BidRidge › Designers › Guide › Chapter 46

Chapter 46 · Room DesignerBeta

Sample Kitchen Remodel: the chef's kitchen, from a room layout to cabinet boxes, slab layouts and a tiled backsplash, all on one job

A kitchen remodel touches four trades. Lay the room out once in the Room Designer, then open it in the Cabinet Designer (every run becomes starting cabinet boxes), send the tops on to the Countertop Designer (slab layouts and seams) and open the backsplash in the Tile Designer (the run with its outlets and the window). Each designer starts from the same room, and every one of them stays linked to the same BidRidge job, so each Send updates that job instead of starting another quote.

Narrated walkthrough, 1:25. Captions on.

The sample in numbers

  • Designers
    4
    Room, Cabinet, Countertop, Tile
  • Cabinets
    18
    3 runs: a pantry wall, the sink wall, the island
  • Tops
    70.4 sf
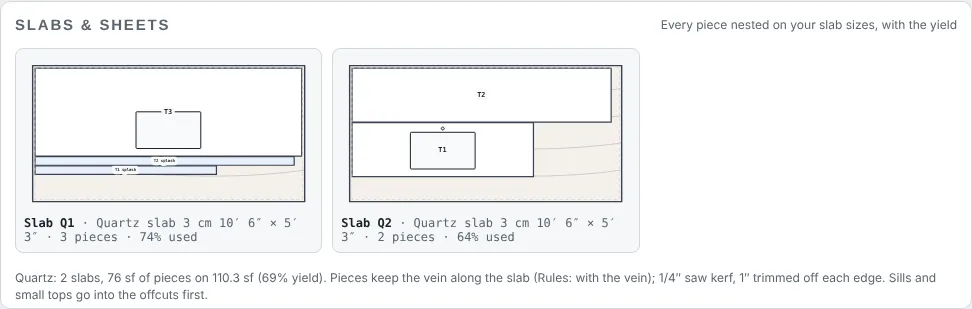
    3 tops on 2 quartz slabs, 69% yield
  • Backsplash
    26.1 sf
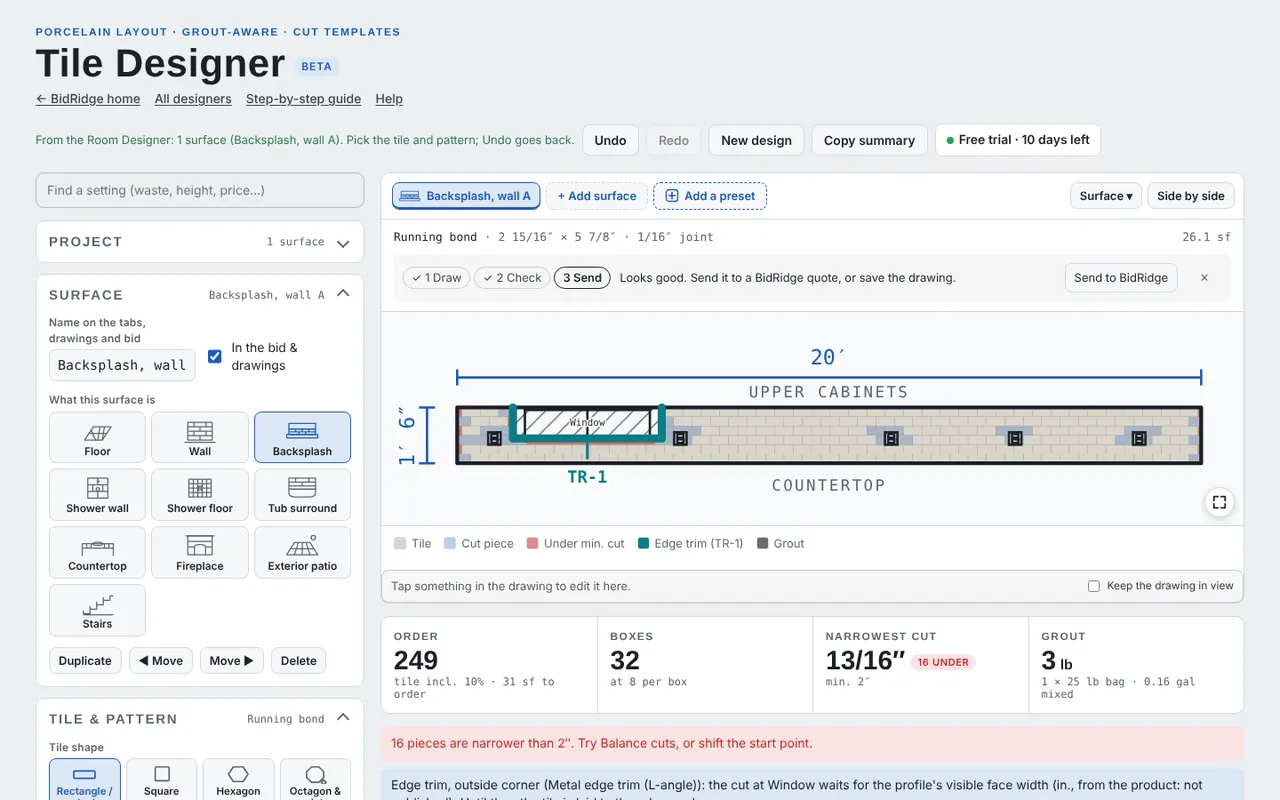
    249 tiles, 32 boxes

Step by step

Step 1: Lay out the room in the Room Designer

Step 1: Lay out the room

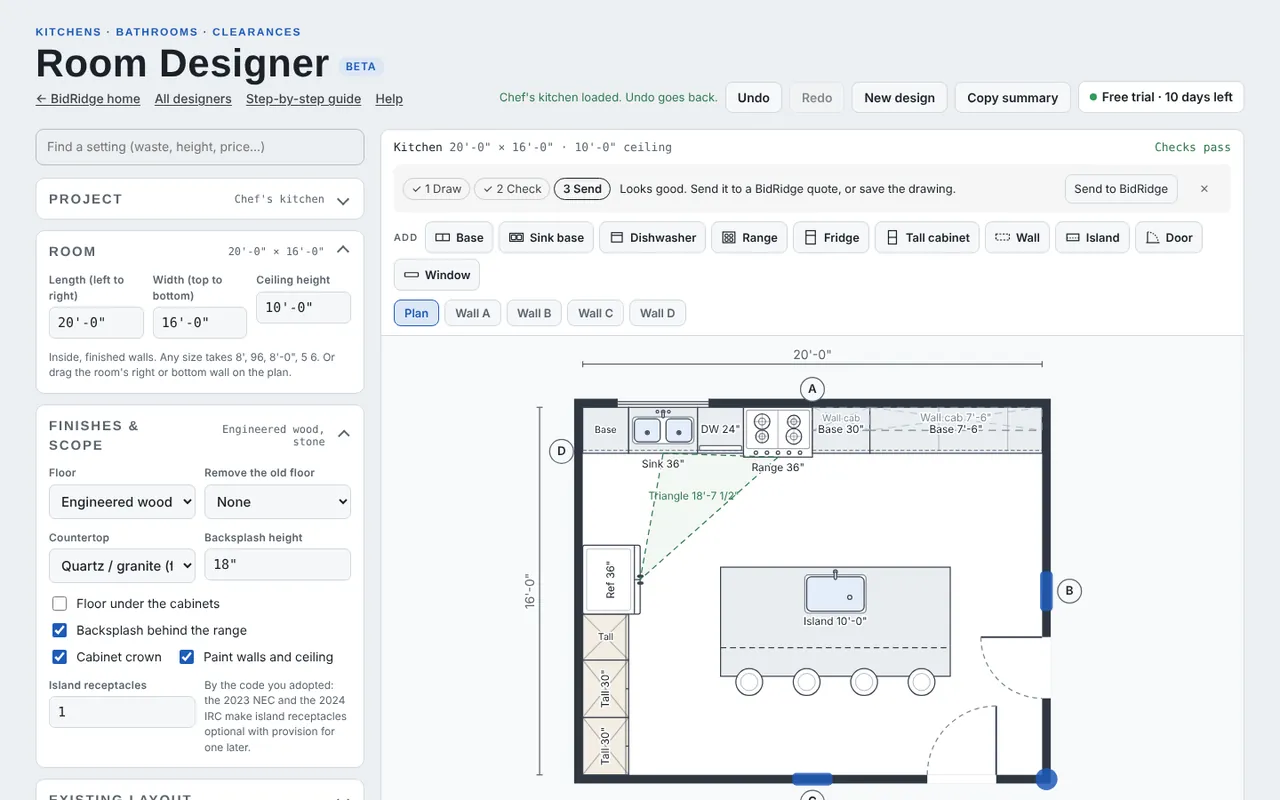
In the Room Designer, tap New design, then Chef's kitchen: a 20 x 16 ft room with a pantry wall and the refrigerator on wall D, the sink under the window, the dishwasher and a 36 in. range under a hood on wall A, and a 10 ft island with a prep sink and four stools. The aisles, the work triangle and the dishwasher's place are checked as you drag (nothing flagged here), and the room fills a Finish carpentry, a Tile, a Flooring and an Interior paint scope. Start this way from a BidRidge job and the room is linked to it from the first step.

Field tip: Chapter 43 covers the Room Designer's kitchen tools: moving cabinets along the walls, the aisles, the triangle, the selections and the rough-in.

Step 2: Detail it: the next designers start from this room in the Room Designer

Step 2: Detail it: the next designers start from this room

The Detail it tab opens the room in the next designer: Open in the Cabinet Designer for the runs, Open in the Tile Designer for the backsplash. Nothing is copied by hand: the receiving designer reads the room's walls, sizes, openings and appliances and makes its own starting design, and Undo there goes back to an empty design if you want to start over. The BidRidge job link goes along.

Step 3: The quote from the room in the Room Designer

Step 3: The quote from the room

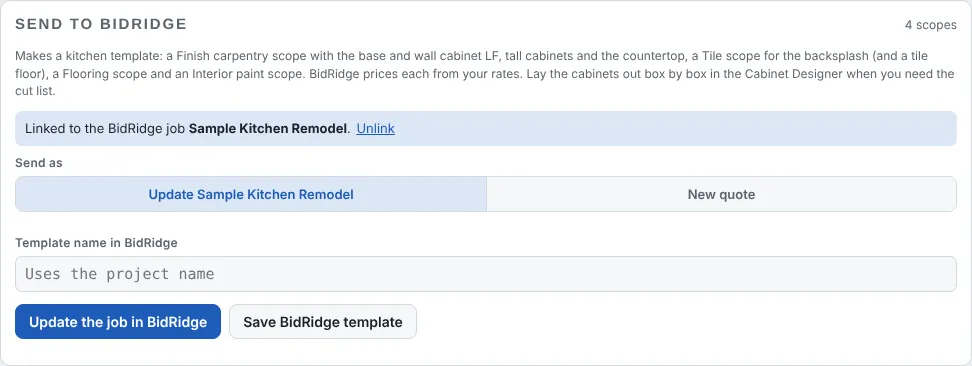
Before any detail, the room alone prices the job: Send to BidRidge makes a kitchen template with the base and wall cabinet LF, the tall cabinets and the countertop on the Finish carpentry scope, the backsplash on the Tile scope, the floor and the paint. It is the quick number for a first visit; the detail designers turn the same job into exact boxes, slabs and tiles when you need the cut lists.

Step 4: Cabinet Designer: every run as starting boxes in the Room Designer

Step 4: Cabinet Designer: every run as starting boxes

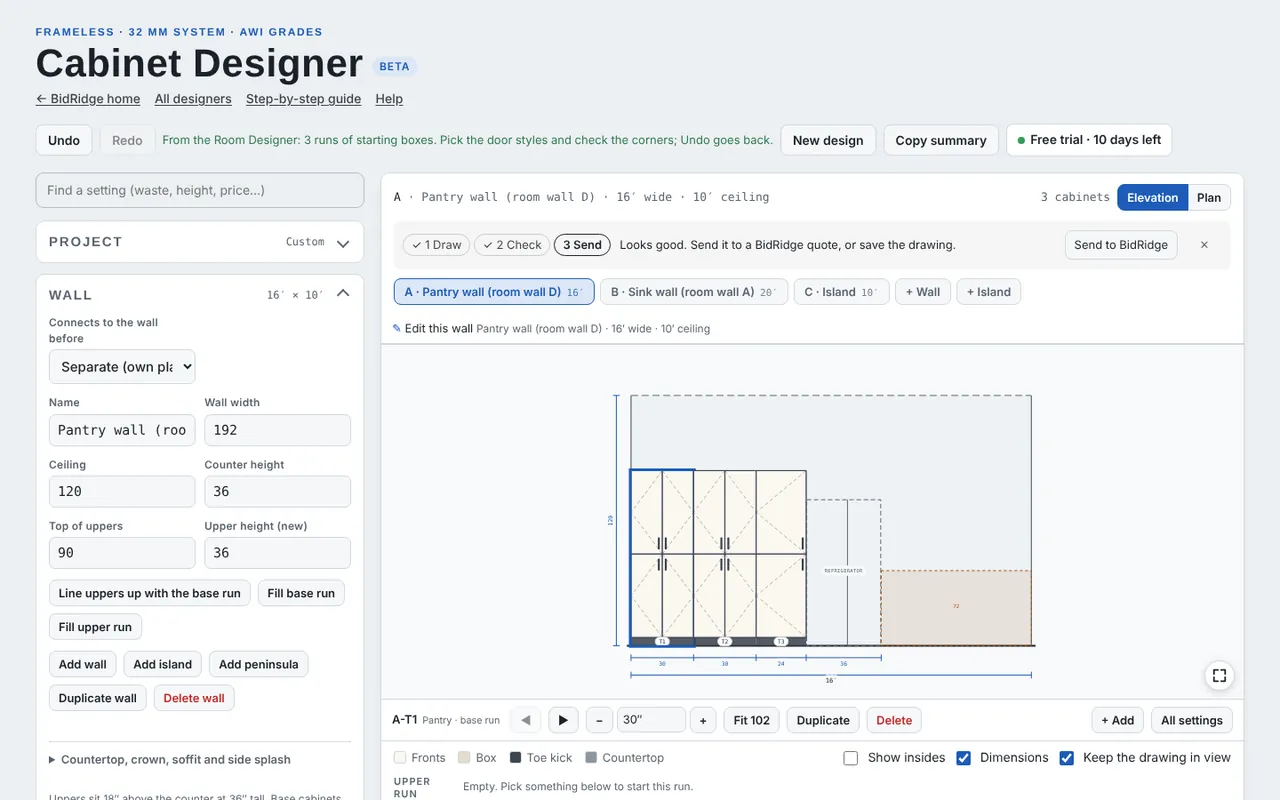
Open in the Cabinet Designer and the room arrives as three runs, each named for what is on it with its room wall letter: the Pantry wall (three pantry cabinets and the refrigerator opening), the Sink wall and the Island. Base runs split into standard widths, the sink base sits under the window, the dishwasher and range openings keep their widths, wall cabinets go where the room had them and the hood space stays open. Pick the door style and the box material and it is a real cabinet design, with nothing flagged.

Step 5: The sink wall in elevation in the Room Designer

Step 5: The sink wall in elevation

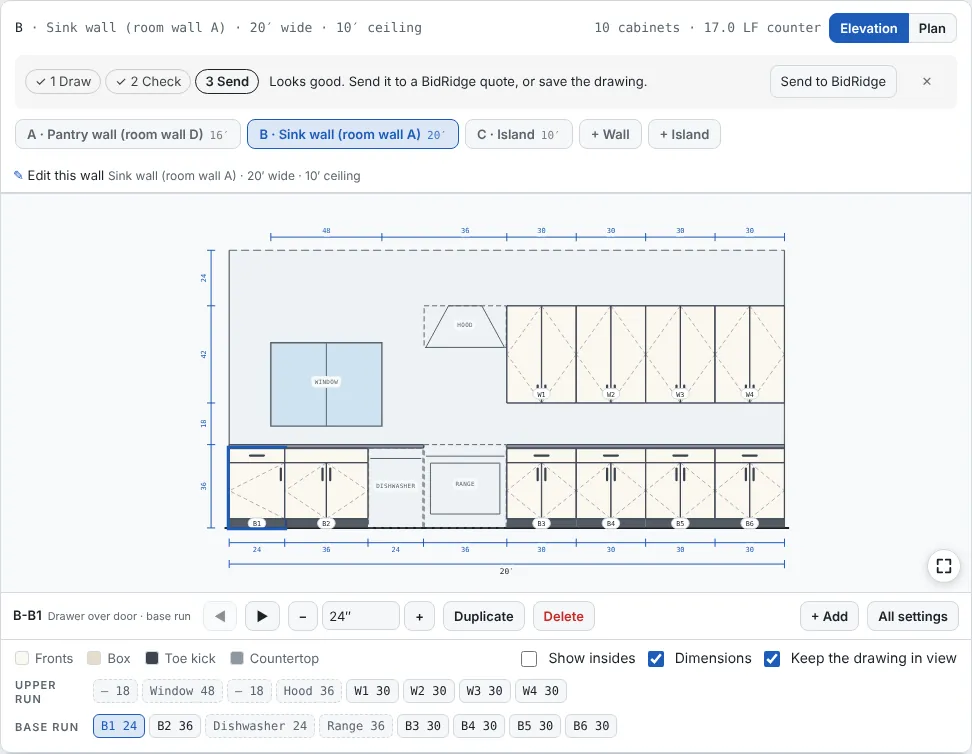
Each run has its elevation: the sink wall shows a drawer base, the 36 in. sink base under the window, the dishwasher and range openings, four 30 in. drawer bases, the hood space and four 30 in. wall cabinets, every box with its size and tag. Tap a box to change it in the bar under the drawing (width, type, doors and drawers); the run re-flows. 10 cabinets and 17 LF of counter on this wall.

Step 6: Countertops from the cabinets in the Room Designer

Step 6: Countertops from the cabinets

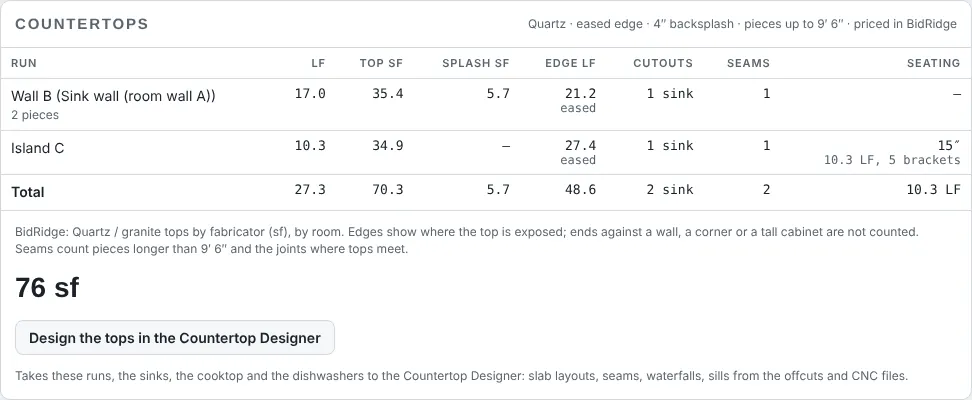
The Countertops tab already measures the tops from the cabinets: the sink wall in two pieces around the range, the island with its 15 in. seating overhang and five brackets, the sink cutouts, the seams and the exposed edges, 76 sf with waste. That number can go to BidRidge as it is. Design the tops in the Countertop Designer takes the same runs, sinks, cooktop and dishwasher to the Countertop Designer for slab layouts.

Step 7: Countertop Designer: the tops with their sinks in the Room Designer

Step 7: Countertop Designer: the tops with their sinks

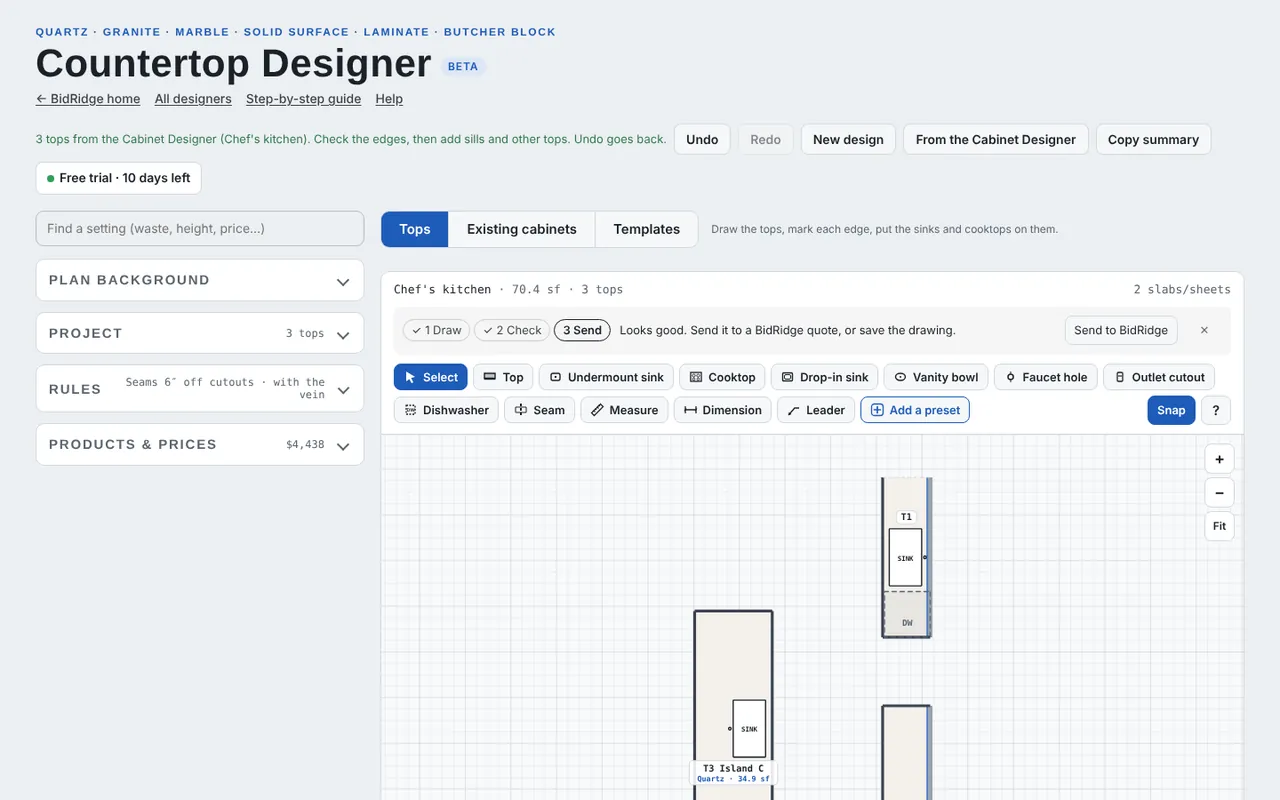
The Countertop Designer opens with three tops from the cabinets: T1 and T2 on the sink wall (the range between them), T3 the island, each sink and the dishwasher placed where the cabinets put them, quartz with an eased edge and a 4 in. backsplash. Mark the edges (finished, against a wall, waterfall), add sills from the offcuts, change the material; the checks look at seams near cutouts and the overhang support.

Step 8: Slabs and yield in the Room Designer

Step 8: Slabs and yield

Slabs & sheets nests every piece on your slab size: two quartz slabs of 10 ft 6 in. x 5 ft 3 in., 76 sf of pieces on 110.3 sf, a 69% yield, the pieces kept with the vein, a 1/4 in. saw kerf and 1 in. trimmed off each edge. That is the slab count to buy, and the layout to send to the fabricator with the shop sheets and the CNC files.

Step 9: Tile Designer: the backsplash in the Room Designer

Step 9: Tile Designer: the backsplash

Back in the Room Designer, Open in the Tile Designer makes the backsplash: the 20 ft run of wall A at its height between the counter and the wall cabinets, the window cut out with an edge trim, a box at each receptacle the room placed, in a 3 x 6 subway running bond: 26.1 sf, 249 tiles with waste, 32 boxes, 3 lb of grout. The check shows the thin pieces the run leaves (here next to the outlet boxes and at the ends): Balance cuts, a different start point, a 1/3 offset or the electrician setting the boxes on a grout line take care of them.

Field tip: A bathroom goes the same way: Open in the Tile Designer makes the shower walls, the shower floor and the bathroom floor (chapter 42).

Step 10: One job, four updates

Each designer's Send to BidRidge goes to the same job, because the link came along from the room: the Cabinet Designer updates the cabinet scope with the boxes, the Countertop Designer the tops with the slab count, the Tile Designer the backsplash. Each update comes in for you to review in BidRidge, and the job's Job Pack collects every designer's drawings and lists, so the crew, the fabricator and the tile setter each get theirs.

More in the guide

Try it on your own job

Open the sample, change it to your measurements, and send it to a BidRidge quote. Drawing is free; the drawing set, the lists and the quote come with a BidRidge license or the 14-day trial.

Sample designs: names, sizes and clients are made up. Prices are BidRidge's starting rates; set your own. The designers check against common guidelines (IRC, NKBA and the makers' published numbers) to help you catch mistakes. They don't replace your building department or the manufacturer's installation instructions: verify with them.