BidRidge › Designers › Guide › Chapter 3

Chapter 3 · Cabinet DesignerBeta

Birch Hill kitchen

We design an L kitchen with a lazy susan corner, a seated island and quartz tops in white oak shaker, and print a client set and a shop set with the cut list and sheet layouts. Then we switch the same kitchen to Buy stock cabinets: the boxes snap to stock sizes, the fillers are worked out, and the elevations and the cabinet order show every code.

In the designer, tap Open project and pick the sample file. It opens exactly as in the video.

Narrated walkthrough, 2:27. Captions on.

The sample in numbers

  • Cabinets
    21 (10 base, 11 wall)
  • Cabinet runs
    22 LF base, 21 LF wall
  • Quartz tops
    68.8 sf with 4" splash
  • Island seating
    7.3 LF, 15" overhang
  • Drawing sets
    Client 5 sheets, shop 16
  • Stock order
    25 codes: 21 boxes, 5 fillers, 3 panels

Step by step

Step 1: Start from the L kitchen with an island in the Cabinet Designer
  1. Project and client: on every sheet
  2. Sink wall, range wall, island
  3. The run on screen

Step 1: Start from the L kitchen with an island

Pick L kitchen with island on the start card. It loads a sink wall, a range wall that turns the corner, and an island. Type the project and client names; they go on every sheet and on the BidRidge quote.

Field tip: Start from the sample closest to the job and change it. It is faster than drawing every run from a blank wall.
Step 2: Check the plan and the aisles in the Cabinet Designer
  1. Plan view
  2. Aisles to the island
  3. Seating overhang

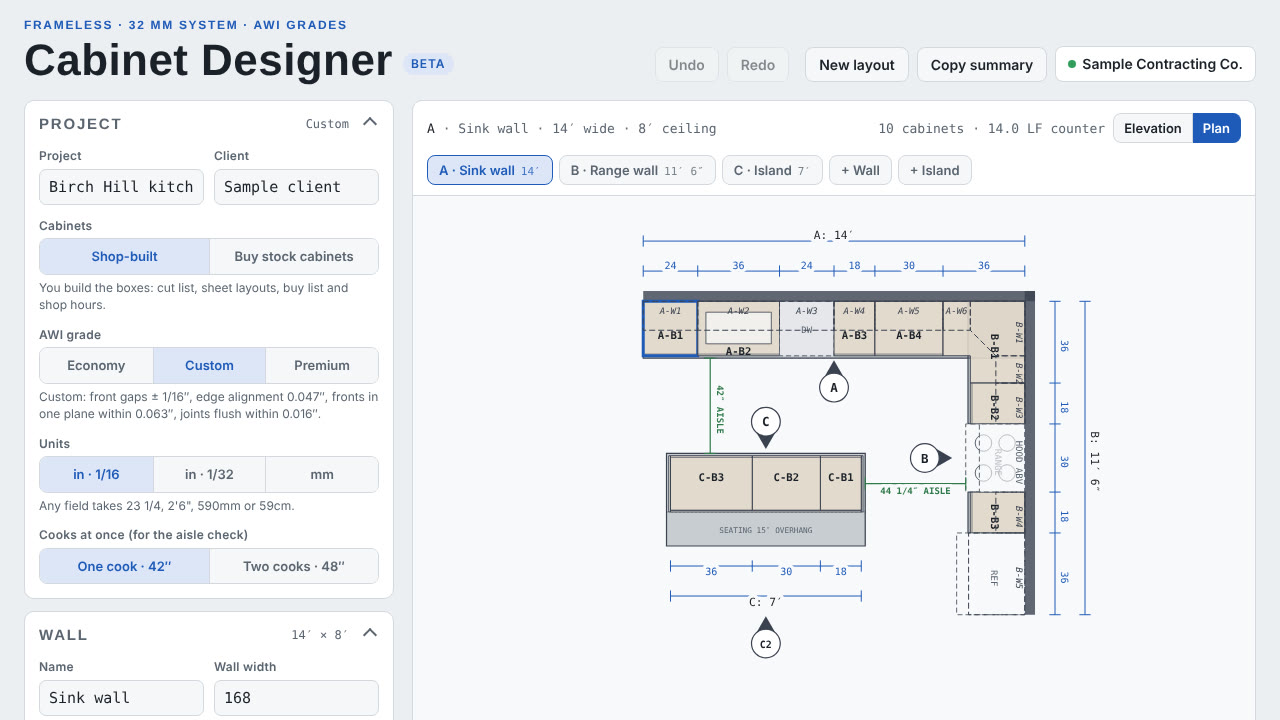
Step 2: Check the plan and the aisles

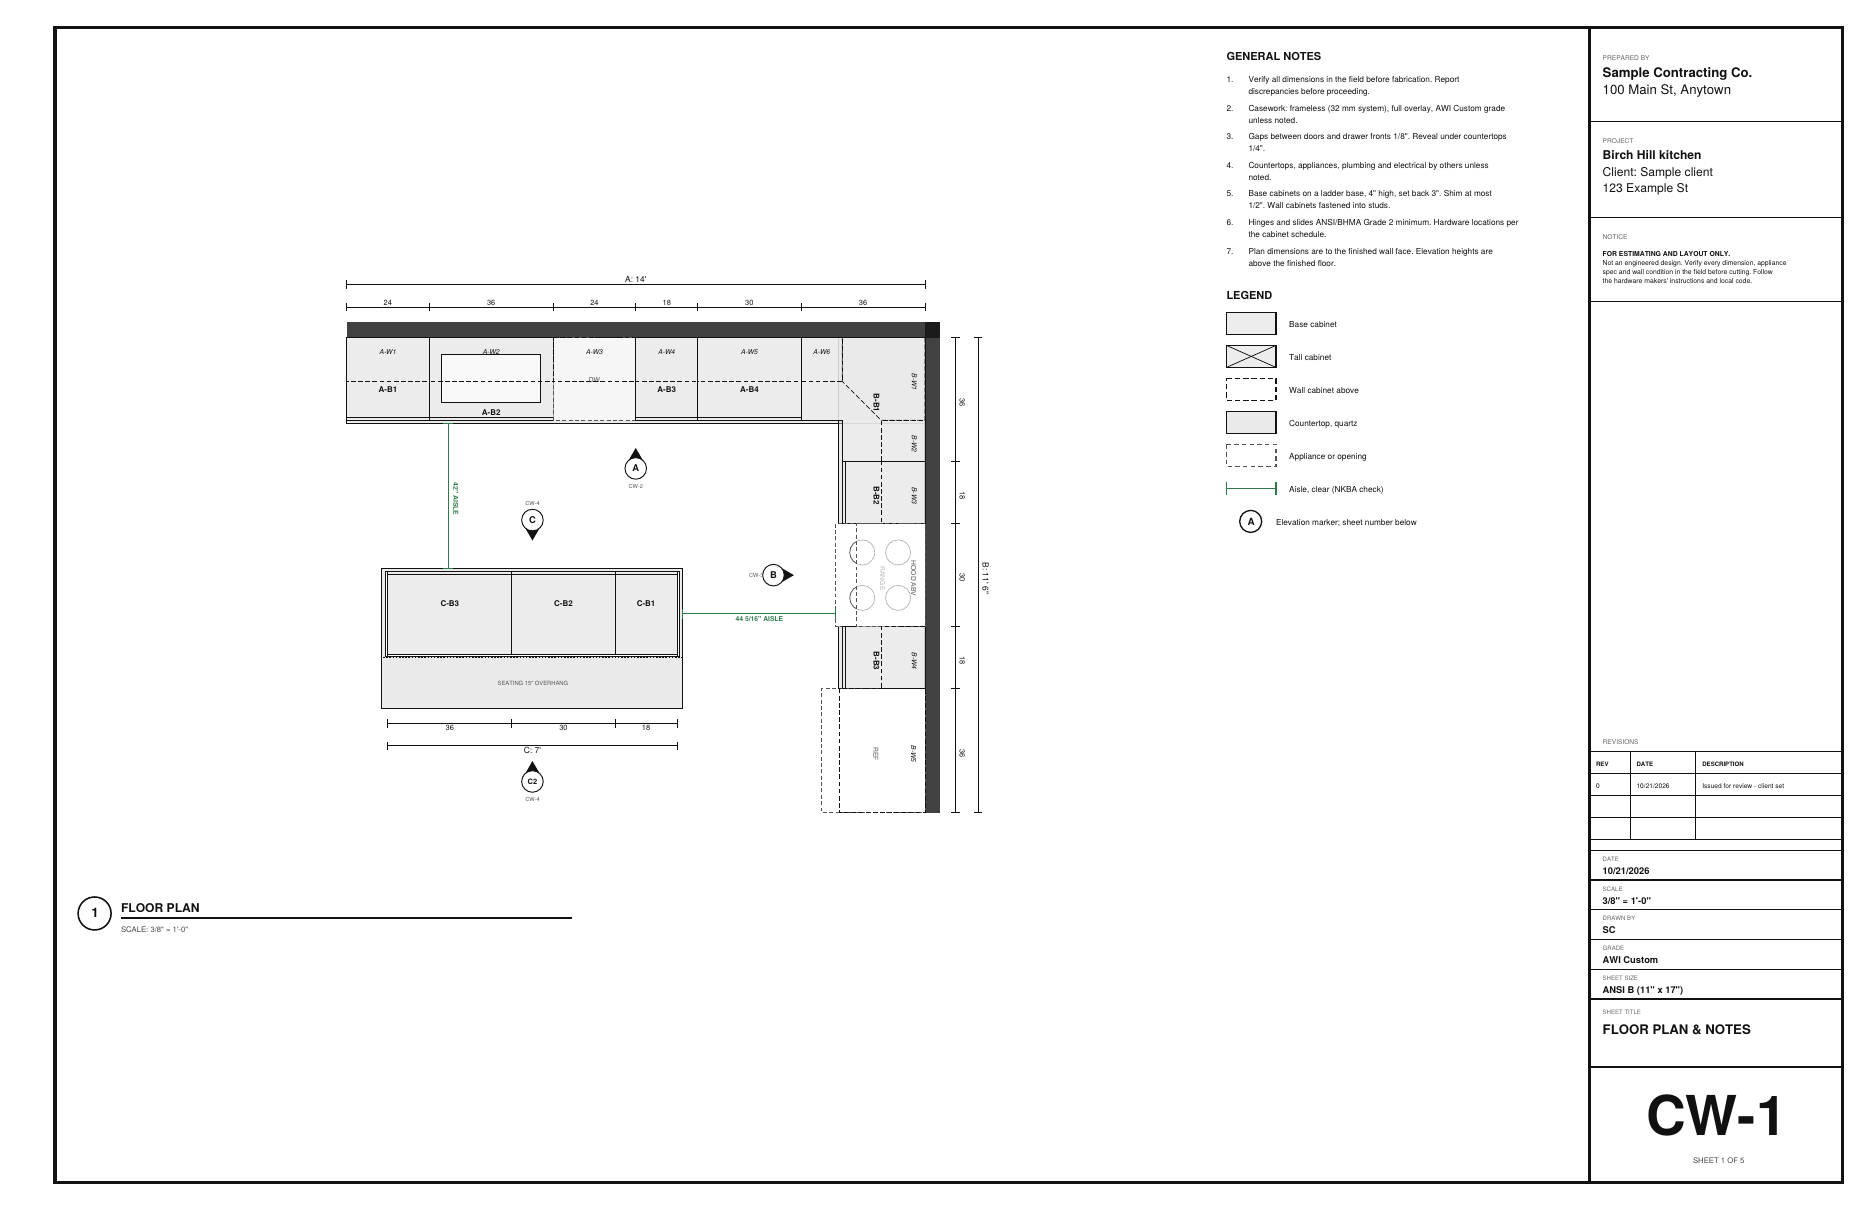
Tap Plan to see the kitchen from above, with the 42 inch aisle to the island and the seating overhang. The Checks card runs the NKBA planning guidelines on the plan: landing areas, aisles, the dishwasher and the corners.

Field tip: Two cooks at once? Switch Cooks at once to Two and the aisle check moves to 48 inches.

Step 3: Work the corner: a lazy susan base in the Cabinet Designer
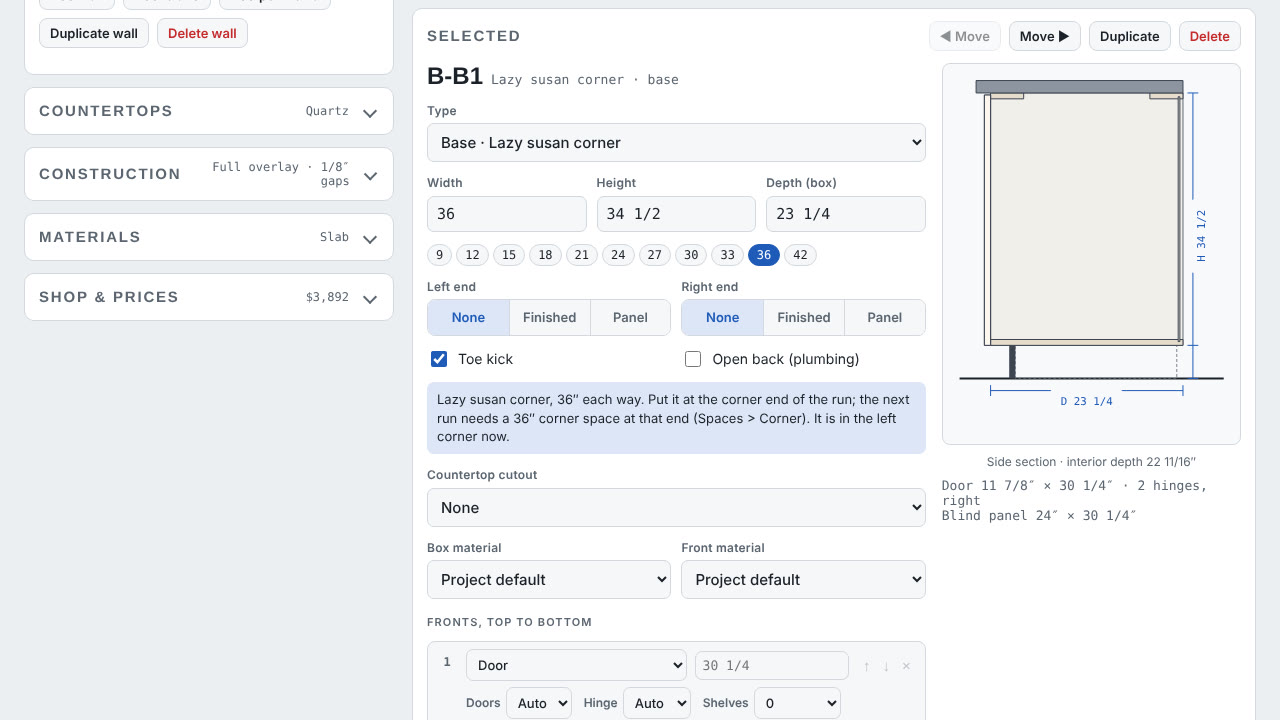
  1. The selected box: 36" lazy susan

Step 3: Work the corner: a lazy susan base

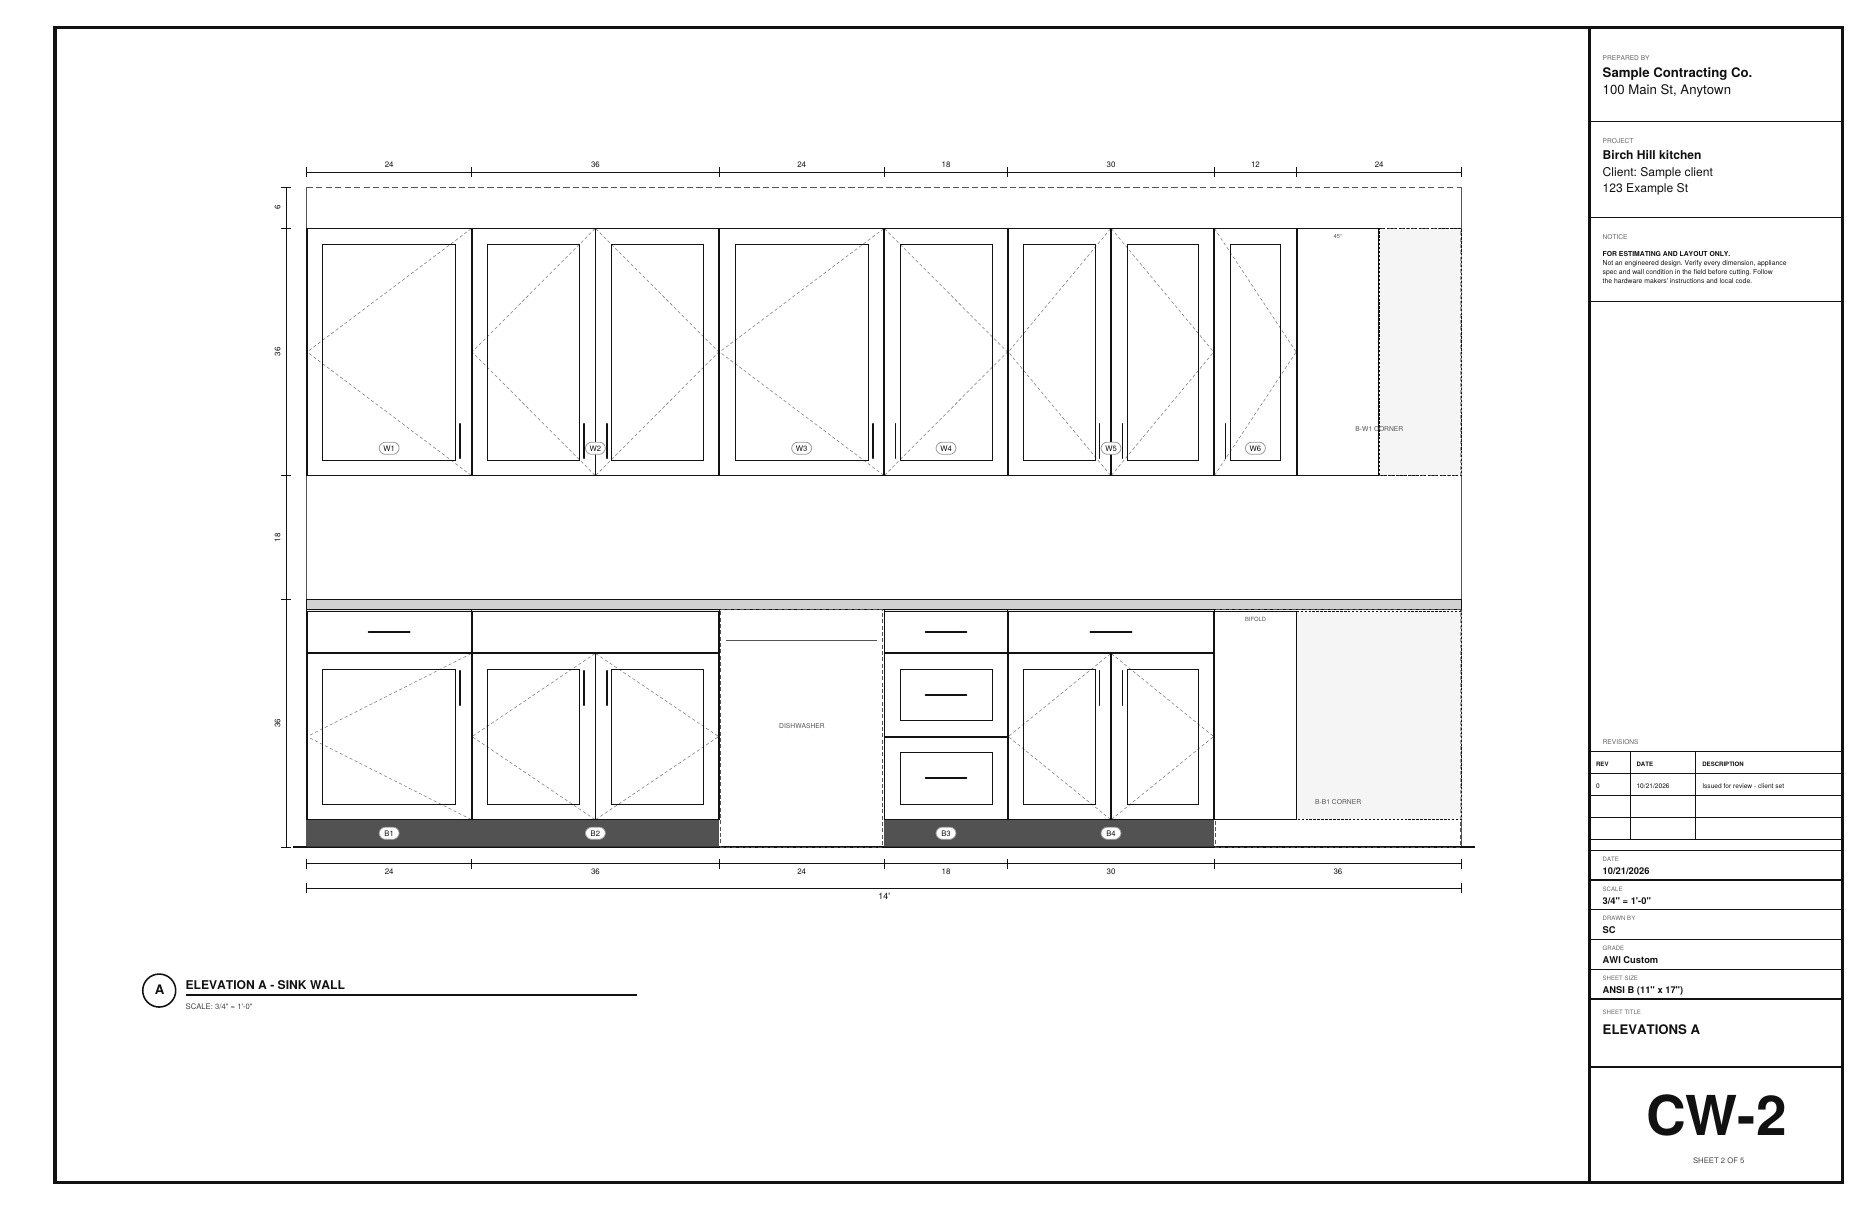
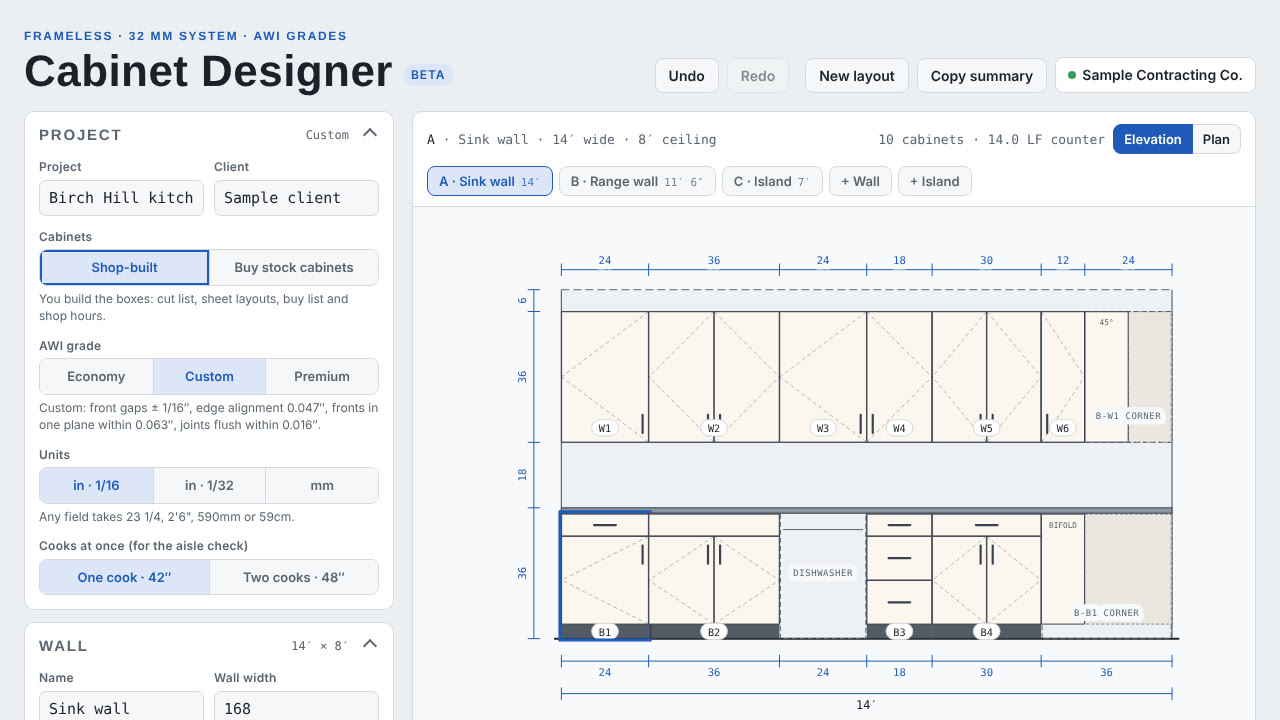
Open the range wall. The corner base is a 36 inch lazy susan with bifold doors, and the wall corner above it is a diagonal cabinet. Tap any box in the run strip under the elevation to see and change it in Selected.

Field tip: Leave the corner space on the sink wall run. The planner draws the face of the corner box there so the two runs line up.

Step 4: Seat the island in the Cabinet Designer
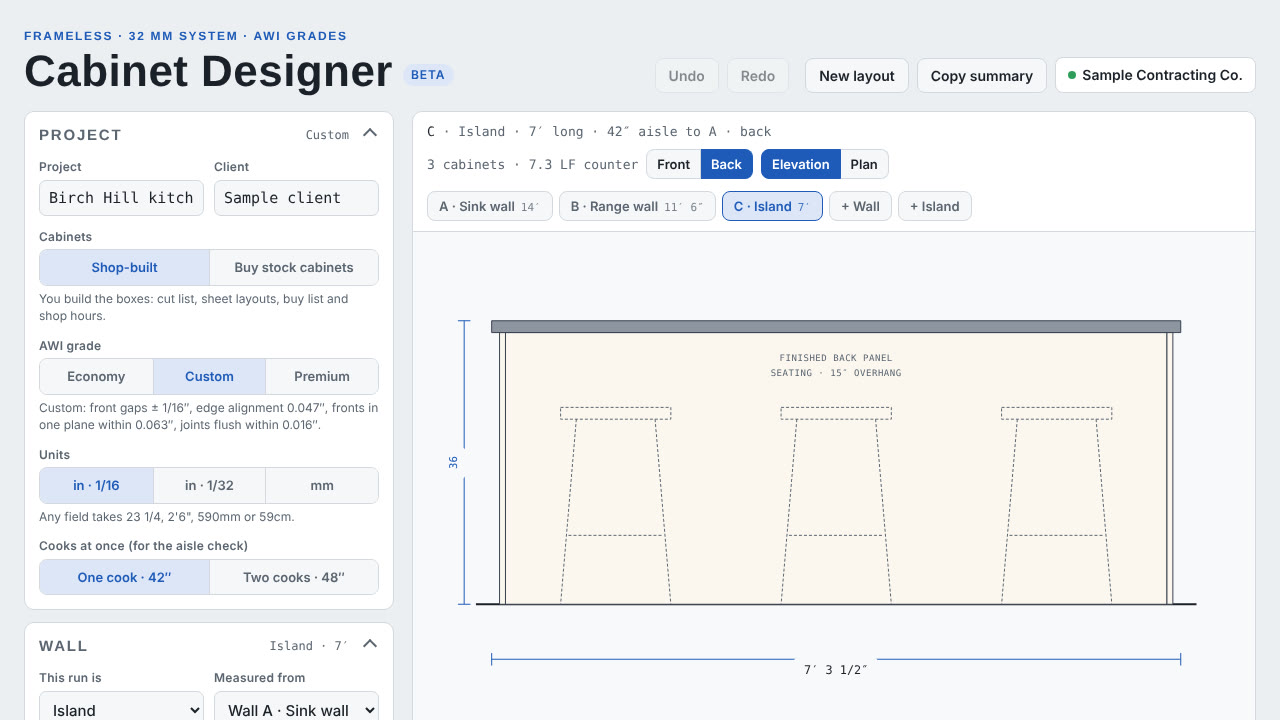
  1. Front or back
  2. The seating side of the island

Step 4: Seat the island

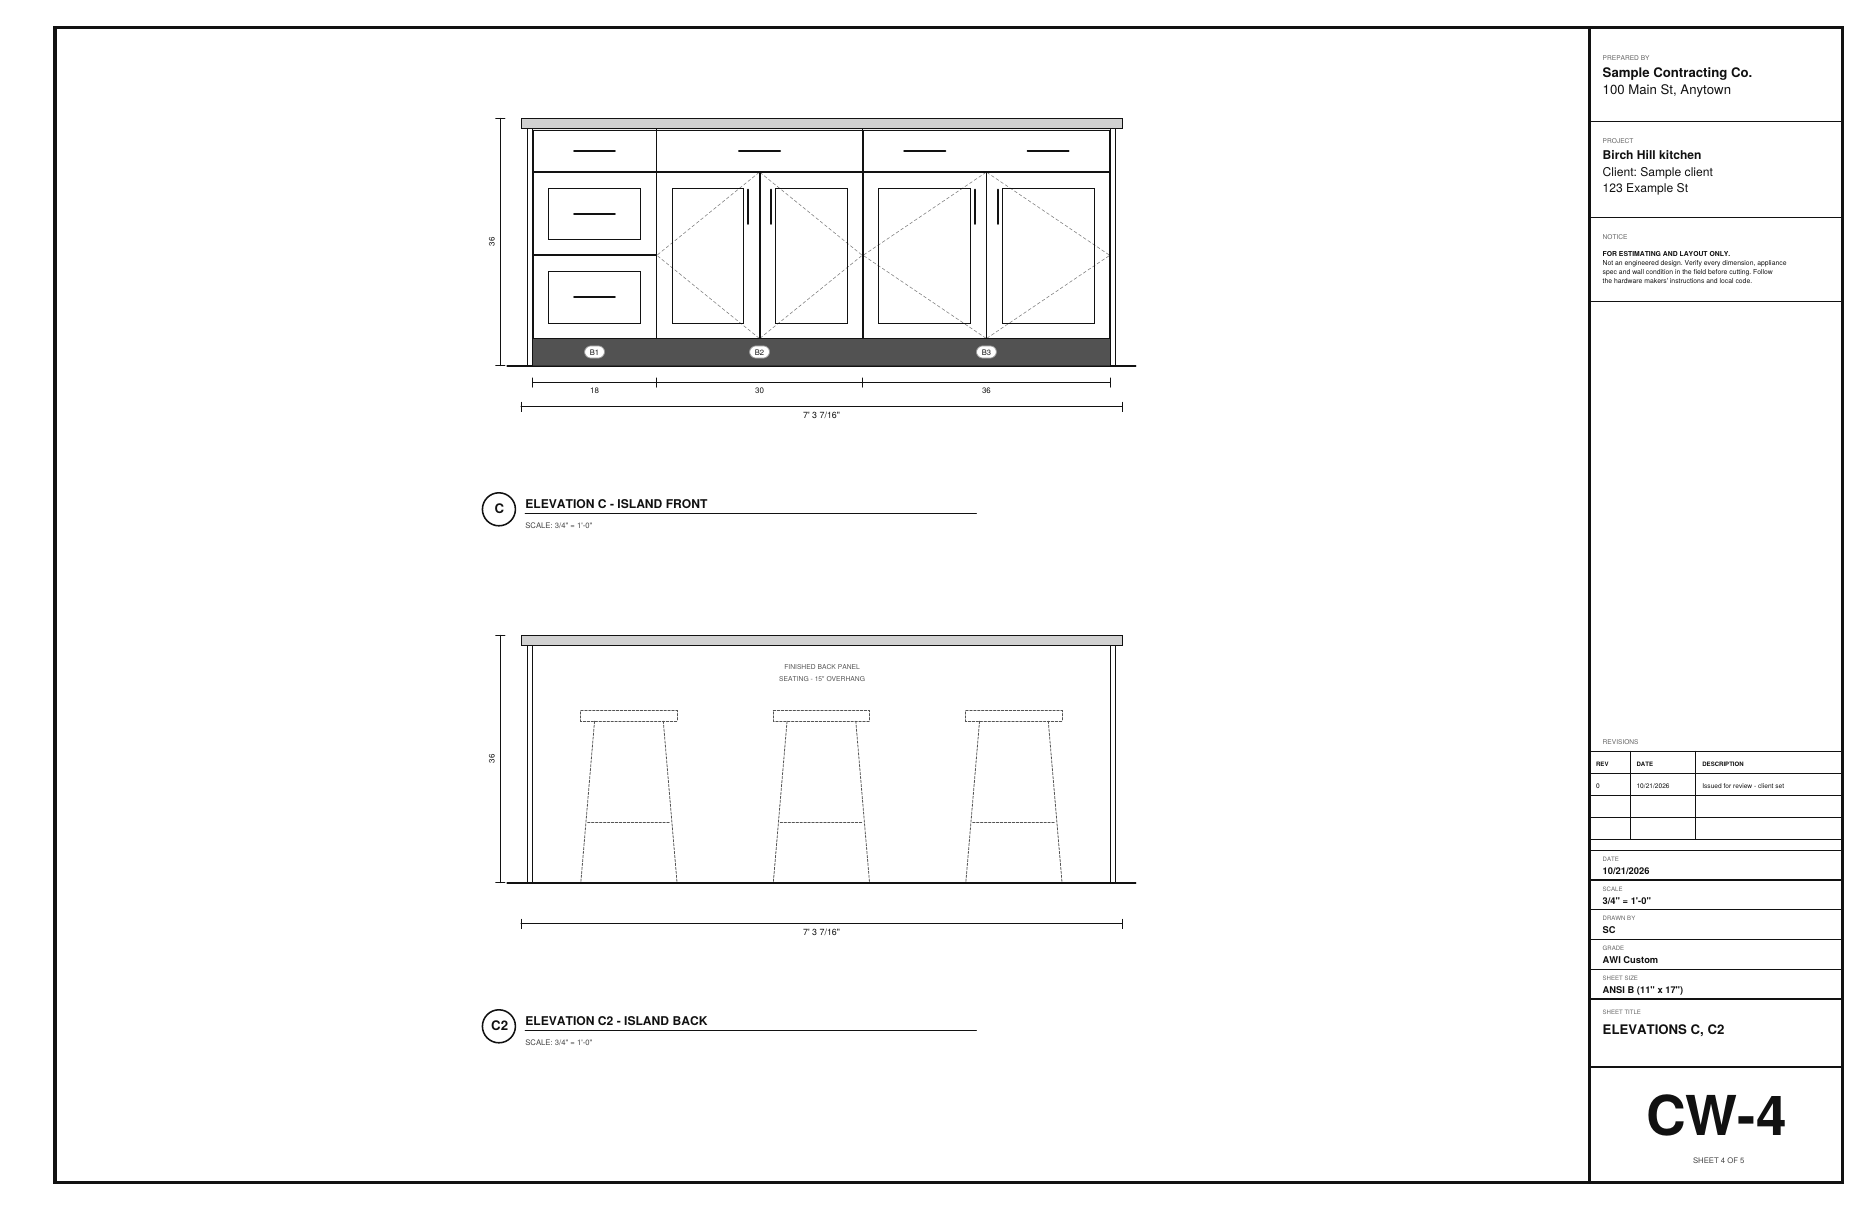
Open the island. The front faces the sink wall with a three-drawer base and two drawer-over-door bases. Tap Back to see the seating side with its 15 inch overhang. The plan shows the overhang, and the Countertops card counts 7.3 LF of seating and four support brackets.

Field tip: Anything over about 10 inches of overhang needs brackets or corbels. Ask your fabricator before you finalize the top.

Step 5: Pick the fronts and the quartz tops in the Cabinet Designer
  1. Quartz tops
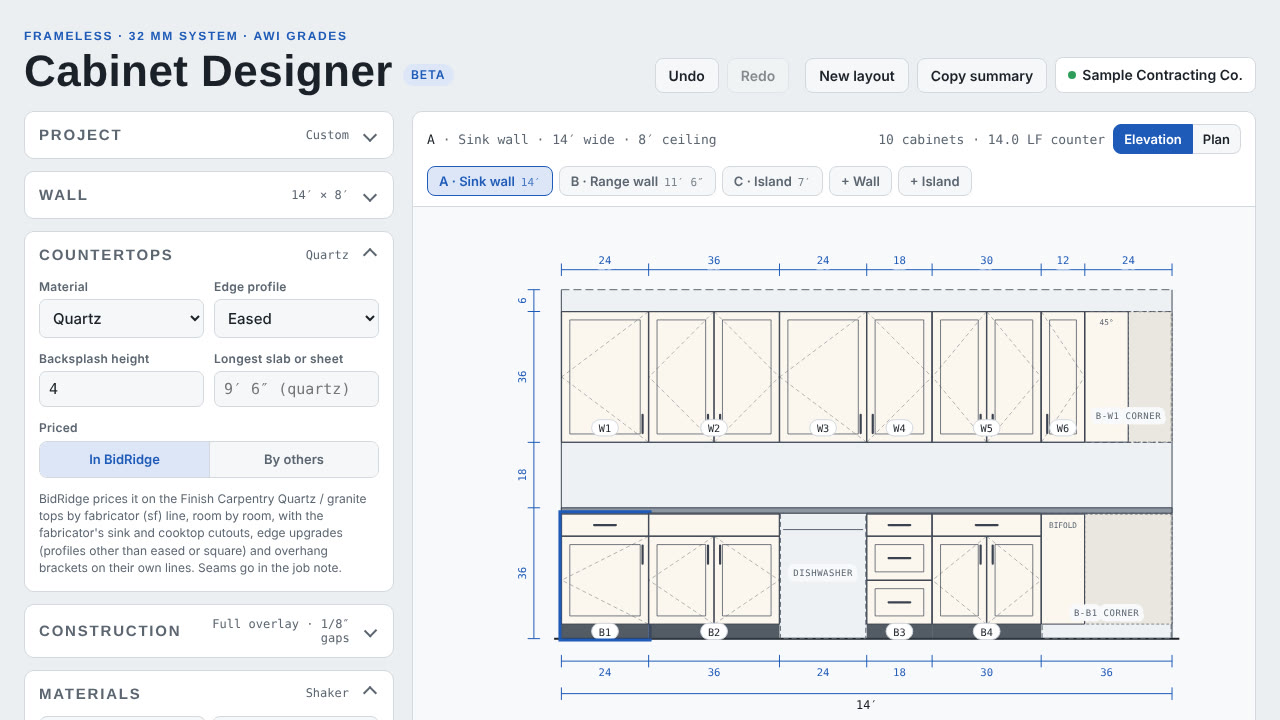
  2. Shaker fronts on the elevation

Step 5: Pick the fronts and the quartz tops

Under Materials, tap Shaker, white oak: rift oak frames with oak veneer panels on prefinished maple boxes. Under Countertops pick Quartz, an eased edge and a 4 inch splash. The Countertops card lists each top with its square feet, edges, cutouts and seams.

Field tip: Seams are counted where a top runs longer than the slab. Put the longest slab size you can get in the field to cut seams.

Step 6: Print the client set and the shop set in the Cabinet Designer
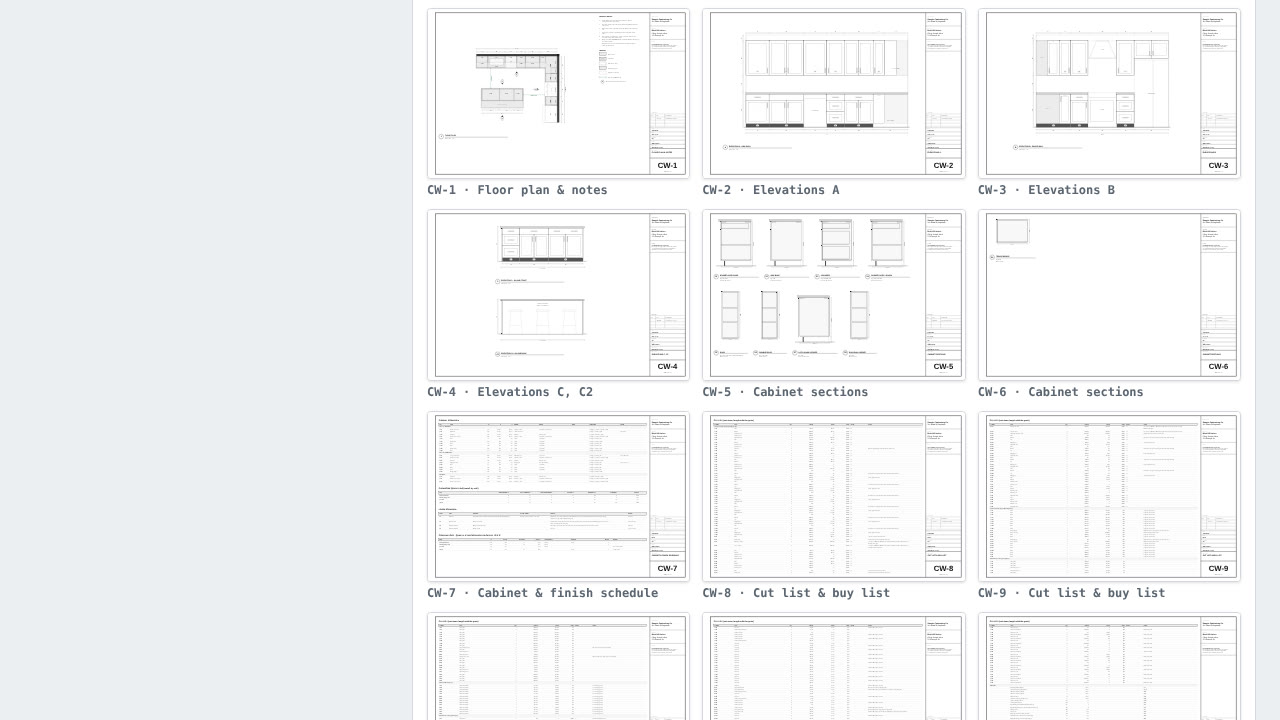
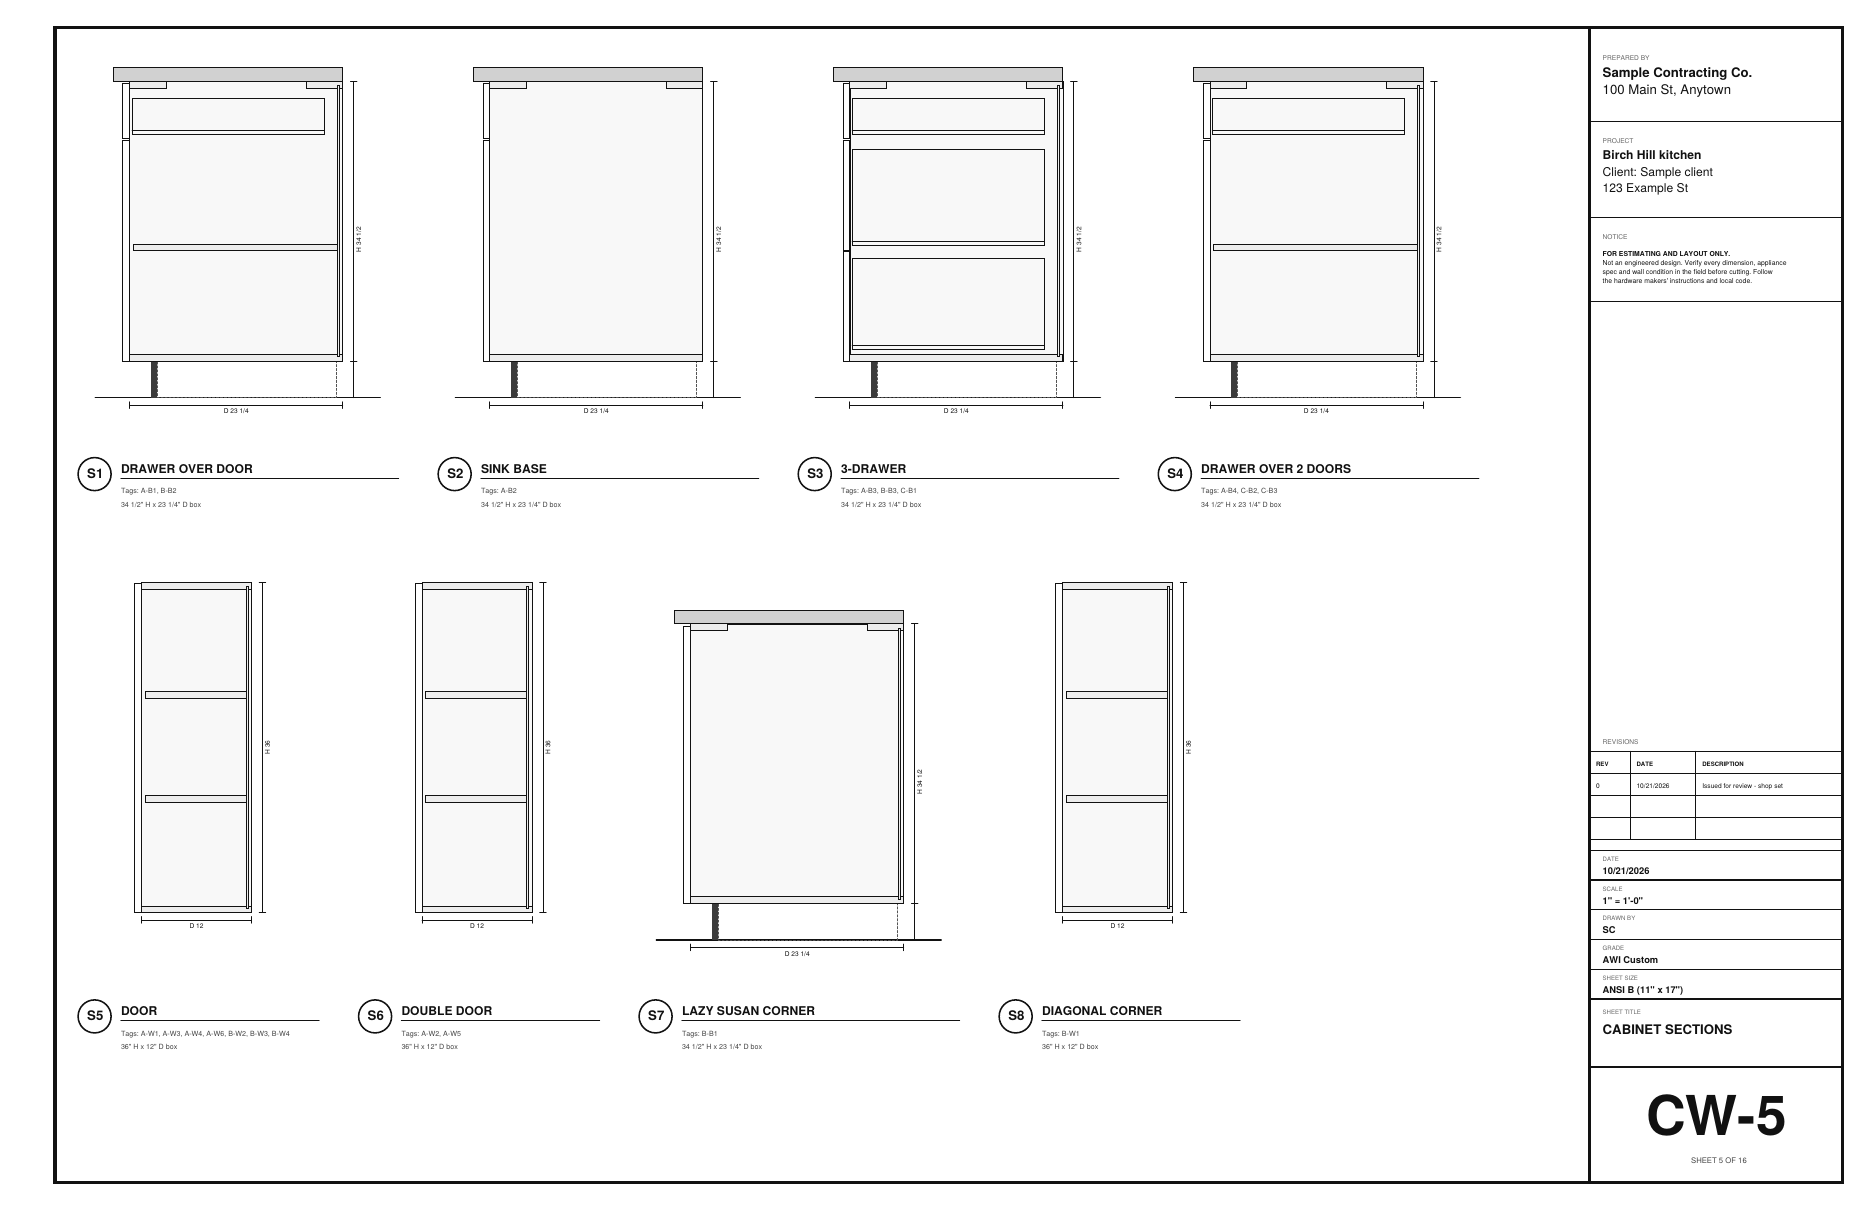
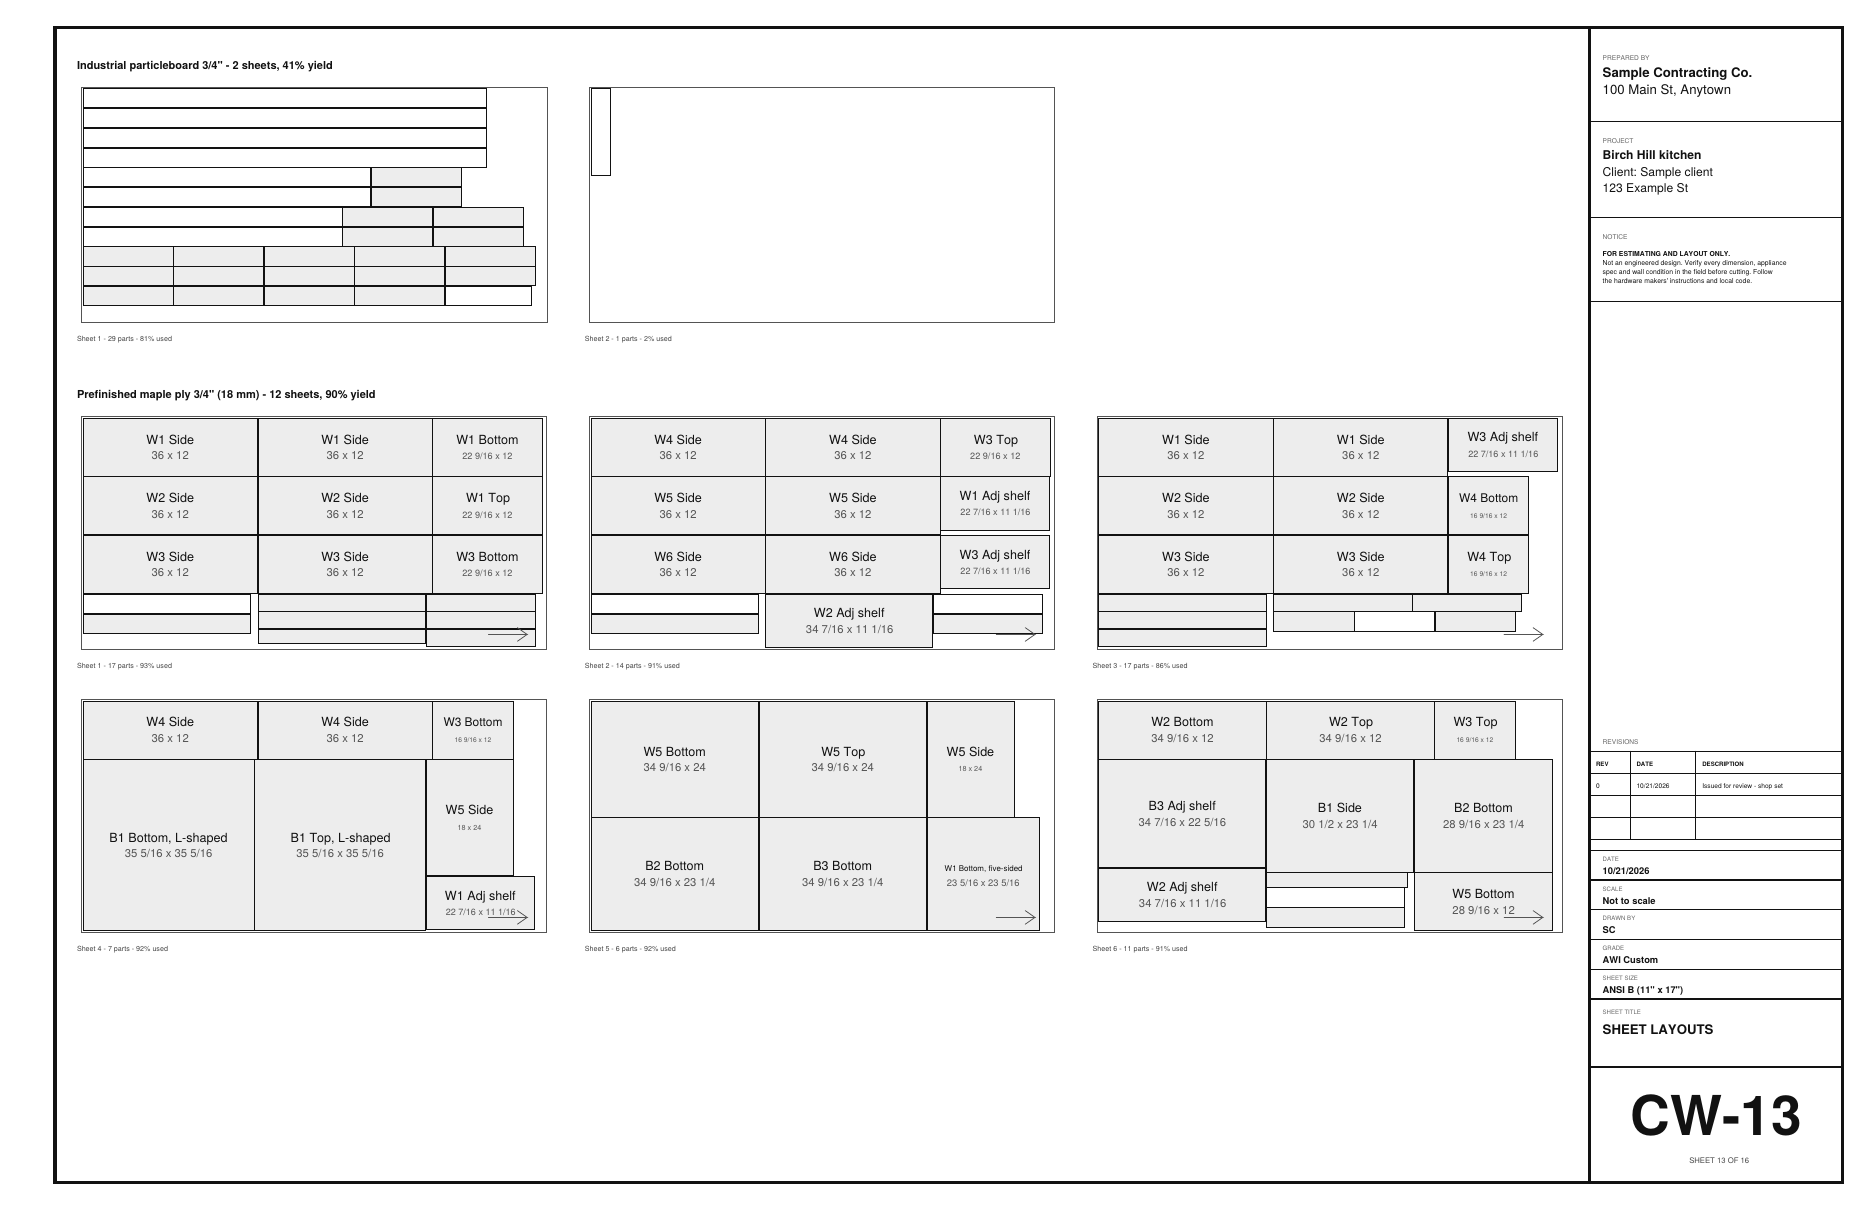
  1. Shop set: sections, cut list, sheet layouts

Step 6: Print the client set and the shop set

Fill in the title block. Sheets for: Client gives the plan, elevations and the cabinet schedule, with no prices. Shop adds the box sections, the cut list and the sheet layouts for the saw. Preview and save each one as a PDF.

Field tip: Send the client set for sign-off before you cut. The shop set stays in the shop.

Step 7: Switch the same kitchen to stock cabinets in the Cabinet Designer
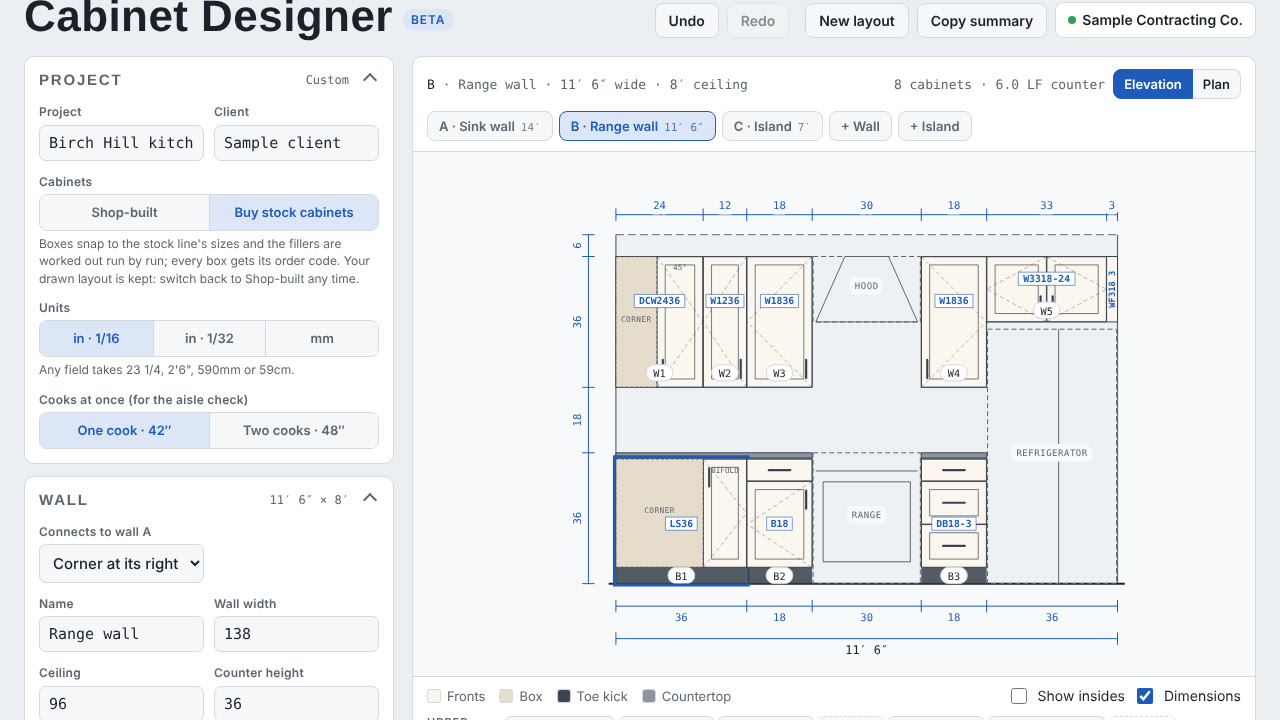
  1. Buy stock cabinets
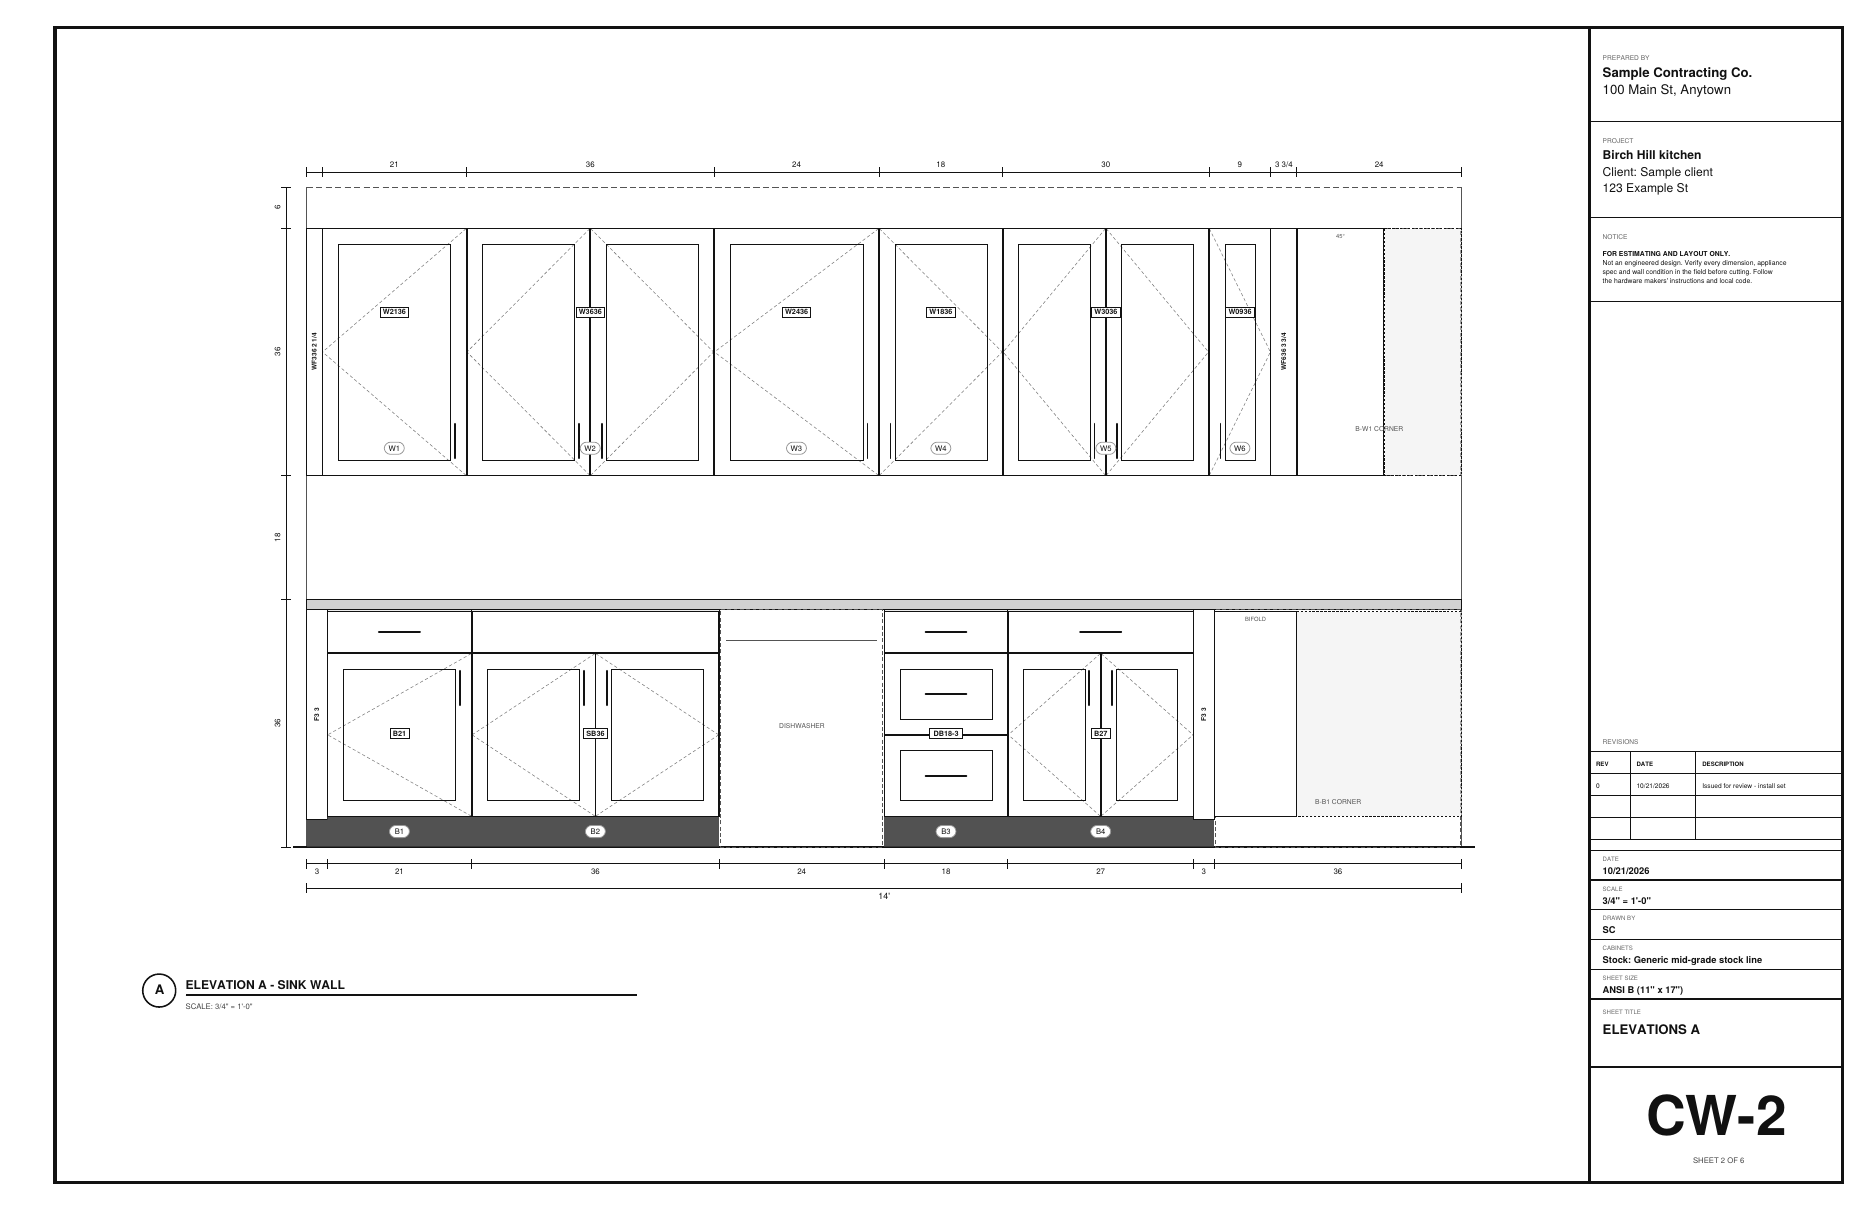
  2. Codes and fillers on the elevation
  3. Run total

Step 7: Switch the same kitchen to stock cabinets

In Project, tap Buy stock cabinets. The layout is kept: each box snaps to the nearest stock width, height and depth, and the fillers are worked out at the walls and corners. The elevations now show each box's code, like LS36 and SB36.

Field tip: Switching back to Shop-built gives the design exactly as it was drawn, so you can price both ways.

Step 8: The cabinet order and the quote in the Cabinet Designer
  1. Order list (.csv)
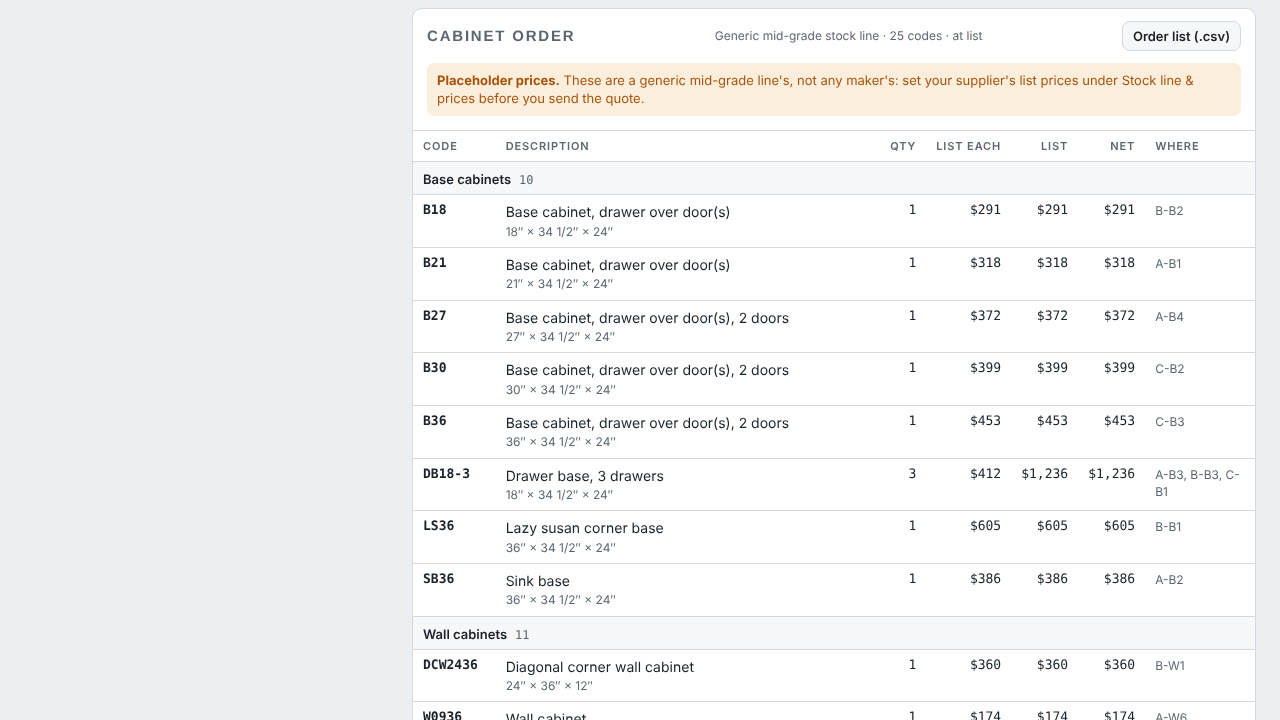
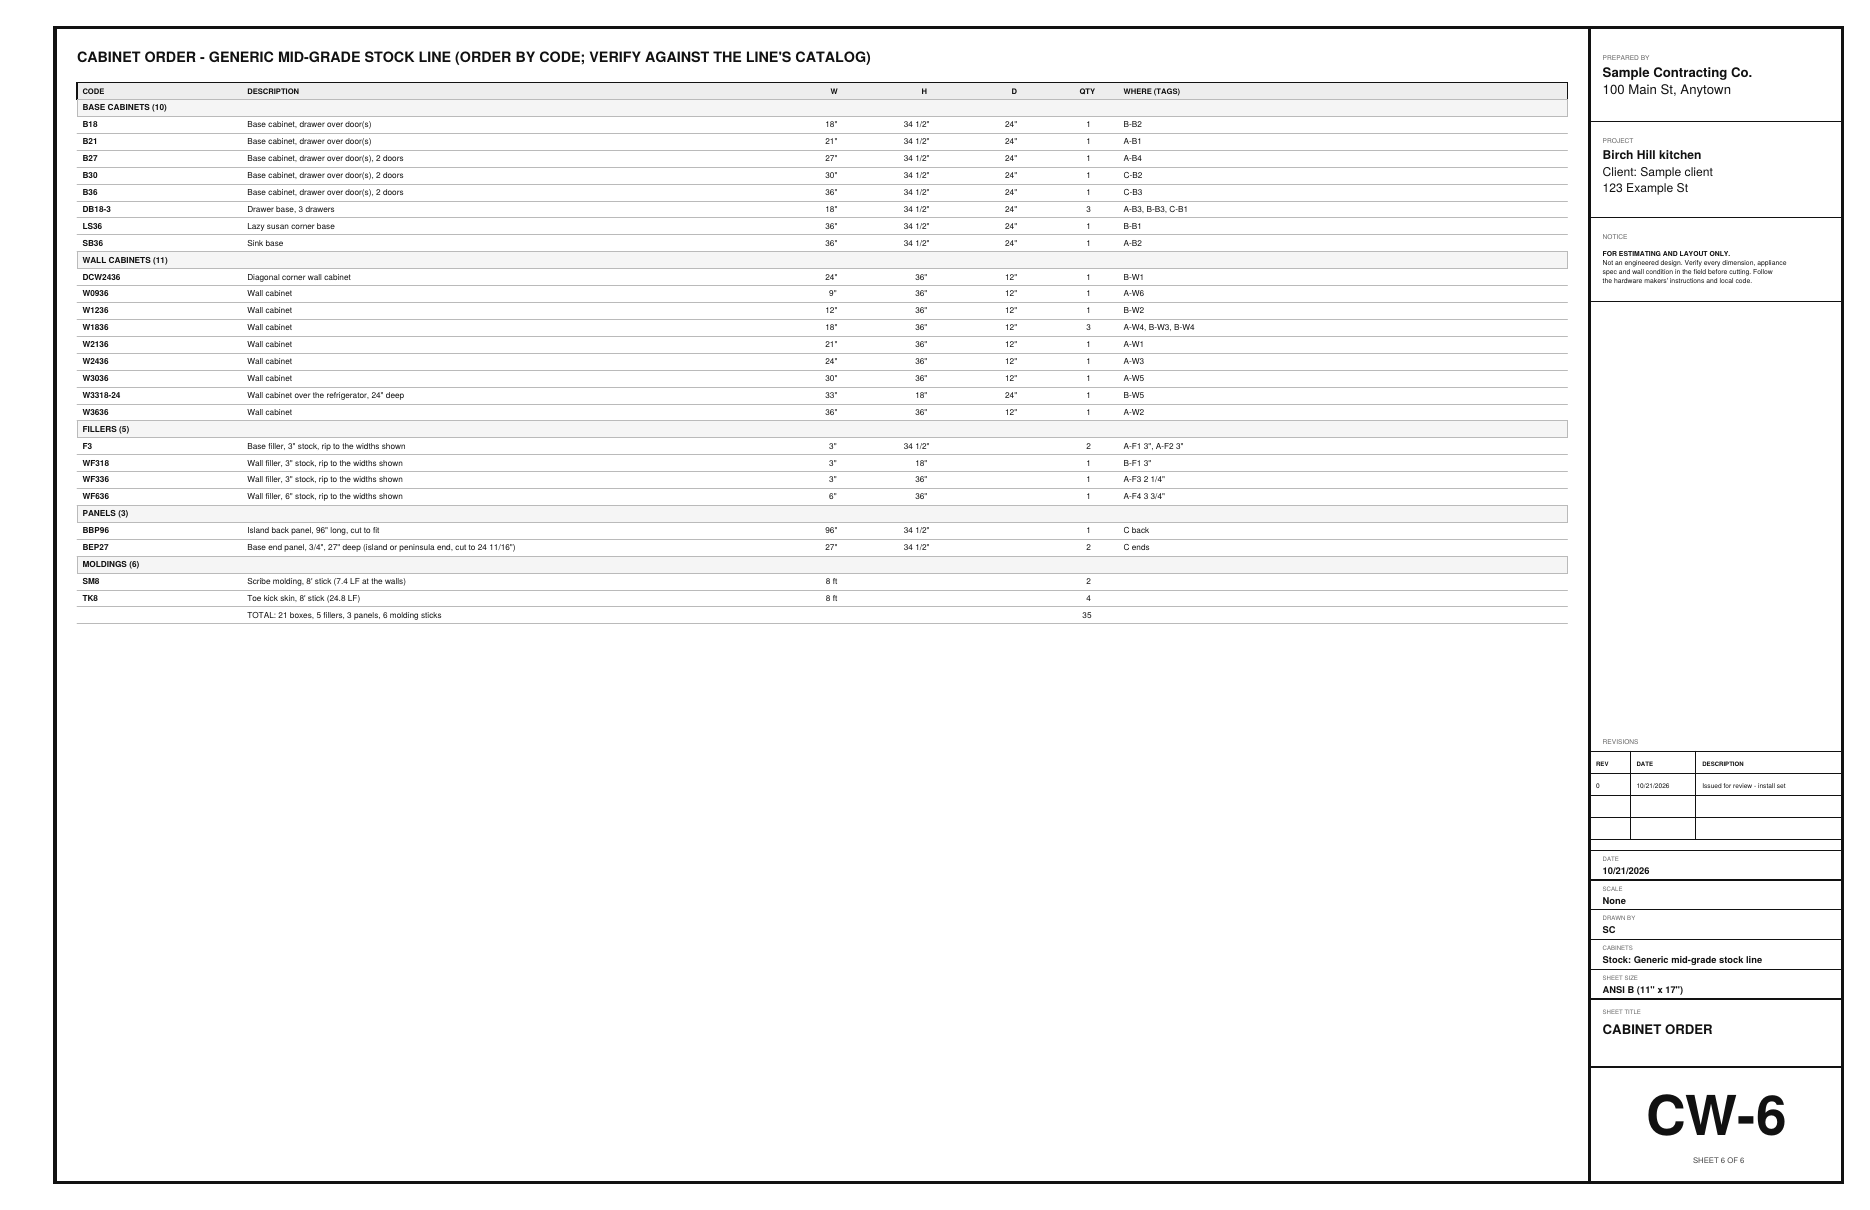
  2. Each code: size, count, where it goes
  3. Placeholder prices: use your supplier's

Step 8: The cabinet order and the quote

The Cabinet order card lists every code with its size, count and where it goes, plus fillers, panels and moldings. Save it as a CSV for your supplier. The install set adds a cabinet order sheet, and Save BidRidge template sends the order and the install work to a quote.

Field tip: The list prices are placeholders for a generic mid-grade line. Put in your supplier's prices and discount before you quote.

Step 9: Walls on the plan: drag, turn and set angles

In the plan view, tap a wall to get its bar: its length, the angle where it meets the wall before it (90, 120, 135 or 150 in one tap, or type any angle), and for an island or a facing run its aisle. Drag the square handle at a free end to make the wall longer or shorter; drag the round knob past the far end to turn a corner run to any angle (it snaps to 15°); drag the four-way handle to move an island or a facing run. Arrow keys nudge the selected wall, and one Undo takes back a whole drag. The cabinets stay on their walls as they move.

Step 10: Plan background: take the runs off the plan

Open the Plan background card under the drawing and import the architect's plan. Set its scale from a dimension you know, then pick Wall run and tap the corners along the wall faces the cabinets go against; each tap snaps to the drawing. Finish run makes one run per leg, at its measured length, joined at the corners (square or at the angle drawn). Trace room makes runs all the way round a room. The viewer then shows your runs and cabinets over the plan, so a run that grew or shrank shows at once. New in 1.63: on a vector PDF with the scale set, Suggest walls finds the walls from the drawing's double lines and shows them for review; tap any you don't want, then Use adds the rest. Scanned sheets are still traced by hand.

What you get

The drawing set, the lists and the files

Real files from this sample, made by the designer. Tap a page to see it full size. Yours carry your company, the client and the address.

Client set: floor plan with the island, aisles and seating
Client set: sink wall elevation
Client set: island front and back
Shop set: cabinet box sections
Shop set: sheet layouts for the saw
Buy stock cabinets: elevation with the stock codes and fillers
Buy stock cabinets: the cabinet order sheet
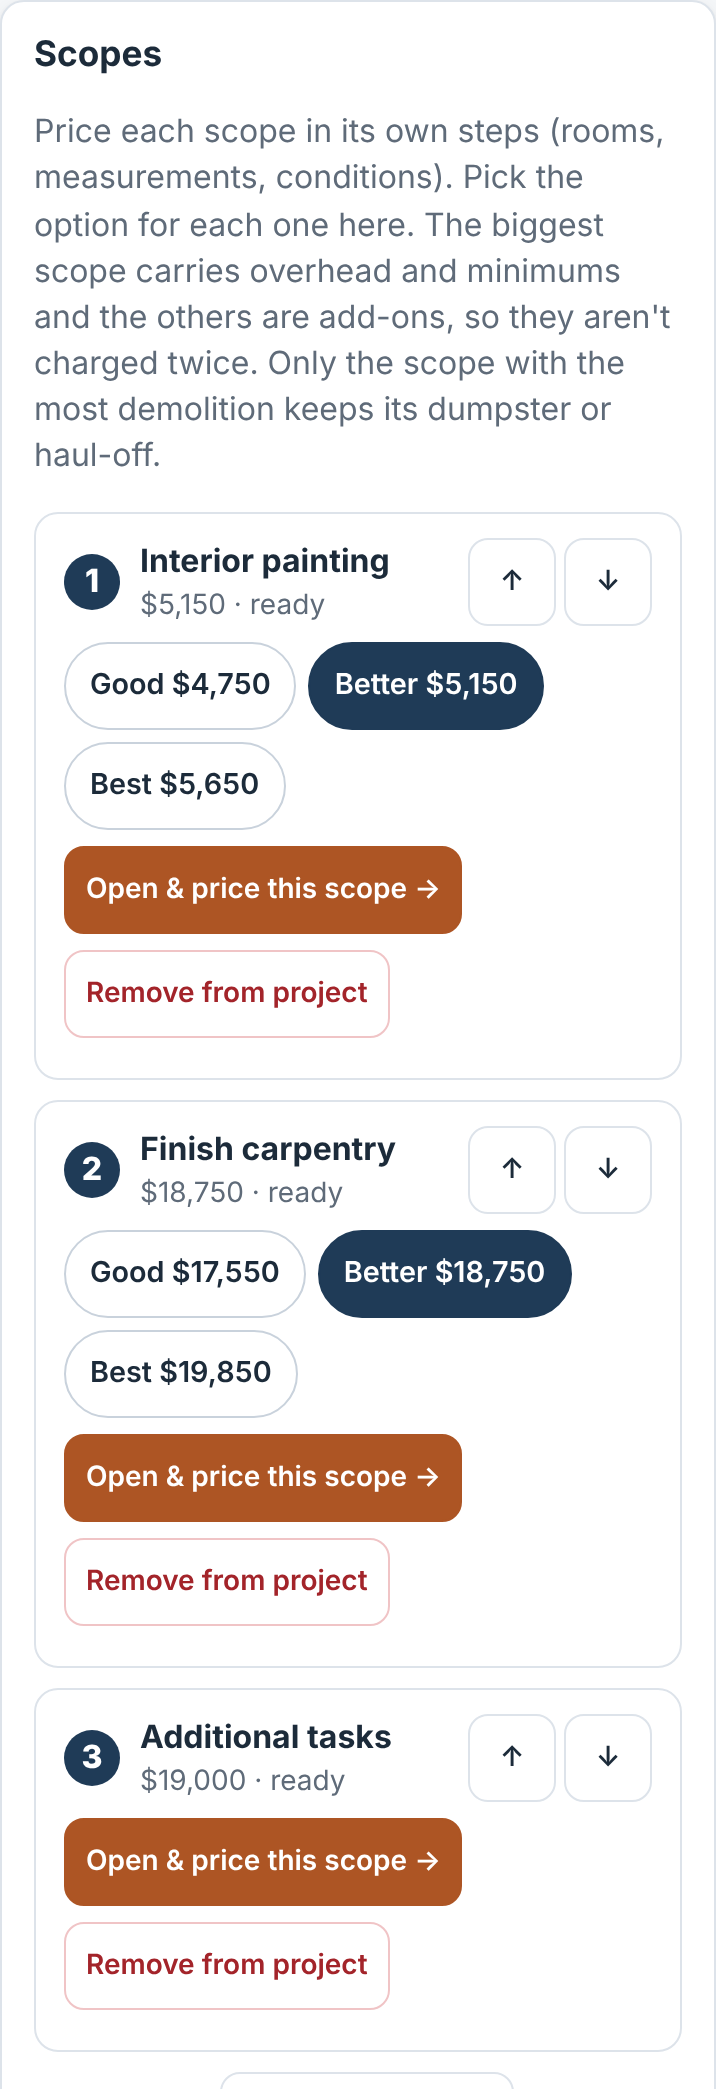
Shop-built: the BidRidge project at the starting rates
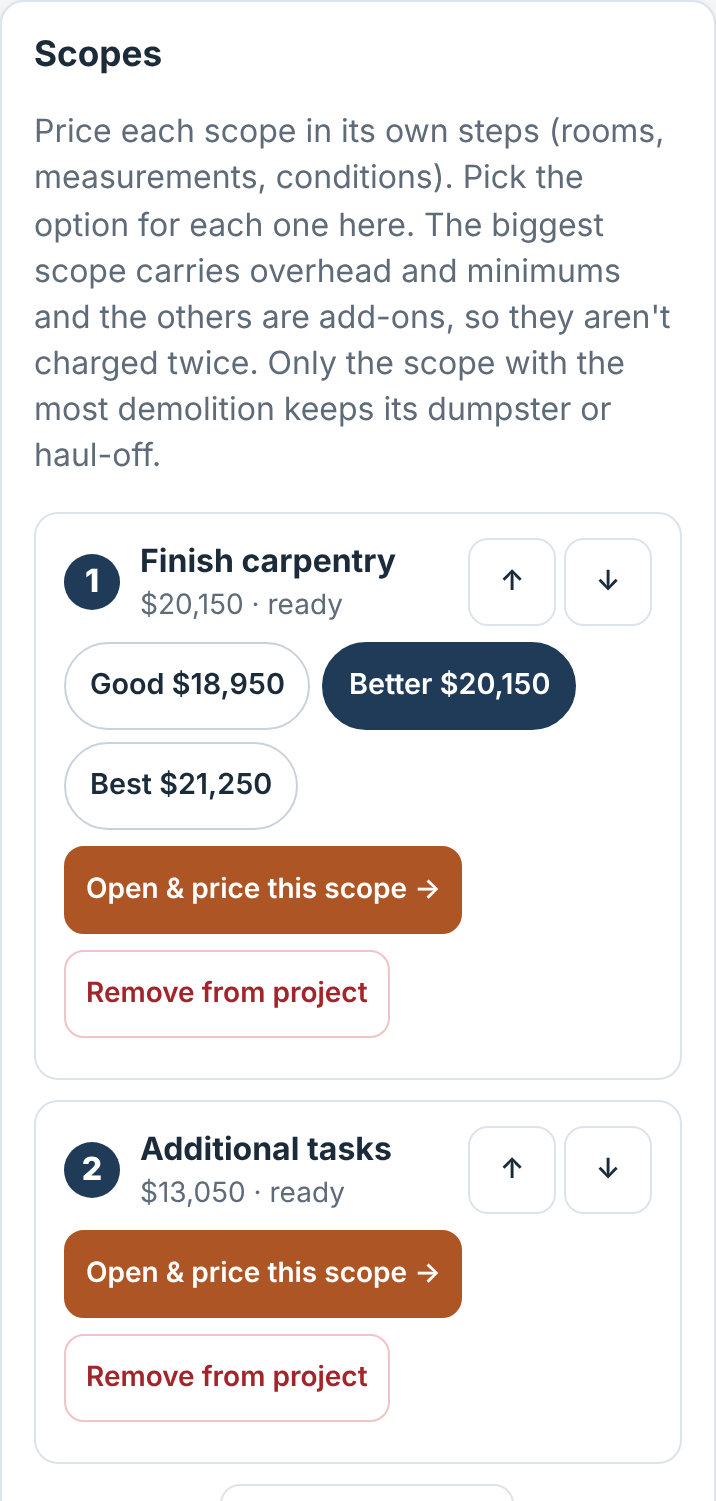
Stock cabinets: the same kitchen as a BidRidge project

The BidRidge quote

Same numbers in the quote

The designer sends its quantities to BidRidge, and BidRidge prices the labor and materials at your rates.

  • Good
    $41,300
  • Better
    $42,900
    Recommended
  • Best
    $44,500
From the designSent to the quote
Cabinets21 (10 base, 11 wall)
Cabinet runs22 LF base, 21 LF wall
Quartz tops68.8 sf with 4" splash
Island seating7.3 LF, 15" overhang
Drawing setsClient 5 sheets, shop 16
Stock order25 codes: 21 boxes, 5 fillers, 3 panels

Shop-built, BidRidge web app at the starting rates: a project of Interior painting (Good $4,750 / Better $5,150 / Best $5,650), Finish carpentry ($17,550 / $18,750 / $19,850) and the shop-built cabinets on Additional tasks ($19,000, one price). Totals add each scope at that option.

More in the guide

Try it on your own job

Open the sample, change it to your measurements, and send it to a BidRidge quote. Drawing is free; the drawing set, the lists and the quote come with a BidRidge license or the 14-day trial.

In the designer, tap Open project and pick the sample file. It opens exactly as in the video.

Sample designs: names, sizes and clients are made up. Prices are BidRidge's starting rates; set your own. The designers check against common guidelines (IRC, NKBA and the makers' published numbers) to help you catch mistakes. They don't replace your building department or the manufacturer's installation instructions: verify with them.