BidRidge › Designers › Guide › Chapter 2

Chapter 2 · Tile DesignerBeta

Hillside primary bath

We lay out a primary bath with a sage 3x12 chevron tub surround that runs unbroken around both inside corners, a niche lined up on the joints, Schluter-RONDEC edges, and a penny-round shower floor sloped to a linear drain. The Tile Designer turns it into a 23-sheet drawing set, cut and order lists with full-size cut templates, and a BidRidge tile quote. Then natural stone and tiled stairs (new in 1.55), and trims and profiles that change the cuts (new in 1.56).

In the designer, tap Open project and pick the sample file. It opens exactly as in the video.

Narrated walkthrough, 2:33. Captions on.

The sample in numbers

  • Tiled area
    73.4 sq ft on 4 surfaces
  • Chevron to order
    82 sf, 25 boxes
  • Corner cut marks
    8 (CW-1 to CW-8)
  • Penny-round sheets
    25 (floor, curb, niche)
  • Edge trim
    39 LF Schluter-RONDEC
  • Drawing set
    24 sheets, 11 x 17

Step by step

Step 1: Start from a preset or the whole tub surround in the Tile Designer
  1. Project type
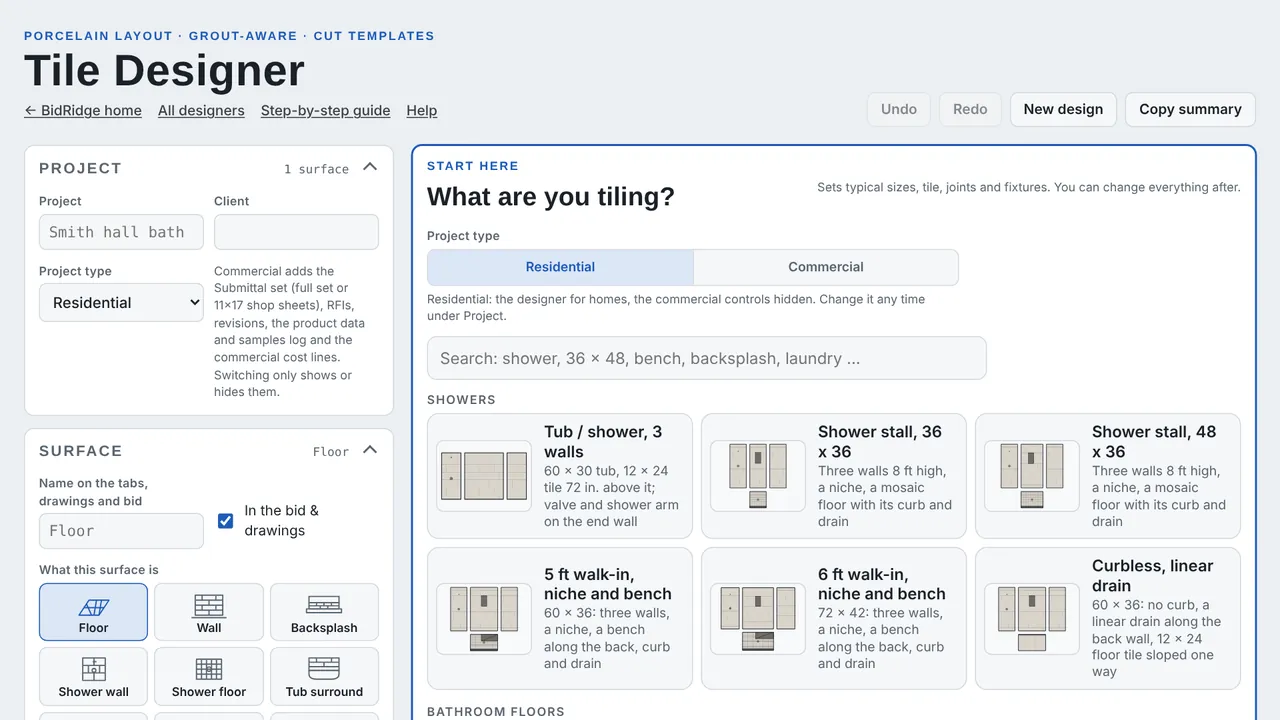
  2. Search the presets
  3. Presets with pictures

Step 1: Start from a preset or the whole tub surround

A new design opens on What are you tiling?: the Project type, a search box and presets with pictures (showers, bath floors, backsplashes, floors, a fireplace, a patio), each at a common size. For this bath, scroll to the whole areas and pick Tub surround, 3 walls; type the tub length, width and the tile height above the tub: 60, 34 and 72 here. The designer adds the left end, the back and the right end as tabs, joined at the inside corners.

Field tip: Measure the end walls at the tub deck and at the top of the tile. If the walls are out of plumb, use the smaller number and let the corner joint take it.

Step 2: Pick the tile, then the chevron in the Tile Designer
  1. Tile size and pattern
  2. Grout joint
  3. The chevron on the back wall

Step 2: Pick the tile, then the chevron

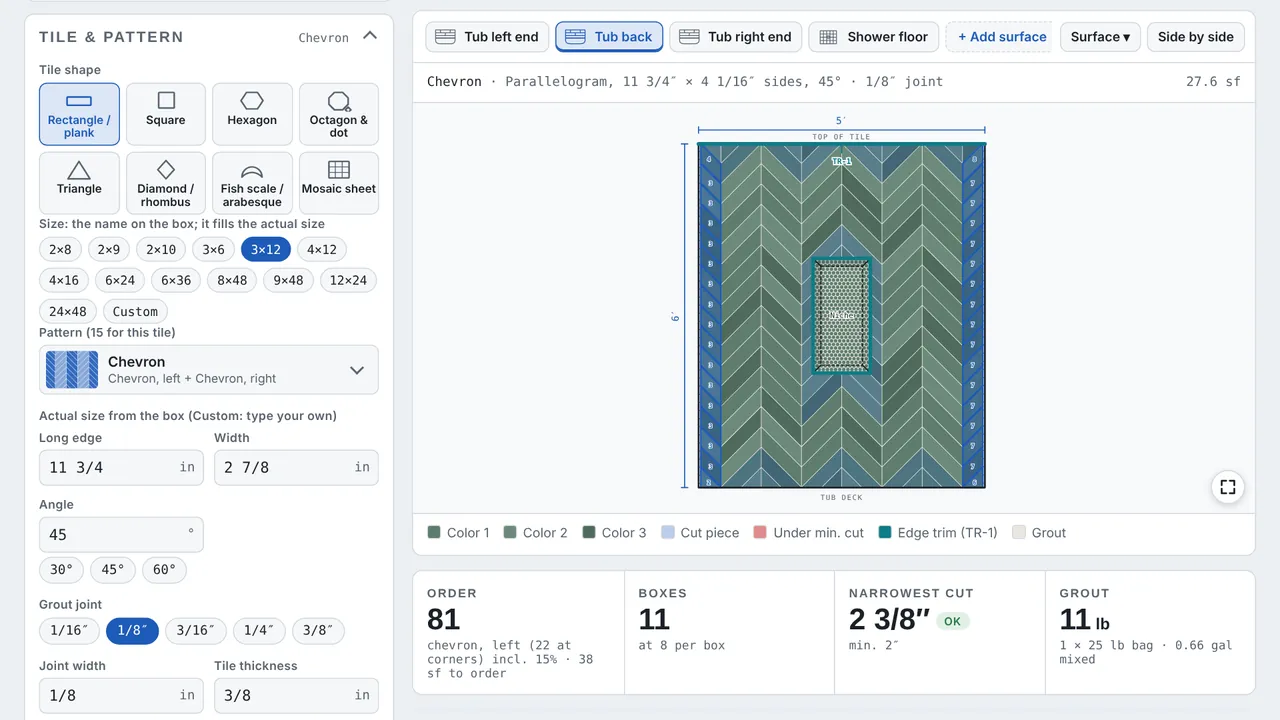
On the back wall, tap the size on the box (3x12) and then Chevron from the pattern list. Set the grout joint and the tile thickness. Under Colors and product names, give the tile and grout their names so they land on the finish schedule.

Field tip: Chevron needs tile with the ends cut at an angle. Check the box: the designer uses the actual size, 2 7/8 x 11 3/4 for a 3x12.

Step 3: Wrap the pattern around the corners in the Tile Designer
  1. Walls unfolded, pattern carried around
  2. Side by side (tap again for one wall)
  3. Wrap the pattern around the corners

Step 3: Wrap the pattern around the corners

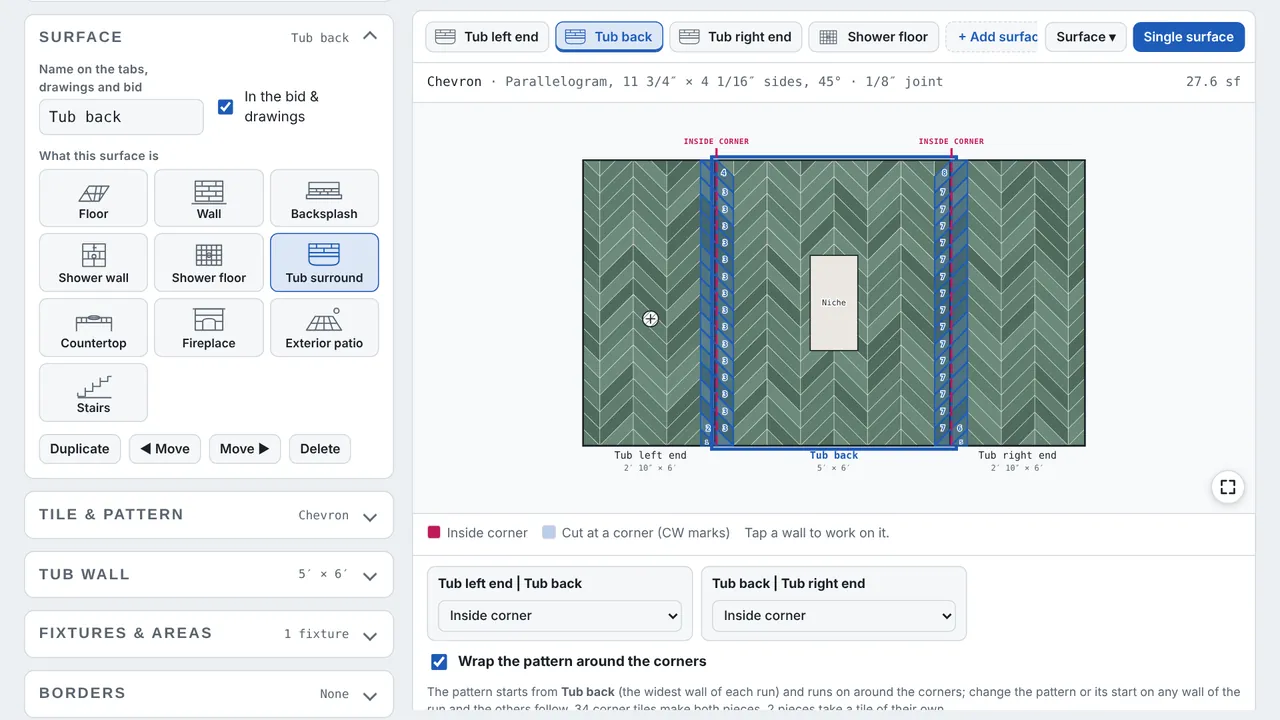
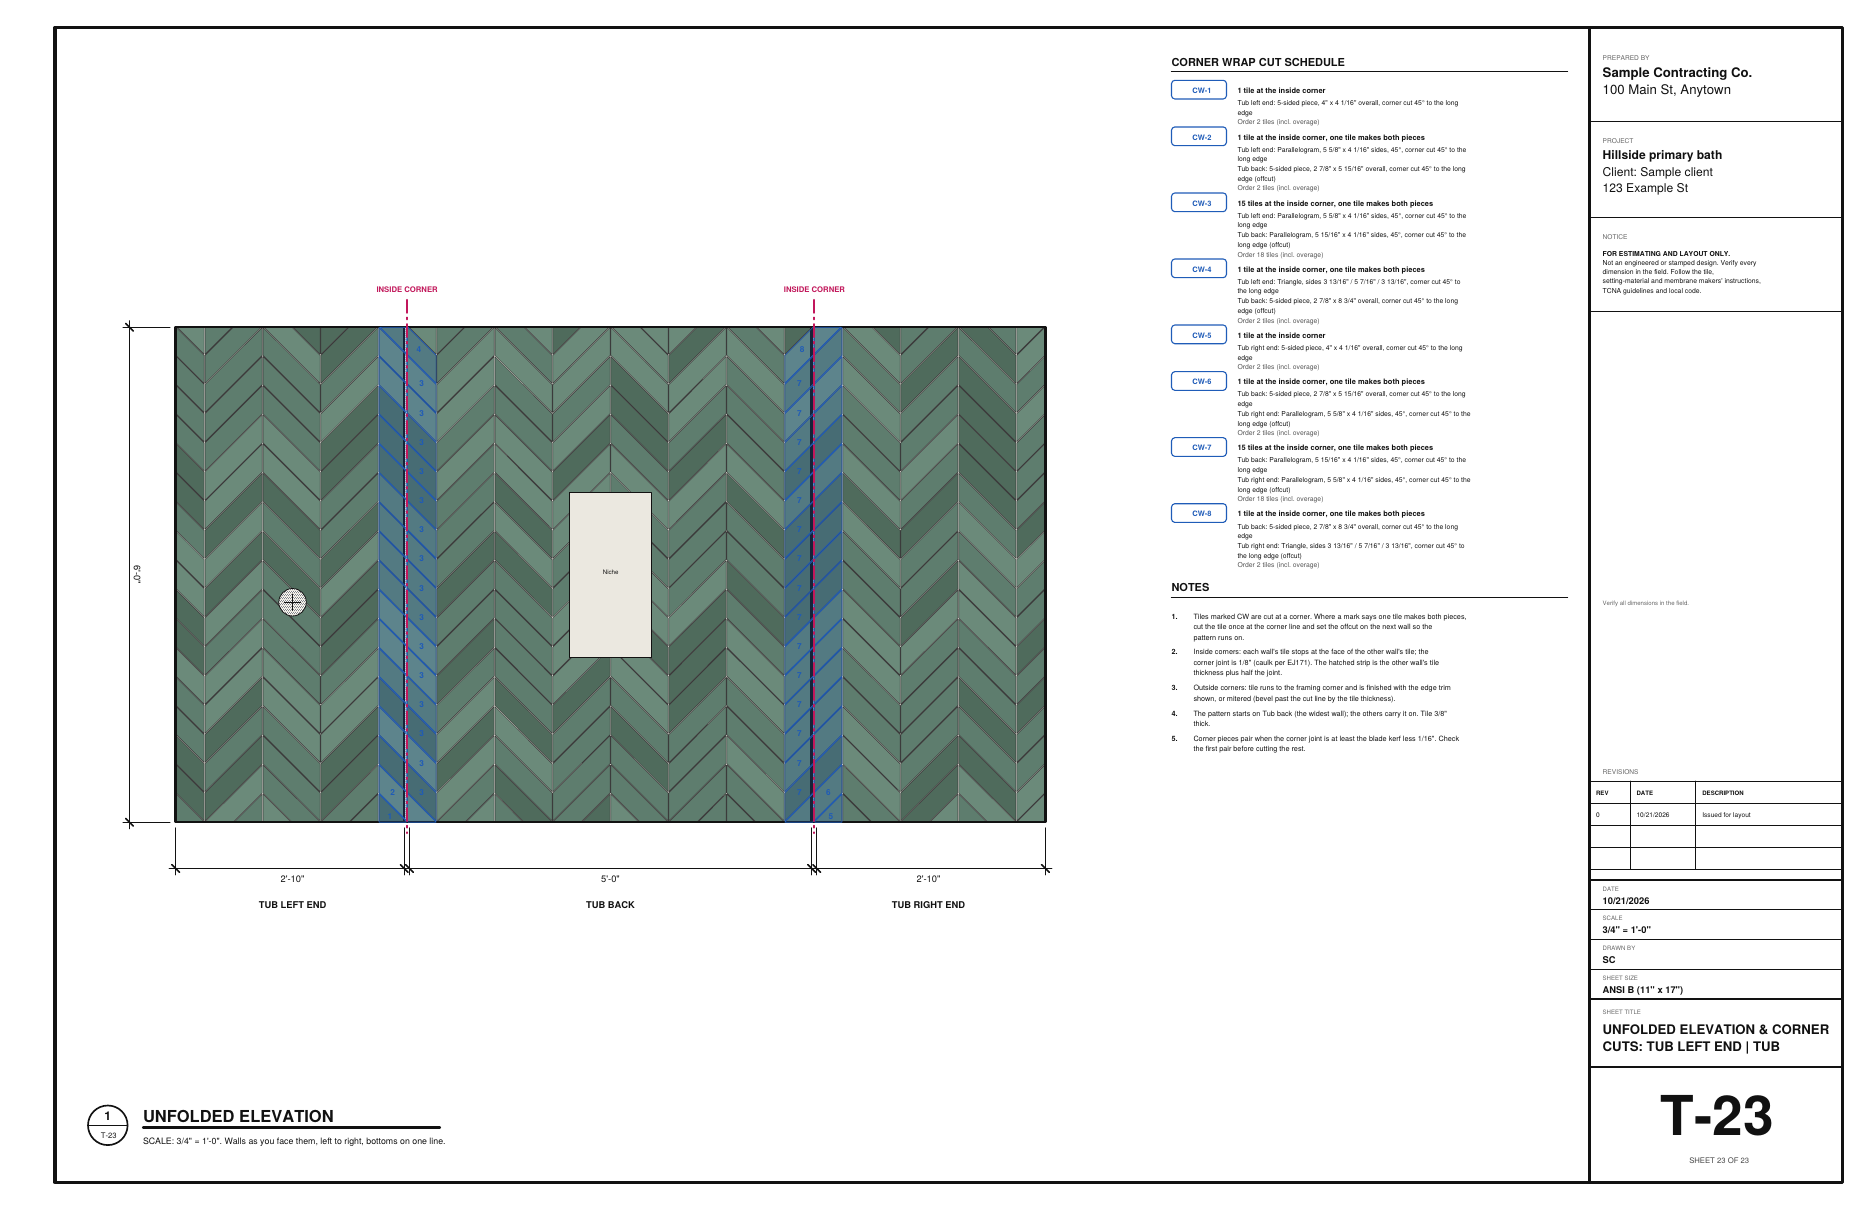
Tap Side by side to see the three walls unfolded (tap it again for one wall). Turn on Wrap the pattern around the corners and the chevron carries on from the back wall onto both end walls. The tiles cut at the corners get marks, CW-1 to CW-8, with which ones come from one tile.

Field tip: Where a CW mark pairs up, cut the tile once at the corner and set the offcut on the next wall. That is fewer tiles and the pattern lines up.

Step 4: Put the niche on the joints in the Tile Designer
  1. Faces tiled with a sheet mosaic
  2. Niche faces unfolded
  3. Niche on the back wall

Step 4: Put the niche on the joints

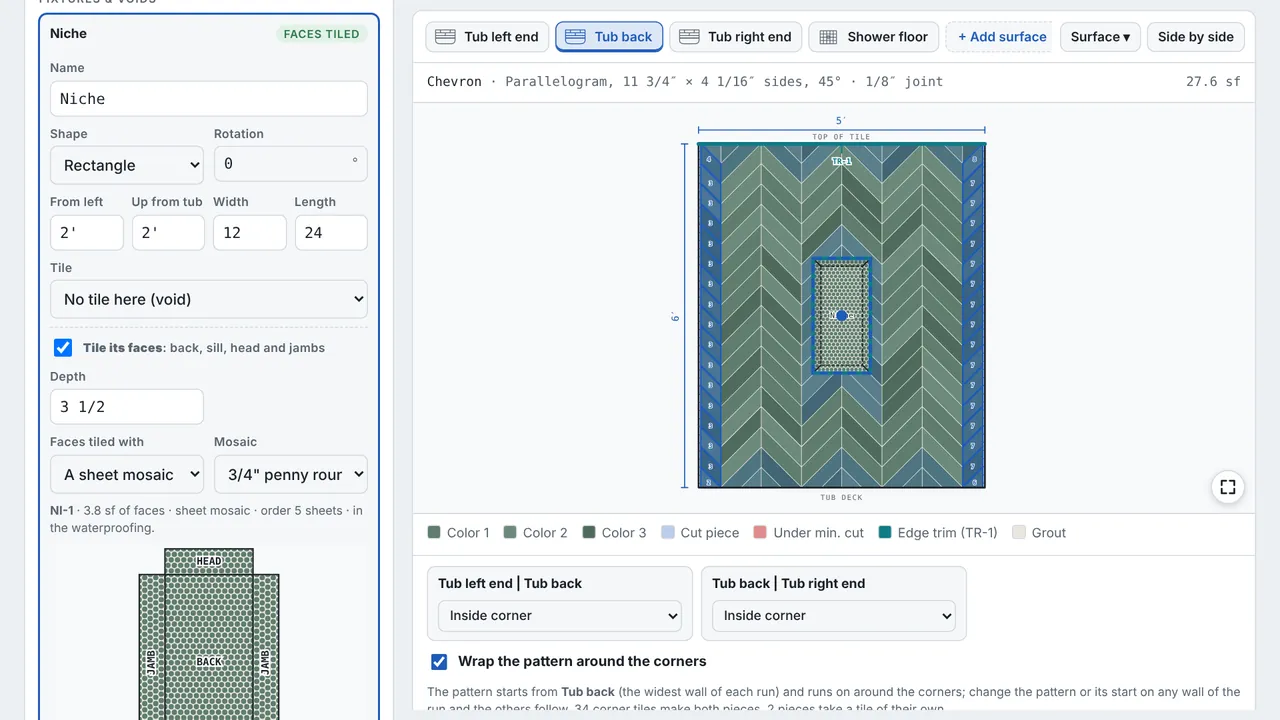
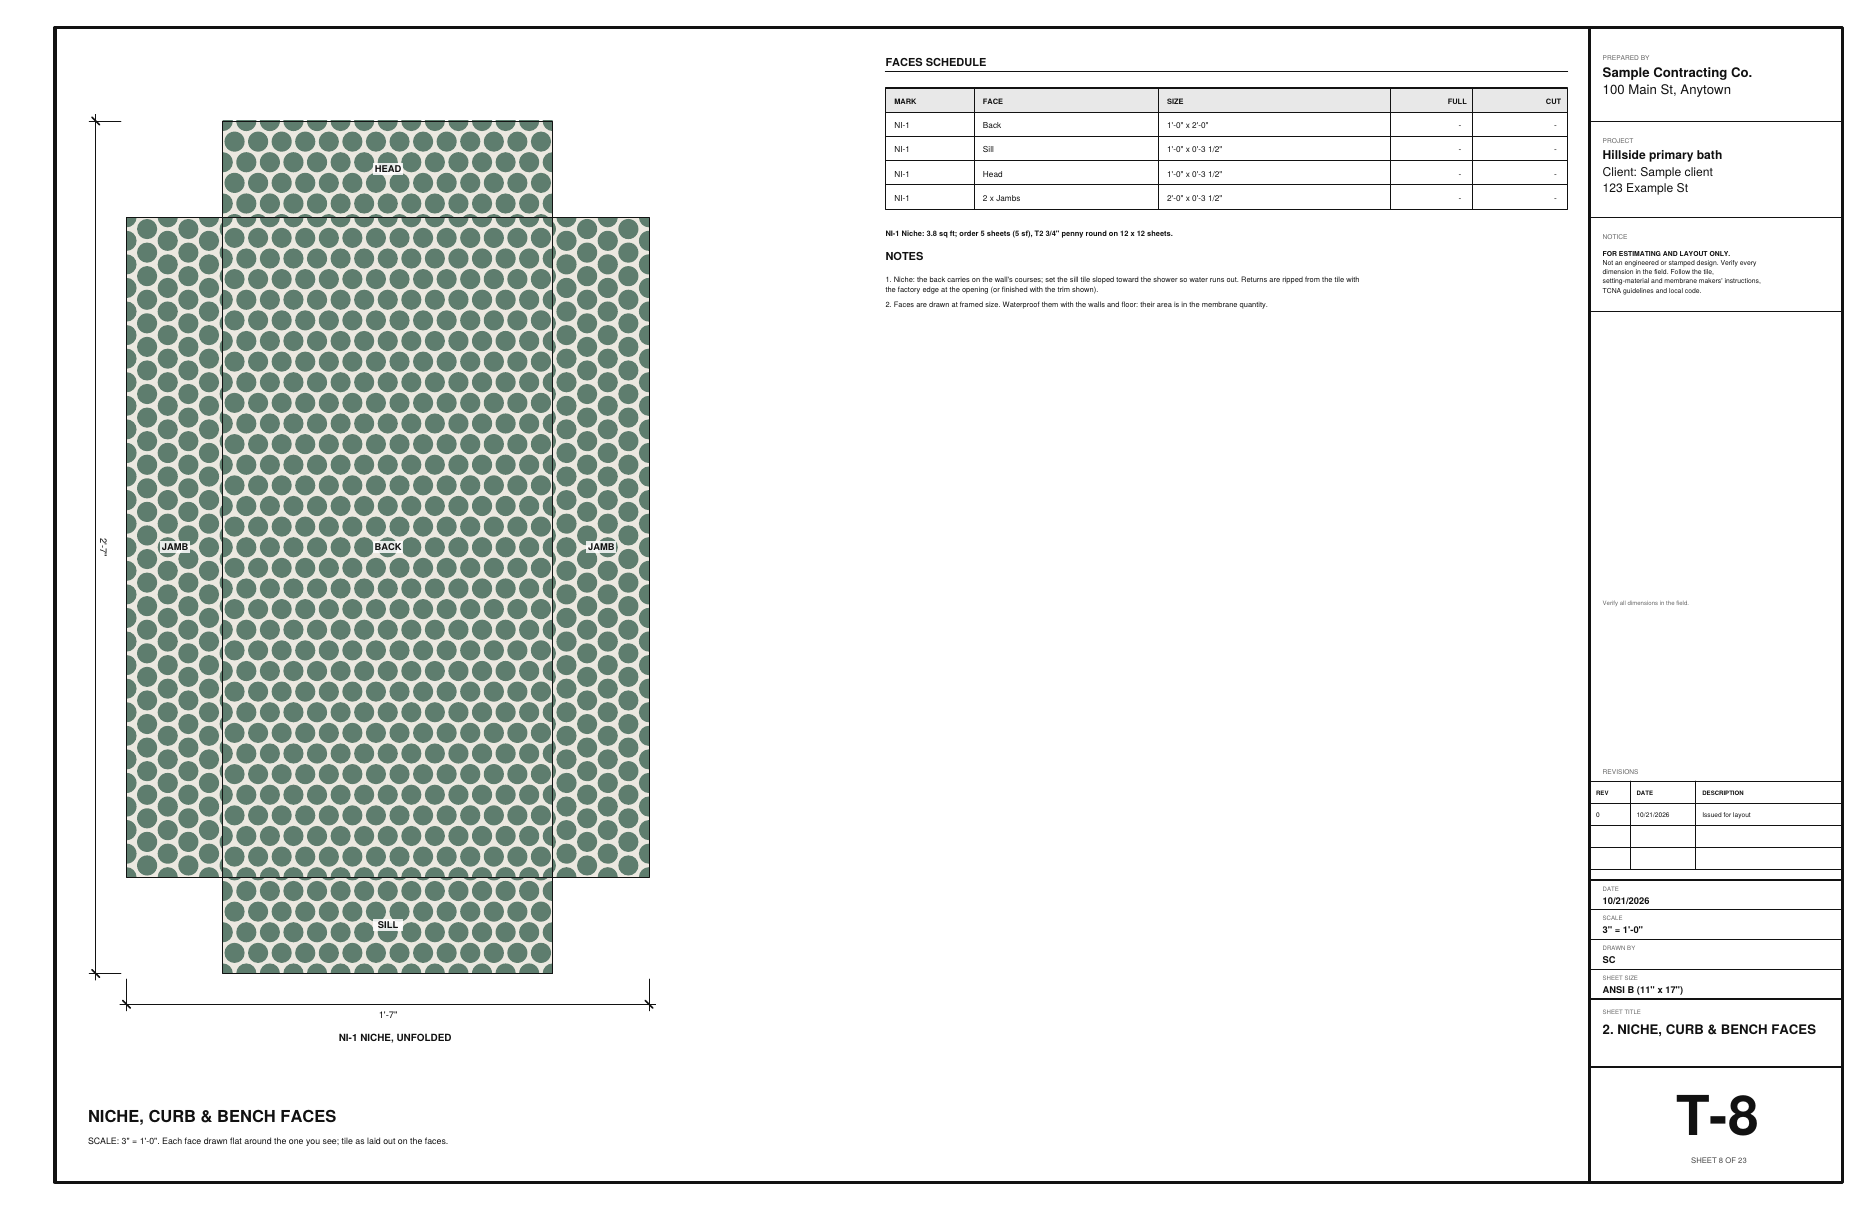
Back to the back wall. Add a Niche from Fixtures and areas and center it on the wall. Its faces are tiled too: here the back, sill, head and jambs get the same penny round as the shower floor, and the designer adds them to the order and the waterproofing.

Field tip: Frame the niche after the layout, not before. Then its edges land where the designer shows them and you are not cutting slivers around it.

Step 5: Trim the edges with Schluter profiles in the Tile Designer
  1. Edges and their finish
  2. Profile and finish
  3. Trim on the elevation

Step 5: Trim the edges with Schluter profiles

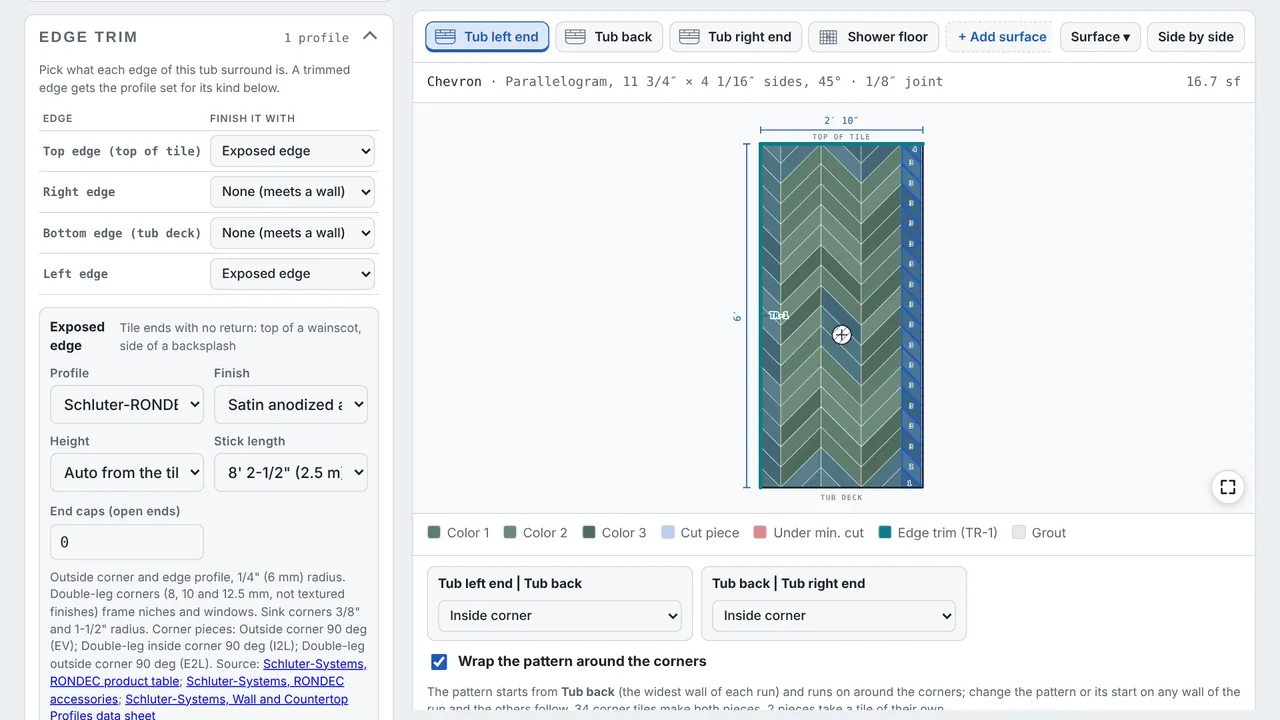
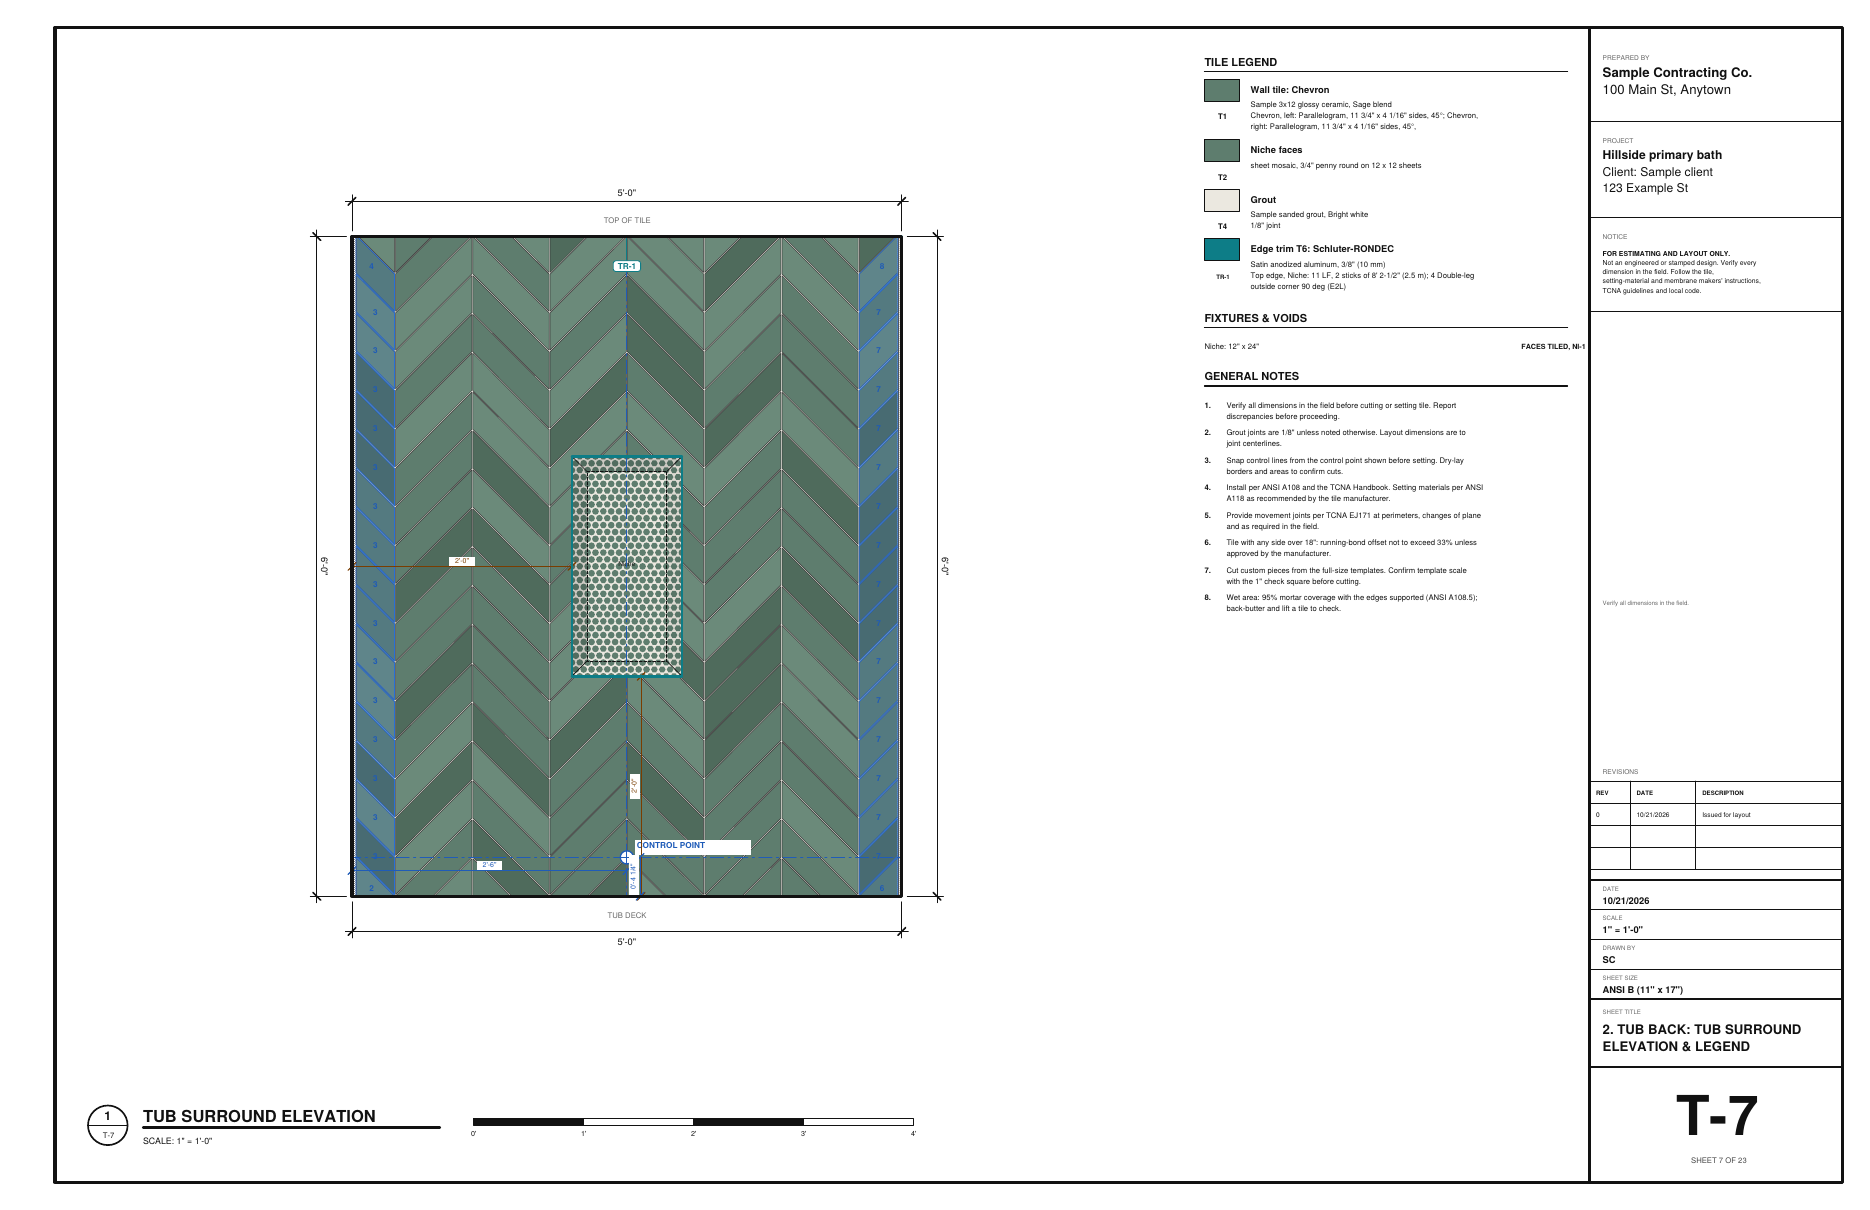
Open Edge trim on each wall. The top of the tile is trimmed already; set the outside edge of each end wall to Exposed edge. Pick Schluter-RONDEC in satin anodized aluminum. The height comes from the tile thickness and the niche gets corner pieces.

Field tip: Profile sizes and item numbers come from Schluter's data sheets. Confirm them with your supplier before you order.

Step 6: Slope the shower floor to a linear drain in the Tile Designer
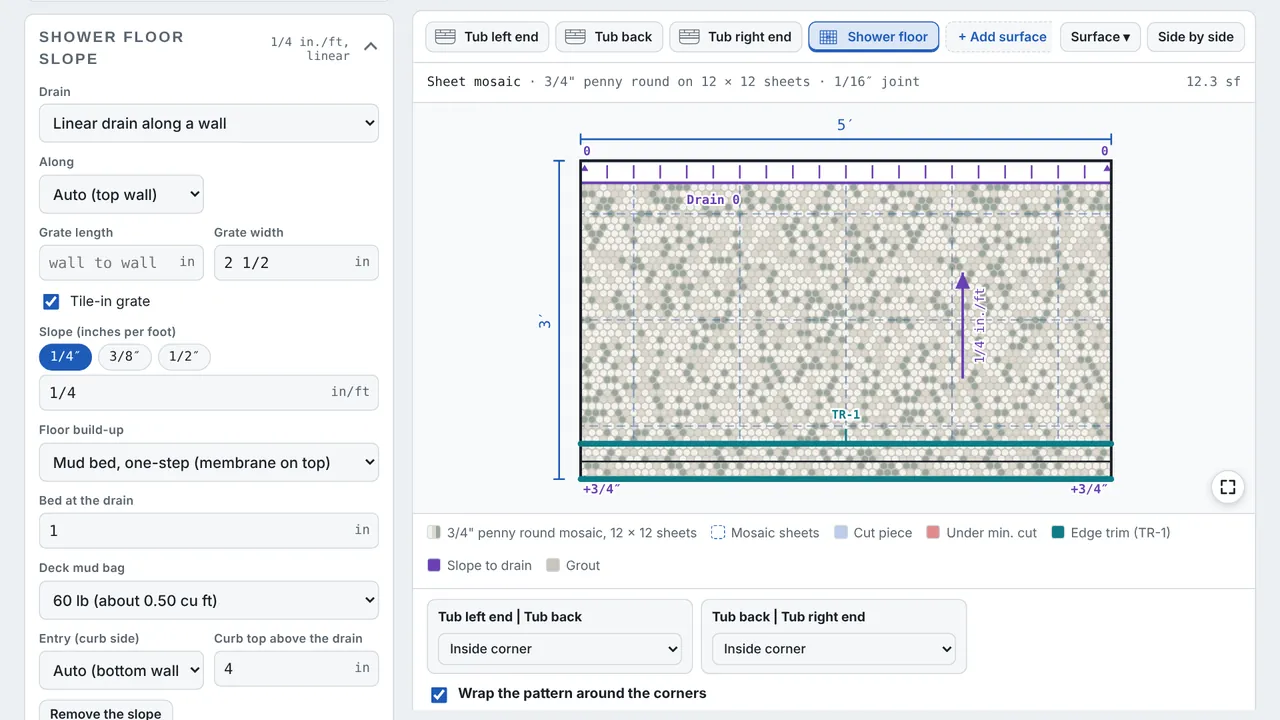
  1. Linear drain along a wall
  2. Floor build-up
  3. One plane to the drain

Step 6: Slope the shower floor to a linear drain

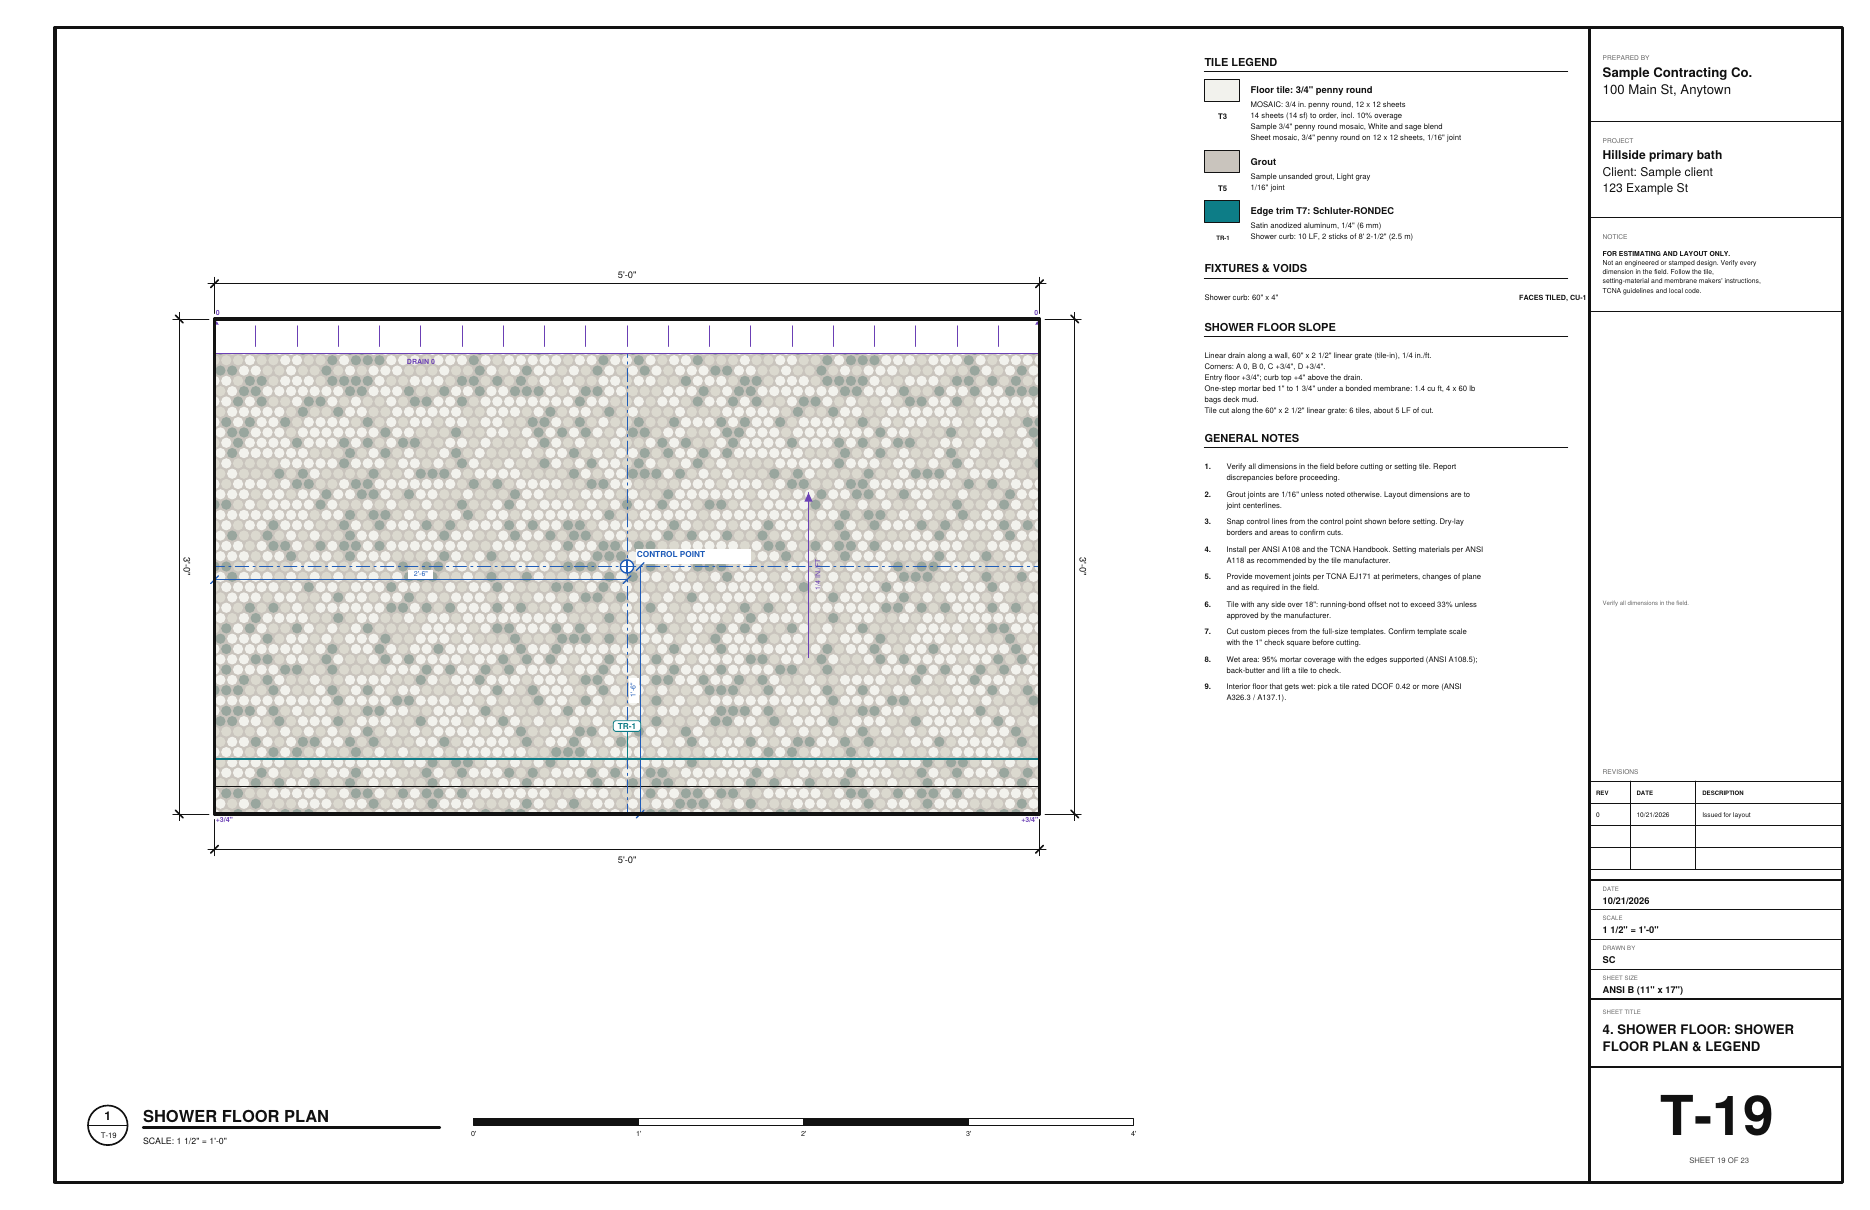
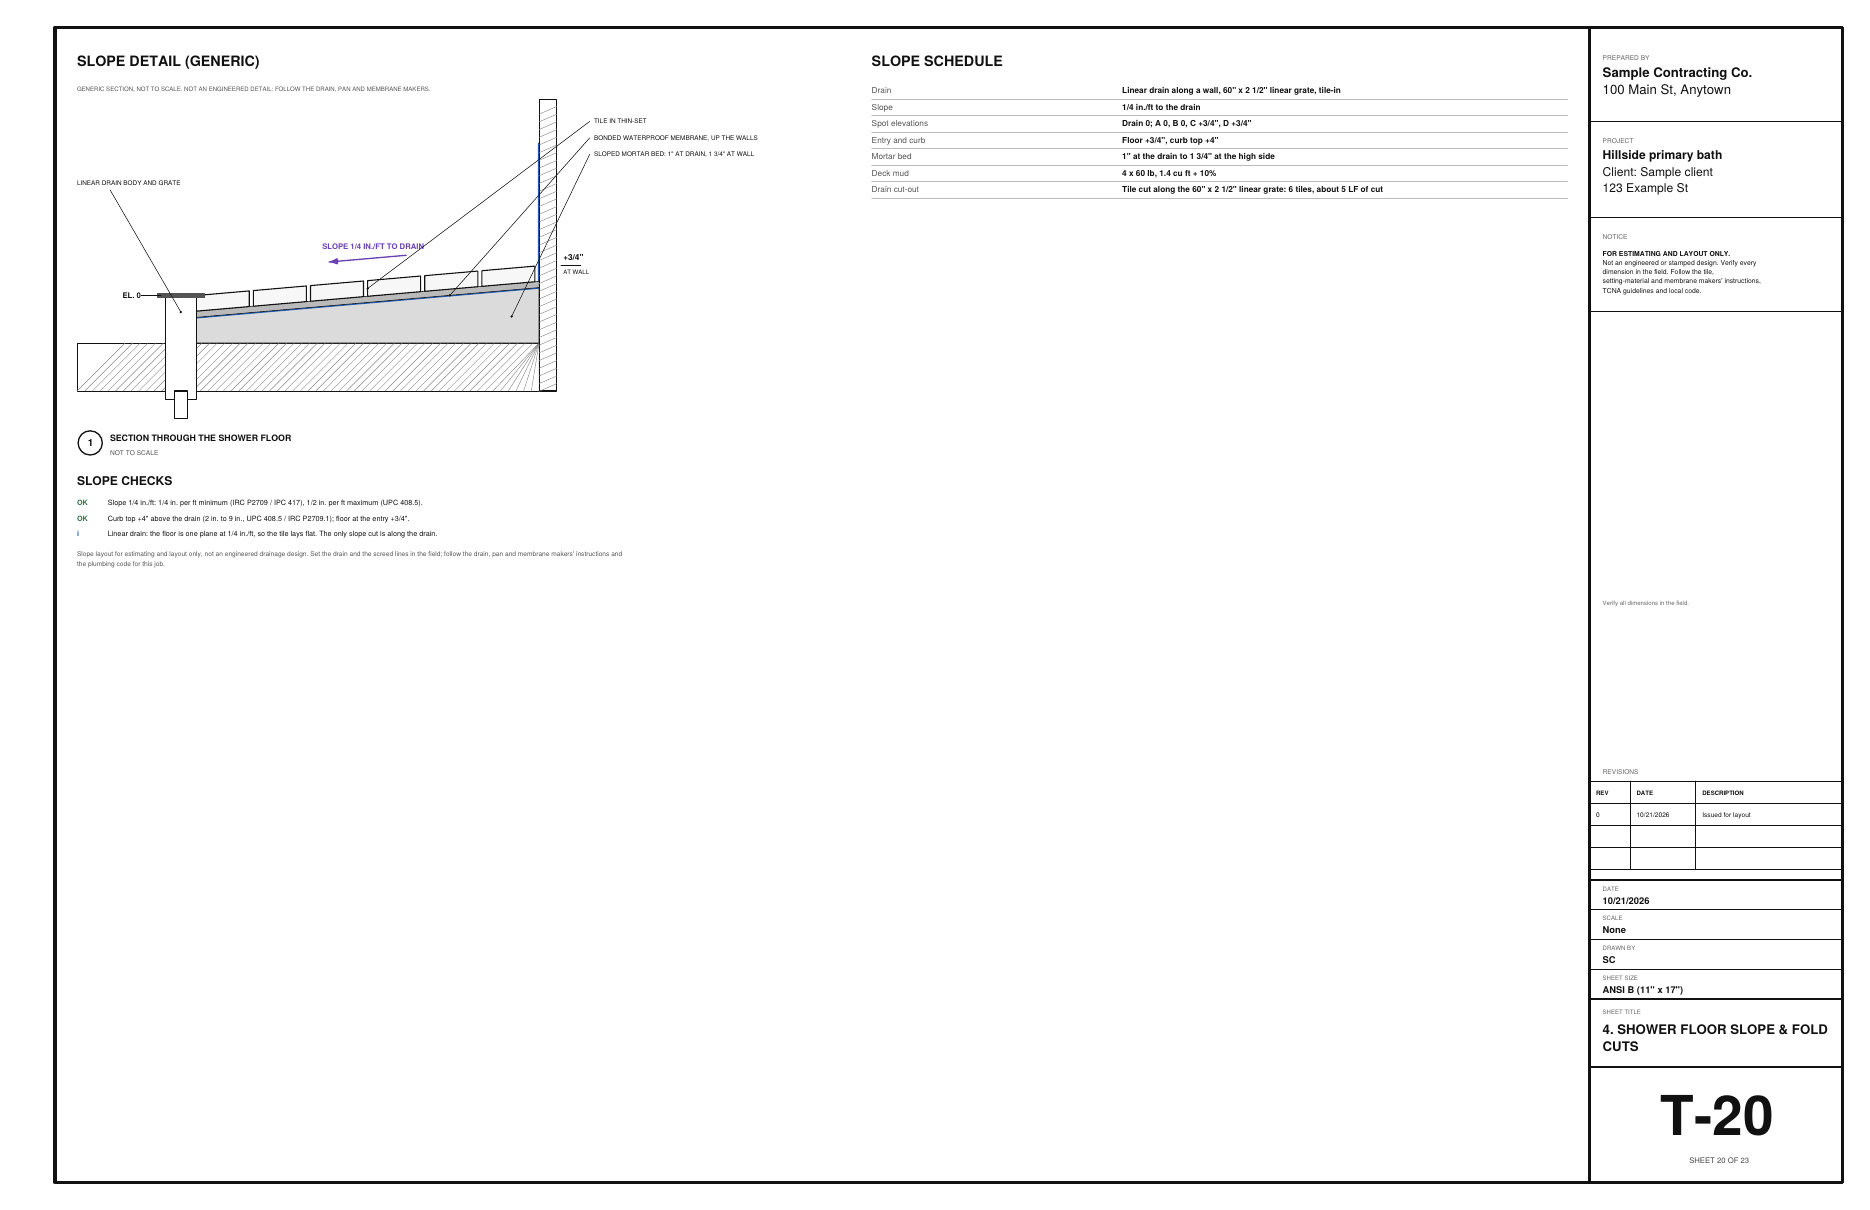
Add a surface: Shower floor, 60 by 36, with a curb across the front. Pick Mosaic sheet and 3/4 penny round. Tap Plan the slope, pick Linear drain along a wall, a tile-in grate and a one-step mud bed. The floor is one plane at 1/4 inch per foot, so the sheets lay flat.

Field tip: The designer checks the slope and the curb height against IRC and UPC guidelines and works out the deck mud bags. Verify the drain and pan with the manufacturer's instructions and your building department.

Step 7: Check the cut list and the cut templates in the Tile Designer
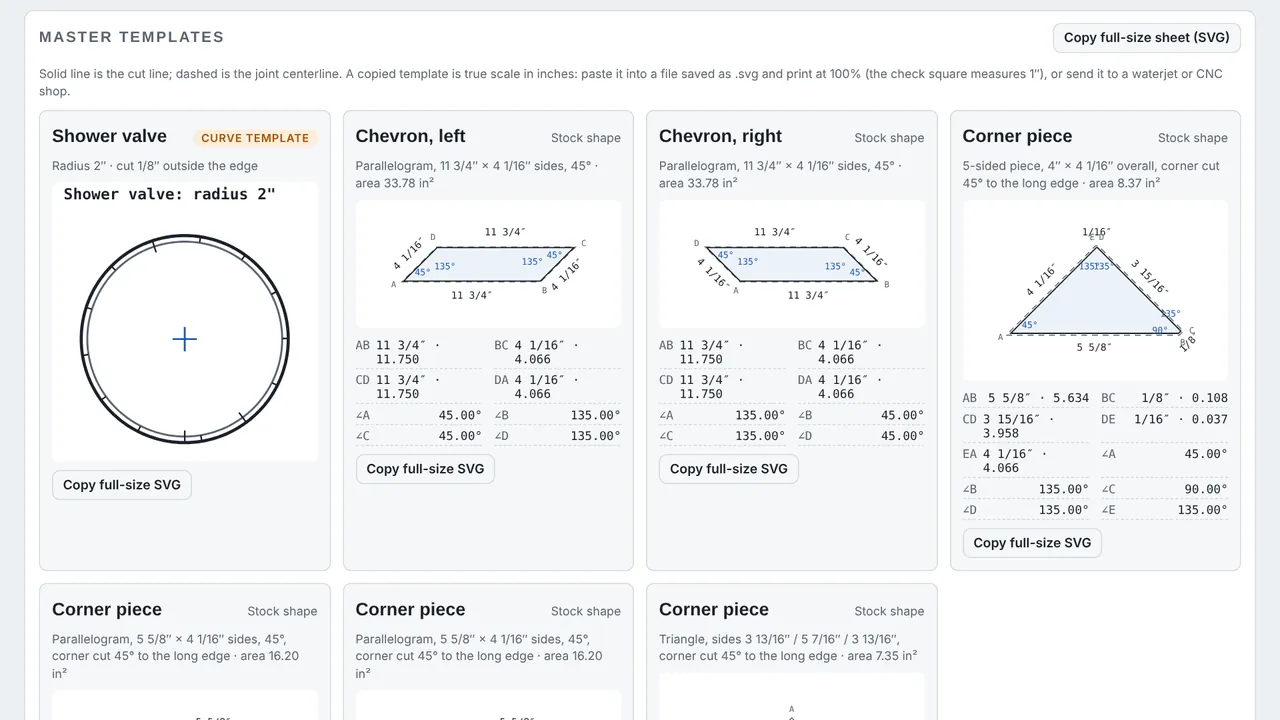
  1. Each odd piece drawn with its sizes
  2. Full-size sheet (SVG)

Step 7: Check the cut list and the cut templates

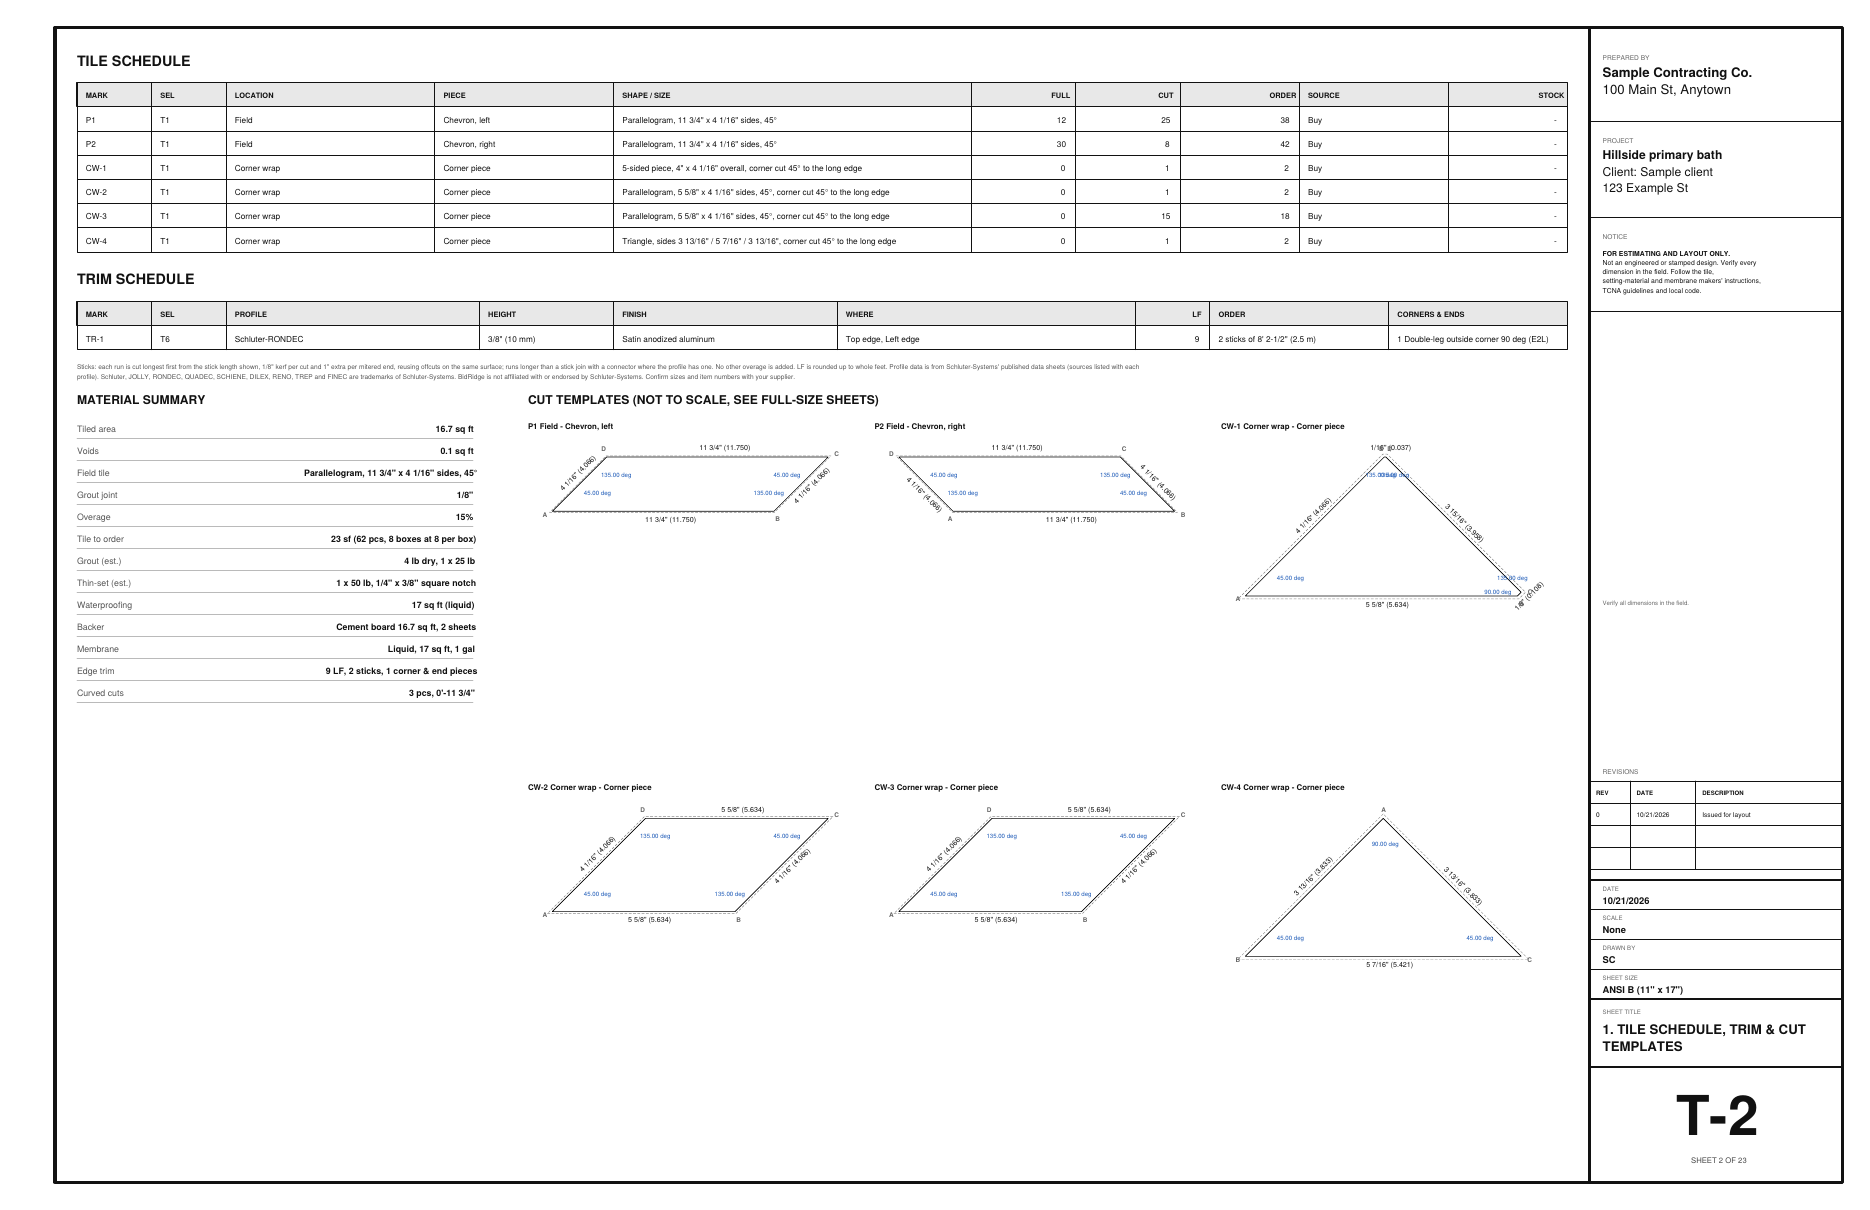
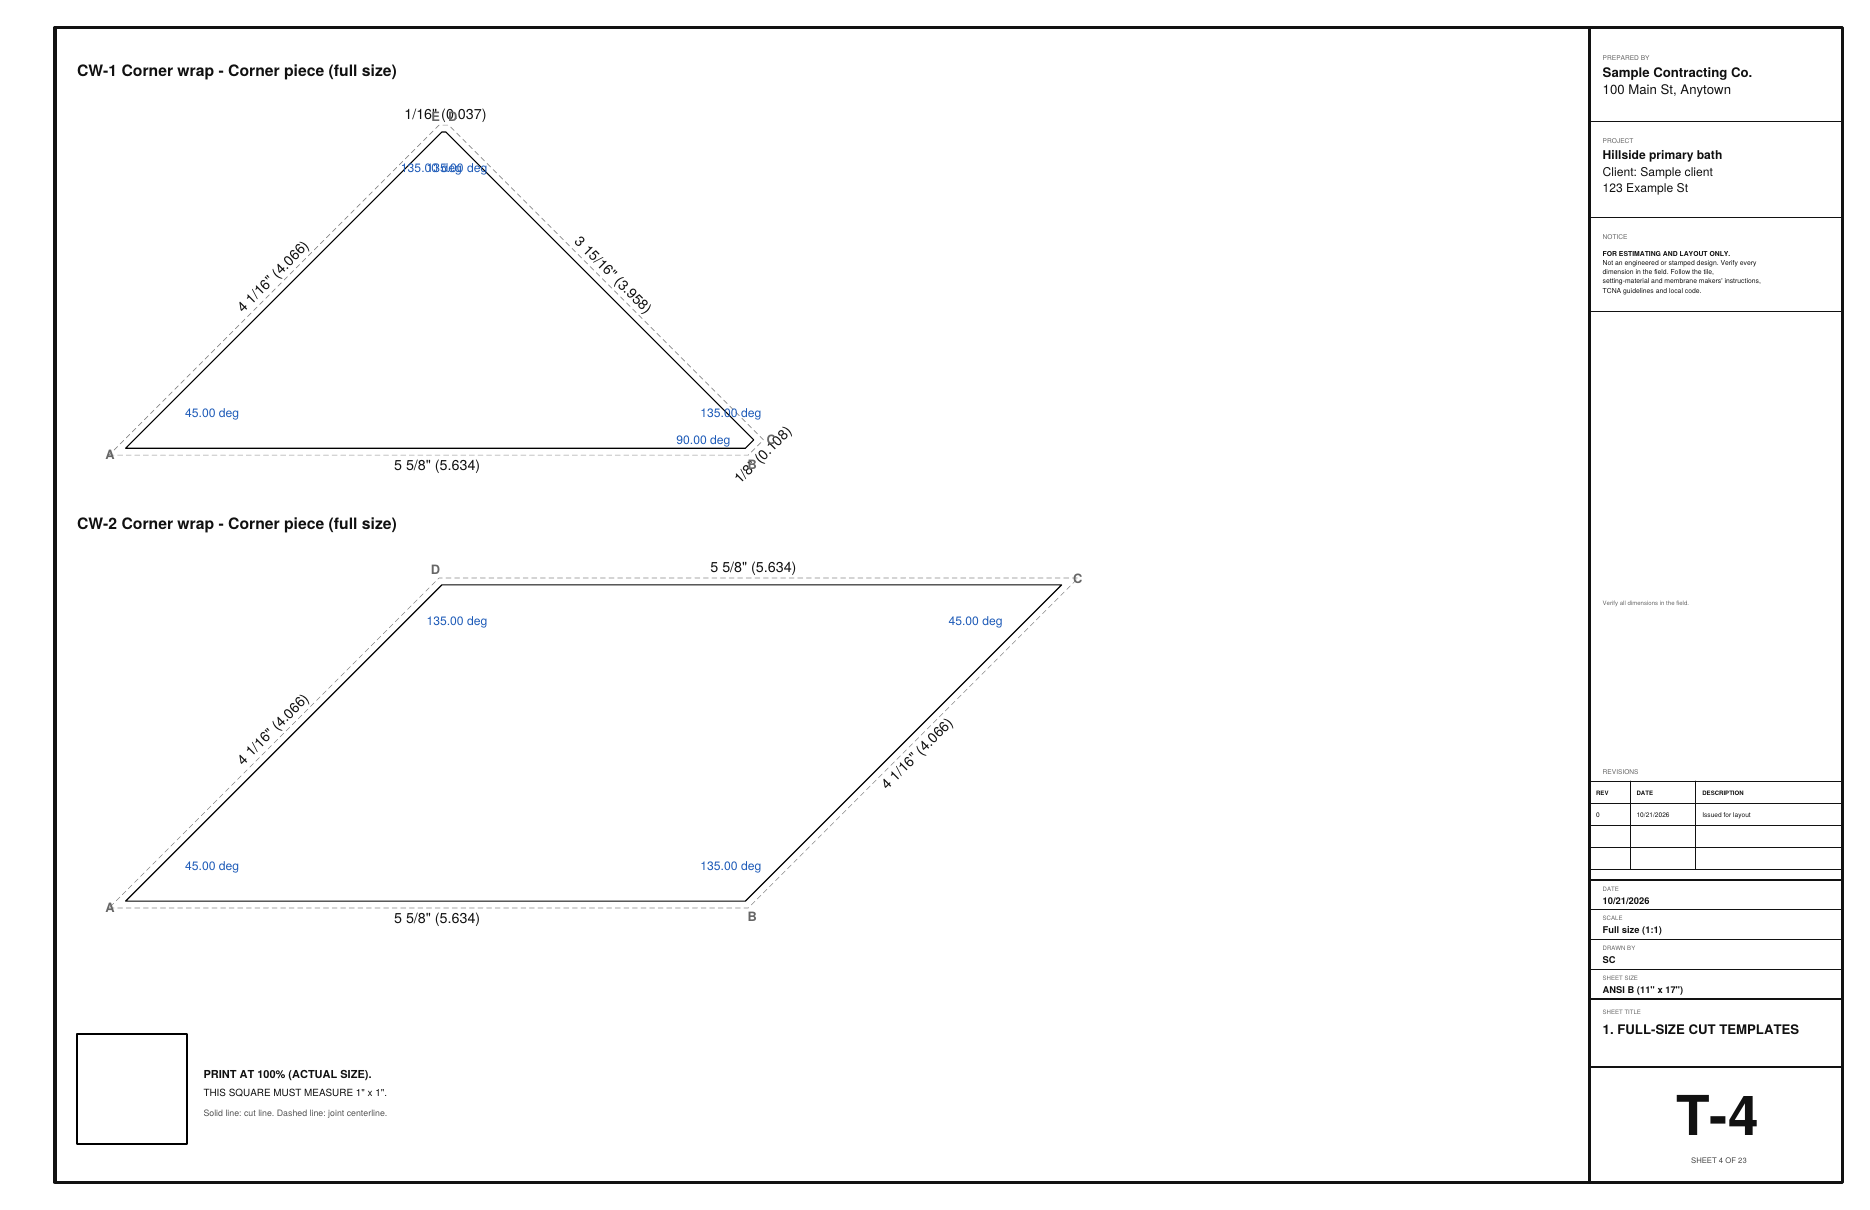
Each wall has its own cut list with the field tile, the corner pieces and what to order. Under Master templates every odd piece is drawn with its sizes and angles. The drawing set prints them full size, with a 1 inch check square.

Field tip: Print the full-size sheets at 100 percent and measure the check square before you trace. A shop can also cut from the copied SVG.

Step 8: Save the drawing set and send it to BidRidge in the Tile Designer
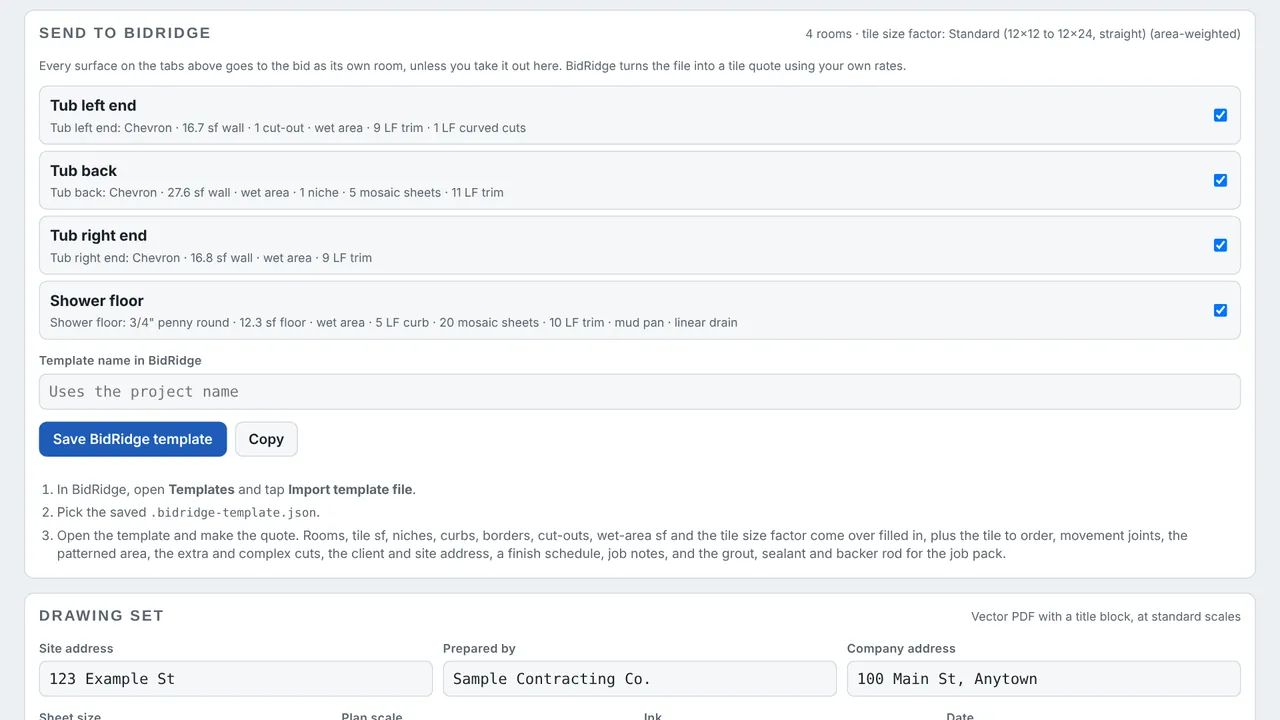
  1. Save BidRidge template
  2. The four rooms to the quote

Step 8: Save the drawing set and send it to BidRidge

Fill in the title block and tap Preview sheets, then Save PDF. Save BidRidge template sends the four rooms with tile, trim, niche, curb, linear drain and deck mud to a BidRidge tile quote, with the drawing set and the order list attached.

Step 9: Natural stone instead of tile in the Tile Designer
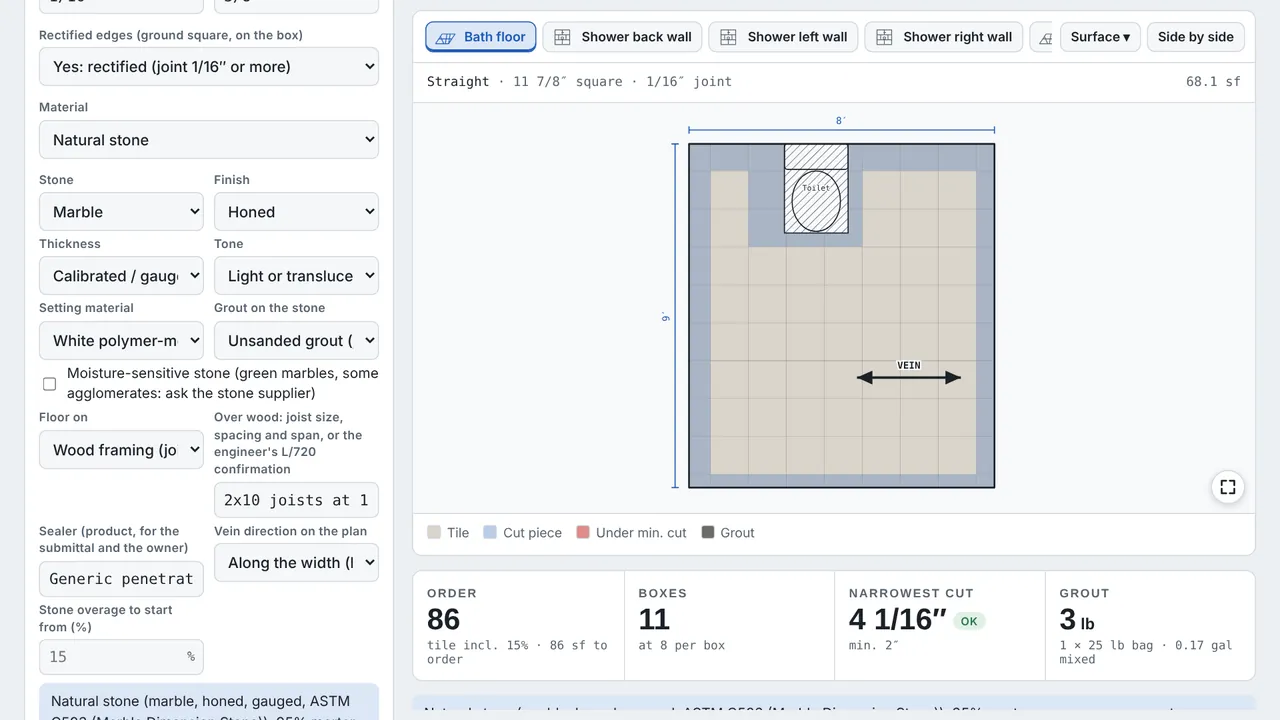
  1. Material: natural stone
  2. The stone, its finish and thickness
  3. Its rules and checks
  4. Vein direction on the plan

Step 9: Natural stone instead of tile

Not in this bath, but on any surface: under Tile & pattern, set Material to Natural stone and pick the stone (marble, granite, limestone, travertine, slate, quartzite or onyx), its finish and its thickness. The designer then checks the stone's rules: 95% mortar coverage, L/720 over wood framing, white mortar for light stone, the grout for polished stone, and lippage by the joint. It adds the sealing, a 15% starting overage, stone saddles and the fabricated stone edge, and draws the vein direction on the plan. Here: the honed marble bath floor of the stone sample.

Field tip: Over wood framing, type the joists or the engineer's confirmation. The designer asks for it instead of assuming the floor is stiff enough for stone.

Step 10: Tiled stairs with every riser checked in the Tile Designer
  1. Finished riser heights, checked
  2. Treads, risers and the skirt laid out

Step 10: Tiled stairs with every riser checked

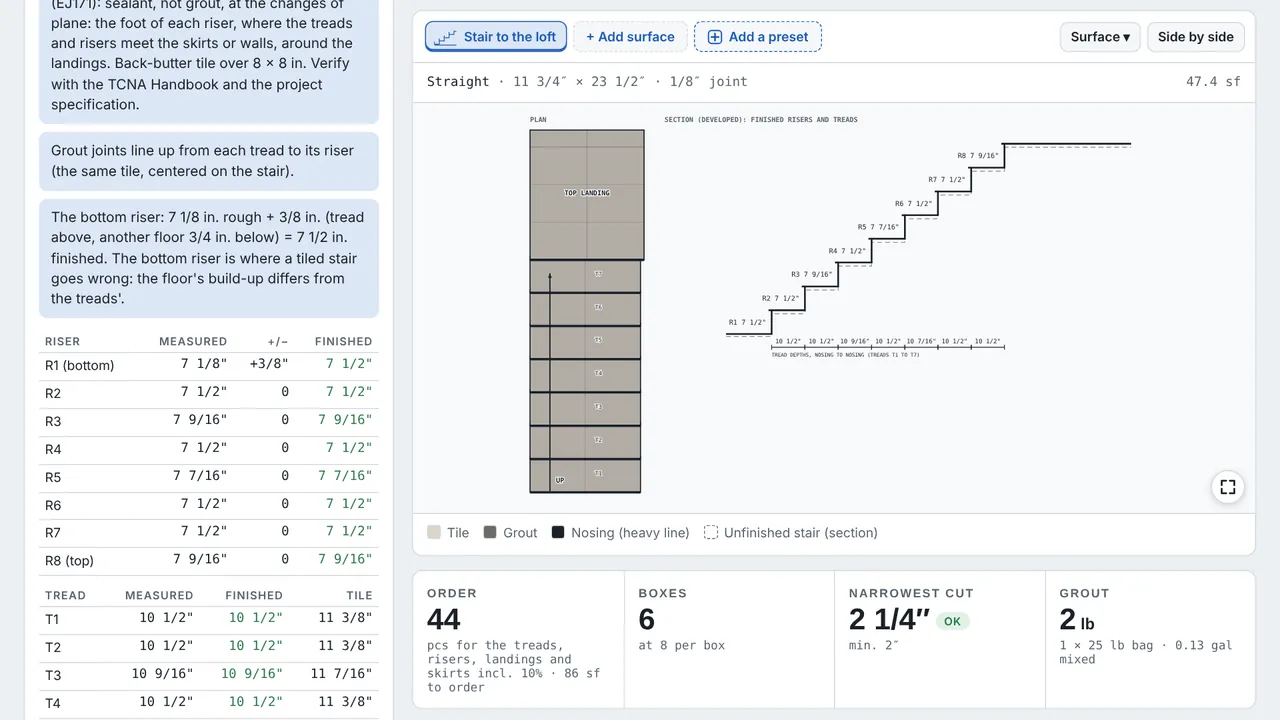
Pick Stairs on the start step or with + Add surface. Type each flight's measured risers and treads, the landings, the structure and the build-up, and the floors at the top and the bottom. The designer works out every finished riser height and checks the flight against the IRC or IBC (risers within 3/8 inch of each other, the tallest riser, the shallowest tread, the nosing), and ADA 504 for a commercial exit stair. A riser out of limit is named with ways to fix it; nothing is changed for you. Treads, risers, landings and skirts are laid out and counted, and the steps go to BidRidge. Here: the stair to the loft from the stair sample.

Field tip: The bottom and top risers are where a tiled stair goes wrong: the build-up of the floor at each end decides them. Check them before the stair is built.

Step 11: Trims and profiles that change the cuts in the Tile Designer
  1. The cut: face + joint off the tile
  2. Face width and joint (published or typed)
  3. Tap a trim: its section at this tile

Step 11: Trims and profiles that change the cuts

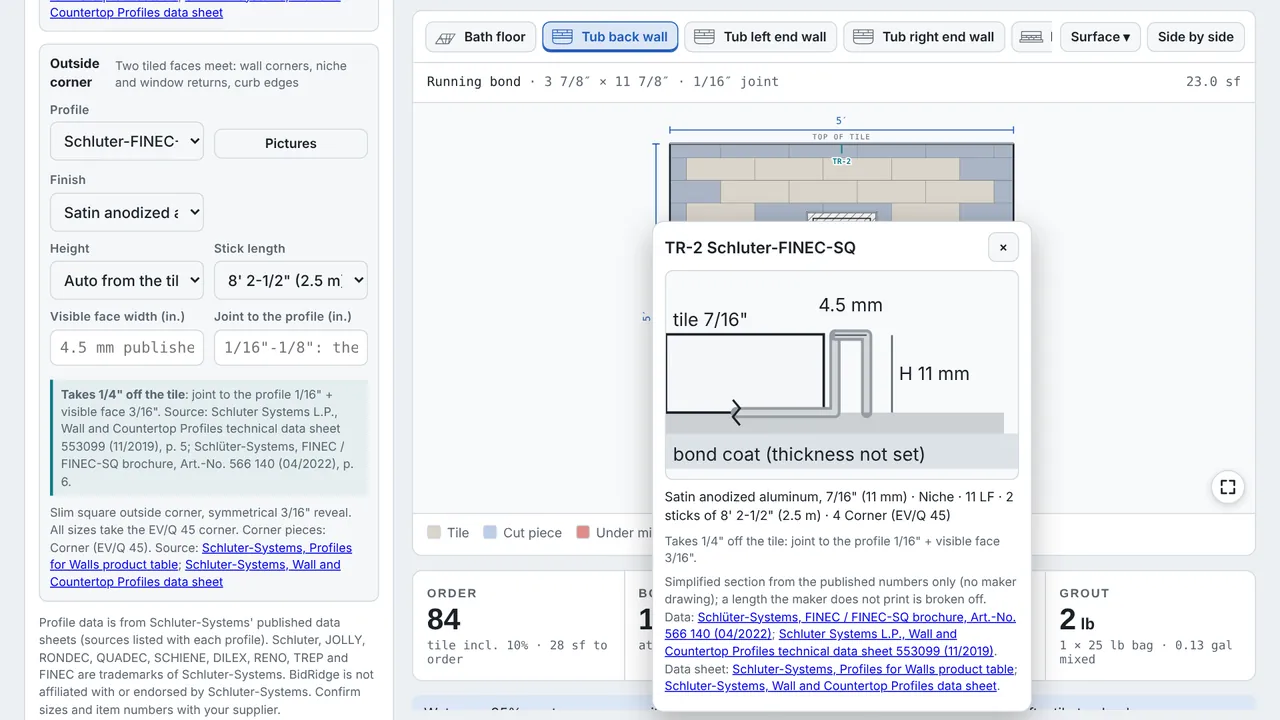
Under Edge trim, say what each edge is (an exposed edge, a wall, a tub deck) and pick a profile for each kind of edge, generic or Schluter, from the list or with Pictures. The trim now comes off the tile: at a trimmed edge the tile is cut shorter by the profile's visible face and its joint (the niche's FINEC-SQ frame here takes 1/4 inch), and the trim is drawn at its true width in its finish. Tap a trim on the drawing for its section at your tile's thickness. Where the maker does not publish a size, a note says so and that cut waits until you type the number. Under Tile & pattern, Thickness, trowel & build-up suggests the tile thickness, a starting trowel notch and the coverage, and the ways to bring floors of different thickness flush. Here: the tub back wall of the trim sample. On a commercial job the Submittal set draws every trim on the plans and elevations with its TR tag and a callout to its detail, as the designer's commercial trims sample (a restroom, a kitchen and an exit stair) shows. A cove on a wall's bottom edge or a floor's edge now starts as Schluter-DILEX-AHKA, which sits on the finished floor tile: the floor runs to the wall first and the profile covers its cut edge, so the floor needs no cut there (wall / wall corners and backsplashes stay DILEX-AHK, and the card offers AHKA in one tap where a floor cove is still AHK).

Field tip: A sanitary cove base no longer gets a metal trim on top: the cove piece has its own finished top. A design saved before 1.56 opens with its trims taken off the cuts and a note that says what changed.

What you get

The drawing set, the lists and the files

Real files from this sample, made by the designer. Tap a page to see it full size. Yours carry your company, the client and the address.

Back wall elevation: chevron, the niche on the joints, RONDEC on the top edge
Unfolded elevation and the corner cut schedule (CW-1 to CW-8)
Shower floor plan: penny round, linear drain, curb
Shower floor slope sheet: section, slope checks and the mortar bed
Tile schedule, trim schedule and the cut templates for the left end wall
Full-size cut templates for the corner pieces
Niche faces unfolded, tiled in penny round
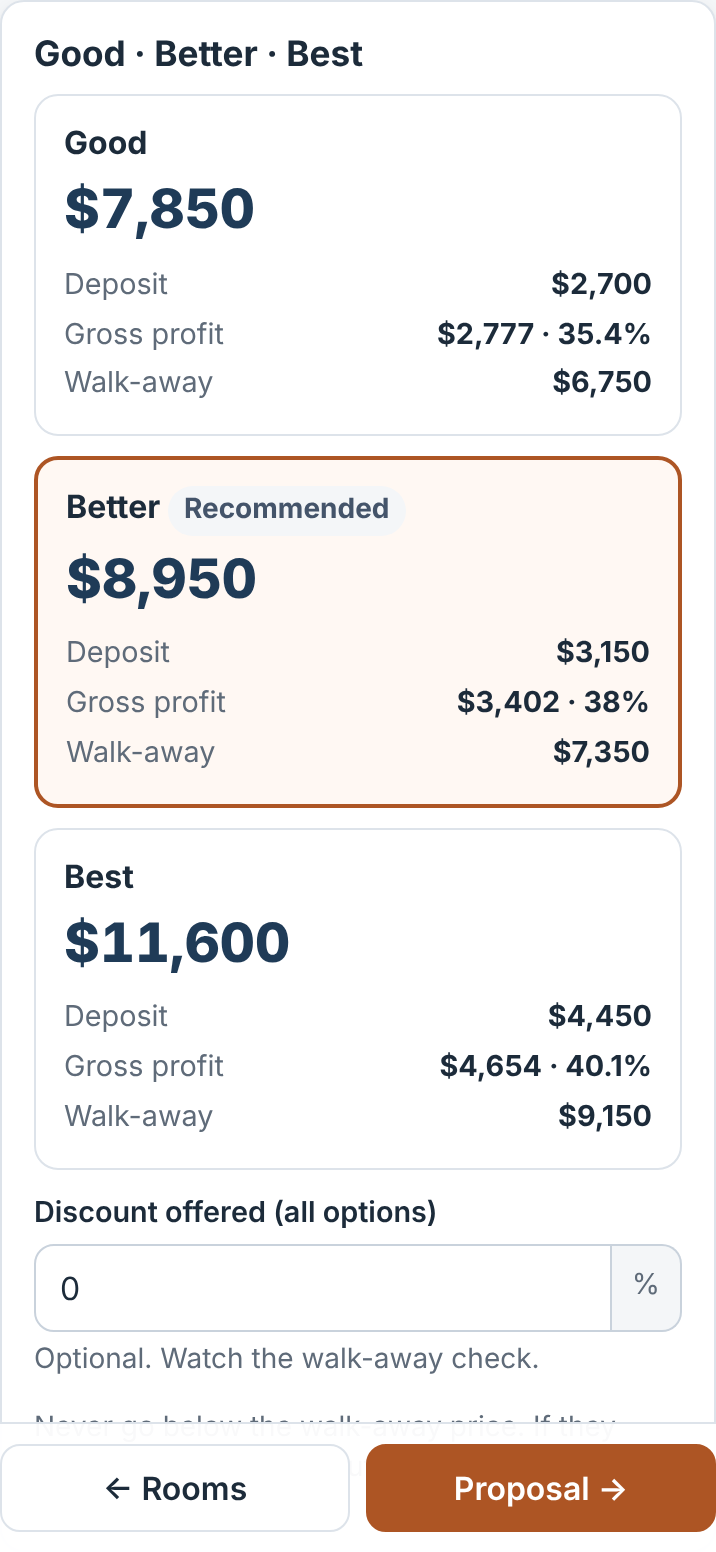
The same job as a BidRidge tile quote at the starting rates

The BidRidge quote

Same numbers in the quote

The designer sends its quantities to BidRidge, and BidRidge prices the labor and materials at your rates.

  • Good
    $7,850
  • Better
    $8,950
    Recommended
  • Best
    $11,600
From the designSent to the quote
Tiled area73.4 sq ft on 4 surfaces
Chevron to order82 sf, 25 boxes
Corner cut marks8 (CW-1 to CW-8)
Penny-round sheets25 (floor, curb, niche)
Edge trim39 LF Schluter-RONDEC
Drawing set24 sheets, 11 x 17

BidRidge web app, starting rates, materials supplied, from the designer's template (4 rooms)

More in the guide

Try it on your own job

Open the sample, change it to your measurements, and send it to a BidRidge quote. Drawing is free; the drawing set, the lists and the quote come with a BidRidge license or the 14-day trial.

In the designer, tap Open project and pick the sample file. It opens exactly as in the video.

Sample designs: names, sizes and clients are made up. Prices are BidRidge's starting rates; set your own. The designers check against common guidelines (IRC, NKBA and the makers' published numbers) to help you catch mistakes. They don't replace your building department or the manufacturer's installation instructions: verify with them.