BidRidge › Designers › Guide › Chapter 28

Chapter 28 · Tile DesignerBeta

Sample hotel: restrooms, a kitchen and floor drains

The wet rooms of the same sample hotel: restrooms and a locker room sloped in a zone around each floor drain, a kitchen sloped whole on a slab sloped by others, a roll-in shower with ADA checks, slip resistance, quarry tile with sanitary cove base on a chemical-resistant epoxy system, and the typical details with their TCNA methods.

In the Tile Designer, tap Open project and pick the sample file, or tap Open the sample hotel on the Building plan card: it is the same job.

Narrated walkthrough, 1:58. Captions on.

The sample in numbers

  • Floors to drains
    4
    3 in zones (36″, 36″, 48″) · the kitchen whole
  • Drains
    5
    4 floor drains · 1 linear (roll-in shower)
  • Deck mud
    34 bags
    60 lb, the zones' mortar beds only
  • Cove base
    248 LF
    16 inside corners · CB-1 and BASE-2
  • Quarry tile
    251.9 sf
    QT-1 on a chemical-resistant epoxy system
  • ADA checks
    5 OK
    standard roll-in shower, 2010 ADA Standards

Step by step

Step 1: Floor drains on the plan in the Tile Designer

Step 1: Floor drains on the plan

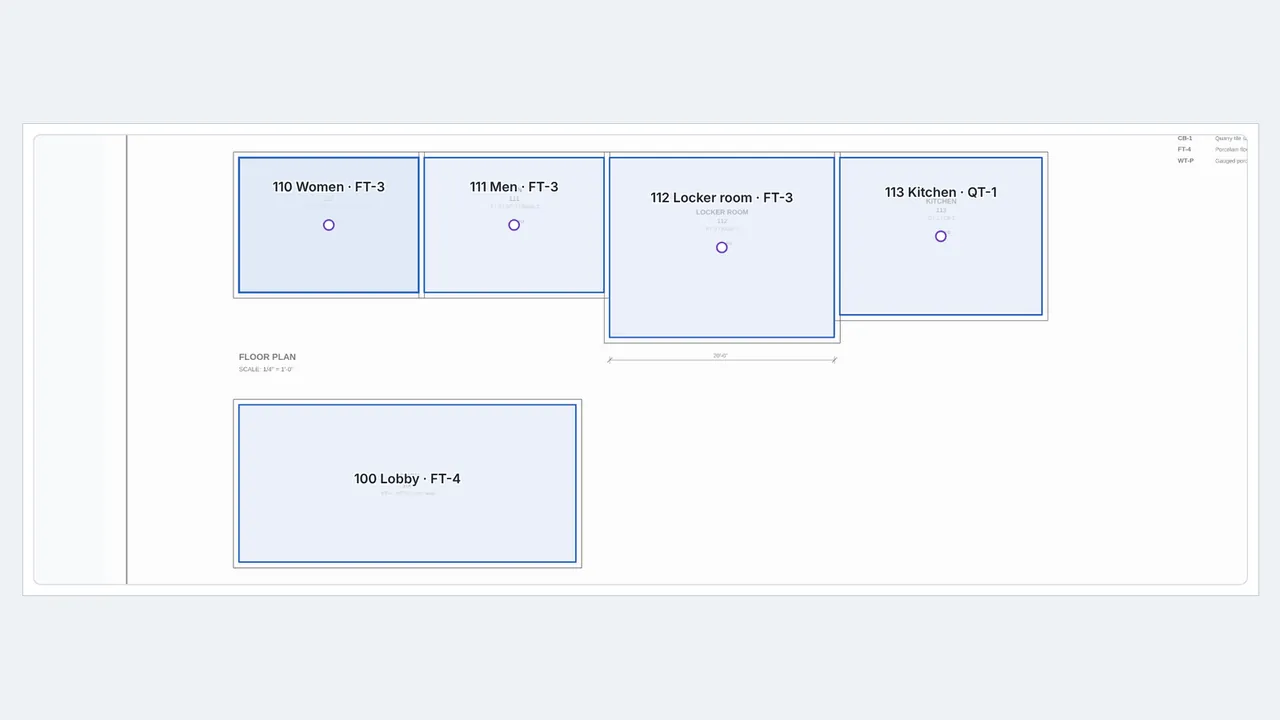
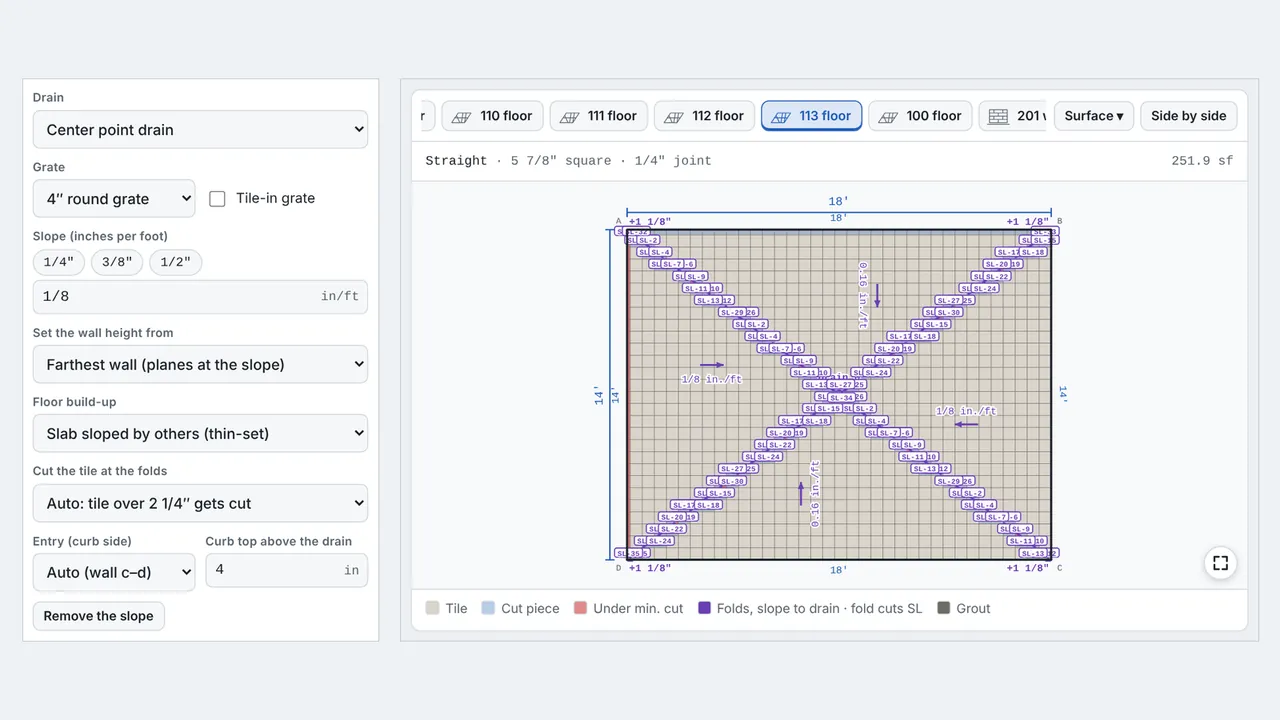
On the Building plan, Floor drain puts a drain on the floor of the room you click, where the architect's plan shows it. The sample has one in 110 Women, 111 Men, 112 Locker room and 113 Kitchen, and a linear drain in the roll-in shower.

Step 2: A floor area, not a shower in the Tile Designer

Step 2: A floor area, not a shower

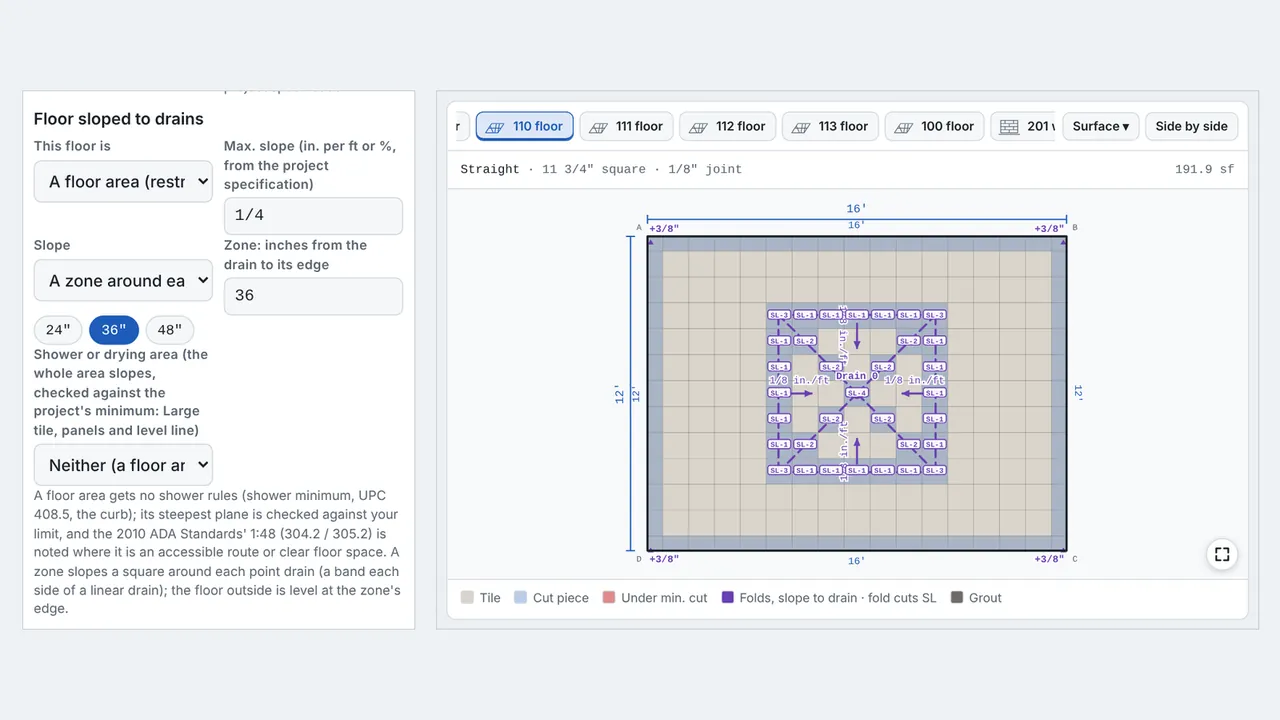
Open the floor. Under Floor sloped to drains, set This floor is: A floor area (restroom, locker room, kitchen) and type the maximum slope from the project specification (1/4 in. per ft here). A floor area gets none of the shower rules (the shower minimum, UPC 408.5, the curb); its steepest plane is checked against your limit.

Field tip: Where it is an accessible route or clear floor space, the 2010 ADA Standards' 1:48 (304.2 / 305.2) is noted.

Step 3: The whole floor, or a zone at each drain in the Tile Designer

Step 3: The whole floor, or a zone at each drain

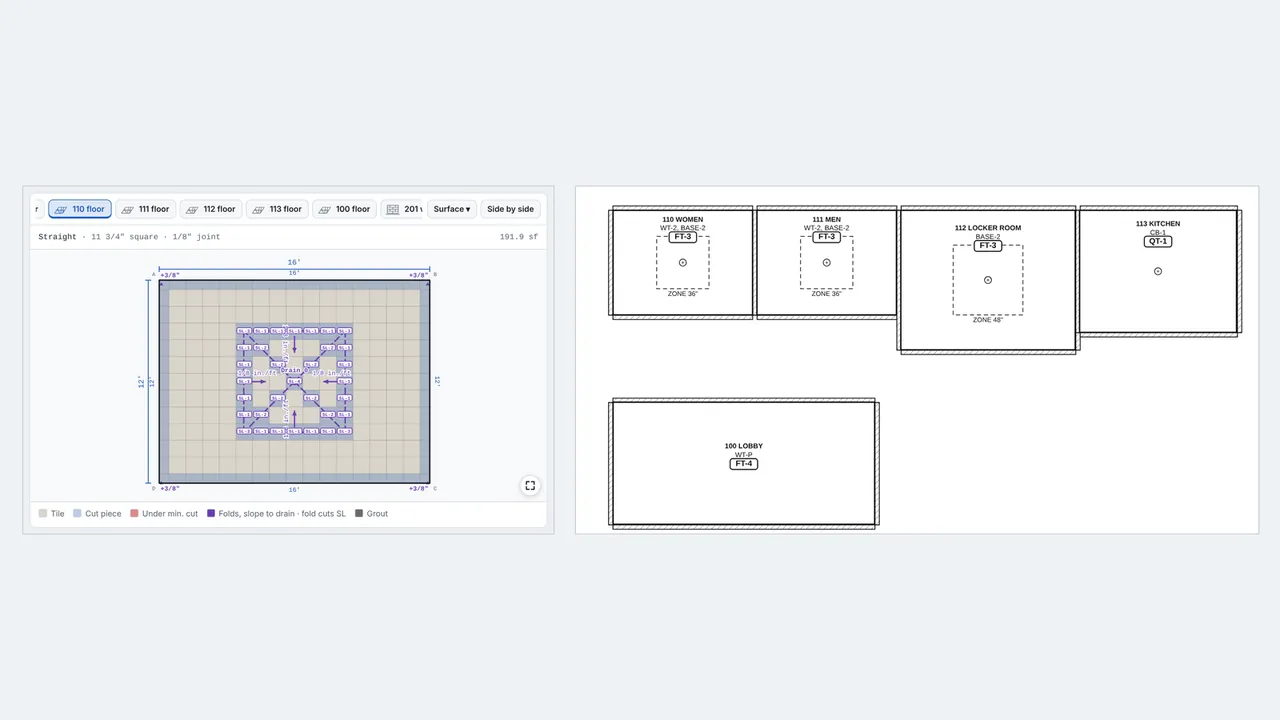
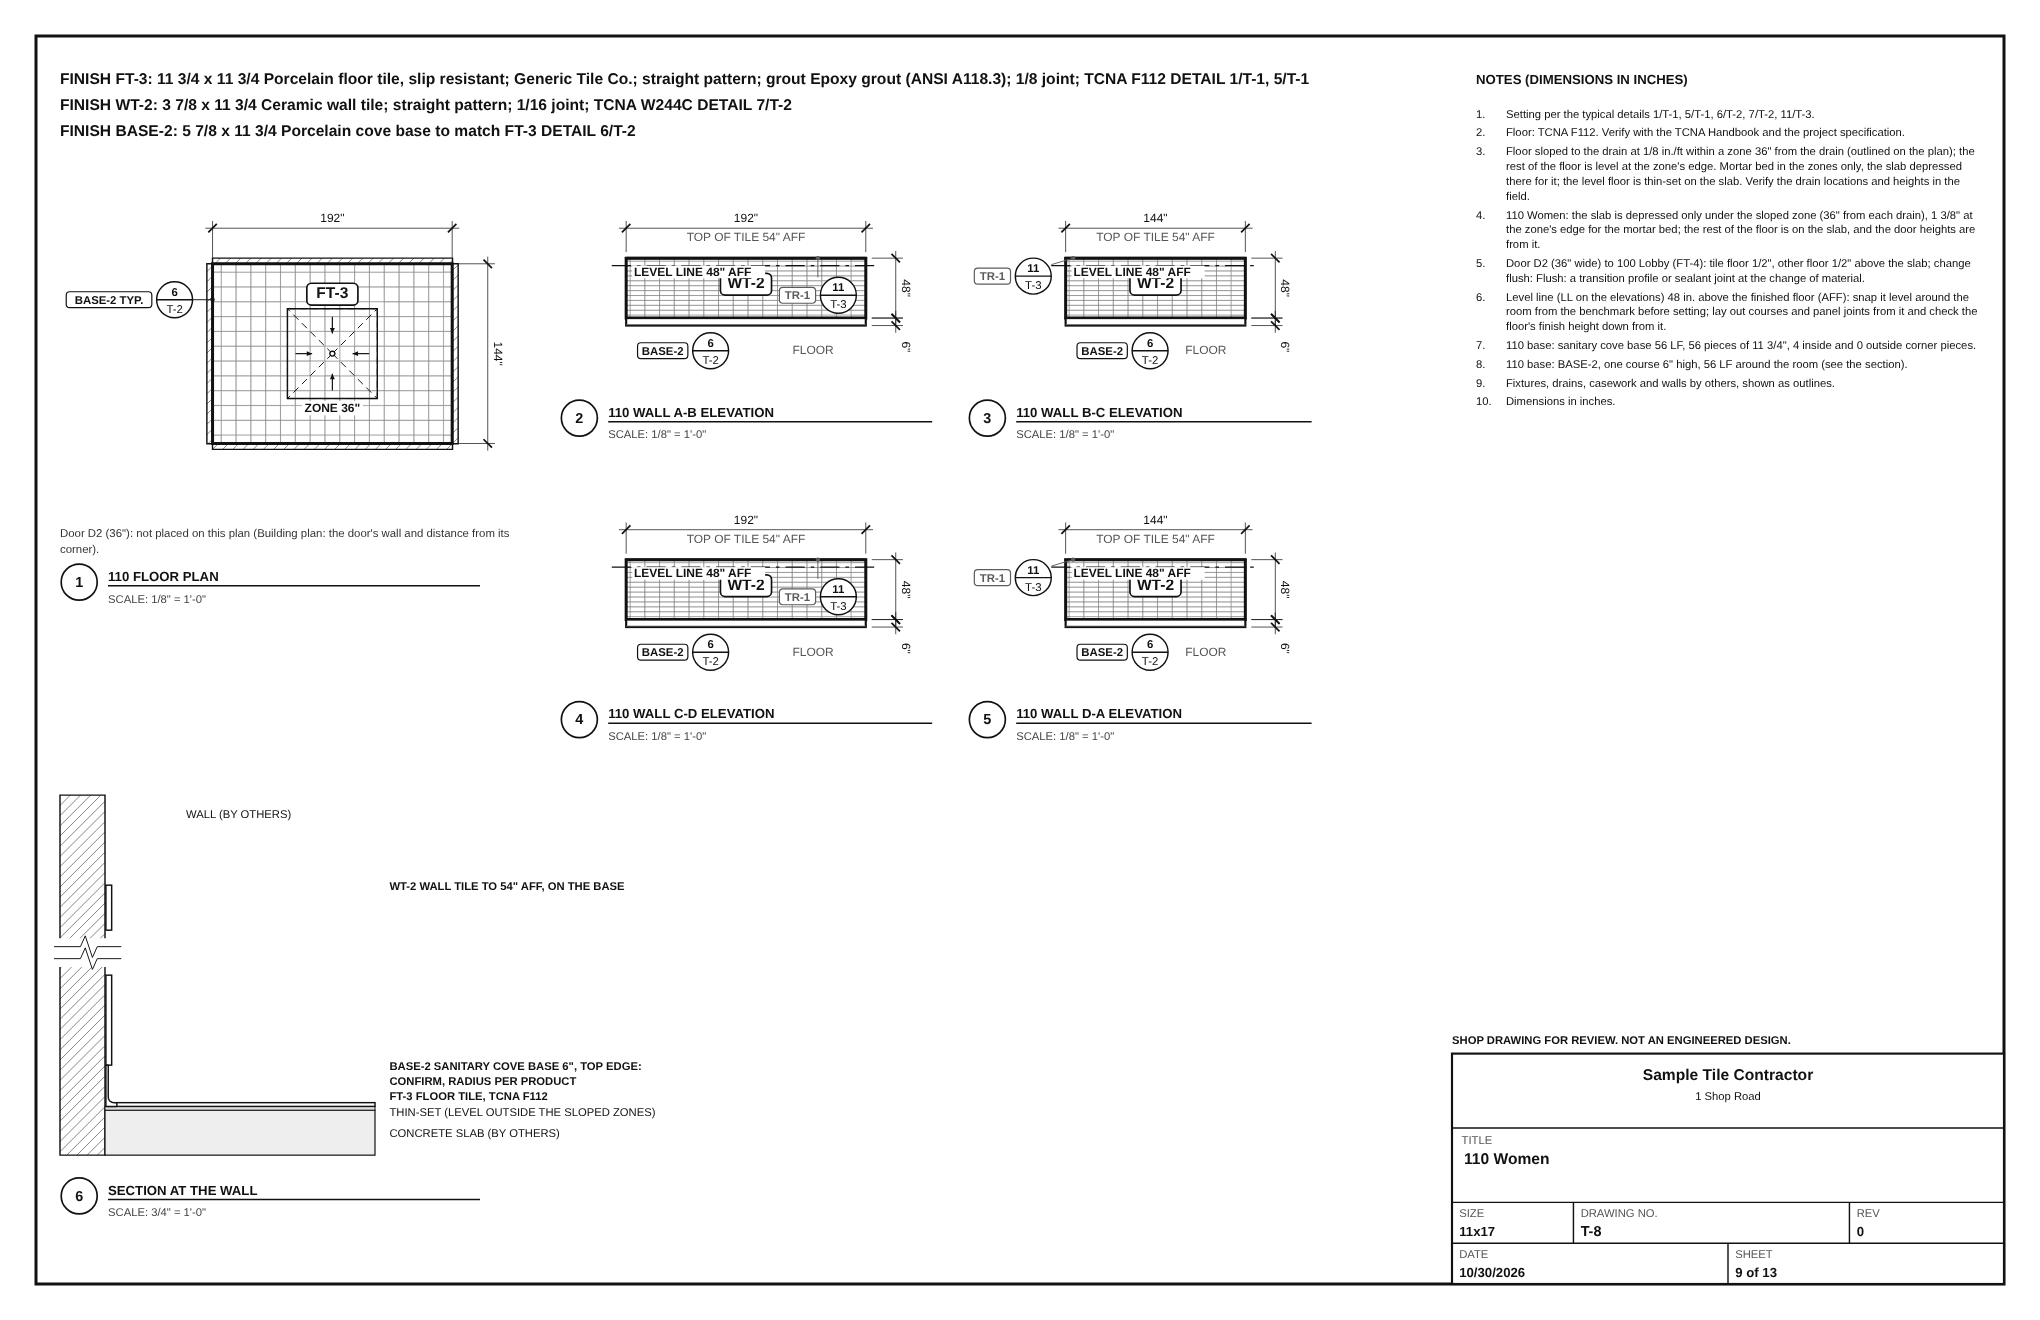
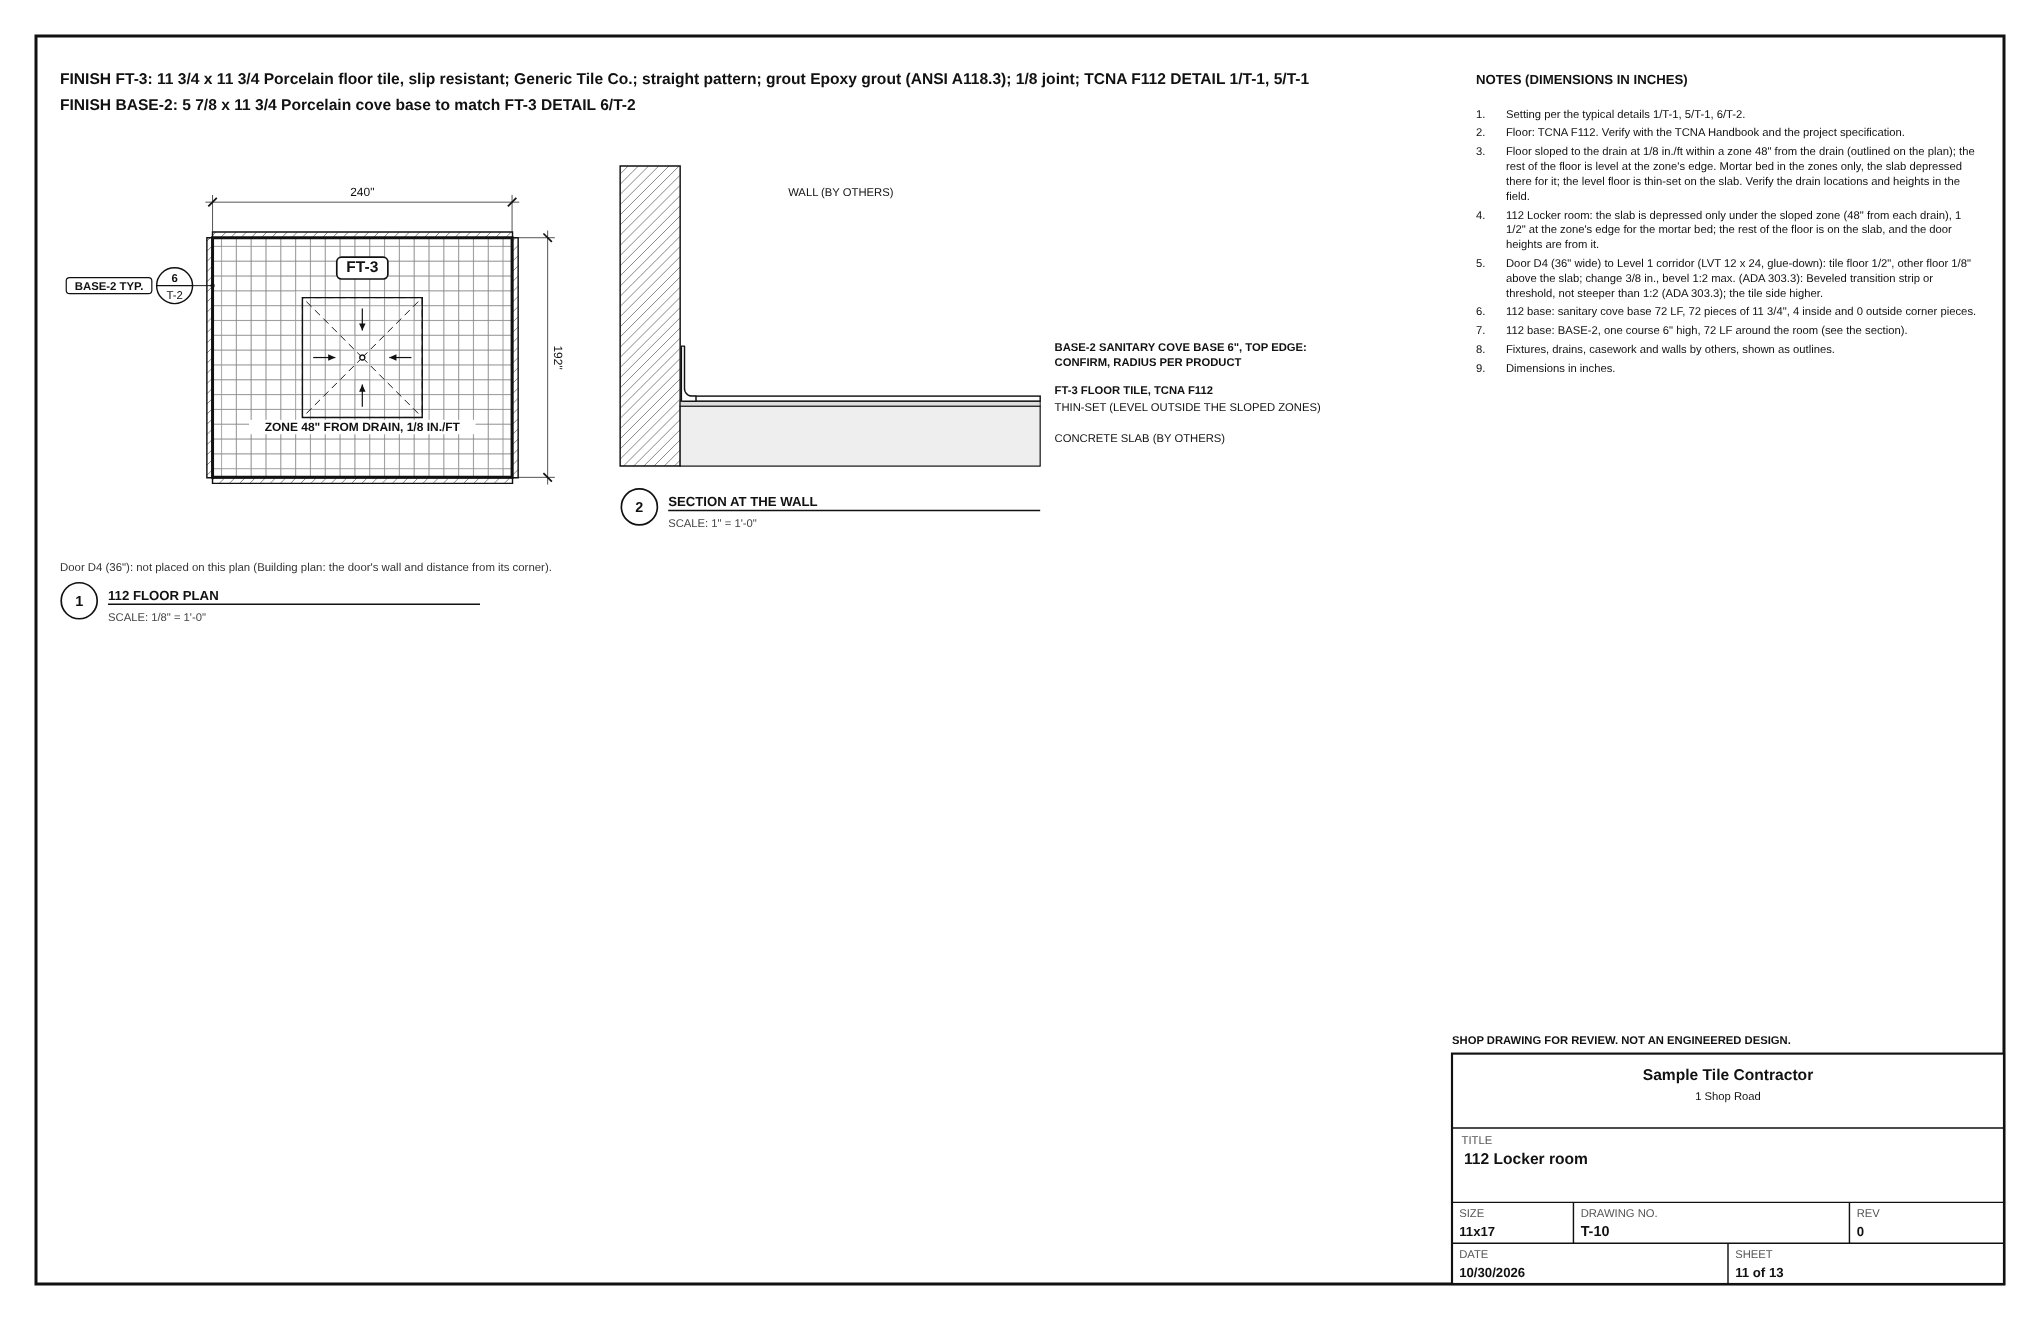
Slope: A zone around each drain slopes a square around each point drain (a band each side of a linear drain) and keeps the rest of the floor level. Type the size or tap 24″, 36″ or 48″. 110 and 111 slope 36″ from the drain, 112 48″, at 1/8 in. per ft; the zones print dashed on the floor finish plan.

Field tip: Zones that would overlap are refused, and the message gives the largest size that fits.

Step 4: Mortar bed, deck mud and fold cuts in the Tile Designer

Step 4: Mortar bed, deck mud and fold cuts

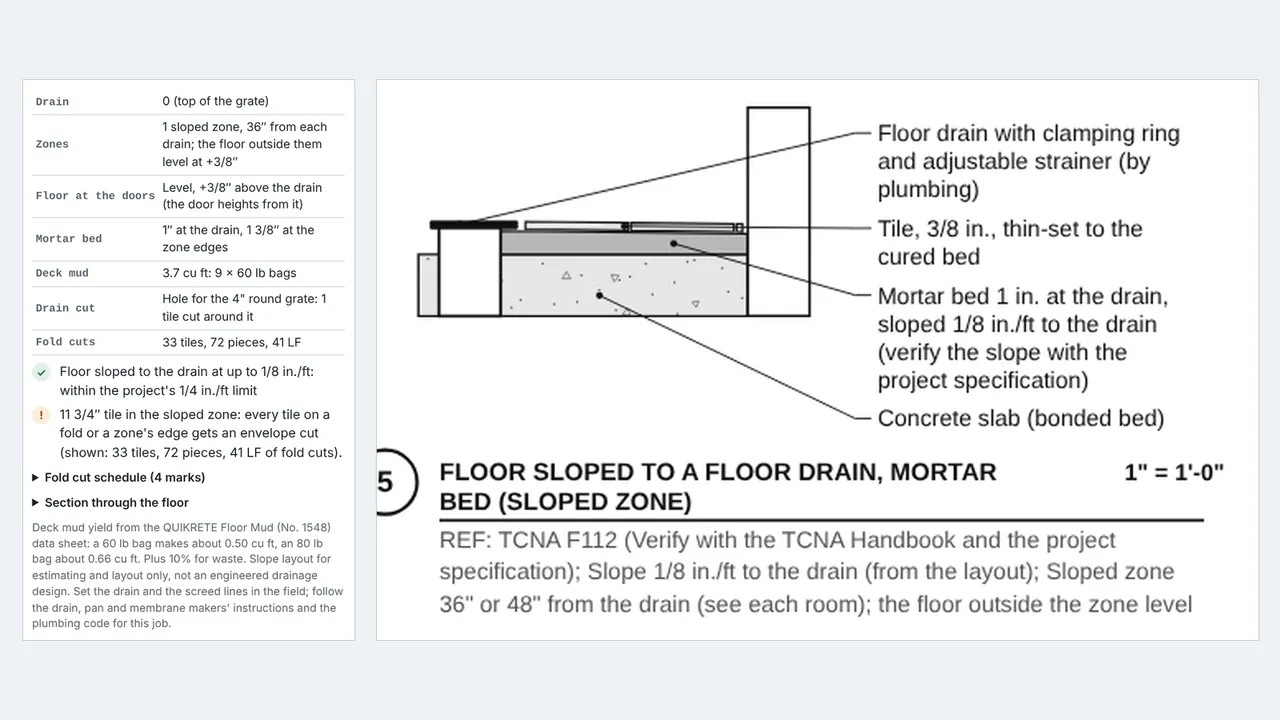
The Floor slope card works out the floor at the doors (level, 3/8″ above the drain in 110), the mortar bed (1″ at the drain, 1 3/8″ at the zone edge), the deck mud (9 bags of 60 lb in 110, 34 in the three rooms) and the fold cuts with their SL marks. The section shows the slab depressed only under the zone.

Field tip: Tile on a fold or on a zone's edge gets an envelope cut; the open checks count them.

Step 5: The kitchen: the slab sloped by others in the Tile Designer

Step 5: The kitchen: the slab sloped by others

113 Kitchen slopes as a whole floor to its center drain. Its method is TCNA F113 (thin-set), so its Floor build-up is Slab sloped by others (thin-set): no mortar bed and no deck mud, and the drain still goes to BidRidge. A mortar-bed method (F111, F112) makes it a sloped mortar bed instead.

Step 6: Shower and drying areas in the Tile Designer

Step 6: Shower and drying areas

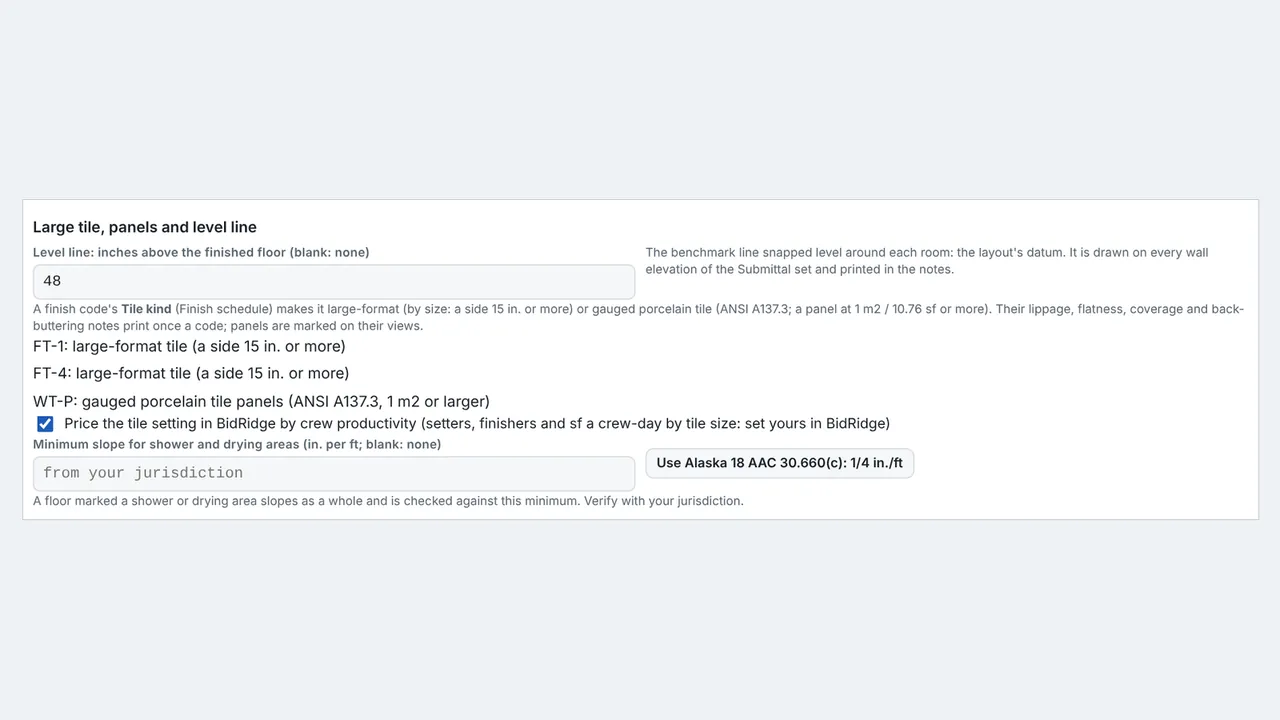
Tick A shower or drying area for a floor that has to slope as a whole, and set the Minimum slope for shower and drying areas under Large tile, panels and level line. Use Alaska 18 AAC 30.660(c): 1/4 in./ft fills in the Alaska rule for public showers; verify with your jurisdiction.

Field tip: An area at exactly 1/4 in. per ft passes both this minimum and the ADA 1:48 maximum.

Step 7: A roll-in shower with ADA checks in the Tile Designer

Step 7: A roll-in shower with ADA checks

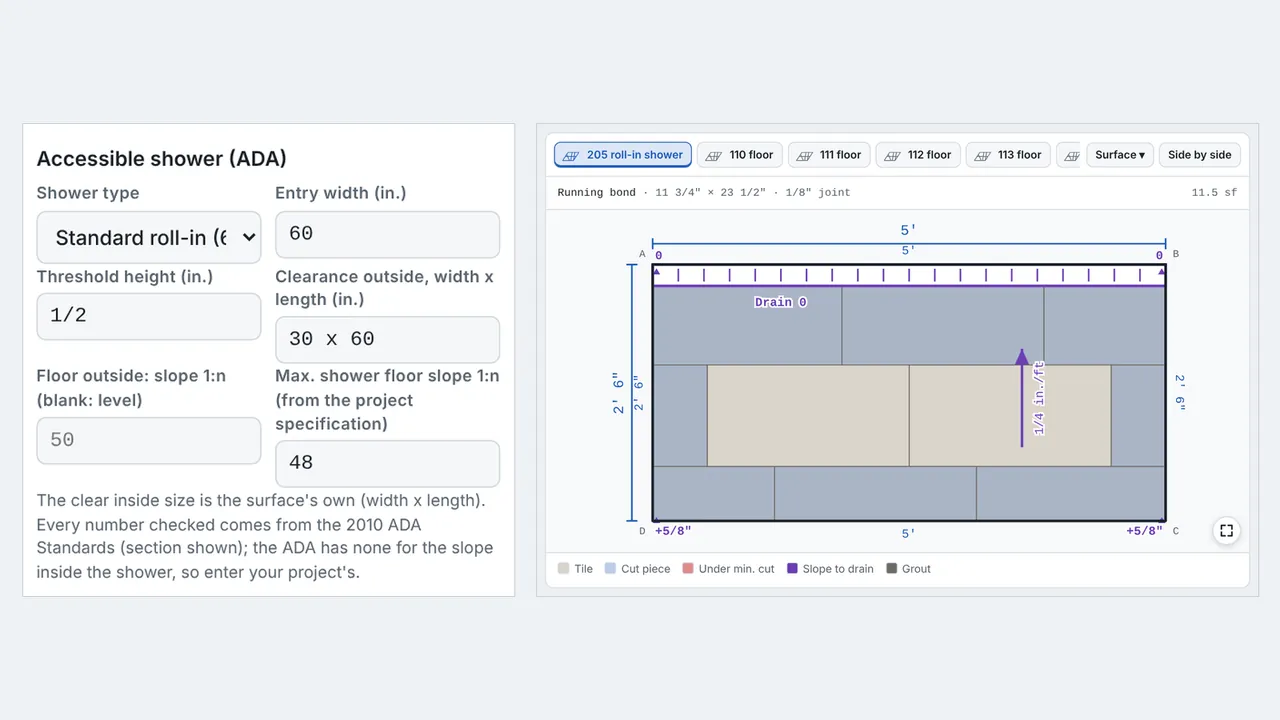
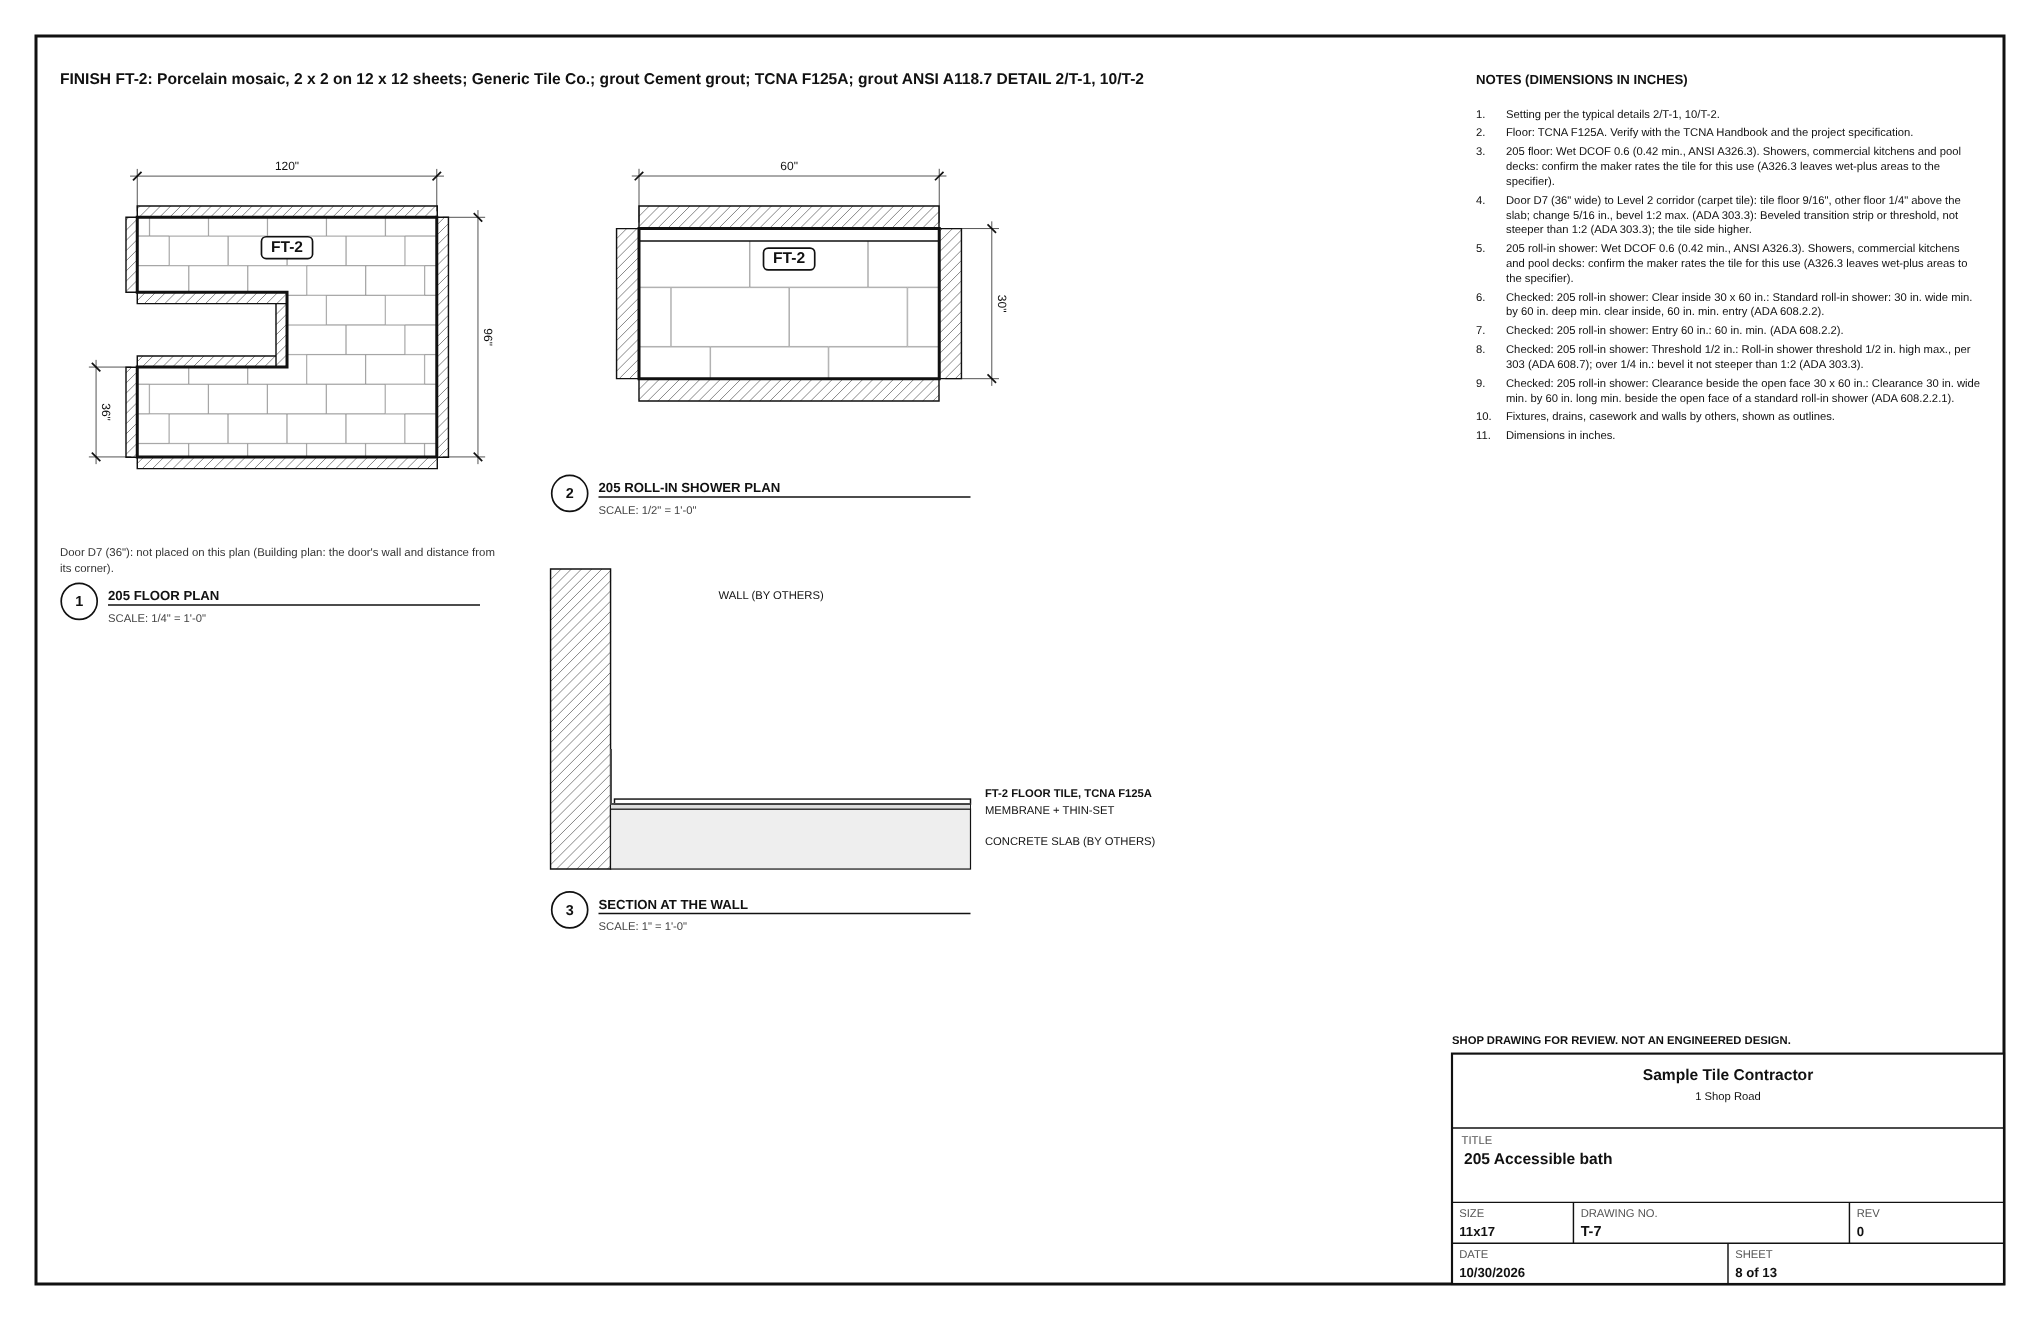
On 205 roll-in shower, Accessible shower (ADA): Standard roll-in (608.2.2), a 60 in. entry, a 1/2 in. threshold, a 30 x 60 clearance outside and the project's maximum shower floor slope (1:48). Each is checked against the 2010 ADA Standards with its section: the 30 x 60 inside size, the entry, the threshold (608.7, 303.3) and the clearance (608.2.2.1).

Field tip: The ADA gives no slope for the floor inside the shower, so there is no default: enter your project's.

Step 8: Slip resistance in the Tile Designer

Step 8: Slip resistance

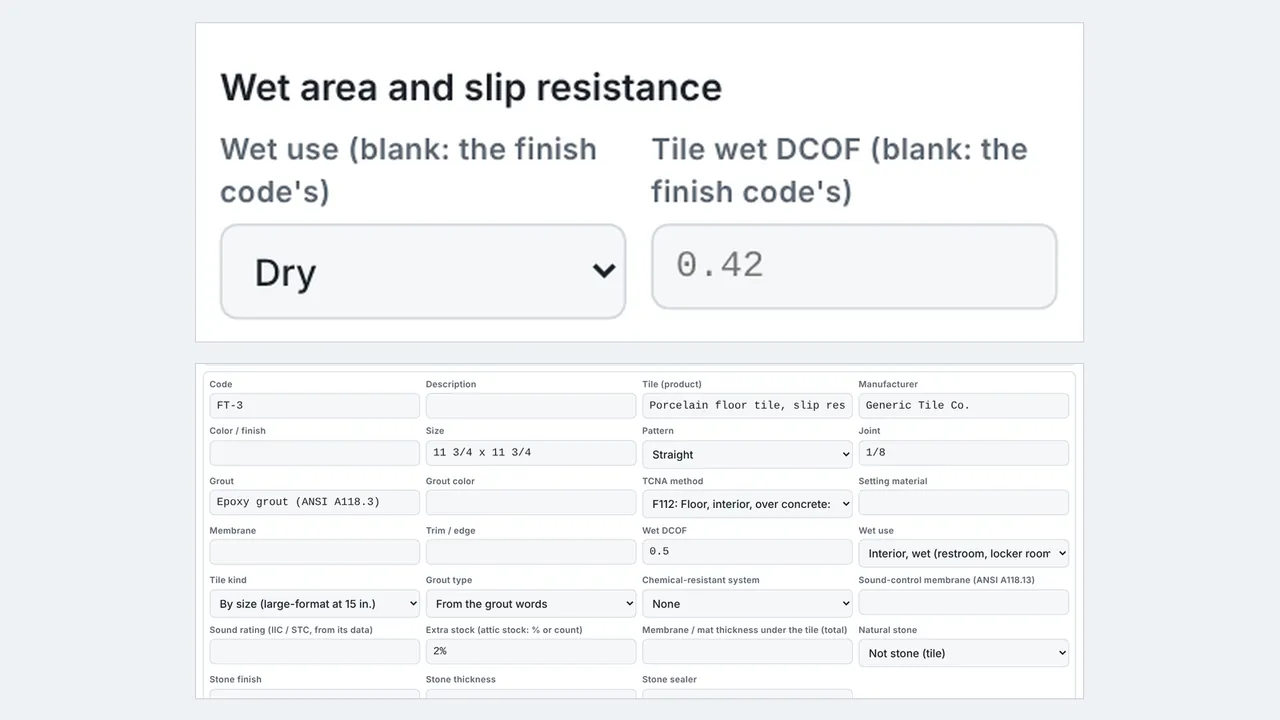
Wet area and slip resistance sets the wet use (interior wet, or wet plus for showers, commercial kitchens and pool decks) and the tile's wet DCOF, on the surface or on its finish code. Under 0.42 (ANSI A326.3) fails and a blank is asked for; wet plus also asks you to confirm the maker rates the tile for it.

Step 9: Quarry tile and sanitary cove base in the Tile Designer

Step 9: Quarry tile and sanitary cove base

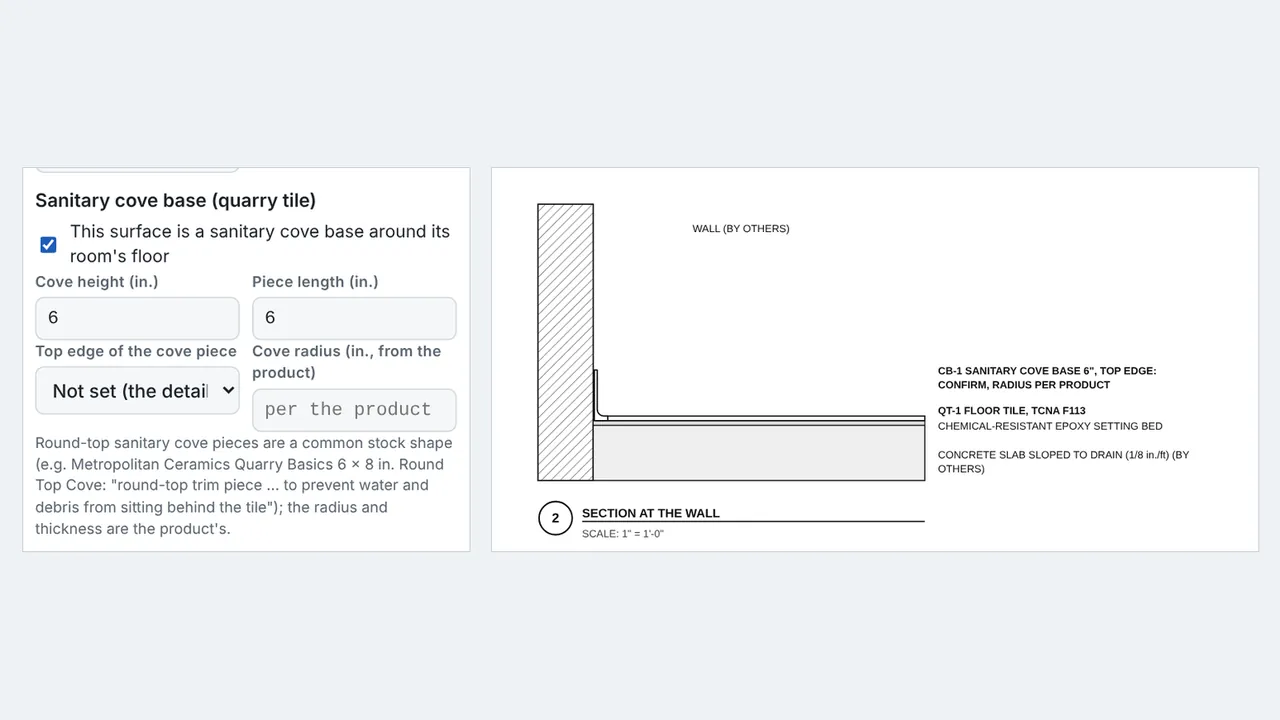
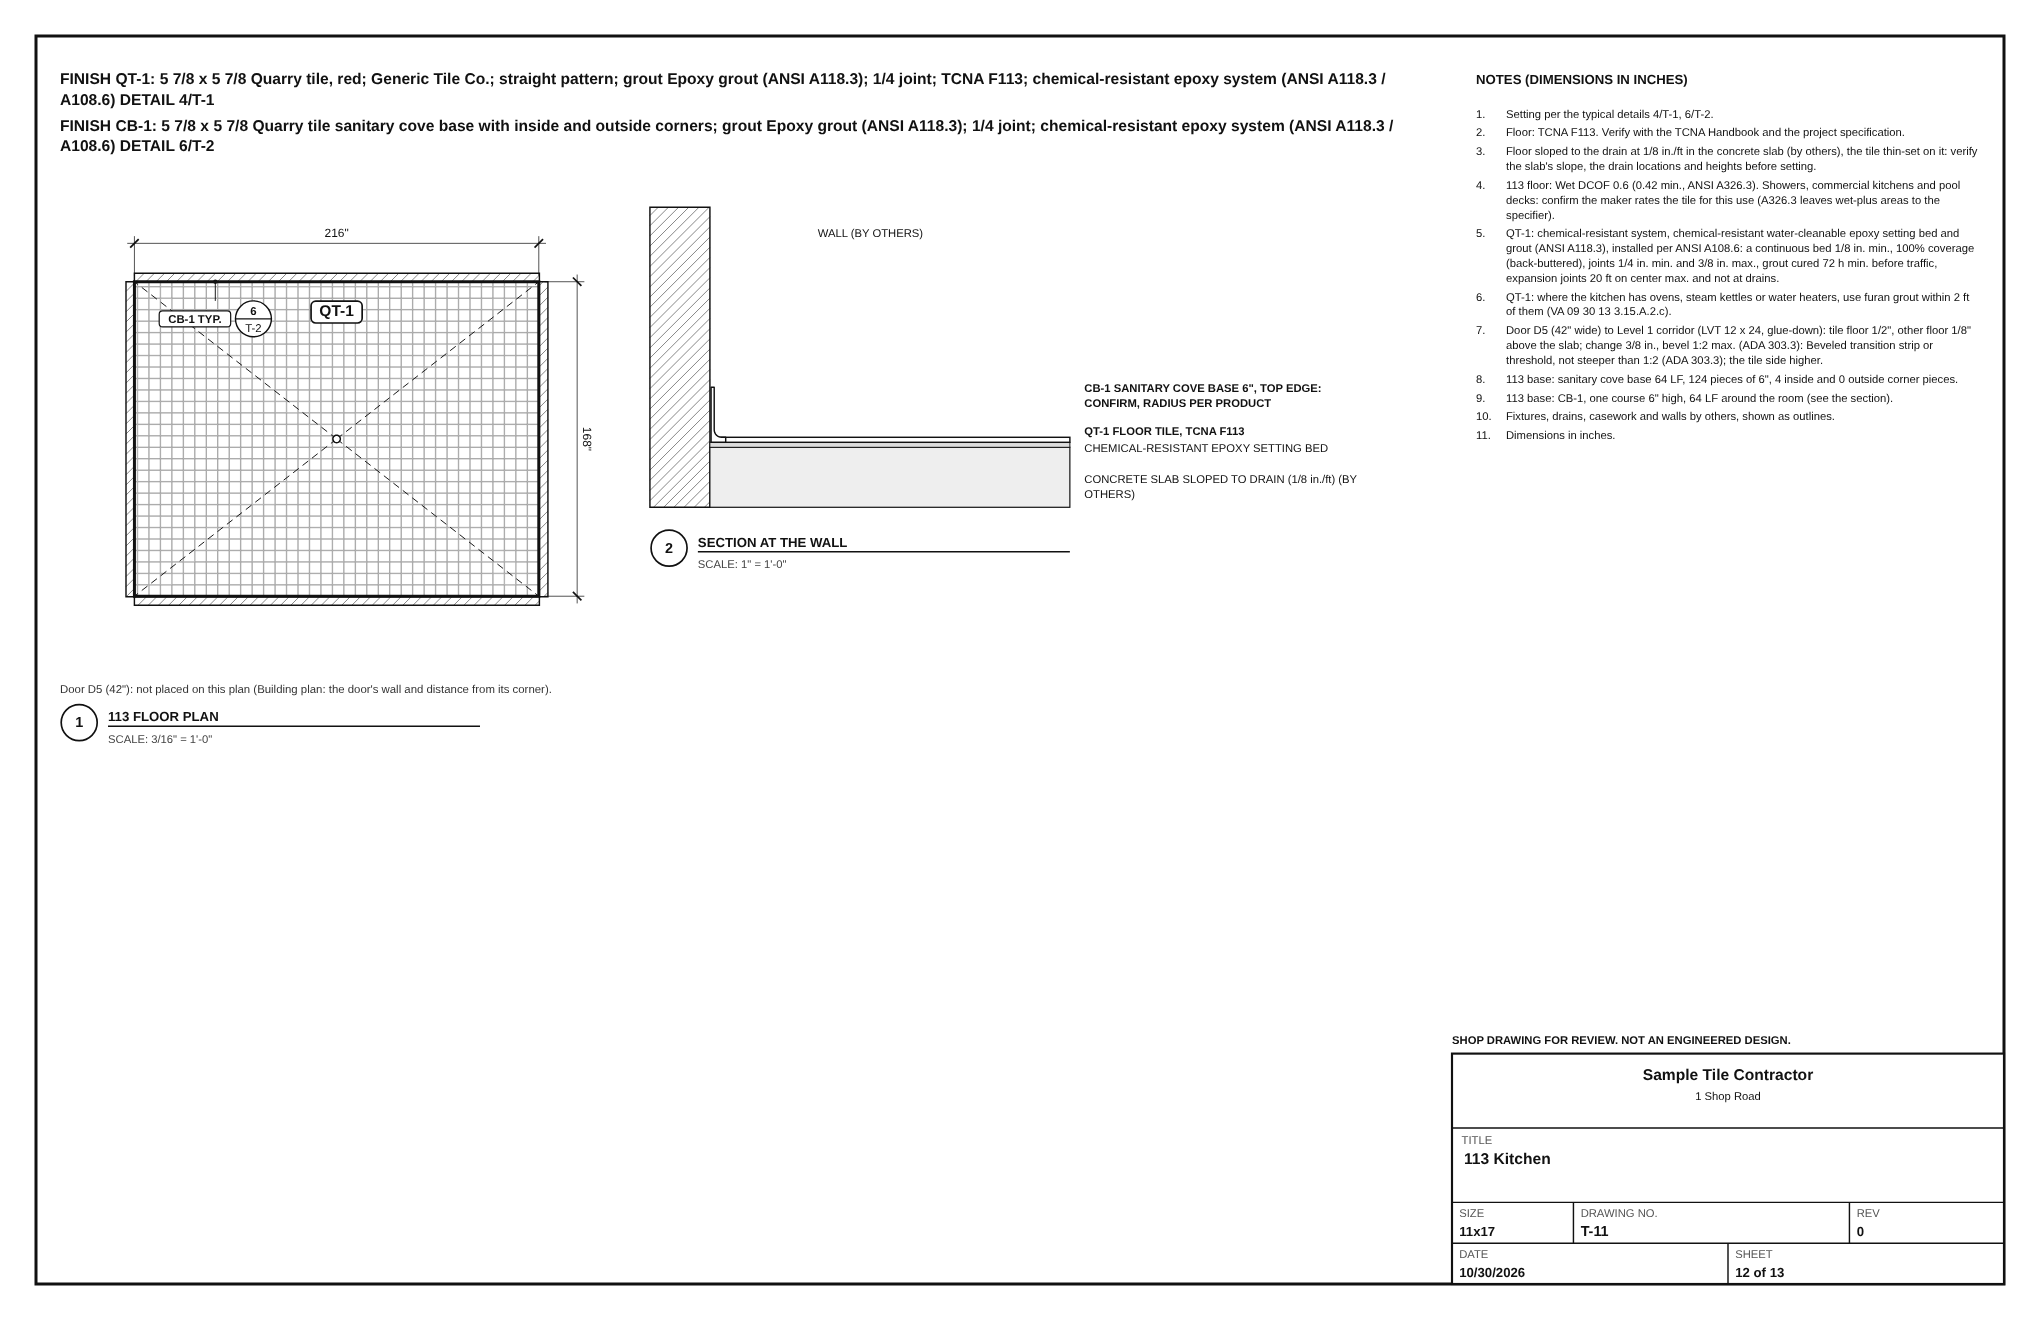
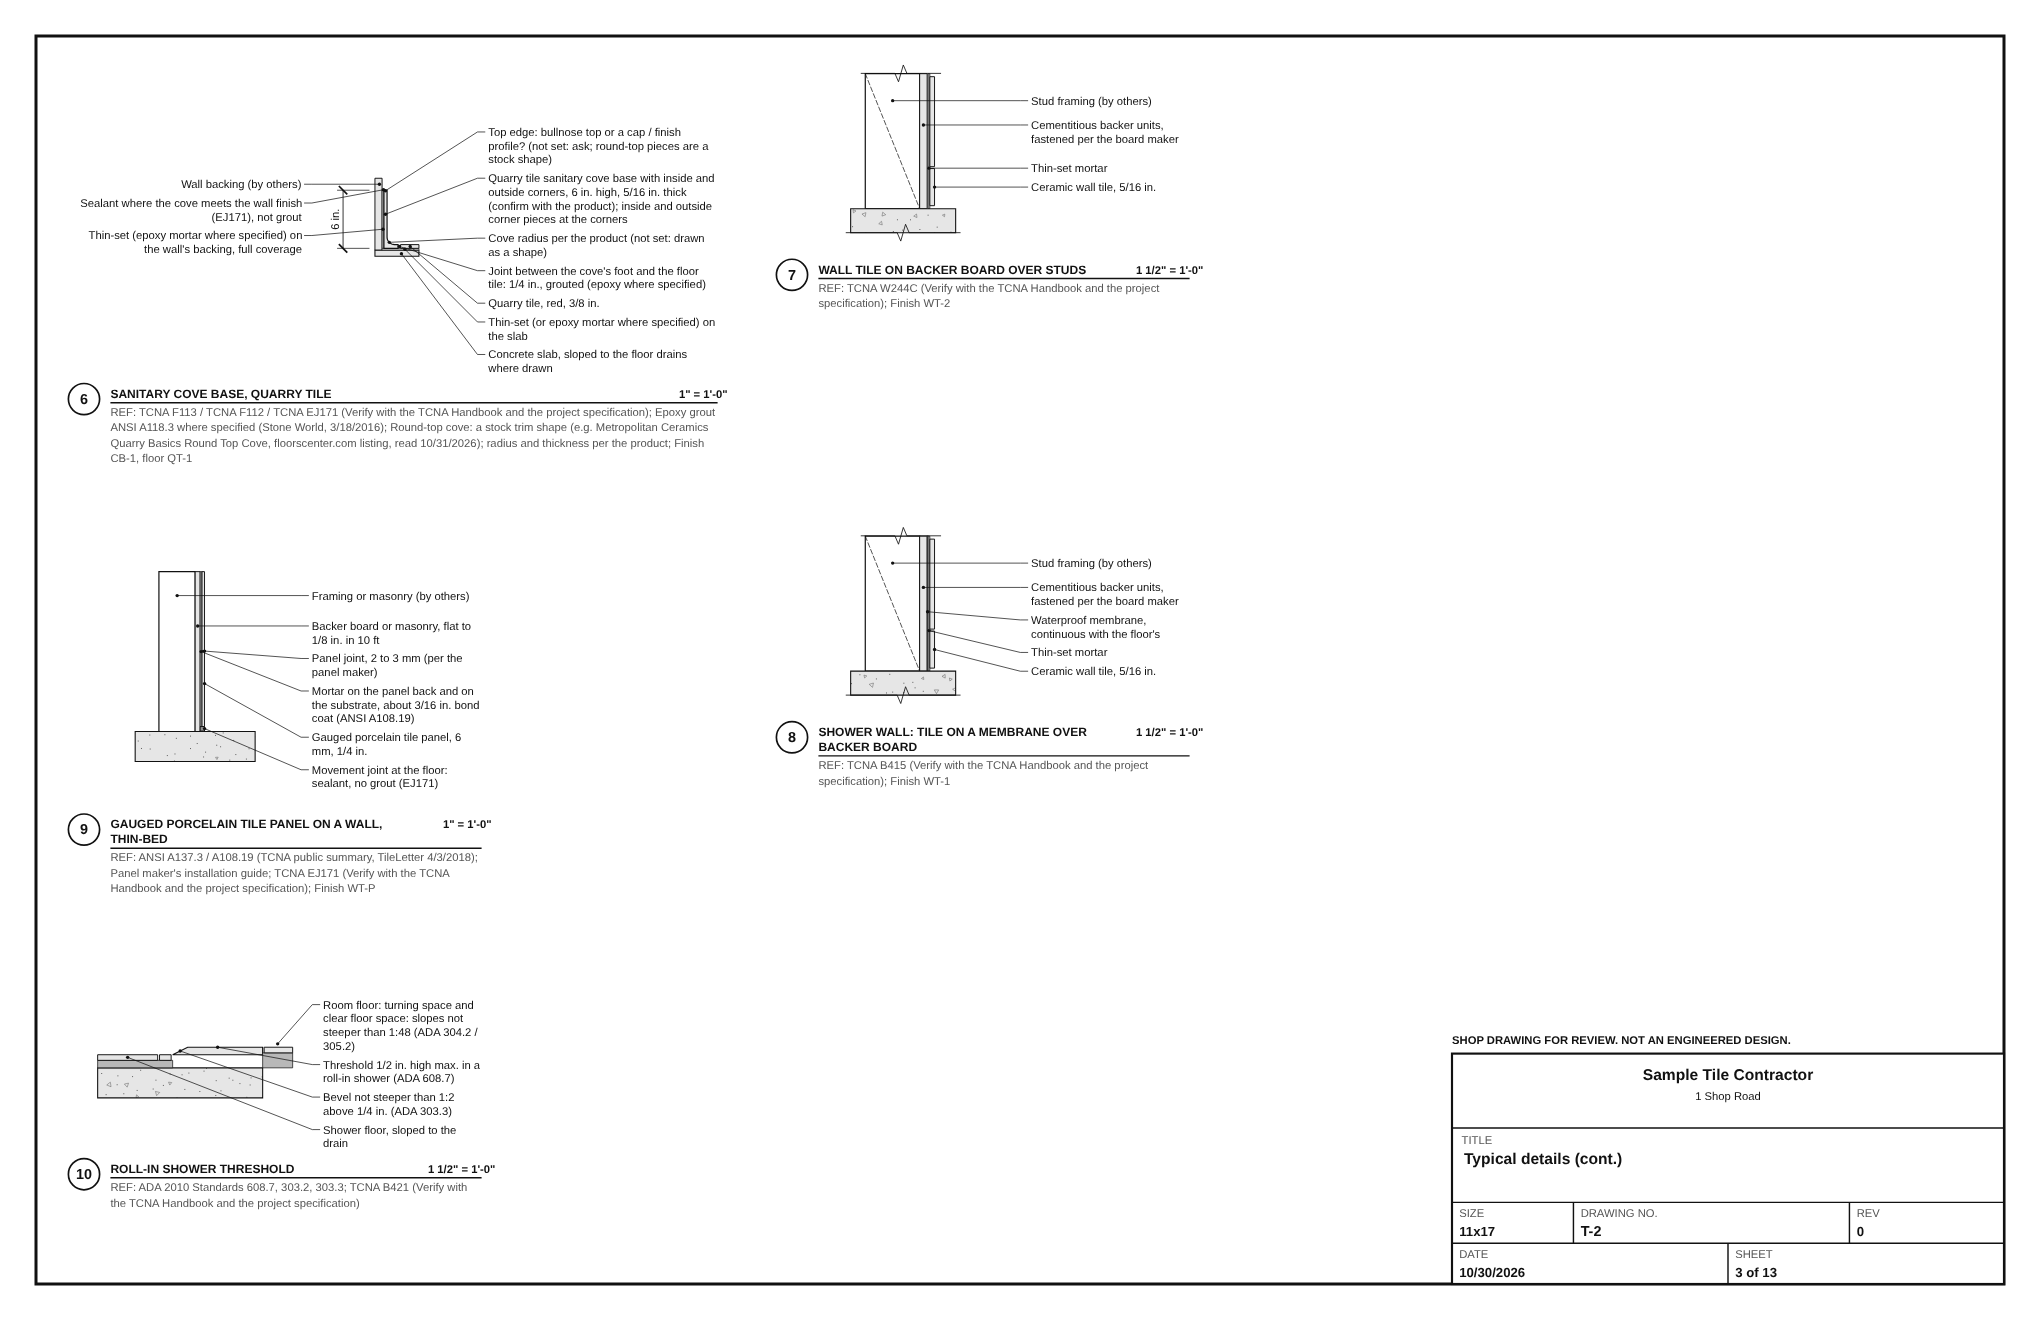
The kitchen floor is QT-1, a 5 7/8″ quarry tile: BidRidge gets its quarry tile sf. Its base is a surface with Sanitary cove base ticked: 6″ high in 6″ pieces, run from the room's floor outline with the inside and outside corners counted. The four bases come to 248 LF and 16 inside corners. Its Top edge (a bullnose top or a cap) and Cove radius go on the cove detail; a cove base gets no metal trim on top, since the cove piece has its own finished top.

Step 10: A chemical-resistant epoxy system in the Tile Designer

Step 10: A chemical-resistant epoxy system

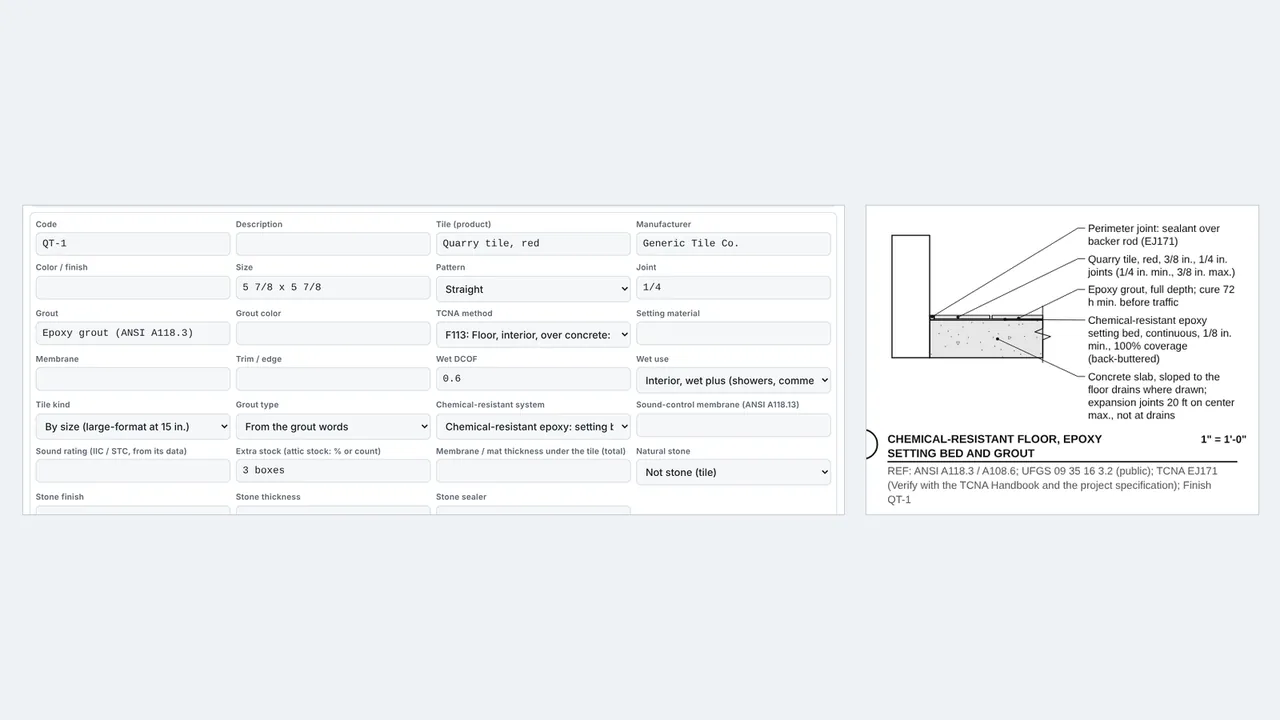
On QT-1, Chemical-resistant system: Chemical-resistant epoxy (ANSI A118.3, A108.6). The notes get the continuous bed, 100% coverage, joints 1/4 to 3/8 in., the 72 h cure and expansion joints 20 ft on center and not at drains; the floor gets its chemical-resistant detail, and BidRidge the chemical-resistant sf.

Field tip: A base or cove in that room not on the same system gets a check asking to confirm it.

Step 11: Typical details with TCNA methods in the Tile Designer

Step 11: Typical details with TCNA methods

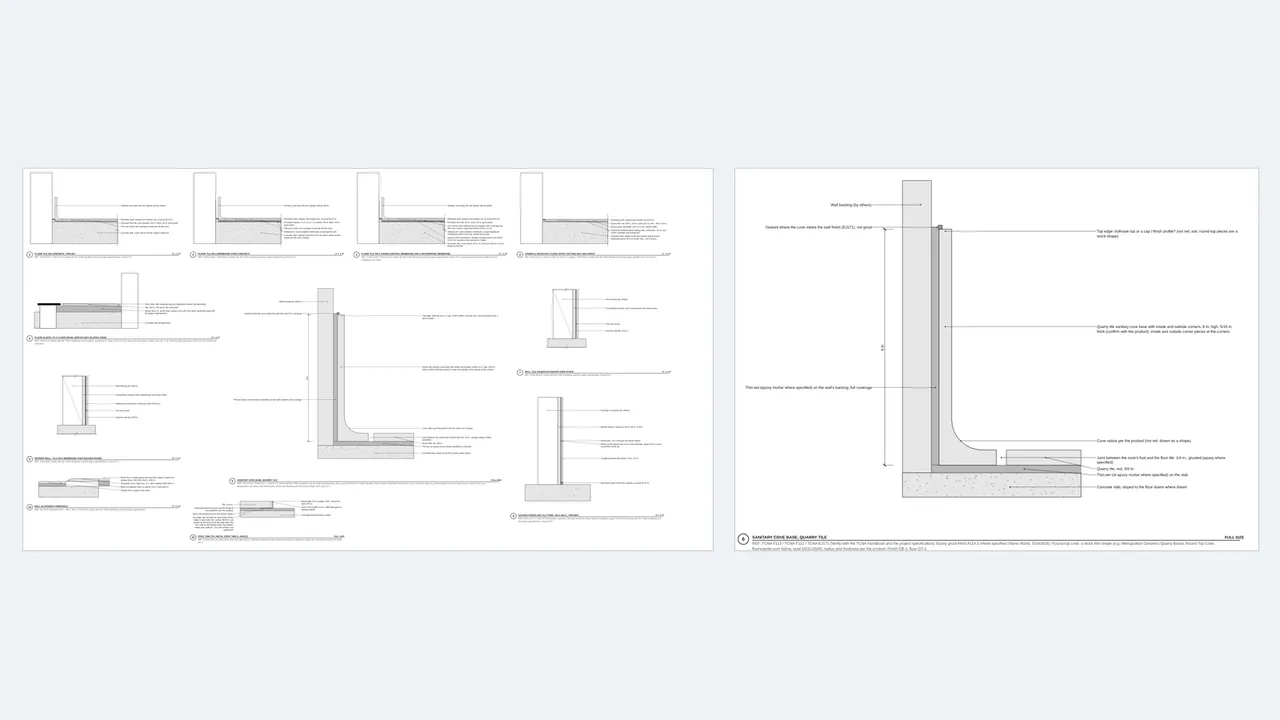
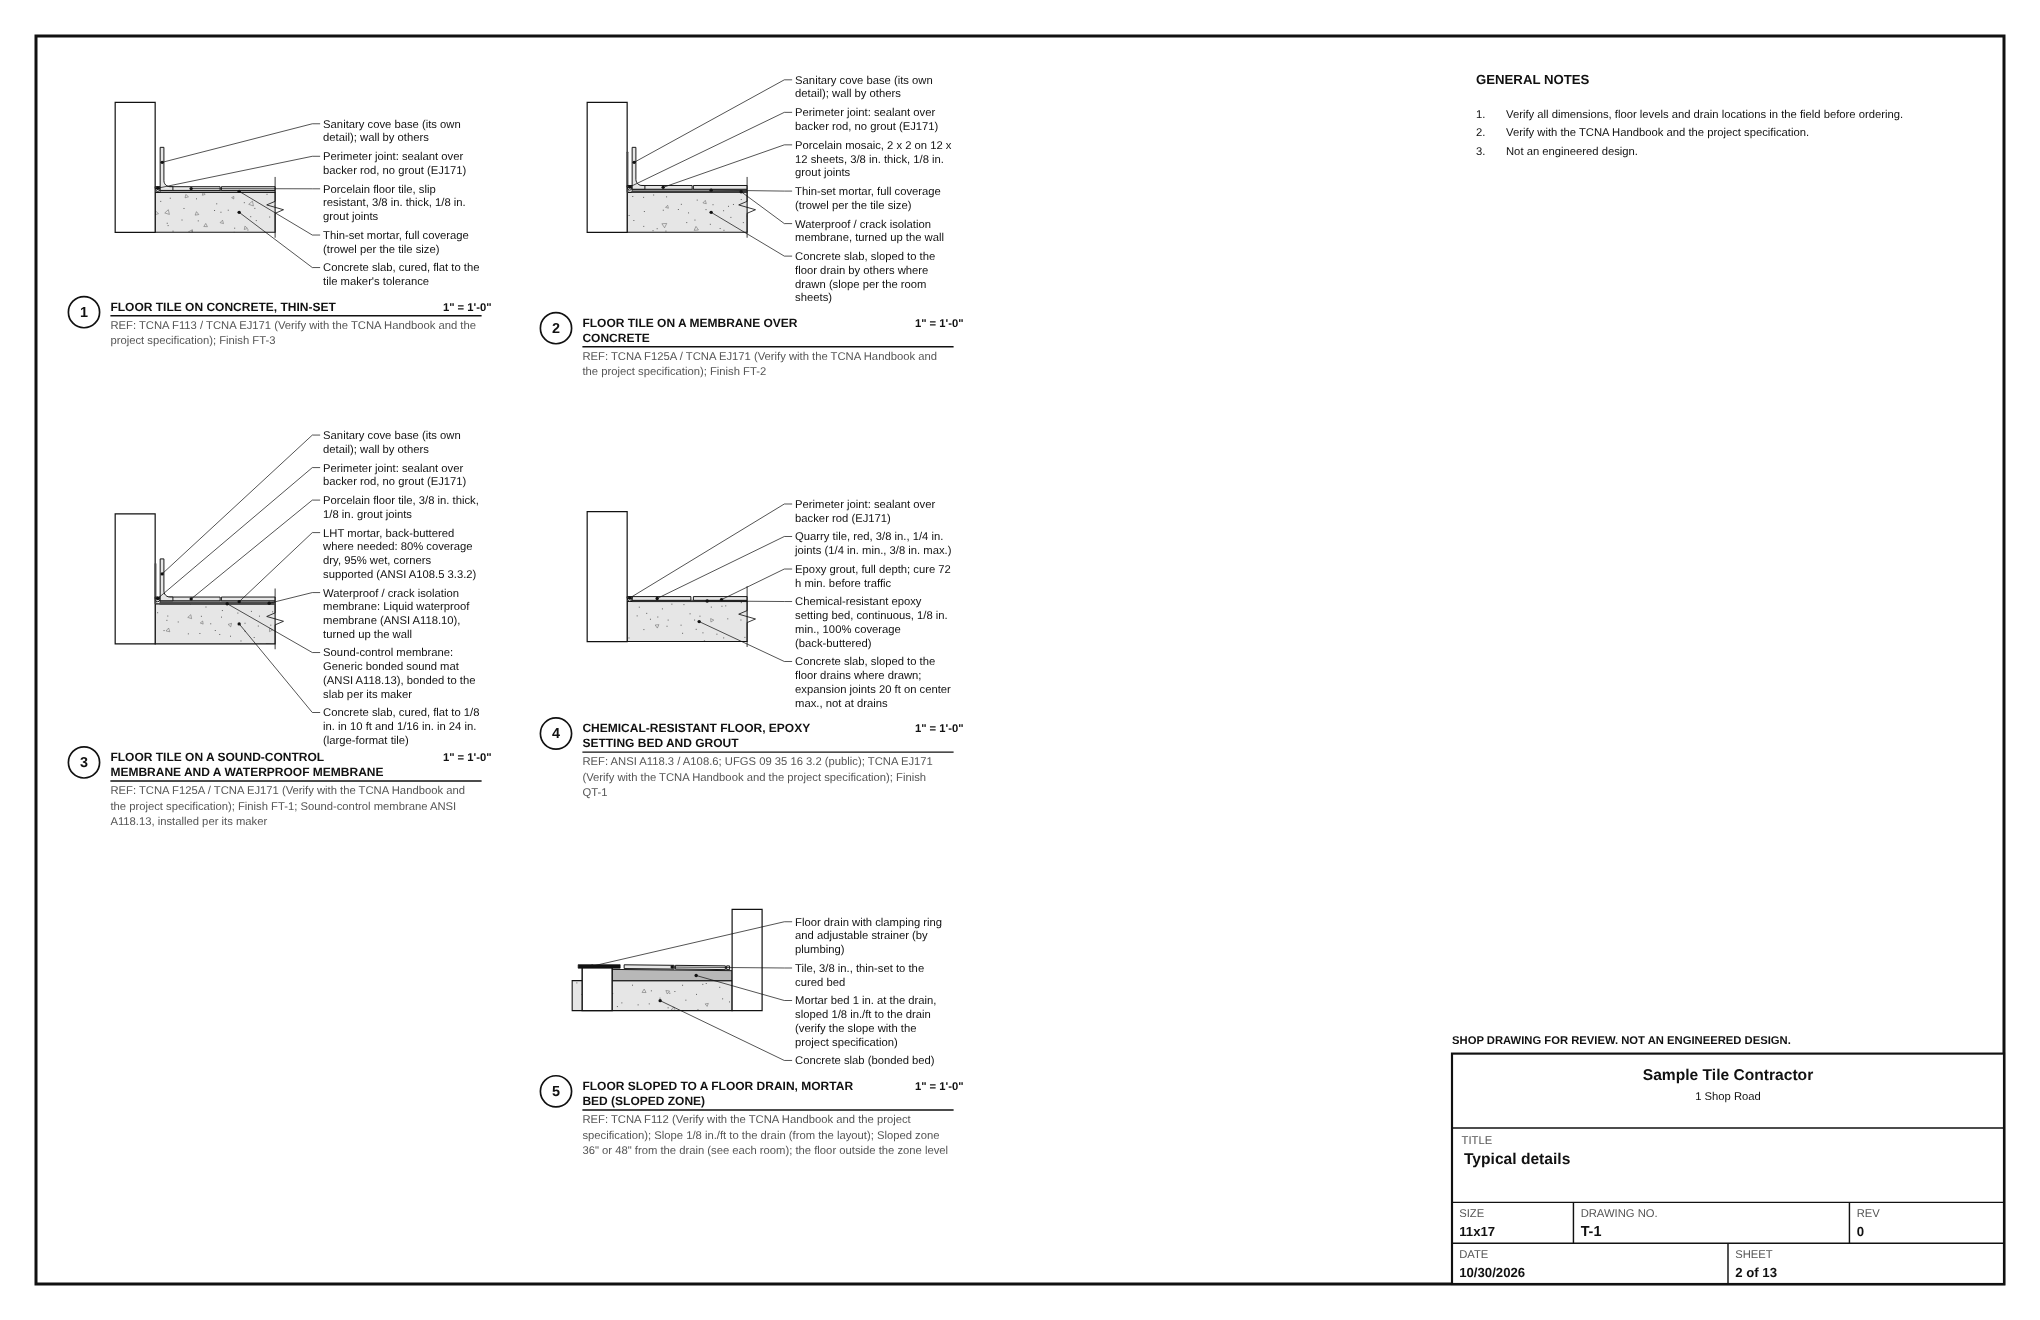
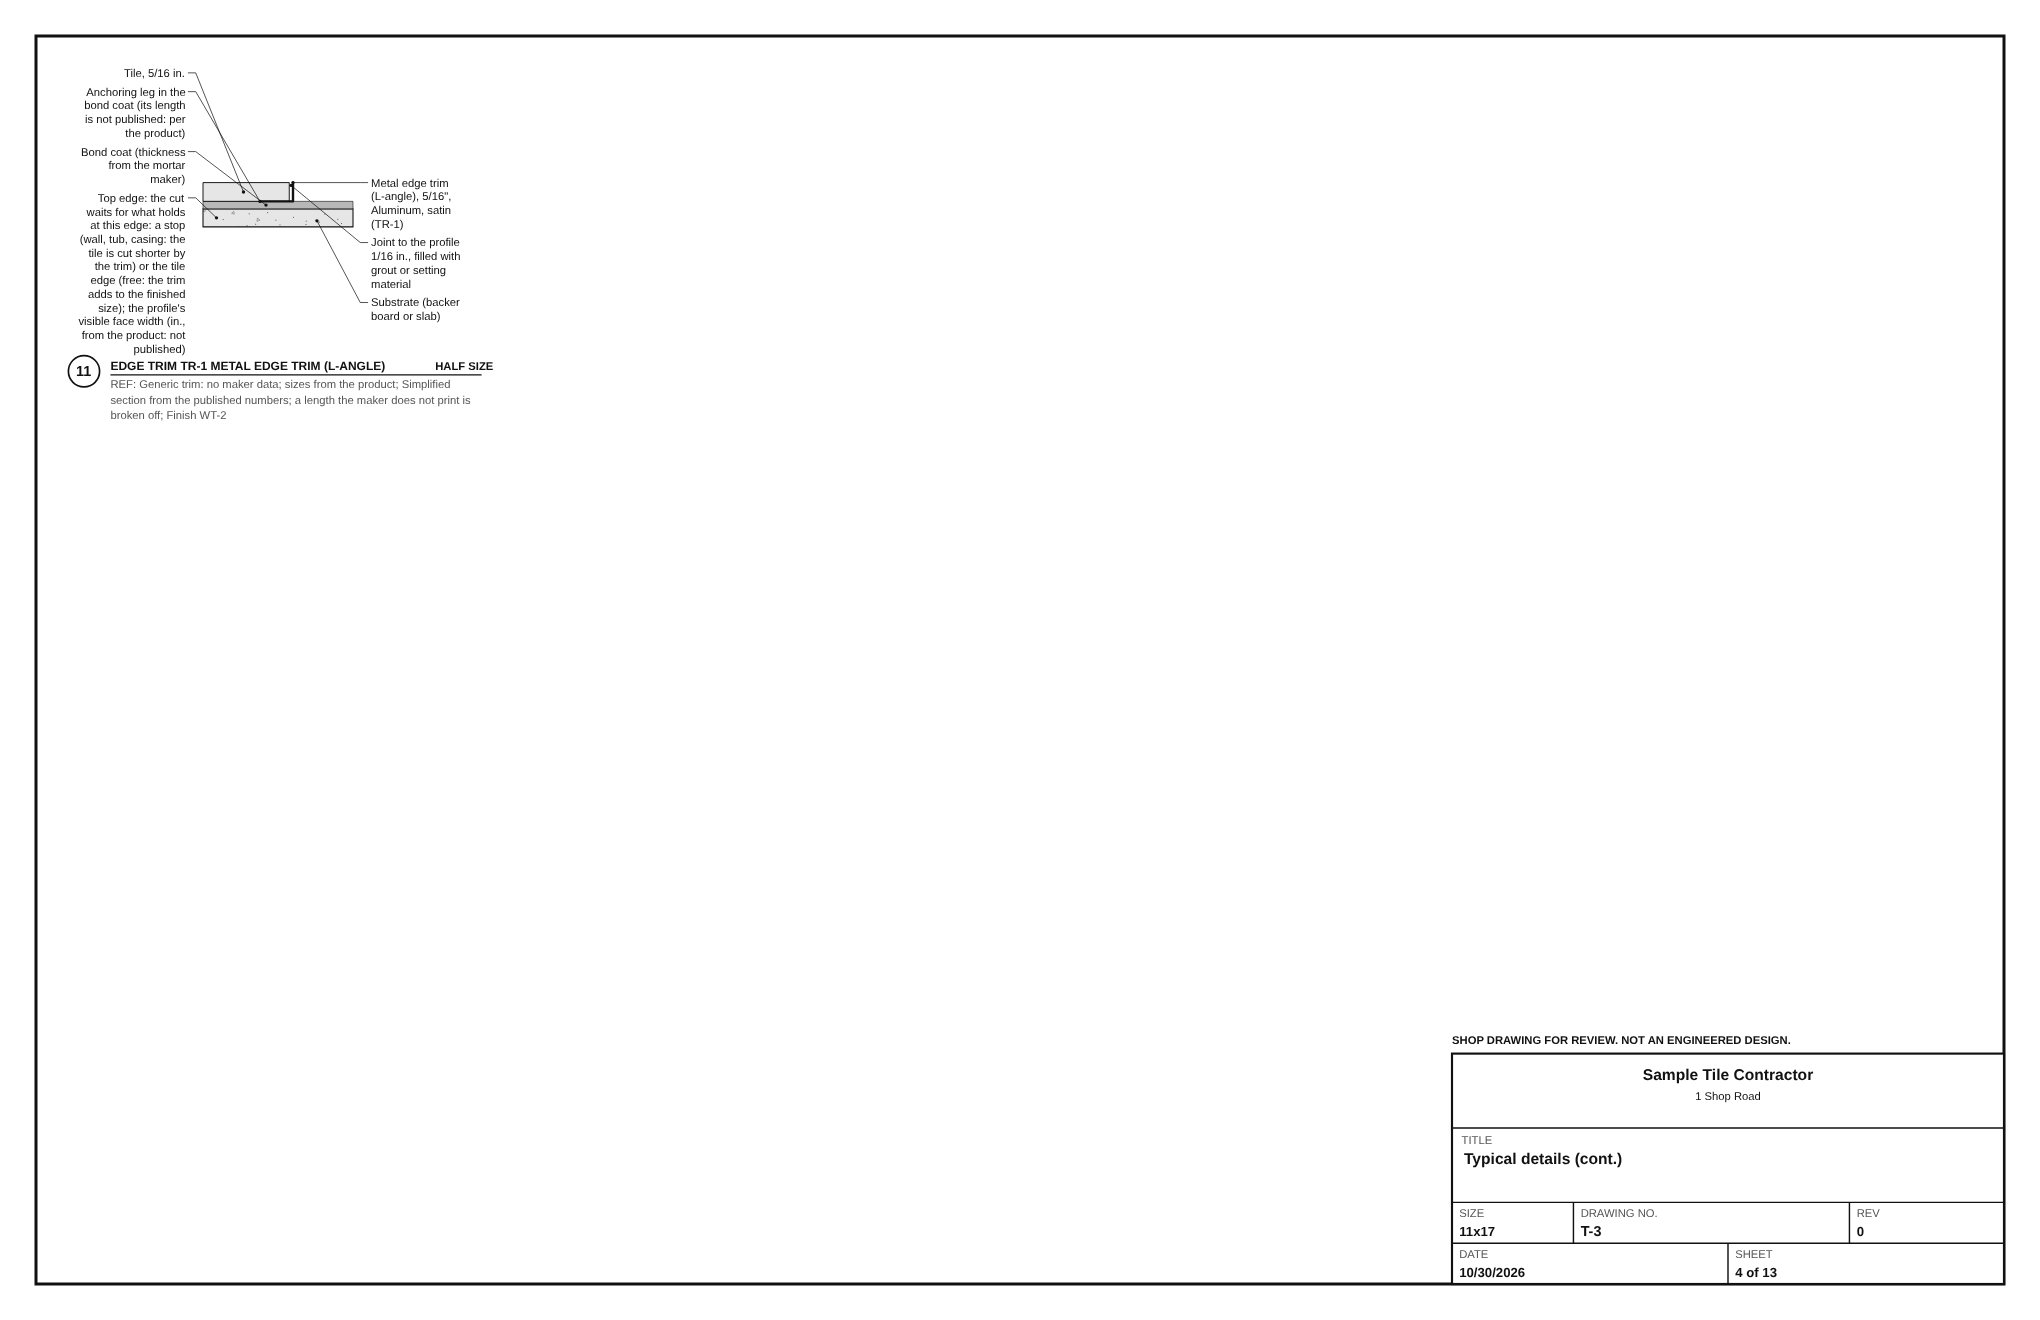
The Submittal set draws only the typical details the job uses, each with its REF line: thin-set on concrete (F113), on a waterproof membrane (F125A), on a sound mat, the chemical-resistant floor, the floor sloped to a drain on a mortar bed (F112, sloped zone), the cove base (at full size on the ARCH D details sheet: its radius, top edge, setting bed and joints), the roll-in shower threshold, and a detail for each trim the job uses (here the metal edge trim at the top of the wainscots, TR-1).

Field tip: Every REF line ends: verify with the TCNA Handbook and the project specification.

Step 12: A sheet a room in the Tile Designer

Step 12: A sheet a room

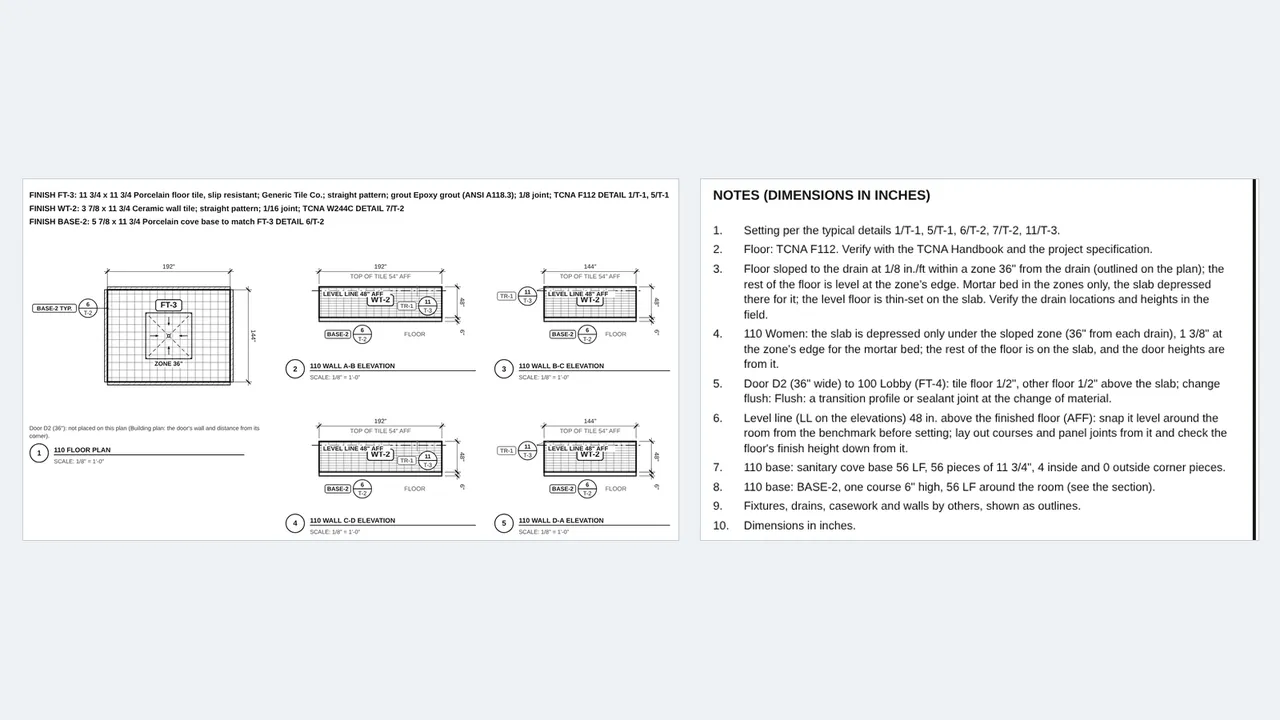
Each room gets a sheet: the finish lines at the top, the plan with its zone and drain, the elevations with the base band under them and the top of the tile (TOP OF TILE 54″ AFF here: 48″ of tile on the 6″ base), the trim tags and the callouts to the details, a section at the wall, and numbered notes: the method, the sloped zone and the level floor, the slab depressed only under the zone, the door and its transition, and the cove base pieces.

What you get

The drawing set, the lists and the files

Real files from this sample, made by the designer. Tap a page to see it full size. Yours carry your company, the client and the address.

T-8 110 Women: the sloped zone, the elevations with the base, trim tags and detail callouts
T-10 112 Locker room: a 48″ zone
T-11 113 Kitchen: quarry tile, cove base, the slab sloped by others
T-7 205 Accessible bath and the roll-in shower
T-1 Typical details
T-1 Typical details
T-2 Typical details (cont.): cove base, shower wall, roll-in threshold
T-3 Typical details (cont.): the edge trim at the top of the wainscots (TR-1)

The BidRidge quote

Same numbers in the quote

The designer sends its quantities to BidRidge, and BidRidge prices the labor and materials at your rates.

  • Good
    $123,300
  • Better
    $150,050
    Recommended
  • Best
    $218,200
The design and the quote, line by line
ItemIn the designerIn the BidRidge quote
Floors sloped in zones110, 111, 112: a drain each, the mortar bed in the zonesFloor drain, set with the sloped bed and tied in x 3; mud bed / dry pack floor 135.7 sf (the zones)
Kitchen and roll-in showerSlab sloped by others; a 60″ linear drainFloor drain, set with the sloped bed and tied in x 1 (kitchen); linear drain x 1 (roll-in)
Sanitary cove base248 LF, 16 inside cornersSanitary cove base 248 LF; inside corner pieces 16
Quarry tileQT-1, 251.9 sfQuarry tile, extra over the floor rate, 251.9 sf
Chemical-resistantKitchen floor and cove, 283.9 sfChemical-resistant setting bed and grout 283.9 sf
Epoxy groutFT-3 floors, 703.7 sfEpoxy grout upgrade 703.7 sf

The sample hotel's template imported into a Tile job in the BidRidge app at its starting rates, crews on. It comes in as a commercial job (the commercial default, commercial open shop); on residential open shop: $88,300 / $111,250 / $172,300. The Submittal set is not part of it. Your rates give your own numbers.

More in the guide

Try it on your own job

Open the sample, change it to your measurements, and send it to a BidRidge quote. Drawing is free; the drawing set, the lists and the quote come with a BidRidge license or the 14-day trial.

In the Tile Designer, tap Open project and pick the sample file, or tap Open the sample hotel on the Building plan card: it is the same job.

Sample designs: names, sizes and clients are made up. Prices are BidRidge's starting rates; set your own. The designers check against common guidelines (IRC, NKBA and the makers' published numbers) to help you catch mistakes. They don't replace your building department or the manufacturer's installation instructions: verify with them.