BidRidge › Designers › Guide › Chapter 27

Chapter 27 · Tile DesignerBeta

Sample hotel: commercial tile, the whole building

We bid and submit the tile for a made-up two-level hotel: the architect's plan under the drawing, the rooms traced from it, the finish codes from the schedule, a guest bath laid out once and built in four units, then the Submittal set (an ARCH D full set or 11x17 shop sheets), the product data log, the commercial costs, and the BidRidge quote.

In the Tile Designer, tap Open project and pick the sample file, or tap Open the sample hotel on the Building plan card: it is the same job.

Narrated walkthrough, 2:10. Captions on.

The sample in numbers

  • Rooms
    7 rooms
    2 levels · 201 Guest bath typical in 4 units
  • Tile
    3,311.5 sf
    1,646.6 sf of floors · 25 surfaces, units counted
  • Finish codes
    10
    FT-1 to FT-4, WT-1, WT-2, WT-P, BASE-2, QT-1, CB-1
  • Sheets
    11 + 13
    ARCH D full set · 11x17 shop sheets
  • Commercial costs
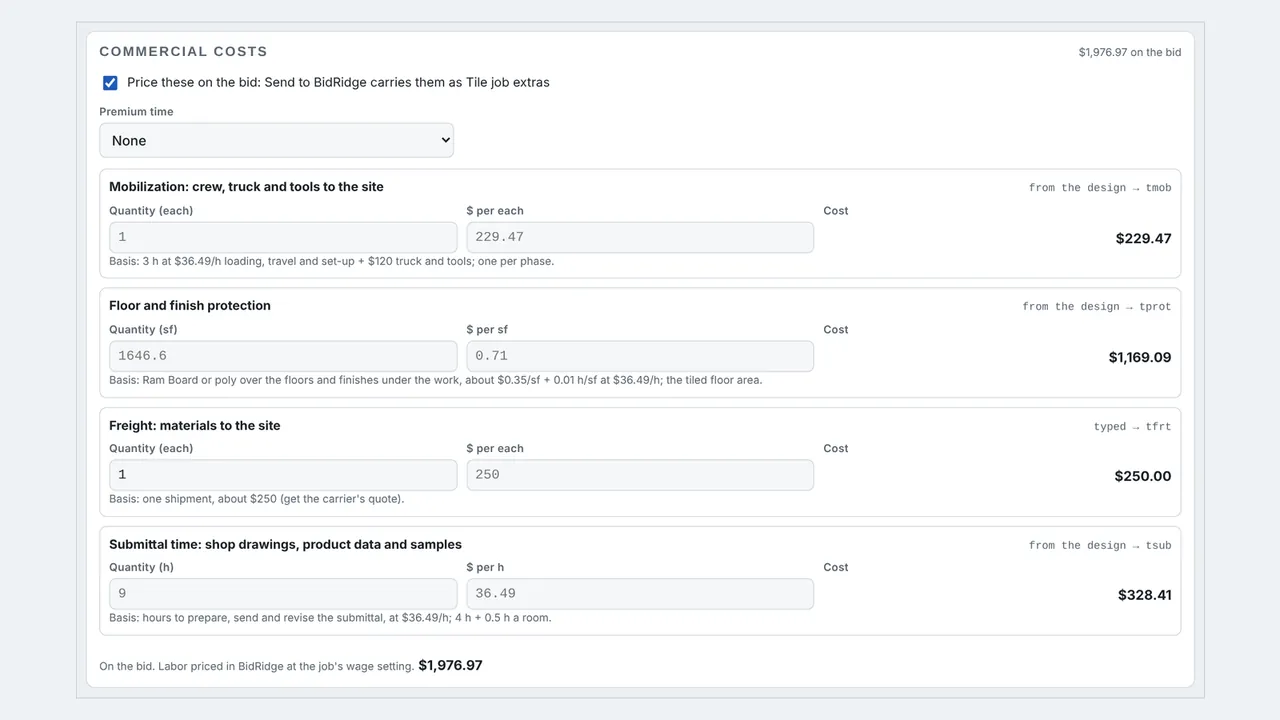
    $1,977
    mobilization, protection, freight, submittal time
  • Quote
    $150,050
    Better, as a commercial job, at the starting rates

Step by step

Step 1: Project type: Commercial in the Tile Designer

Step 1: Project type: Commercial

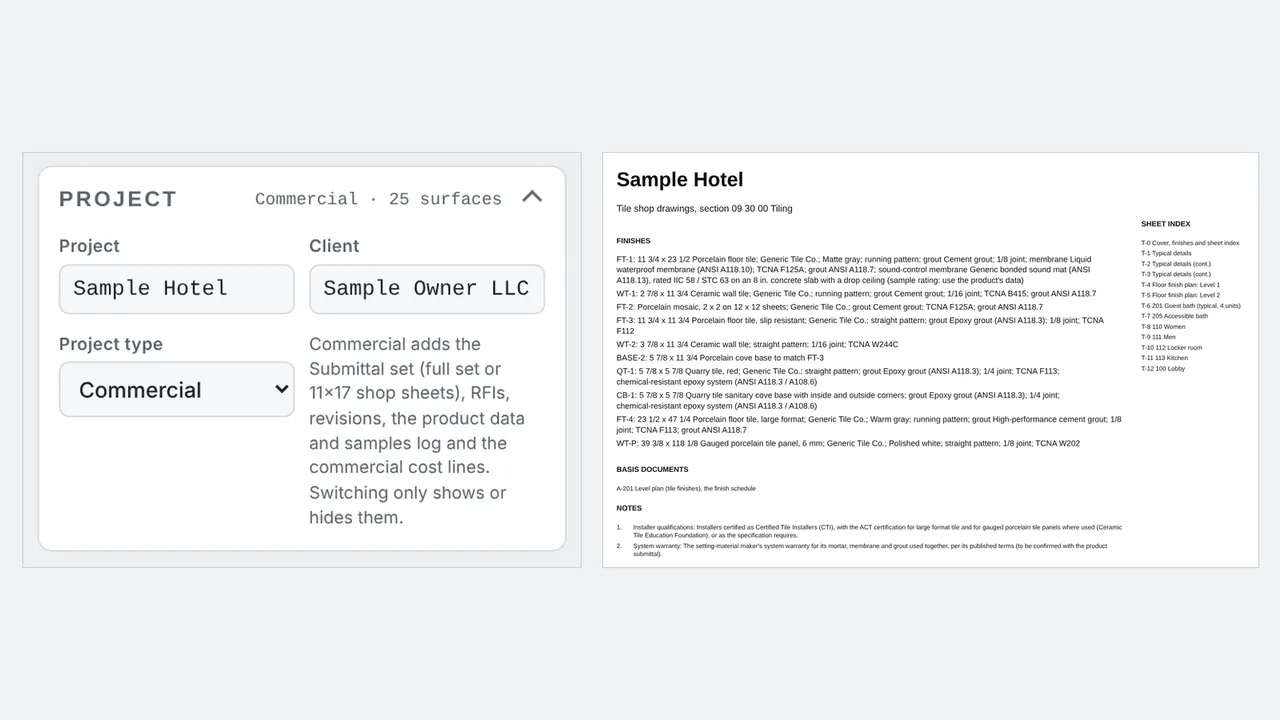
In the Project card, first in the rail, set Project type to Commercial (a new design can start as Commercial on the start step). It adds the Building plan, the Submittal set, questions for the architect (RFIs), revisions, the product data and samples log and the commercial cost lines. Switching back only hides them; nothing is deleted. New in 1.64: Draft RFIs from the checks, at the top of the RFI register, turns the design's warnings and failed checks into RFIs with a plain question and the code reference (no AI).

Field tip: A Residential project draws, prints and sends exactly as before.
Step 2: Open the sample hotel in the Tile Designer

Step 2: Open the sample hotel

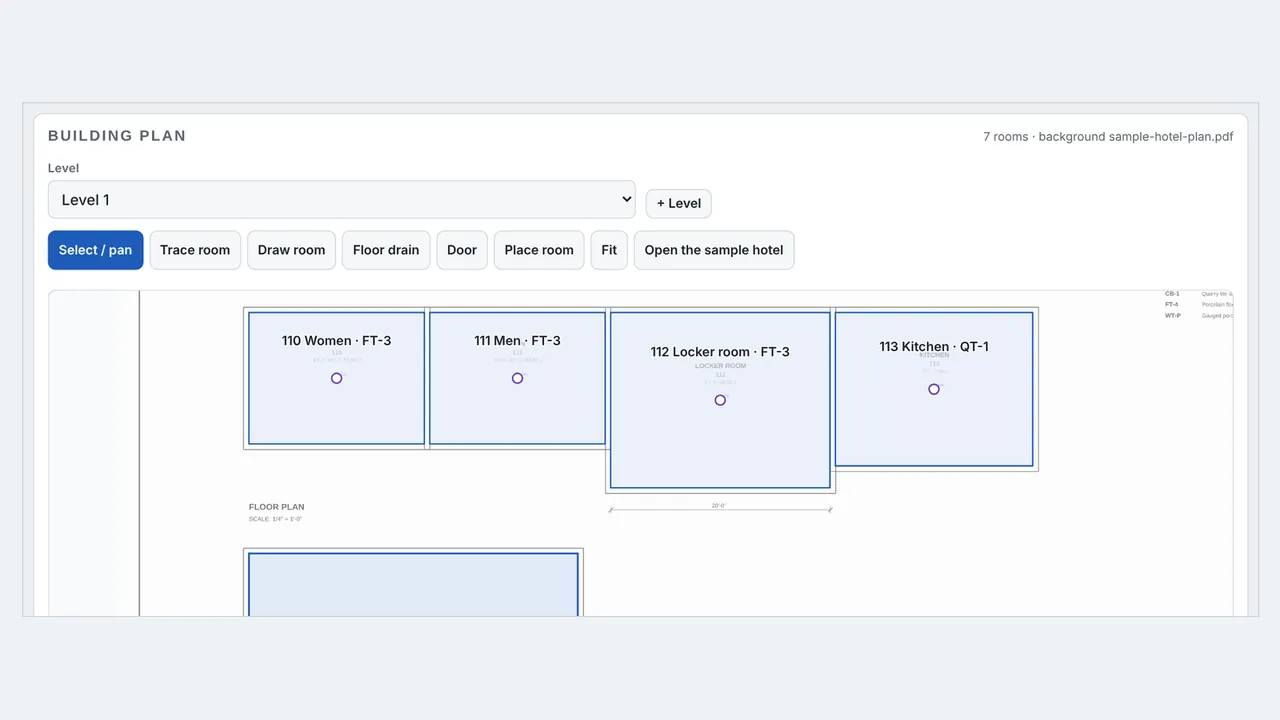
On the Building plan card, Open the sample hotel loads the job this chapter follows: 7 rooms on two levels with the architect's plan behind them. Pick a level at the top; tap a room on the plan to open its floor surface.

Field tip: Or download the sample design below and open it with Open project.

Step 3: Put the architect's plan underneath in the Tile Designer

Step 3: Put the architect's plan underneath

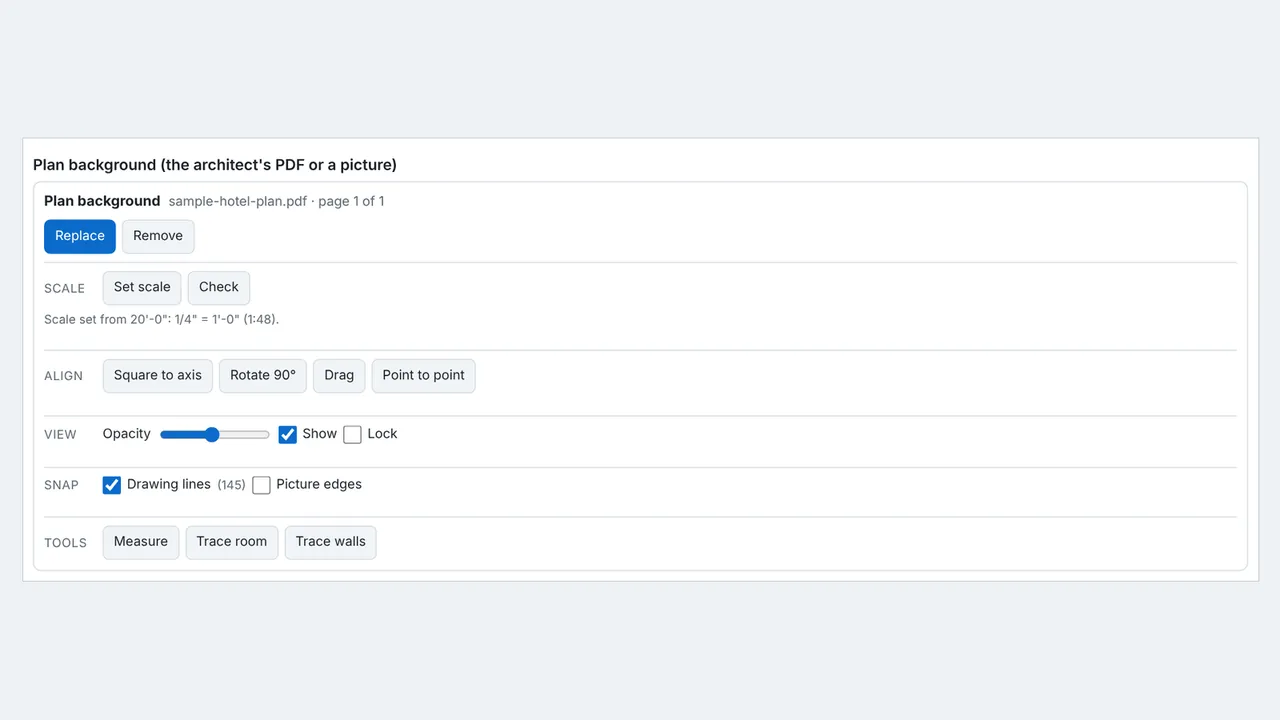
Under Plan background, open a PDF page or a picture of the plan. Set scale: click both ends of a dimension you know (the 20'-0" one here), type it, then Check it against a second one. Square it, rotate it, fade it, lock it; the drawing snaps to its lines. New in 1.63: on a vector PDF with the scale set, Suggest rooms outlines each room from the room names printed on the sheet and shows it for review; tap any you don't want, then Use adds the rest with their names. Scanned sheets are still traced by hand.

Field tip: The plan is never printed on the sheets. In the app the PDF reader is built in, so it works with no signal.

Step 4: Trace the rooms, add walls and base in the Tile Designer

Step 4: Trace the rooms, add walls and base

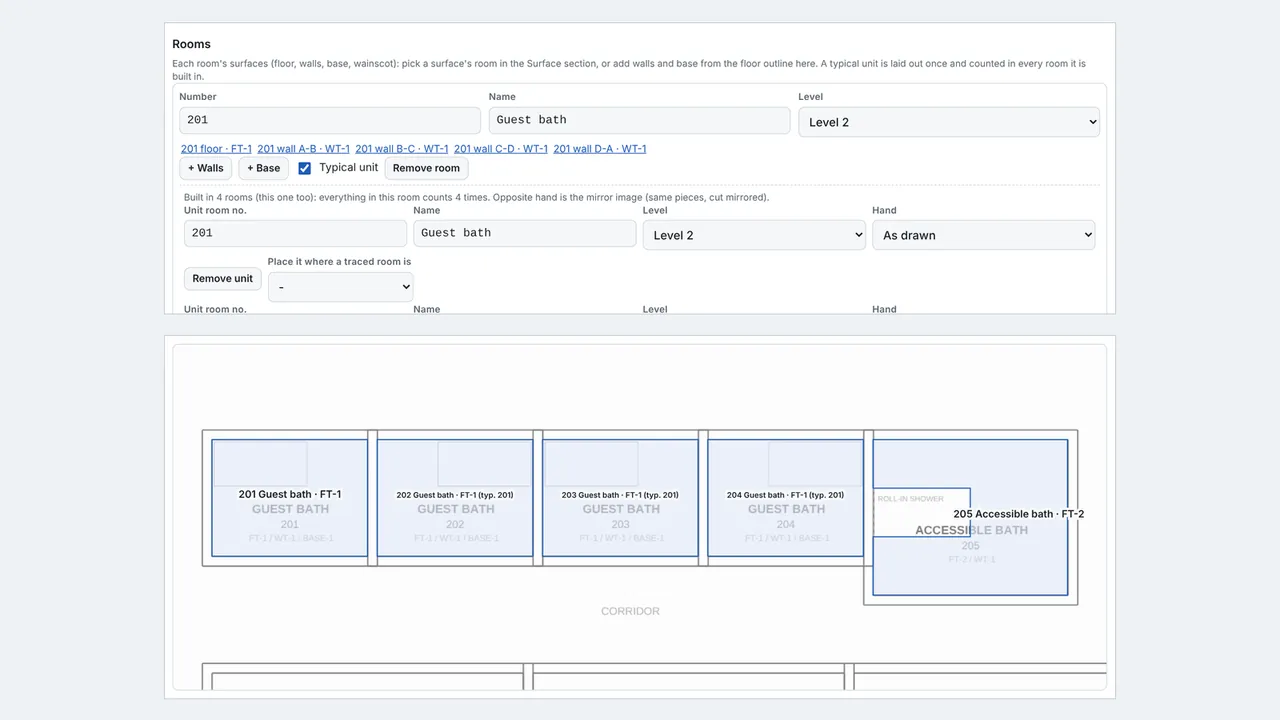
Trace room (click inside a room on the plan) or Draw room (corners snapped to its lines) makes a numbered room on the level, with its floor as a new surface tab. Under Rooms, + Walls adds a wall surface along each edge of the floor at the wall tile height, and + Base one base the room's perimeter long.

Field tip: Floor drain puts a drain on the room's floor where you click (chapter 28).

Step 5: Finish codes from the architect's schedule in the Tile Designer

Step 5: Finish codes from the architect's schedule

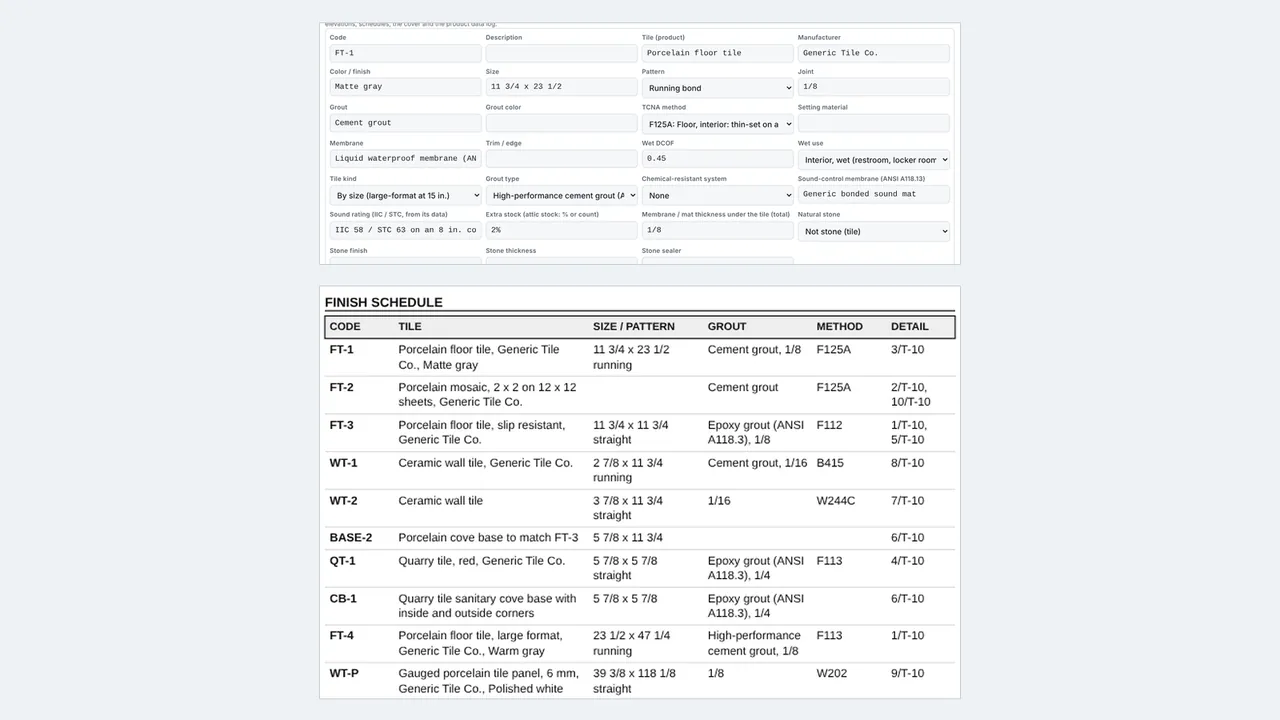
Under Finish schedule, type each code as the drawings have it (FT-1, WT-2, BASE-2, QT-1 ...): tile, maker, color, size, pattern, joint, grout, the TCNA method and the setting materials. Change an entry and every surface on that code follows. The codes print on the plans, the elevations, the finish schedule (with the DETAIL each code is built to) and the cover.

Field tip: The sample's products are made up (Generic Tile Co.): type the specified ones.

Step 6: Each surface: its room and its code in the Tile Designer

Step 6: Each surface: its room and its code

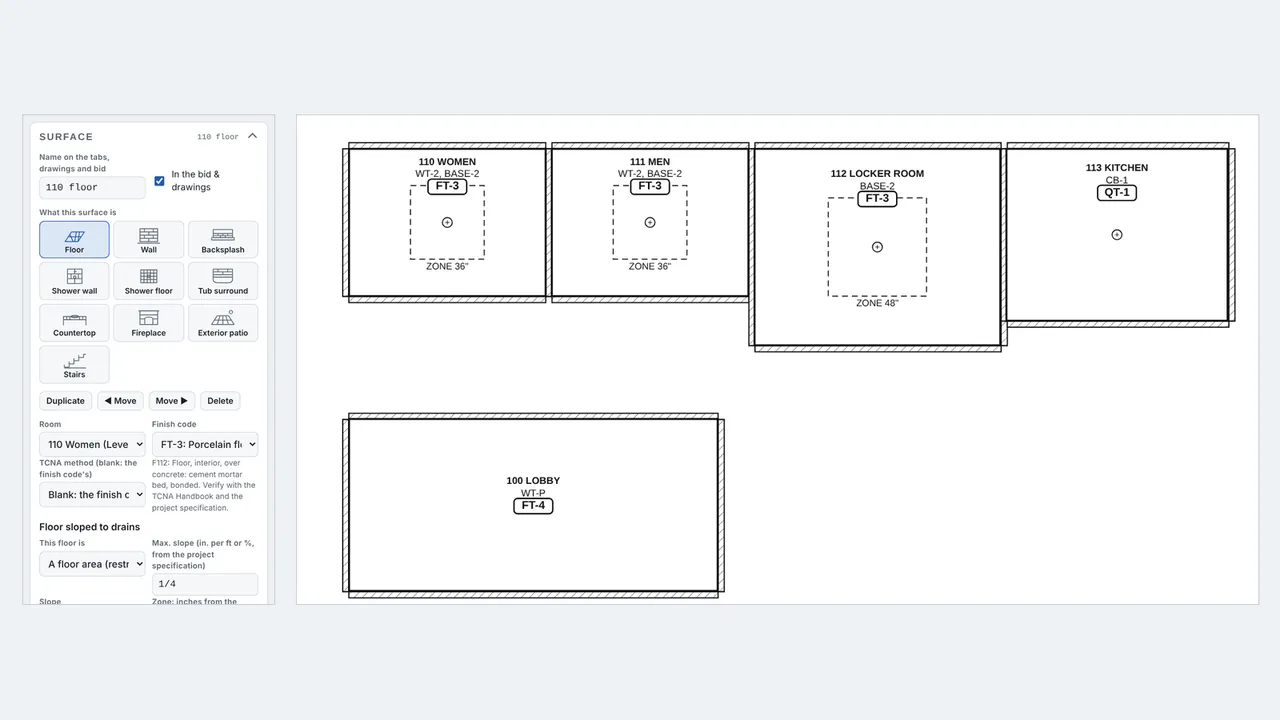
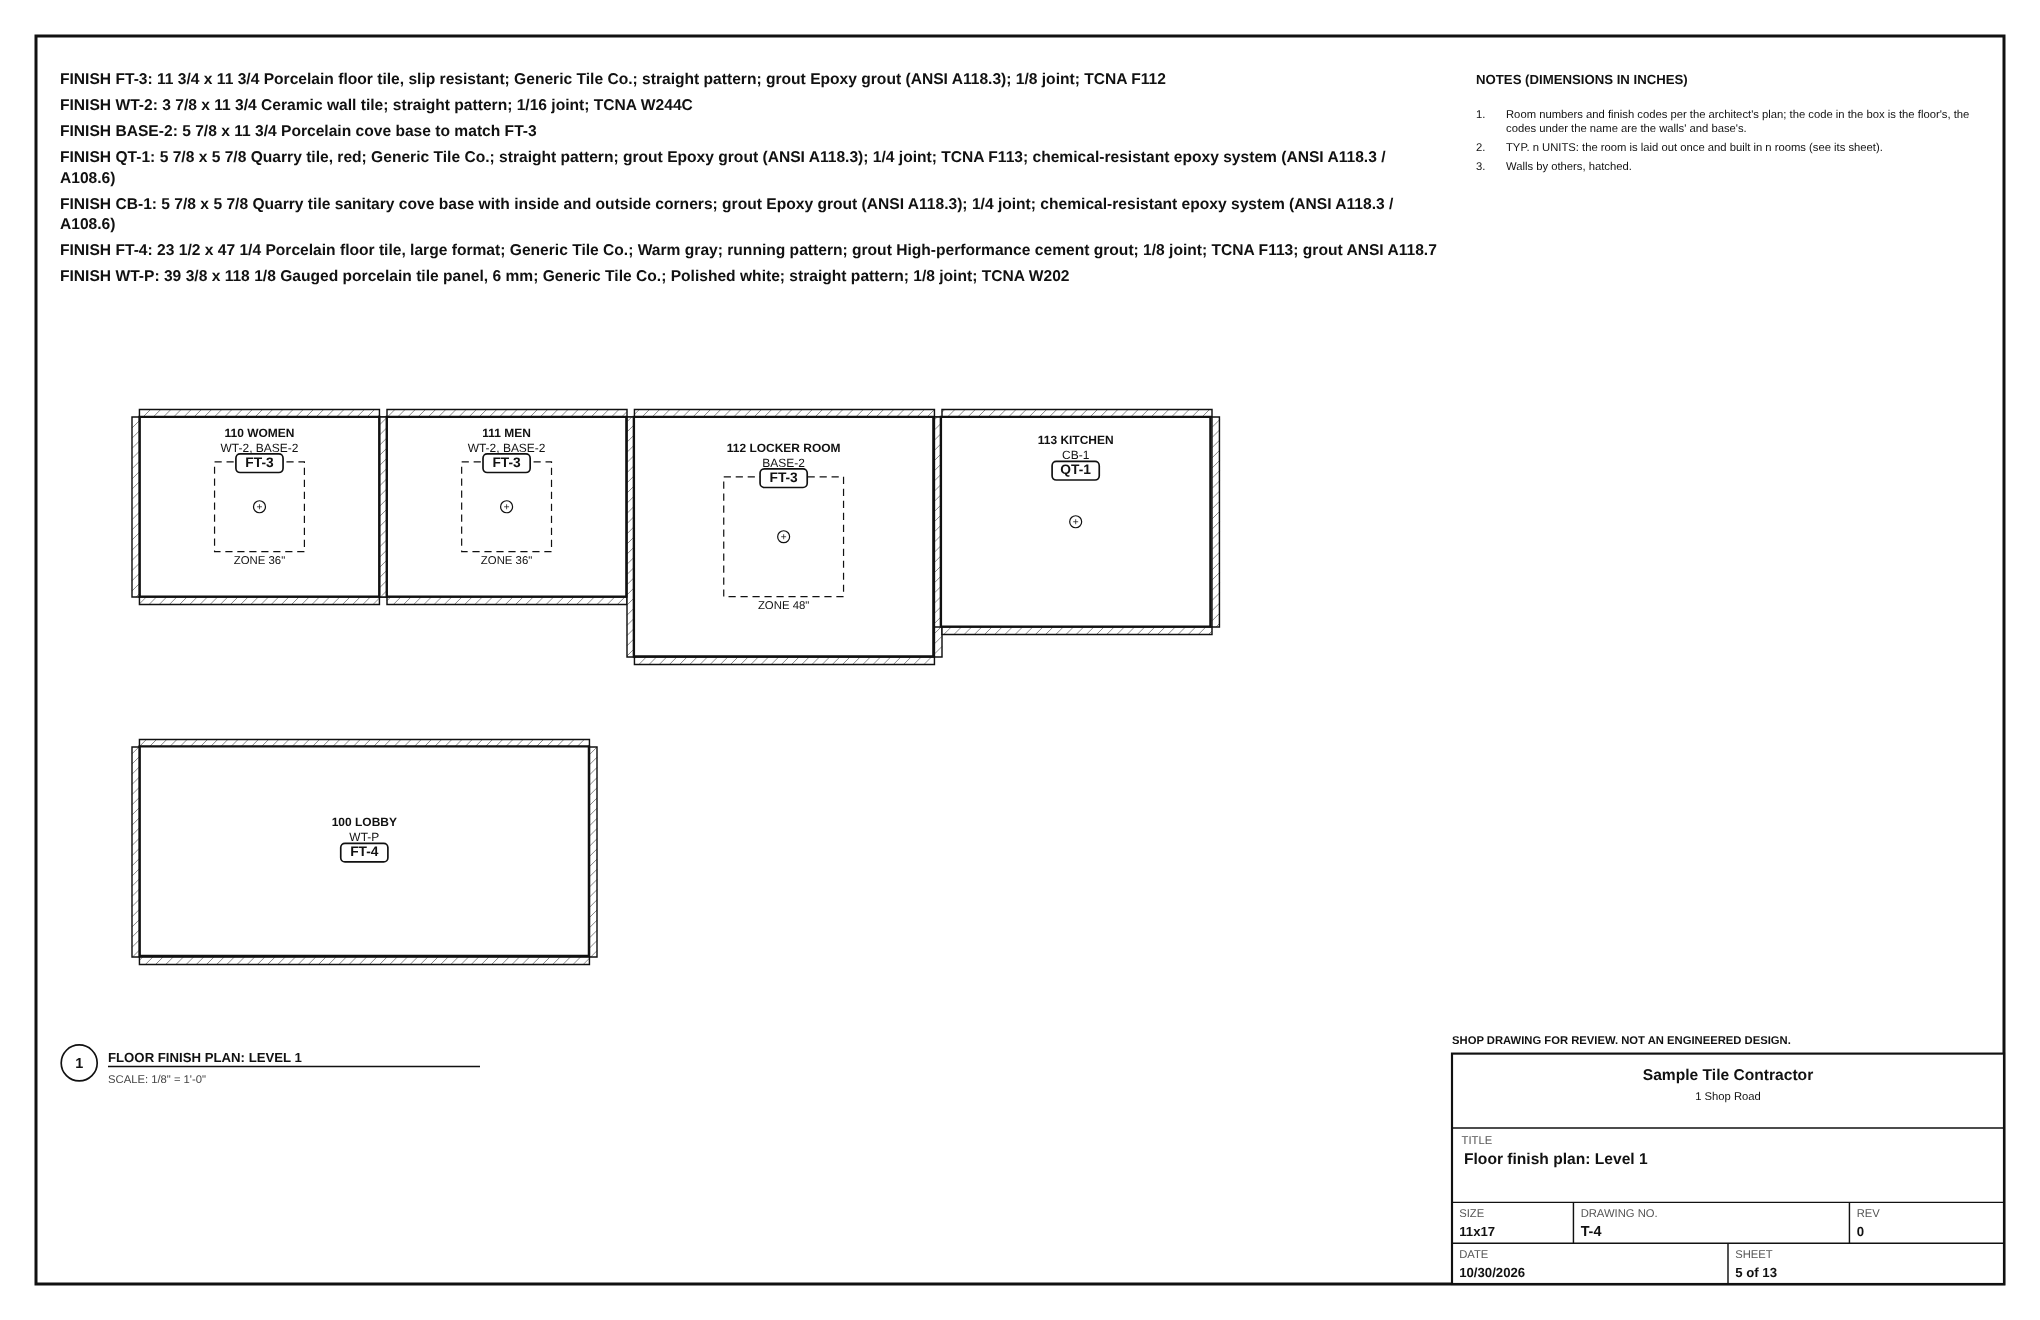
In the Surface section each surface picks its room and its finish code, and its own TCNA method if it differs from the code's. The floor finish plan then shows every room with its number and name, the floor's code in a box, and the wall and base codes under the name.

Step 7: A typical unit, built four times in the Tile Designer

Step 7: A typical unit, built four times

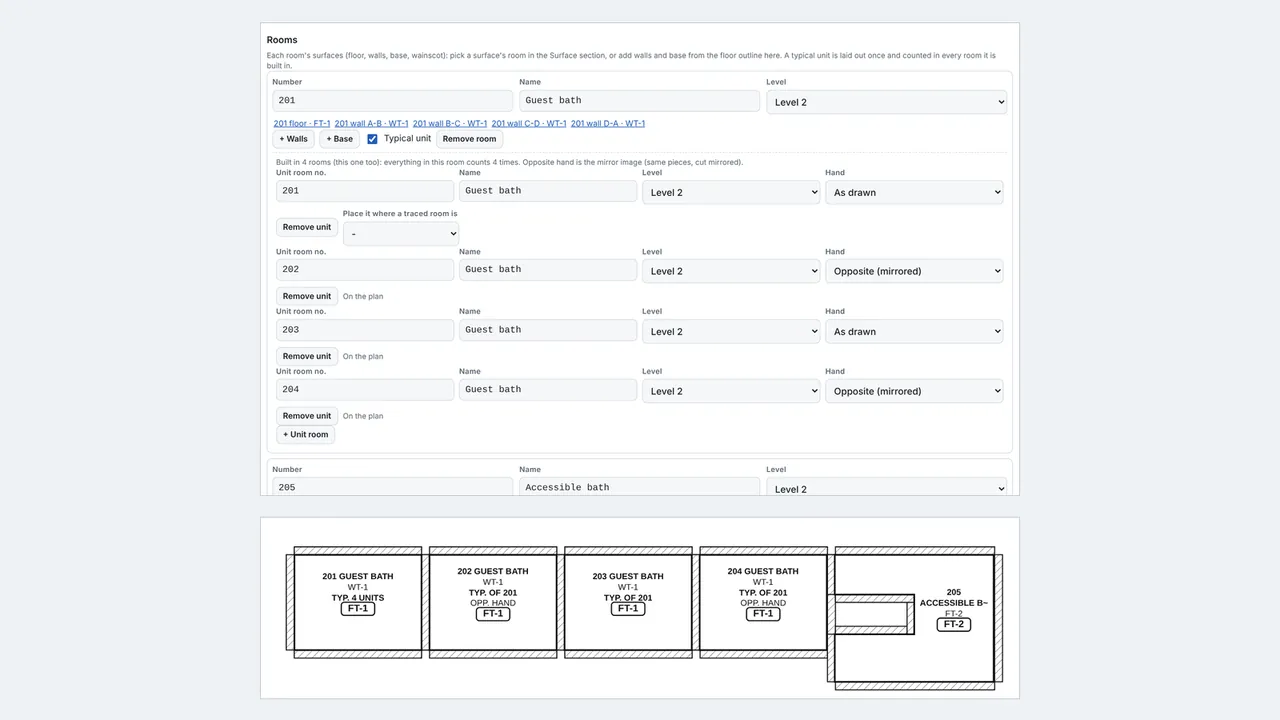
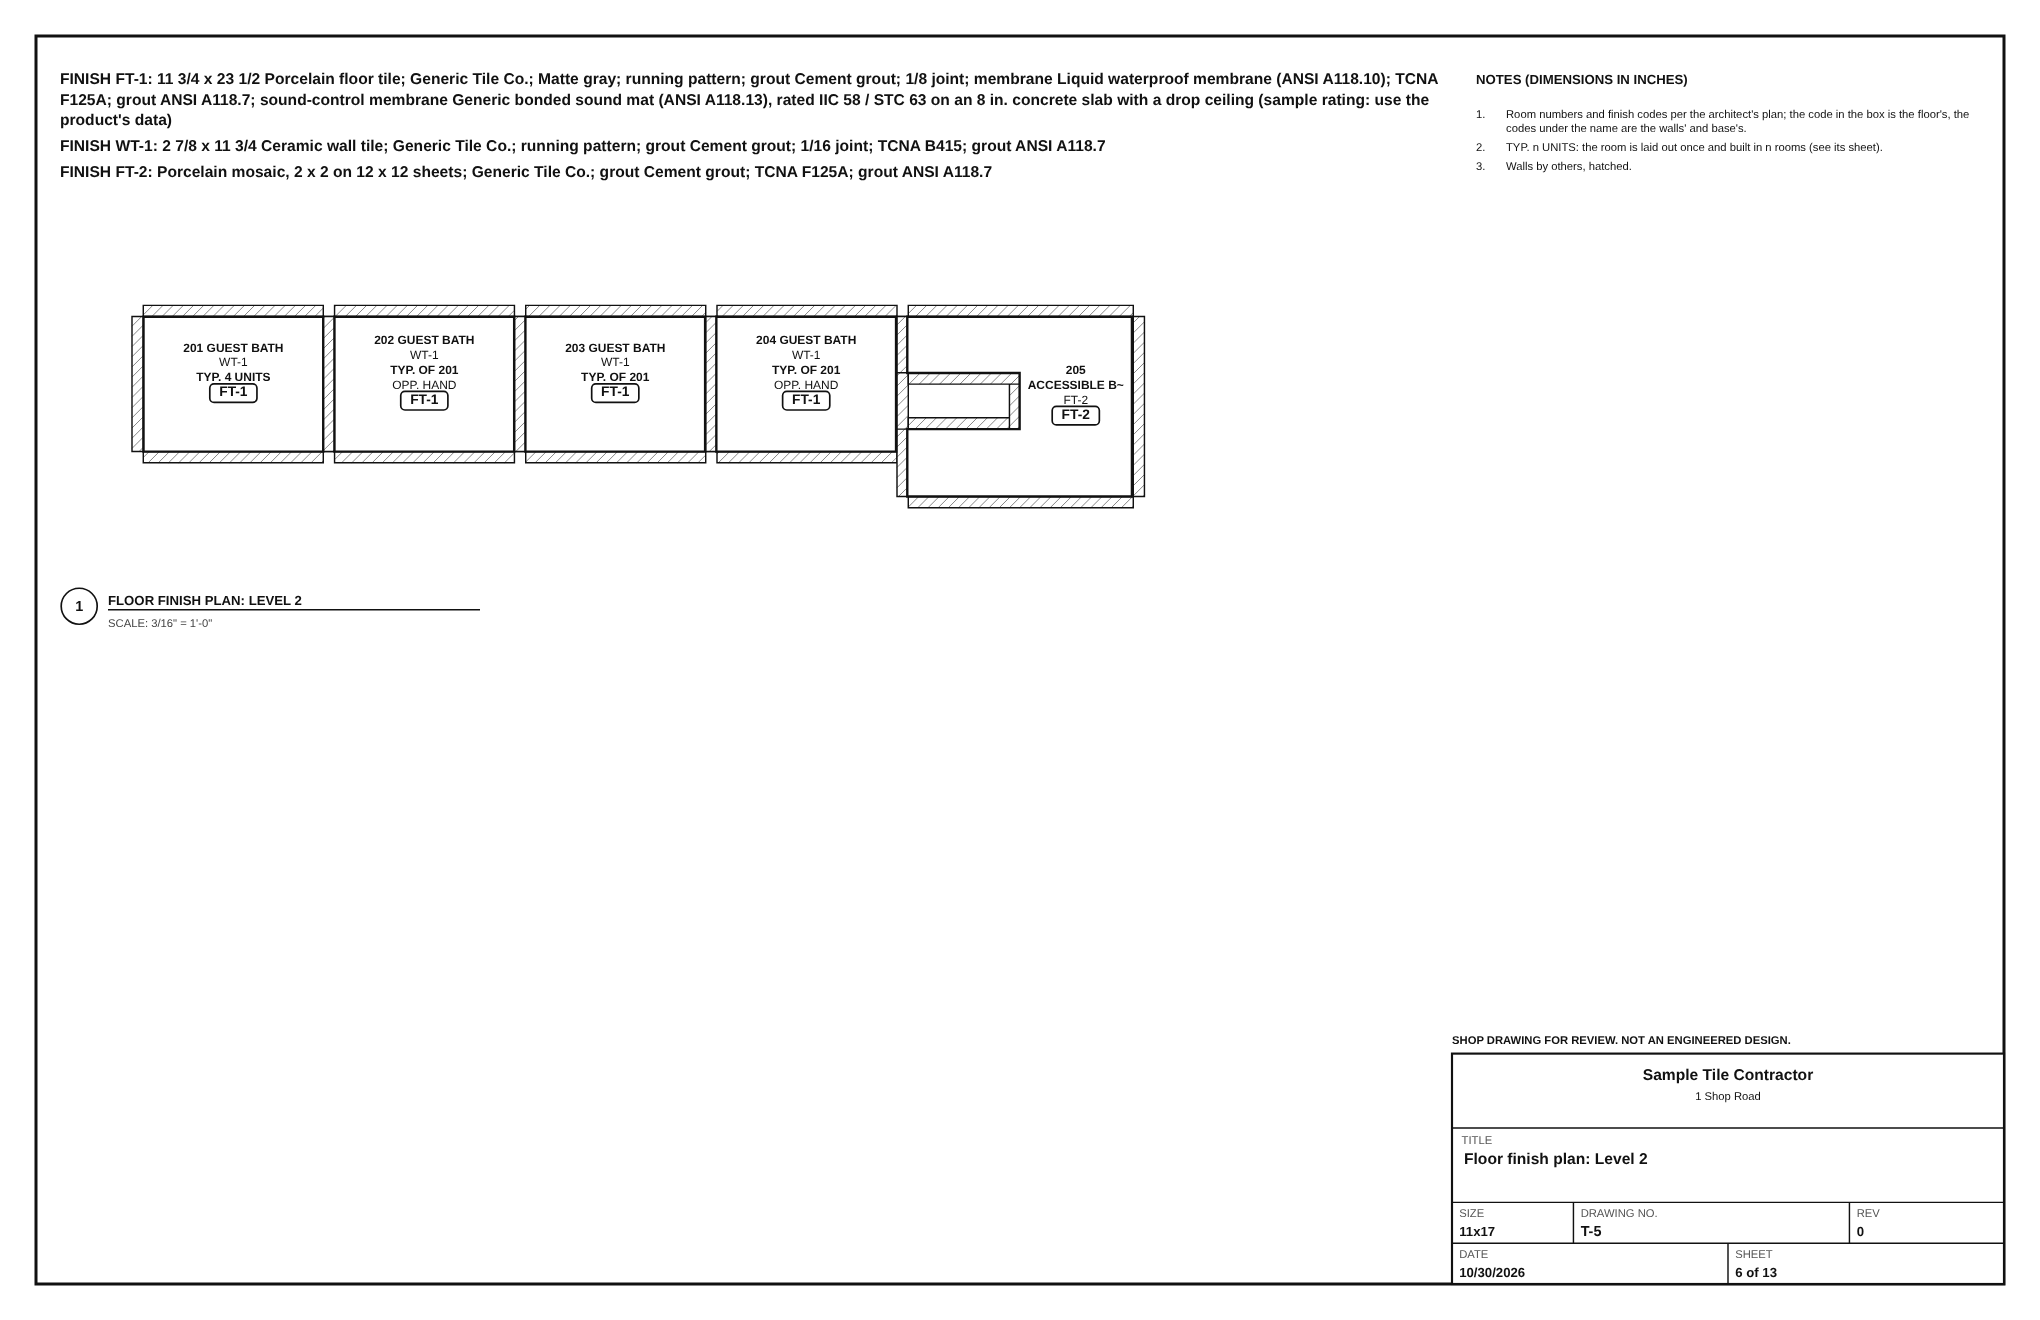
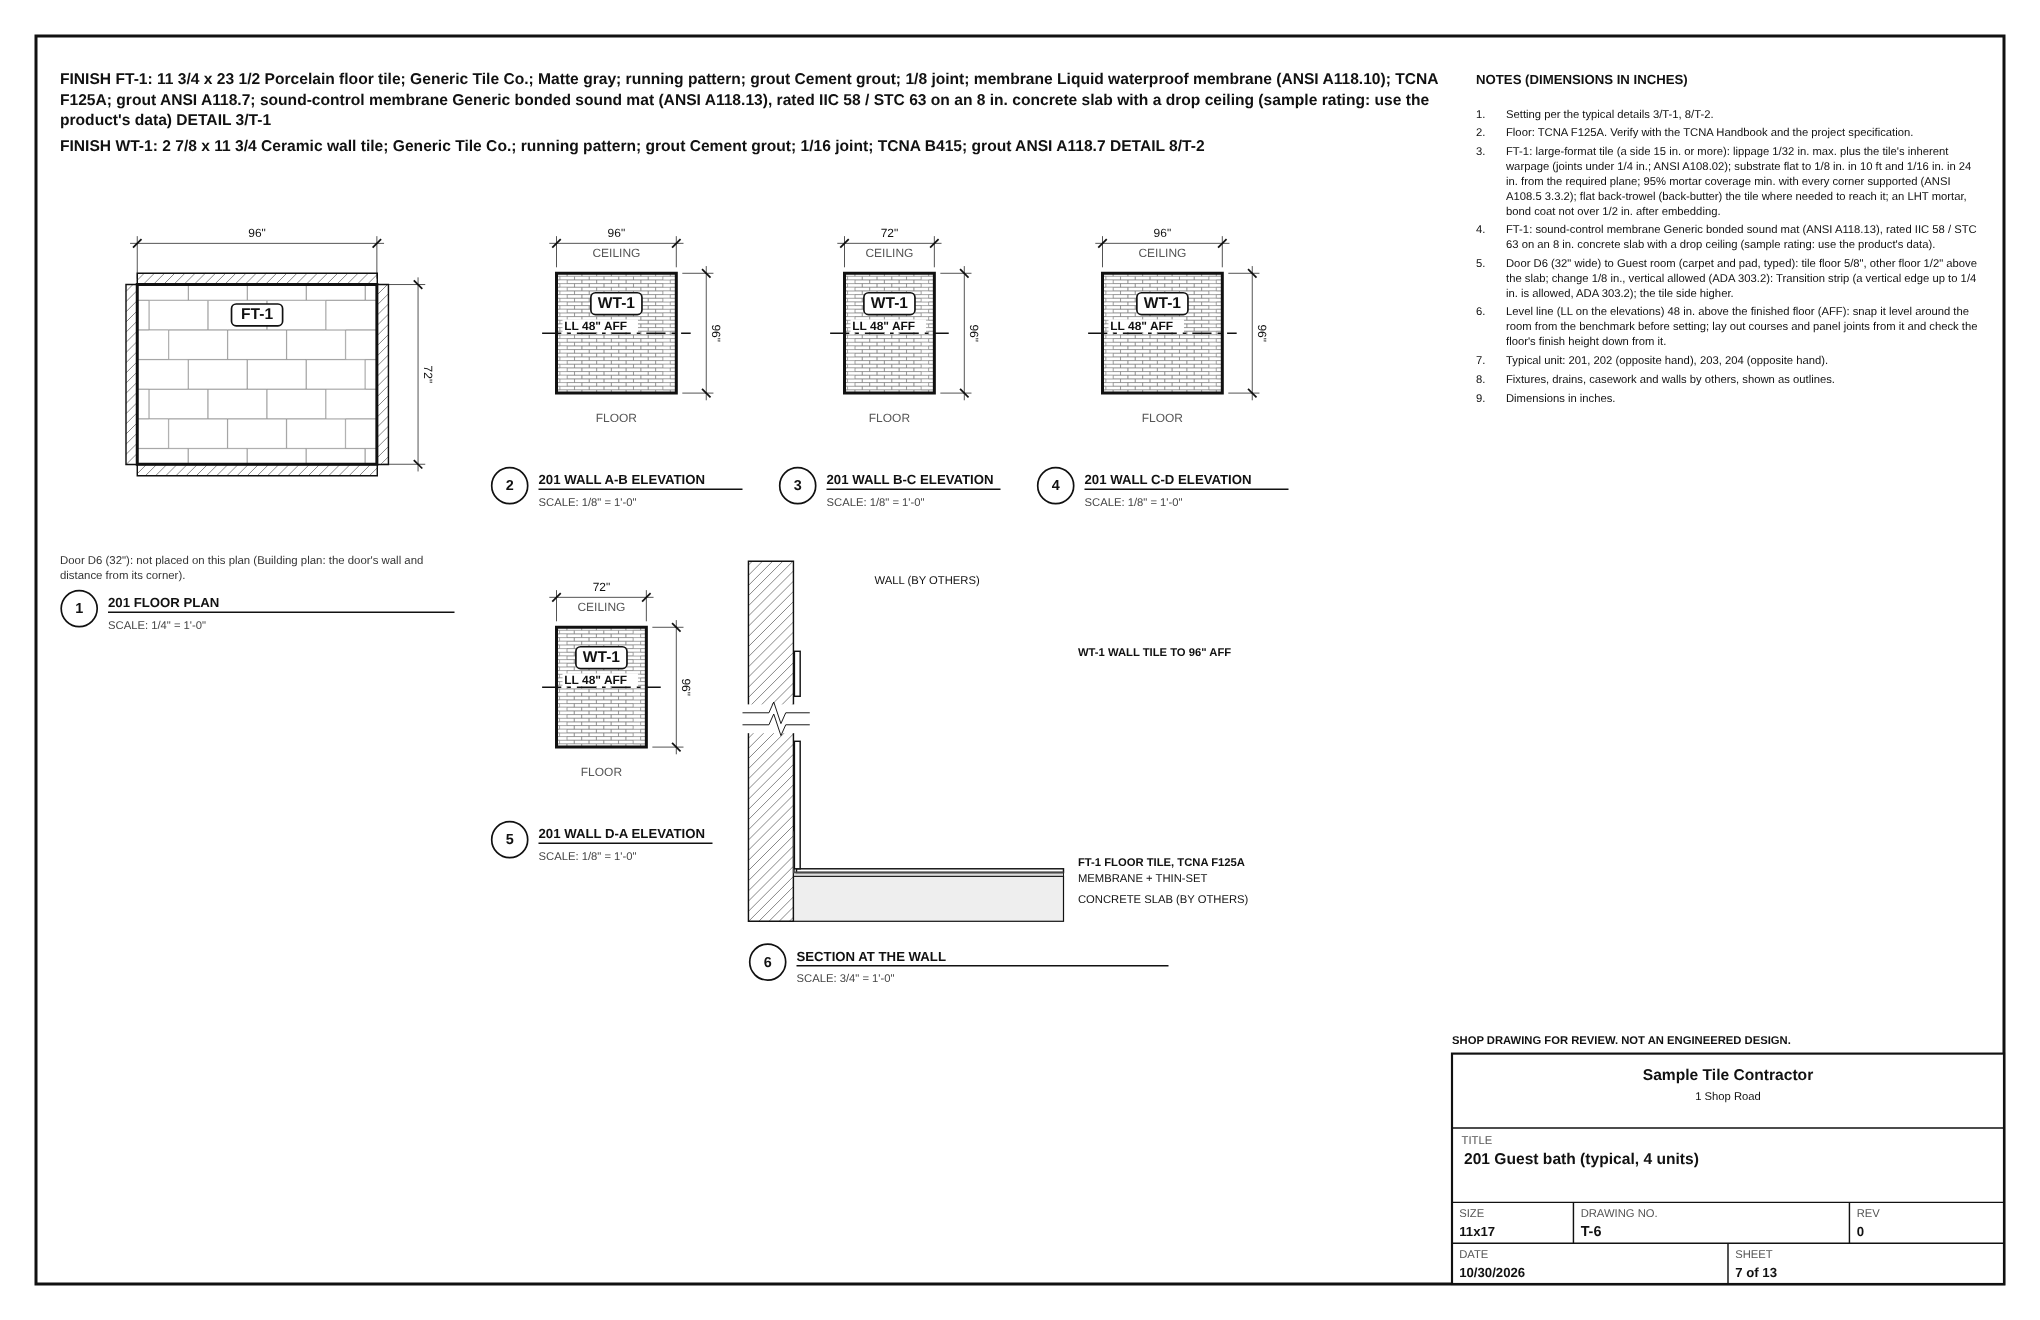
201 Guest bath is drawn once. Tick Typical unit and add 202, 203 and 204 with + Unit room, each As drawn or Opposite (mirrored). Everything in the room then counts four times: tile, cuts, grout, thin-set, boxes, the cut and buy lists and the BidRidge rooms, named "(typical, 4 rooms)".

Field tip: Place it where a traced room is draws the unit on the plan; a unit not on the plan counts the same.

Step 8: Totals by level, room, code and type in the Tile Designer

Step 8: Totals by level, room, code and type

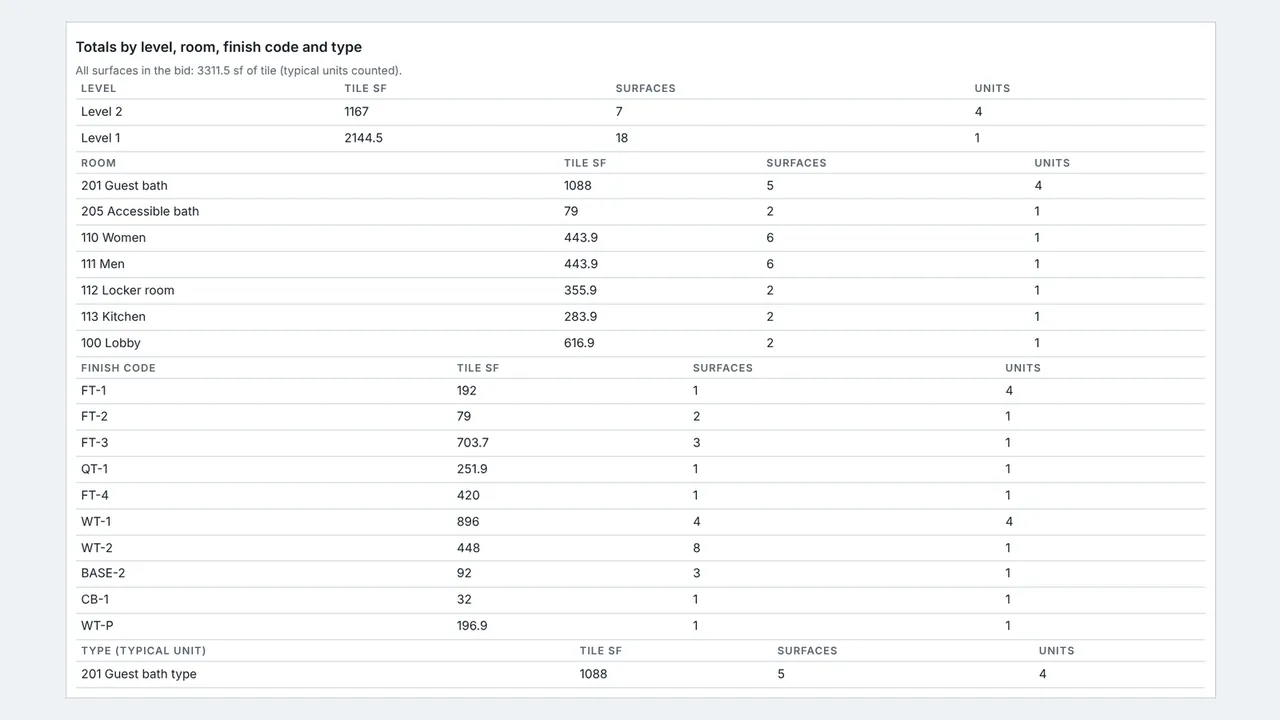
Totals adds it up with the units counted: 3,311.5 sf of tile, 2,144.5 sf on Level 1 and 1,167 sf on Level 2, then by room, by finish code and by typical unit type.

Step 9: The Submittal set in the Tile Designer

Step 9: The Submittal set

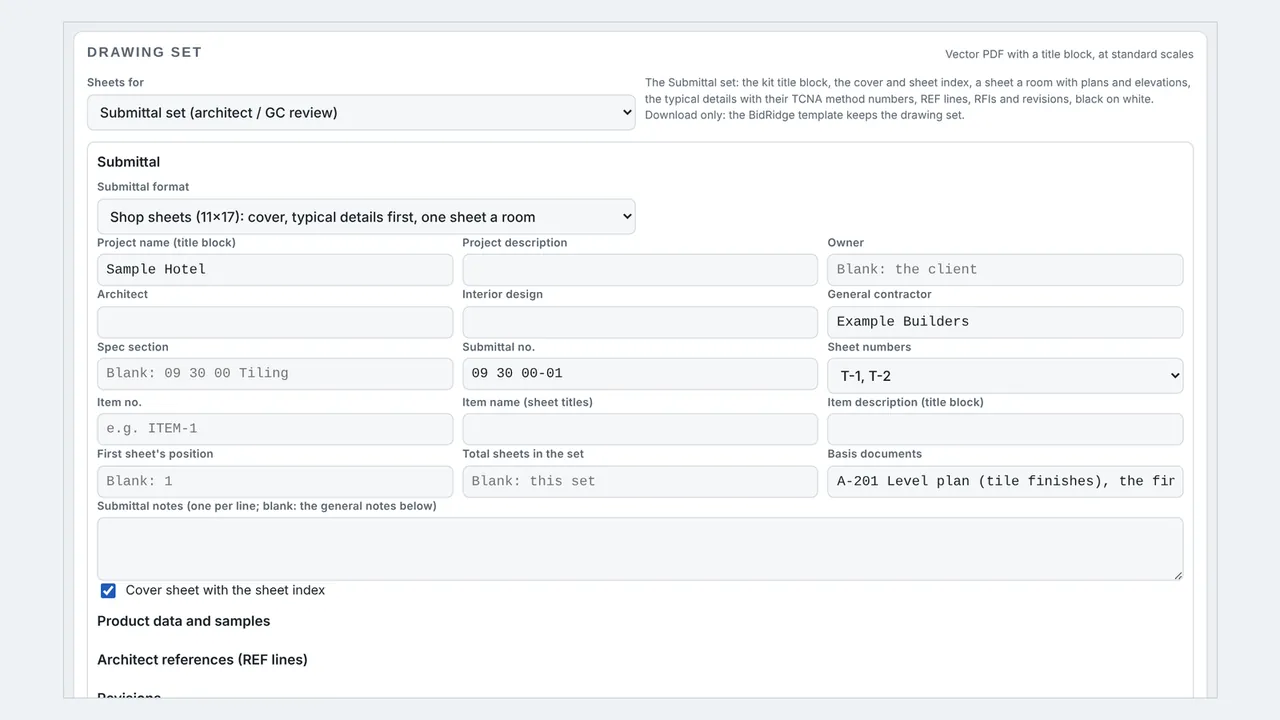
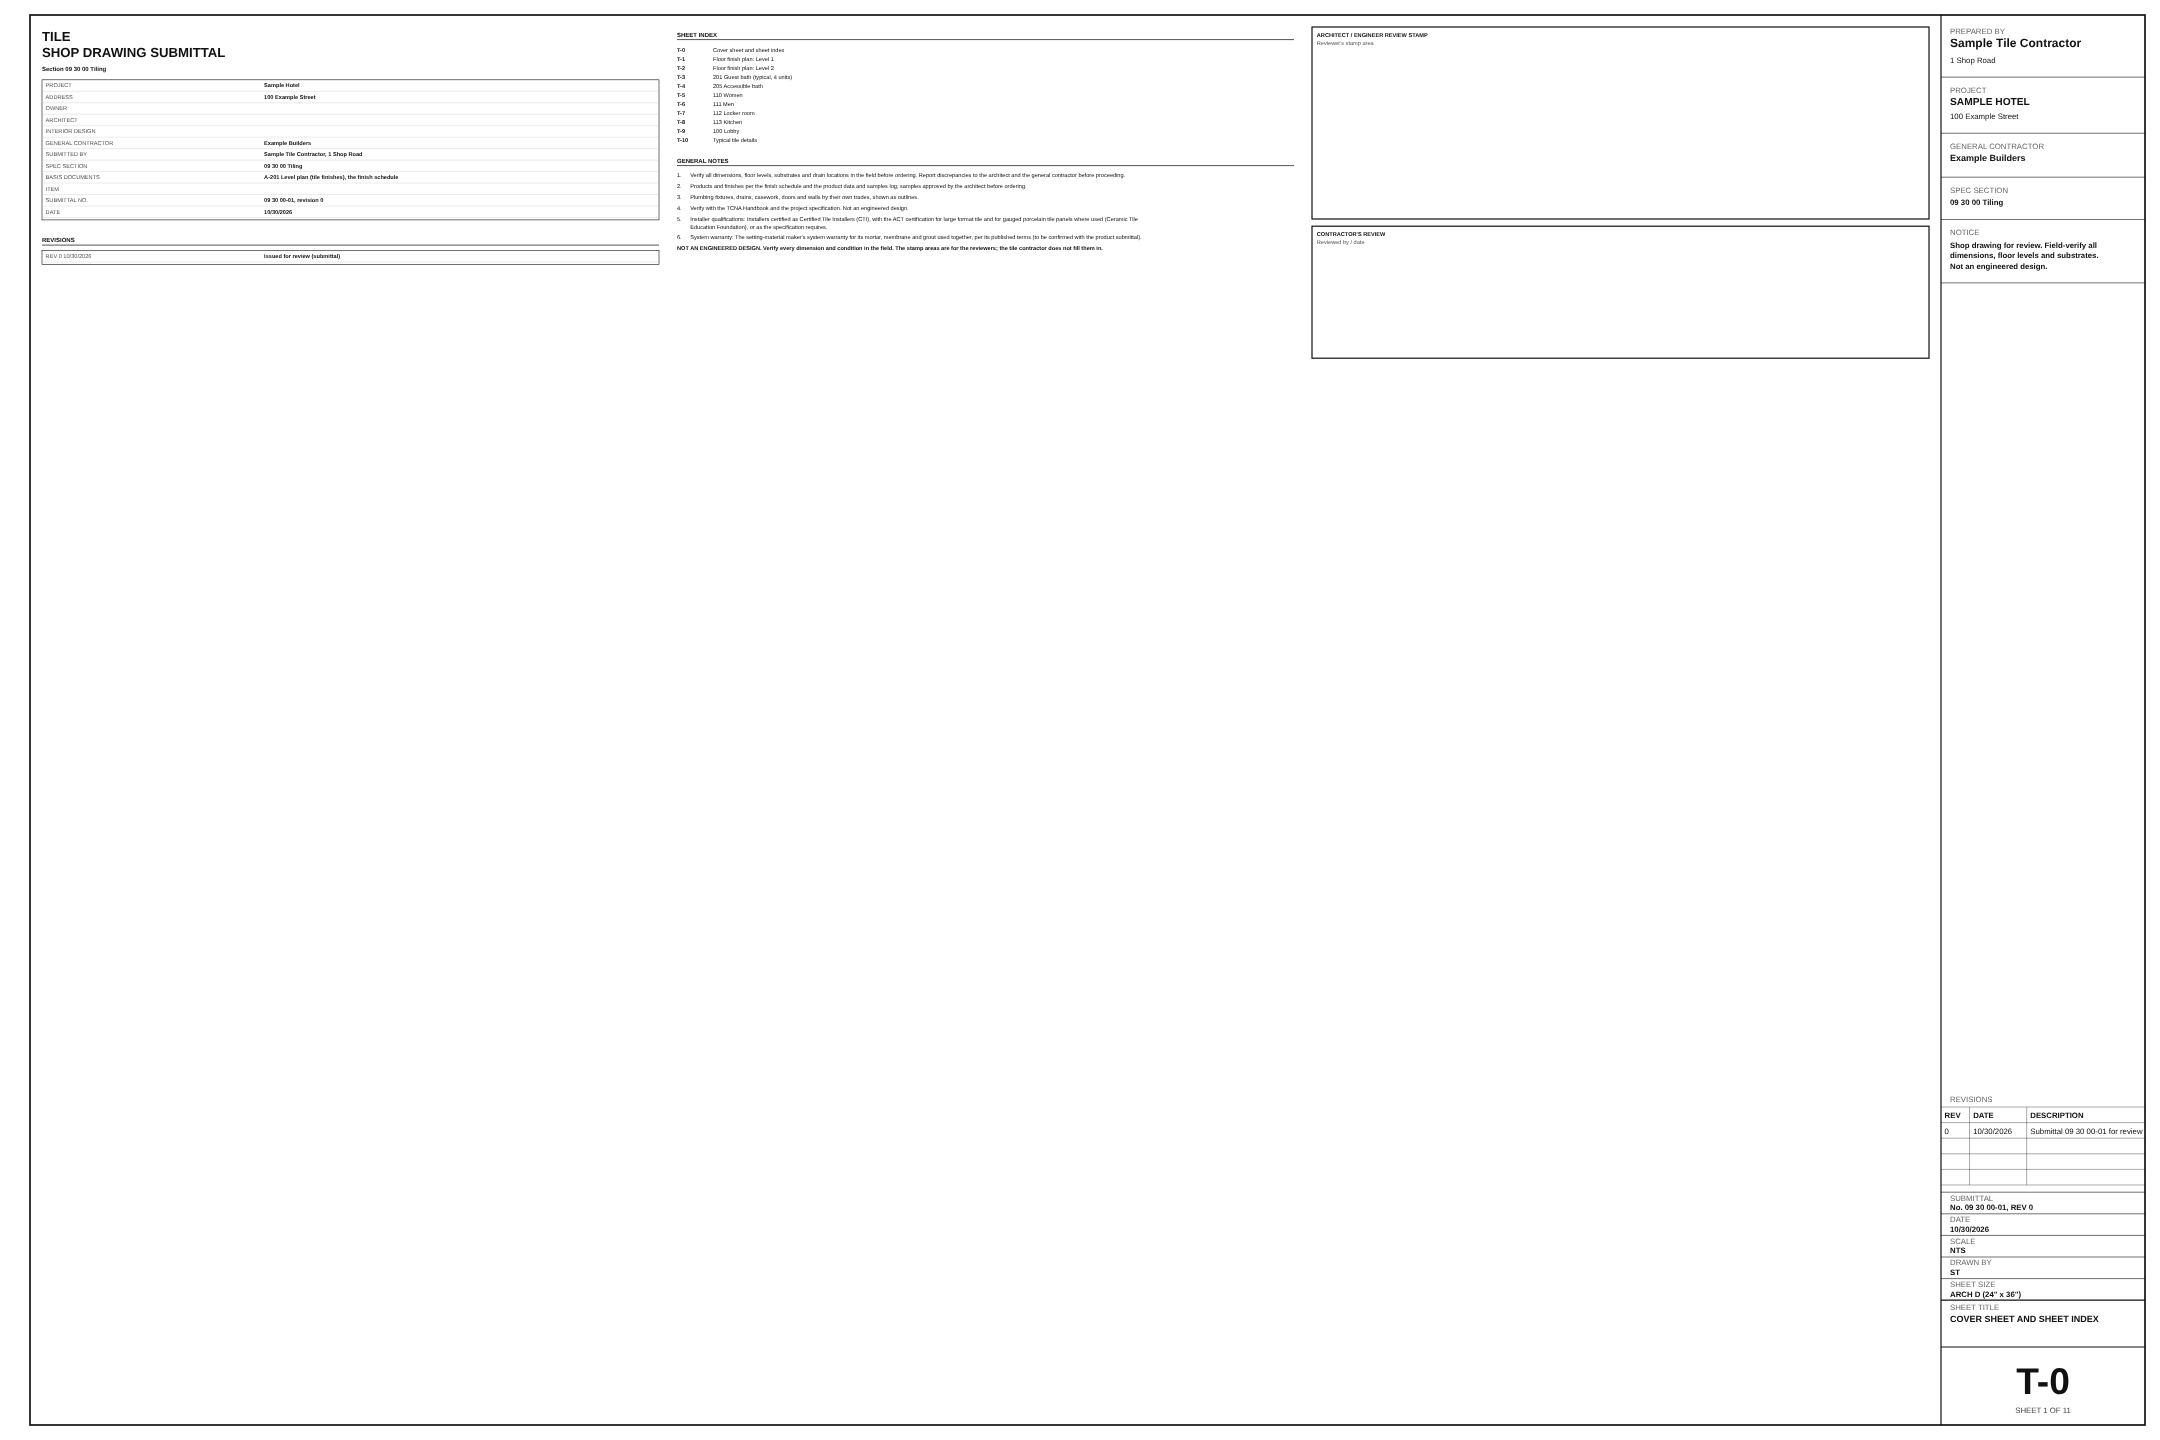
Set Sheets for: Submittal set and pick the format: the full set on ARCH D (cover and sheet index, a floor finish plan a level, a sheet a room, the typical details) or 11x17 shop sheets (the details first, then a sheet a room). Fill in the job card (owner, architect, GC, spec section, submittal number, basis documents), Preview sheets, then Save PDF. Each trim and profile is drawn on the plans and elevations with its TR tag and a callout (n/T-x) to its detail.

Field tip: The Submittal set is download only; the BidRidge template keeps the drawing set.

Step 10: Product data, RFIs and revisions in the Tile Designer

Step 10: Product data, RFIs and revisions

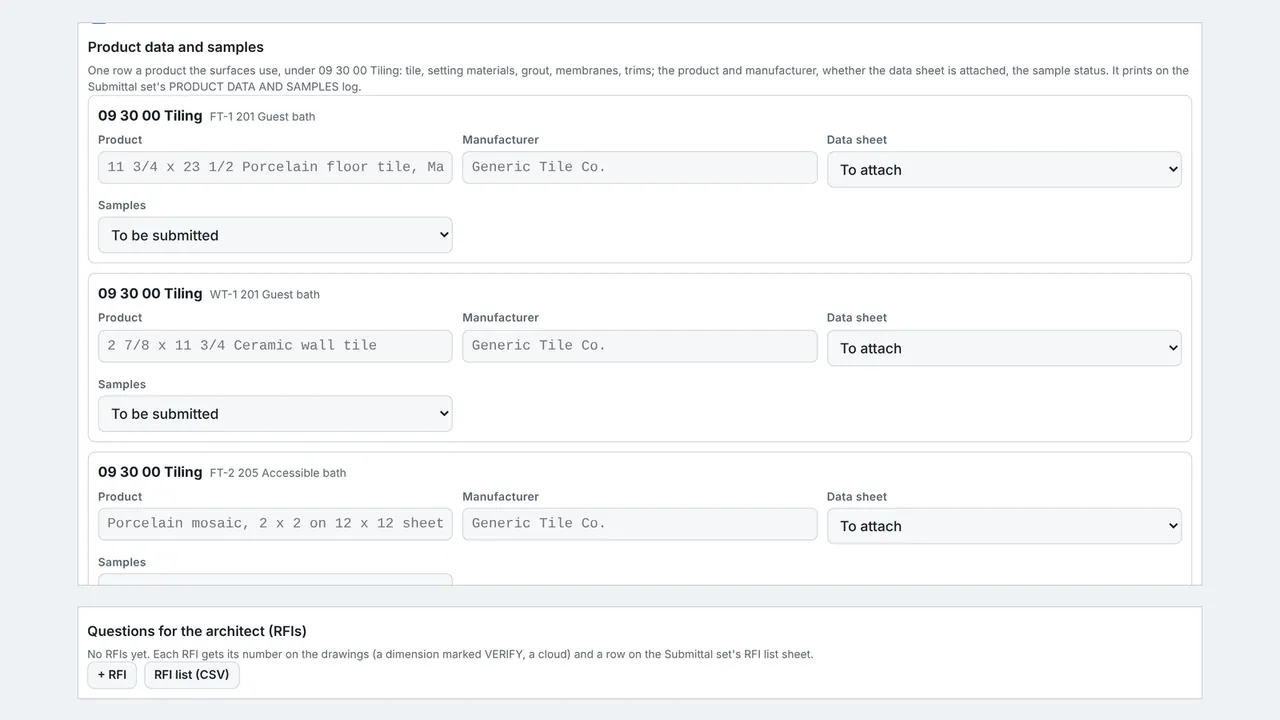
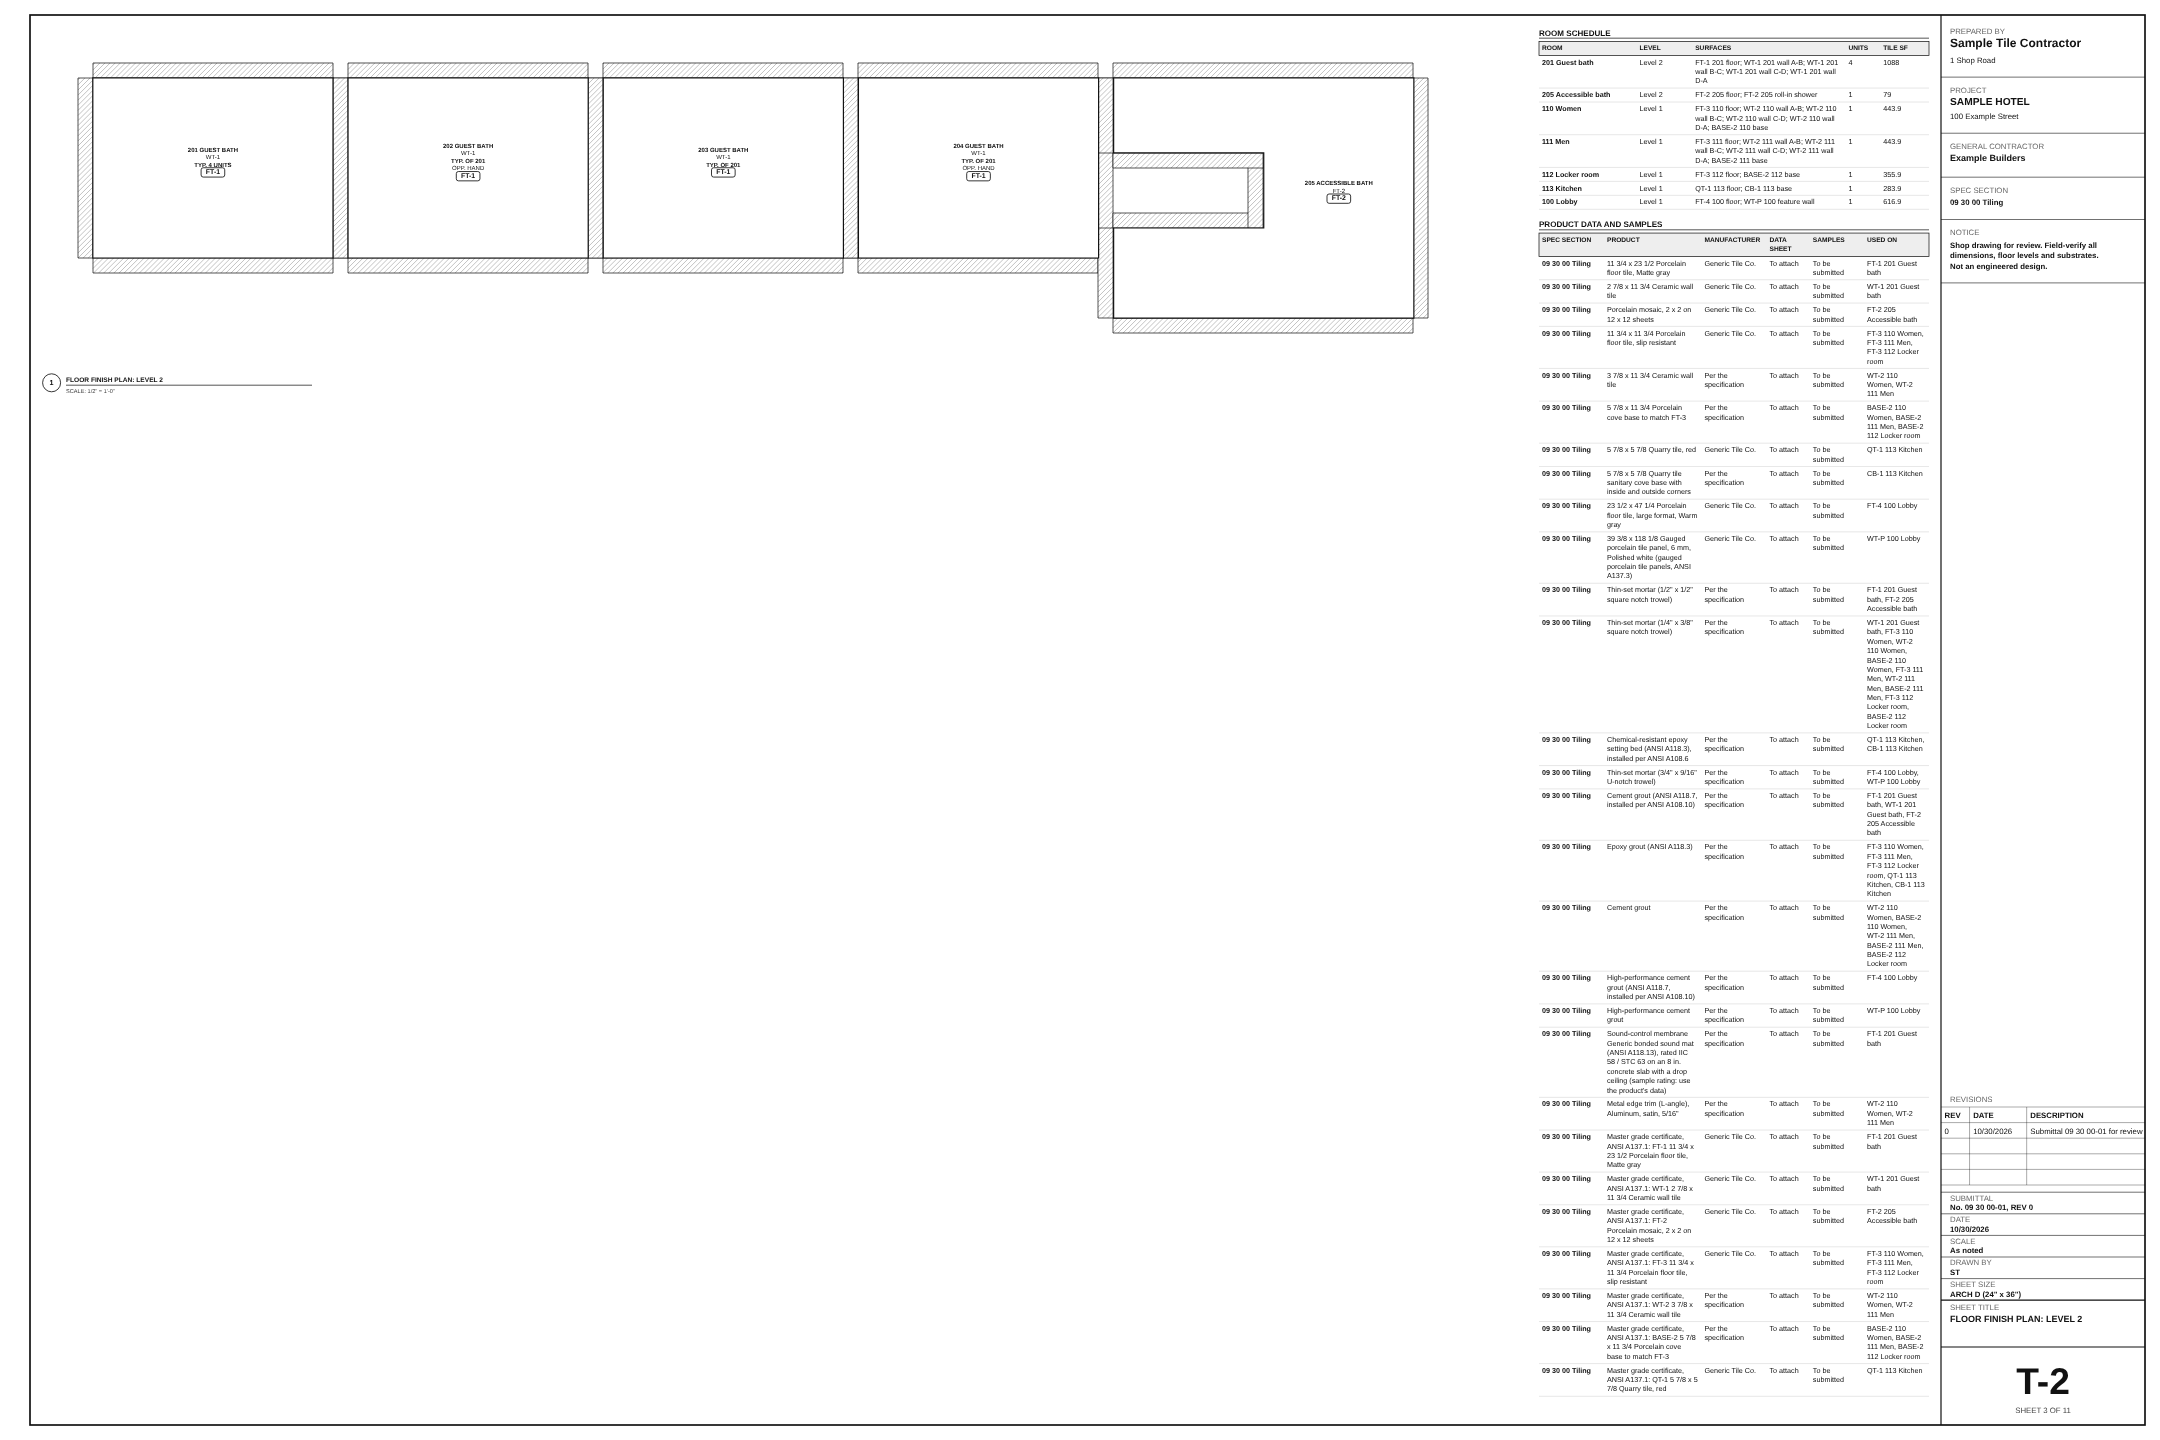
Product data and samples has one row a product under 09 30 00 Tiling (tile, setting materials, grout, membranes, trims) with its data sheet and sample status. Each RFI gets its number on the drawings (a dimension marked VERIFY, a cloud) and a row on the RFI list; a revision clouds the surfaces changed after it.

Step 11: Commercial costs in the Tile Designer

Step 11: Commercial costs

Tick Price these on the bid and the commercial cost lines go to BidRidge as Tile job extras: mobilization, floor and finish protection (the tiled floor area, 1,646.6 sf here), freight and submittal time (4 h + 0.5 h a room), with premium time as an option. Each line shows its quantity, price and basis: $1,976.97 here.

Field tip: The starting prices are marked to set your own.

Step 12: Send it to BidRidge in the Tile Designer

Step 12: Send it to BidRidge

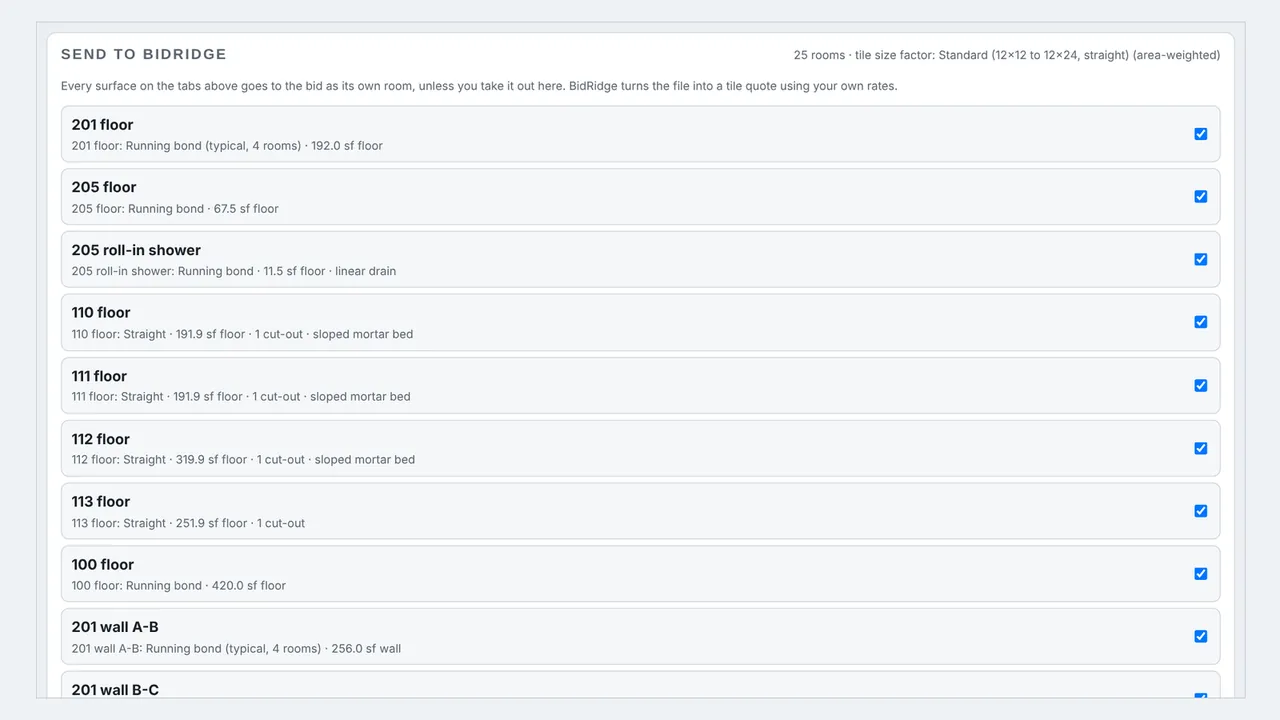
Send to BidRidge lists every surface as its own room: 25 here, the guest bath ones marked typical, 4 rooms. Save BidRidge template, then in BidRidge open Templates and tap Import template file. Rooms, tile, cuts, drains, cove base, the tile systems and the commercial lines come in filled in.

Field tip: A Commercial project comes in as a commercial job: your commercial wage basis and the overhead lines, under Wages & job type.

What you get

The drawing set, the lists and the files

Real files from this sample, made by the designer. Tap a page to see it full size. Yours carry your company, the client and the address.

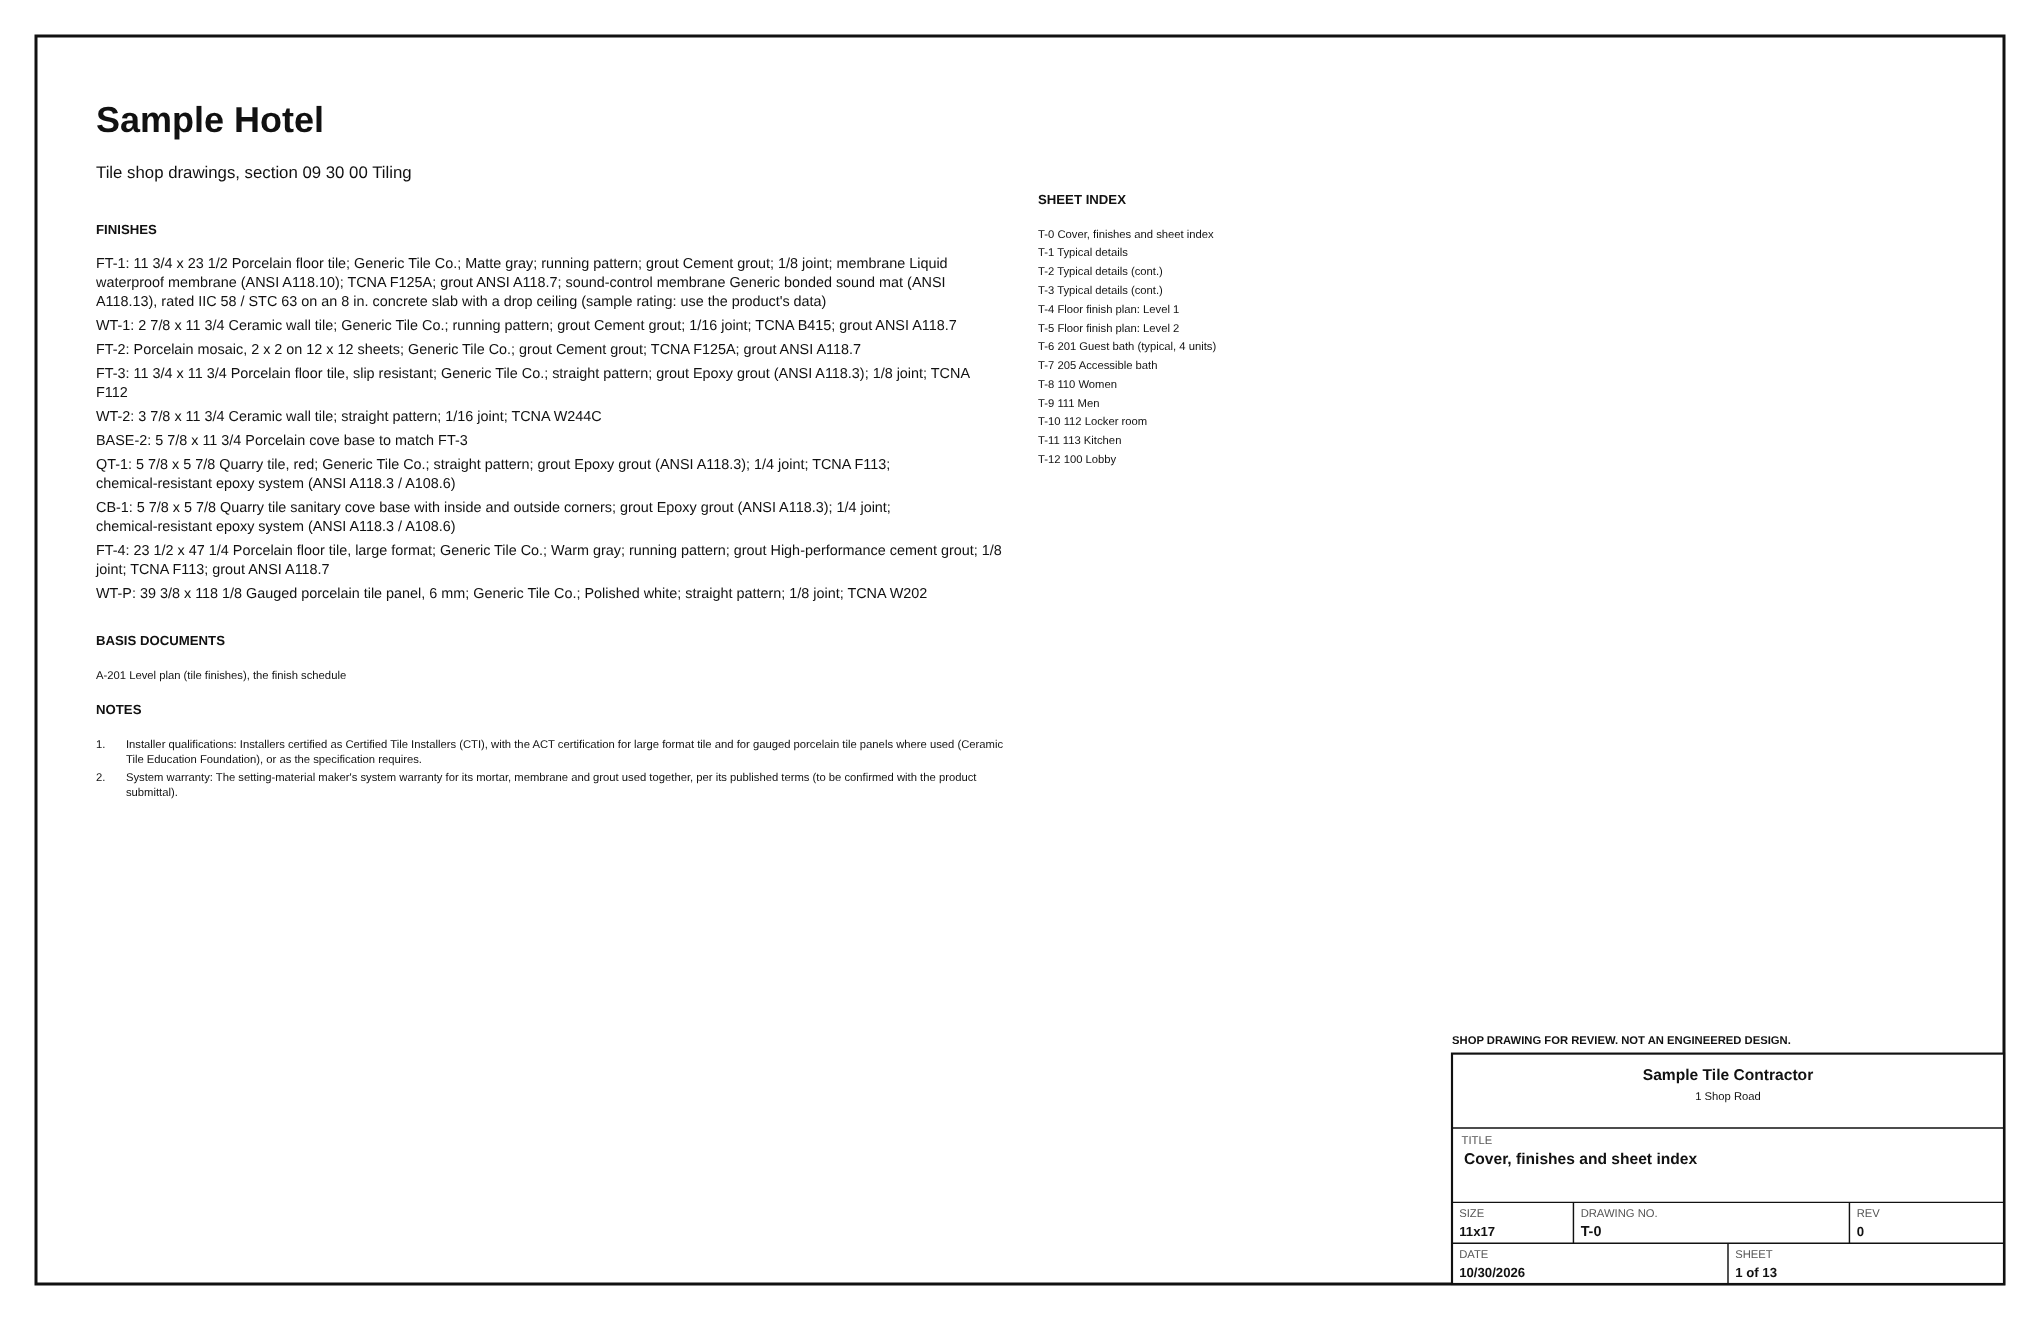
T-0 Cover, finishes and sheet index (11x17 shop sheets)
T-4 Floor finish plan: Level 1, codes and sloped zones
T-5 Floor finish plan: Level 2, the typical guest bath in 4 units
T-6 201 Guest bath (typical, 4 units)
T-0 Cover sheet and sheet index (ARCH D full set)
T-2 Floor finish plan: Level 2 with the room schedule and product data log (ARCH D)

The BidRidge quote

Same numbers in the quote

The designer sends its quantities to BidRidge, and BidRidge prices the labor and materials at your rates.

  • Good
    $123,300
  • Better
    $150,050
    Recommended
  • Best
    $218,200
The design and the quote, line by line
ItemIn the designerIn the BidRidge quote
Floors1,646.6 sf on 8 floor surfaces, typical units countedFloor tile installation 1,646.6 sf
Walls and base1,540.9 sf of wall tileWall tile installation 1,540.9 sf
Typical guest bath201 laid out once, built in 4 roomsIts 5 rooms arrive counted: (typical, 4 rooms)
Commercial costs$1,976.97 in the designerTile job extras: mobilization 1, protection 1,646.6 sf, freight 1, submittal 9 h

The sample hotel's template imported into a Tile job in the BidRidge app at its starting rates, crews on. It comes in as a commercial job (the commercial default, commercial open shop); on residential open shop: $88,300 / $111,250 / $172,300. The Submittal set is not part of it. Your rates give your own numbers.

More in the guide

Try it on your own job

Open the sample, change it to your measurements, and send it to a BidRidge quote. Drawing is free; the drawing set, the lists and the quote come with a BidRidge license or the 14-day trial.

In the Tile Designer, tap Open project and pick the sample file, or tap Open the sample hotel on the Building plan card: it is the same job.

Sample designs: names, sizes and clients are made up. Prices are BidRidge's starting rates; set your own. The designers check against common guidelines (IRC, NKBA and the makers' published numbers) to help you catch mistakes. They don't replace your building department or the manufacturer's installation instructions: verify with them.