BidRidge › Designers › Guide › Chapter 4

Chapter 4 · Deck & Fence DesignerBeta

Lakeview deck

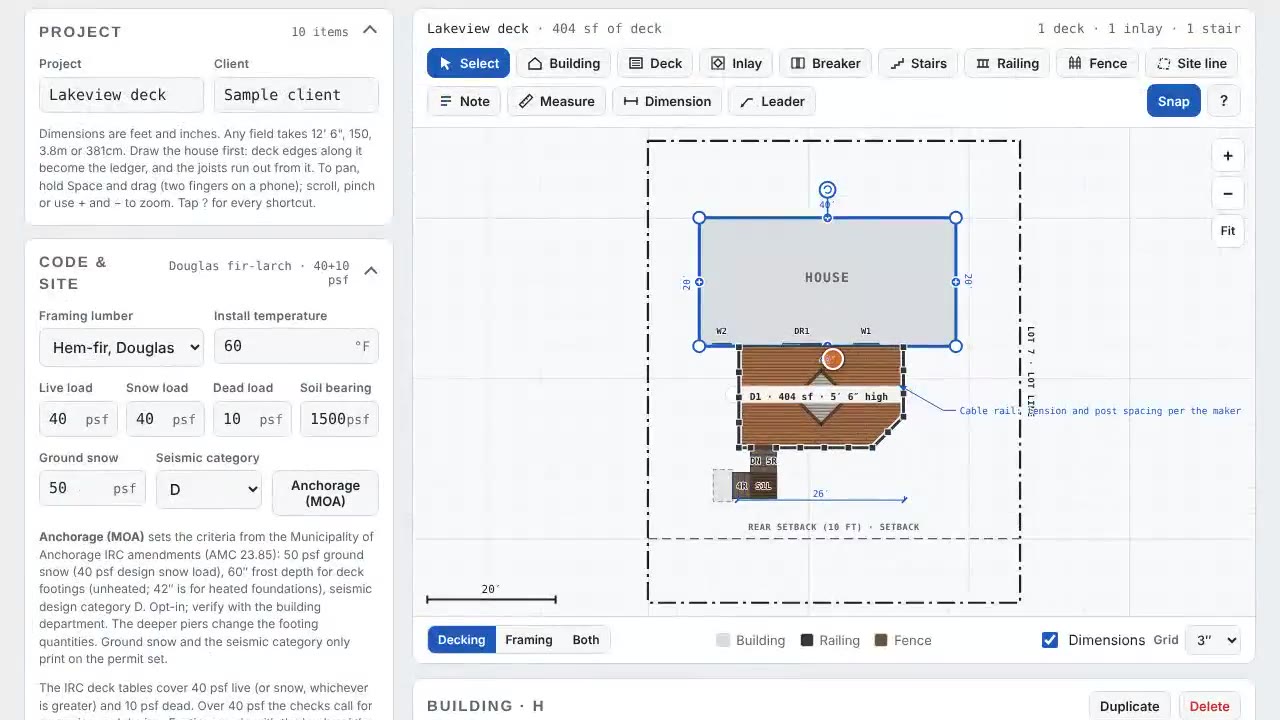
We draw a composite deck off the back of the house with typed lengths, frame it with a picture-frame border and a diamond inlay, and bring the yard stairs down through an L-turn landing with cable rail. Then we turn on the Anchorage settings and print the permit set, with the R.13 checklist on the cover.

In the designer, tap Open project and pick the sample file. It opens exactly as in the video.

Narrated walkthrough, 2:17. Captions on.

The sample in numbers

  • Deck
    404 sf, 5′ 6″ high
  • Stairs
    9 risers, 2 flights, 48″ landing
  • Cable rail
    51 LF level + 18 LF stair
  • Framing
    2x10 at 16″, 8 piers to 60″
  • Lists
    47 buy-list rows, 137 cut pieces
  • Permit set
    P-0 to P-5

Step by step

Step 1: Draw the deck with typed lengths in the Deck & Fence Designer
  1. Deck tool
  2. Snapped to the house wall
  3. Typed length and angle

Step 1: Draw the deck with typed lengths

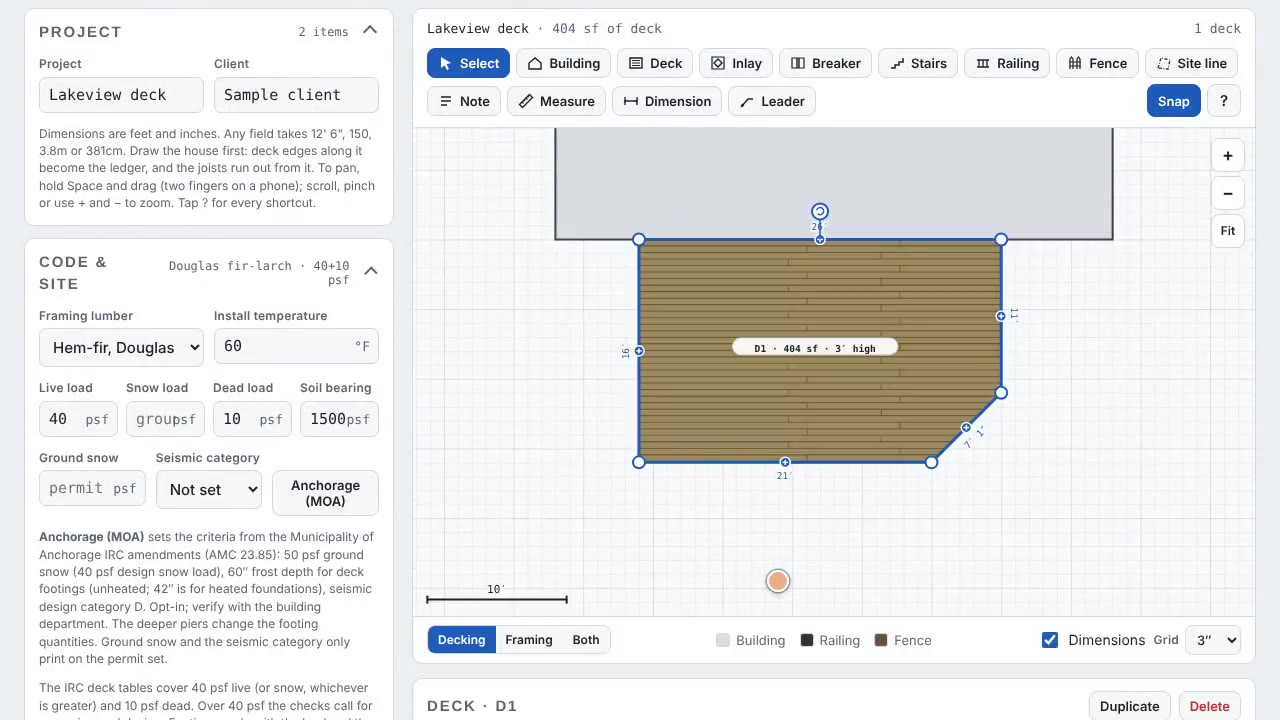
Start blank, pick Deck and click on the house wall: the edge snap puts the corner right on it. Point the way the side runs, type the length and press Enter. For the clipped corner type the length and the angle, 7'0-7/8@225, then Enter on the last side to close it.

Field tip: Type the lengths off your site sketch. Feet, inches or both work: 26', 21' 6", 150 (inches).
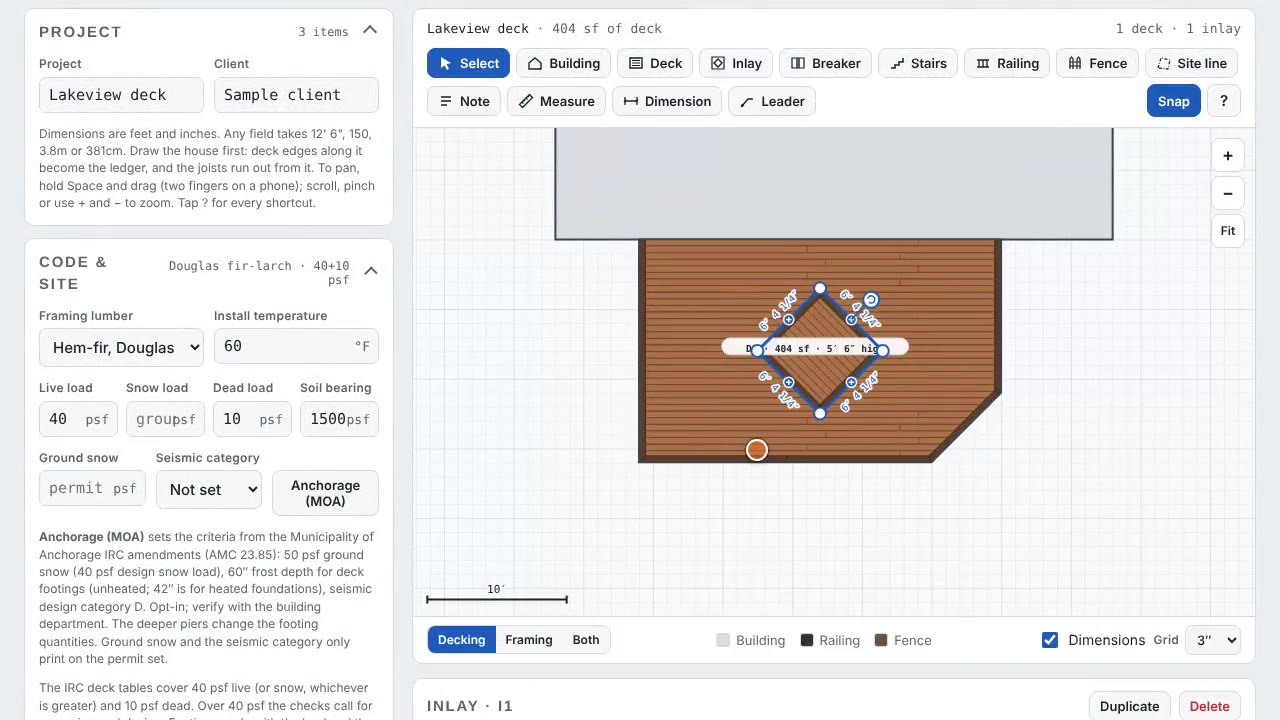
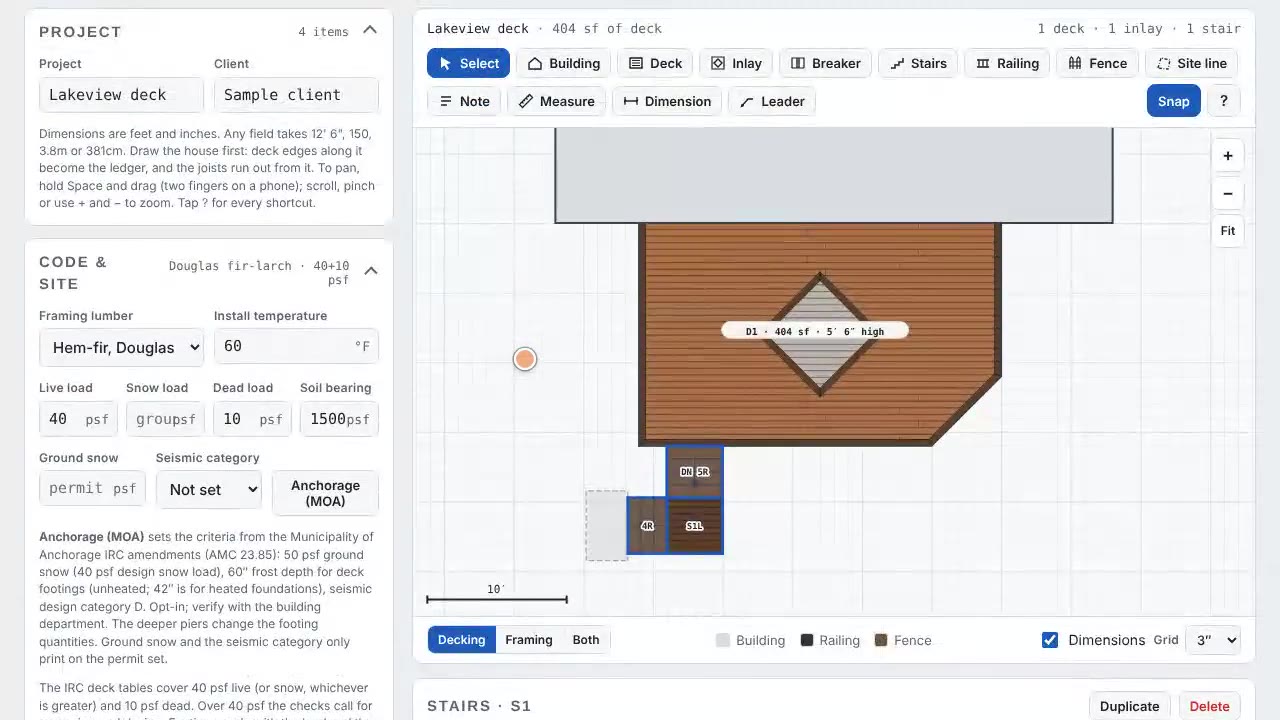
Step 2: Picture-frame border and a diamond inlay in the Deck & Fence Designer
  1. Height
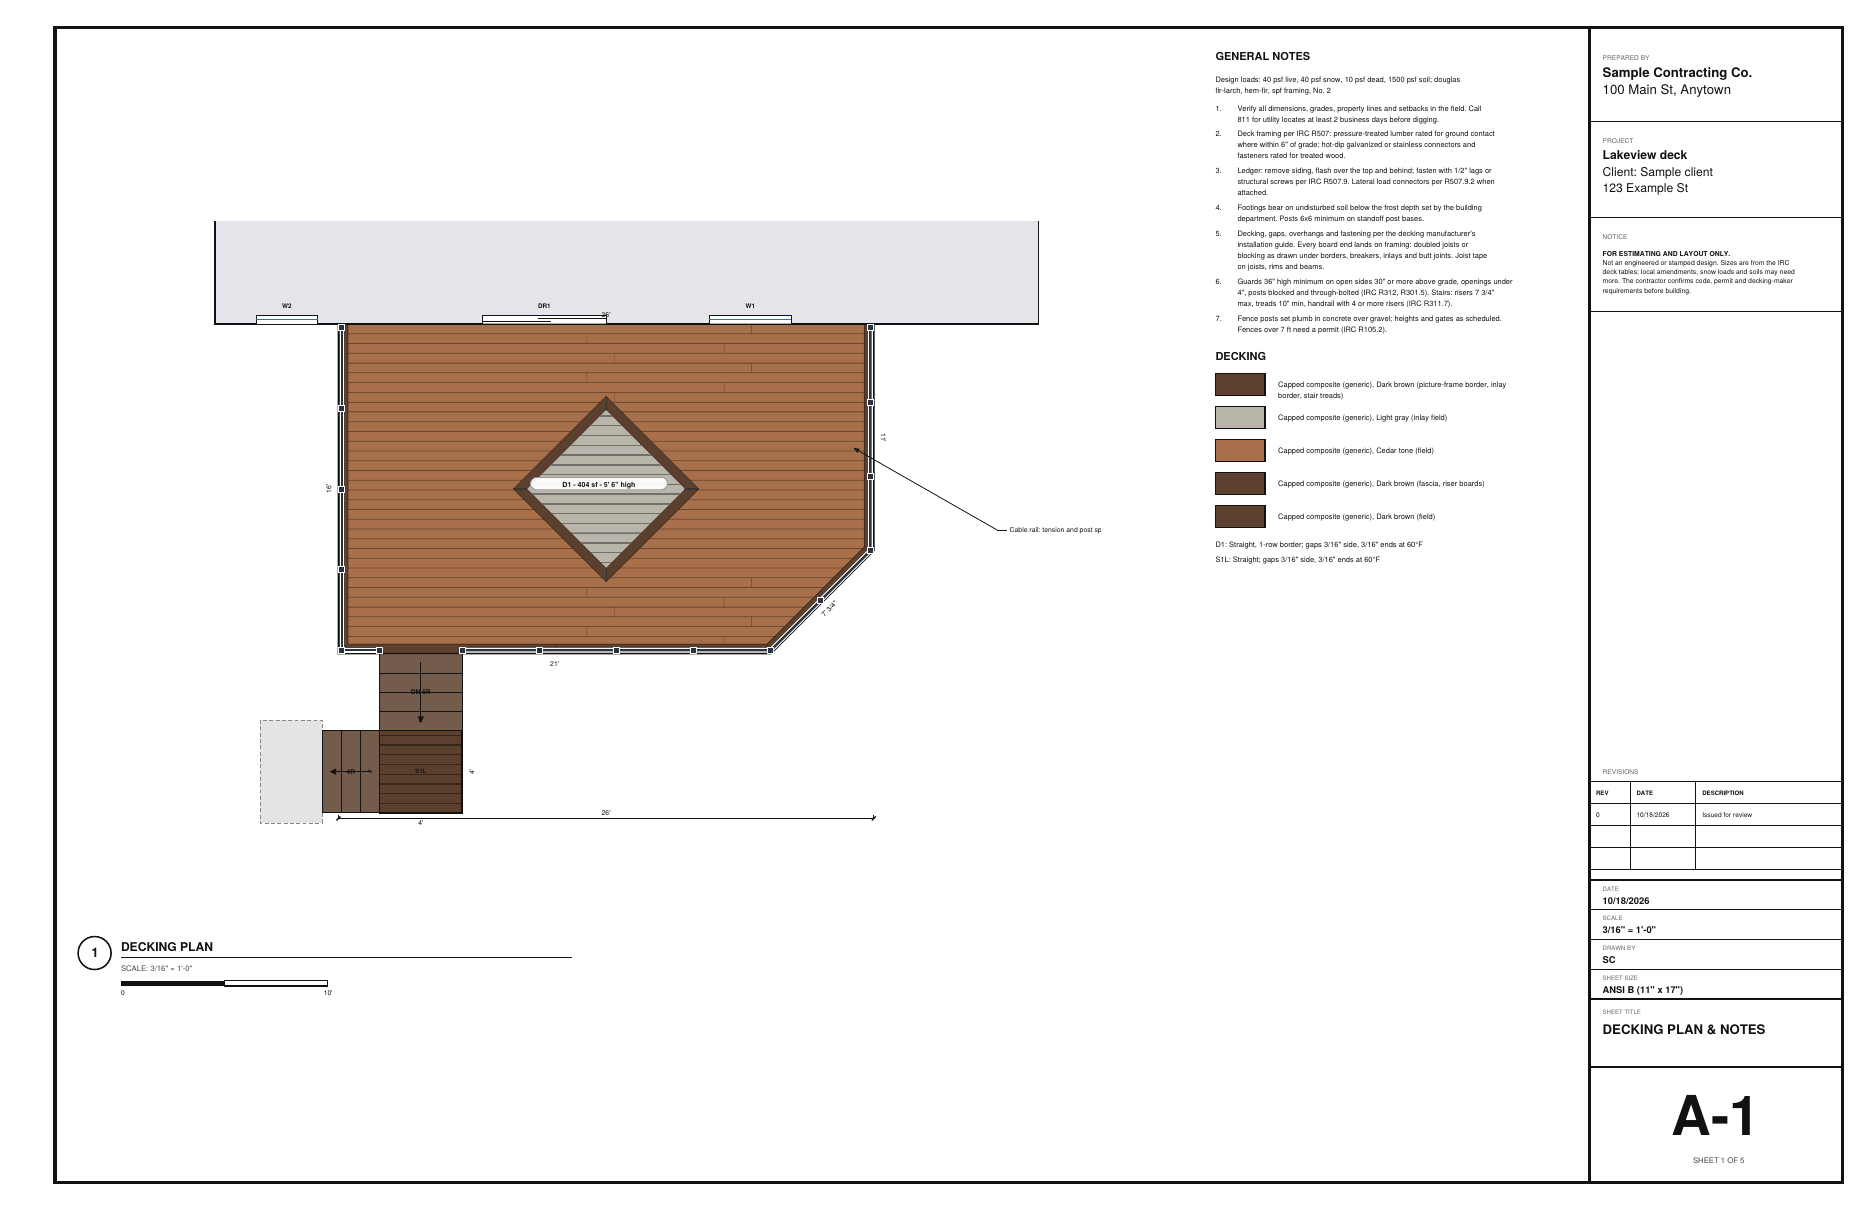
  2. Picture-frame border
  3. Inlay tool

Step 2: Picture-frame border and a diamond inlay

In the deck's panel, set the height and pick one row of picture-frame border. Draw the inlay with the Inlay tool: four clicks on the grid and Enter. It gets its own border, field direction and colors, and the framing under it is doubled.

Field tip: Border boards are square-edge and face-screwed with plugs. The buy list keeps them apart from the grooved field boards.

Step 3: Stairs that turn at a landing in the Deck & Fence Designer
  1. Stairs tool
  2. Landing partway down: turn right

Step 3: Stairs that turn at a landing

Pick Stairs and click the edge where they go down. A 5′ 6″ rise is too tall for one straight run here, so set the landing partway down to turn right 90°. The designer splits it into 5 and 4 risers, puts the landing on its own posts, and adds a paver pad at the bottom.

Field tip: The landing has to be at least as deep as the stair is wide. The designer sizes it that way and checks it.

Step 4: Cable rail in the Deck & Fence Designer
  1. Stainless cable

Step 4: Cable rail

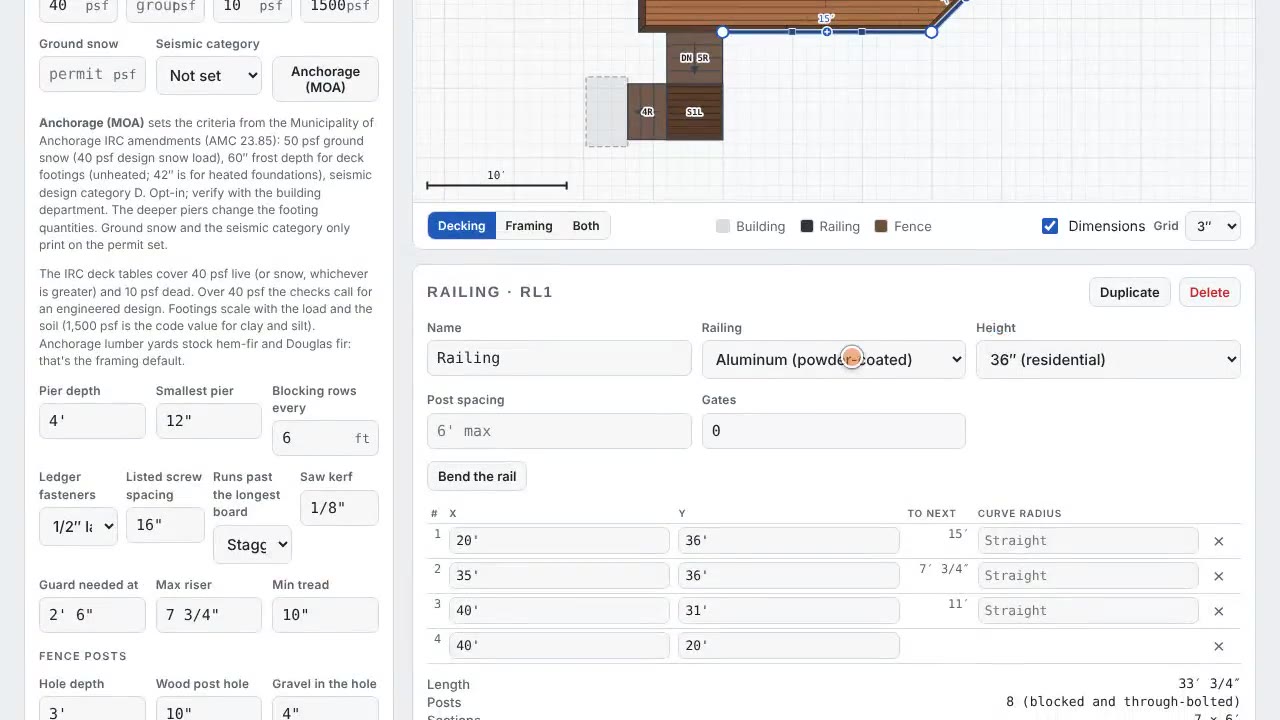
Pick Railing and click along the open edges, leaving the stair opening. Set the type to stainless cable. Posts go every 4 feet, and the stair rail and blocking show up in the buy list.

Field tip: Cable posts need solid blocking. Order the cable kit after the posts are set and measured.

Step 5: Dimension and leader notes in the Deck & Fence Designer
  1. Dimension
  2. Leader note

Step 5: Dimension and leader notes

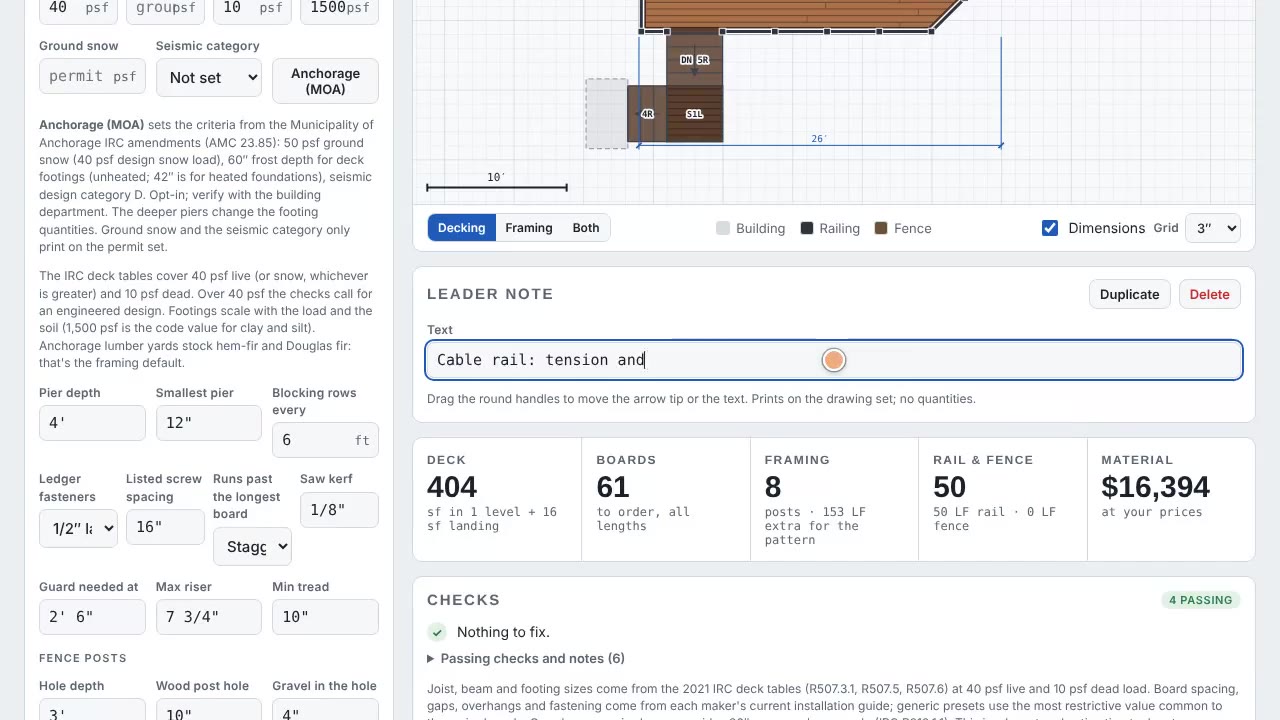
The Dimension tool snaps to corners: two clicks give a dimension that prints on both plan sheets. A Leader puts a note on the plan, like what the rail maker needs. Notes never change a quantity.

Field tip: Hold Shift to keep a line at 0, 45 or 90 degrees. Hold Alt to turn snapping off.

Step 6: Framing, footings and checks in the Deck & Fence Designer
  1. Framing view
  2. Checks against IRC deck guidelines

Step 6: Framing, footings and checks

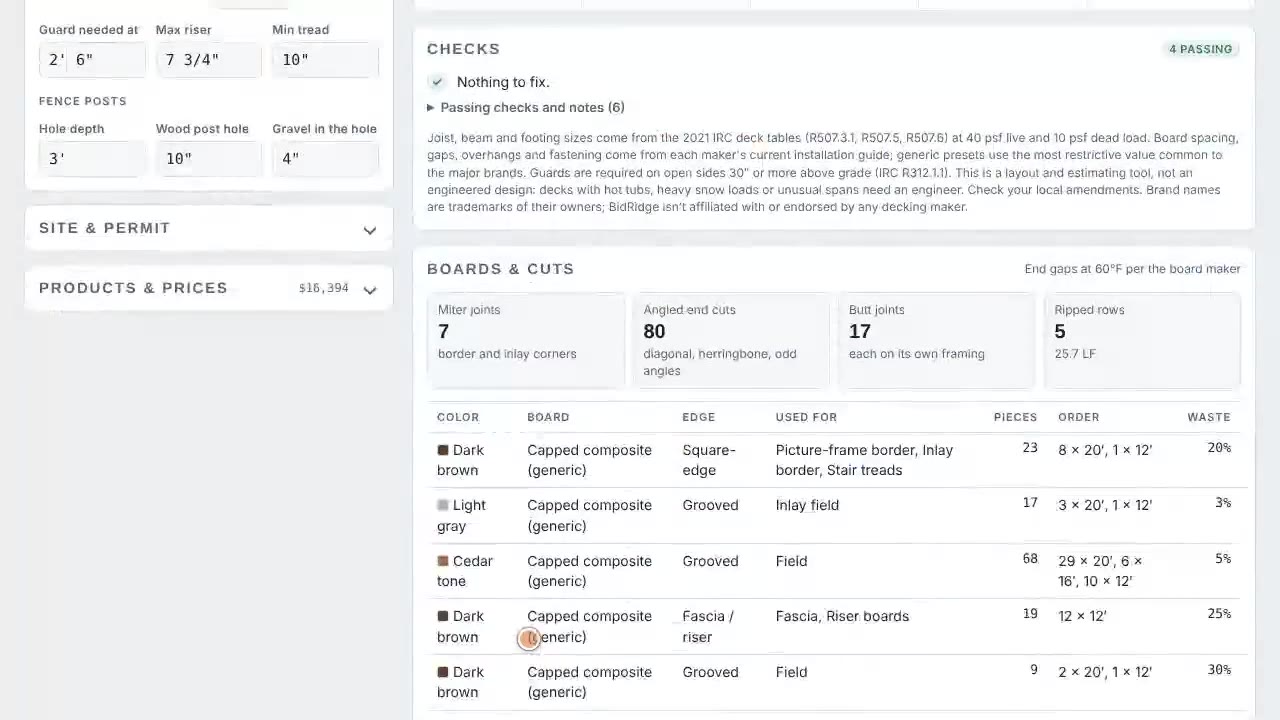
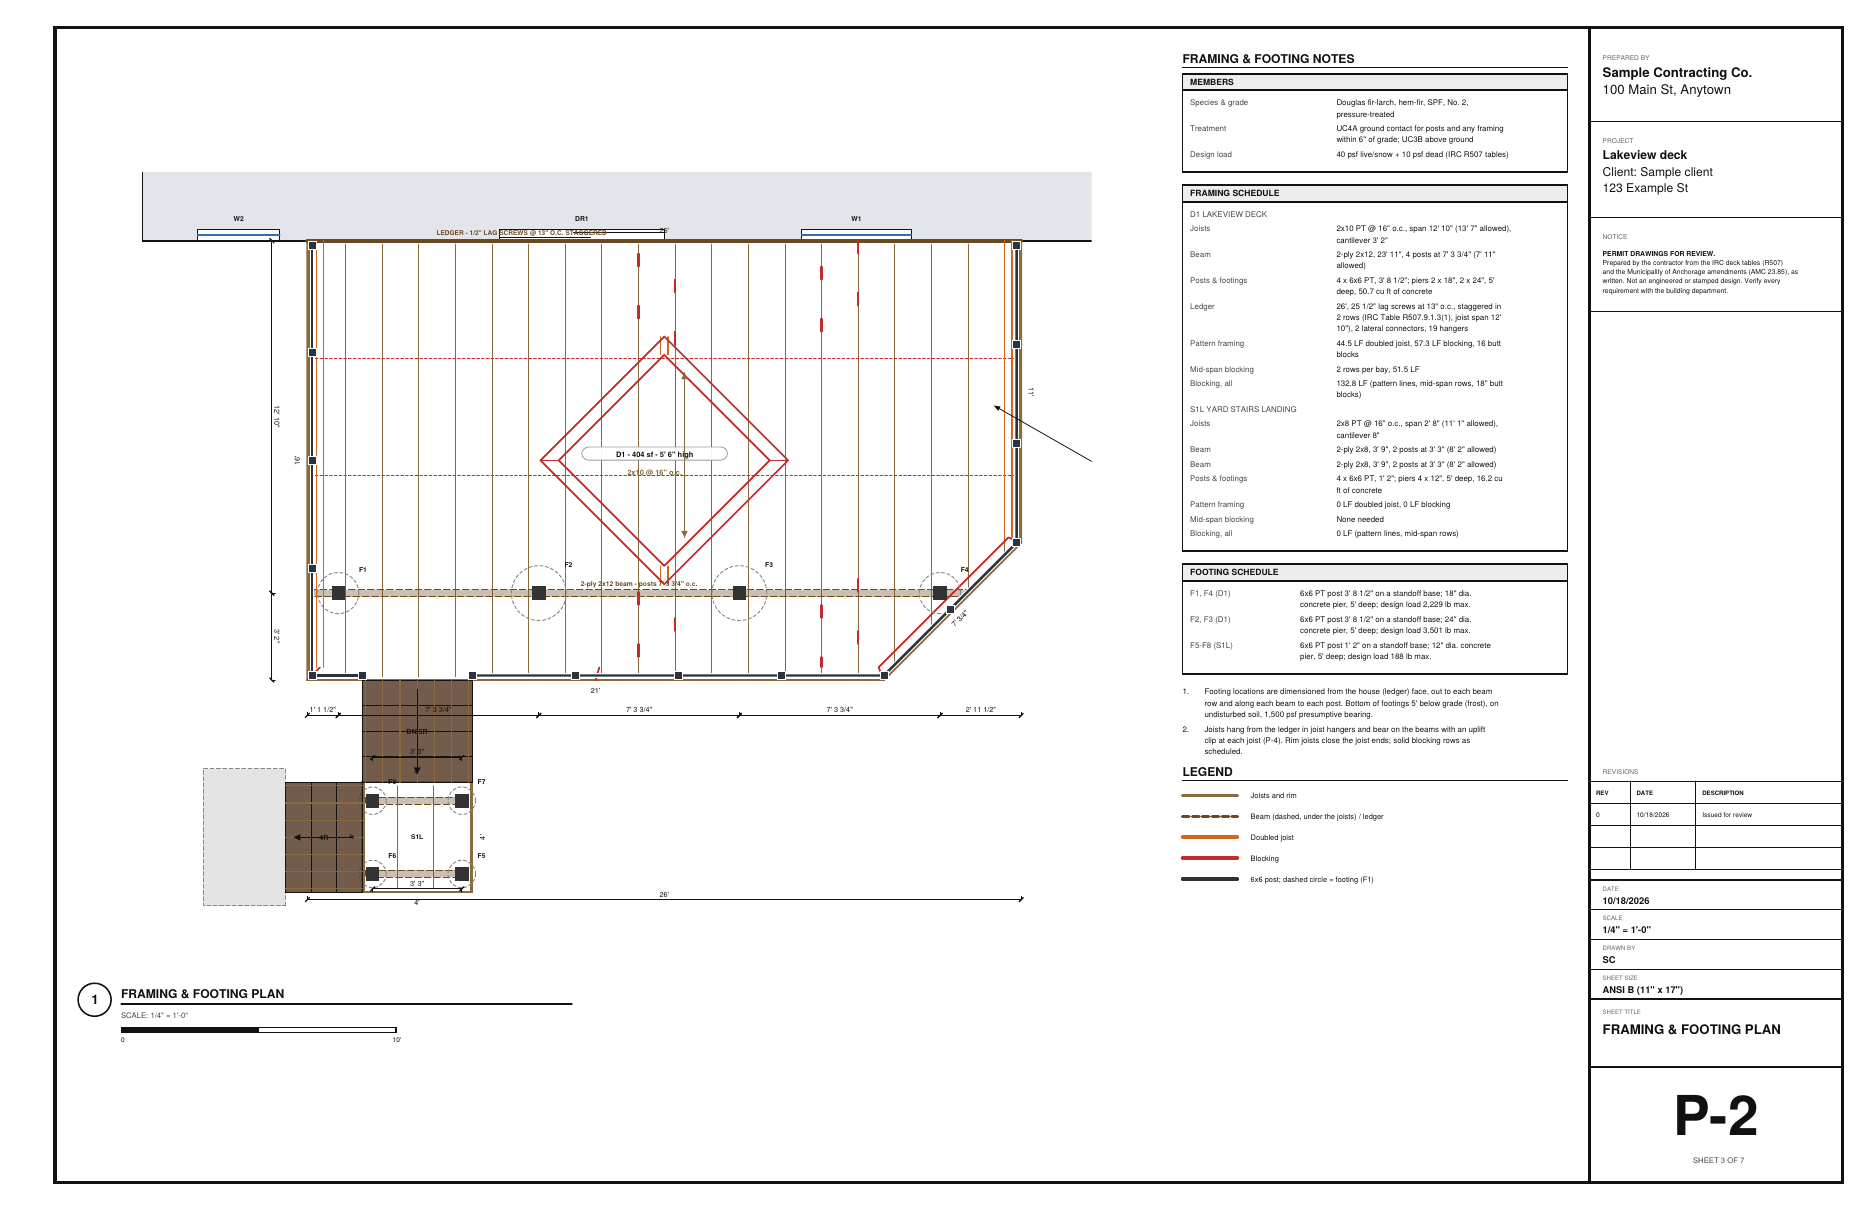
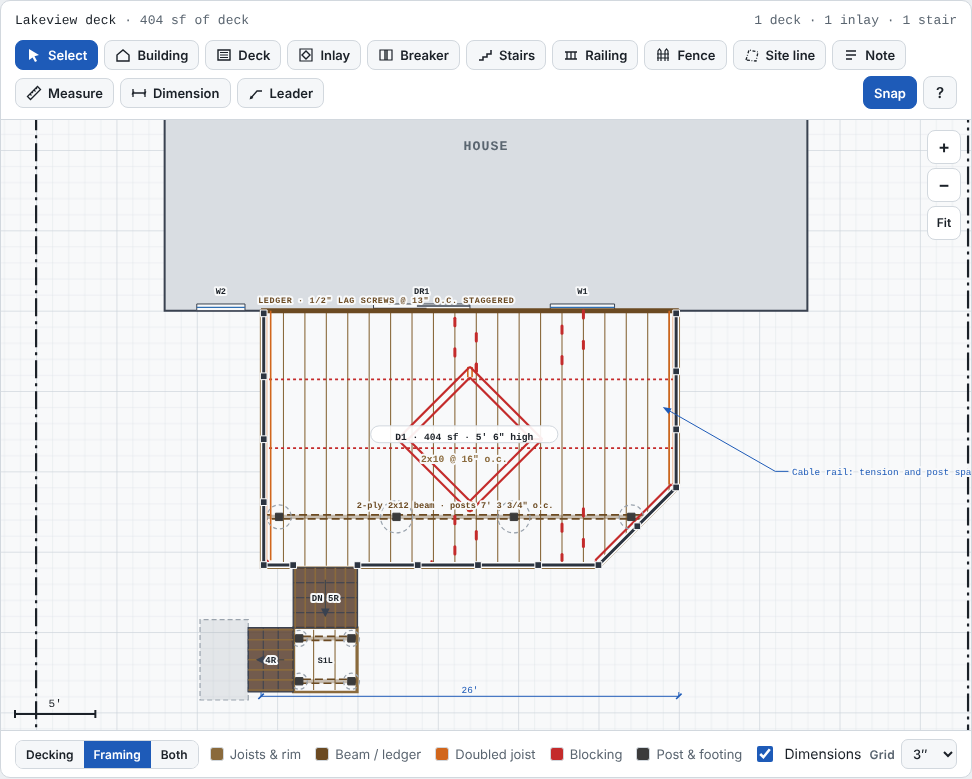
Switch the plan to Framing. Joists, the beam, the posts and blocking under every border and inlay seam are already worked out. The checks list compares the design with IRC deck guidelines; verify with your building department.

Field tip: Tap a check's fix button and the design changes, with one undo.

Step 7: Anchorage settings and permit details in the Deck & Fence Designer
  1. Anchorage (MOA)
  2. Ledger questions
  3. Doors, windows, lot and setback lines

Step 7: Anchorage settings and permit details

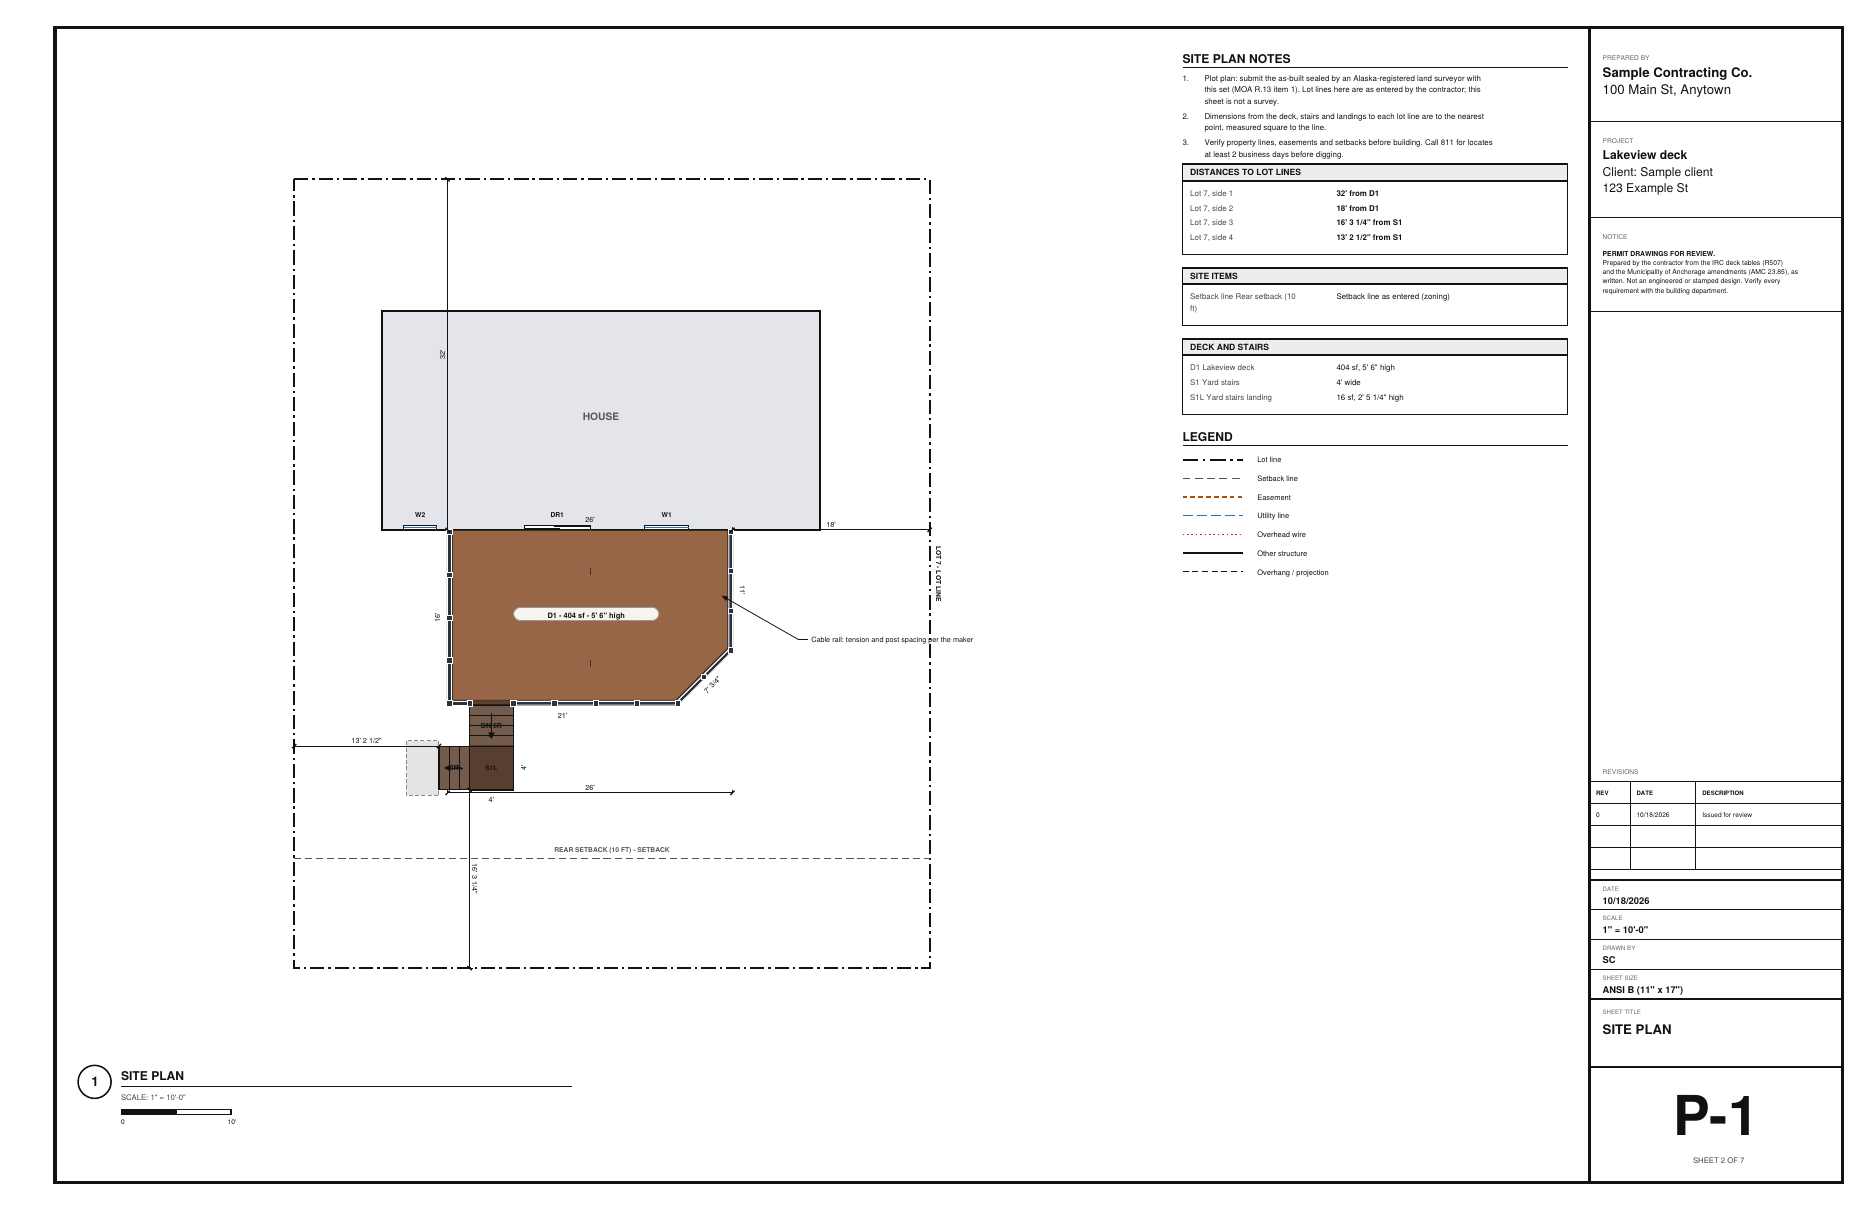
Under Code & site, the Anchorage (MOA) button sets 50 psf ground snow, 40 psf design snow, 60″ frost depth and seismic category D. Answer the ledger questions, add the doors and windows on the house wall, and the lot and setback lines.

Field tip: These are the MOA amendments as written. Confirm them with the building department for your job.

Step 8: The permit set in the Deck & Fence Designer
  1. Sheets for: Permit set
  2. Preview
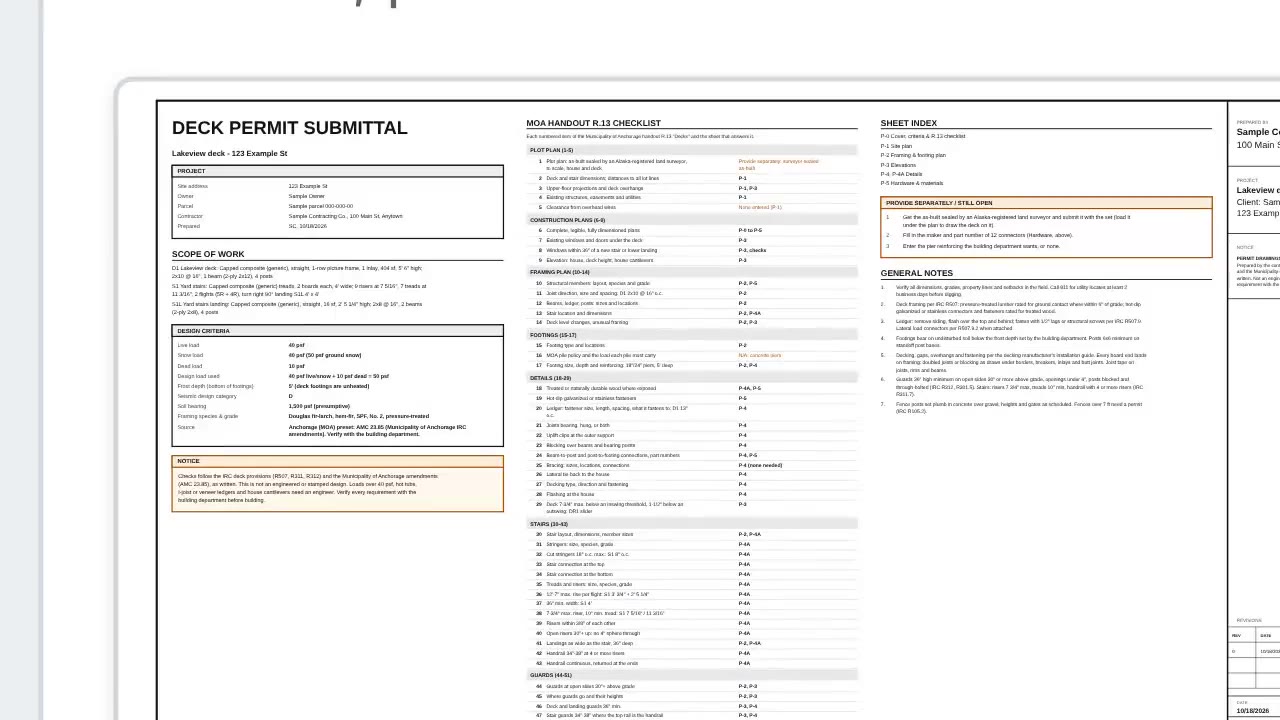
  3. P-0: design criteria and the R.13 checklist

Step 8: The permit set

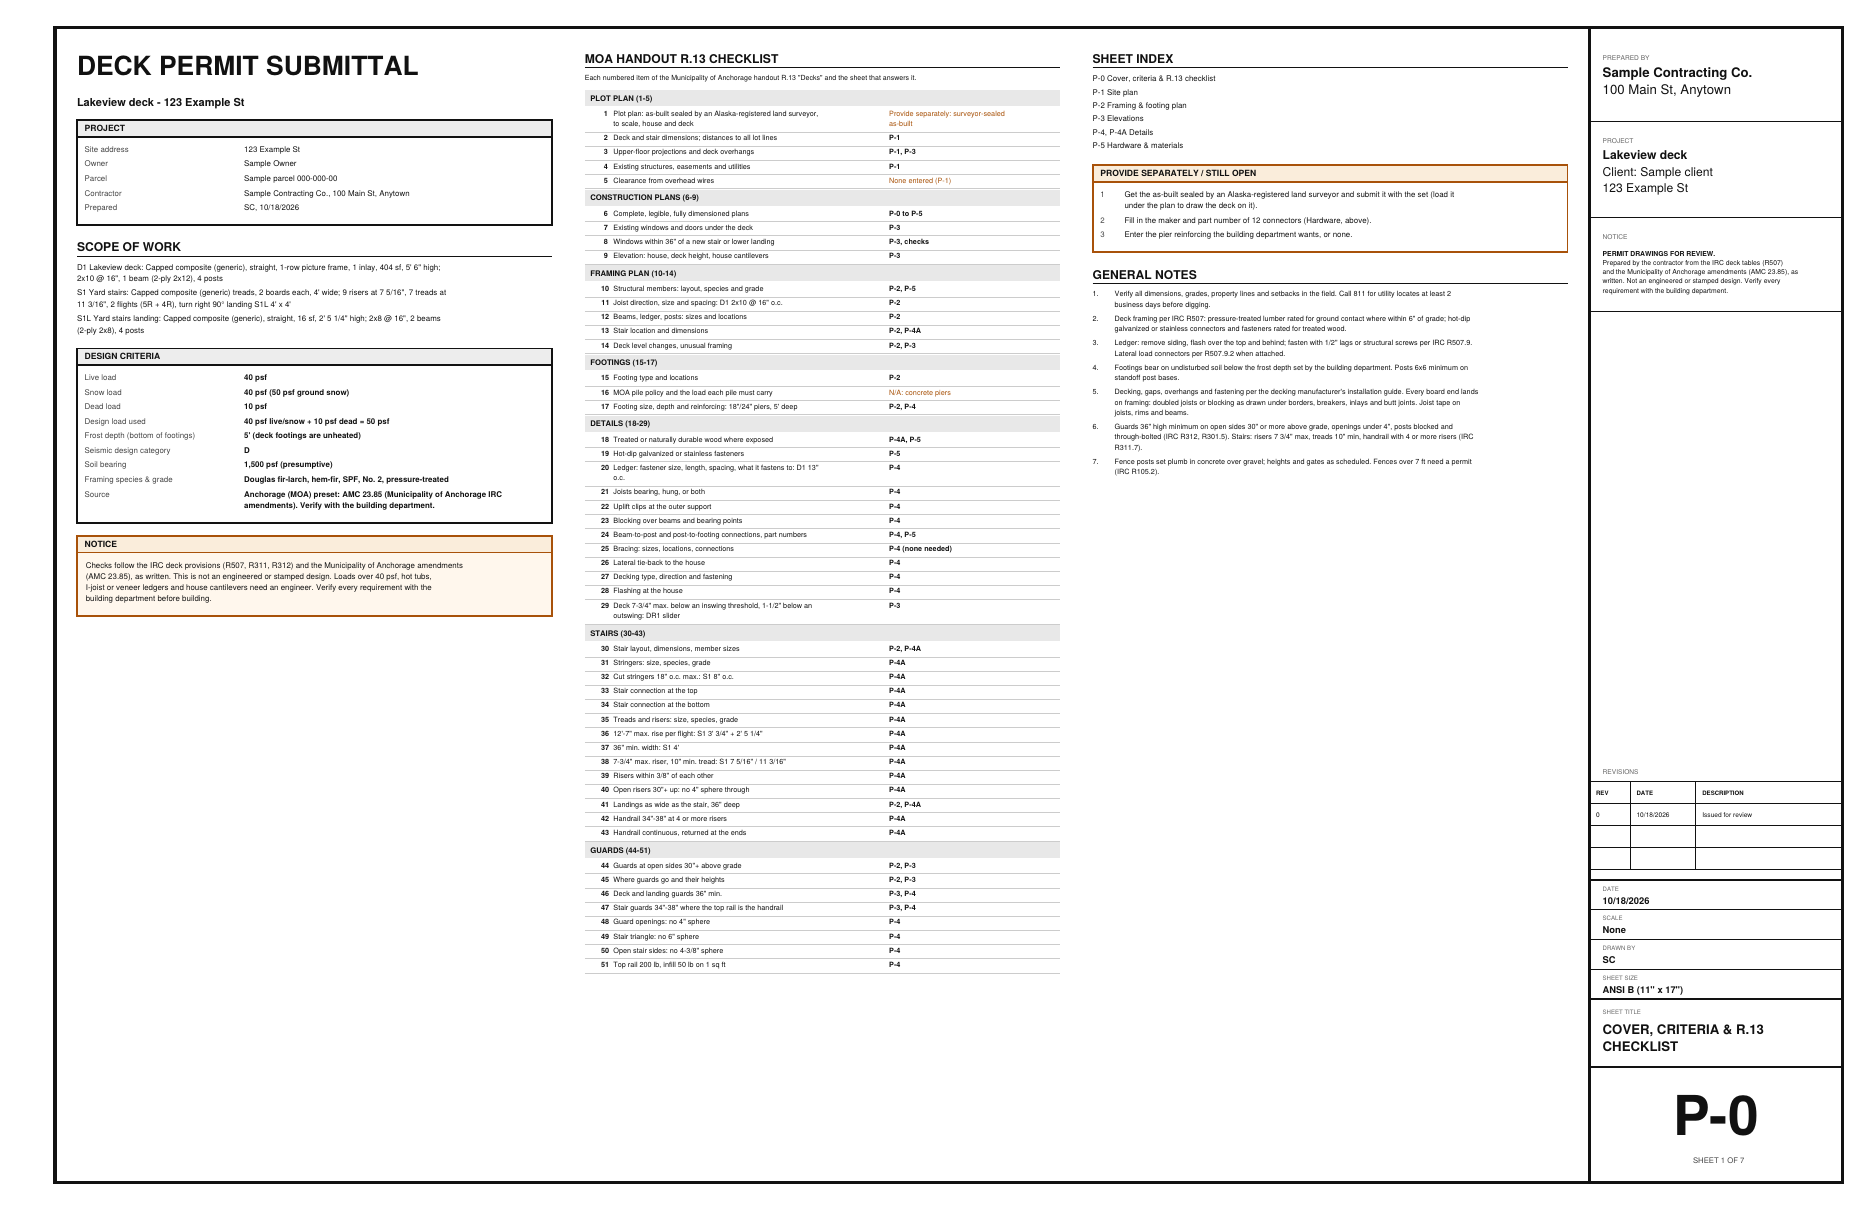
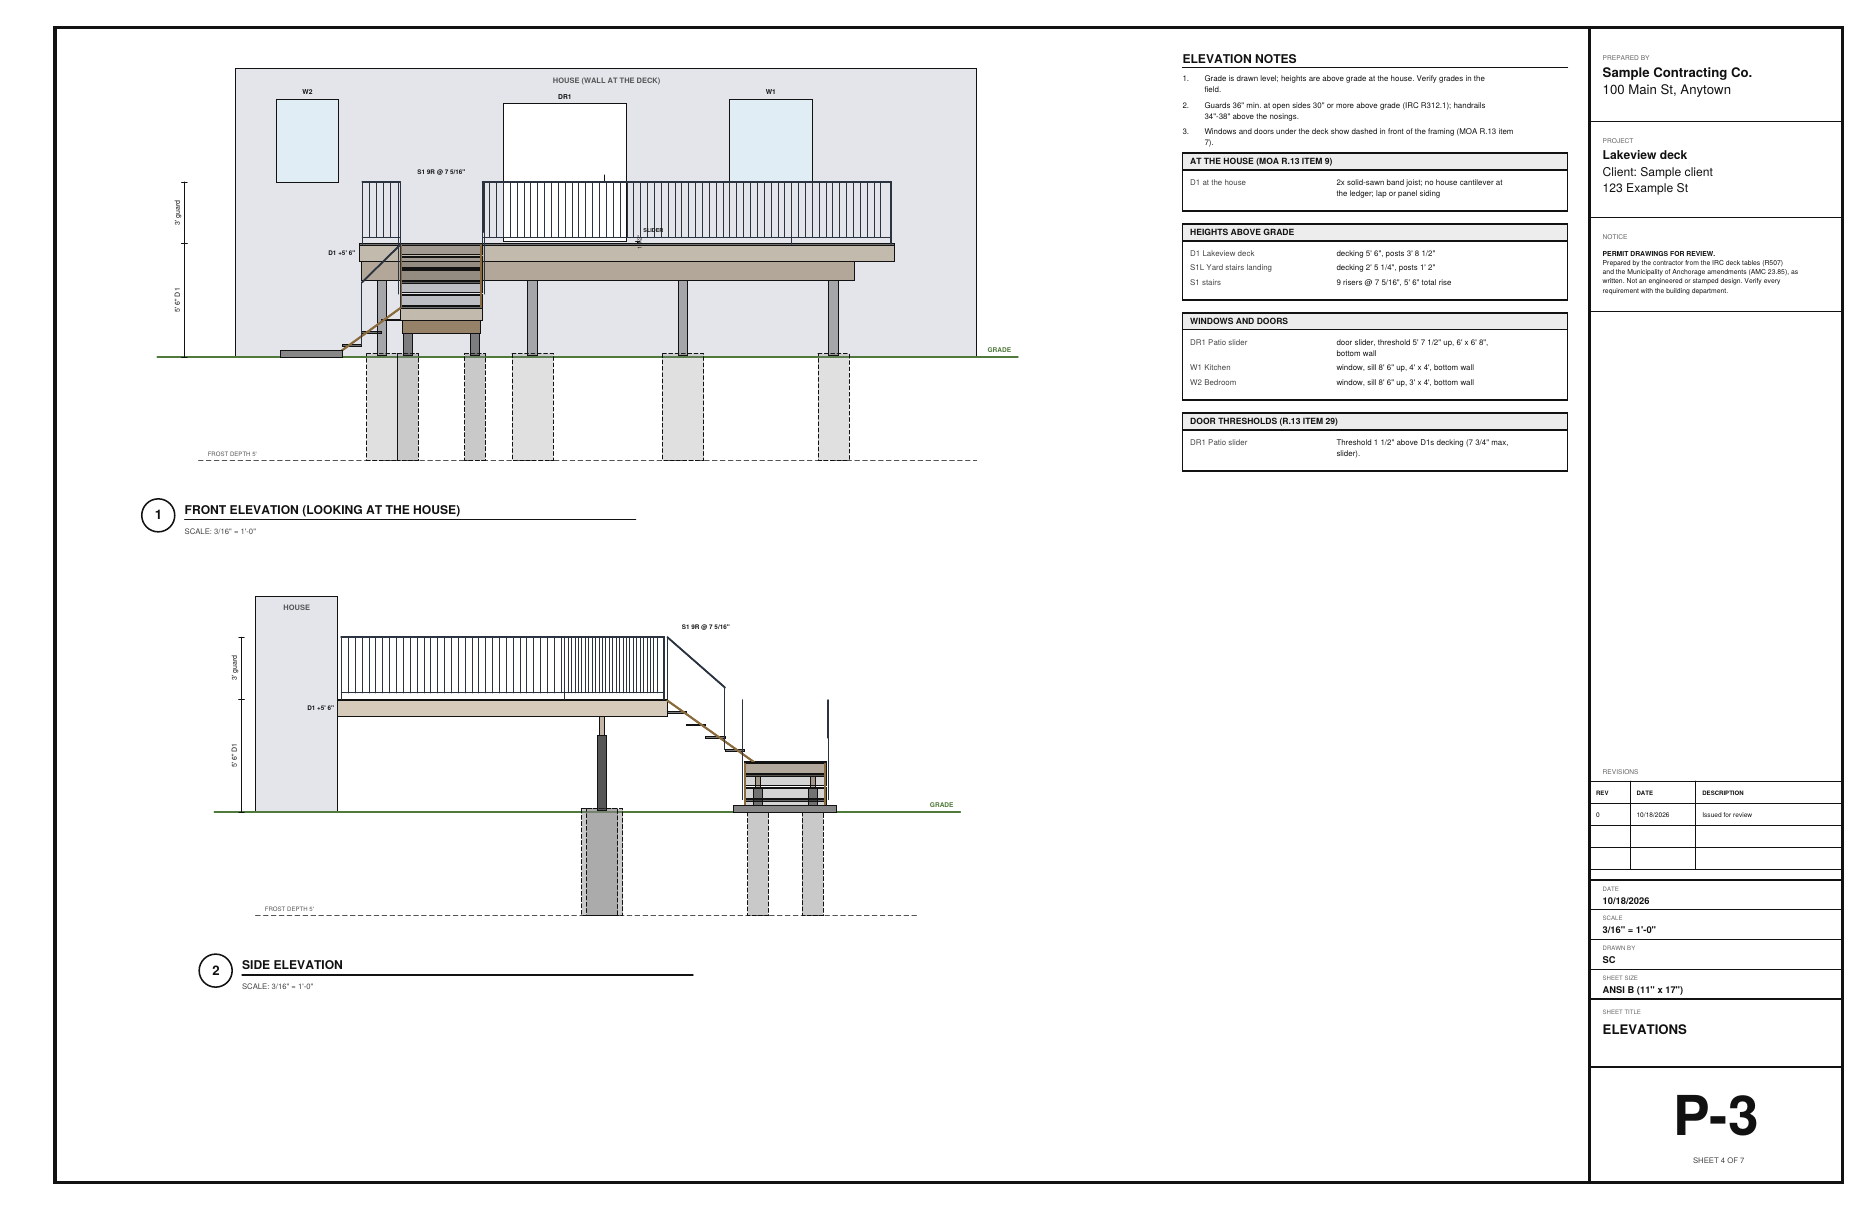
Under Drawing set, pick Sheets for: Permit set and preview it. P-0 is the cover with the design criteria and the R.13 checklist, showing the sheet each item is on. P-1 to P-5 are the site plan, framing and footings, elevations, details and hardware.

Field tip: The still-to-do list names what you still owe: the sealed as-built, part numbers and pier reinforcing.

Step 9: Commercial fencing in the Deck & Fence Designer

Step 9: Commercial fencing

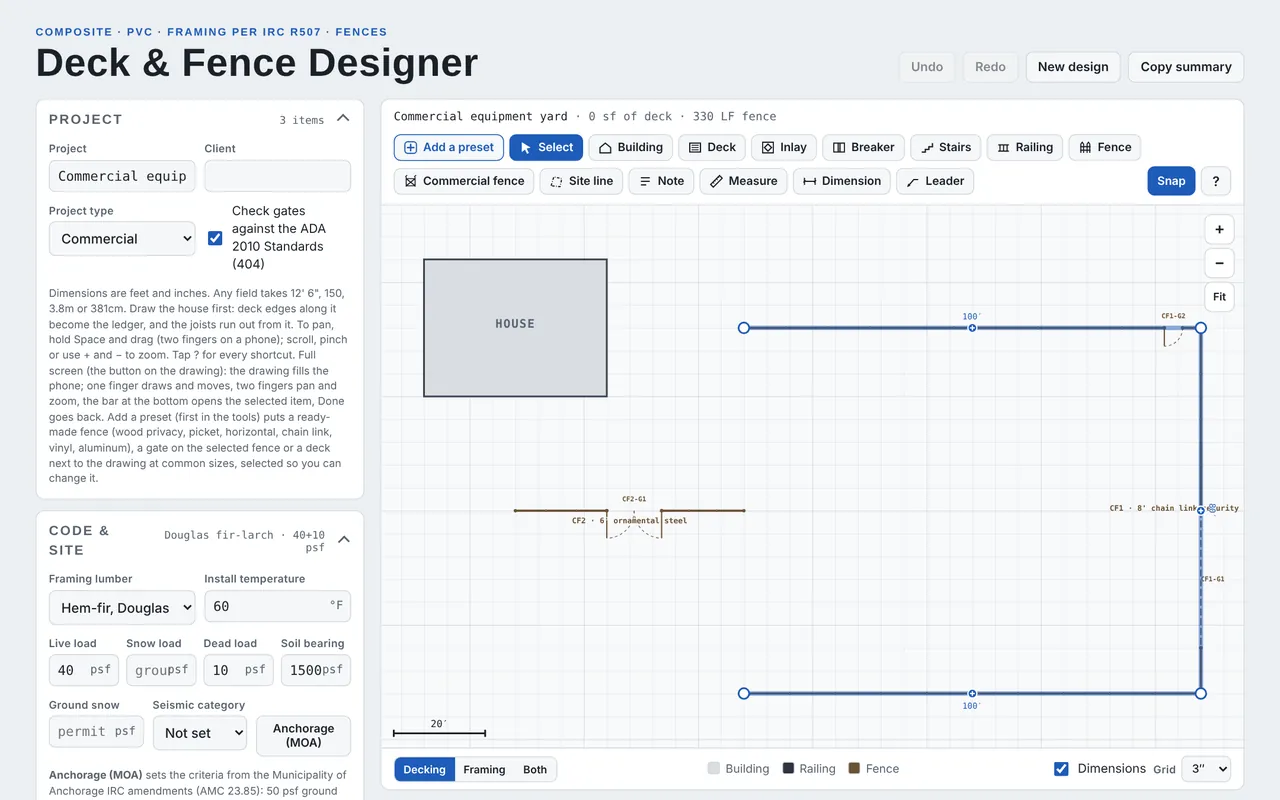
Set the project type to Commercial and pick Commercial fence. Draw the line, then pick the system: chain link security fence, ornamental steel or aluminum, welded wire or temporary construction fence. The Commercial equipment yard sample has 280 ft of 8 ft chain link with three strands of barbed wire and 50 ft of 6 ft ornamental steel.

Field tip: Type your site's wind speed, exposure and icing and the line post spacing is checked against the fence industry's wind load guide (CLFMI WLG 2445, 2023) for the post and fabric; with no wind speed it is your setting, and over 10 ft it is flagged.

New in 1.58, narrated (steps 9 to 11), 1:42. Captions on.
Step 10: Gates and the schedules in the Deck & Fence Designer

Step 10: Gates and the schedules

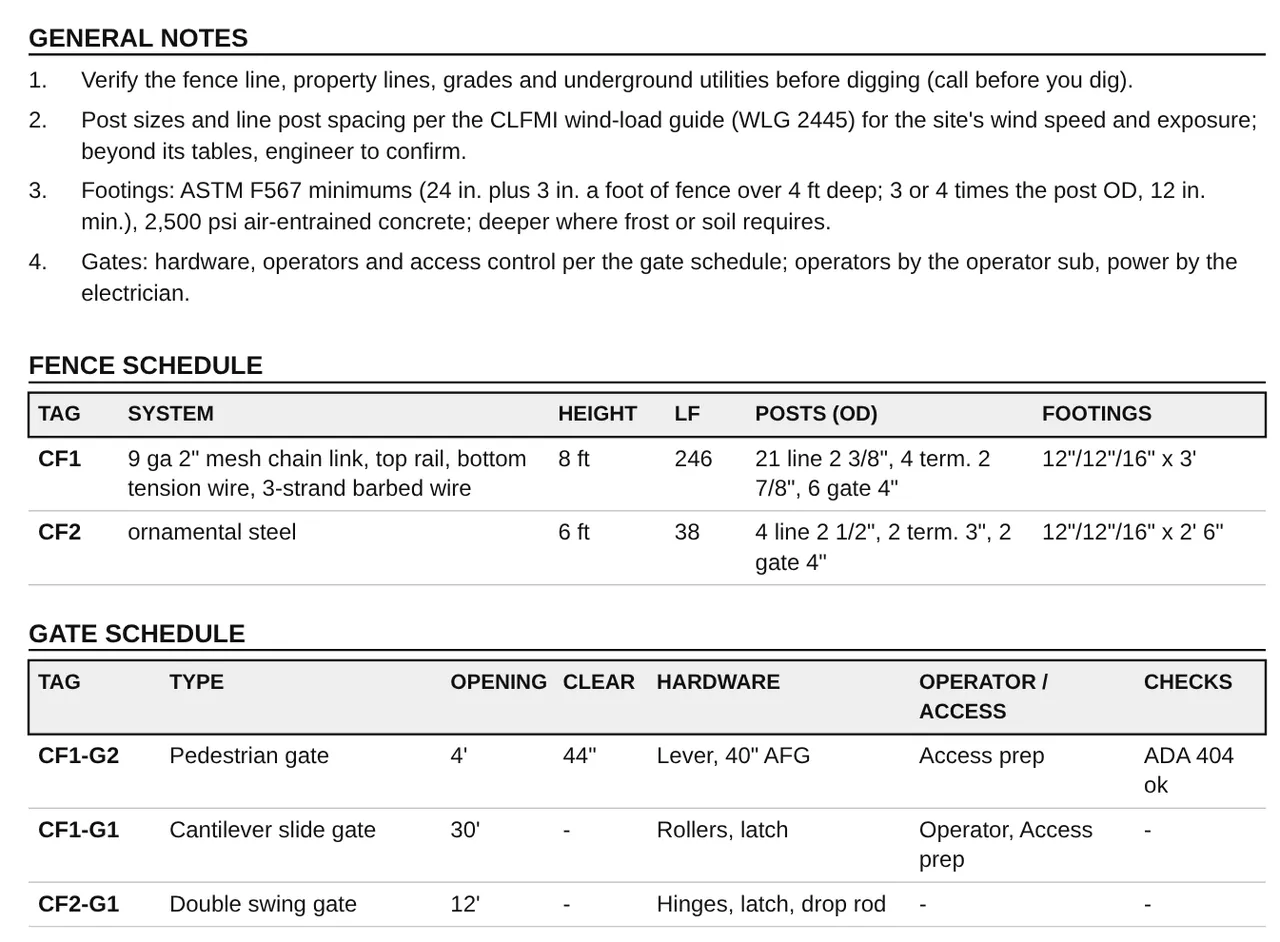
Add swing, double, cantilever slide or pedestrian gates on the line. The yard has a 30′ cantilever slide gate with an operator and access-control prep, a 4′ pedestrian gate with lever hardware at 40″ and 44″ clear, and a 12′ double swing gate on the ornamental fence. With the ADA check on, a pedestrian gate needs 32″ clear (ADA 2010 404.2.3) and its hardware 34″ to 48″ above the ground (404.2.7).

Field tip: Operators and readers go to their own subs; the quote carries the operator as a sub line and the access-control prep as a stub and a post.

Step 11: The fence Submittal set in the Deck & Fence Designer

Step 11: The fence Submittal set

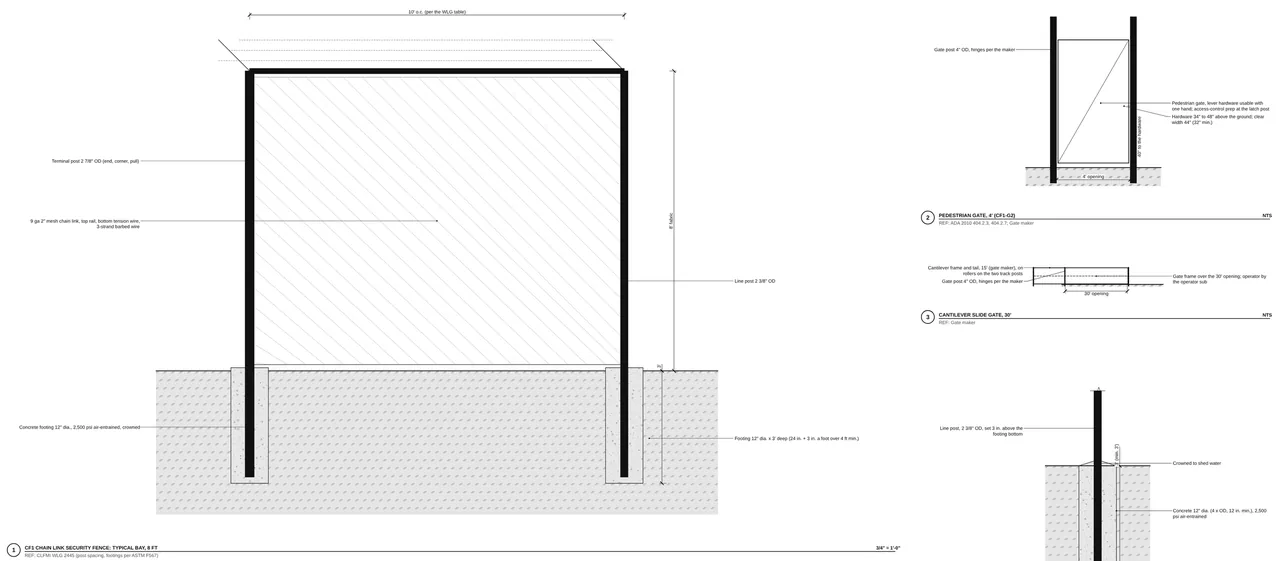
Pick Sheets for: Submittal set. A-1 is the fence plan with the fence, gate and product data schedules; A-2 has the typical bays, the gates and a footing detail for each post size. Footings follow the ASTM F567 minimums as the wind load guide gives them: 24″ deep plus 3″ for each foot of fence over 4 ft, at least 12″ across.

Field tip: Typical details, not an engineered design: field-verify the fence line, the grades and the utilities before digging.

What you get

The drawing set, the lists and the files

Real files from this sample, made by the designer. Tap a page to see it full size. Yours carry your company, the client and the address.

P-0 cover: design criteria (Anchorage), the R.13 checklist with the sheet each item is on
P-1 site plan: lot and setback lines, distances to every lot line
P-2 framing and footing plan with the footing schedule
P-3 elevations: the house wall with its doors and windows, the stairs and landing
A-1 decking plan: picture-frame border and the diamond inlay
The framing view: joists, beam, posts and blocking under every border seam

The BidRidge quote

Same numbers in the quote

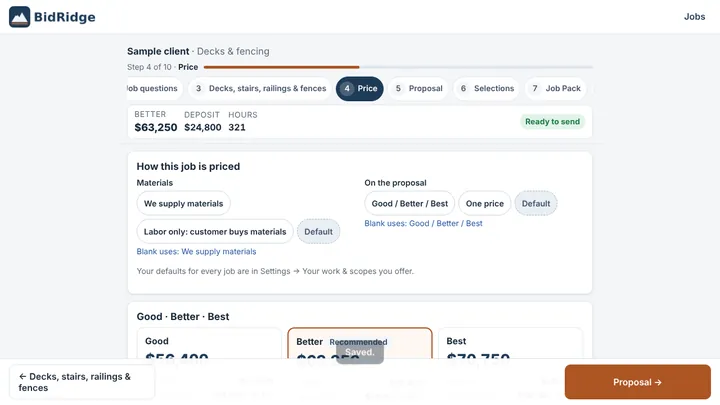
The designer sends its quantities to BidRidge, and BidRidge prices the labor and materials at your rates.

  • Good
    $56,400
  • Better
    $63,250
    Recommended
  • Best
    $70,750
From the designSent to the quote
Deck404 sf, 5′ 6″ high
Stairs9 risers, 2 flights, 48″ landing
Cable rail51 LF level + 18 LF stair
Framing2x10 at 16″, 8 piers to 60″
Lists47 buy-list rows, 137 cut pieces
Permit setP-0 to P-5

The Lakeview deck sent to the BidRidge web app, priced at its starting rates.

The sample opened as a quote in the BidRidge app: Good, Better and Best prices
The BidRidge app, at its starting rates.

Try it on your own job

Open the sample, change it to your measurements, and send it to a BidRidge quote. Drawing is free; the drawing set, the lists and the quote come with a BidRidge license or the 14-day trial.

In the designer, tap Open project and pick the sample file. It opens exactly as in the video.

Sample designs: names, sizes and clients are made up. Prices are BidRidge's starting rates; set your own. The designers check against common guidelines (IRC, NKBA and the makers' published numbers) to help you catch mistakes. They don't replace your building department or the manufacturer's installation instructions: verify with them.