BidRidge › Designers › Guide › Chapter 45

Chapter 45 · Flooring DesignerBeta

Start here: the parts every designer shares, shown in the Flooring Designer

All seventeen designers are built the same way. A starting card with samples, a toolbar over the drawing, the selected item's settings in a bar under it, the results as tabs, a next-step strip, a settings search, undo, save and open, and one button that sends the design to a BidRidge quote. Learn them once in any designer and the rest feel familiar. This chapter walks through them in the Flooring Designer.

Narrated walkthrough, 1:23. Captions on.

The sample in numbers

  • Designers
    16
    the same layout in every one
  • Steps
    3
    Draw, Check, Send
  • Undo
    Ctrl+Z
    every change, one at a time
  • Free mode
    Draw
    exports and Send with a license or the 14-day trial

Step by step

Step 1: The starting card: a sample or a blank plan in the Flooring Designer

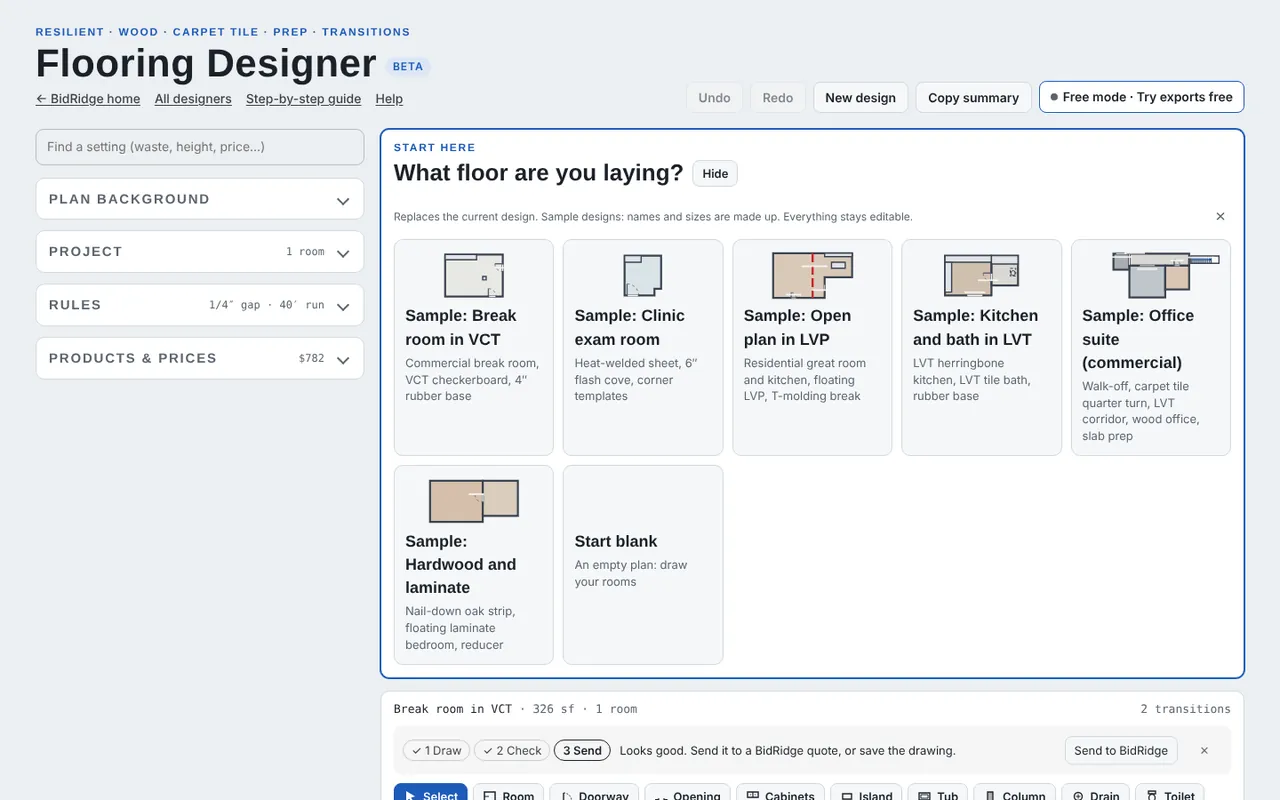
Step 1: The starting card: a sample or a blank plan

A designer opens on its starting card. Tap a sample to open a finished design (made-up names and sizes, every part editable), or Start blank for an empty plan. Samples are the fastest way to learn: open one, tap things, change them, and watch the takeoff and the checks follow. Opening a sample replaces the current design, so save first if you want to keep it. New design at the top brings the card back any time; Hide folds it out of the way.
Step 2: The page: drawing in the middle, settings at the side in the Flooring Designer

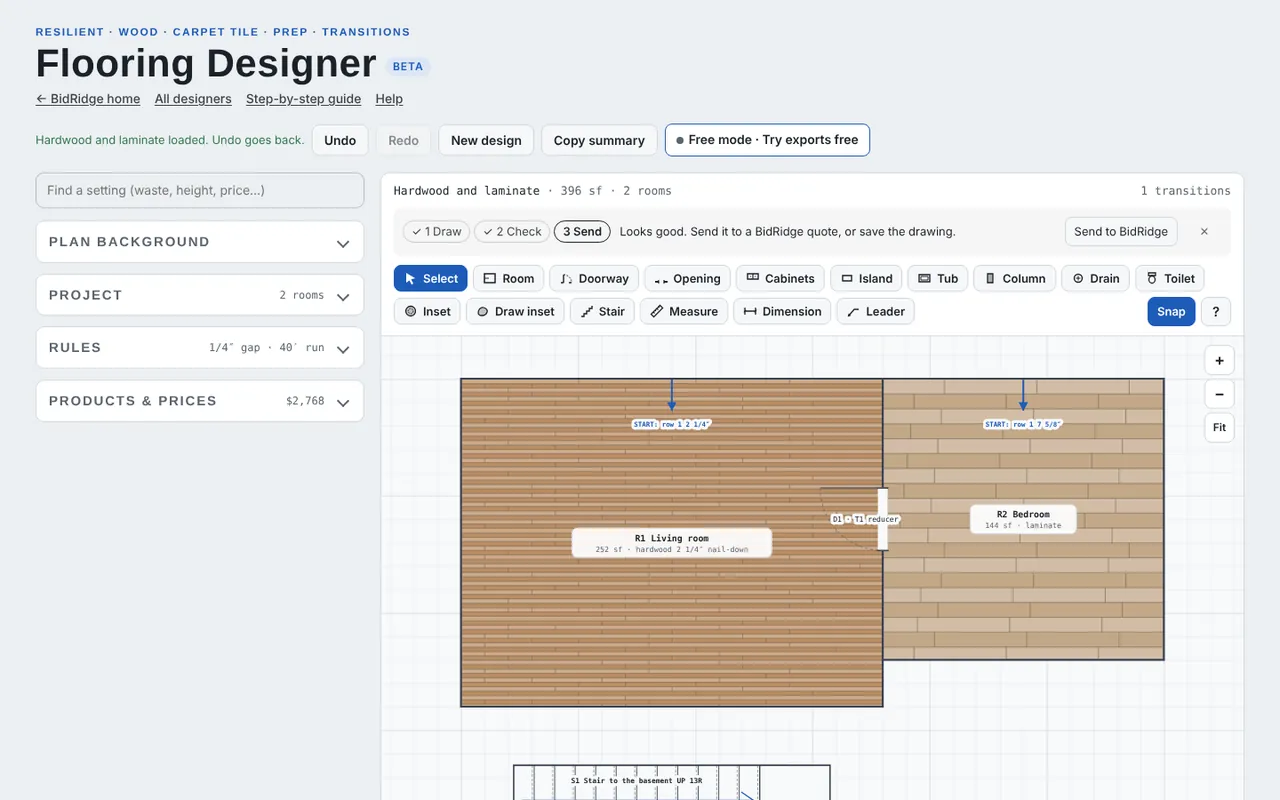
Step 2: The page: drawing in the middle, settings at the side

The drawing is in the middle with its toolbar on top. The side panel holds the settings that cover the whole design: the plan background, the project (client, address), the rules (gaps, waste, heights, the code toggles that apply to you) and products and prices. Each section folds; its summary line shows the key numbers while it is closed. At the top: Undo and Redo, New design, Copy summary (the design as text to paste in an email), the step-by-step guide for this designer and Help.

Step 3: Draw with the toolbar in the Flooring Designer

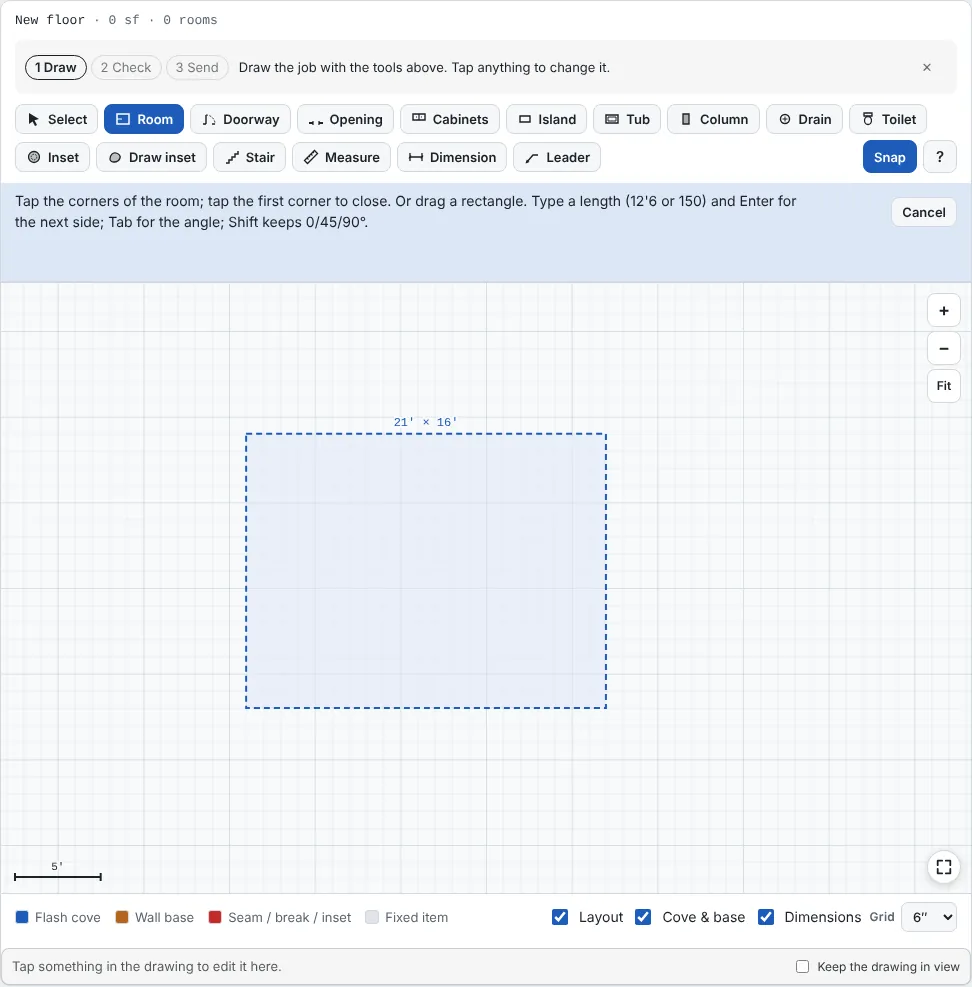
Step 3: Draw with the toolbar

Pick a tool and draw on the plan. Rooms, walls and outlines: tap the corners and tap the first one again to close, or drag a rectangle. Type a length (12'6, 150 for inches, 3.8m) and press Enter to place the next corner that far; Tab adds an angle; hold Shift to keep 0, 45 or 90 degrees. The blue bar under the toolbar says what the tool is waiting for, and the size shows as you drag. Snap catches corners, edges and the grid; hold Alt to place a point freely. Select goes back to picking things.

Field tip: The ? button lists every shortcut: lengths, angles, snaps, selecting, nudging, duplicating and zooming.

Step 4: Tap anything: its settings are in the bar under the drawing in the Flooring Designer

Step 4: Tap anything: its settings are in the bar under the drawing

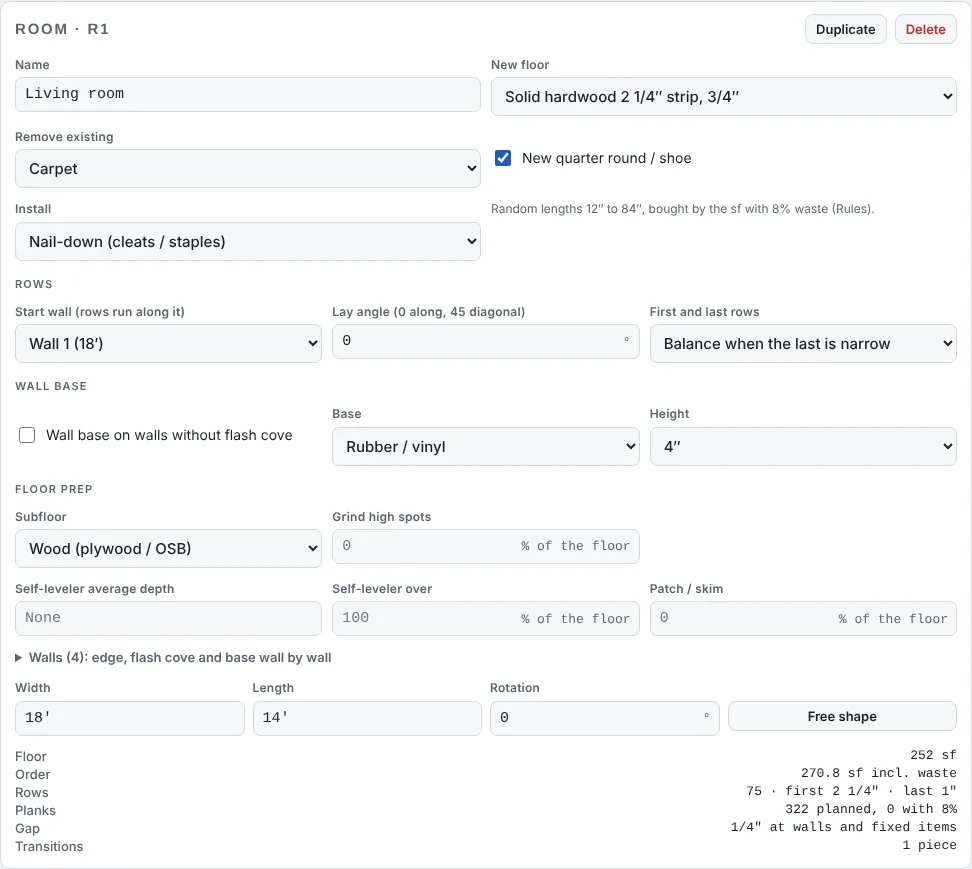
Tap an item and its settings open in the bar under the drawing: here the living room's floor, what is torn out, the install method, the start wall and lay angle, the wall base, the floor prep and its size. Change any of them and the plan, the takeoff and the checks update together. The numbers at the bottom (floor, order with waste, rows, planks) are the item's own takeoff. Duplicate copies the item; Delete removes it. Drag an item to move it, drag a corner handle to resize it, arrow keys nudge it.

Field tip: Keep the drawing in view (under the plan) pins the drawing on screen while you scroll through a long settings bar.

Step 5: The results, one tab at a time in the Flooring Designer

Step 5: The results, one tab at a time

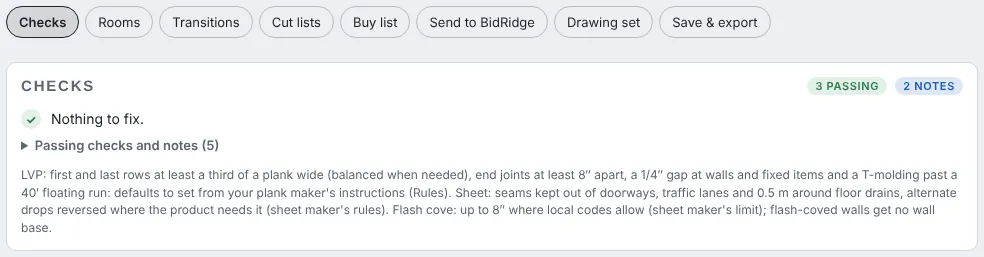
Under the drawing the results sit as tabs: Checks first, then the designer's own lists (here Rooms, Transitions, Cut lists and the Buy list), Send to BidRidge, the Drawing set and Save & export. Checks says what needs fixing first, then the counts of passing checks and notes; open Passing checks and notes to see each one with the code section or maker's rule it comes from. Checks flag, they never say a design is compliant: the rules are the defaults you can change, and the code toggles are the ones you turn on.

Step 6: Find a setting in the Flooring Designer

Step 6: Find a setting

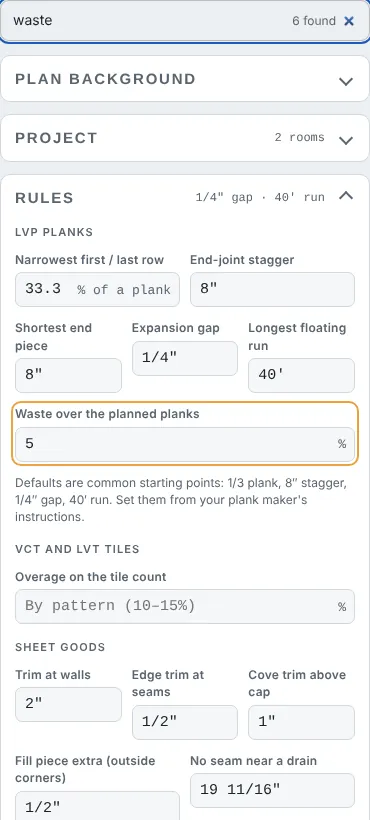
The search box at the top of the side panel finds any setting by name: type waste, height, price, gap or a product and the matching fields light up with their sections open (6 found here). Clear it with the x. It is the quickest way to the one number you want to change without learning where every designer keeps it.

Step 7: Draw, Check, Send: the next-step strip

The strip over the toolbar shows where the design stands: Draw while it is empty, Check while something is flagged (with a button to show the checks), Send once it looks good (with the Send to BidRidge button). It is a nudge, not a gate: you can send at any time. Close it with the x if you do not want it; it stays closed in that designer.

Step 8: Save, open and export in the Flooring Designer

Step 8: Save, open and export

The design saves in this browser as you work, so closing the tab loses nothing. Save project writes a project file you can keep, email or open on another computer with Open project. The same tab exports the lists (buy list and cut lists as CSV for a spreadsheet) and the drawing as SVG. The Drawing set tab prints the sheets to PDF, and on commercial jobs the Submittal set.

Field tip: Save project before opening a sample or starting a new design: those replace what is on screen. Undo brings back the last change only within this visit.

Step 9: Send to BidRidge in the Flooring Designer

Step 9: Send to BidRidge

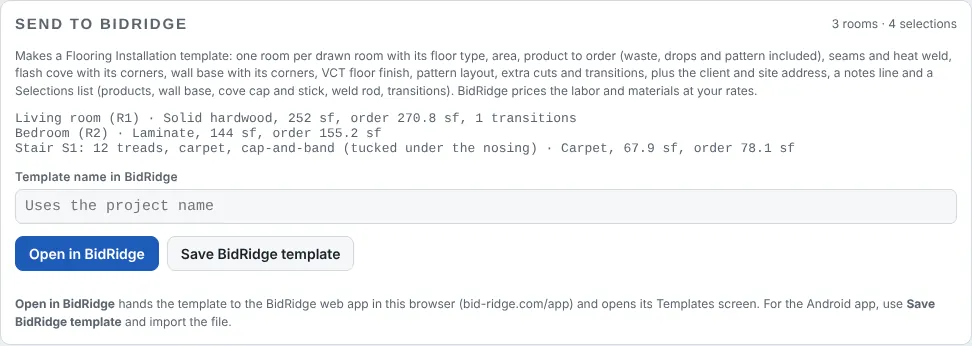
Send to BidRidge turns the design into a BidRidge quote: it says what it will make (here a Flooring Installation template, one room per drawn room with its area, the product to order with waste, seams, flash cove, wall base, transitions and a selections list) and BidRidge prices the labor and materials with your own rates. A design sent from a job stays linked to it: change the design, send again, and the job gets an update to review instead of a new quote.

Field tip: Opened from the BidRidge app, a designer signs in by itself and Send goes straight back to the job. Chapter 1 follows a design from the job to a signed quote.

Step 10: Free mode, the trial and working offline

Anyone can open a designer and draw. Saving the drawing set, the cut and buy lists, copying the summary and sending to BidRidge need a BidRidge license or the 14-day free trial: the button at the top says which you have. Every BidRidge license includes the designers. In the Android app the designers are installed with it, so Design it works with no signal: draw, save the PDFs and lists, and send the layout back to the job.

Step 11: Drawing shortcuts in the Flooring Designer

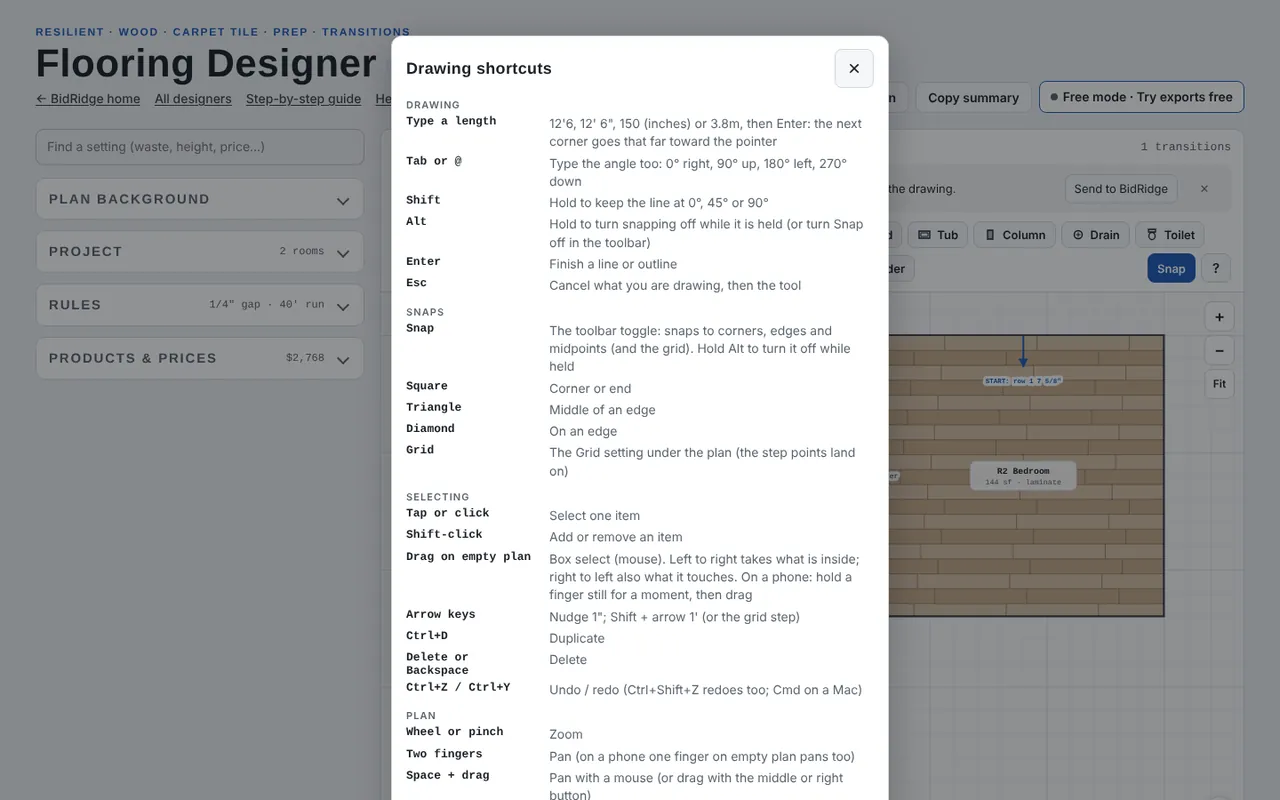
Step 11: Drawing shortcuts

The ? next to Snap opens the shortcut list. Drawing: type a length and Enter, Tab for the angle, Shift for 0/45/90, Alt to turn snapping off, Enter to finish, Esc to cancel. Selecting: tap, Shift-click to add, drag on empty plan to box-select, arrow keys to nudge, Ctrl+D to duplicate, Delete to remove, Ctrl+Z and Ctrl+Y to undo and redo. Plan: wheel or pinch to zoom, two fingers or Space and drag to pan, Fit to see it all.

More in the guide

Try it on your own job

Open the sample, change it to your measurements, and send it to a BidRidge quote. Drawing is free; the drawing set, the lists and the quote come with a BidRidge license or the 14-day trial.

Sample designs: names, sizes and clients are made up. Prices are BidRidge's starting rates; set your own. The designers check against common guidelines (IRC, NKBA and the makers' published numbers) to help you catch mistakes. They don't replace your building department or the manufacturer's installation instructions: verify with them.