BidRidge › Designers › Guide › Chapter 6

Chapter 6 · Flooring DesignerBeta

Clinic exam room

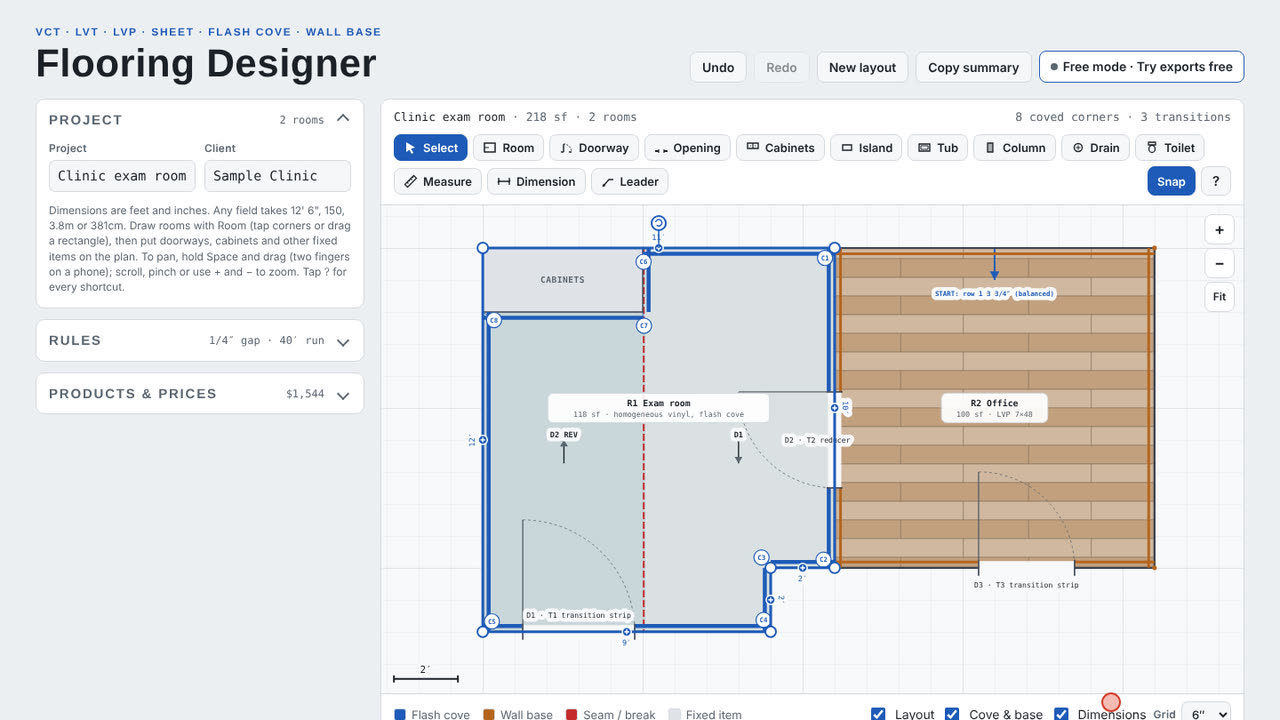
We lay out a clinic exam room in heat-welded sheet with a 6″ flash cove, print the corner templates full size, and run 4″ rubber base in the office next door. Then a quick LVP open plan shows the rows, the balanced rips and the T-molding break.

In the designer, tap Open project and pick the sample file. It opens exactly as in the video.

Narrated walkthrough, 2:30. Captions on.

The sample in numbers

  • Floor
    218 sf
    2 rooms
  • Sheet ordered
    27 LF
    2 m roll · 2 drops · 12 LF seam
  • Flash cove
    40 LF
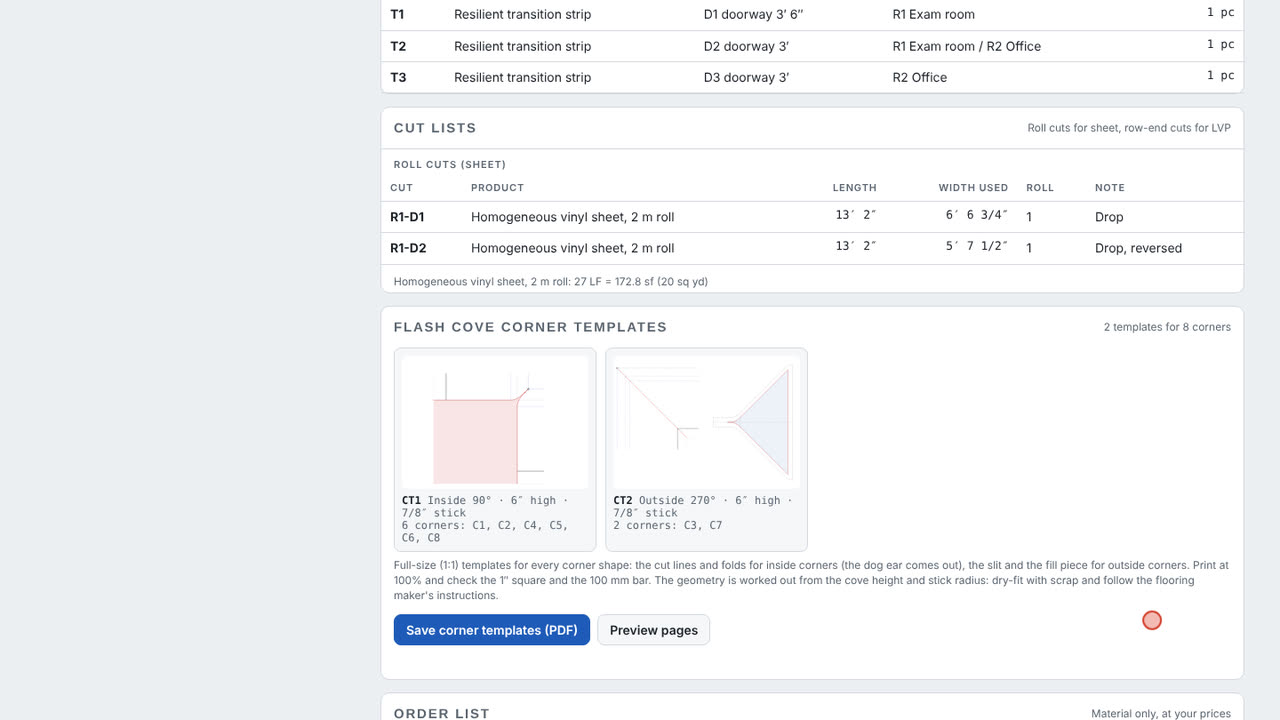
    6″ · 8 corners · 2 templates
  • Rubber base
    34 LF
    4″ · 4 preformed corners
  • Material
    $1,670
    at the starting prices
  • LVP open plan
    944 sf
    45 rows · 43 boxes

Step by step

Step 1: Draw the rooms in the Flooring Designer
  1. Room tool
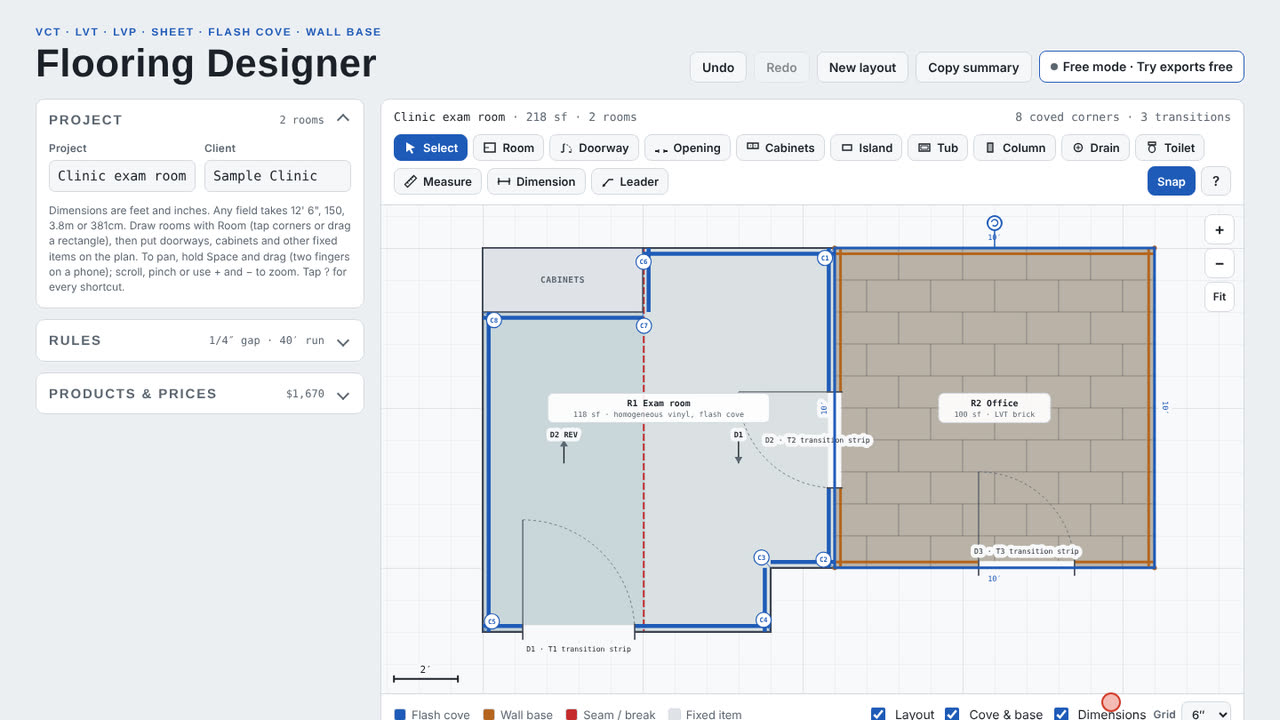
  2. Exam room: tap each corner
  3. Office: drag a rectangle

Step 1: Draw the rooms

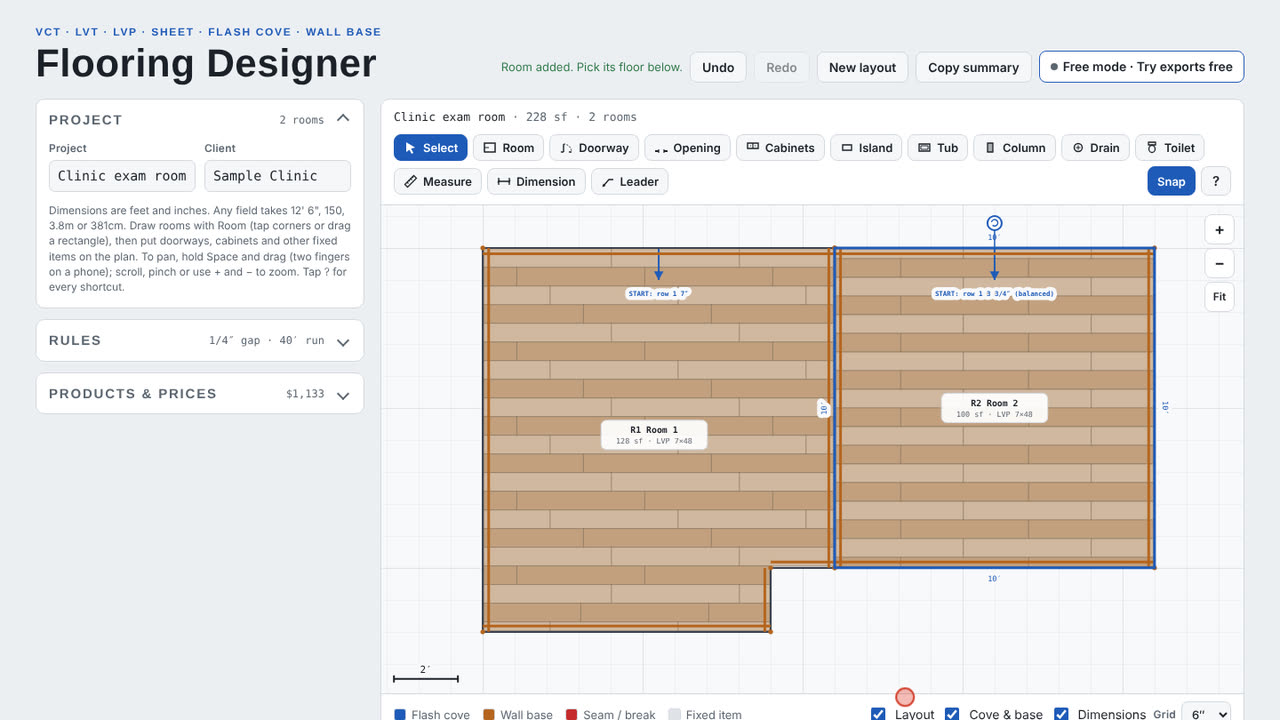
Pick Room and tap the corners of the exam room. Type a length any way you like: 11', 11-0 or 132. Draw the office next to it with a drag. Each room gets a number that stays put.

Field tip: Measure wall to wall at the floor, not off the old base. The designer adds the trim at each wall for you.
Step 2: Doorways and the sink base in the Flooring Designer
  1. Doorway tool
  2. Cabinets tool
  3. Sink base: the floor stops here
  4. Doorway with its transition

Step 2: Doorways and the sink base

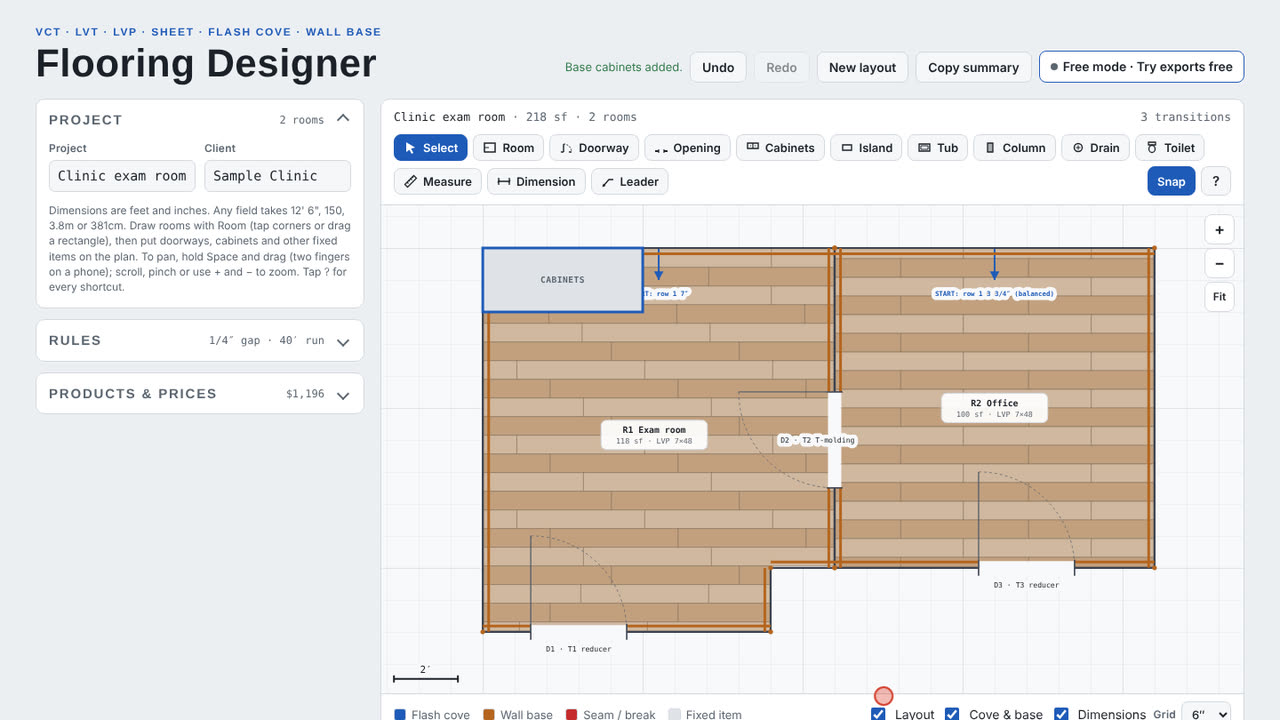
Pick Doorway and tap a wall to place each door. Pick Cabinets and drop the sink base on the plan. The floor stops at the cabinet, and each doorway gets a transition that suits the floors on each side.

Field tip: Put each door where it really is. The seam plan keeps seams out of doorways, so a door in the wrong spot moves the seams.

Step 3: Sheet and 6″ flash cove in the Flooring Designer
  1. Sheet flash cove up the walls
  2. The seam, out of the doorway
  3. Room totals: 8 coved corners

Step 3: Sheet and 6″ flash cove

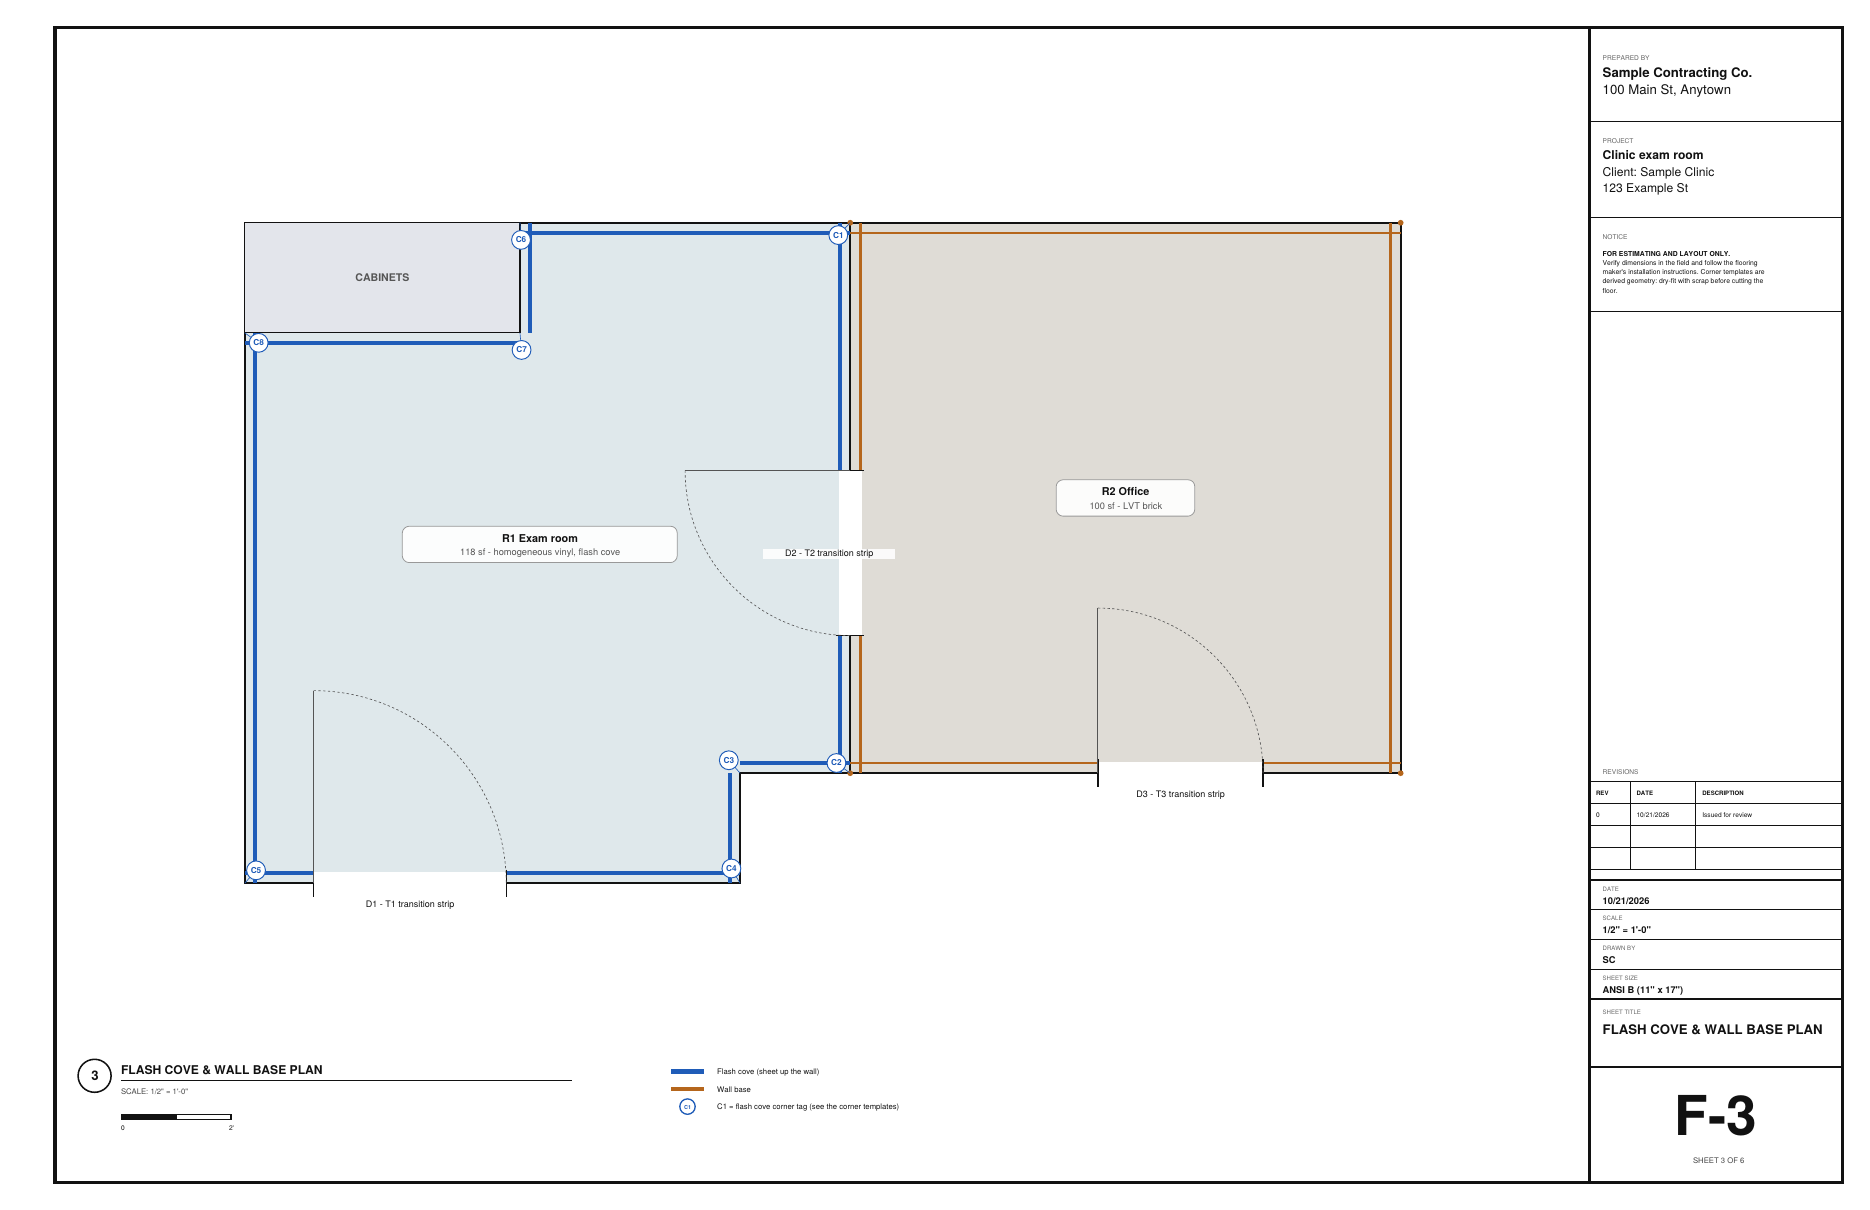
Tap the exam room. Pick the homogeneous sheet on a 2 m roll and turn on flash cove. Set the height to 6″, the 7/8″ cove stick and the cap strip. Coved walls get no wall base, and the sheet runs up the sink base toe kick.

Field tip: Check the cove height your job spec and the sheet maker allow before you go over 6″.

Step 4: Rubber base in the office in the Flooring Designer
  1. 4″ rubber base, less the doorways
  2. LVT 12 × 24 in brick

Step 4: Rubber base in the office

Tap the office. It is LVT 12 × 24 in a brick pattern with 4″ rubber base. The base runs on every wall, less the doorways, with preformed inside corners. That is 34 LF, one 120′ coil and 4 corners.

Field tip: Switch to 4′ pieces under Rules if your supplier sells base by the carton.

Step 5: Read the seam plan in the Flooring Designer
  1. Drop 1
  2. Drop 2, reversed
  3. 27 LF off the roll

Step 5: Read the seam plan

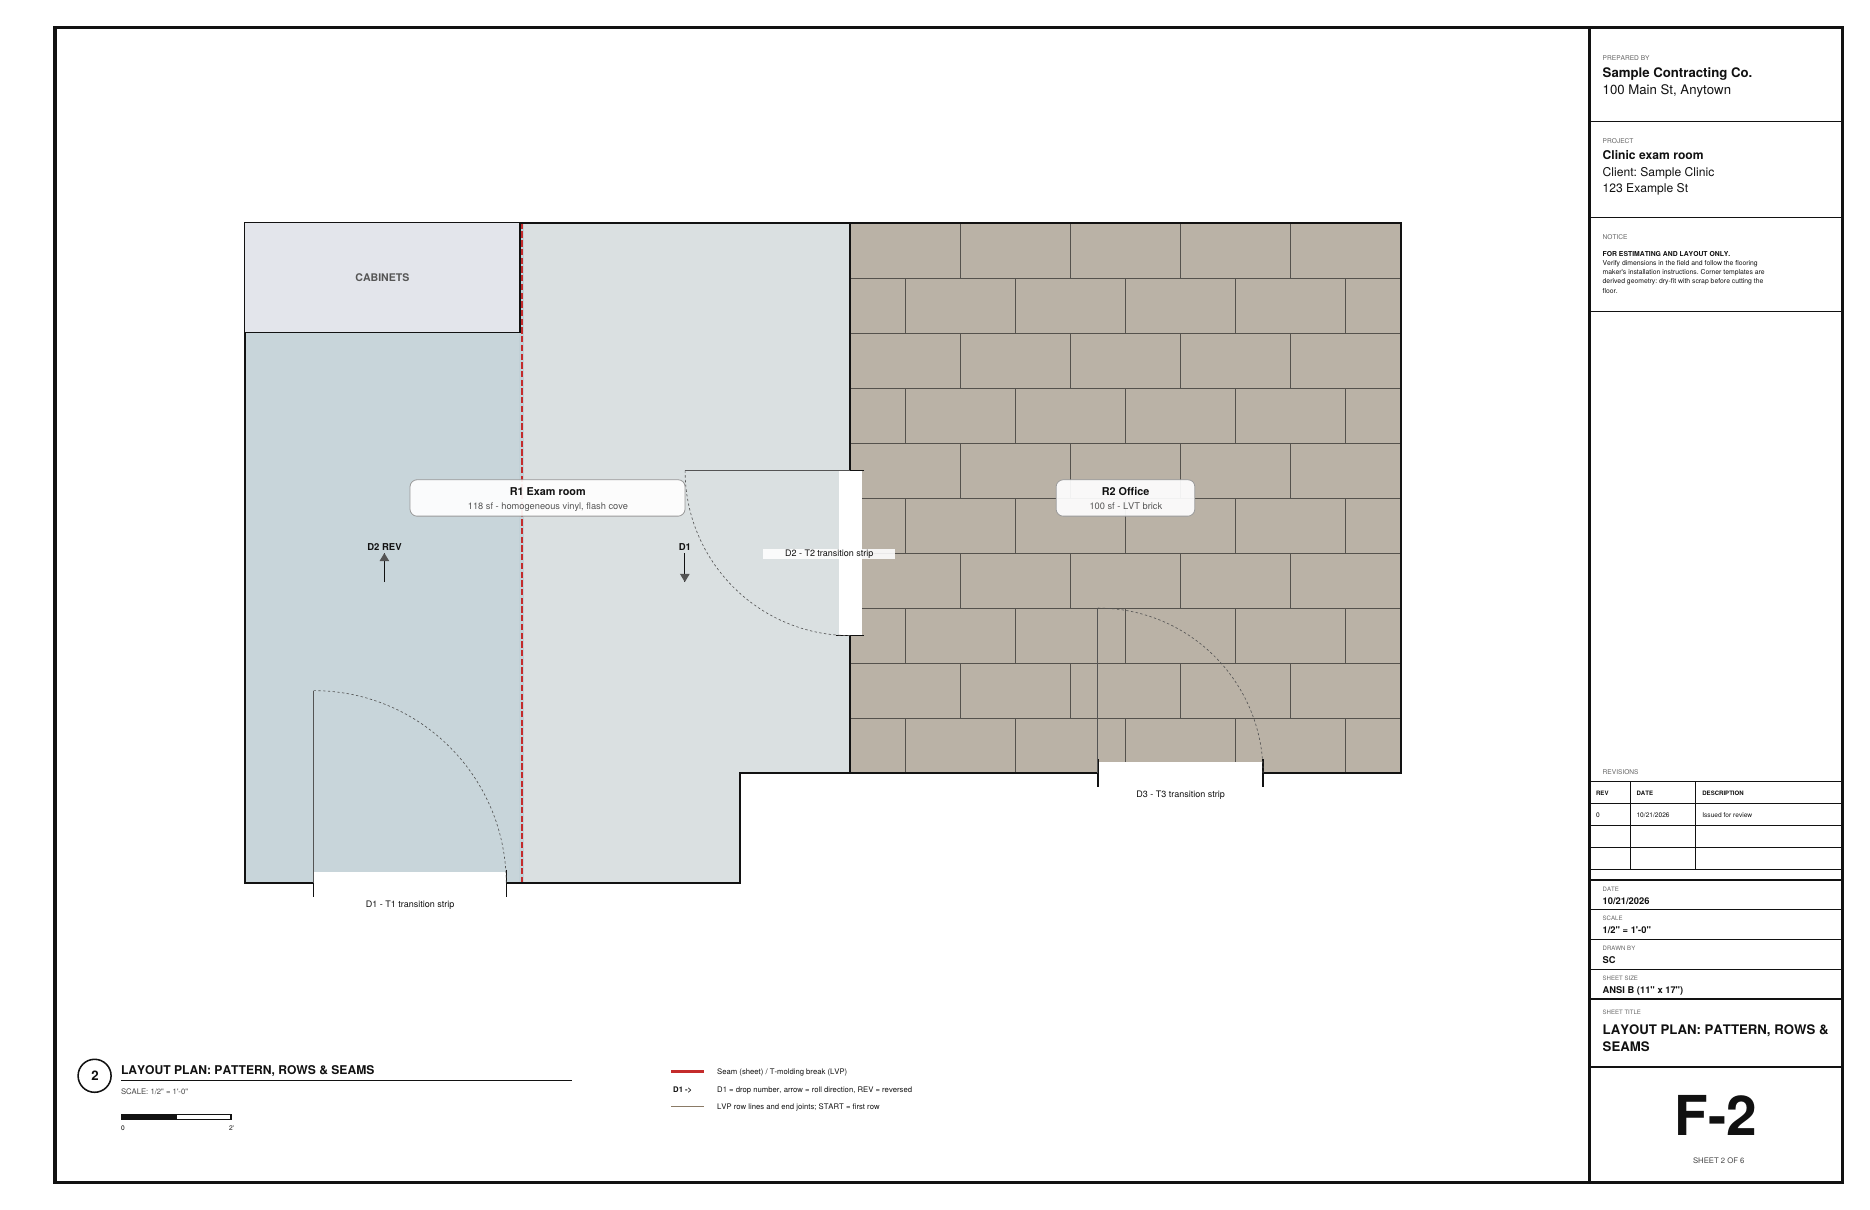
The designer tries both directions and shifts the seam, then picks the plan with the least sheet and no seam in a doorway. Here it is two drops with one 12 LF seam, and the second drop is reversed. The roll cut list gives each drop's length with the cove allowance in it.

Field tip: Cut the drops in roll order and reverse every other one, as the plan marks with REV.

Step 6: Print the corner templates at 100% in the Flooring Designer
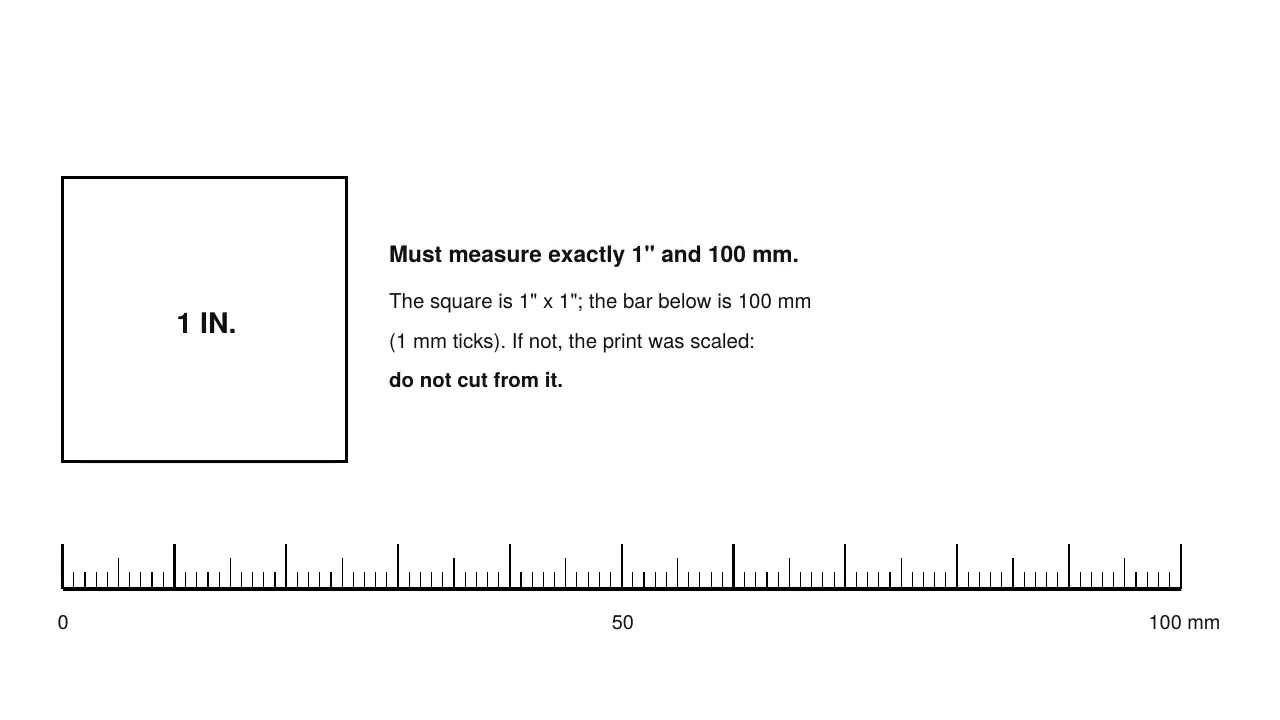
  1. The 1″ square: must measure exactly 1″
  2. The 100 mm bar, 1 mm ticks

Step 6: Print the corner templates at 100%

The exam room has 6 inside and 2 outside cove corners, so you get two templates: CT1 and CT2. Save the corner templates PDF and print it at actual size. Measure the 1″ square and the 100 mm bar on every page before you cut. Tape the tiles together at the crosses.

Field tip: If the square is not exactly 1″, the printer scaled the page. Turn off fit to page and print again.

Step 7: Send it to BidRidge in the Flooring Designer
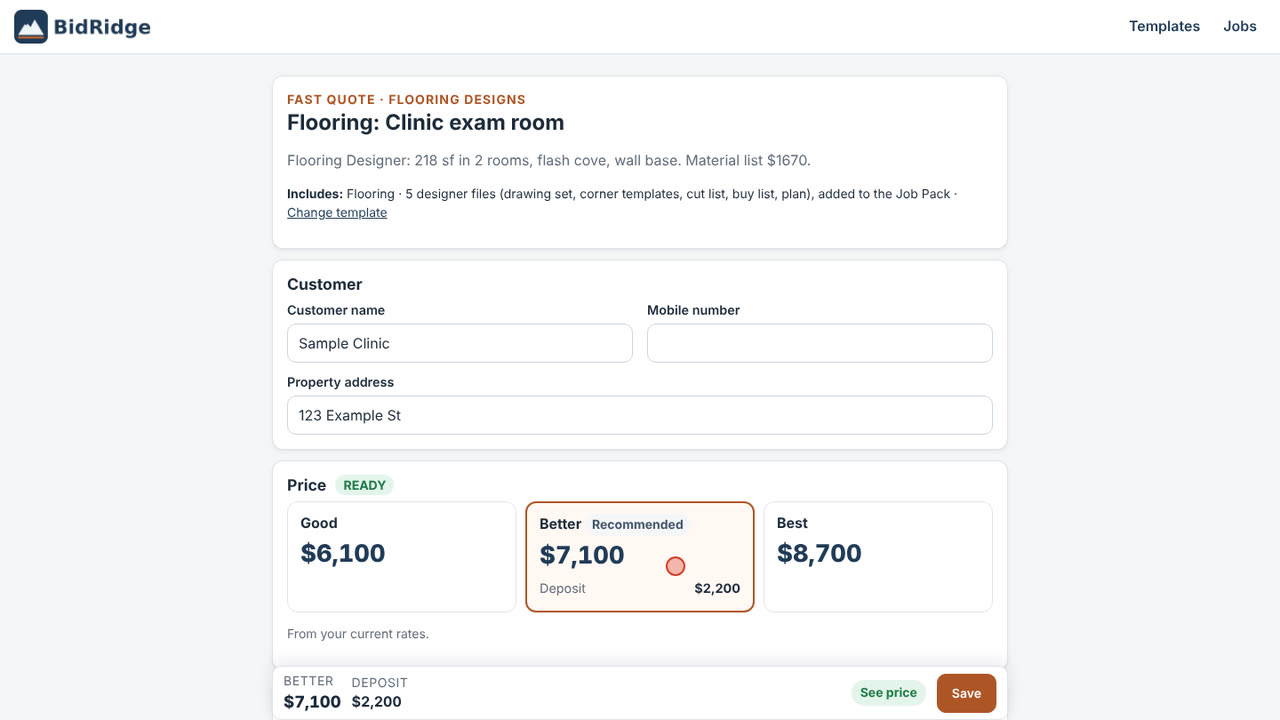
  1. Good price
  2. Better (recommended) price
  3. Best price

Step 7: Send it to BidRidge

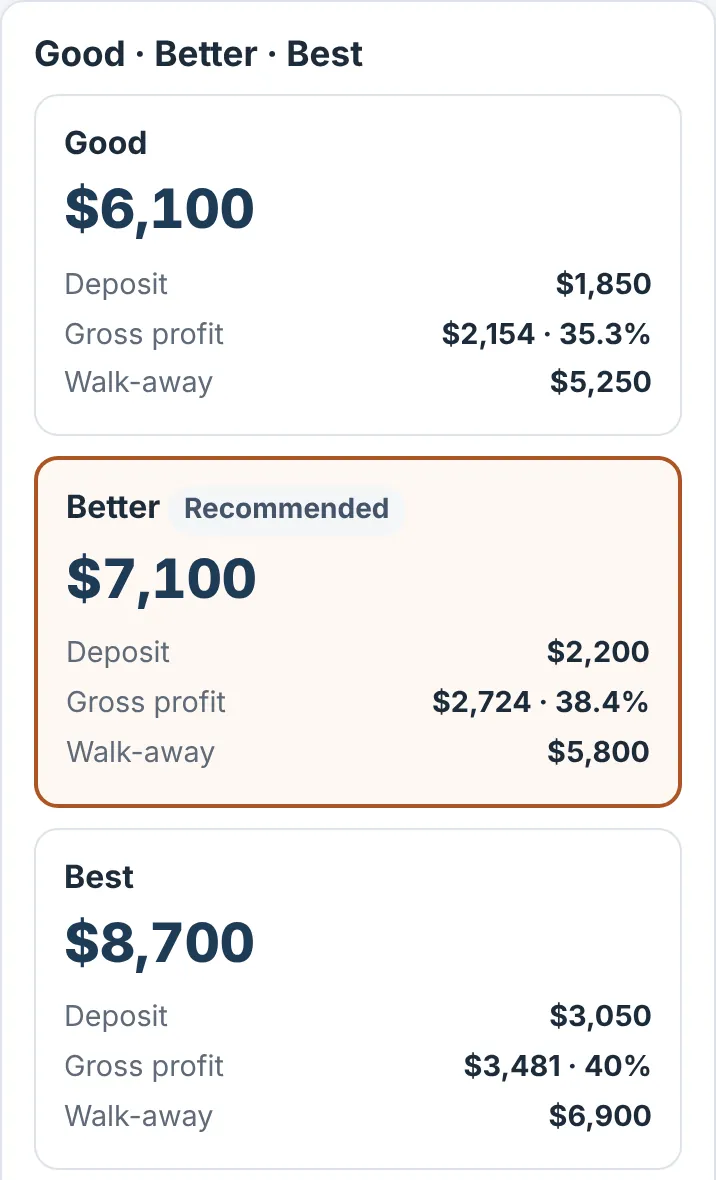
The order list shows every material at your prices. Save the drawing set, then Open in BidRidge. The quote gets each room's area, the flash cove, the seams, the weld rod and the base, and BidRidge prices the labor at your rates.

Field tip: The prices in the designer are starting placeholders. Set your own under Products & prices before you send.

Step 8: LVP open plan: rows, rips, T-molding in the Flooring Designer
  1. Row 1: 5 1/4″ rip (balanced)
  2. T-molding break past 40′

Step 8: LVP open plan: rows, rips, T-molding

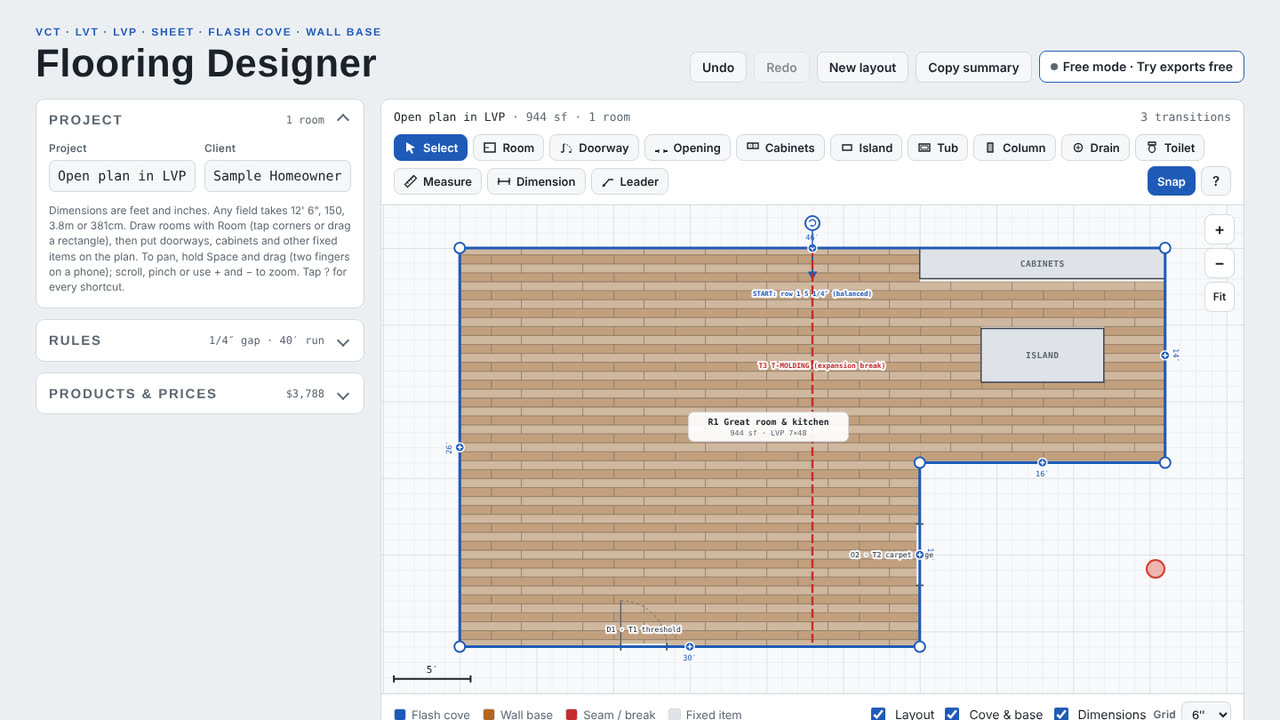
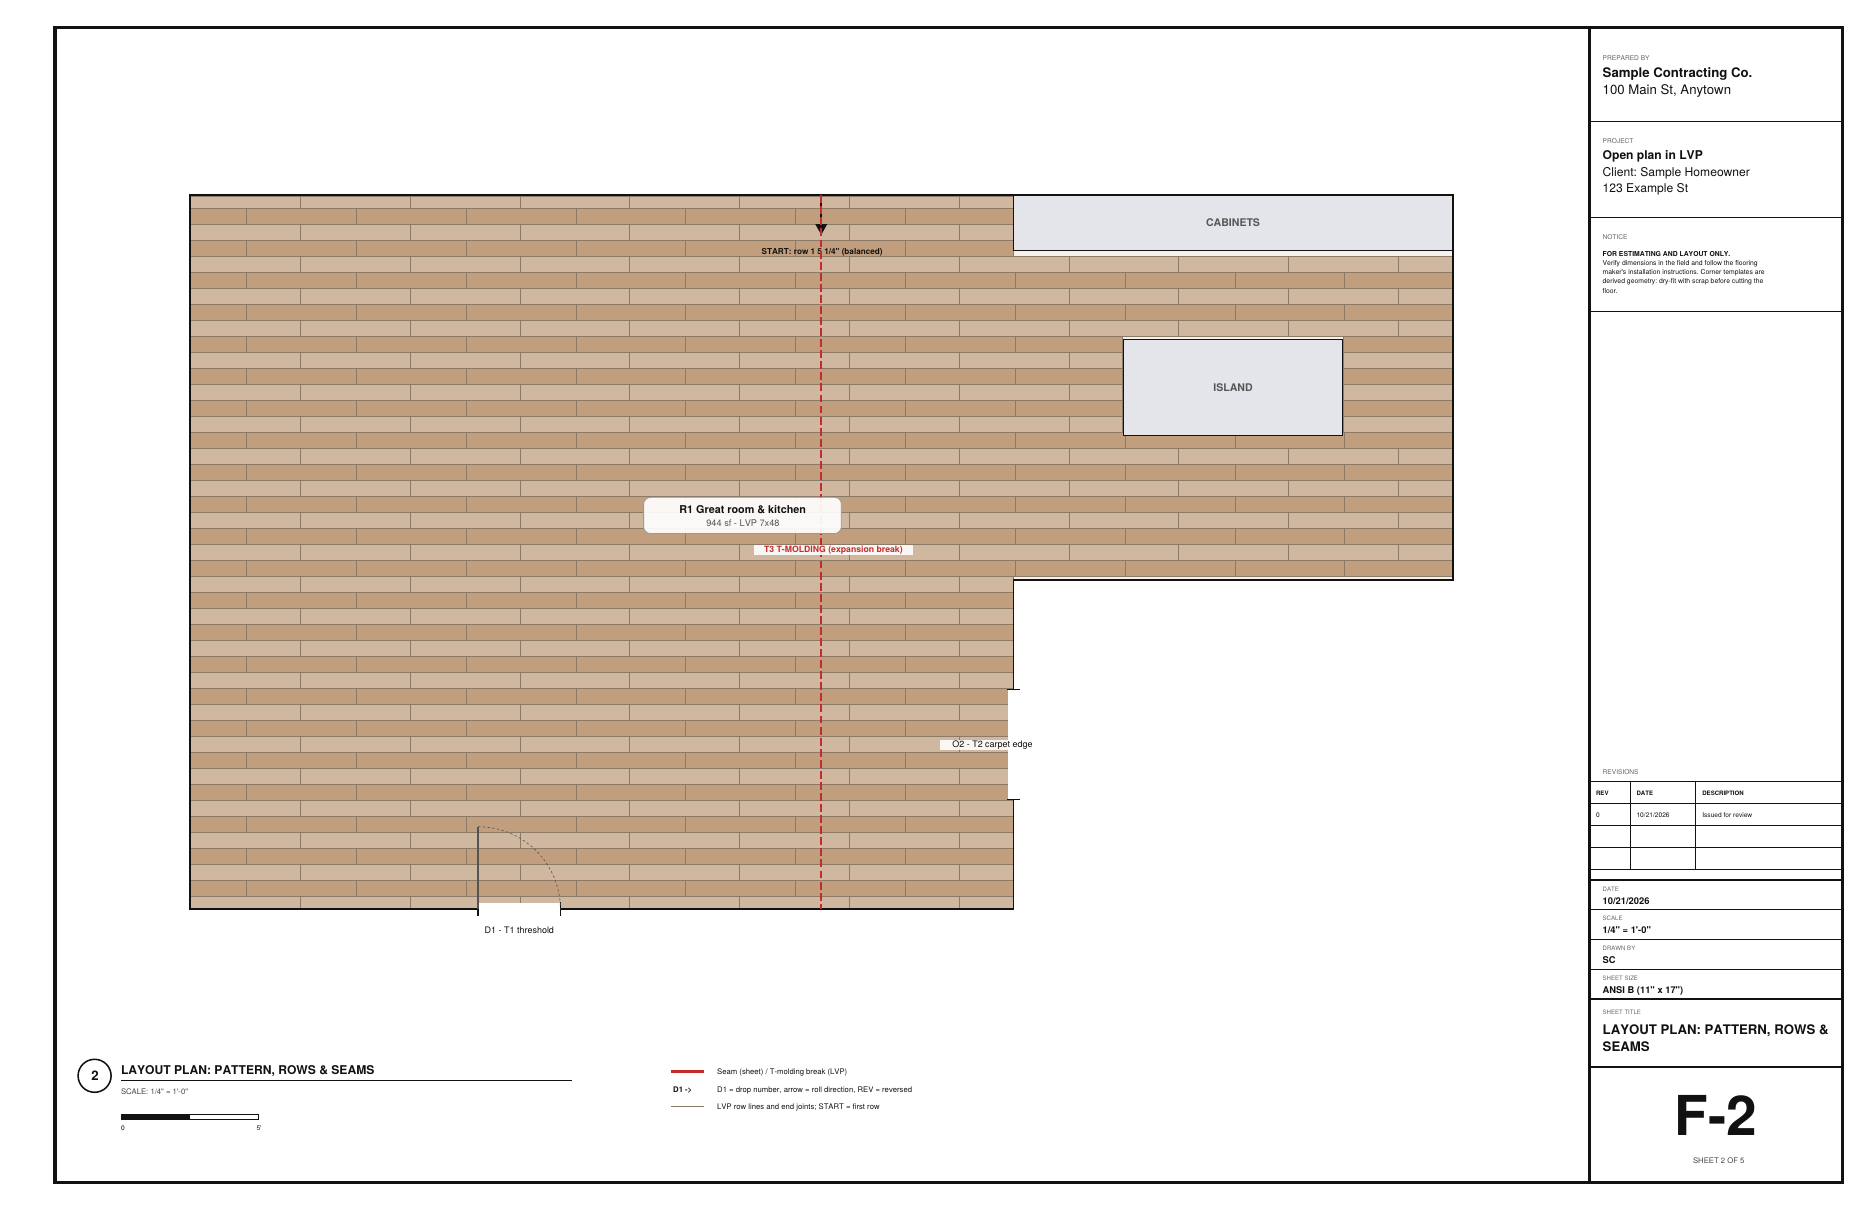
Open the LVP sample. The rows start at the top wall and the last row would be a 3 1/2″ rip. Pick Always balance and the first and last rows are both 5 1/4″. The room runs 46′, past the 40′ floating limit, so the designer adds a T-molding break.

Field tip: Set the rip, stagger, gap and run limit from your plank maker's instructions under Rules.

Step 9: Commercial: carpet tile, LVT, wood and a walk-off in the Flooring Designer

Step 9: Commercial: carpet tile, LVT, wood and a walk-off

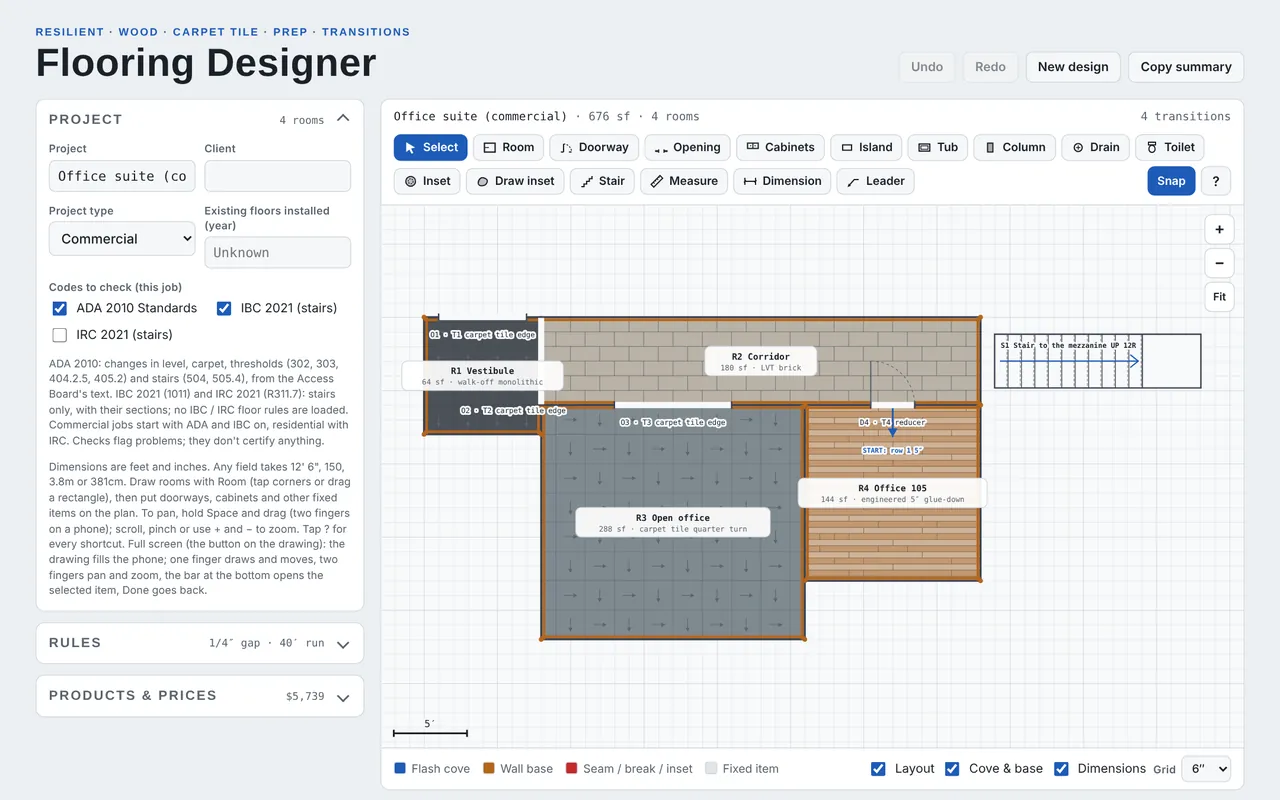
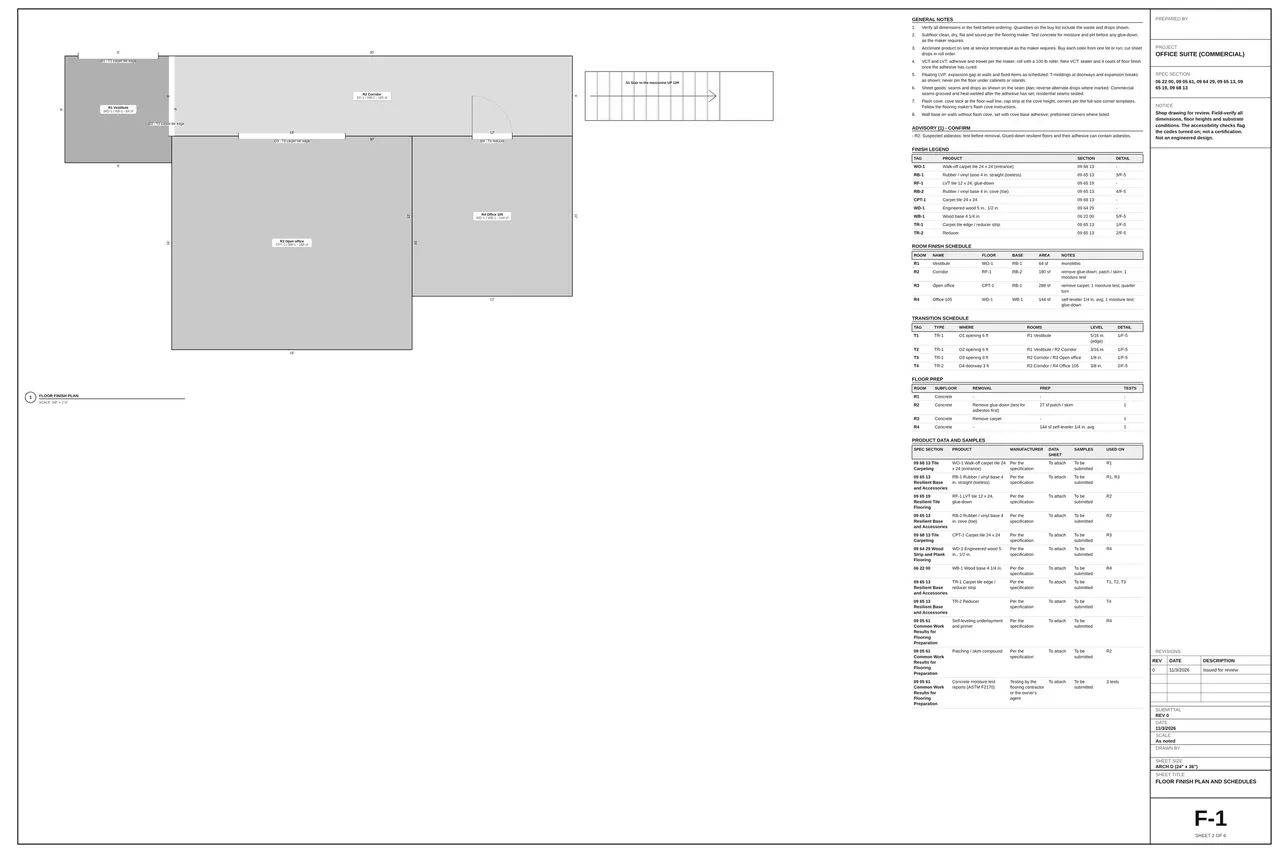
Open the Office suite (commercial) sample and set the Project type to Commercial: the codes to check then start with ADA 2010 and IBC 2021 (stairs). The vestibule is walk-off carpet tile, the corridor LVT, the open office carpet tile laid quarter turn and Office 105 engineered 5″ wood, glue-down. Each doorway gets its transition from the two floor heights: carpet tile edges at T1 to T3 and a reducer at T4.

Field tip: A residential job starts with IRC 2021 (stairs) instead. Turn each code on or off for the job; the checks flag problems, they don't certify anything.

New in 1.58, narrated (steps 9 to 13), 1:59. Captions on.
Step 10: Floor prep and moisture tests in the Flooring Designer

Step 10: Floor prep and moisture tests

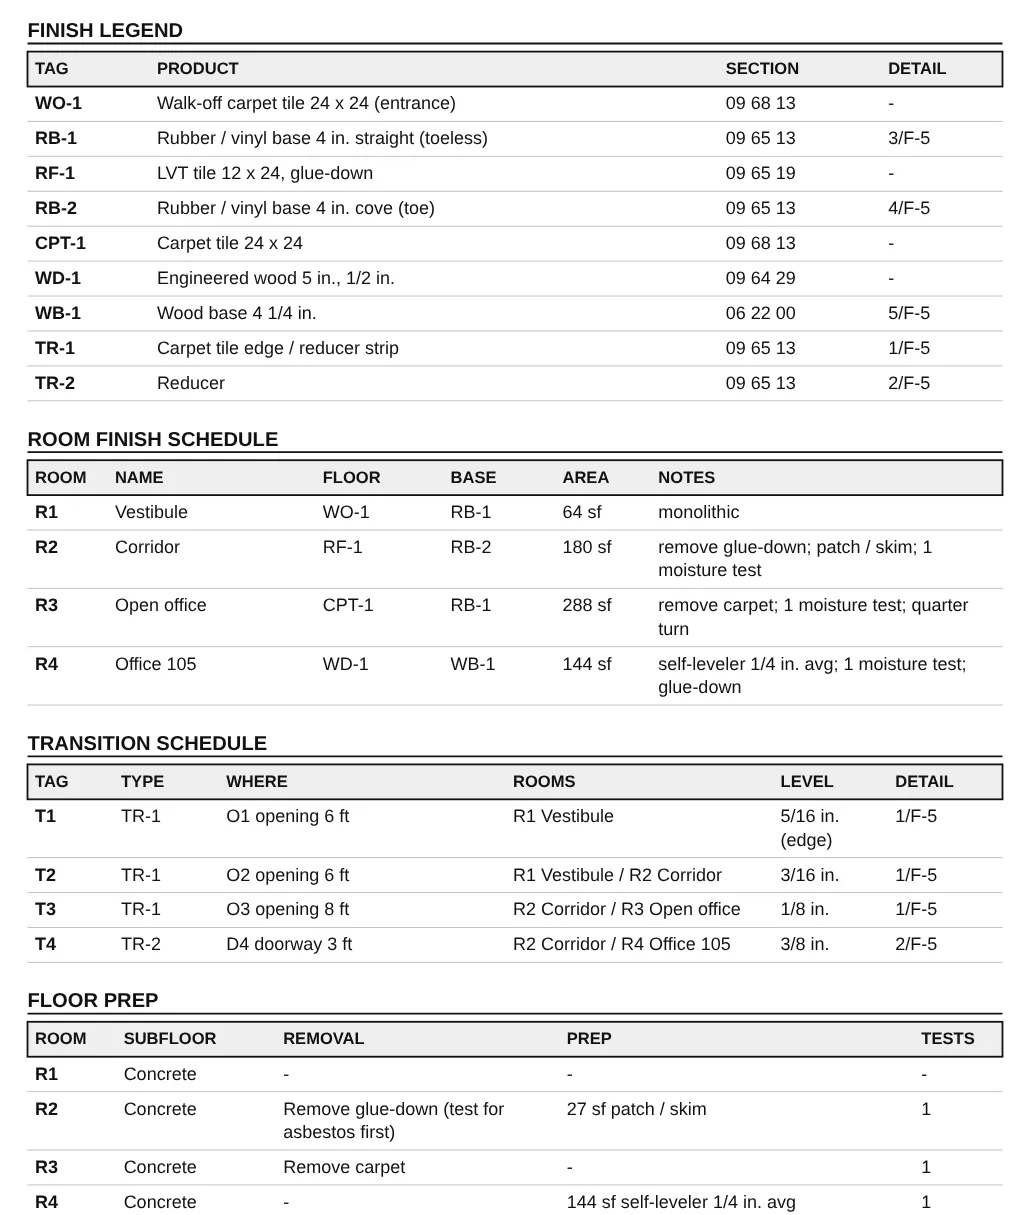
Pick a room and set its subfloor and prep. The corridor takes up a glue-down floor and gets a patch and skim; Office 105 gets a 1/4″ self-leveling pour. The floor prep schedule lists each room's subfloor, removal, prep and moisture tests, and the advisory asks for an asbestos test before the glue-down comes up.

Field tip: Moisture tests: 3 for the first 1,000 sf of slab and 1 more for each further 1,000 sf or part of it (ASTM F2170 in-situ RH, or F1869 calcium chloride if you pick it under Rules).

Step 11: Transitions drawn from the floor heights in the Flooring Designer

Step 11: Transitions drawn from the floor heights

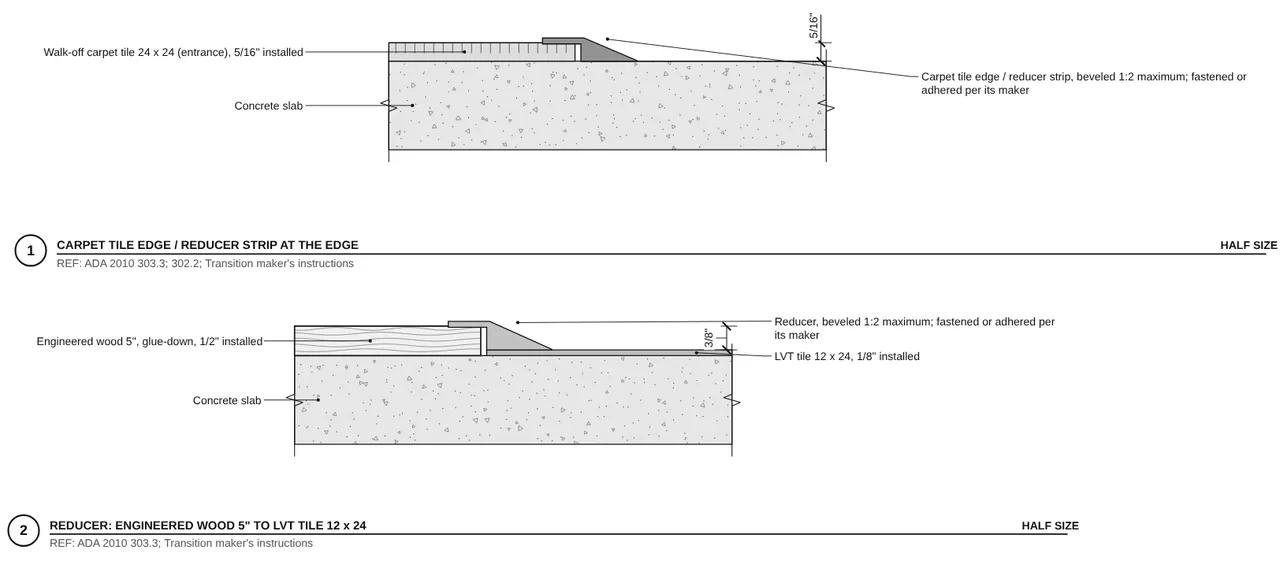
Each transition gets a detail drawn from the two floors: here the carpet tile edge at the vestibule and the reducer from the 1/2″ engineered wood down to the 1/8″ LVT. With ADA on, a change in level over 1/4″ needs a bevel no steeper than 1:2, and over 1/2″ it is a ramp (ADA 2010 303.2 to 303.4).

Field tip: The transition schedule lists each doorway with its type, the rooms on both sides, the level change and its detail.

Step 12: Stairs in the Flooring Designer

Step 12: Stairs

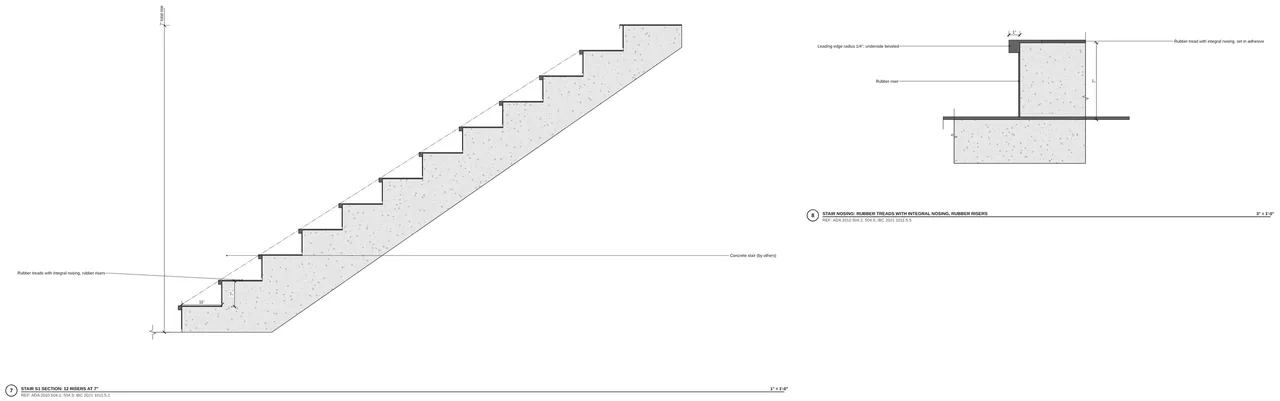
Pick Stair and tap the plan, then set the risers, rise, tread, width, nosing and finish. Stair S1 is 12 risers at 7″ with 11″ treads, 44″ wide, in rubber treads with integral nosing and rubber risers. On this commercial job it is checked against ADA 2010 504 and IBC 2021 1011, and any flag names its section.

Field tip: On a residential job the stair is checked against IRC 2021 R311.7: an 8″ riser fails R311.7.5.1 (7 3/4″ max).

Step 13: The Submittal set in the Flooring Designer

Step 13: The Submittal set

Under Drawing set, pick Sheets for: Submittal set. The full set is six ARCH D sheets: the cover with the sheet index, F-1 the floor finish plan with the finish legend and the room finish, transition, floor prep and product data schedules, the floor layout, the base and flash cove plan, the stairs and F-5 the details. Each detail is referenced from the plan, like 1/F-5. It also prints as 11x17 shop sheets.

Field tip: The Submittal set is part of BidRidge Commercial, and the trial includes it. A residential project keeps the drawing set.

Step 14: Plan background: start from the floor plan

Open Plan background at the top of the side panel and import the architect's floor plan (a PDF page or a photo). Click both ends of a dimension you know, type its length, and check the scale against a second one. Room, Doorway and the fixed items now snap to the drawing's corners and lines, and Trace room turns the room you click inside into a flooring room with the floor you used last: pick its floor, layout and base as for a drawn room. The plan stays under your drawing (fade it, lock it), is saved with the project and never prints.

What you get

The drawing set, the lists and the files

Real files from this sample, made by the designer. Tap a page to see it full size. Yours carry your company, the client and the address.

F-2 layout plan: two drops of 2 m sheet, the 12 LF seam and the reversed drop (REV)
F-3 flash cove & wall base plan: 6″ cove in the exam room with corners C1 to C8, 4″ rubber base in the office
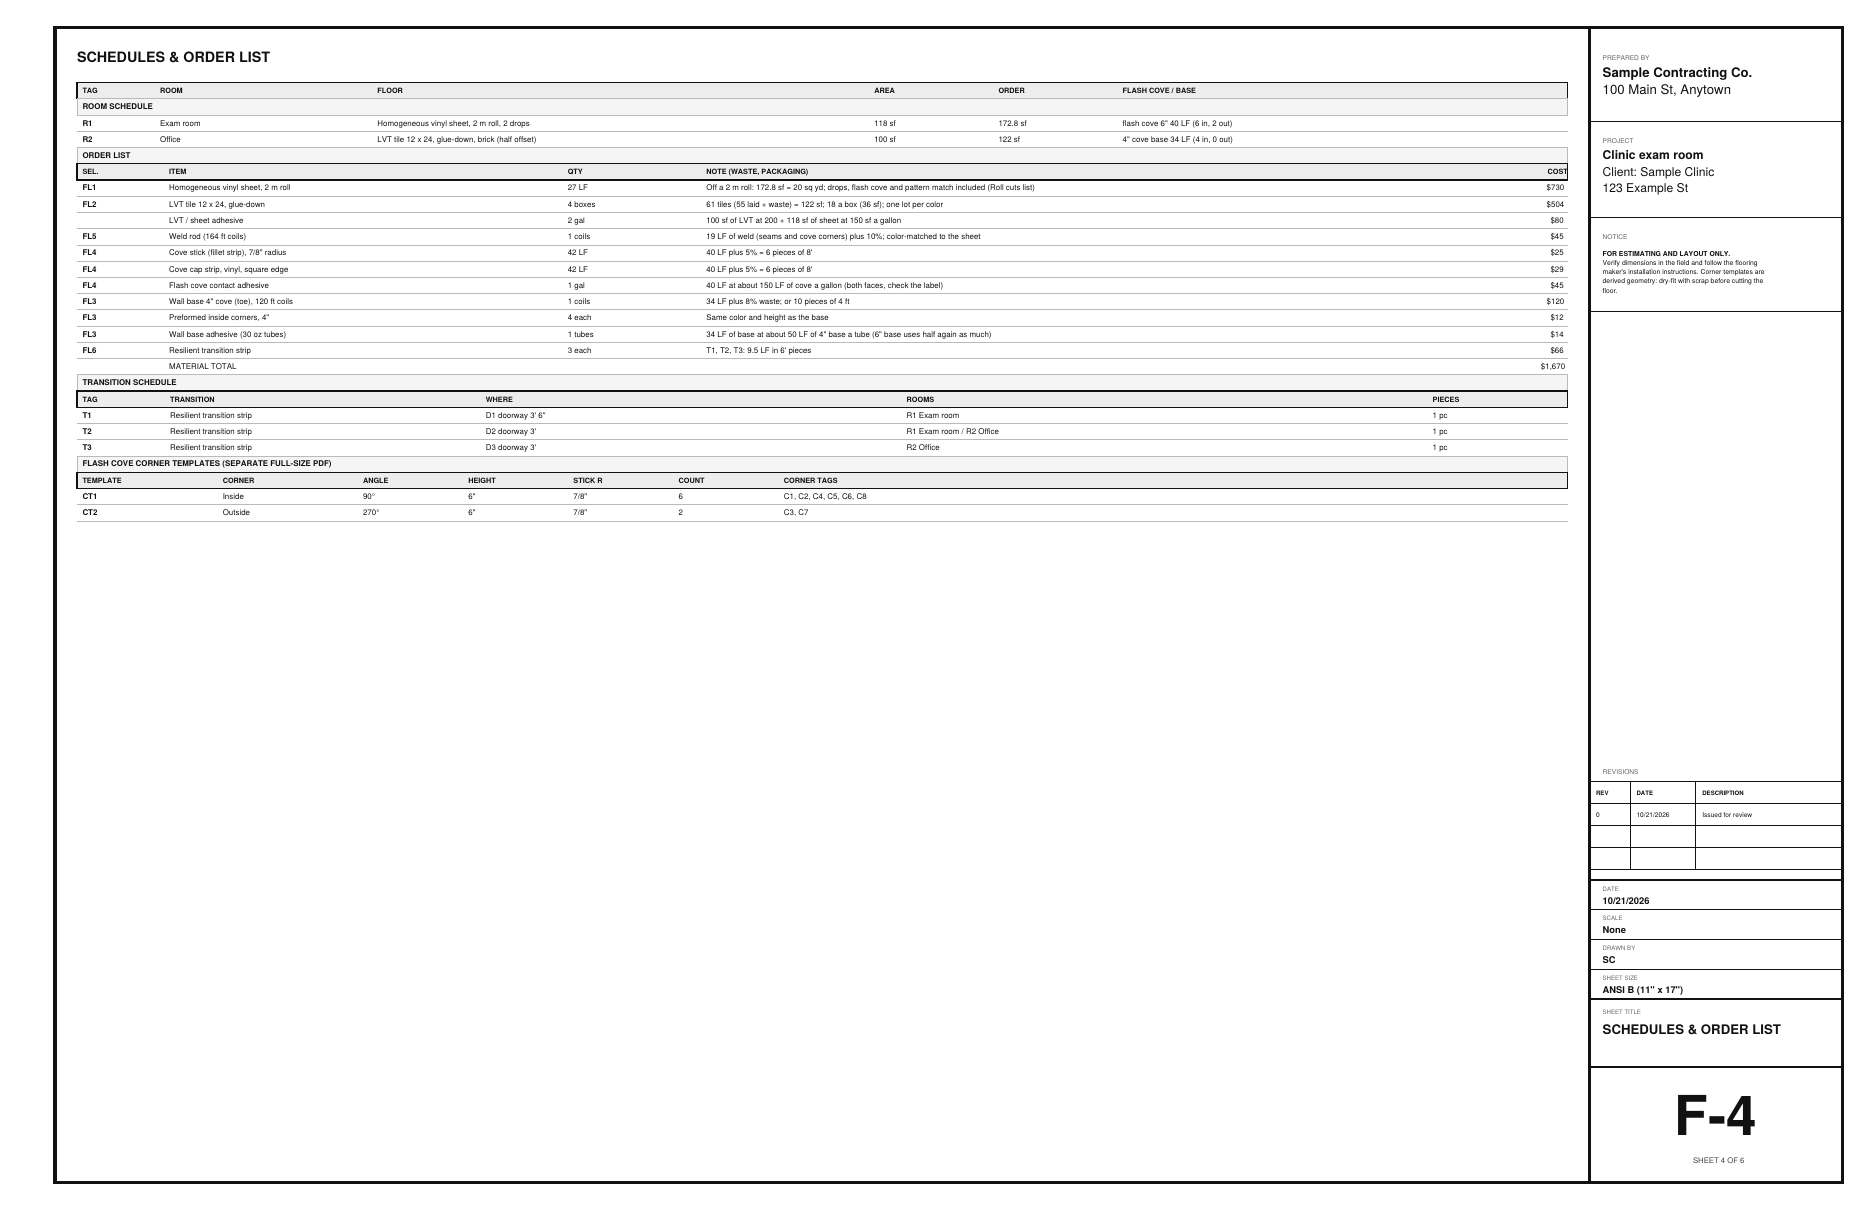
F-4 schedules & order list: rooms, transitions, corner templates and every material
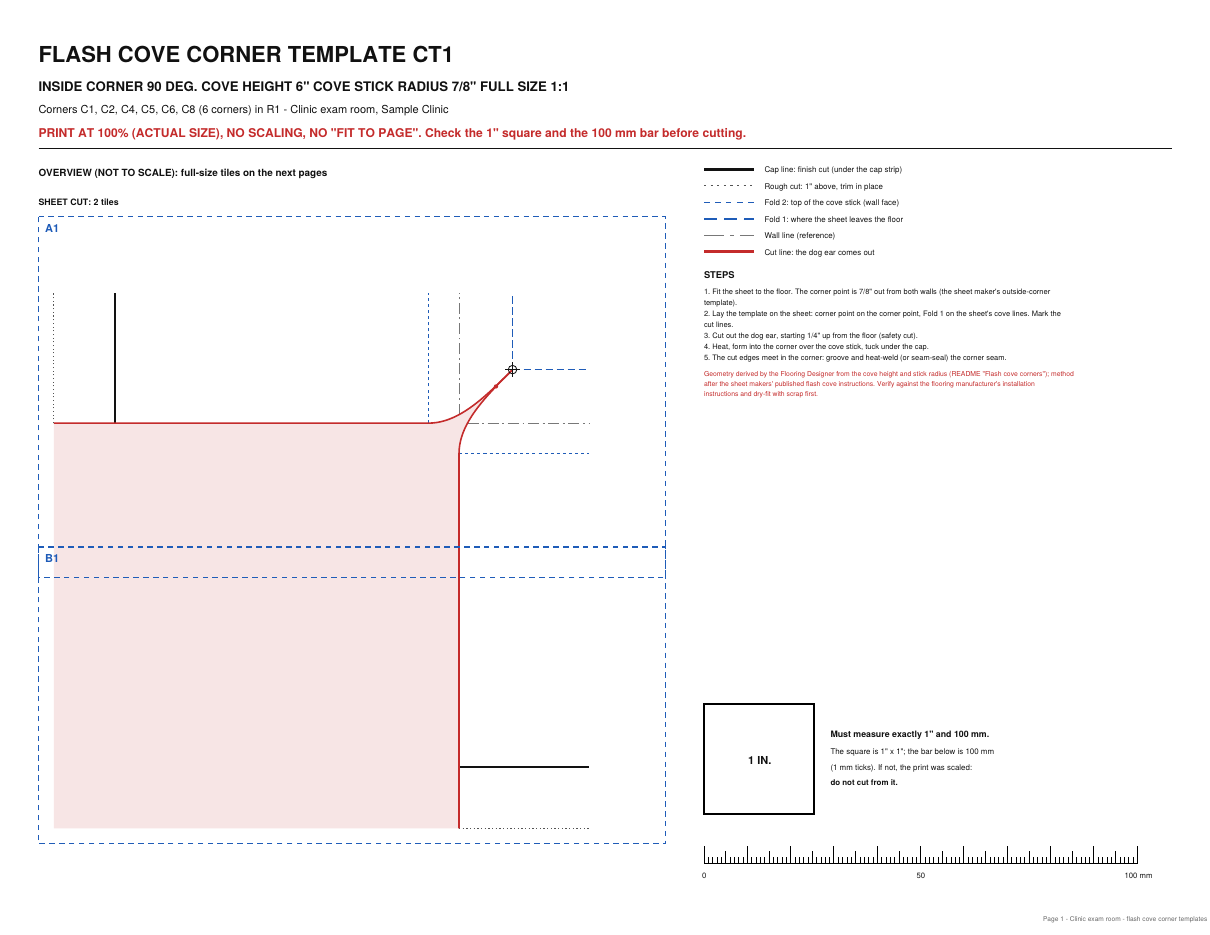
Corner template CT1 (inside 90°, 6 corners): legend, steps, the 1″ square and the 100 mm bar
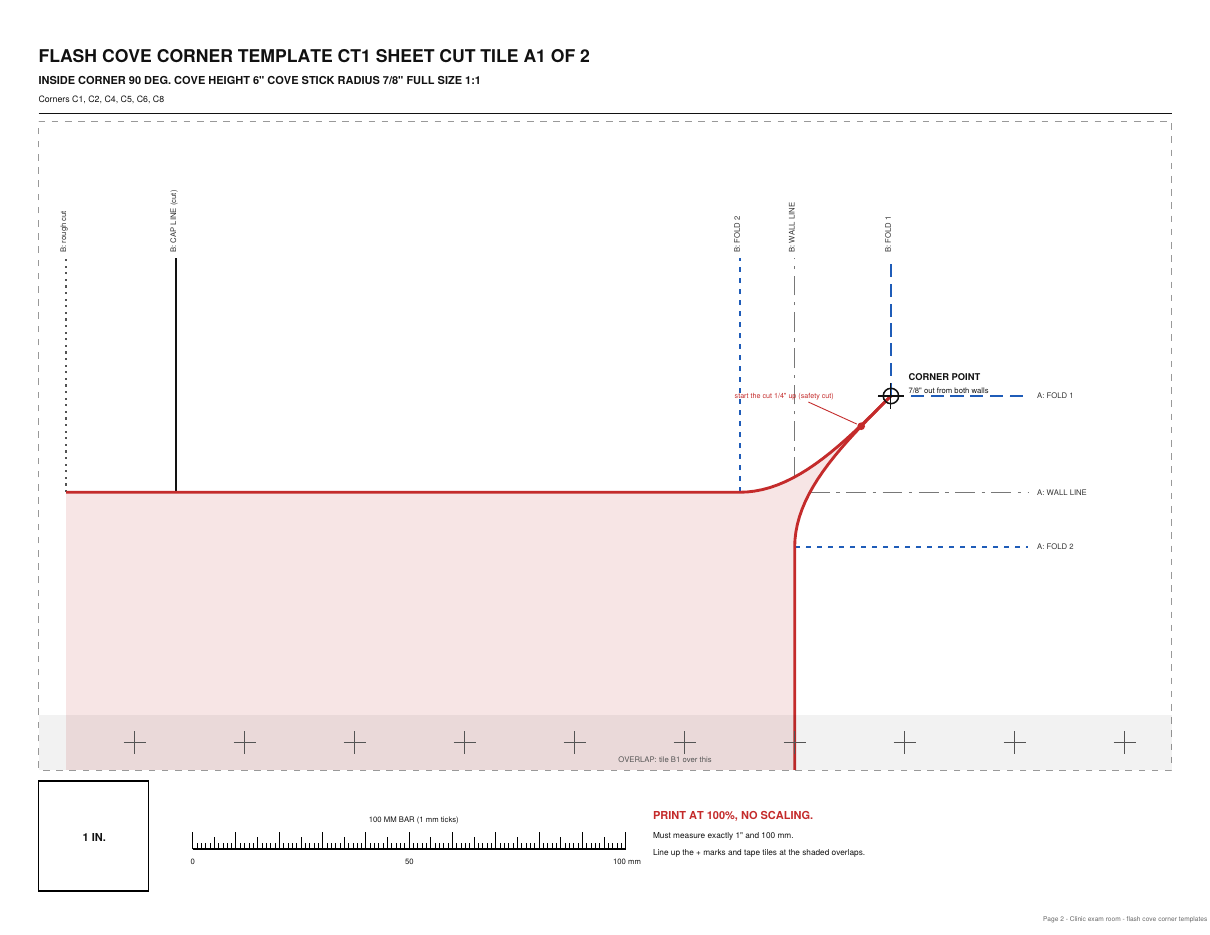
CT1 full-size tile A1: the dog ear to cut out, the folds and the corner point
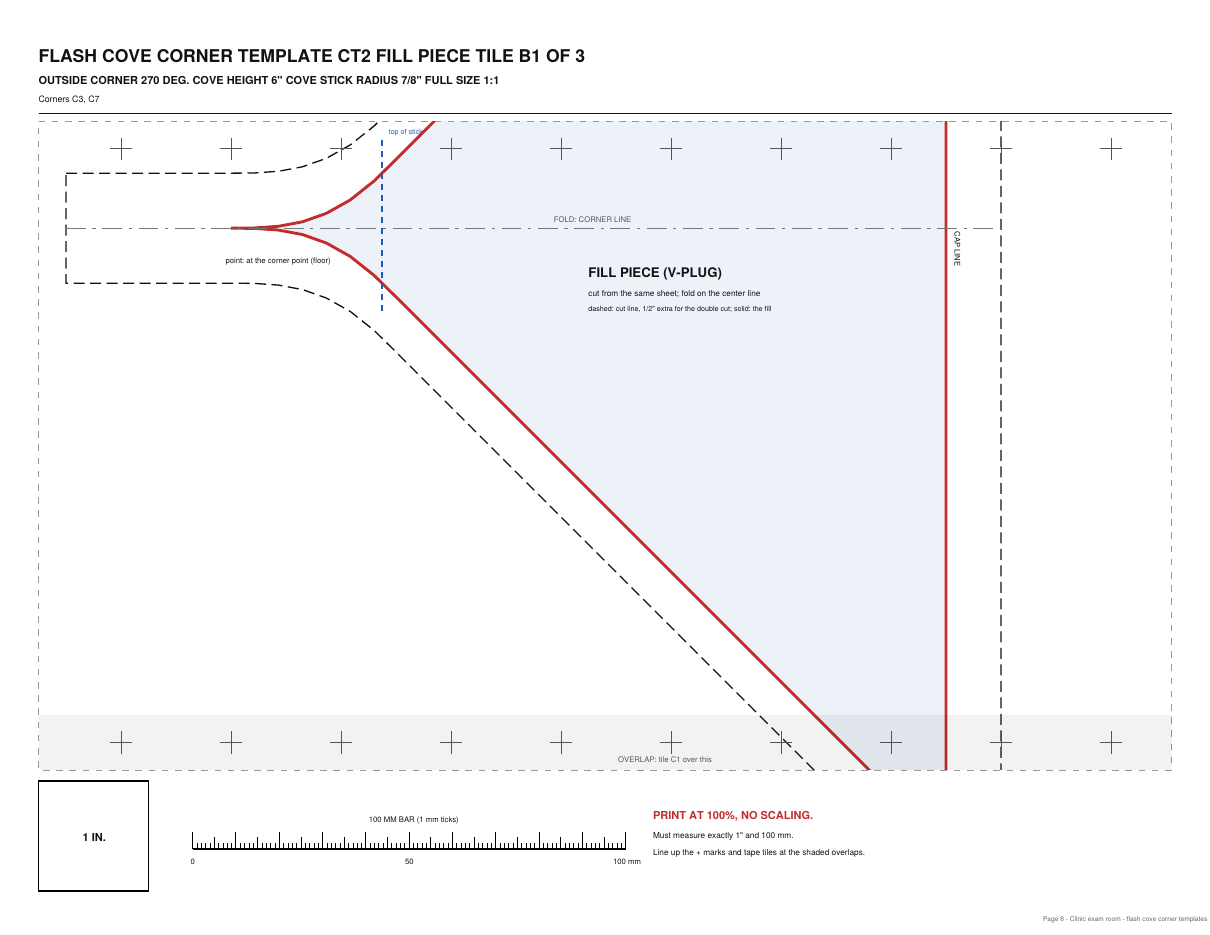
CT2 (outside 270°): the fill piece, cut from the same sheet and welded in
LVP open plan F-2: rows from the top wall, 5 1/4″ balanced rips and the T3 T-molding break

The BidRidge quote

Same numbers in the quote

The designer sends its quantities to BidRidge, and BidRidge prices the labor and materials at your rates.

  • Good
    $6,100
  • Better
    $7,100
    Recommended
  • Best
    $8,700
The design and the quote, line by line
ItemIn the designerIn the BidRidge quote
Exam room floor118 sf sheet15.27 × 7.73 ft = 118 sf
Office floor100 sf LVT10 × 10 ft = 100 sf
Flash cove40 LF, 6″, 6 in / 2 out40 LF, 6″, 6 in / 2 out
Seams and weld12 LF seam, 19 LF weld12 LF seam, 19 LF weld
Rubber base34 LF, 4″, 4 inside34 LF, 4″, 4 inside
Transitions3 transition strips2 in the exam room, 1 in the office

Clinic exam room sample, opened as a quote in the BidRidge app at its starting rates. Your rates give your own numbers.

The sample opened as a quote in the BidRidge app: Good, Better and Best prices
The BidRidge app, at its starting rates.

Try it on your own job

Open the sample, change it to your measurements, and send it to a BidRidge quote. Drawing is free; the drawing set, the lists and the quote come with a BidRidge license or the 14-day trial.

In the designer, tap Open project and pick the sample file. It opens exactly as in the video.

Sample designs: names, sizes and clients are made up. Prices are BidRidge's starting rates; set your own. The designers check against common guidelines (IRC, NKBA and the makers' published numbers) to help you catch mistakes. They don't replace your building department or the manufacturer's installation instructions: verify with them.