BidRidge › Designers › Guide › Chapter 7

Chapter 7 · Roofing & Siding DesignerBeta

Two-story re-roof and siding

We draw a two-story house with a garage, put two dormers and a chimney on the roof, and let the designer work out every plane, panel, trim and flashing in Snap-Loc 24. Then Siding mode puts fiber cement, a shake gable, a metal wainscot and T1-11 on the walls with smart trim, and the design updates the BidRidge job it was opened from.

In the designer, tap Open project and pick the sample file. It opens exactly as in the video.

Narrated walkthrough, 2:42. Captions on.

The sample in numbers

  • Roof
    20.8 sq
    2,077.5 sf · 4 sections, 2 of them dormers
  • Panels
    89 pcs
    Snap-Loc 24 · 1,086 LF · 8 lengths
  • Trims
    57 pcs
    high-rib on the ribs · 4″ legs
  • Ice barrier
    1,016 sf
    Alaska rule: 24″ inside the warm wall
  • Siding
    2,880 sf
    15 walls · 17 sections · 4 siding types
  • Quote
    $110,500
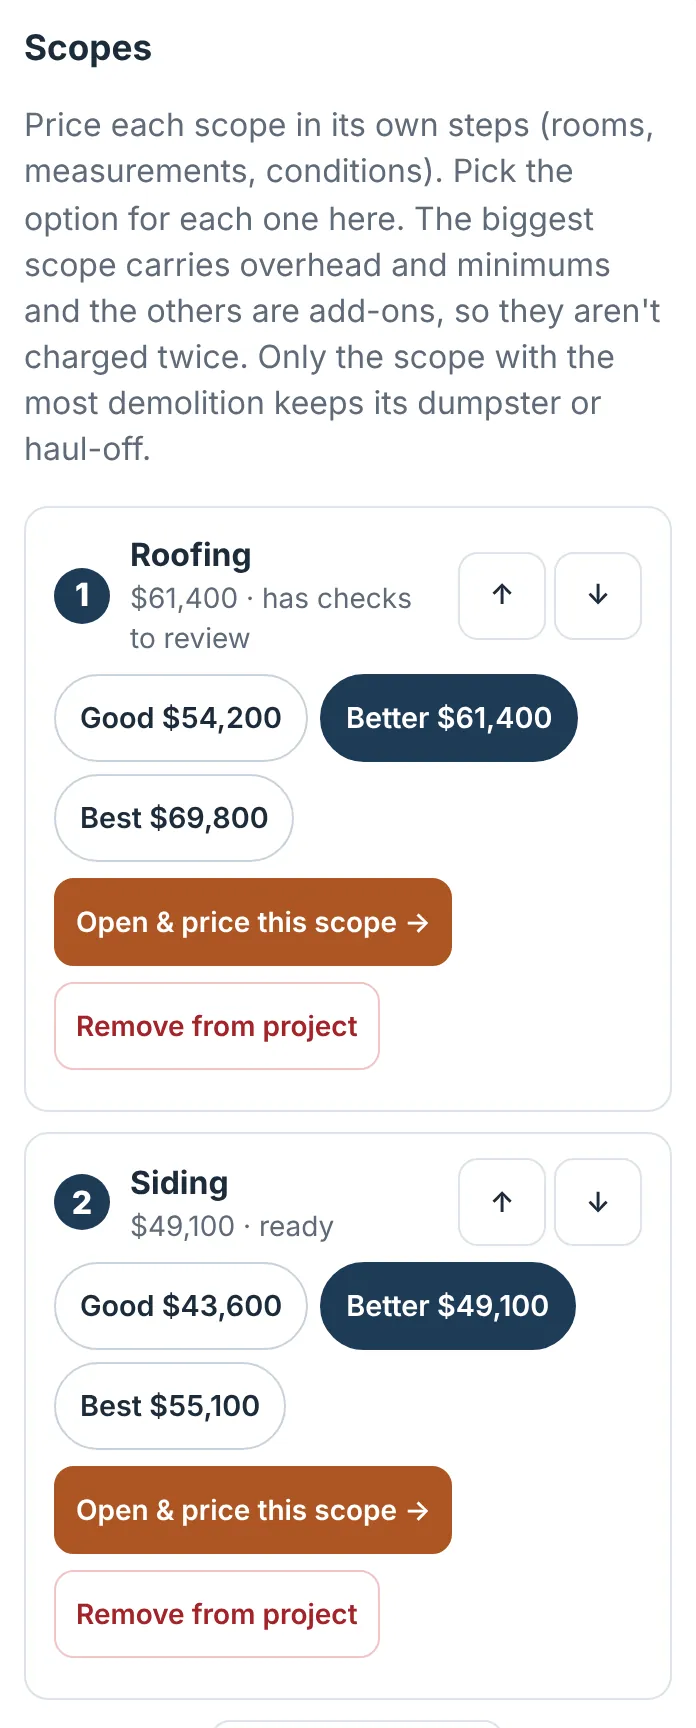
    Better: roof $61,400 + siding $49,100

Step by step

Step 1: Draw the house and the garage in the Roofing & Siding Designer
  1. Section tool
  2. House: 36′ × 28′, 8/12, 2 stories
  3. Garage: 24′ × 24′, 4/12
  4. Sidewall flashing + kick-out

Step 1: Draw the house and the garage

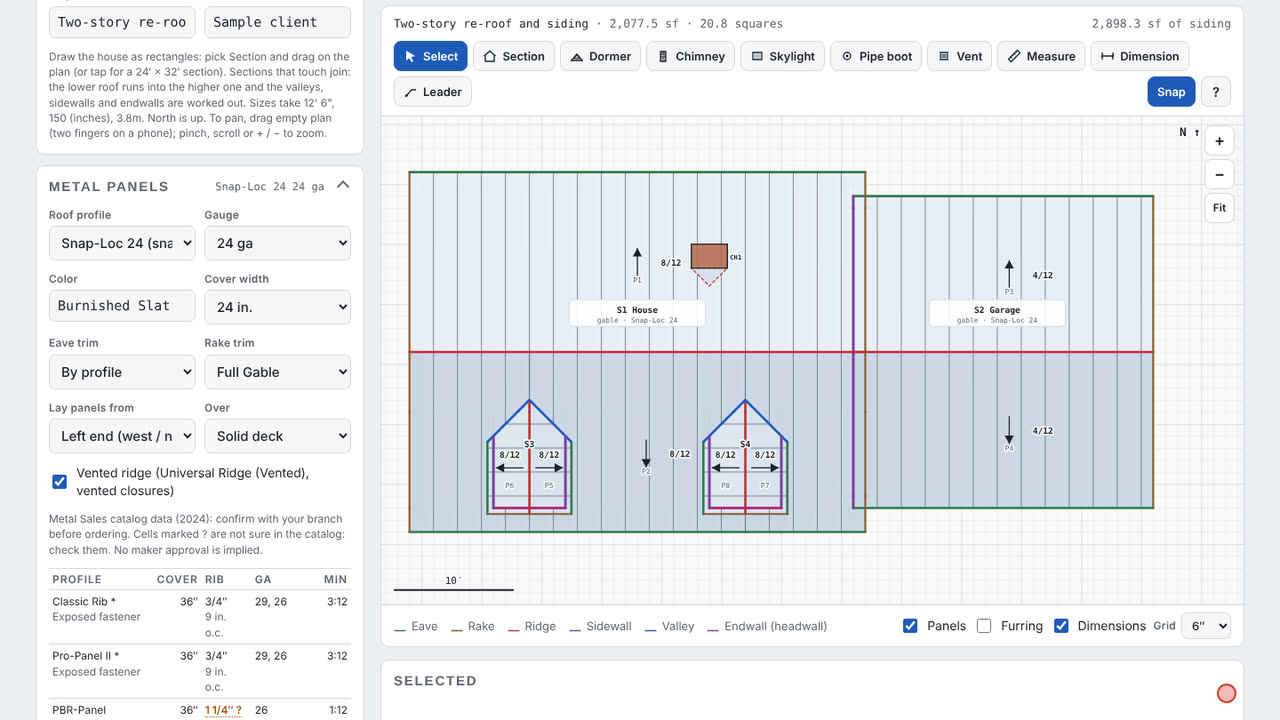
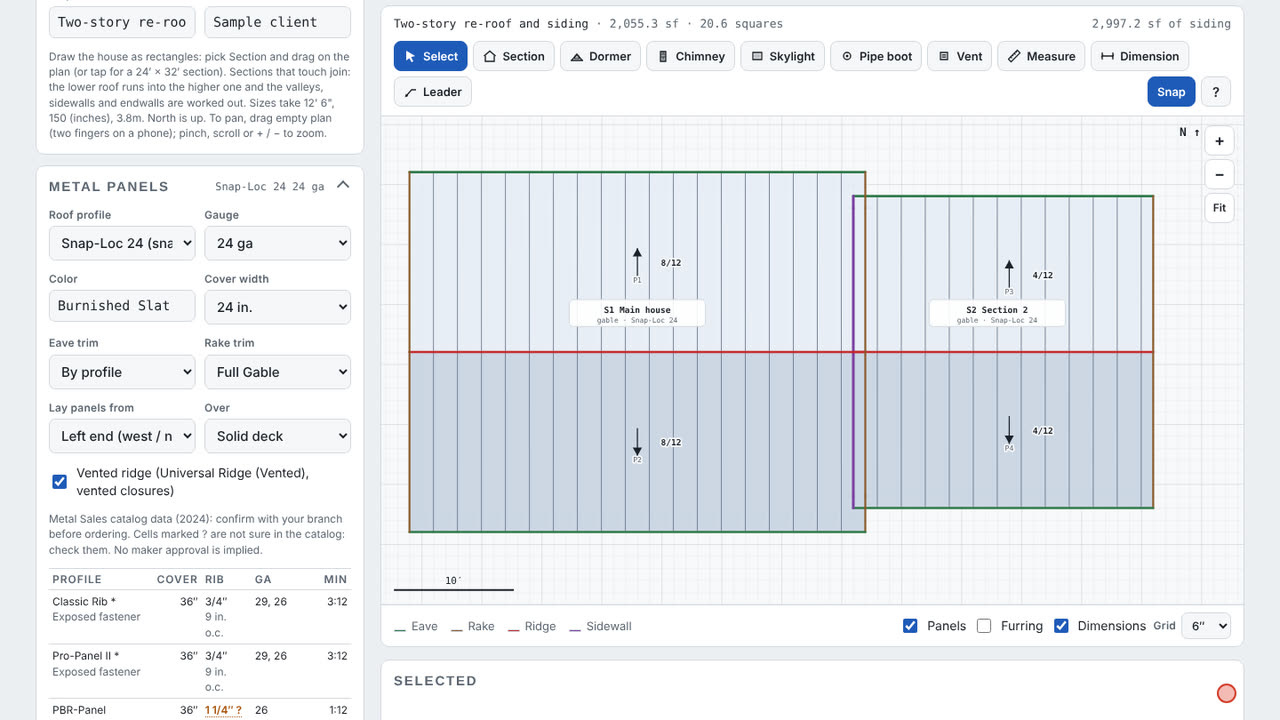
Pick Section and drag a rectangle for the house: 36′ by 28′. Set it to metal, 8 in 12, 2 stories. Drag the garage against the east wall: 24′ by 24′, one story, 4 in 12, ridge east–west. The garage roof stops at the house wall, so you get sidewall flashing up both slopes and a kick-out at each eave.

Field tip: Sizes take 36', 36-0 or 432. North is up on the plan.

Step 2: Add the dormers and the chimney in the Roofing & Siding Designer
  1. Dormer tool
  2. Chimney tool
  3. Dormer: valleys, cheek walls, apron
  4. Chimney 36″ across: a cricket

Step 2: Add the dormers and the chimney

Pick Dormer and tap the house's south slope twice. Each dormer faces down the slope and gets its valleys, step flashing on its cheek walls and an apron under its front wall. Pick Chimney and tap the north slope. It is 36″ across the slope, so it gets a cricket.

Field tip: Drag a chimney or skylight to move it. Drop it off the roof and it goes back onto the nearest plane.

Step 3: Pick the metal in the Roofing & Siding Designer
  1. 89 Snap-Loc 24 panels, 1,086 LF
  2. Order by length: 8 lengths

Step 3: Pick the metal

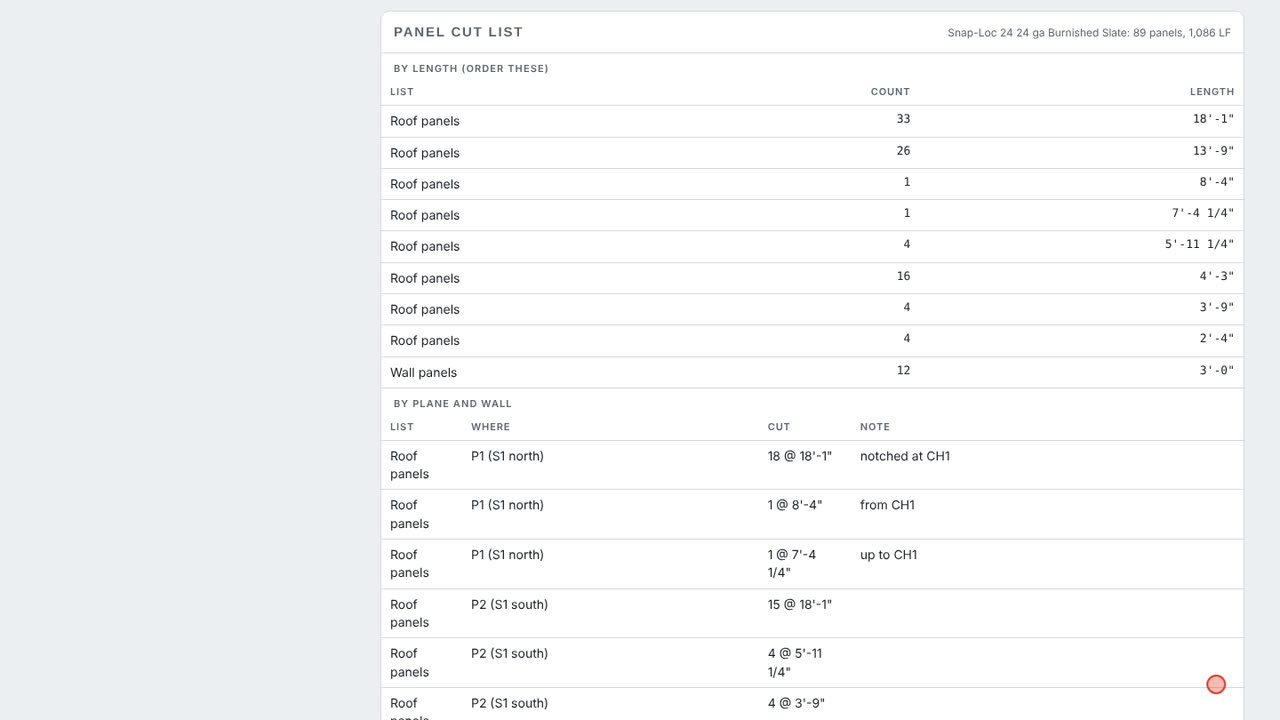
Under Metal panels pick Snap-Loc 24, 24 gauge, Burnished Slate. The designer lays panels on every plane: 89 panels, 1,086 LF in 8 lengths. Panels under the dormers are cut into a piece below and a piece above, and the ones at the chimney are cut or notched.

Field tip: The profile table is a panel maker's catalog data (2024). Confirm it with your supplier before you order.

Step 4: Trims, closures and the checks in the Roofing & Siding Designer
  1. Rib 3″ > 1 1/4″: high-rib trims, 4″ legs
  2. Ridge, valley, sidewall, endwall: high-rib
  3. Z-closures under the high-rib trims

Step 4: Trims, closures and the checks

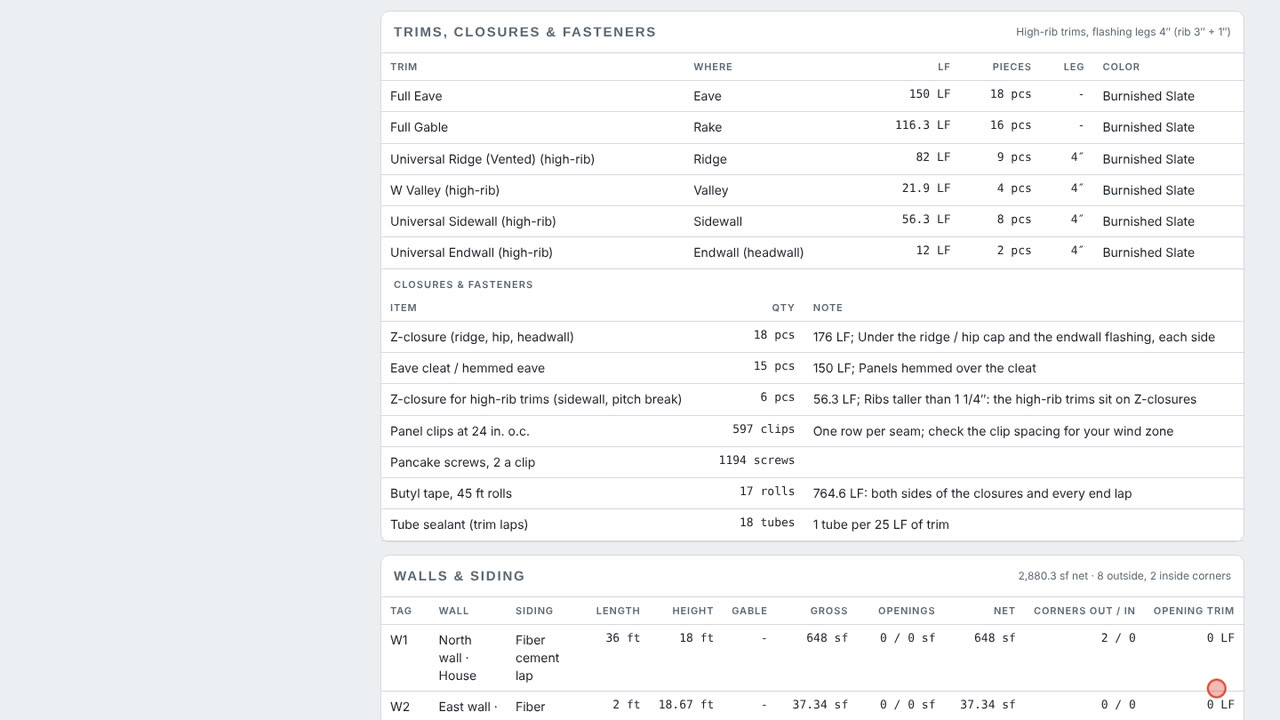
Snap-Loc's 3″ seam is taller than 1 1/4″, so the ridge, valley, sidewall and endwall trims are the high-rib versions with a 4″ leg, on Z-closures. Every plane is checked against the profile's minimum slope, and the ice barrier follows the Alaska rule: 1,016 sf.

Field tip: Tick Snow guard on any eave over a door or a walk. BidRidge flags a metal roof with no snow guards.

Step 5: Switch to Siding in the Roofing & Siding Designer
  1. Roof | Siding
  2. A tab for every wall: 15 here
  3. The wall to scale: dormer front wall

Step 5: Switch to Siding

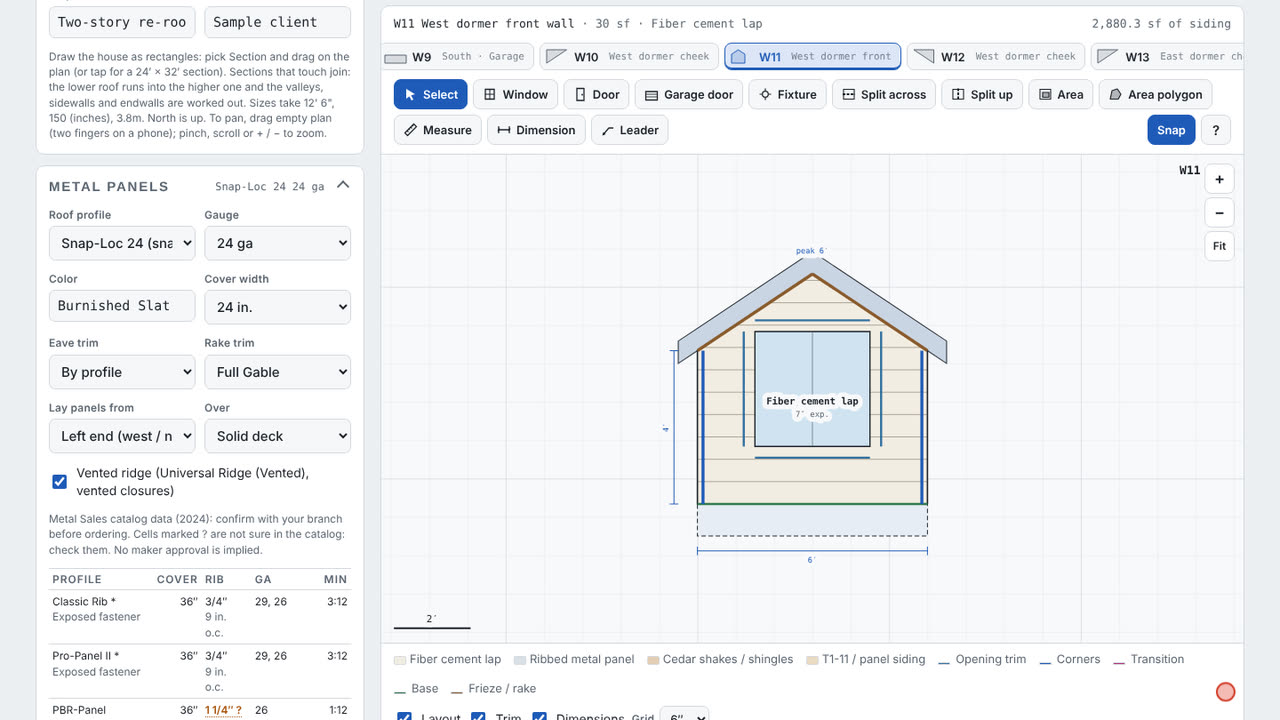
Tap Siding at the top. Every wall the house makes gets a tab: 15 here, with the gables, the wall above the garage roof and the dormer walls. A tab opens that wall's elevation to scale, with the eave above it and the grade below.

Step 6: Shakes in the west gable in the Roofing & Siding Designer
  1. Cedar shakes above the plate, 6″ exposure
  2. Belly band 5/4×6 + Z-flashing
  3. Fiber cement lap below

Step 6: Shakes in the west gable

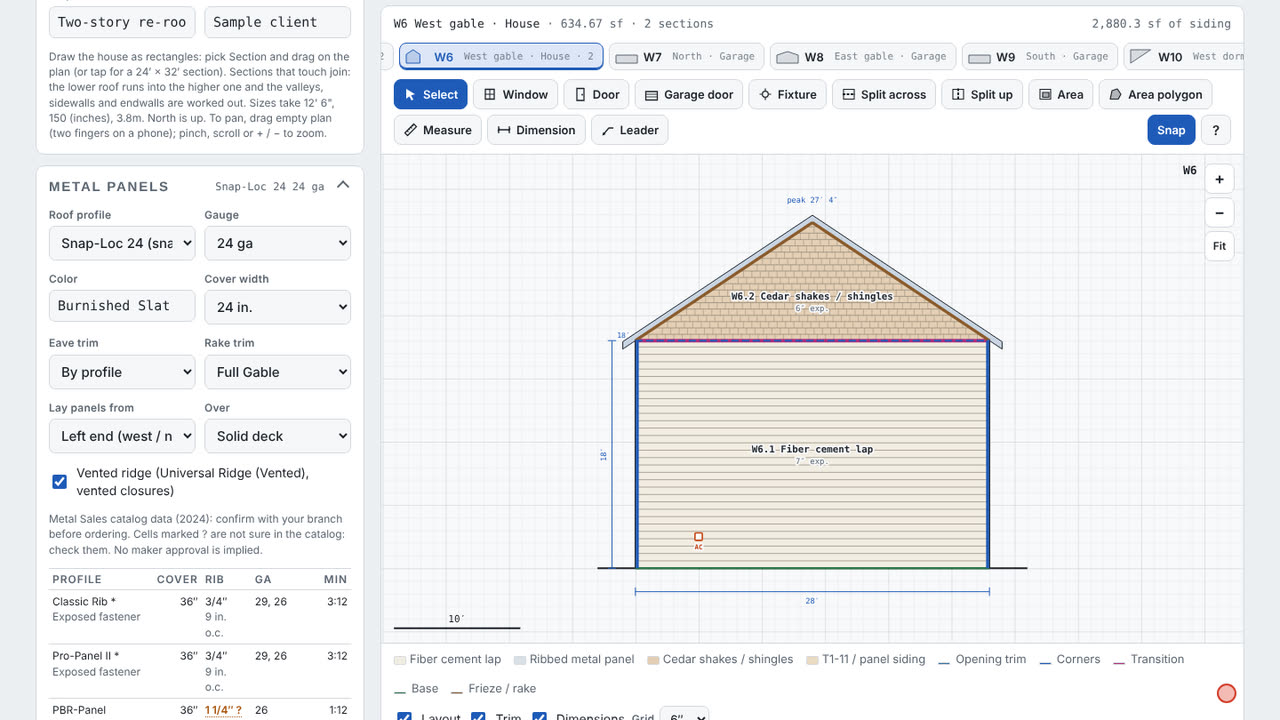
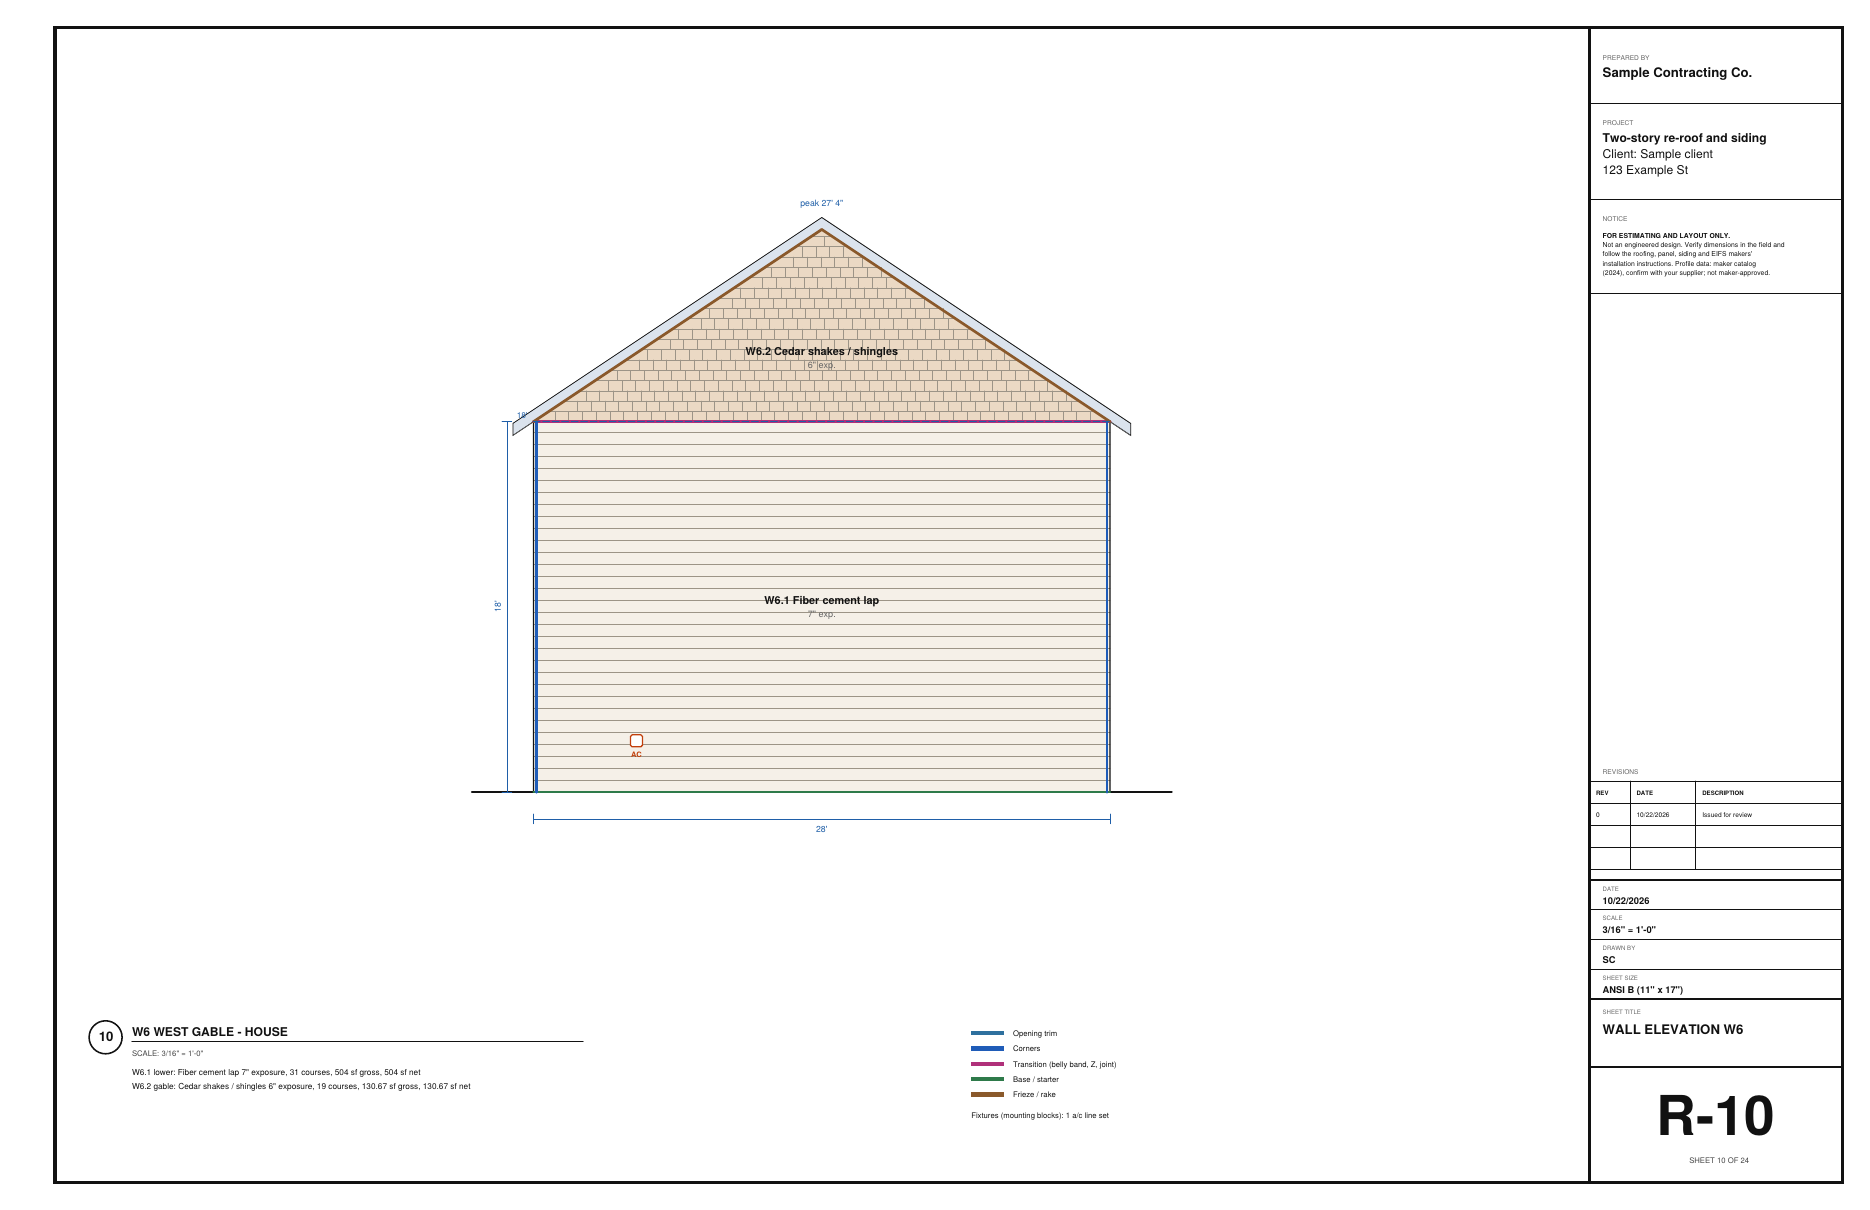
Open W6, the west gable, and tap Split the gable at the plate. The part above the plate becomes cedar shakes at a 6″ exposure. The line between the two sections gets a belly band with Z-flashing.

Field tip: Split across makes a belly band anywhere. Split up puts two sidings side by side.

Step 7: A metal wainscot and T1-11 on the garage in the Roofing & Siding Designer
  1. Area tool
  2. T1-11 in 4×9 sheets, grooves 8″

Step 7: A metal wainscot and T1-11 on the garage

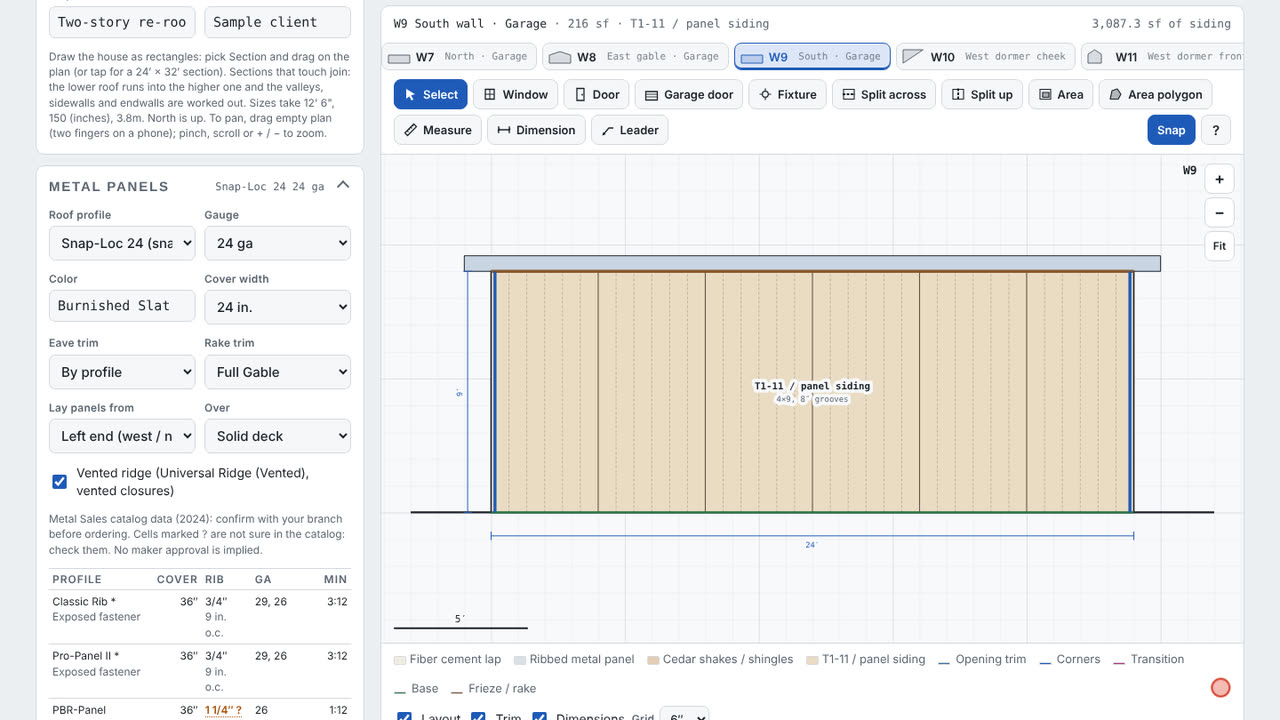
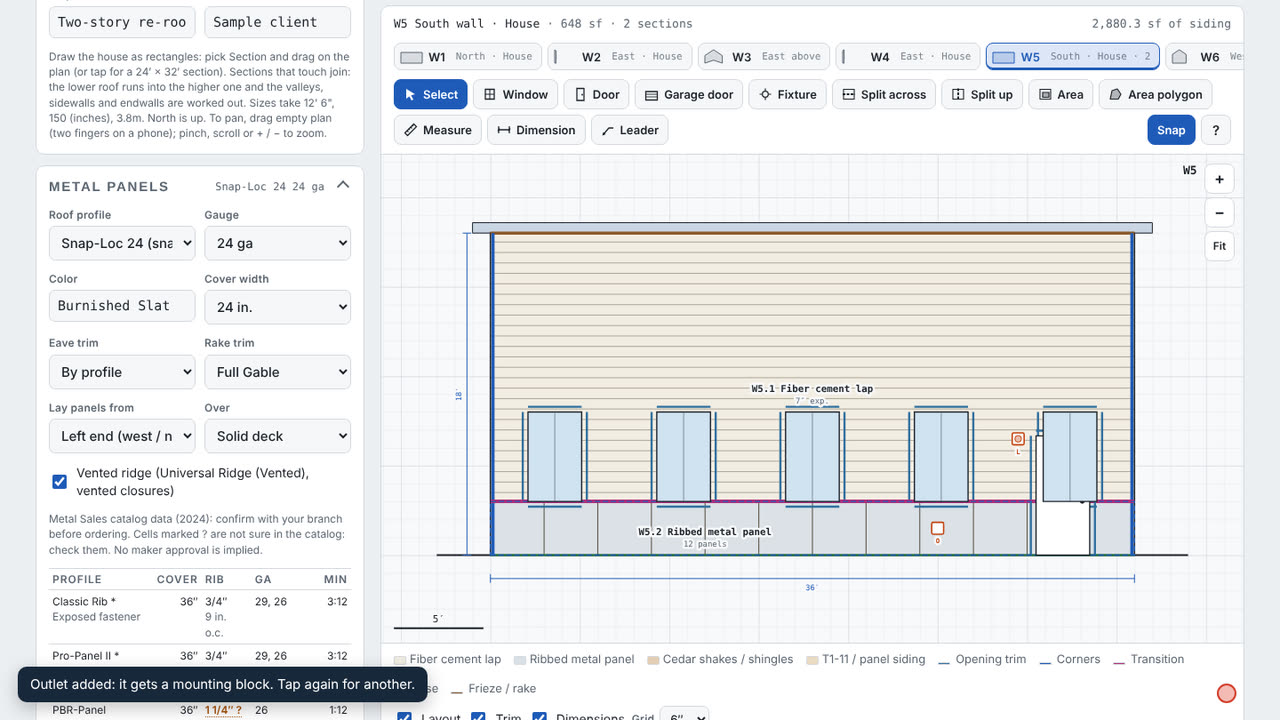
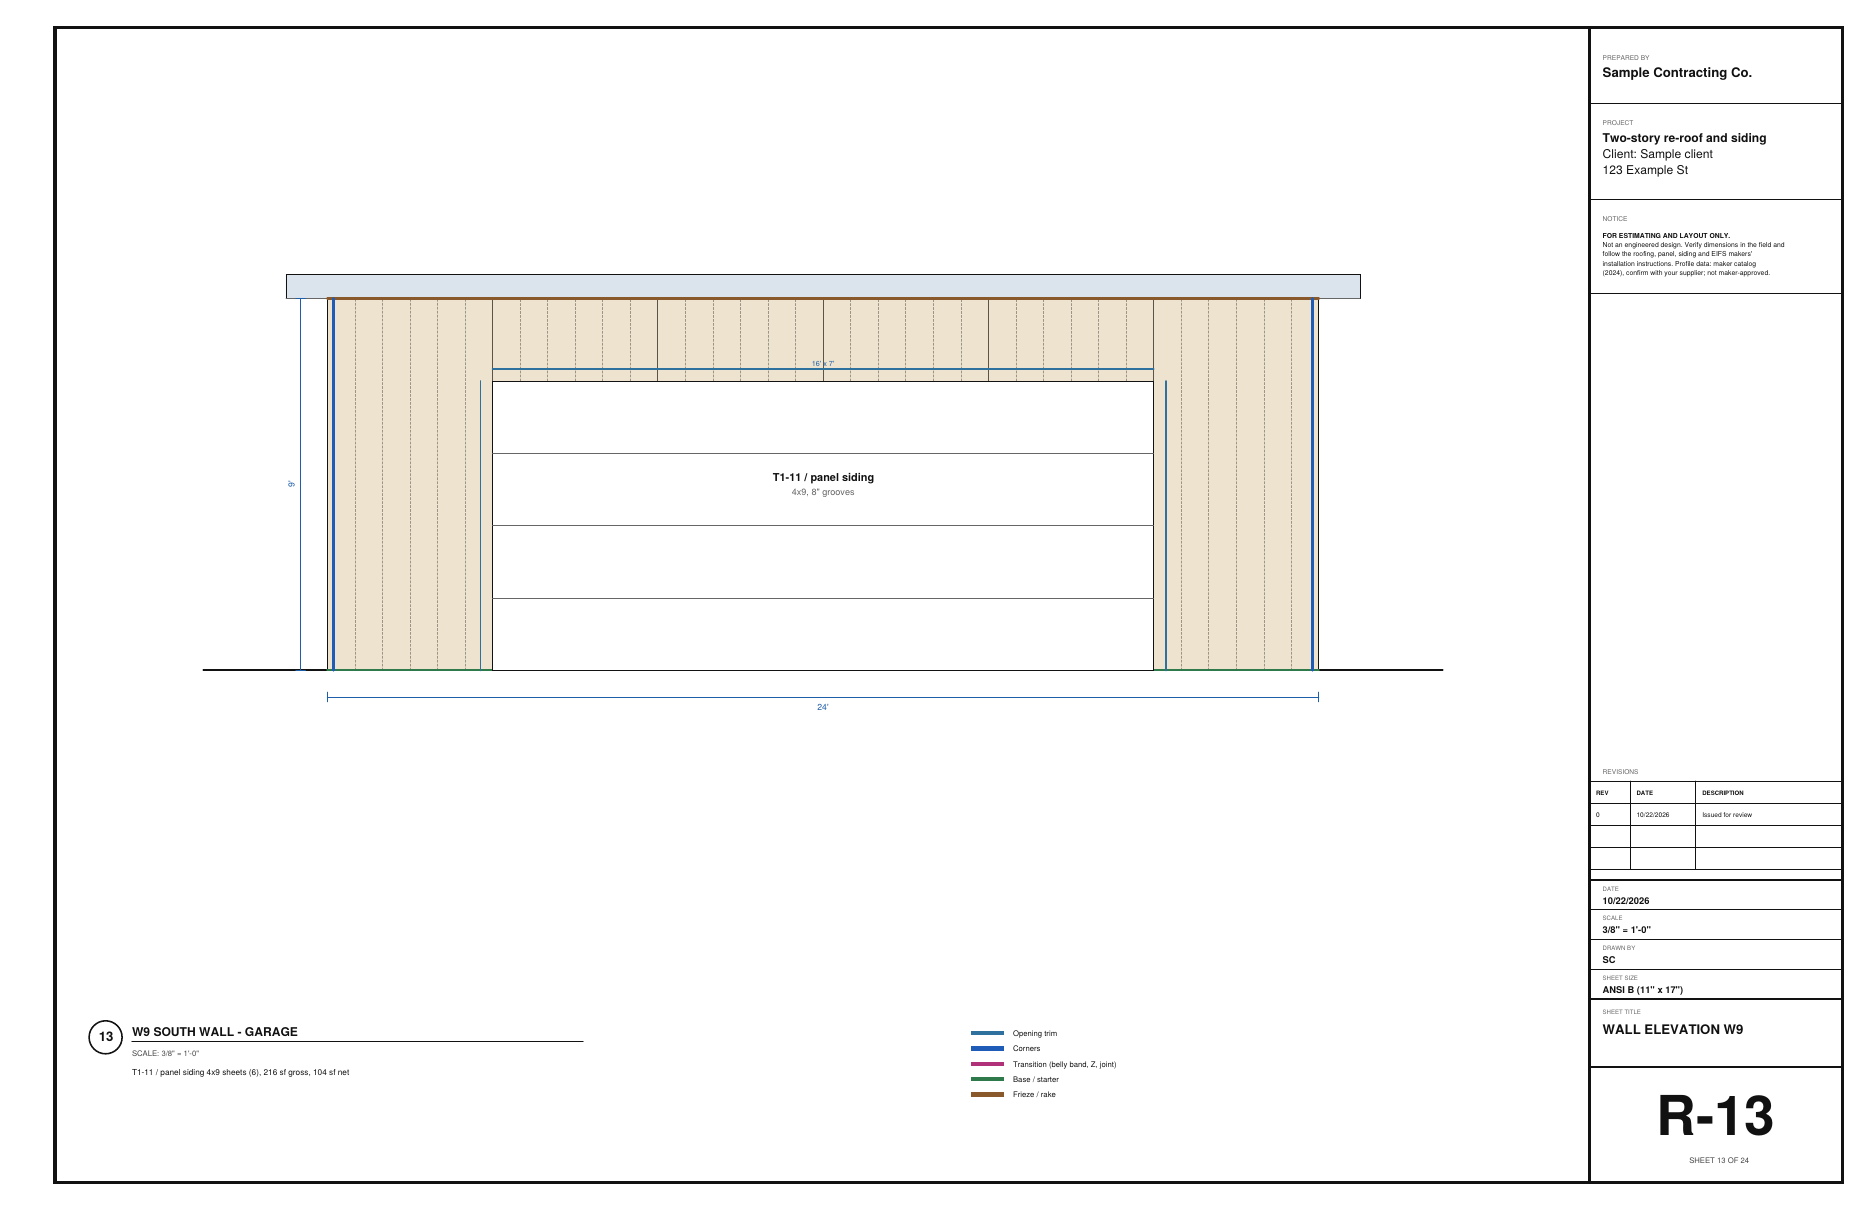
On W5, the south wall, pick Area and drag a band 36″ high along the bottom, then set it to ribbed metal panel. Tap each garage wall and pick T1-11. Each section lays out its own courses, sheets or panels.

Step 8: Windows, doors and fixtures in the Roofing & Siding Designer
  1. Window, Door, Garage door
  2. Fixture: light, outlet, hose bib…
  3. Door, dragged into place
  4. Wall light: PVC mounting block
  5. Outlet: flashed block in the metal

Step 8: Windows, doors and fixtures

Pick Window and tap the wall, then drag it or type its size and place. The south wall gets five windows and a door, the garage a 16′ door, each dormer a window. Pick Fixture for the light, outlet, hose bib, dryer vent, meter and A/C line set. Each gets a mounting block that suits its siding.

Field tip: Window places are measured from the wall's left end, seen from outside.

Step 9: Smart trim in the Roofing & Siding Designer
  1. Fiber cement: casing and corner boards 5/4×4
  2. Metal wainscot: metal jamb, corner and base trim
  3. Belly band where the sections meet
  4. T1-11: Z-flashing at the sheet joints

Step 9: Smart trim

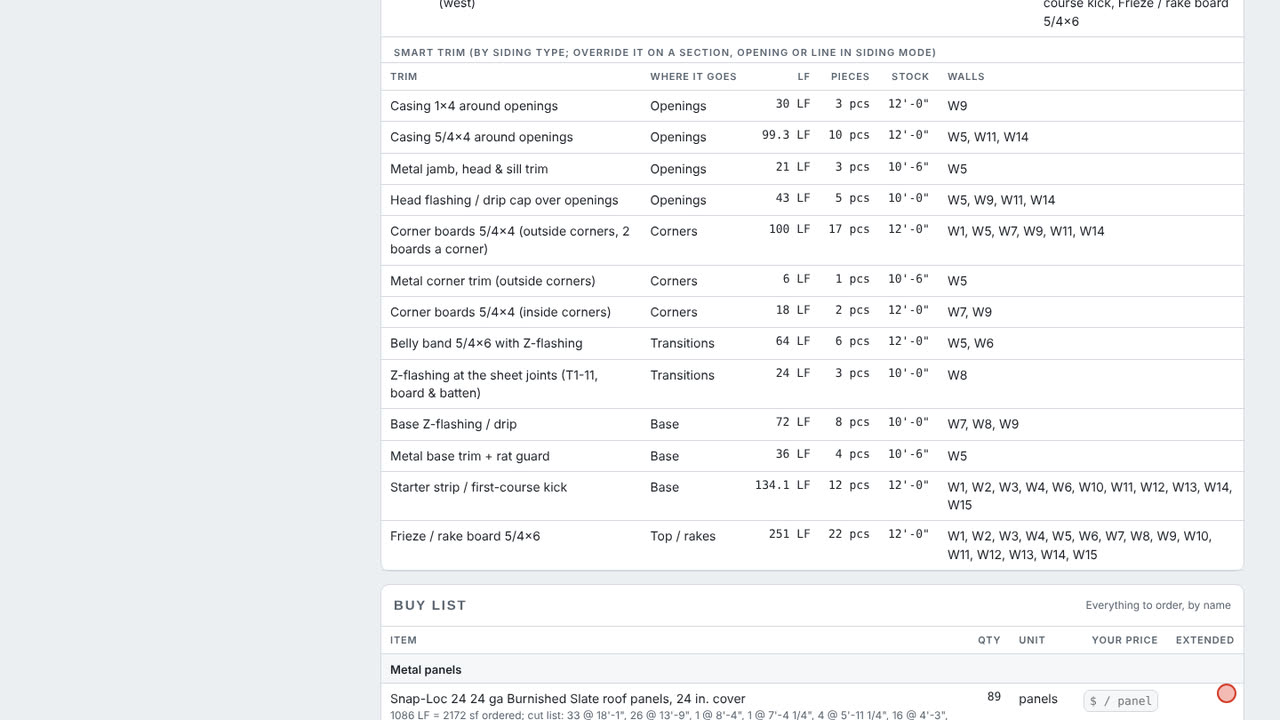
Trim follows the siding: casings, corner boards and frieze on the fiber cement, metal trim on the wainscot, Z-flashing at the T1-11 joints and base. The Siding sections & smart trim card lists all 17 sections and every trim run, nested into stock lengths.

Field tip: Change the trim on any section, opening or line and the totals follow. Stone veneer gets its own: weep screed, corner stones, casing bead with stone sills, a cap over a stone wainscot, and lath, 2 layers of WRB and a scratch coat over framing.

Step 10: Print the drawing set in the Roofing & Siding Designer
  1. Save PDF: 24 sheets
  2. Preview sheets
  3. A wall elevation per wall

Step 10: Print the drawing set

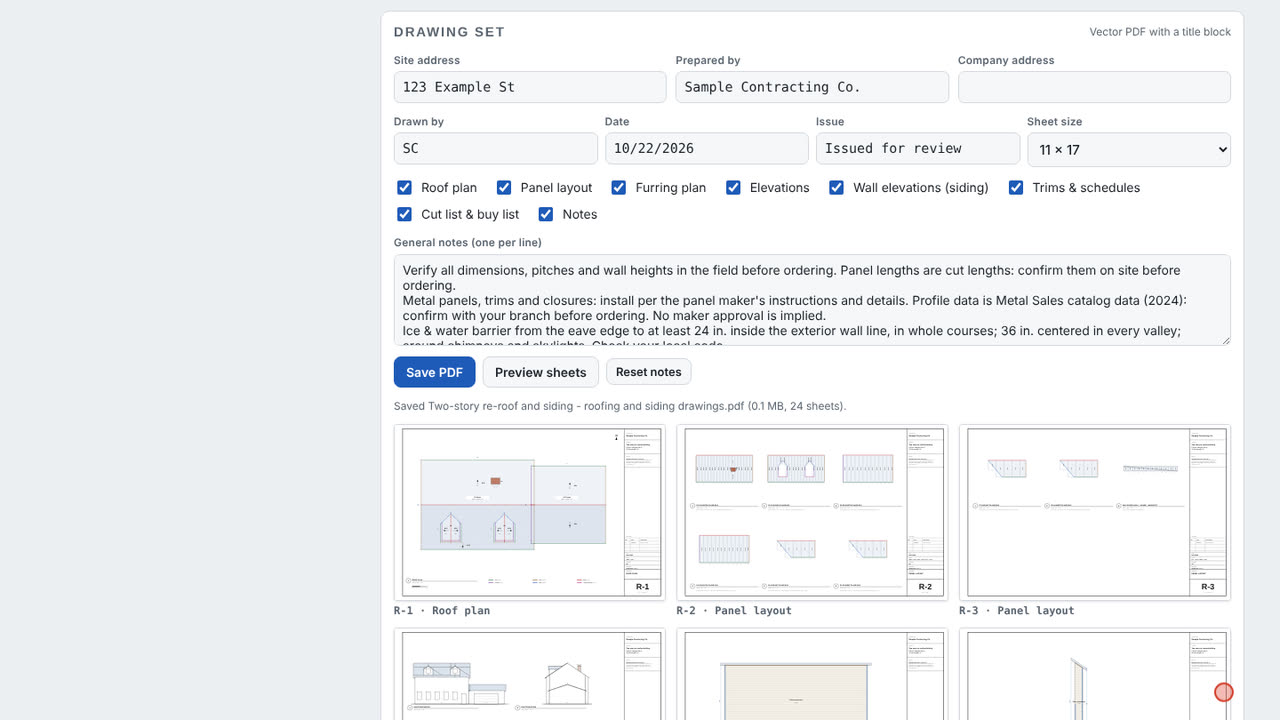
Save PDF makes 24 sheets: the roof plan, the panel layout of every plane, the elevations, a wall elevation for each of the 15 walls, trims & schedules, the cut list and buy list, and the notes.

Step 11: Update the BidRidge job in the Roofing & Siding Designer
  1. Roofing: the designer's rows
  2. Siding: added as a second scope

Step 11: Update the BidRidge job

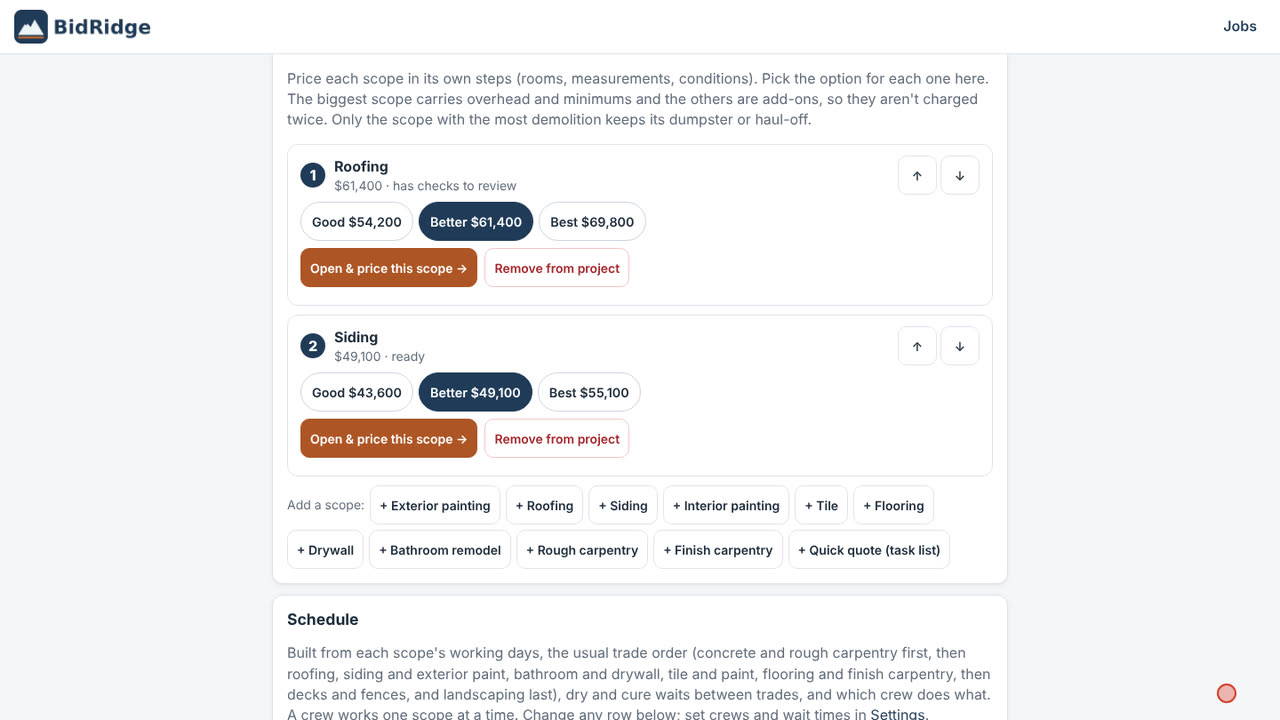
Opened from a roofing job with Design it, the BidRidge card reads Update the job in BidRidge. BidRidge shows what changes before it updates the job, keeps what you typed there, and adds Siding as a second scope, both priced at your rates.

Field tip: The roof and the walls go over as one project with two scopes, so the customer signs one proposal.

Step 12: A low-slope porch in the Roofing & Siding Designer

Step 12: A low-slope porch

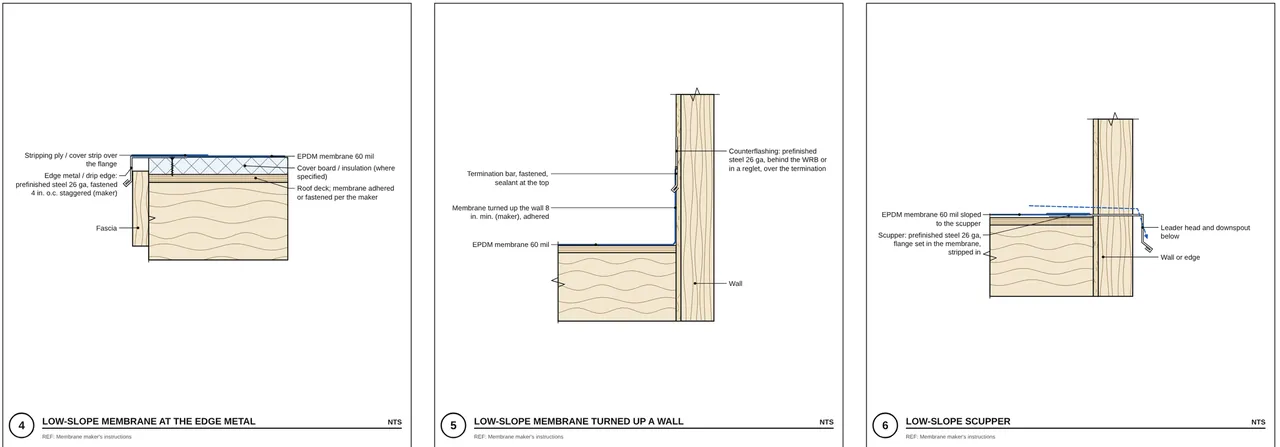
Pick a membrane for a low-slope section: TPO, EPDM or modified bitumen (2-ply). The designer counts the rolls with the side and end laps, the 8″ turn-up at walls and the tie-in, the edge metal, the termination bar and the scuppers or roof drains, and draws the edge, wall and scupper details. The slope of a low-slope section stops at 1/4 in 12, the least a membrane needs to drain.

Field tip: The slope and laps the membrane maker requires win; the code's minimum slopes are not loaded here.

New in 1.58, narrated: a low-slope porch roof, 1:22. Captions on.
Step 13: Angled, many-sided and curved sections in the Roofing & Siding Designer

Step 13: Angled, many-sided and curved sections

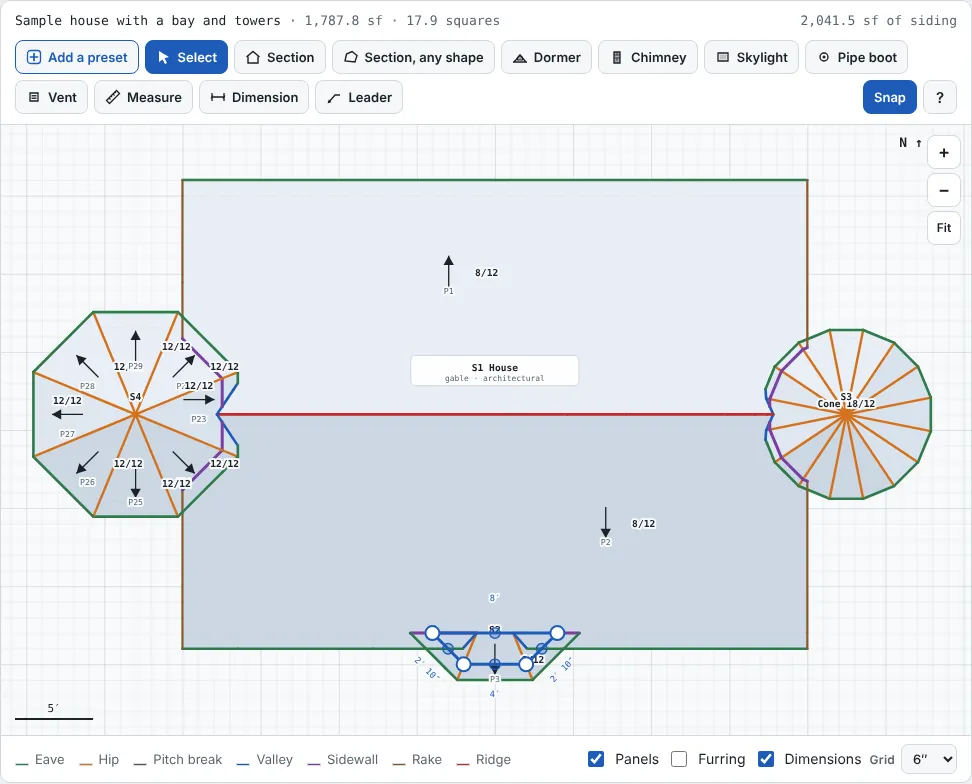
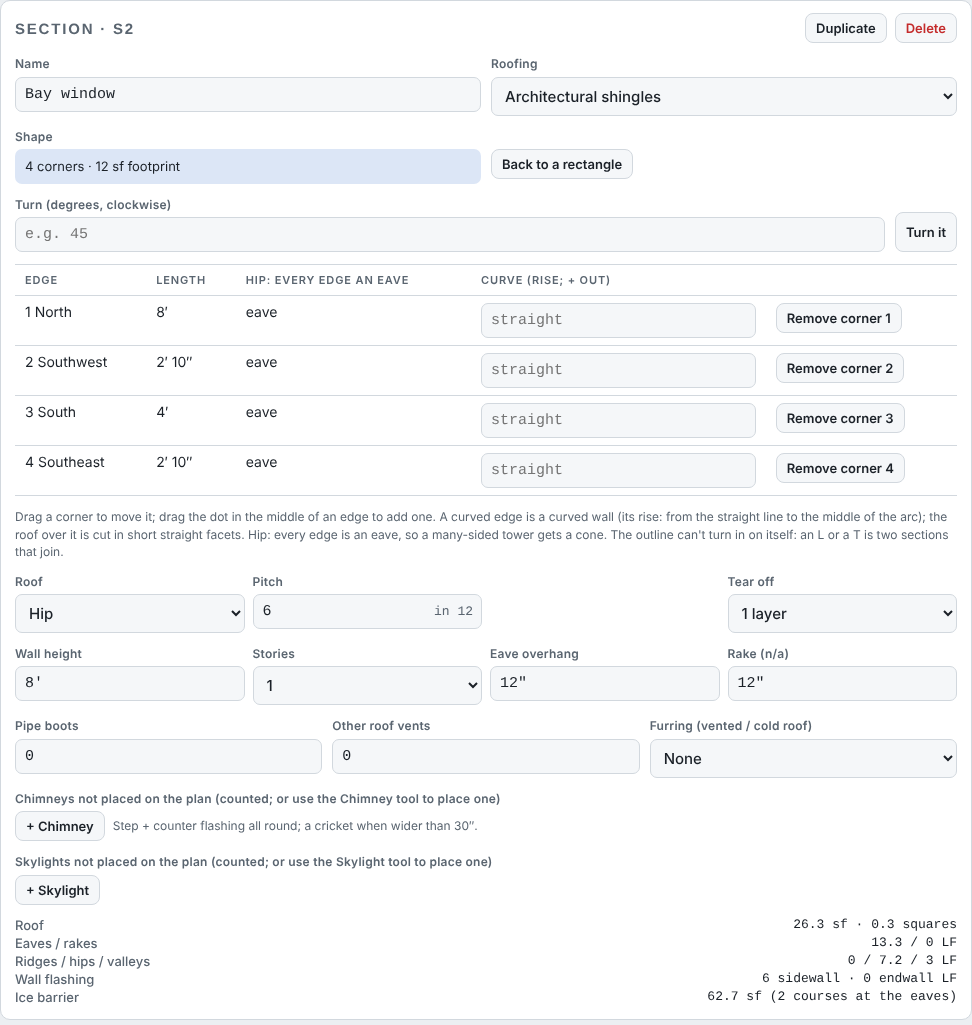
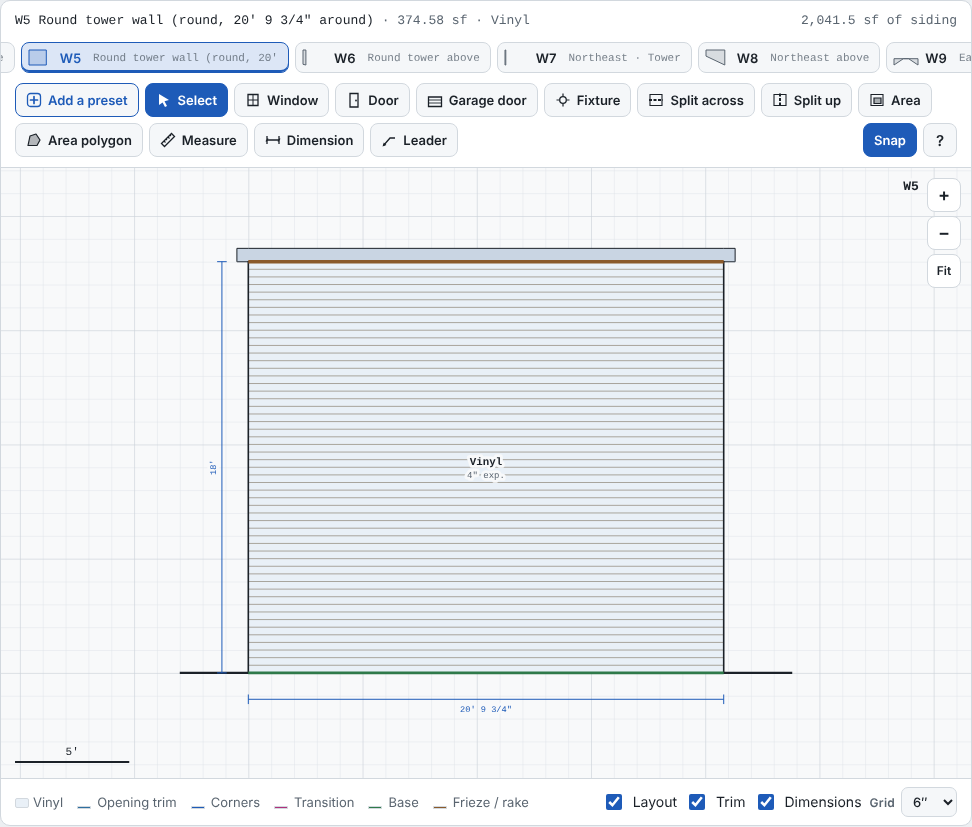
New in 1.72: Section, any shape draws a section by its corners (tap each, then the first to close): a 45-degree bay, an angled wing, an octagon or a round tower. Its panel lists each edge with its length, Eave or Gable end, a curve (the rise from the straight line to the middle of the arc) and Remove corner; drag a corner, or drag an edge's middle to add one. Every eave edge gets its own roof plane at the section's pitch, so a hip on many sides is a pyramid and a round tower is a cone; where it meets the house it makes the valleys or wall flashing like any section. In Siding each straight edge is its own wall named by its compass direction, a round tower is one curved wall measured around, and the corners get their angle. A rectangle's panel has Any shape and Turn it. Add a preset has the Bay window (45 degrees), Octagon tower and Round tower (cone roof), placed against the selected section.

Field tip: The outline can't turn in on itself: an L or a T is two sections that join. Barrel roofs and eyebrow dormers are still typed under Extra roof areas.

Narrated video: low-slope and any-shape sections, 0:53. Captions on.

What you get

The drawing set, the lists and the files

Real files from this sample, made by the designer. Tap a page to see it full size. Yours carry your company, the client and the address.

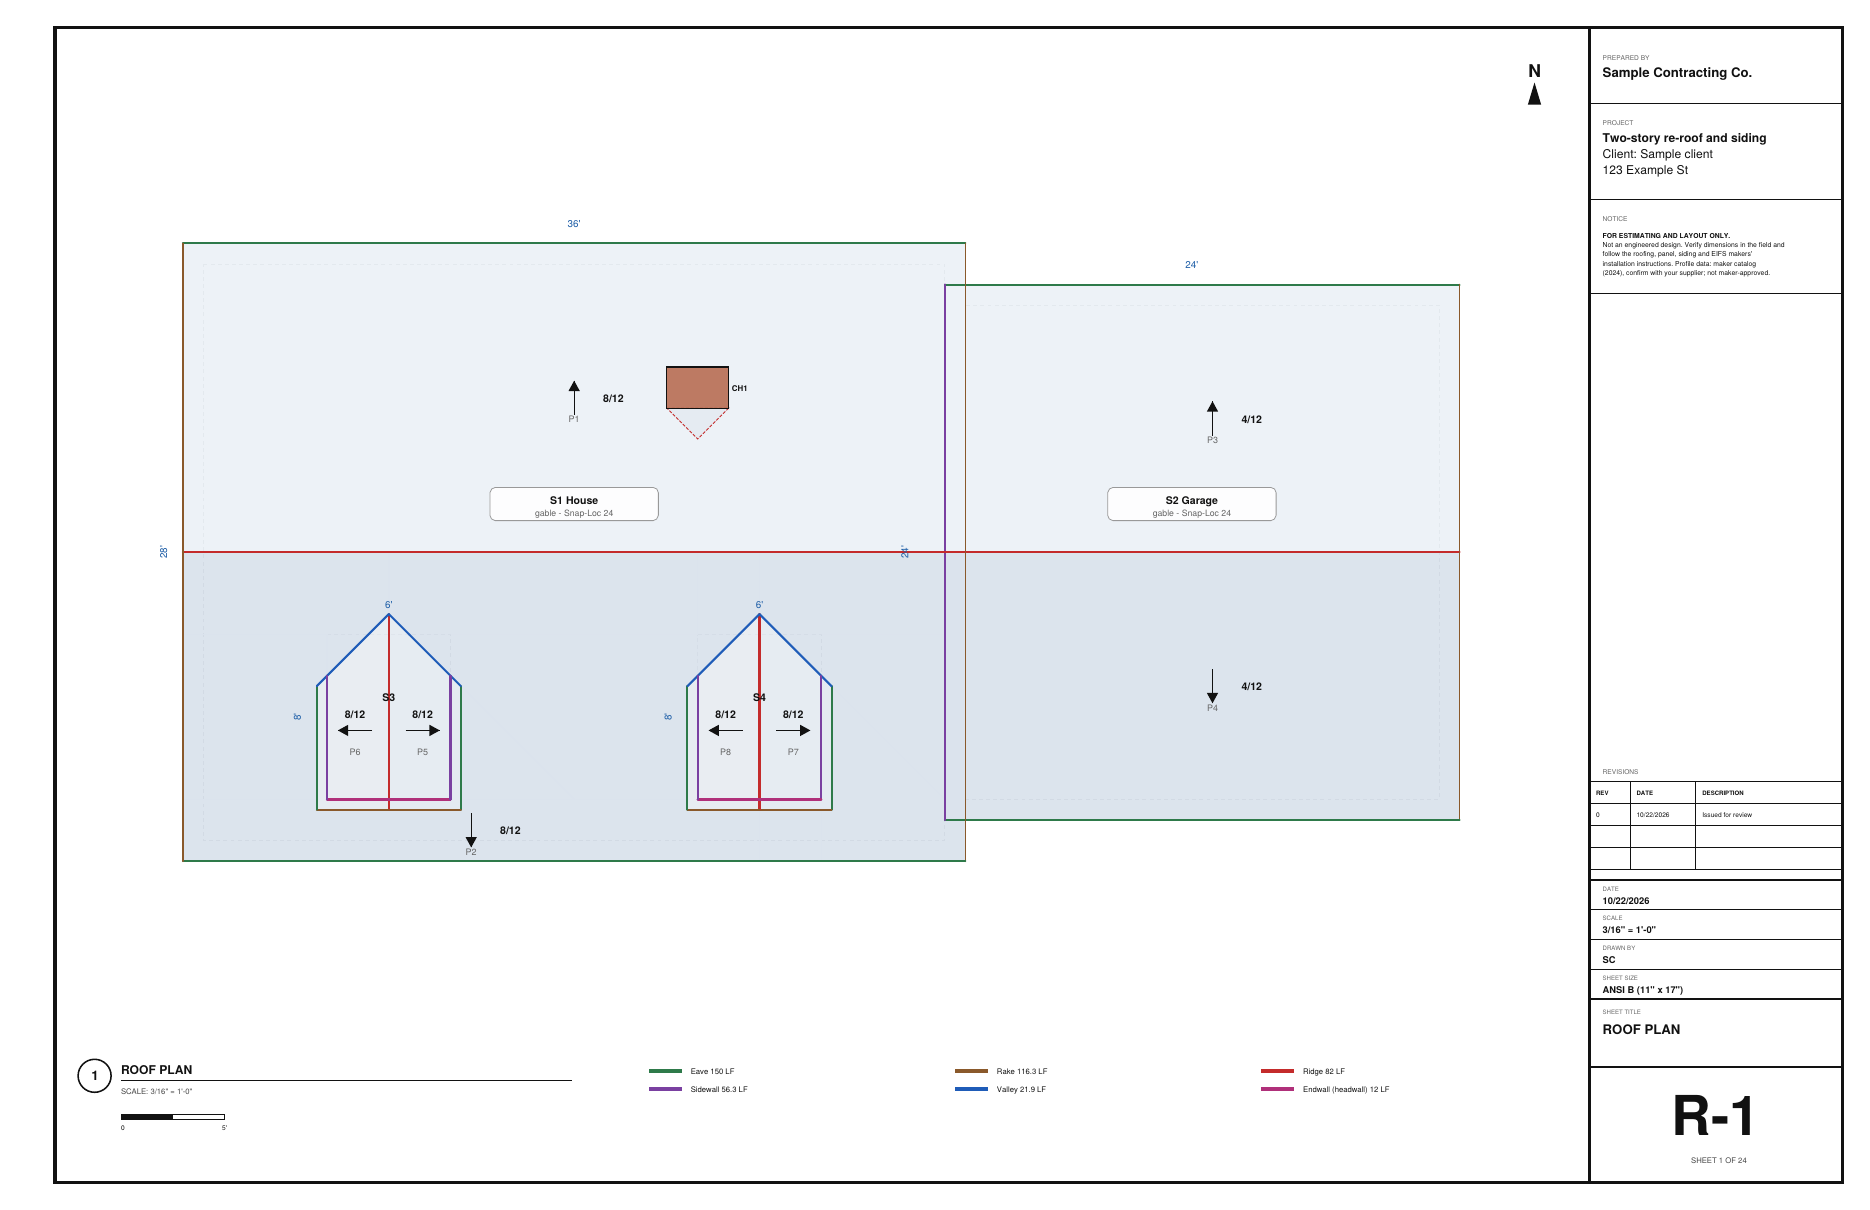
R-1 roof plan: planes, edges by kind, pitch arrows, the two dormers and the chimney with its cricket
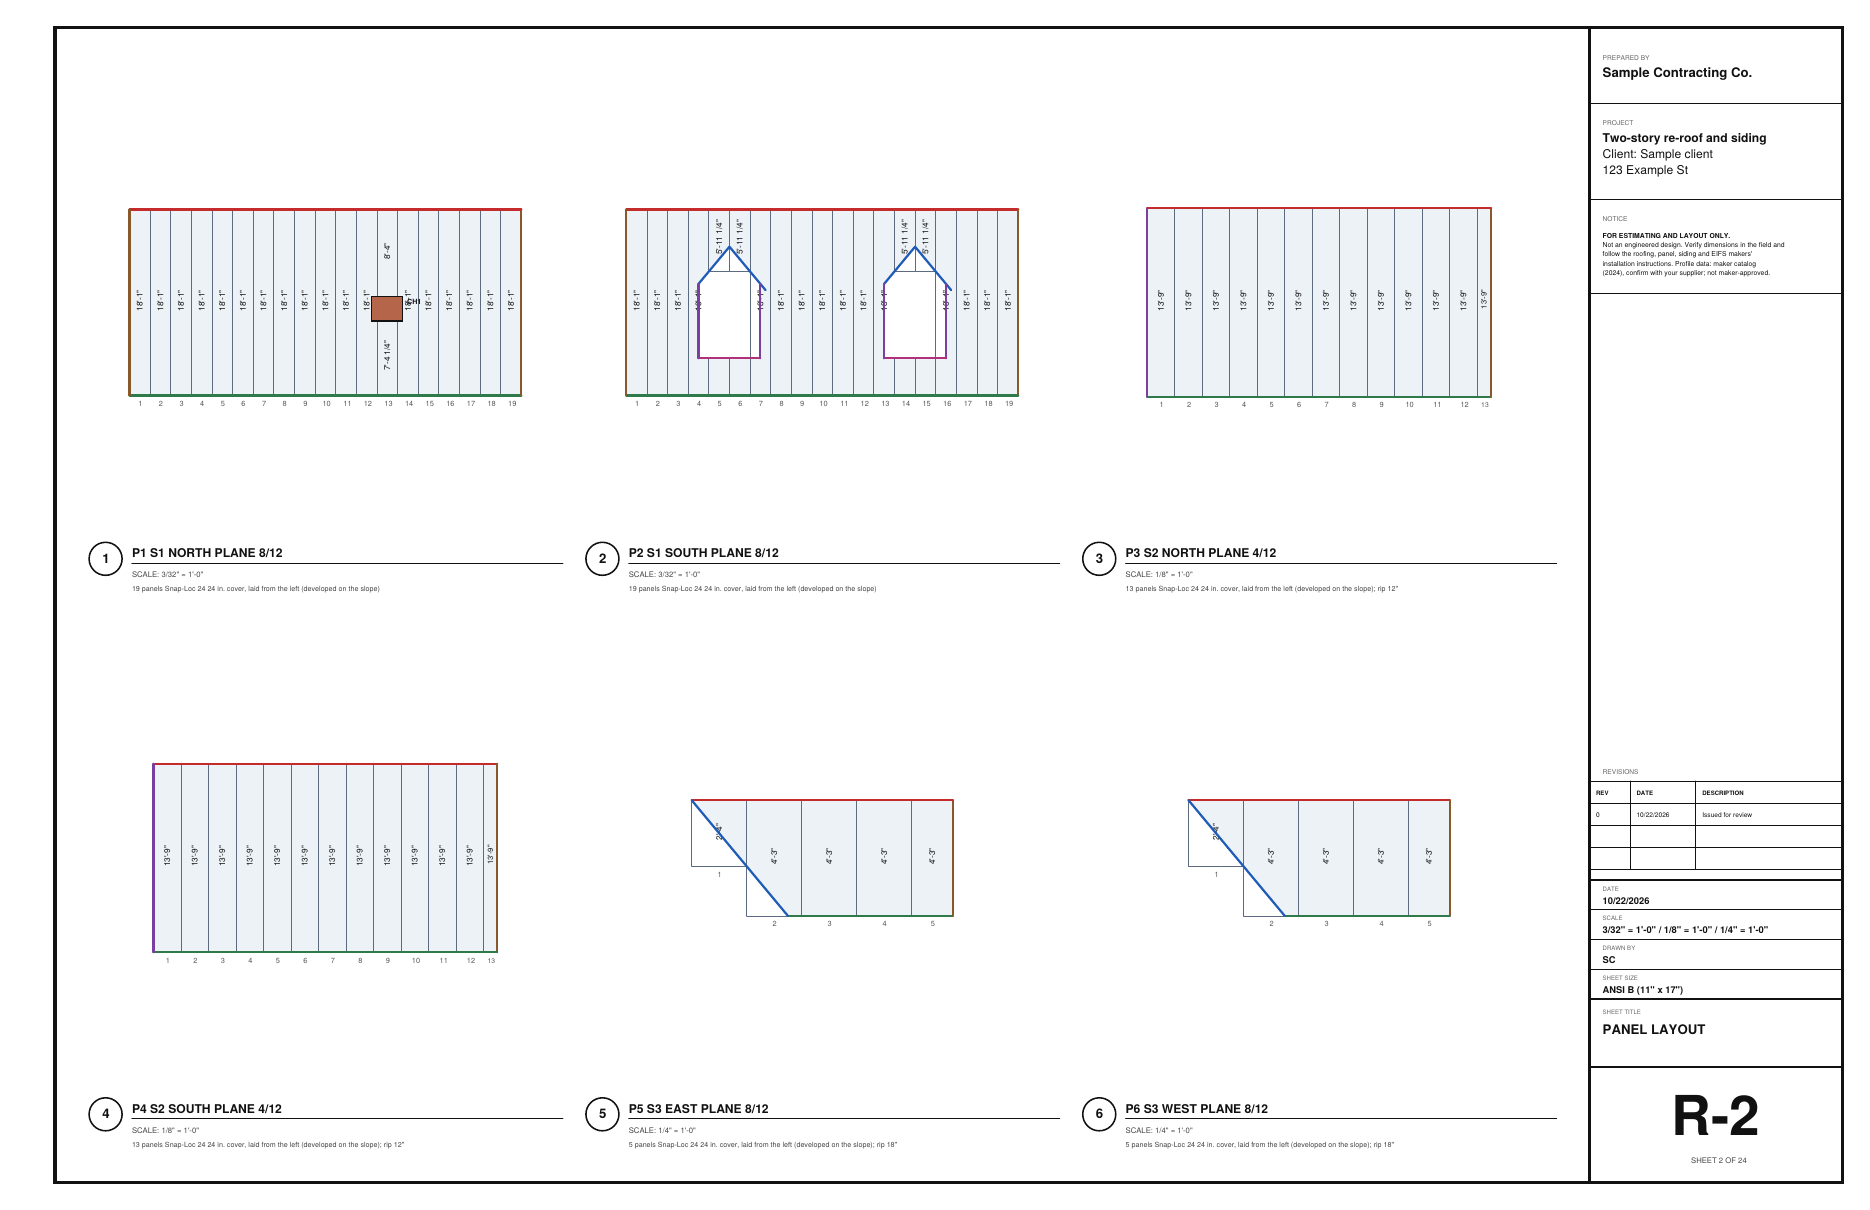
R-2 panel layout: each plane developed flat, every panel's length, the pieces below and above the dormers
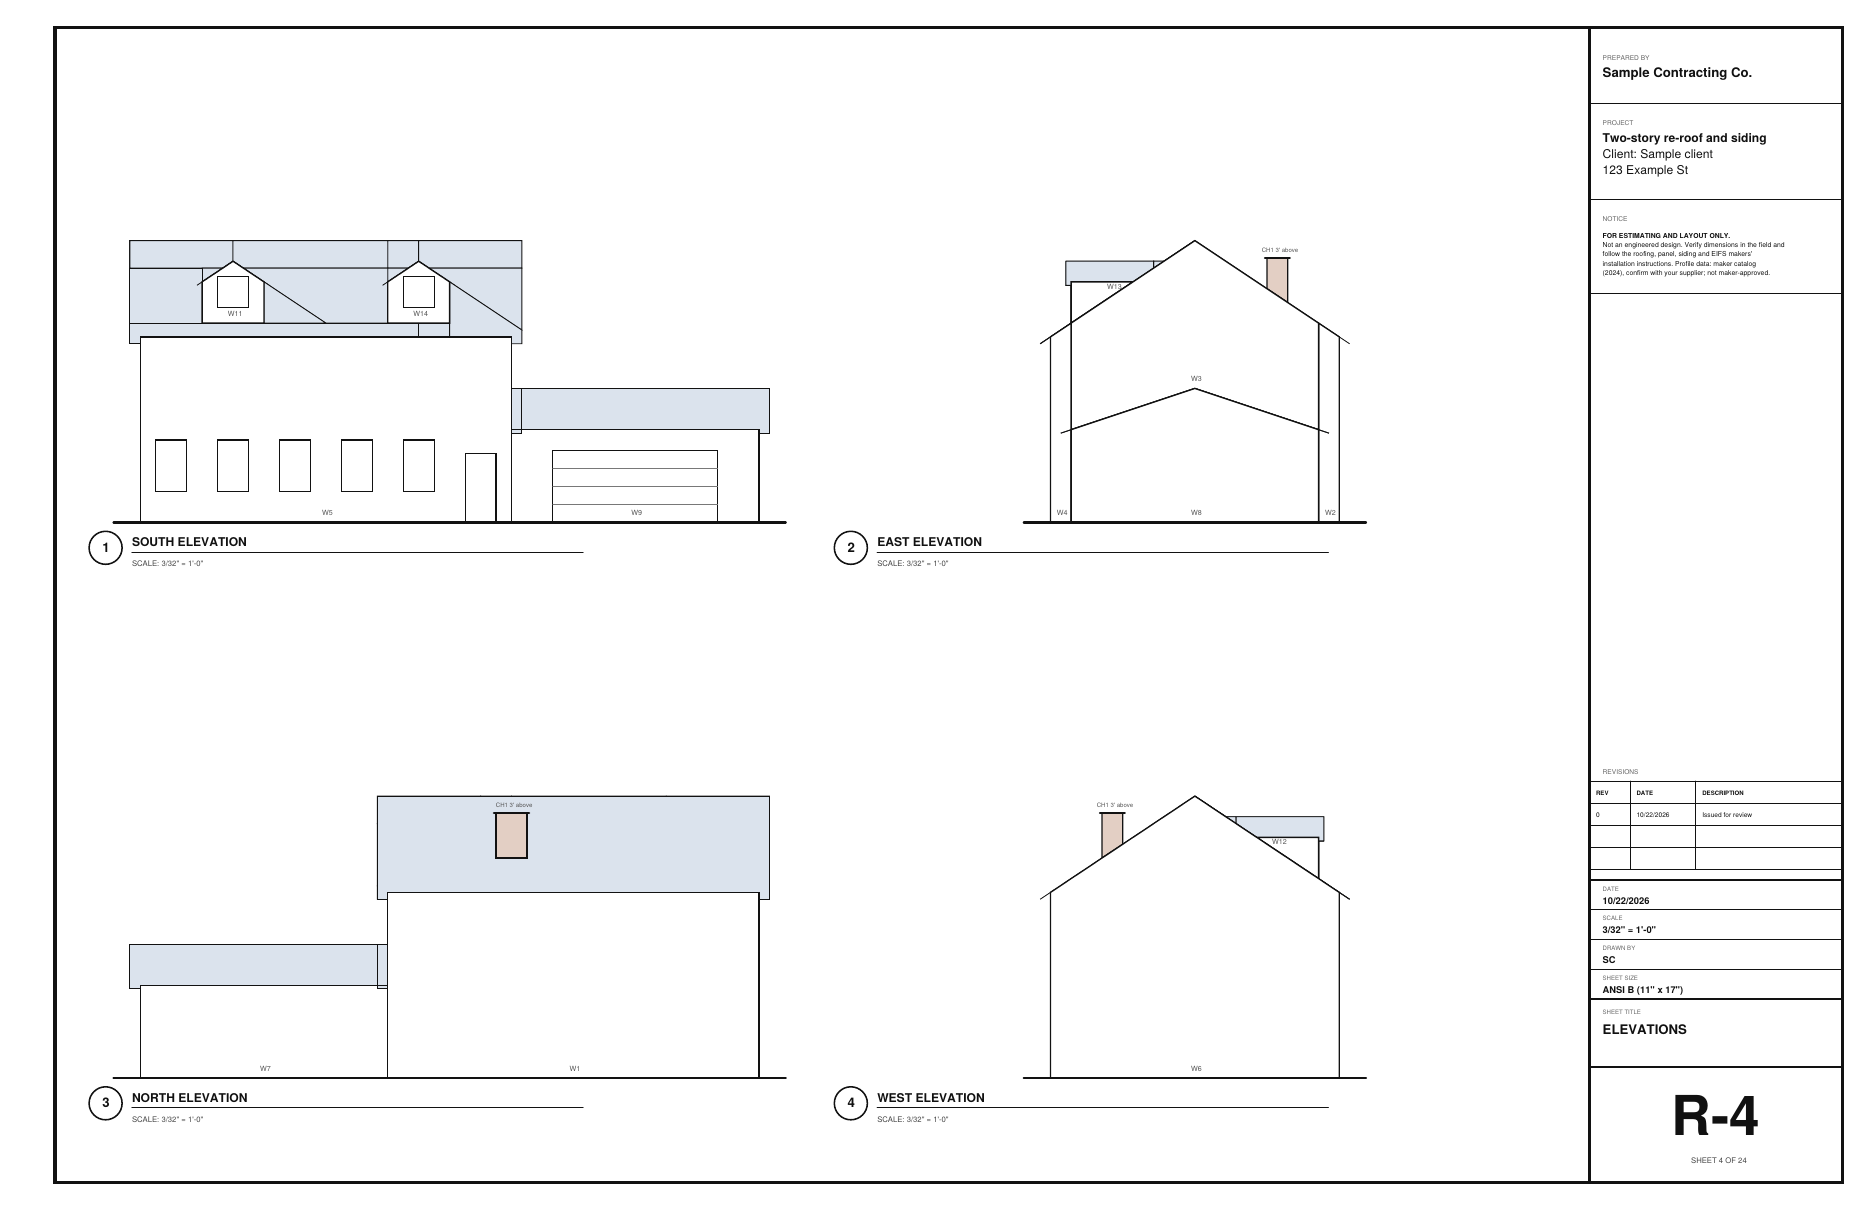
R-4 elevations: walls, gables, dormers, the chimney and the openings at their places
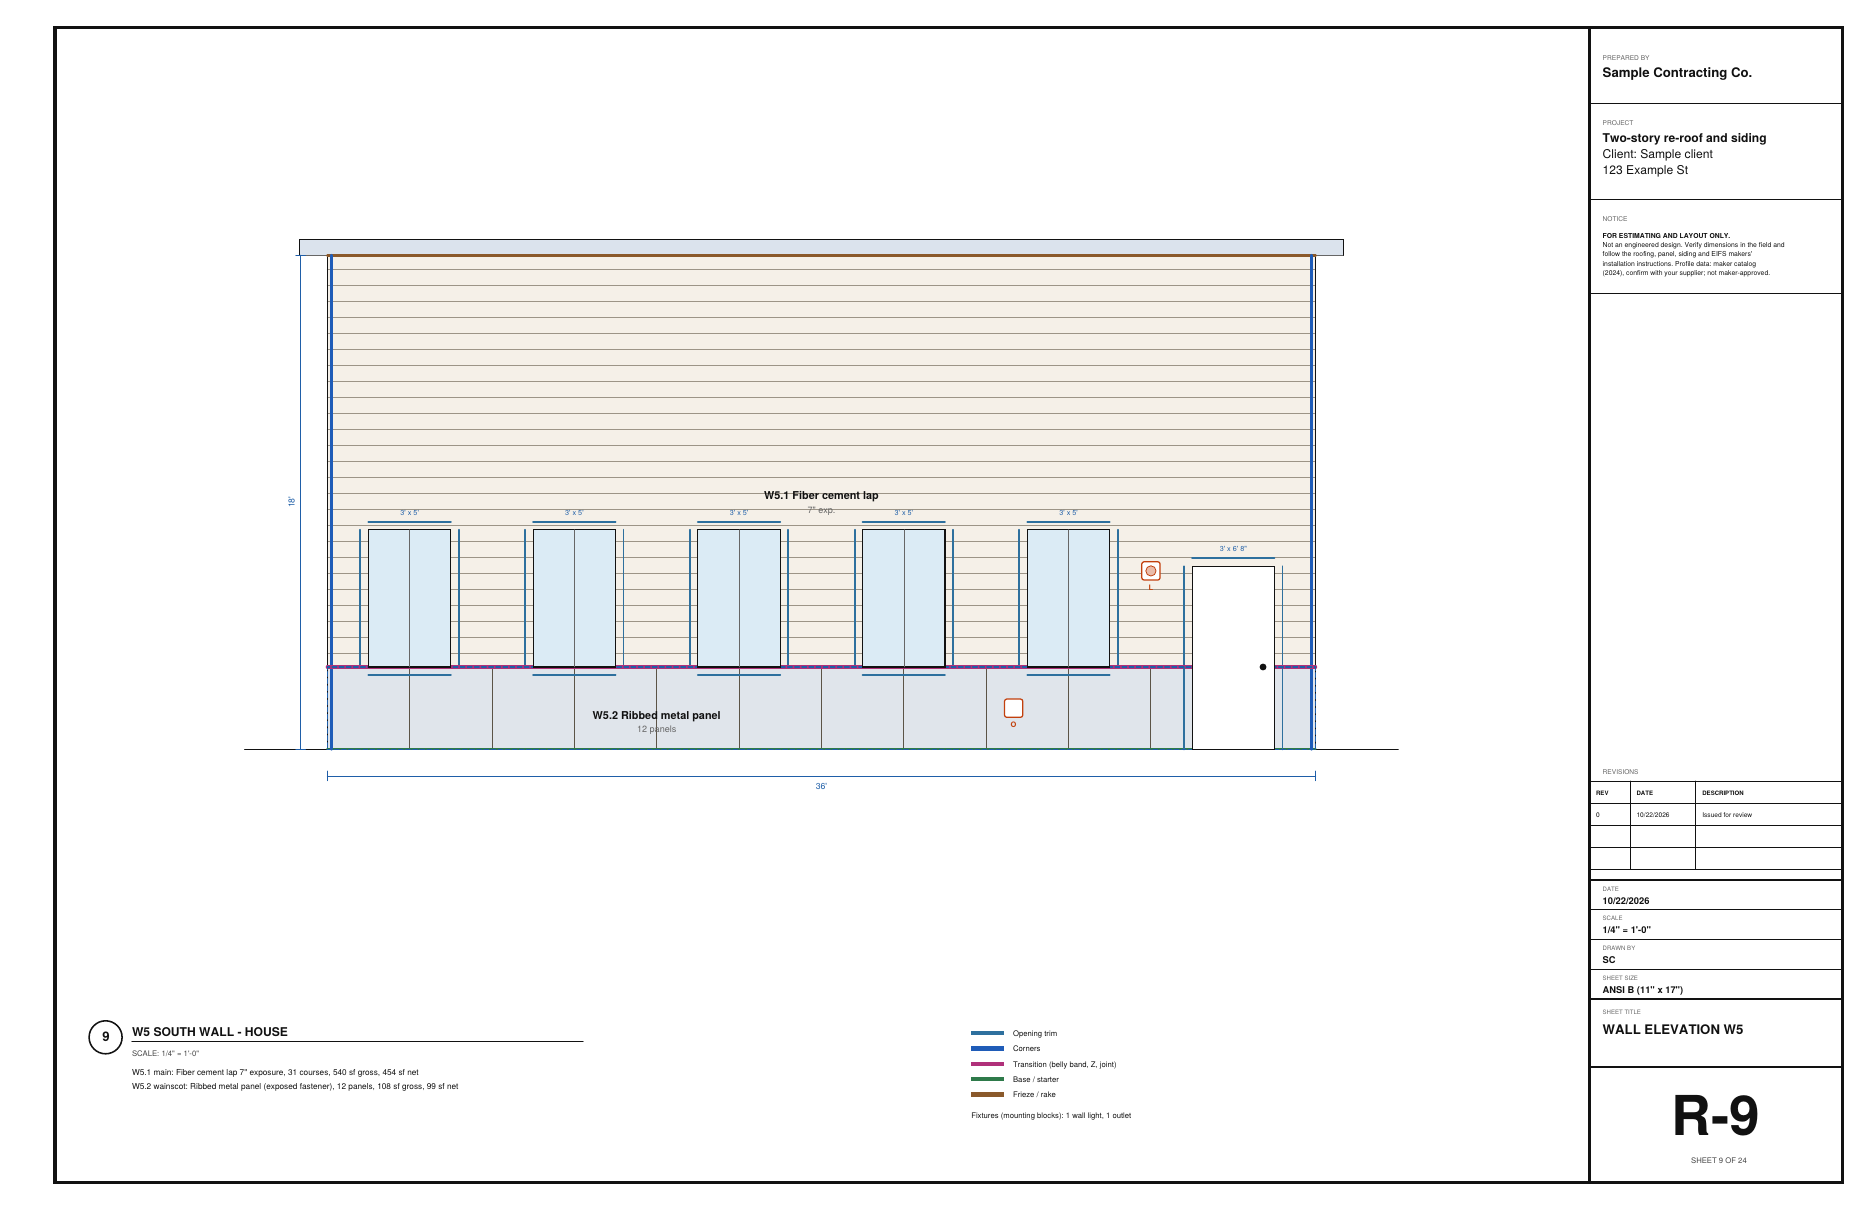
R-9 wall elevation W5: fiber cement lap over a 36″ ribbed metal wainscot, five windows, a door and two fixtures
R-10 wall elevation W6: cedar shakes above the plate, fiber cement below, the belly band between
R-13 wall elevation W9: T1-11 sheets on the garage around the 16′ door
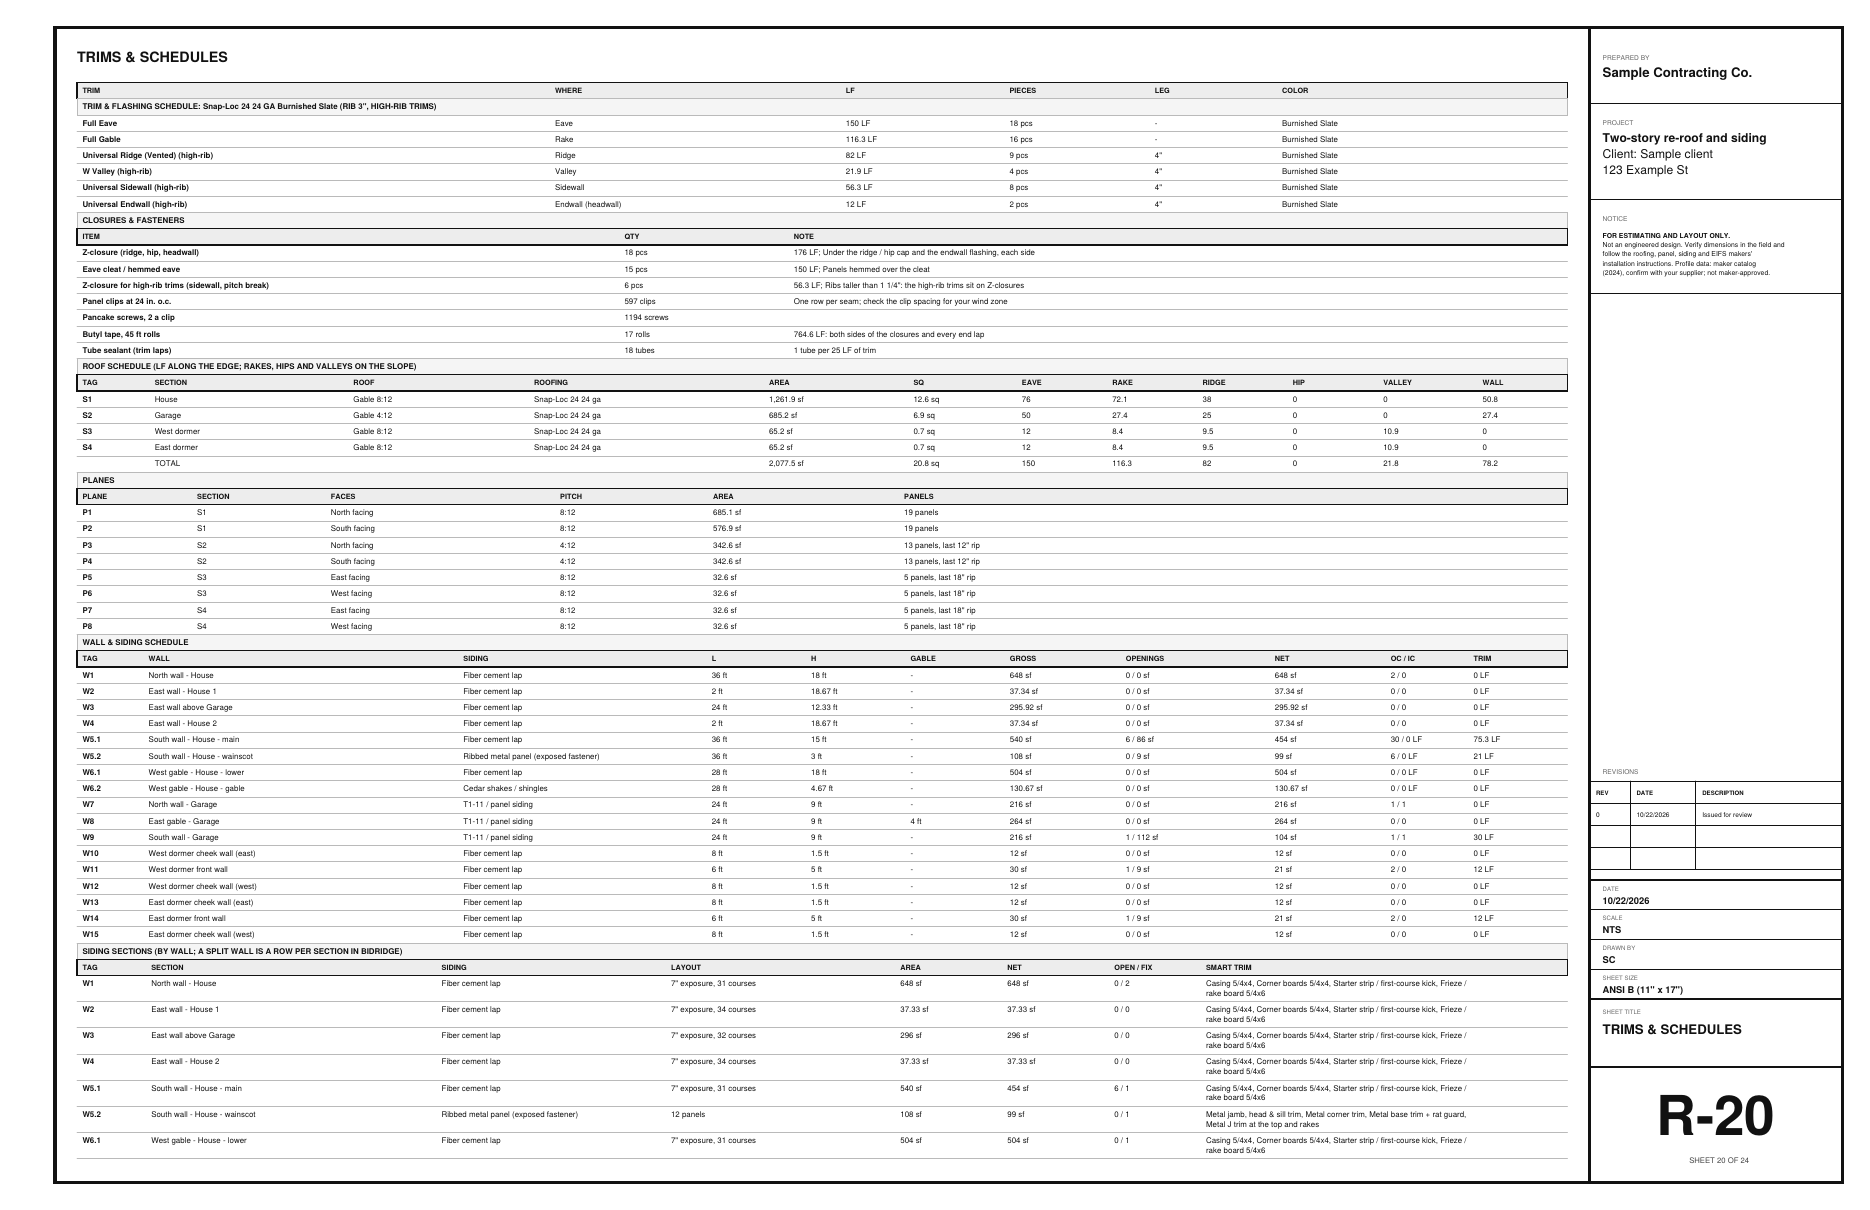
R-20 trims & schedules: trim and flashing with leg sizes, closures and fasteners, roof, plane and wall schedules
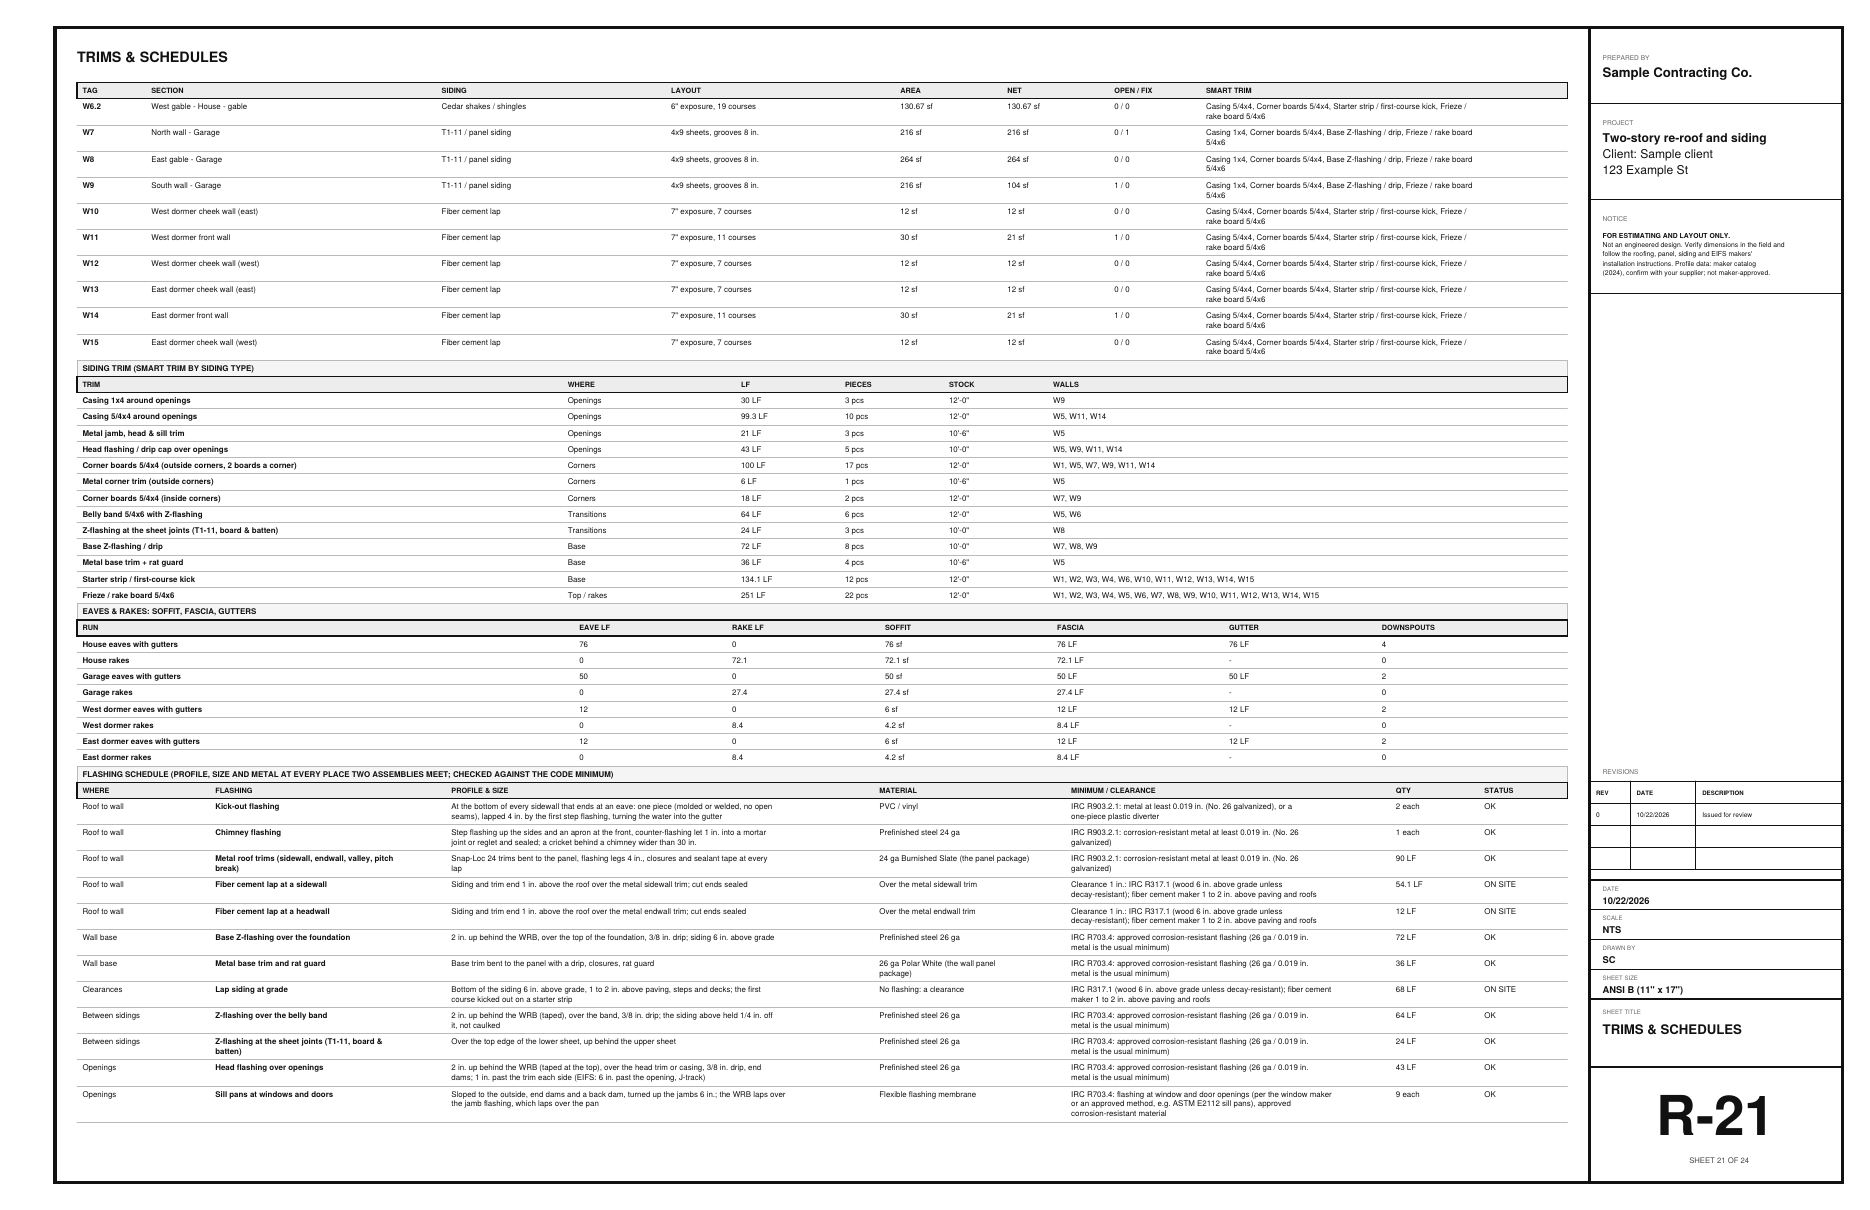
R-21 siding sections and smart trim by type, soffit, fascia and gutters
A 45-degree bay: its edges, Eave or Gable end, curves and Turn it
The round tower in Siding: one curved wall, measured around

The BidRidge quote

Same numbers in the quote

The designer sends its quantities to BidRidge, and BidRidge prices the labor and materials at your rates.

  • Good
    $97,800
  • Better
    $110,500
    Recommended
  • Best
    $124,900
The design and the quote, line by line
ItemIn the designerIn the BidRidge quote
Roof2,077.5 sf, 4 roof rows20.8 squares, 2,078 sf
Ice barrier1,016 sf (Alaska rule)1,016 sf
Metal trim438.3 LF, high-rib438.3 LF
Wall flashing78.2 LF (50.8 house + 27.4 garage)78.2 LF
Siding2,880 sf net, 17 sections, 9 openings28.8 squares, 2,880 sf net
Mounting blocks6 (light, outlet, hose bib, dryer vent, meter, A/C)6 blocks
Soffit, fascia, gutters245.9 sf, 266.3 LF, 150 LF, 10 downspouts246 sf, 266 LF, 150 LF, 10 downspouts

Two-story sample, opened in the BidRidge app at its starting rates: one project, two scopes. Roofing $54,200 / $61,400 / $69,800 and siding $43,600 / $49,100 / $55,100 (Good / Better / Best), added together here. Your rates give your own numbers.

The sample opened as a quote in the BidRidge app: Good, Better and Best prices
The BidRidge app, at its starting rates.

Try it on your own job

Open the sample, change it to your measurements, and send it to a BidRidge quote. Drawing is free; the drawing set, the lists and the quote come with a BidRidge license or the 14-day trial.

In the designer, tap Open project and pick the sample file. It opens exactly as in the video.

Sample designs: names, sizes and clients are made up. Prices are BidRidge's starting rates; set your own. The designers check against common guidelines (IRC, NKBA and the makers' published numbers) to help you catch mistakes. They don't replace your building department or the manufacturer's installation instructions: verify with them.