BidRidge › Designers › Guide › Chapter 8

Chapter 8 · Concrete DesignerBeta

Shop slab and drive

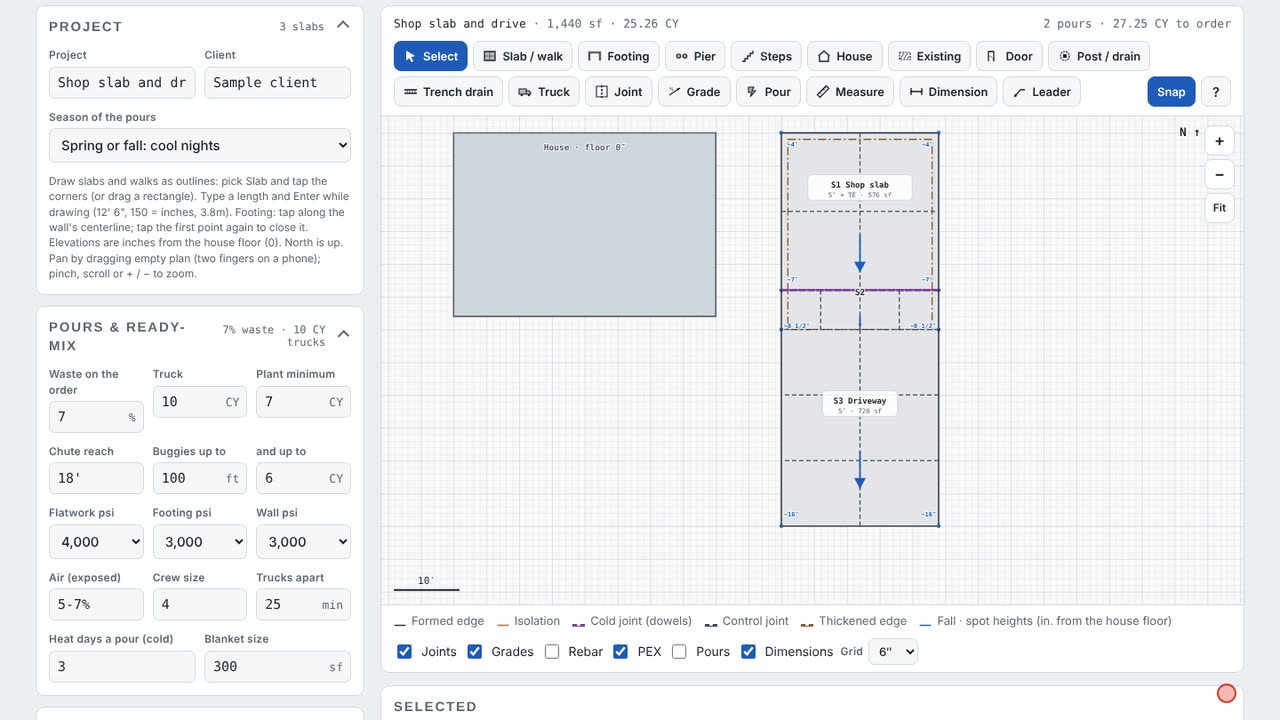
We draw a 24 × 24 shop slab with thickened edges and radiant tubing, a 6′ apron and a 24 × 30 driveway, and let the designer lay out the joints, the grades, the bar list and the pours. Then we print the drawing set with a ready-mix order for each pour, update the BidRidge job it was opened from, and look at a second sample with steps and a curved patio.

In the designer, tap Open project and pick the sample file. It opens exactly as in the video.

Narrated walkthrough, 2:31. Captions on.

The sample in numbers

  • Flatwork
    1,440 sf
    3 slabs · 5″ · thickened edges
  • Concrete
    25.26 CY
    27.25 CY to order in 2 pours · pumped
  • Rebar
    844 lb
    67 #4 × 20′ · laps 40d · 80 chairs
  • Radiant PEX
    588 LF
    2 loops of 294′ · 1 manifold
  • Joints
    168 LF
    12′ 6″ apart at most at 5″ · 24 LF dowelled
  • Quote
    $40,500
    Better, at the starting rates

Step by step

Step 1: Draw the shop slab in the Concrete Designer
  1. Slab / walk tool
  2. Shop slab 24′ × 24′, 5″, #4 @ 18″

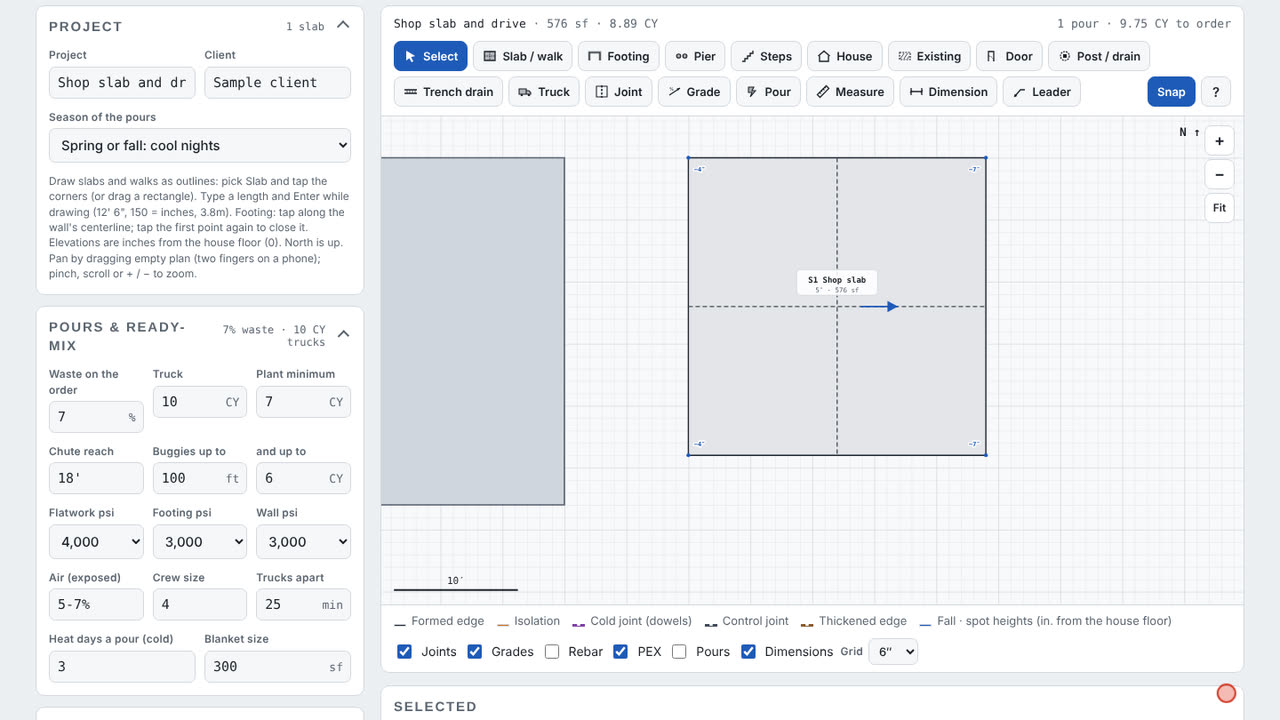
Step 1: Draw the shop slab

Pick Slab / walk and drag a rectangle beside the house, then type its corners in the corner table: 24′ by 24′. Set the type to Garage / shop slab. It starts 5″ thick with a #4 rebar grid at 18″ each way.

Field tip: Sizes take 24', 24-0 or 288. Heights are inches from the house floor.
Step 2: Thicken the edges in the Concrete Designer
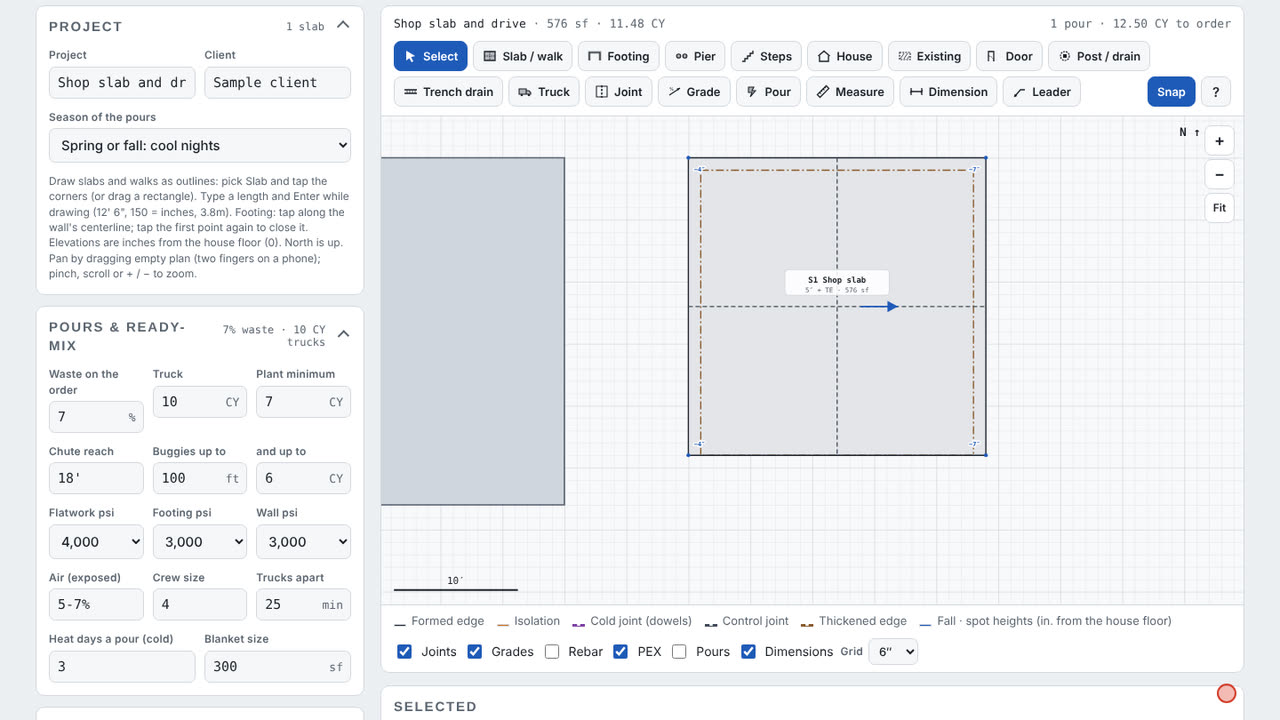
  1. Thickened edge 12″ × 12″ (north, east, west)
  2. The door side stays plain

Step 2: Thicken the edges

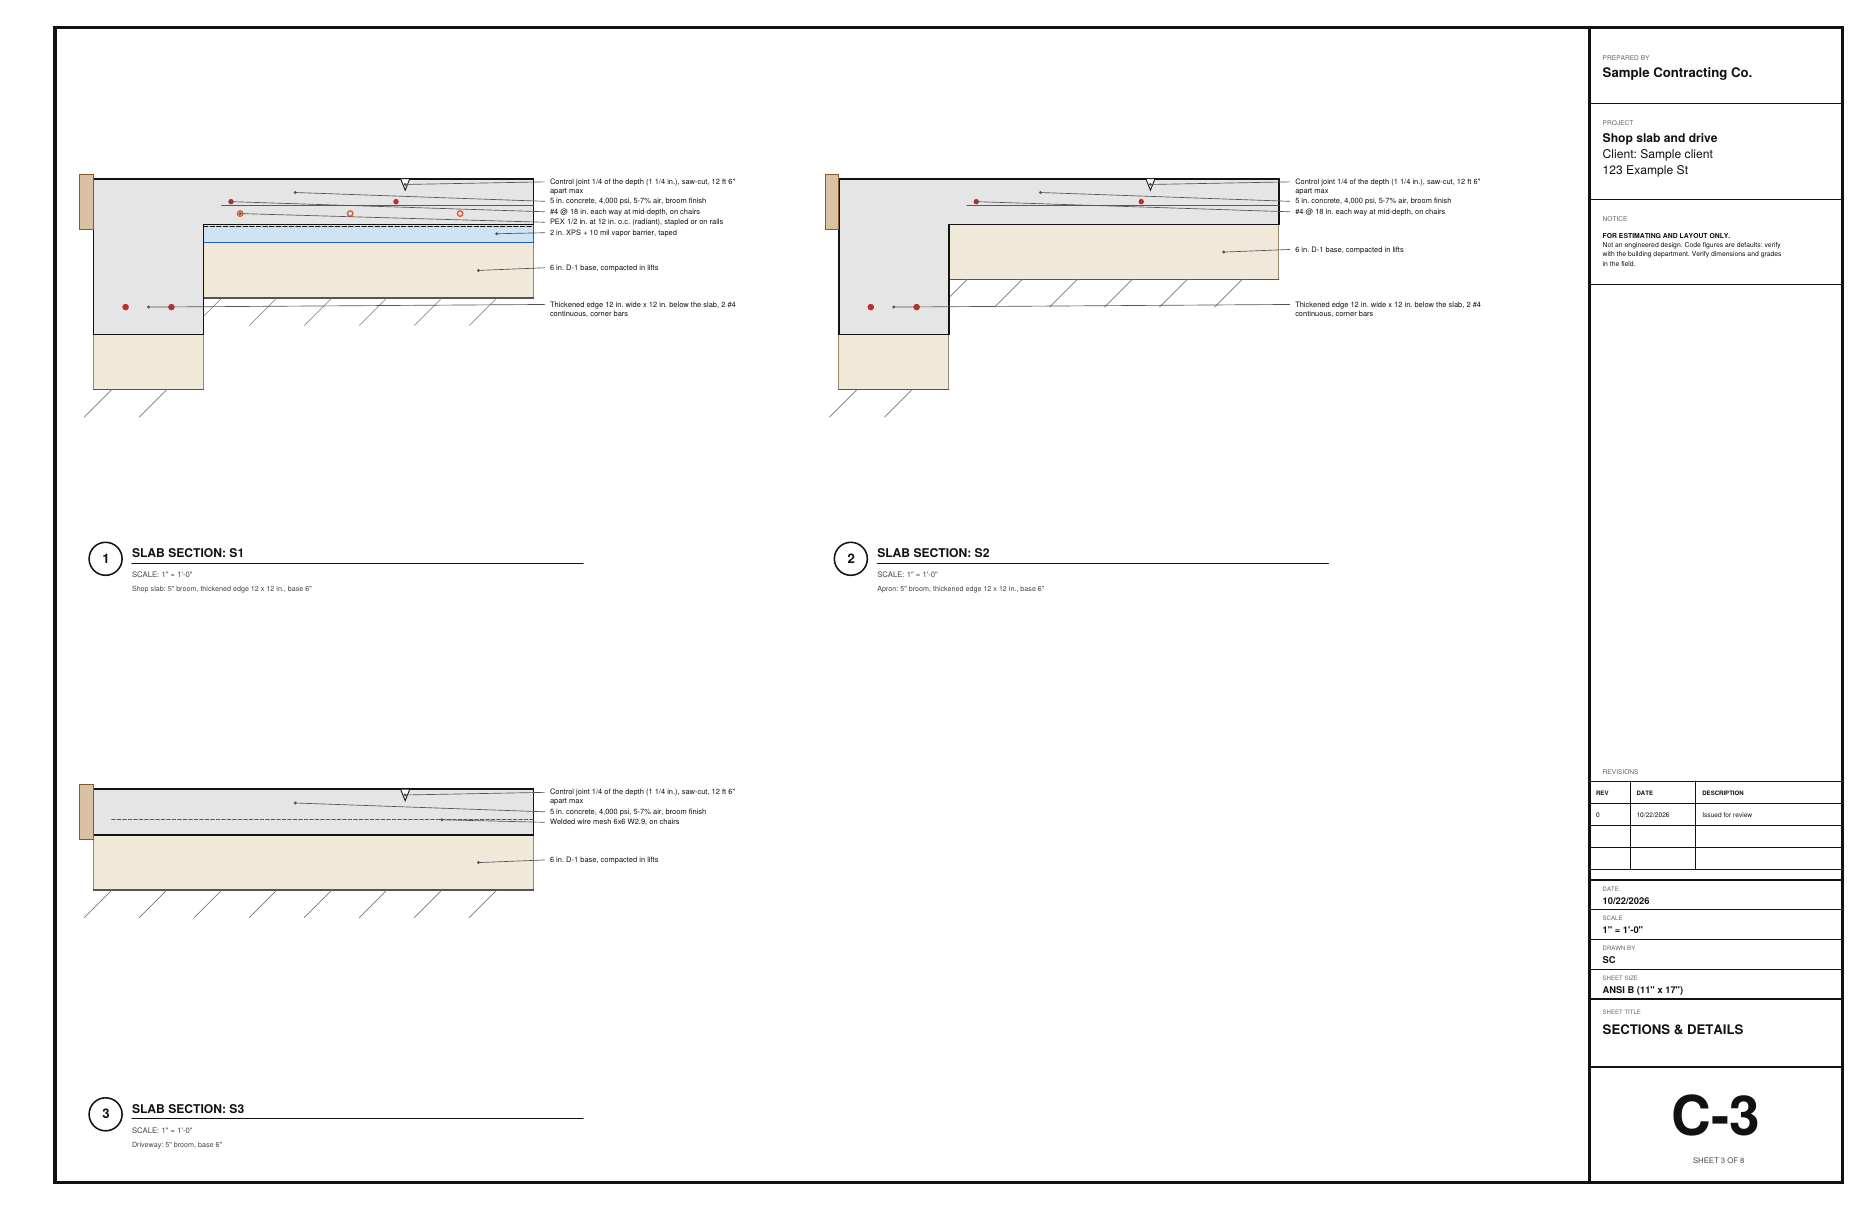
Tick the north, east and west edges under Thickened edges: 12″ wide and 12″ deeper than the slab, with two #4 bars and corner bars. The concrete goes from 8.89 to 11.48 CY.

Field tip: The door side stays plain where the apron meets it.

Step 3: Add the apron and the driveway in the Concrete Designer
  1. Cold joint with dowels: 24 LF
  2. Control joint: one pour

Step 3: Add the apron and the driveway

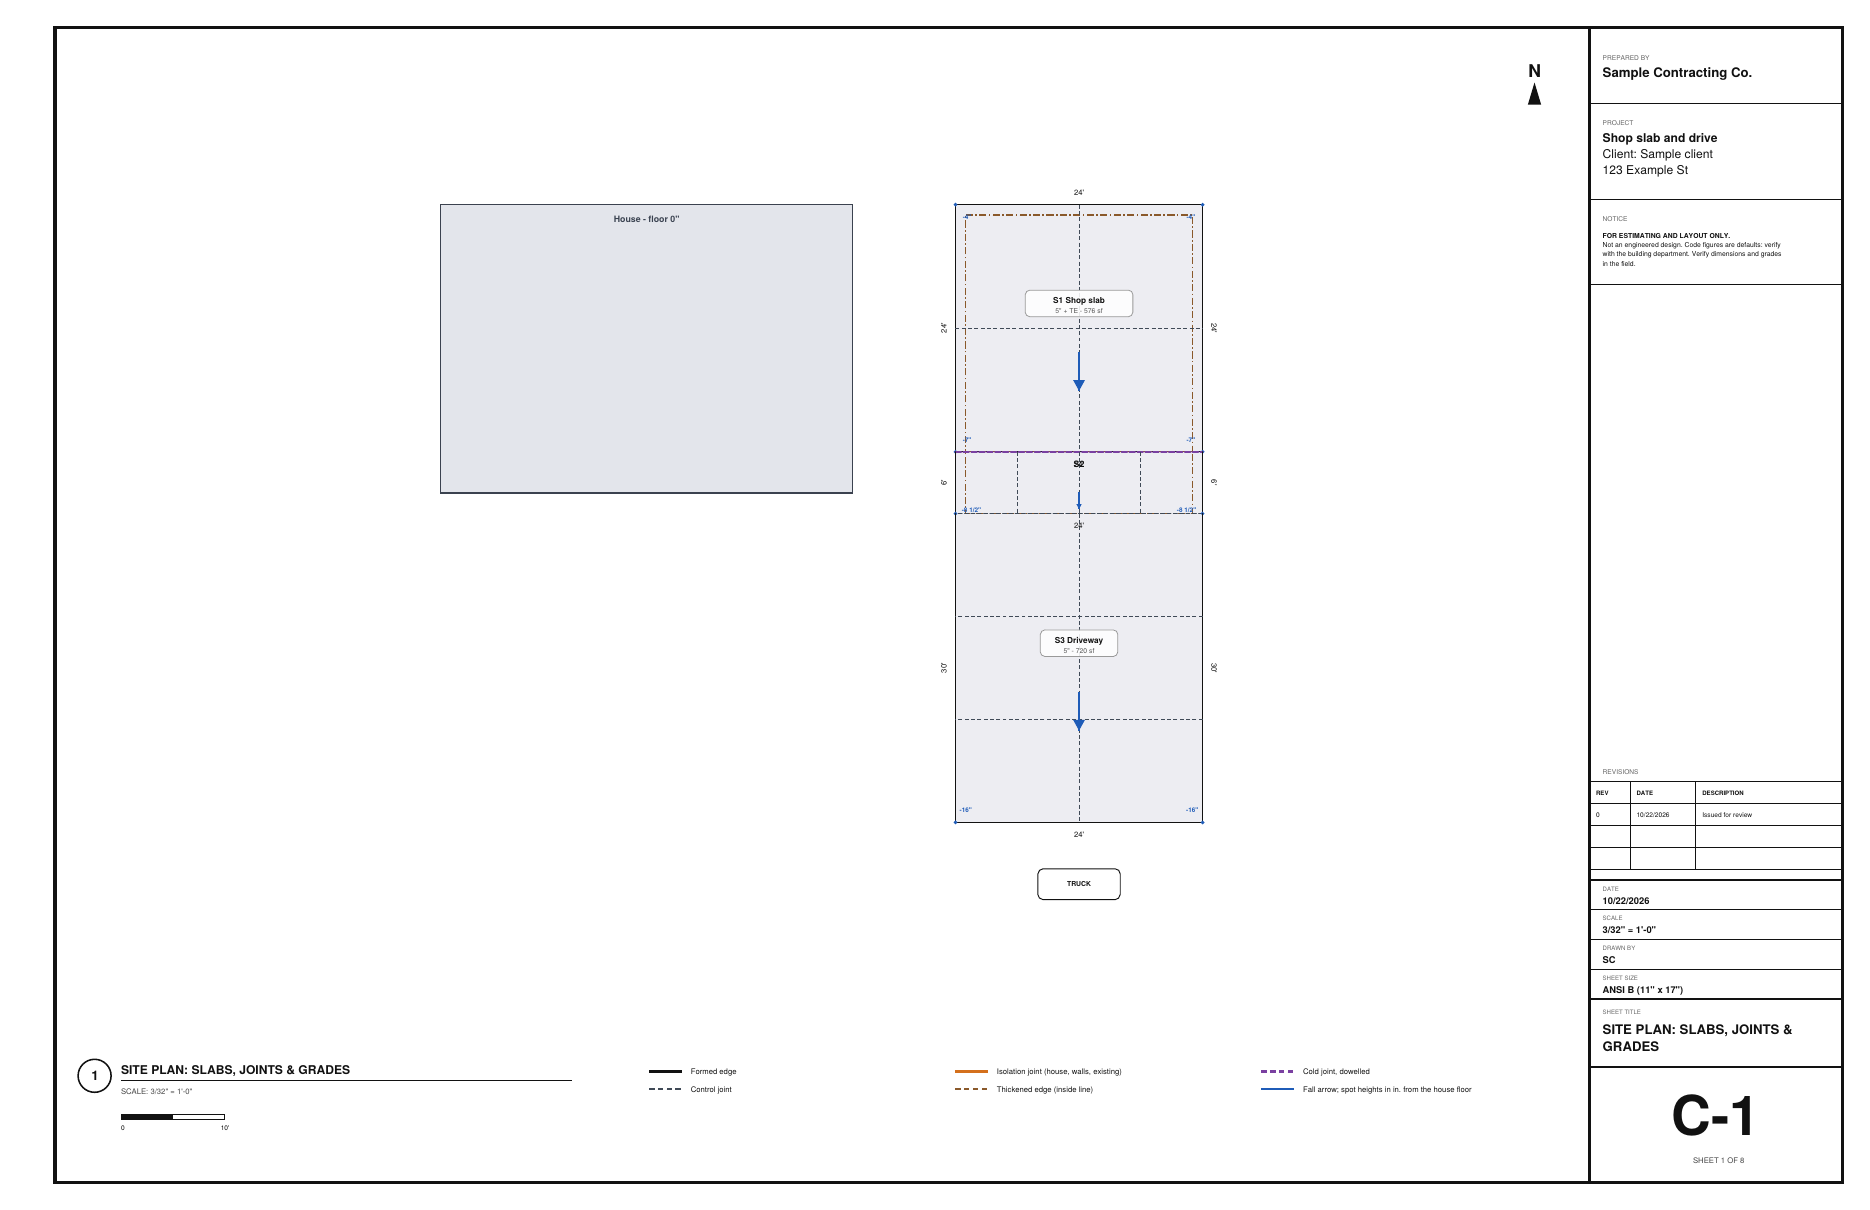
Draw the 6′ apron and the 24 × 30 driveway below it. The apron is poured after the shop slab, so the joint between them is a cold joint with 24 LF of dowels. The apron and the driveway go in one pour, with a control joint between them.

Step 4: Check the joints in the Concrete Designer
  1. Joints 12′ 6″ apart at most (5″ slab)
  2. Panels close to square, lined up across the slabs
  3. Joint tool

Step 4: Check the joints

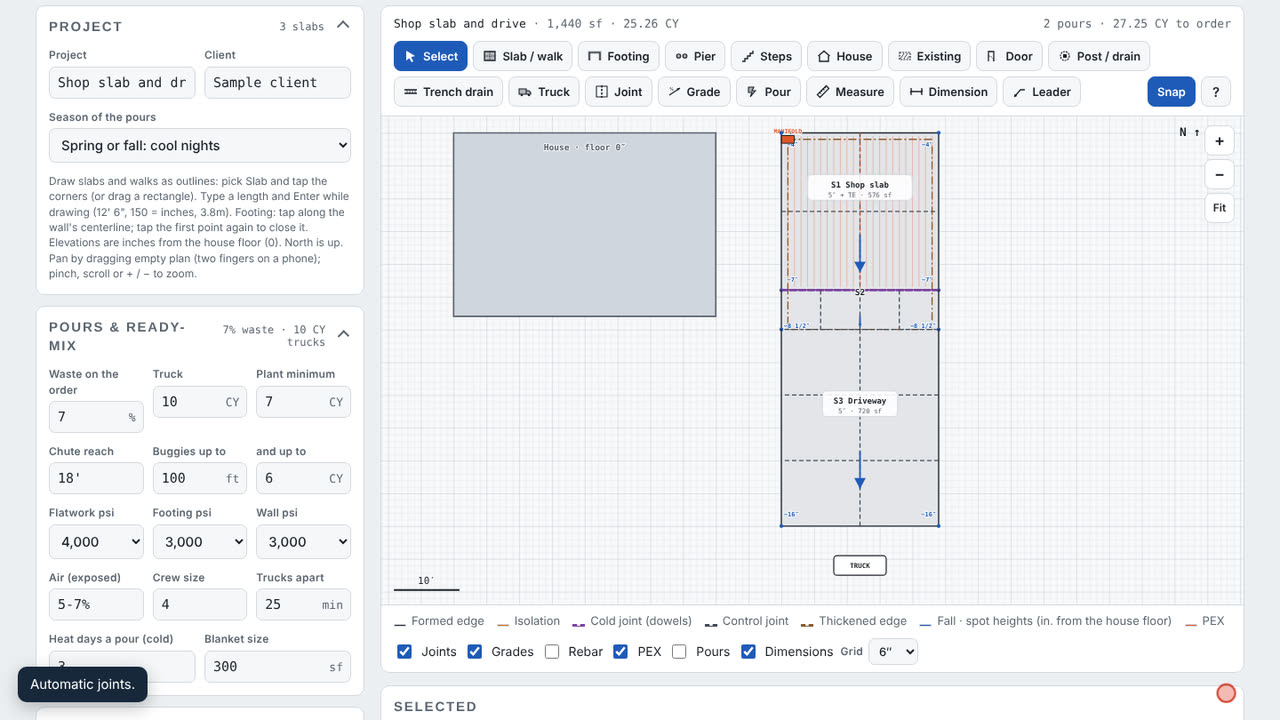
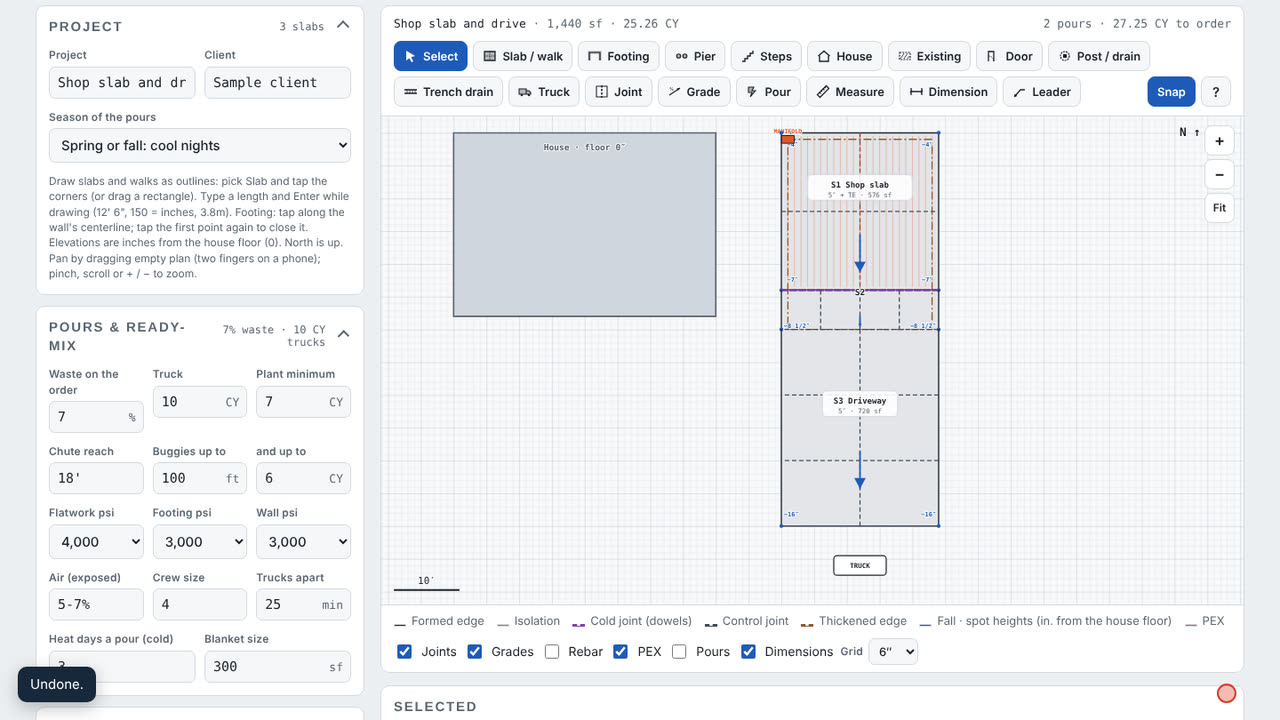
Joints are laid out for you: 2.5 times the thickness in feet, so 12′ 6″ at most at 5″, panels close to square, lined up across the slabs. Drag a joint to move it, or pick Joint to add one. Move one too far and the panel gets flagged; Back to automatic resets them.

Field tip: Joints are saw-cut a quarter of the slab deep. Switch to tooled joints on the slab.

Step 5: Set the grades in the Concrete Designer
  1. Shop: 1/8″ per ft to the door
  2. Apron and drive: 1/4″ per ft
  3. Spot heights from the house floor
  4. Grade tool

Step 5: Set the grades

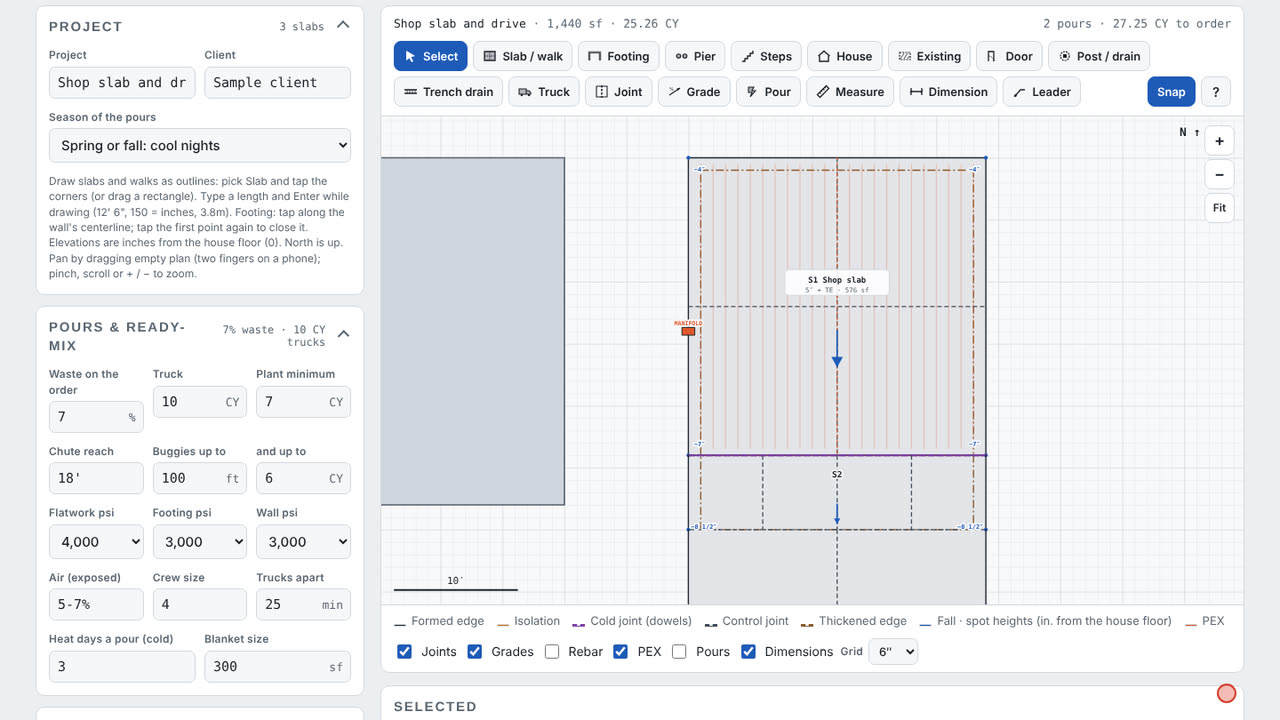
The shop falls 1/8″ per foot to its door, and the apron and driveway carry on at 1/4″ per foot. Spot heights show at the corners. Pick Grade and drag on a slab to change its fall.

Field tip: A slab that falls toward the house is flagged, with a one-tap fix.

Step 6: Lay the radiant tubing in the Concrete Designer
  1. PEX at 12″: 2 loops of 294′
  2. Manifold

Step 6: Lay the radiant tubing

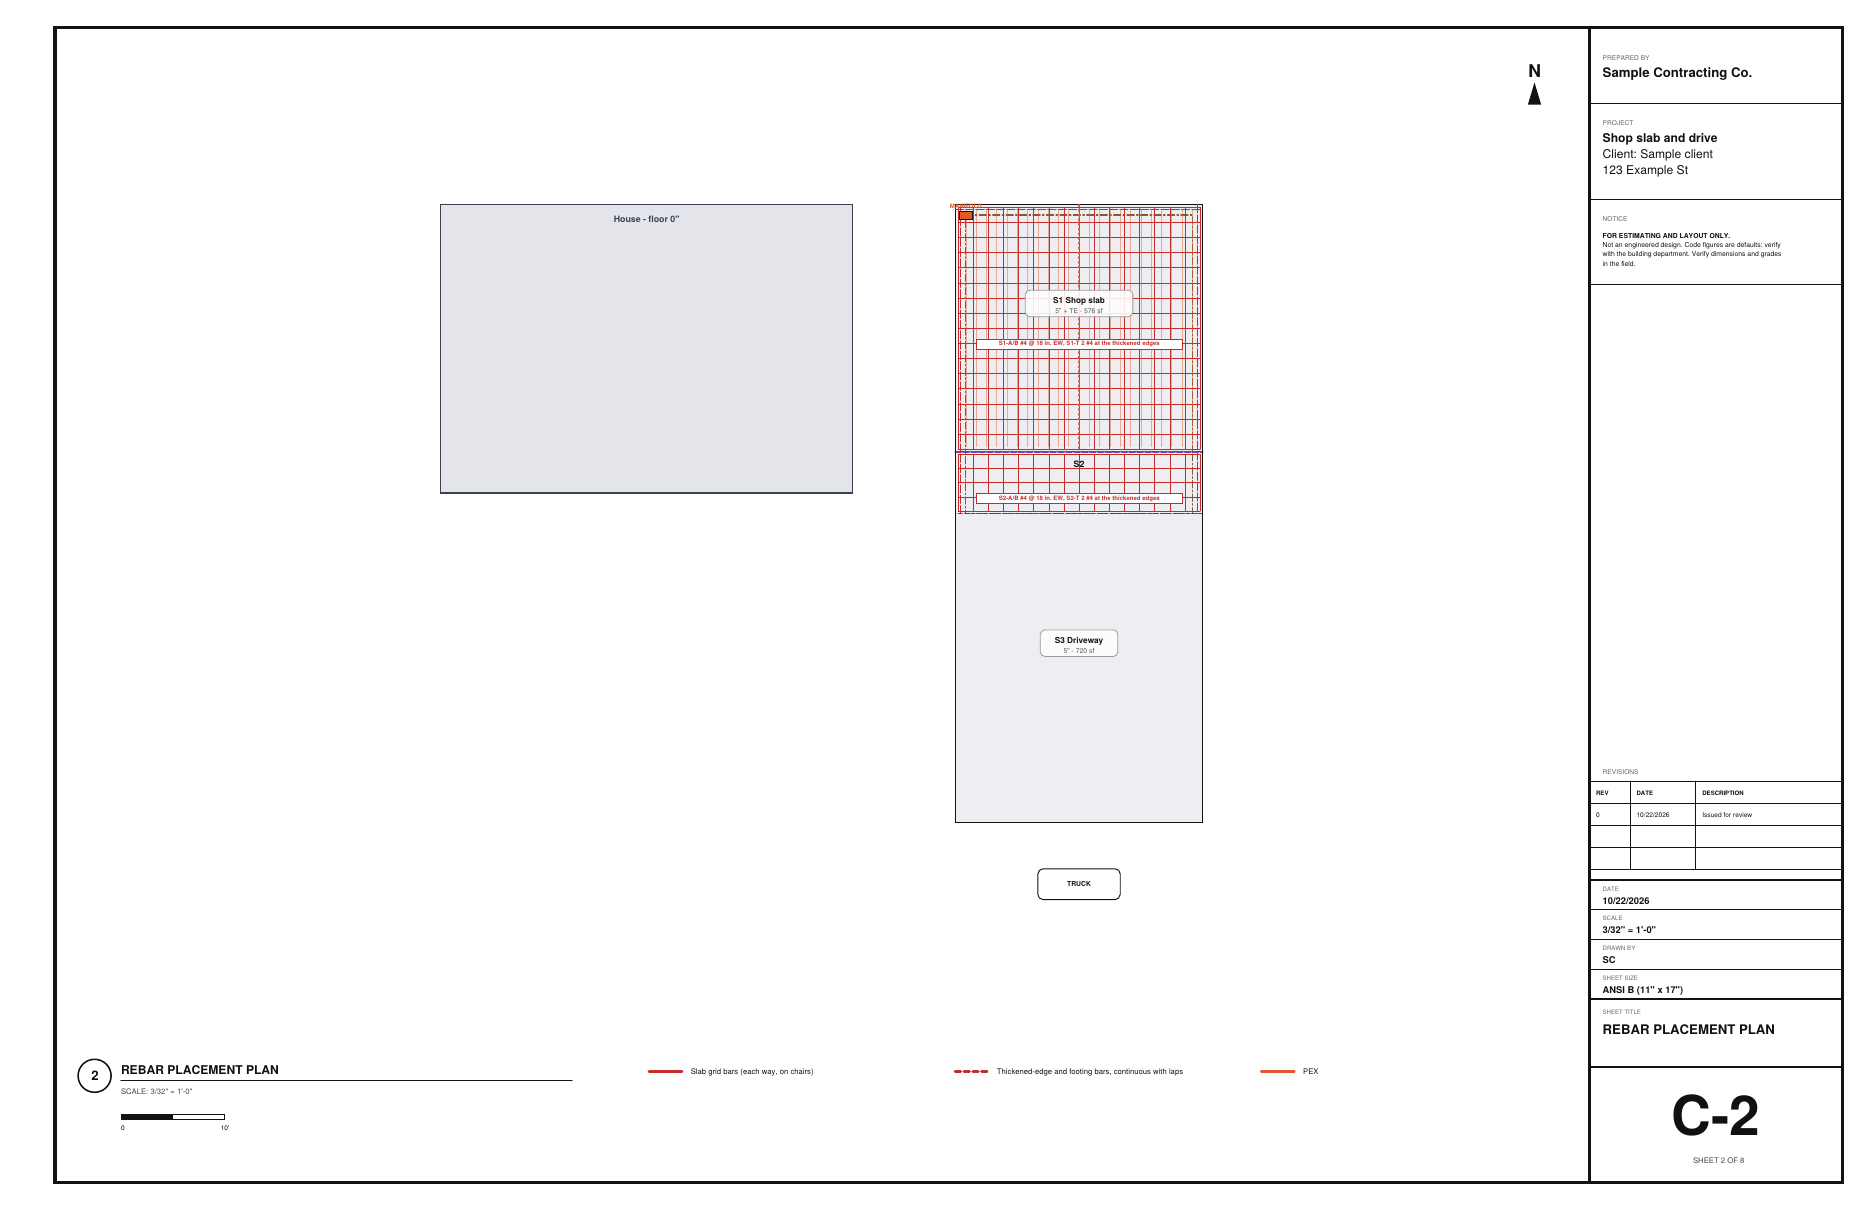
Tick Radiant PEX in this slab at 12″. That is 576 LF in the slab plus a leader to the manifold for each loop: 2 loops of 294 feet and 1 manifold. The slab is insulated under, so 2″ XPS and a vapor barrier go on the buy list too.

Step 7: Plan the pours in the Concrete Designer
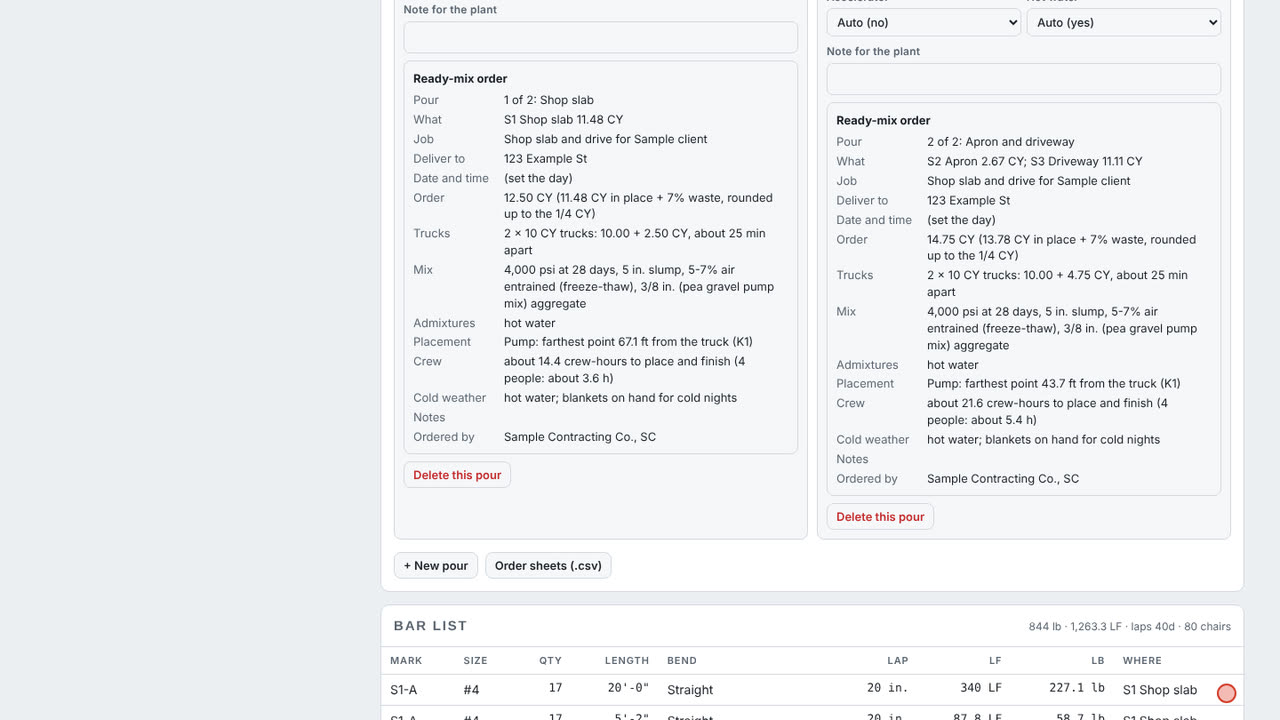
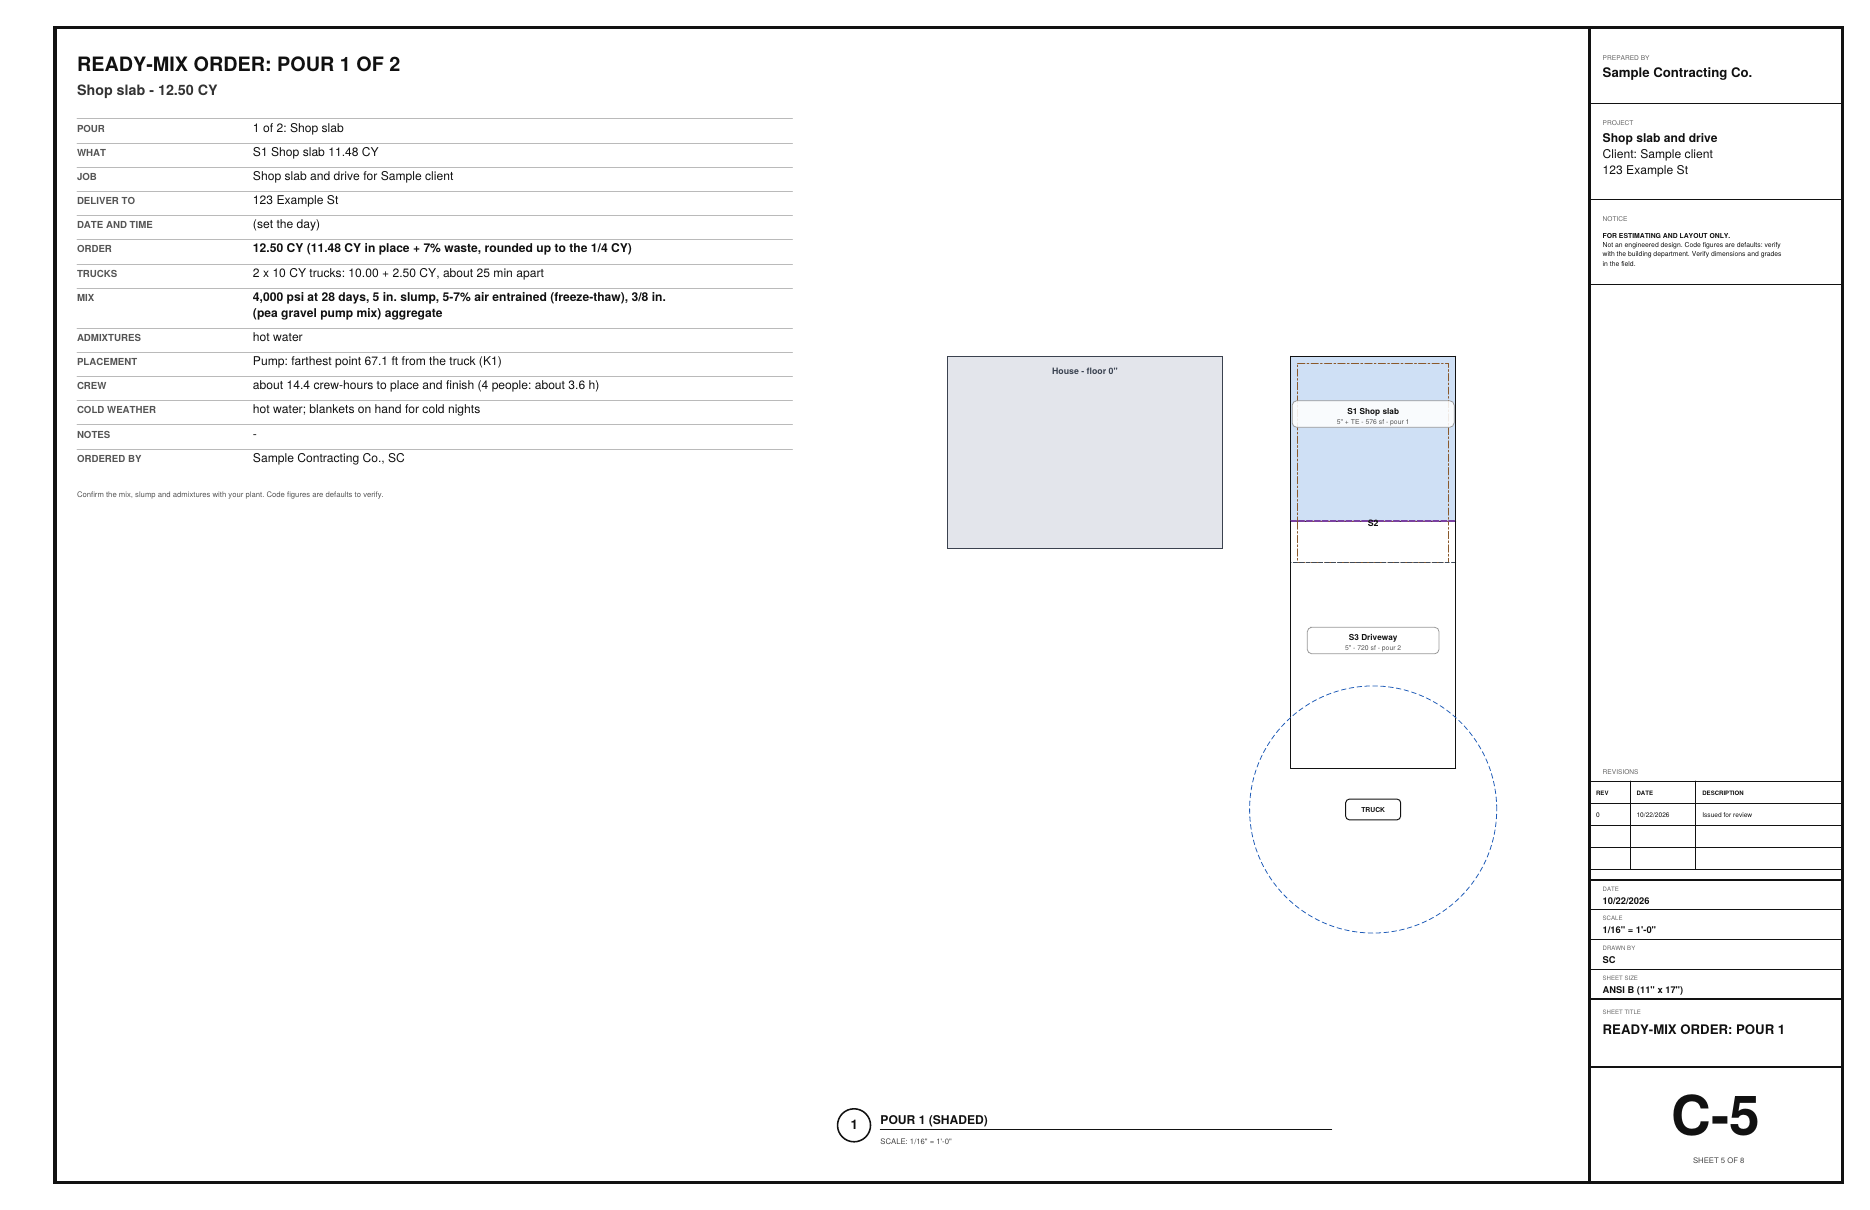
  1. Pour 1: 12.50 CY, 2 trucks
  2. 4,000 psi, 5–7% air (freeze-thaw)

Step 7: Plan the pours

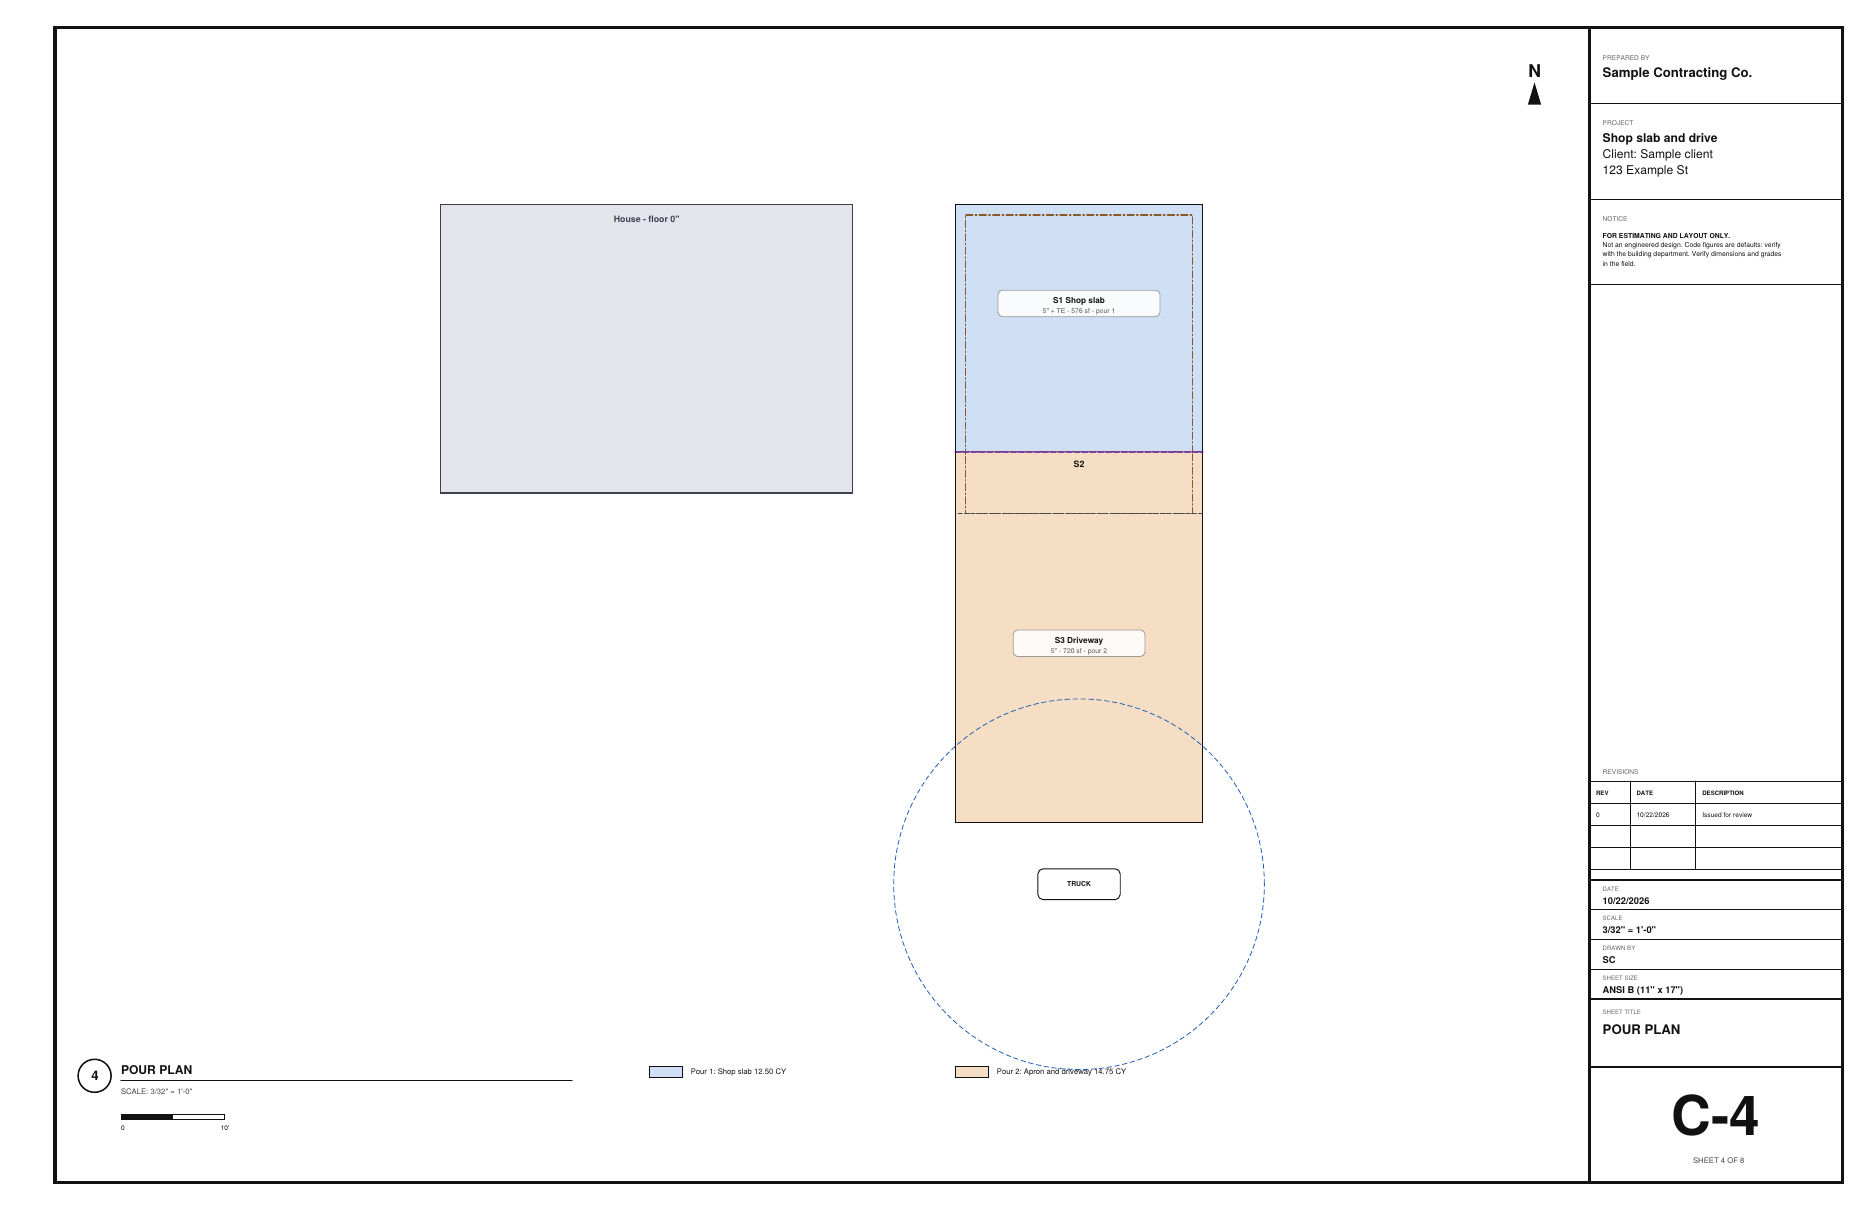
Mark where the truck parks. Each pour gets its yards with waste, rounded up to the 1/4 CY, the trucks, and a chute, buggies or a pump by the reach. Here both pours are pumped: 12.50 and 14.75 CY of 4,000 psi with 5 to 7% air.

Field tip: Each pour prints its own ready-mix order sheet for the plant.

Step 8: Print the drawings and the bar list in the Concrete Designer
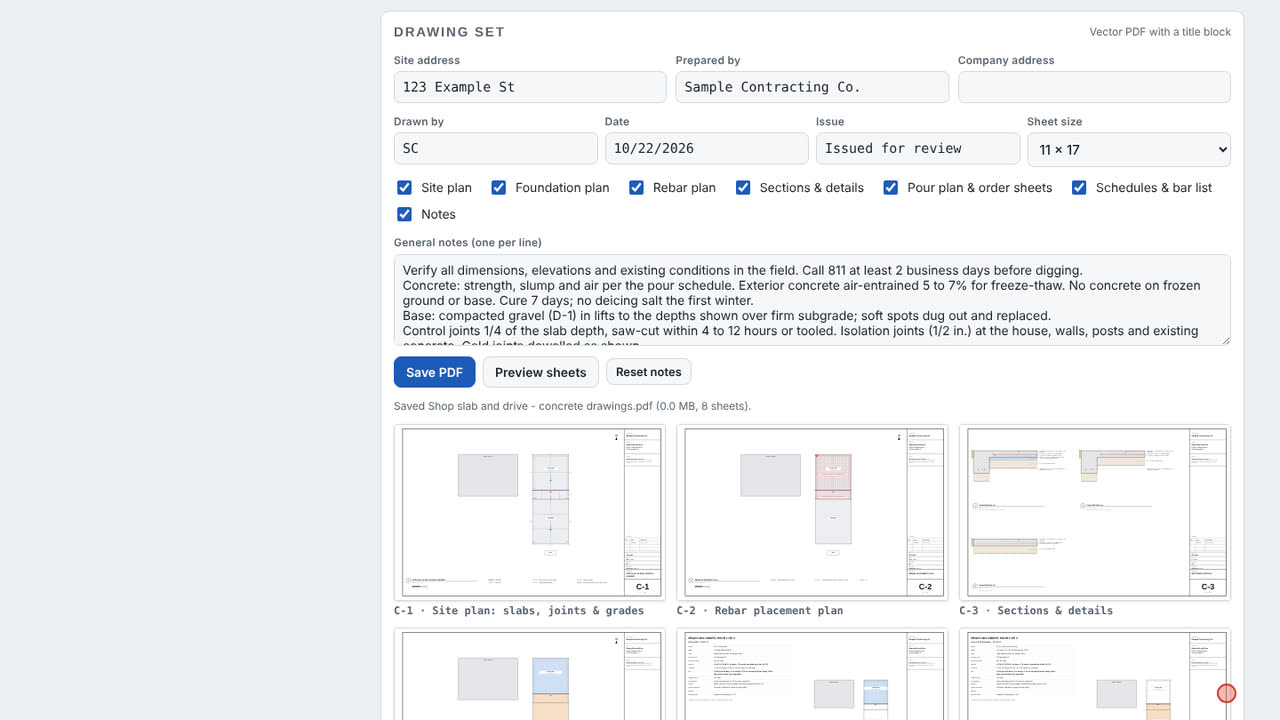
  1. Save PDF: 8 sheets
  2. A ready-mix order per pour
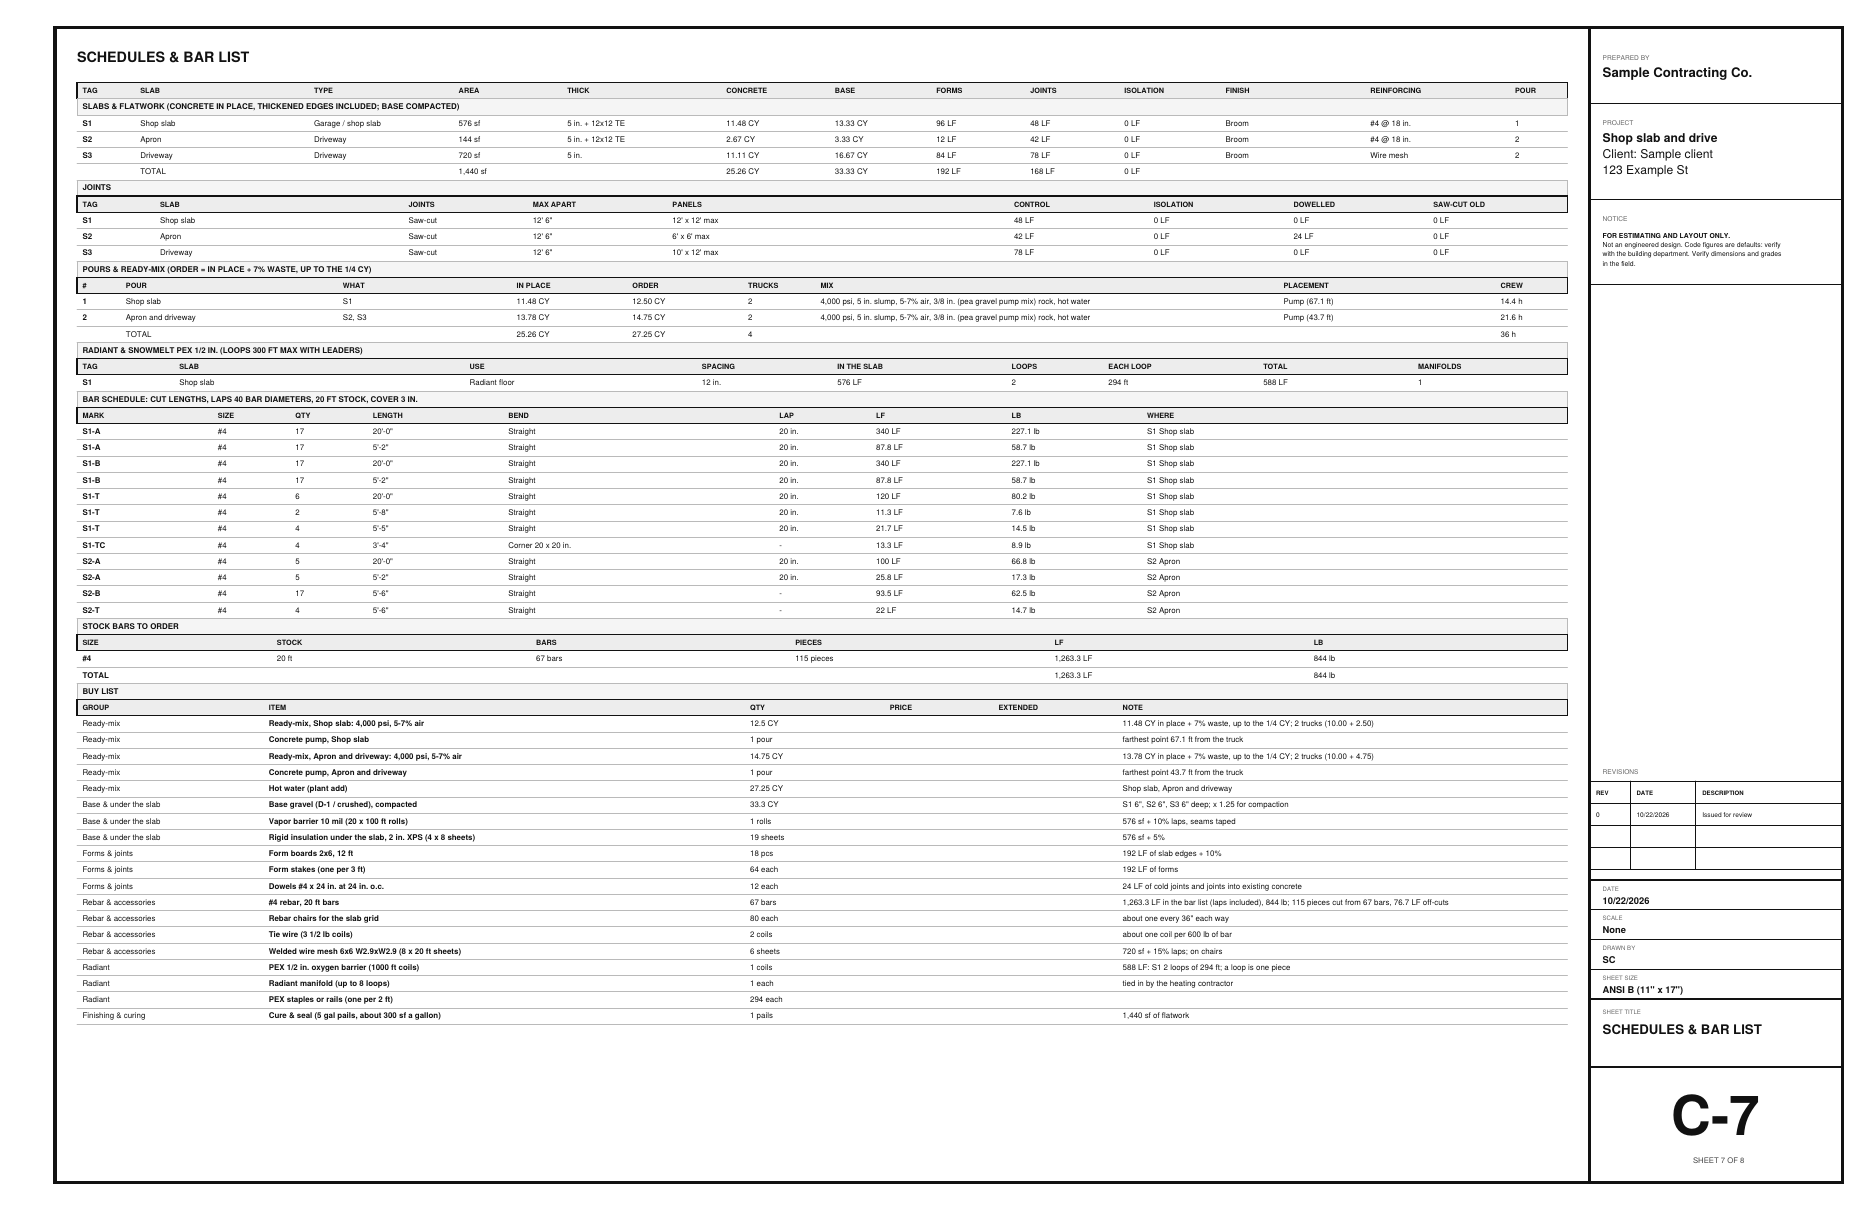
  3. Schedules with the bar list

Step 8: Print the drawings and the bar list

Save PDF makes the site plan with joints and grades, the rebar placement plan, the slab sections, the pour plan, a ready-mix order for each pour, the schedules with the bar list and the stock bars to order, and the notes.

Field tip: Bar sizes and spacing are defaults to verify, with an engineer where the job calls for one.

Step 9: Update the BidRidge job in the Concrete Designer
  1. Priced at your rates: Good, Better, Best
  2. Better (recommended)

Step 9: Update the BidRidge job

Opened from a concrete job with Design it, the BidRidge card reads Update the job in BidRidge. BidRidge shows what changes, keeps what you typed there, and prices the slabs, bars, PEX, pours and pump at your rates.

Step 10: One more: steps and a curved patio in the Concrete Designer
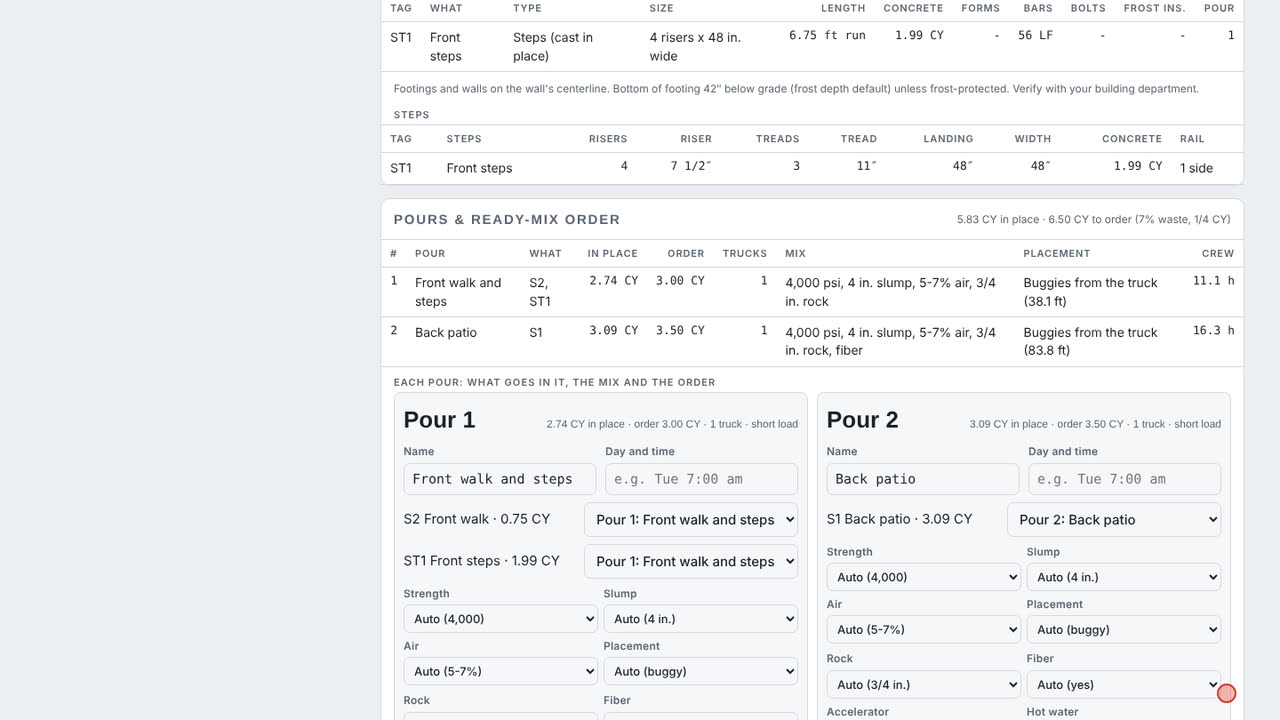
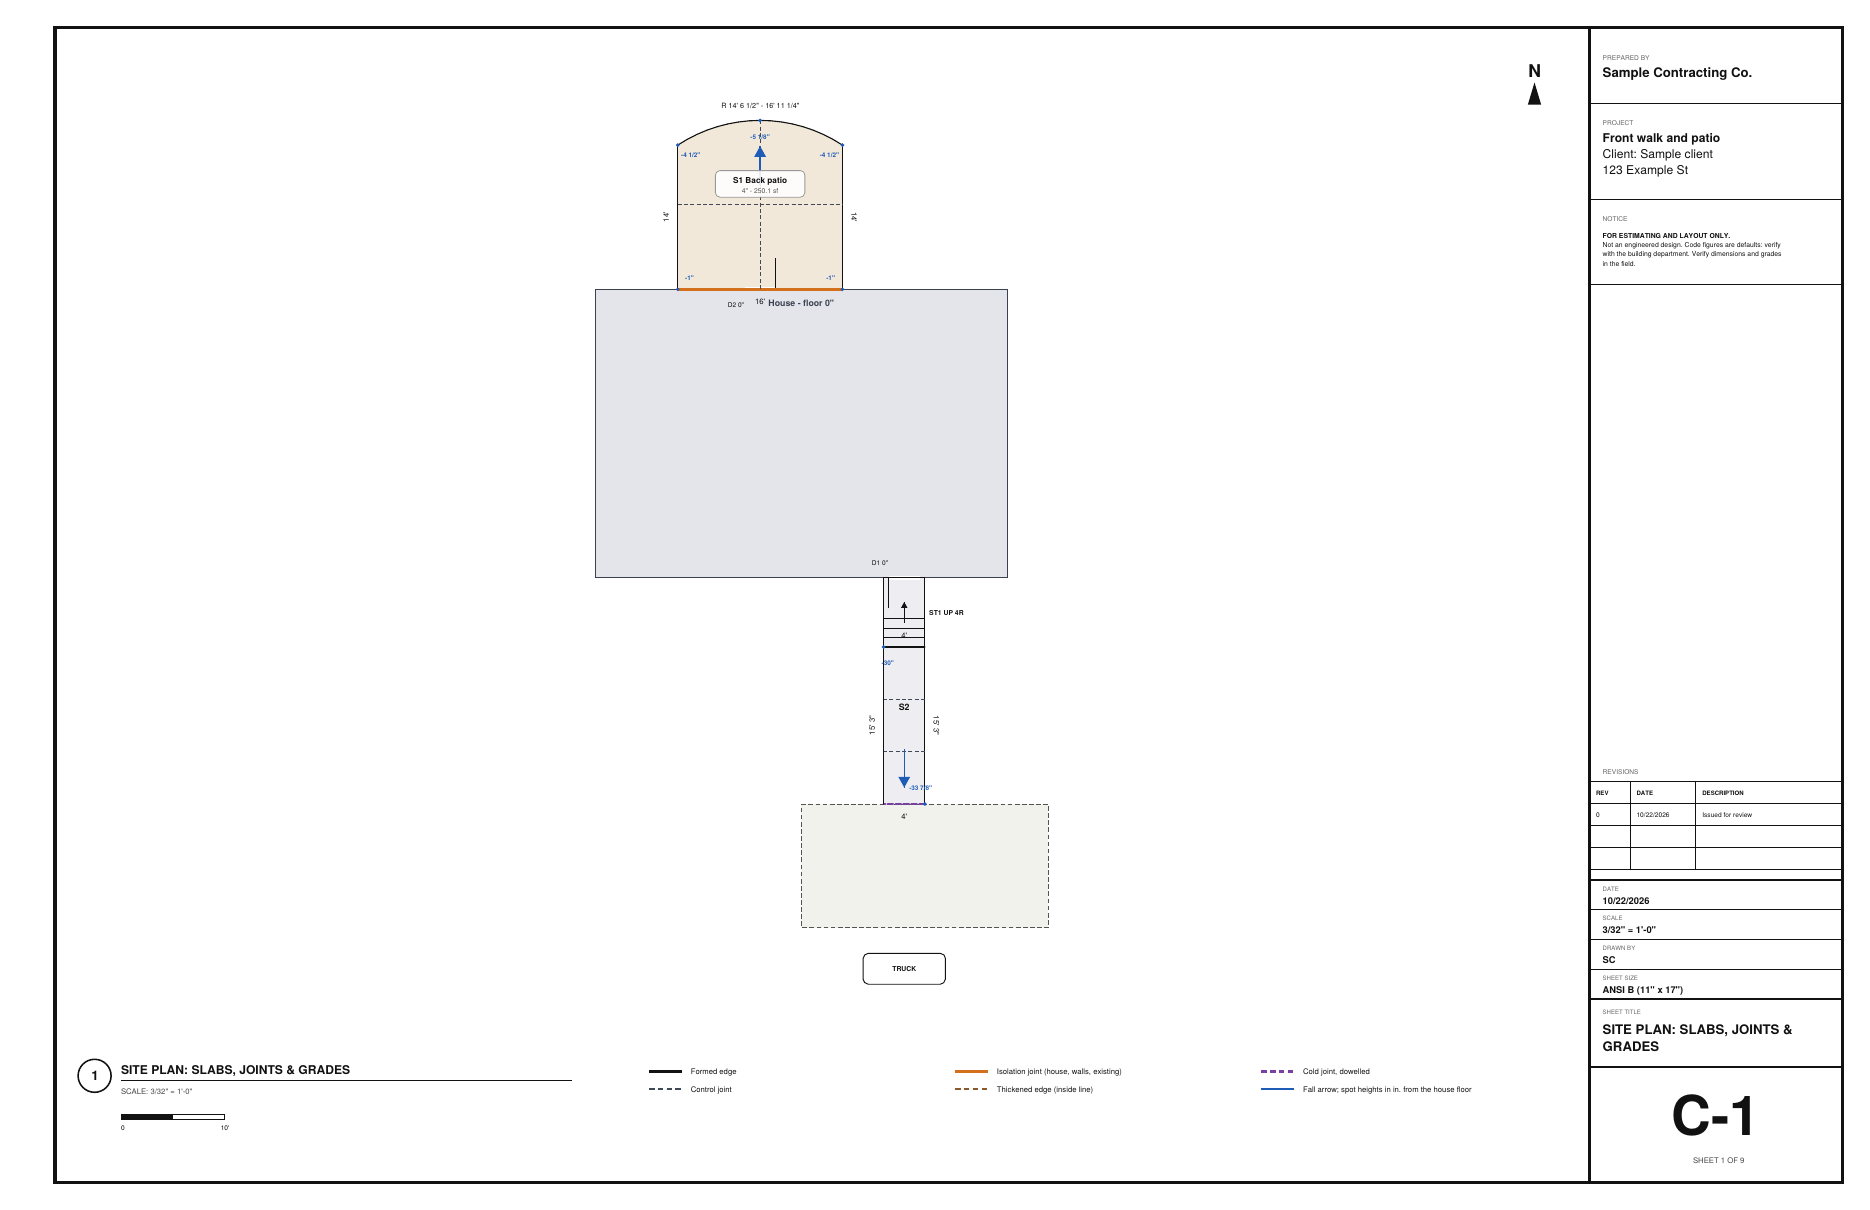
  1. Front steps: 4 risers of 7 1/2″, 11″ treads, a handrail
  2. Short load: under the plant minimum

Step 10: One more: steps and a curved patio

Open the patio sample. The front steps work out to 4 risers of 7 1/2″ and 11″ treads, with a handrail. The back patio has a curved edge and is stamped and colored. Both pours are under the plant's 7 CY minimum, so each is flagged for a short-load fee.

Field tip: Riser, tread and handrail numbers are starting defaults. Verify them with your building department.

Step 11: Plan background: start from the drawings

Open Plan background at the top of the side panel and import the site plan, the foundation plan or a structural floor plan (a PDF page or a photo). Click both ends of a dimension you know, type its length, and check the scale against a second dimension. The tools now snap to the drawing's corners and lines; a pier tapped on a column center stays on it. Trace room turns the outline you click into a slab (or the house, existing concrete or a recess; on a Commercial floor, an elevated slab or an opening), and Trace walls lays footing runs with stem walls on the walls' centerlines, ready for their sizes. The drawing stays under your plan (fade it, lock it), is saved with the project and is never printed on your sheets.

What you get

The drawing set, the lists and the files

Real files from this sample, made by the designer. Tap a page to see it full size. Yours carry your company, the client and the address.

C-1 site plan: slabs, formed and cold-joint edges, control joints, thickened edges, fall arrows and spot heights
C-2 rebar placement plan: the grid each way, the thickened-edge bars and the PEX loops
C-3 slab sections: thickened edge, insulation, vapor barrier, bars and tubing
C-4 pour plan: pour 1 the shop slab, pour 2 the apron and driveway, the pump's reach from the truck
C-5 ready-mix order for pour 1, with the pour shaded on the plan
C-7 schedules & bar list: slabs, joints, pours, PEX, every bar and the stock bars to order
Patio sample C-1: the front walk and steps, the curved back patio, joints and falls

The BidRidge quote

Same numbers in the quote

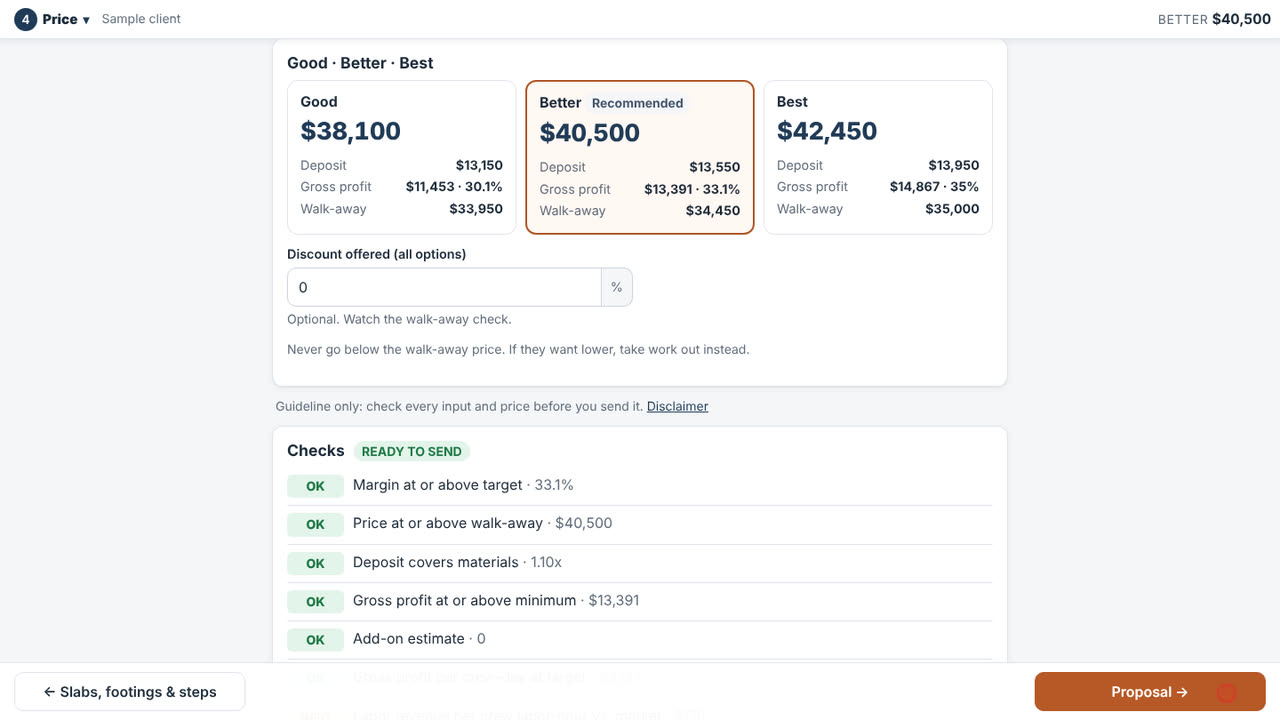
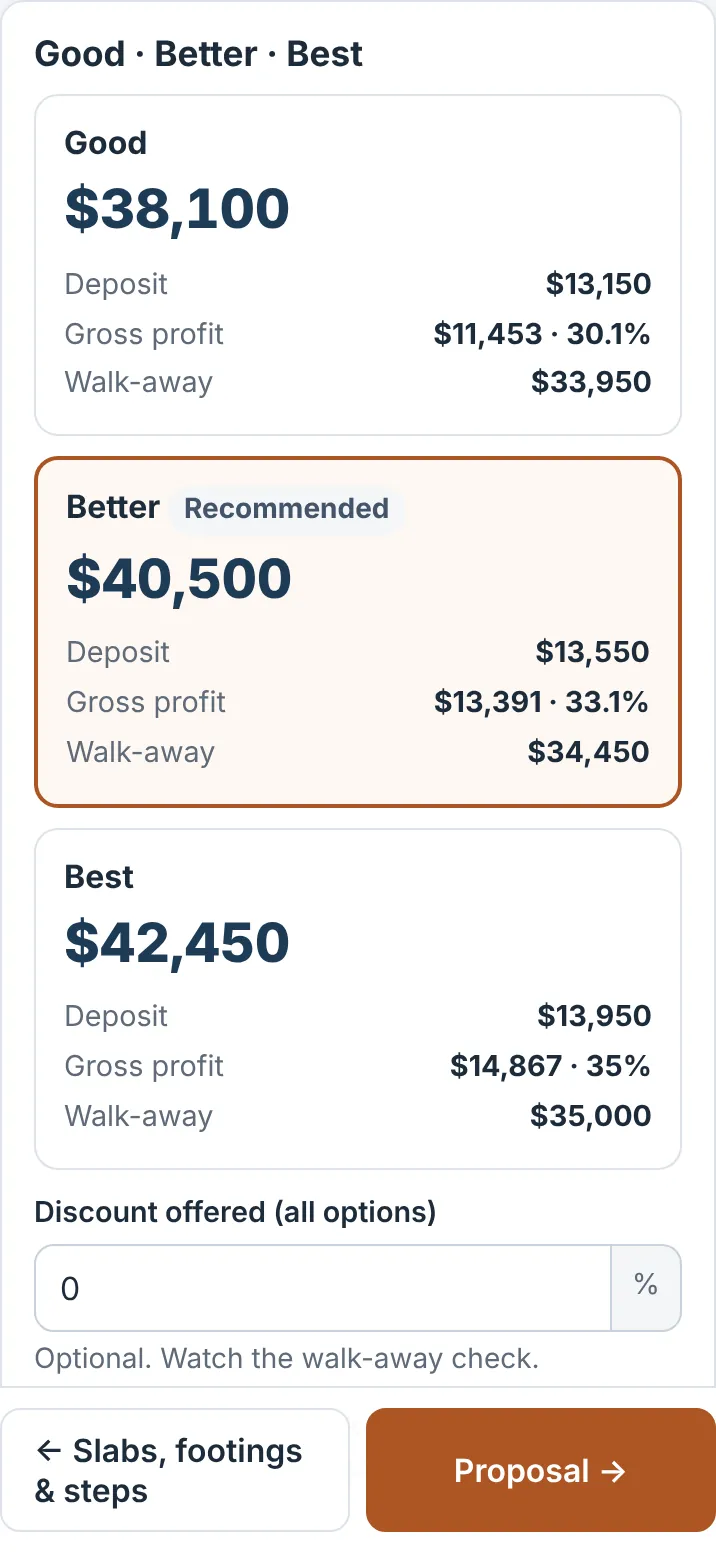
The designer sends its quantities to BidRidge, and BidRidge prices the labor and materials at your rates.

  • Good
    $38,100
  • Better
    $40,500
    Recommended
  • Best
    $42,450
The design and the quote, line by line
ItemIn the designerIn the BidRidge quote
Flatwork1,440 sf, 3 slabs1,440 sf
Ready-mix25.26 CY (thickened edges in)25.26 CY
Slab rebar1,263.3 LF bar list1,263.3 LF
Radiant PEX588 LF, 2 loops588 LF
Control joints168 LF168 LF

Shop slab sample, opened in the BidRidge app at its starting rates. Your rates give your own numbers.

The sample opened as a quote in the BidRidge app: Good, Better and Best prices
The BidRidge app, at its starting rates.

More in the guide

Try it on your own job

Open the sample, change it to your measurements, and send it to a BidRidge quote. Drawing is free; the drawing set, the lists and the quote come with a BidRidge license or the 14-day trial.

In the designer, tap Open project and pick the sample file. It opens exactly as in the video.

Sample designs: names, sizes and clients are made up. Prices are BidRidge's starting rates; set your own. The designers check against common guidelines (IRC, NKBA and the makers' published numbers) to help you catch mistakes. They don't replace your building department or the manufacturer's installation instructions: verify with them.