BidRidge › Designers › Guide › Chapter 9

Chapter 9 · Ceiling DesignerBeta

Sample office suite

We draw an open office in 2x4 ACT on a balanced grid, put the lights, diffusers and heads in it, and add a cedar T&G lobby with a drywall soffit between the two. Then we check the seismic bracing, print the drawing set and the buy list, and update the BidRidge Ceilings job the design was opened from.

In the designer, tap Open project and pick the sample file. It opens exactly as in the video.

Narrated walkthrough, 2:15. Captions on.

The sample in numbers

  • Ceiling
    1,693 sf
    3 areas · ACT 2x4, drywall on grid, cedar T&G
  • ACT tiles
    141
    90 full · 48 cut · borders 40″ and 14″ · 19 cartons
  • Fixtures
    49
    25 lights · 6 diffusers and returns · 17 heads and detectors · 1 access panel
  • Seismic
    12 bracing groups
    48 clips · 2″ wall angle · ASTM E580 defaults
  • Soffits
    40 LF
    S1 1′ drop · S2 3′ drop
  • Quote
    $21,700
    Better, at the starting rates

Step by step

Step 1: Draw the open office in the Ceiling Designer
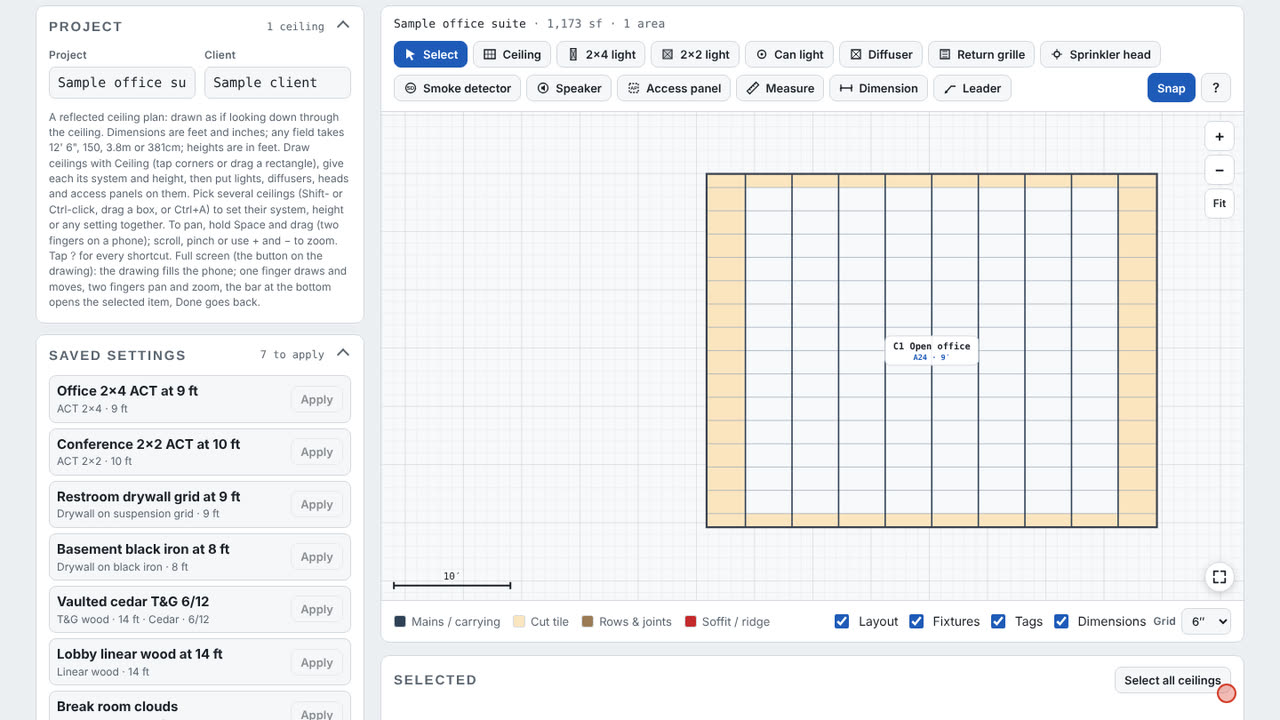
  1. Ceiling tool
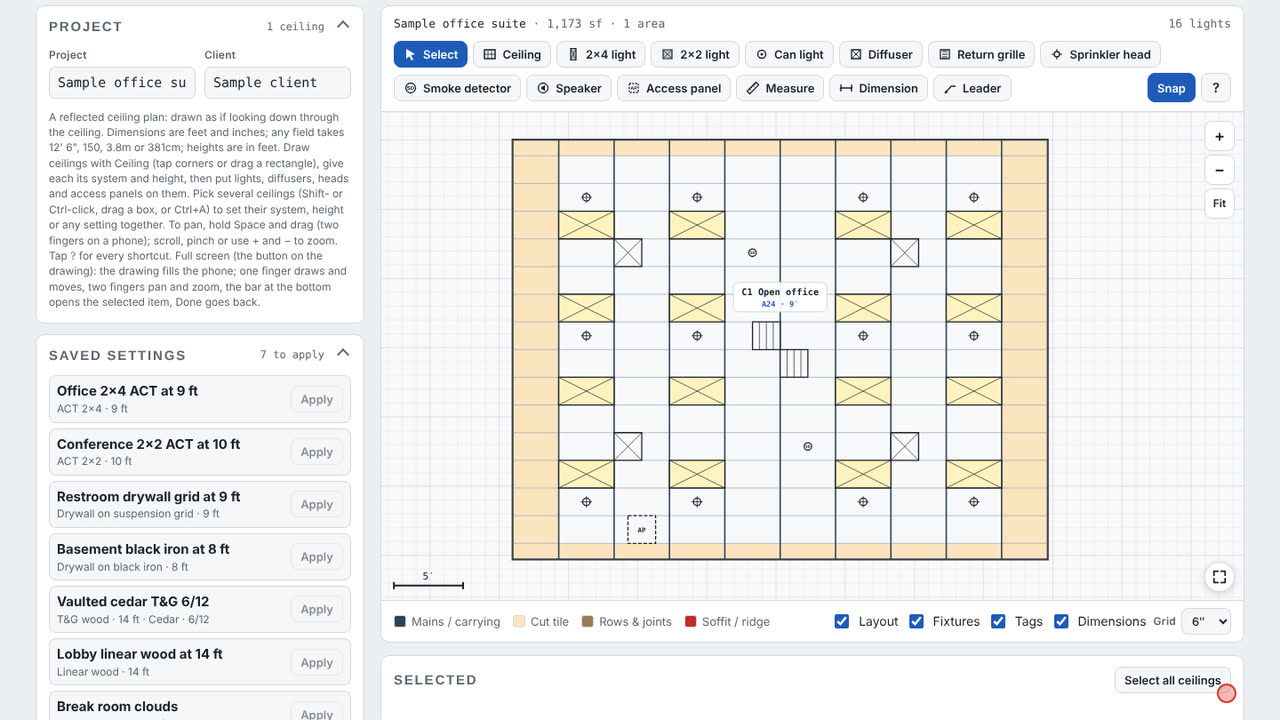
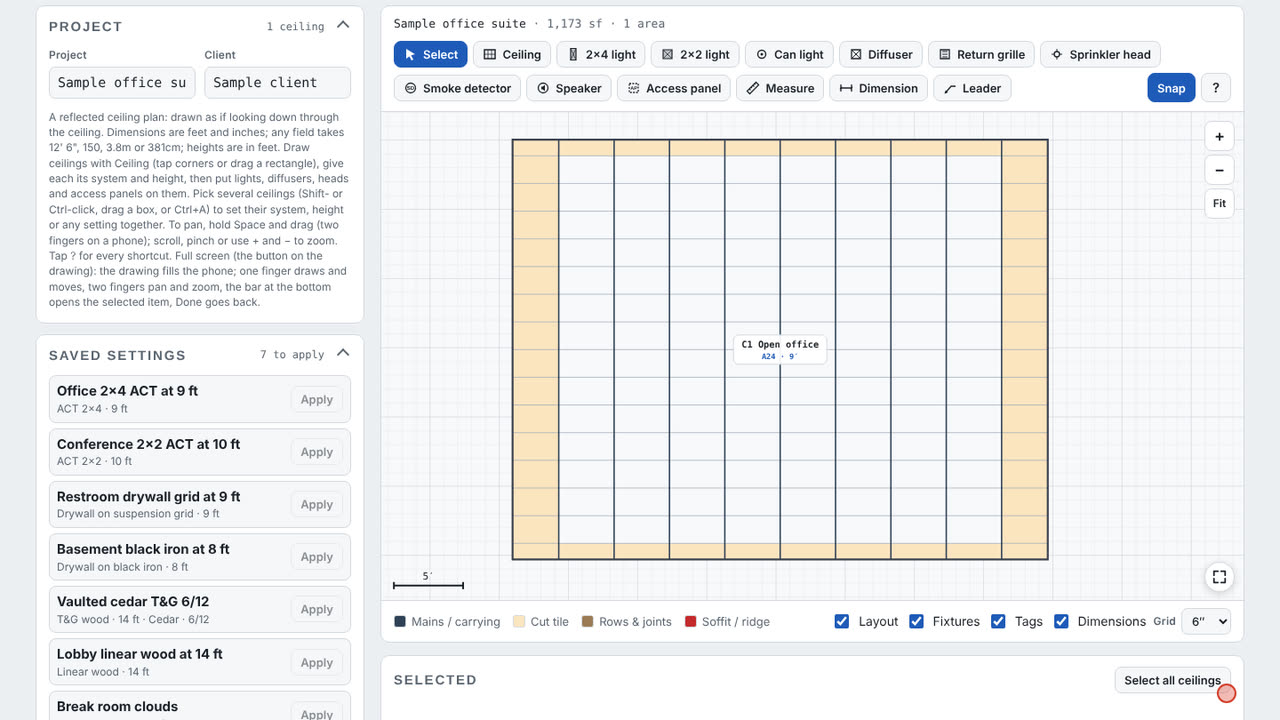
  2. Open office 38′ 8″ × 30′ 4″: ACT 2x4 at 9′

Step 1: Draw the open office

Pick Ceiling and drag a rectangle, then type the size in the editor: 38′ 8″ by 30′ 4″. Name it, pick Office 2x4 ACT at 9 ft under Saved settings and tap Apply saved settings. The grid, the mains and the cut border tiles show up right away.

Field tip: Any size field takes 38' 8", 464 (inches) or 11.8m. Heights are in feet.
Step 2: Balance the grid in the Ceiling Designer
  1. 40″ borders each side: at least half a tile
  2. 14″ borders top and bottom

Step 2: Balance the grid

Start full at the first wall leaves a 4″ strip of tile on the far side, and the check flags it. Tap Balance the grid: the layout centers itself, and every border is at least half a tile, 40″ one way and 14″ the other.

Field tip: Centered puts a grid line on the center of the room; Balanced picks a line or a tile, whichever gives the bigger borders.

Step 3: Put the lights in the grid in the Ceiling Designer
  1. 2x4 light tool
  2. Each light snaps into a full tile
  3. 2x2 diffuser: half a tile and a 24″ filler

Step 3: Put the lights in the grid

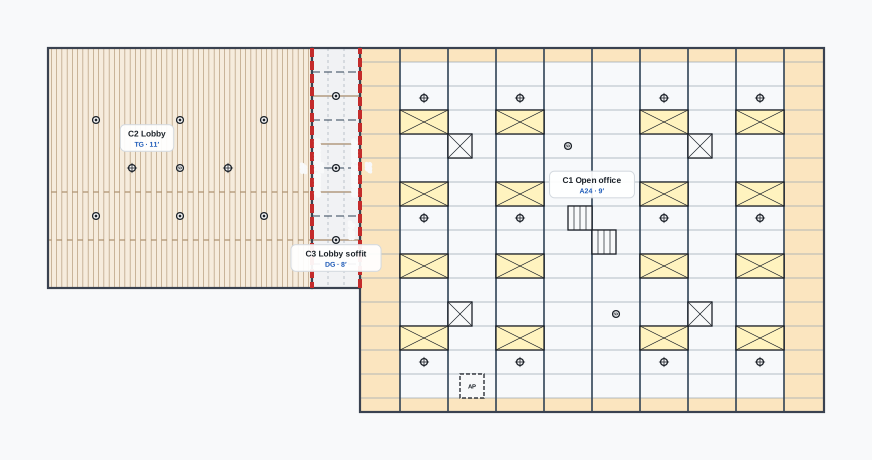
Pick 2x4 light and tap the tiles: each light snaps into its tile and takes it out of the count. A 2x2 diffuser in the 2x4 grid takes half a tile and leaves a 24″ filler. Heads and smoke detectors sit mid-tile. A light in a cut border tile gets flagged.

Field tip: Tap again for another light; Esc stops.

Step 4: Add the cedar lobby in the Ceiling Designer
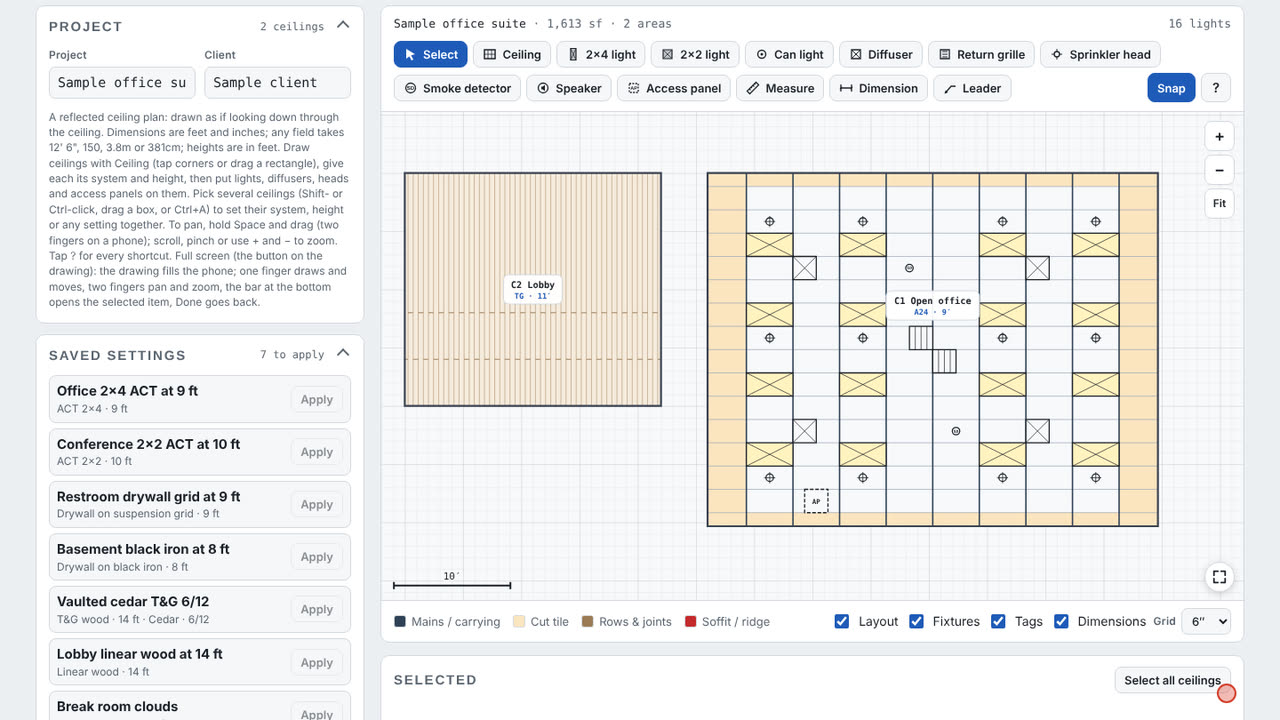
  1. Lobby: cedar T&G at 11′, clear coat
  2. 1,020 LF on 8, 12 and 16 ft stock, joints on framing

Step 4: Add the cedar lobby

Draw the lobby, 22′ by 20′, and set it to T&G wood, cedar, at 11 ft with a clear coat. The boards are nested into 8, 12 and 16 foot stock with the joints on framing and staggered, and both edge rows are ripped the same.

Step 5: Drop the soffit in the Ceiling Designer
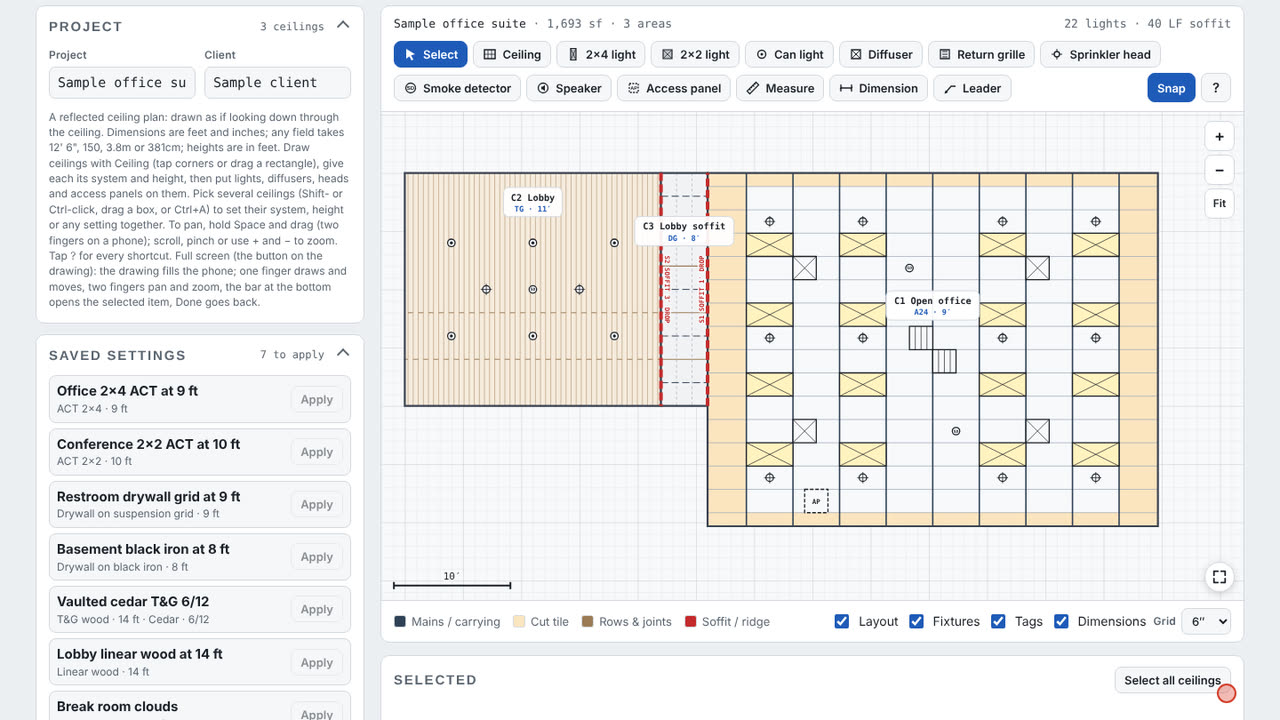
  1. S1: office 9′ to soffit 8′, 1′ drop
  2. S2: lobby 11′ to soffit 8′, 3′ drop
  3. Drywall on suspension grid at 8′

Step 5: Drop the soffit

Draw a 4′ band between the lobby and the office and make it Drywall on suspension grid at 8 ft. Where ceilings at different heights meet, the soffits are tagged and counted: S1 is a 1′ drop from the office, S2 a 3′ drop from the lobby, 40 LF in all.

Field tip: Clouds and baffles hang under a ceiling and make no soffit.

Step 6: Check the seismic bracing in the Ceiling Designer
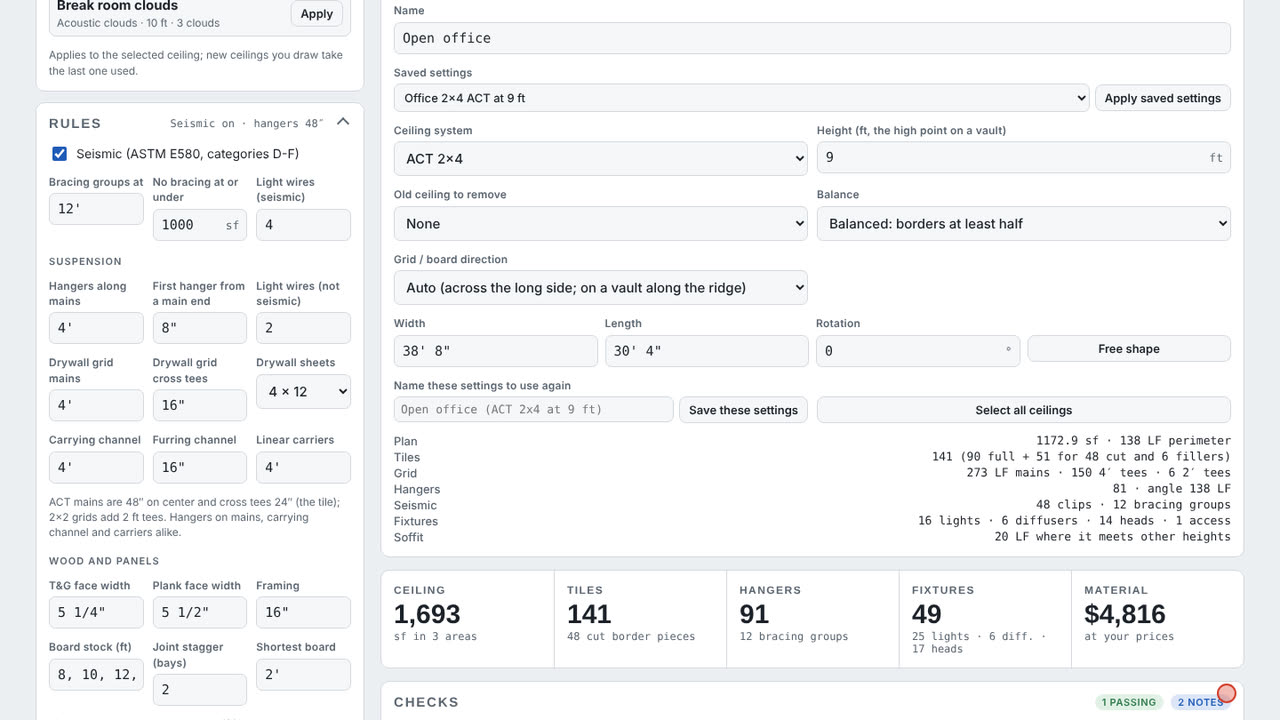
  1. Seismic on: ASTM E580 defaults
  2. Bracing every 12′ each way; none at or under 1,000 sf
  3. Open office: 48 clips, 12 bracing groups

Step 6: Check the seismic bracing

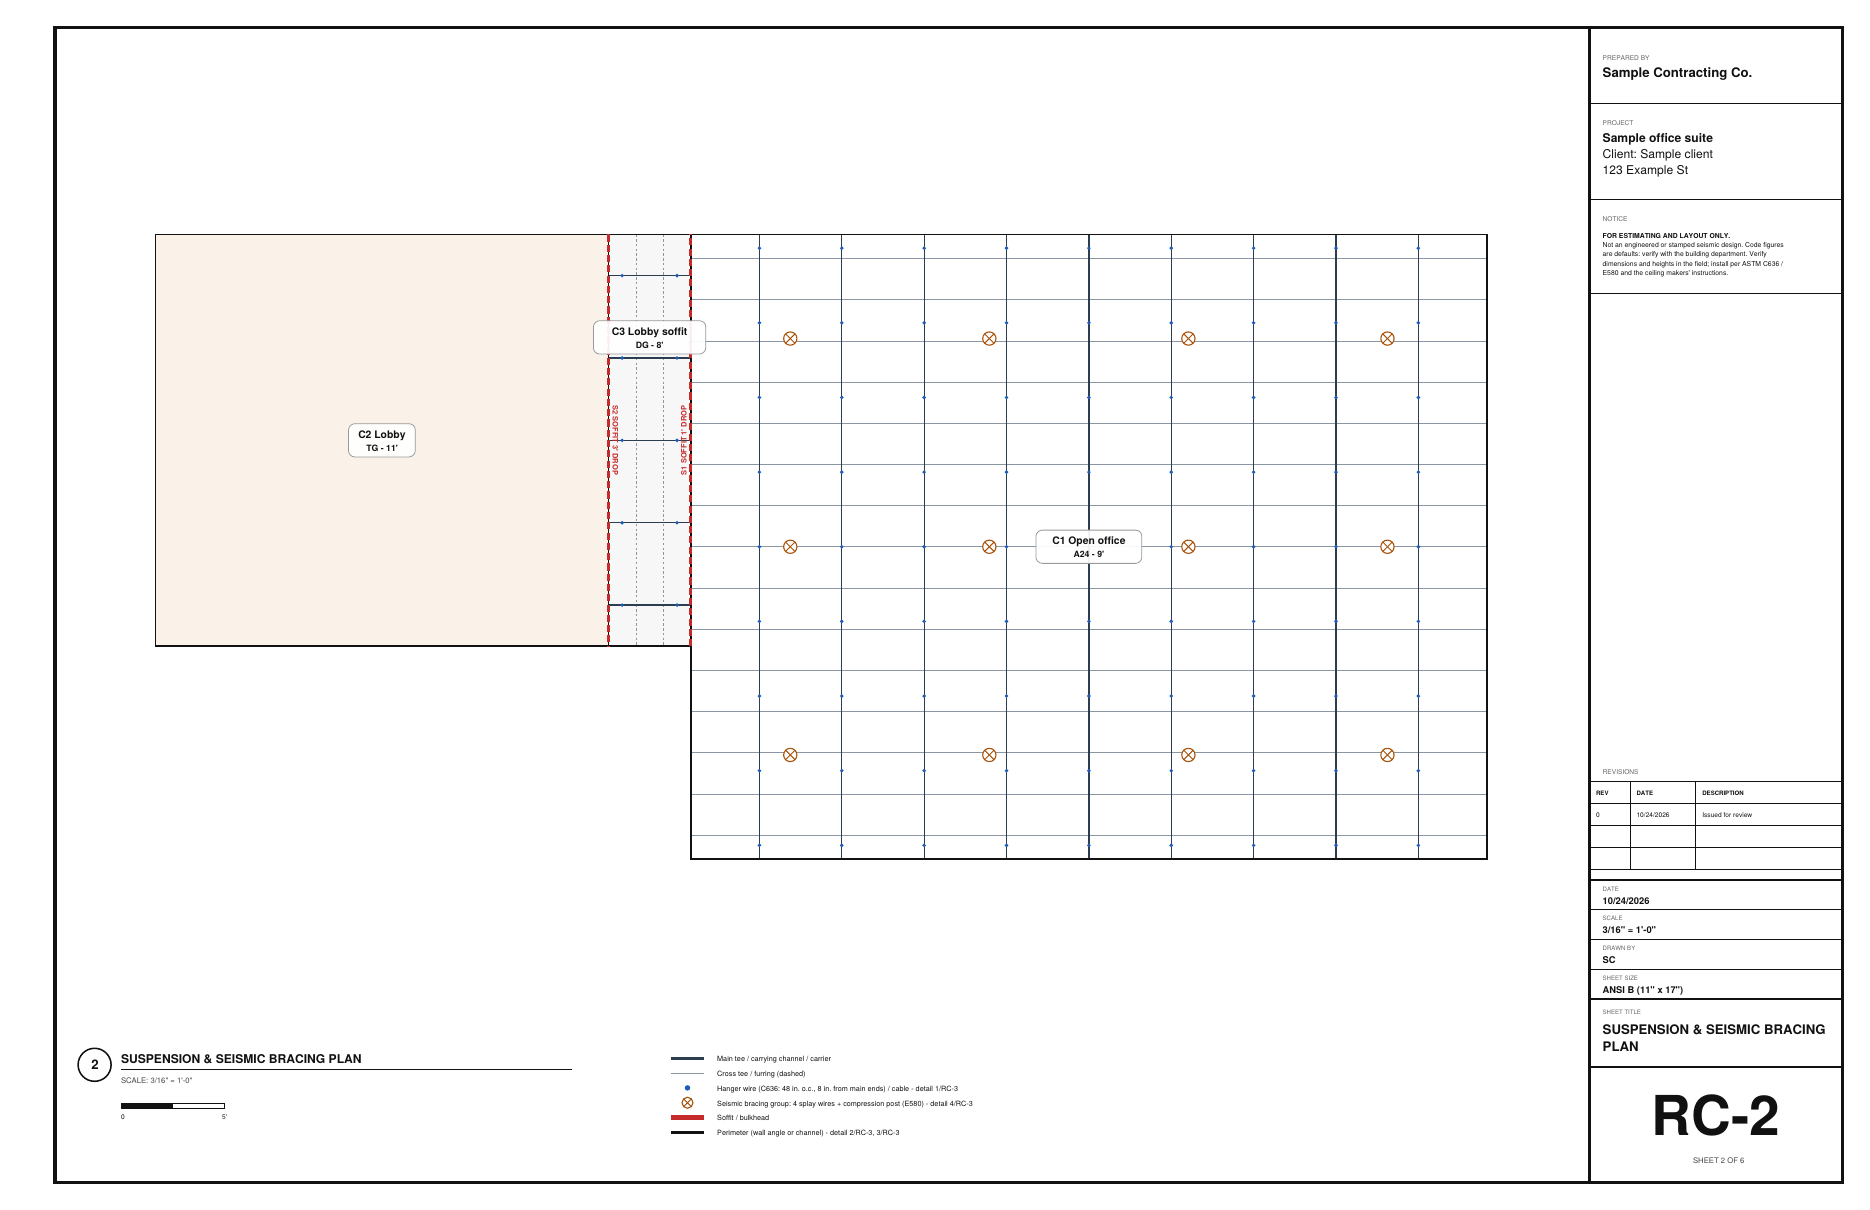
Seismic is on in Rules: 2″ wall angle, clips at the main and tee ends, and a bracing group every 12 ft each way. The open office gets 48 clips and 12 bracing groups; the 80 sf soffit is under the 1,000 sf exempt size. Lights hang on their own wires.

Field tip: These are ASTM E580 defaults for layout and estimating. Verify with your building department and the grid maker.

Step 7: Print the drawing set in the Ceiling Designer
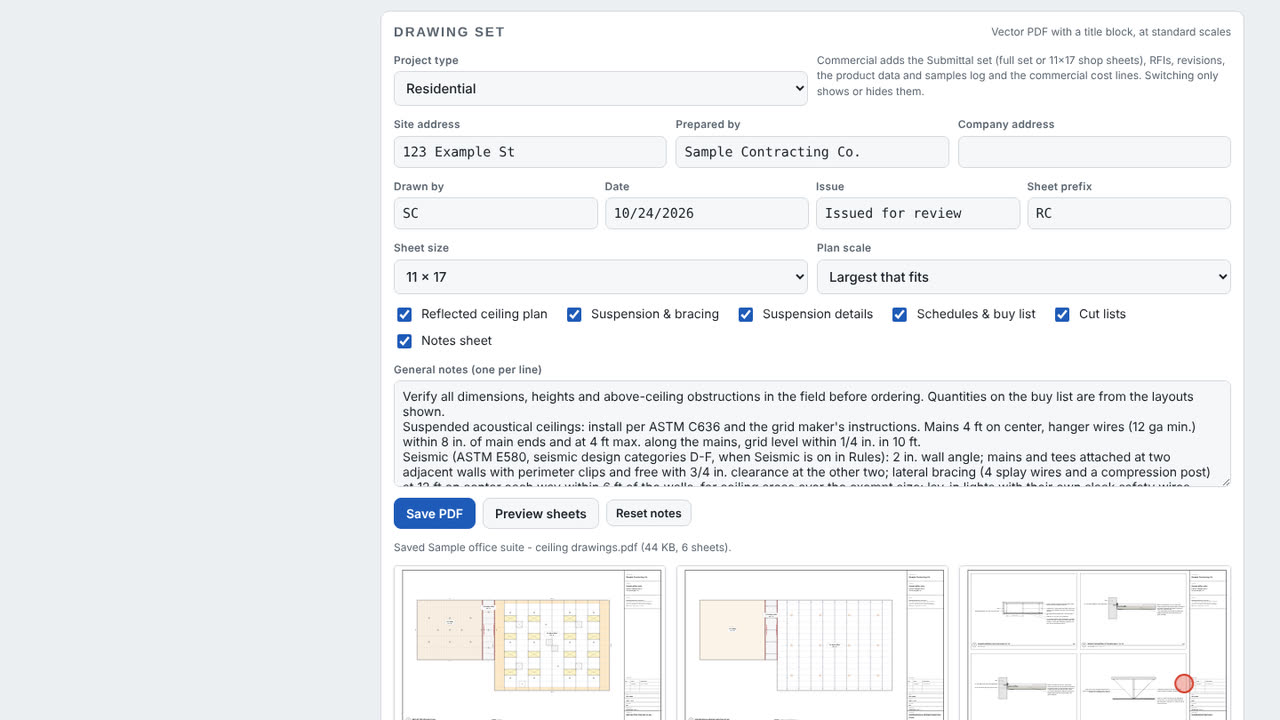
  1. Save PDF: 6 sheets on 11 × 17
  2. RC-2 suspension & seismic bracing plan
  3. Preview sheets

Step 7: Print the drawing set

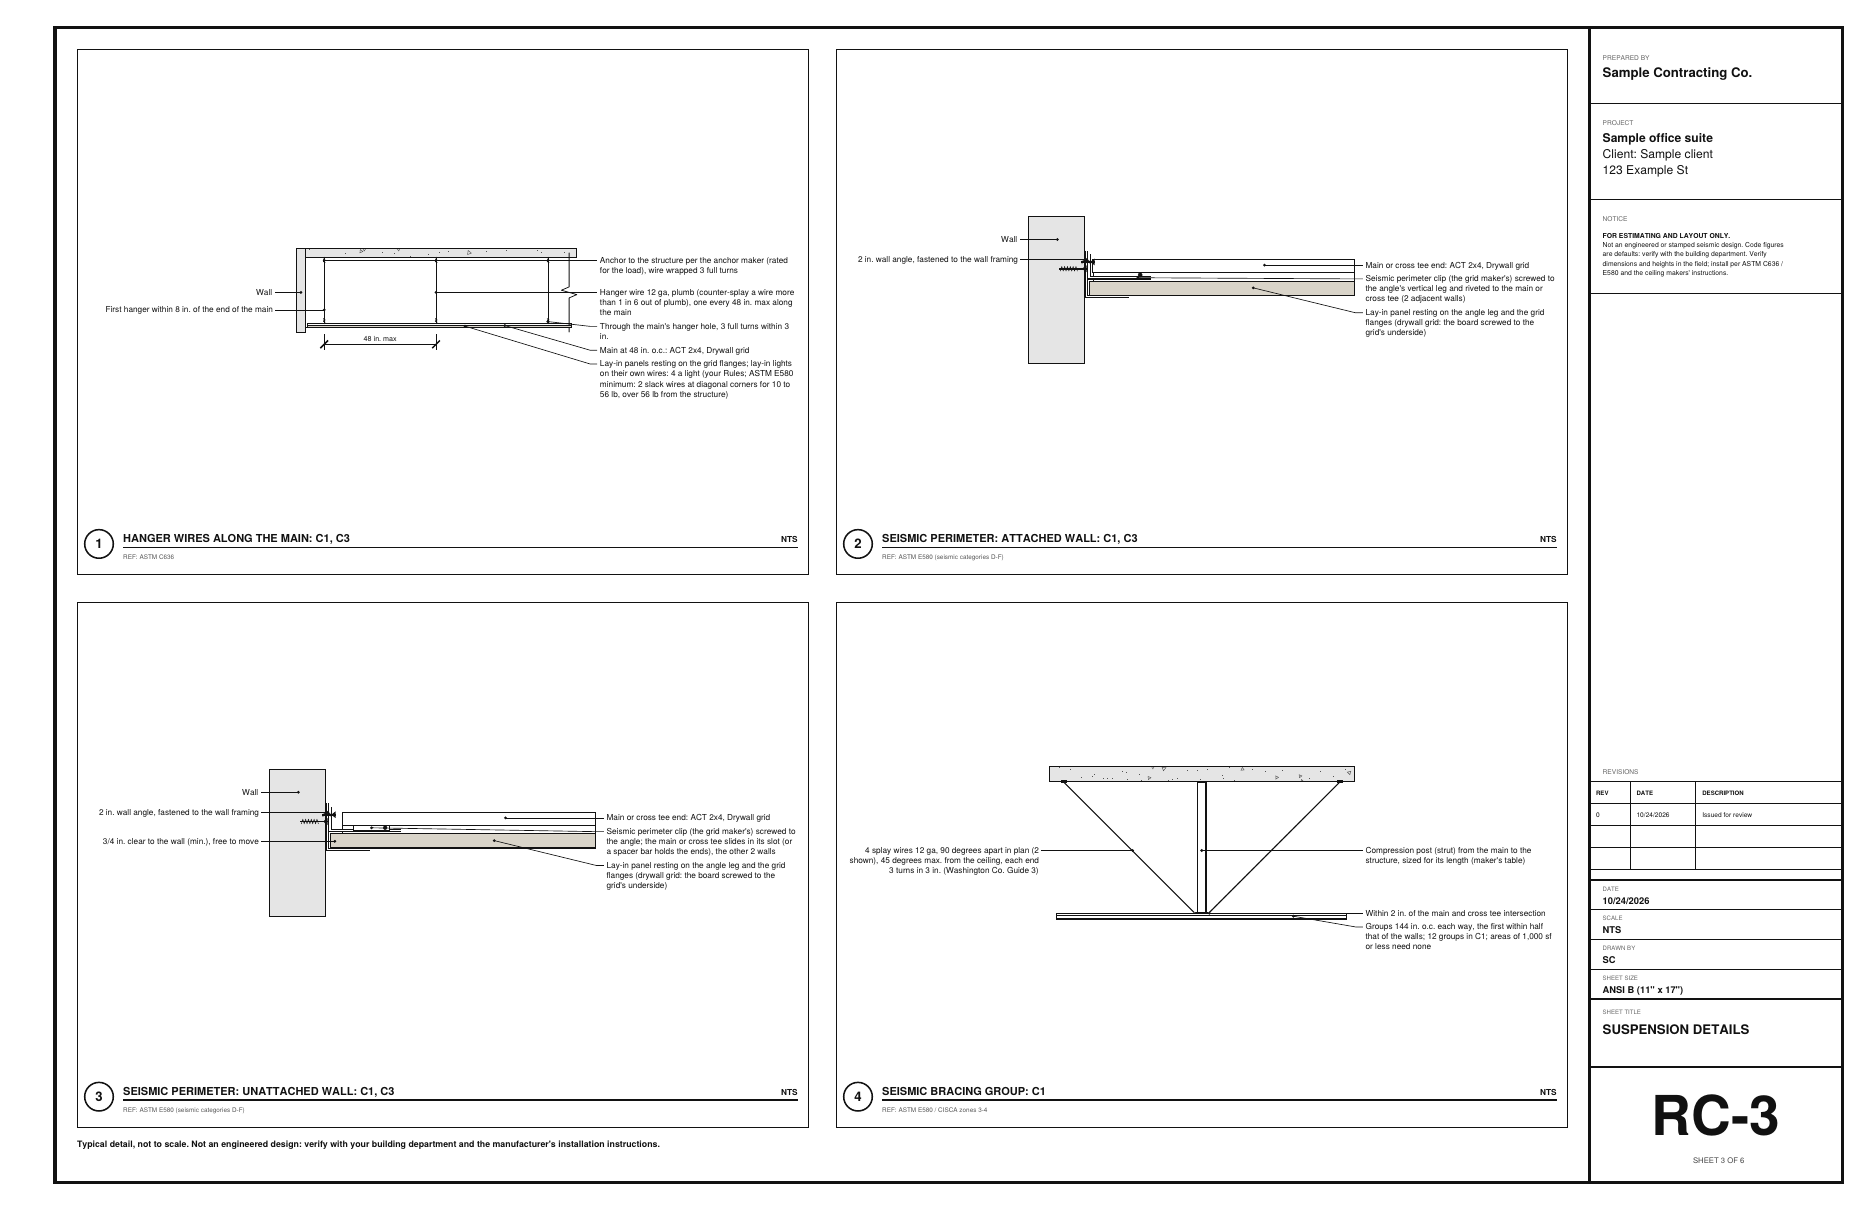
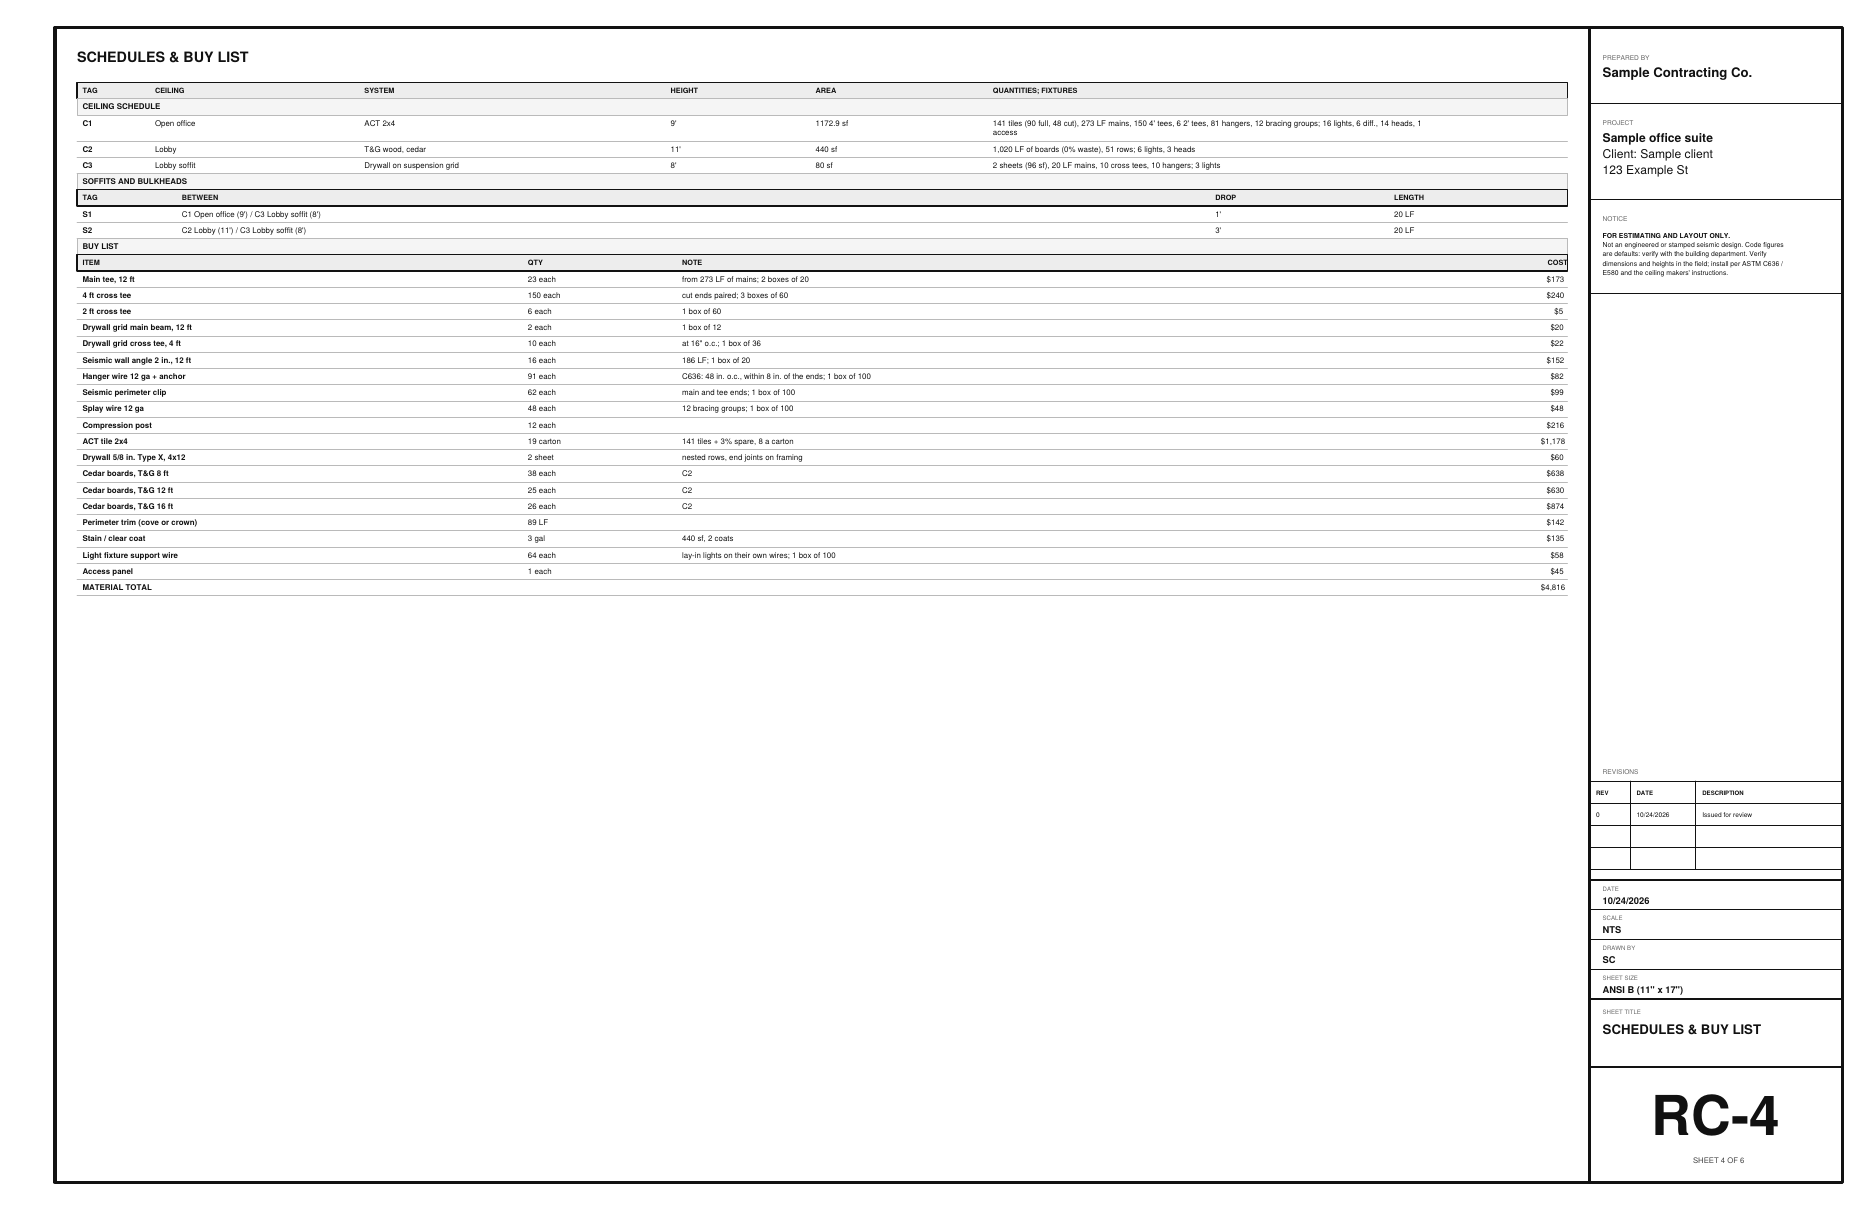
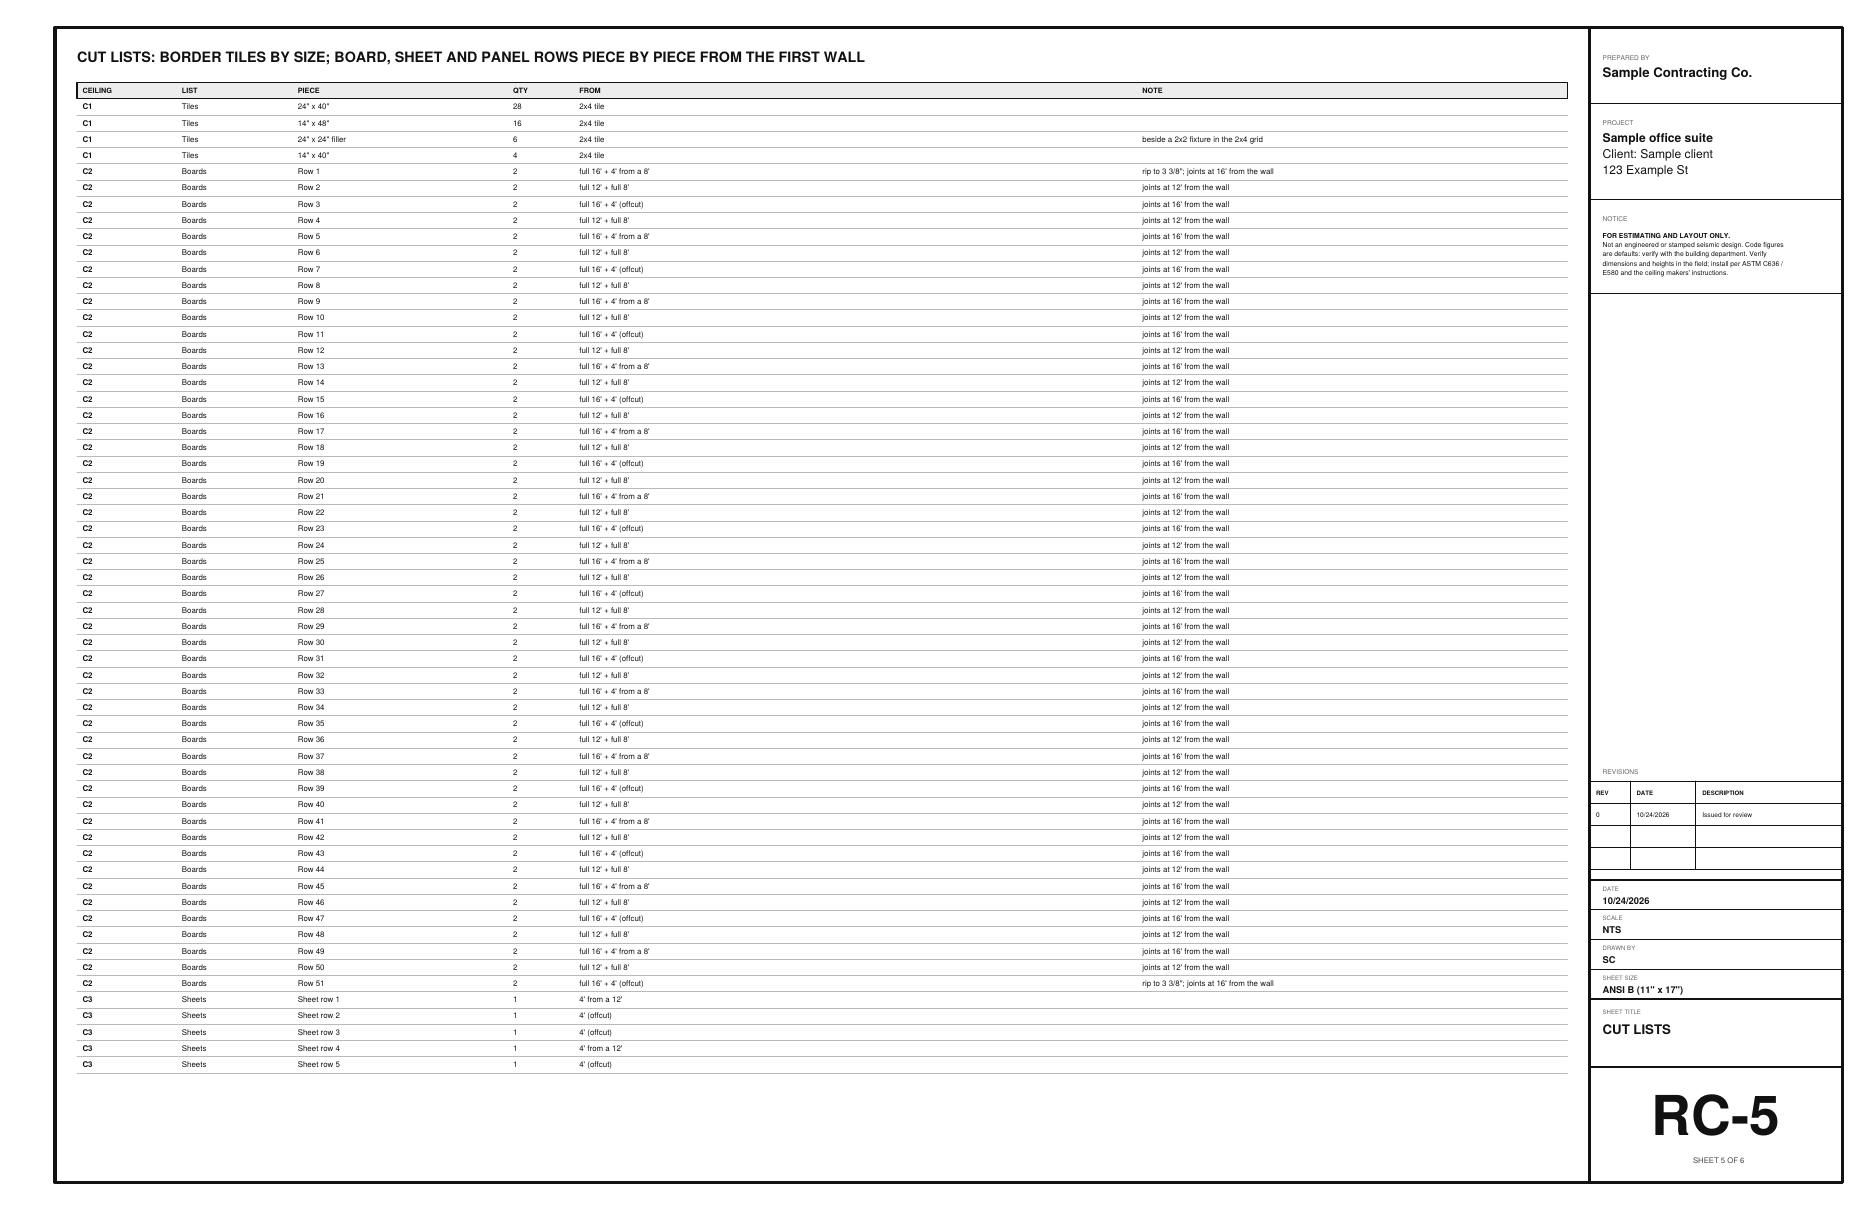
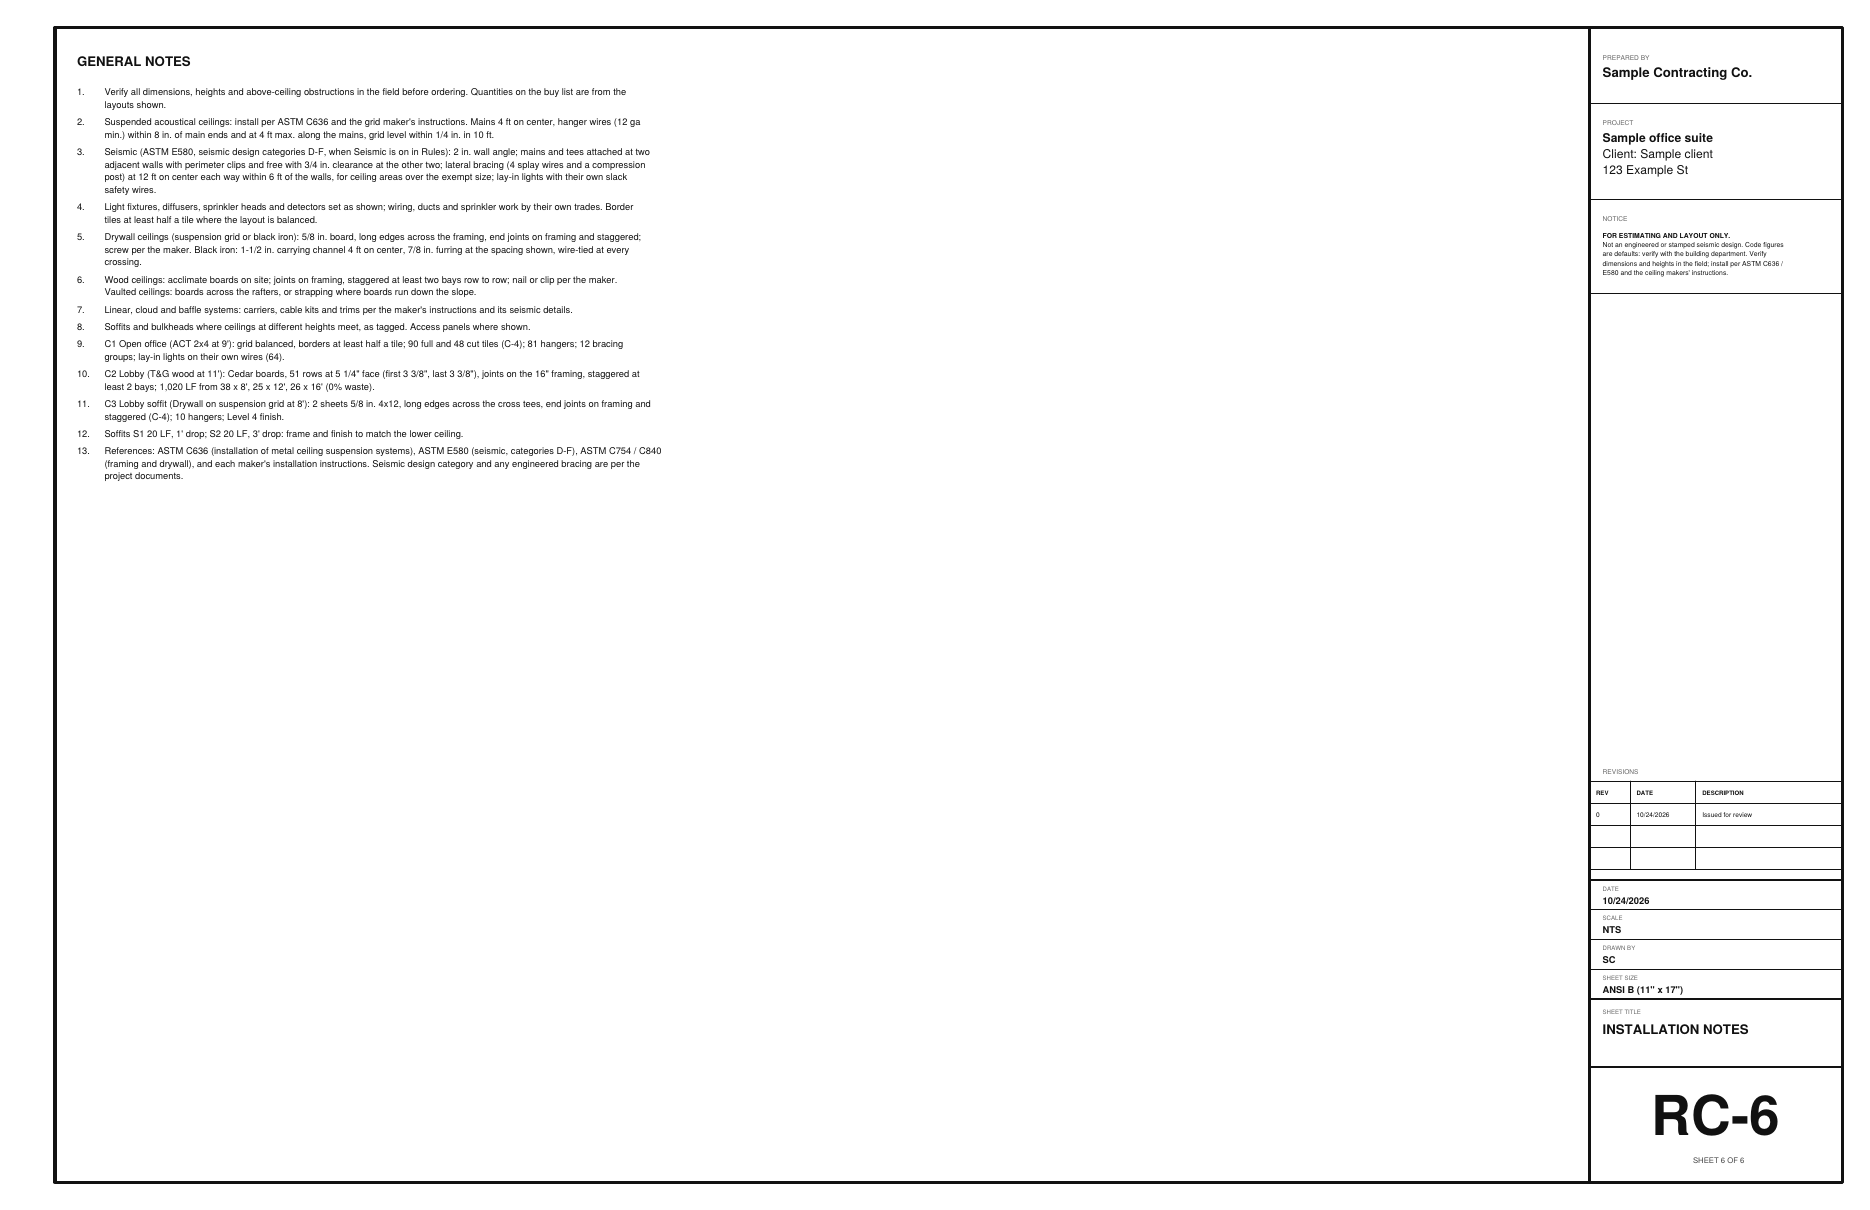
Preview sheets shows the set: RC-1 reflected ceiling plan, RC-2 suspension and seismic bracing plan, RC-3 suspension details, RC-4 schedules and buy list, RC-5 cut lists and RC-6 the notes sheet. Save PDF makes it, on 11 × 17 with a title block.

Step 8: Read the buy list in the Ceiling Designer
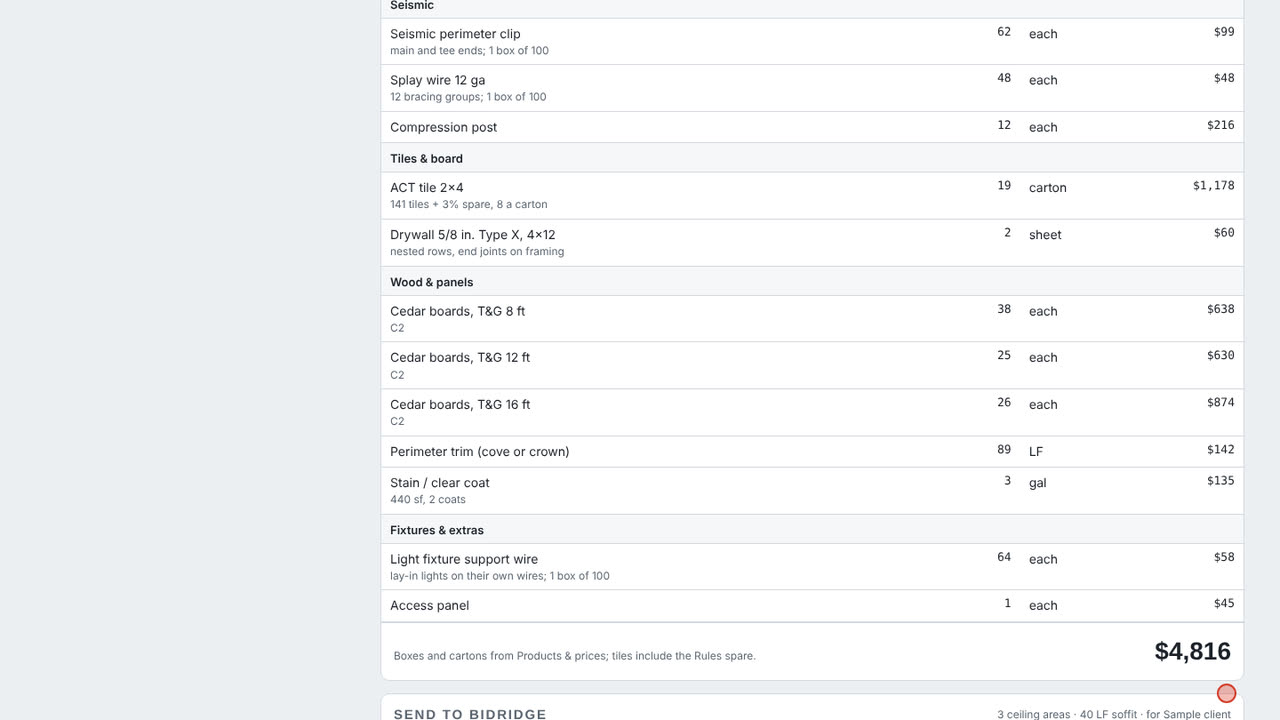
  1. 19 cartons: 141 tiles + 3% spare
  2. Cedar by length: 8, 12 and 16 ft
  3. Material at your prices

Step 8: Read the buy list

The buy list counts what to buy in boxes and cartons: 23 main tees, 150 cross tees, 19 cartons of 2x4 tile with a 3% spare, the cedar by length, splay wire and compression posts. Save it as a CSV with the cut lists and the ceiling plan.

Field tip: Prices and box sizes are yours to set under Products & prices.

Step 9: Update the job in BidRidge in the Ceiling Designer
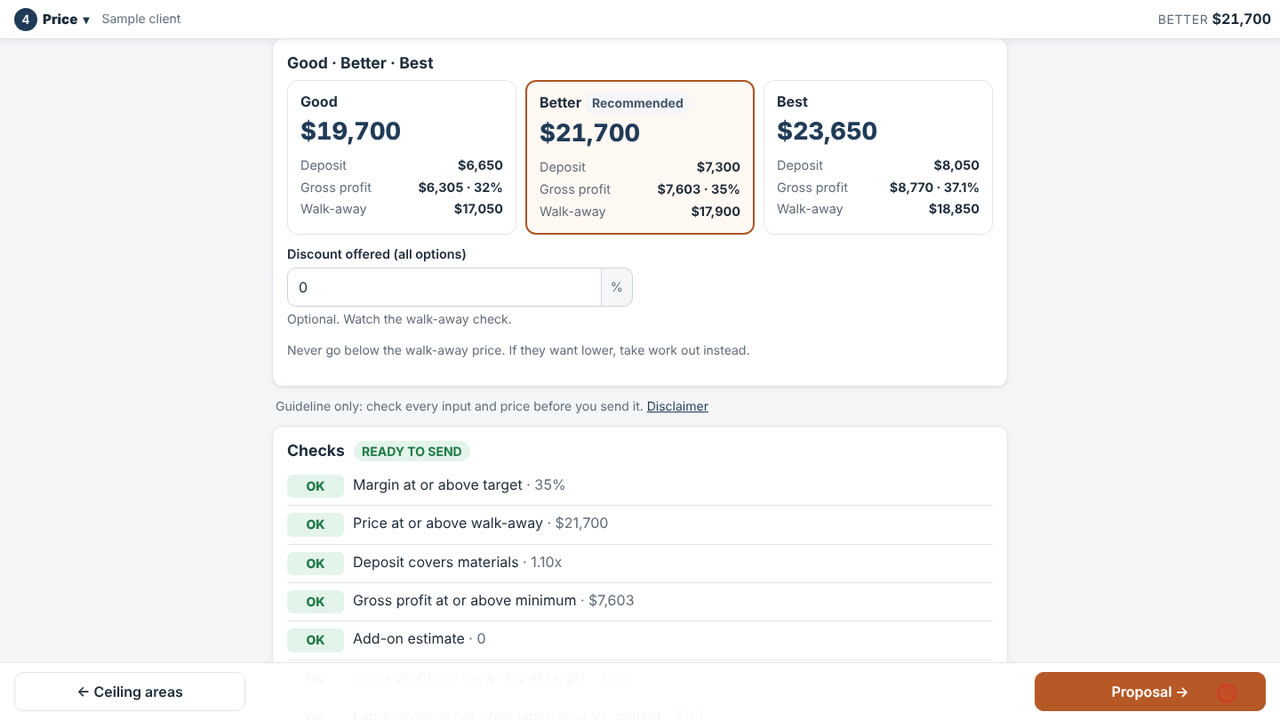
  1. Priced at your rates: Good, Better, Best
  2. Better (recommended)

Step 9: Update the job in BidRidge

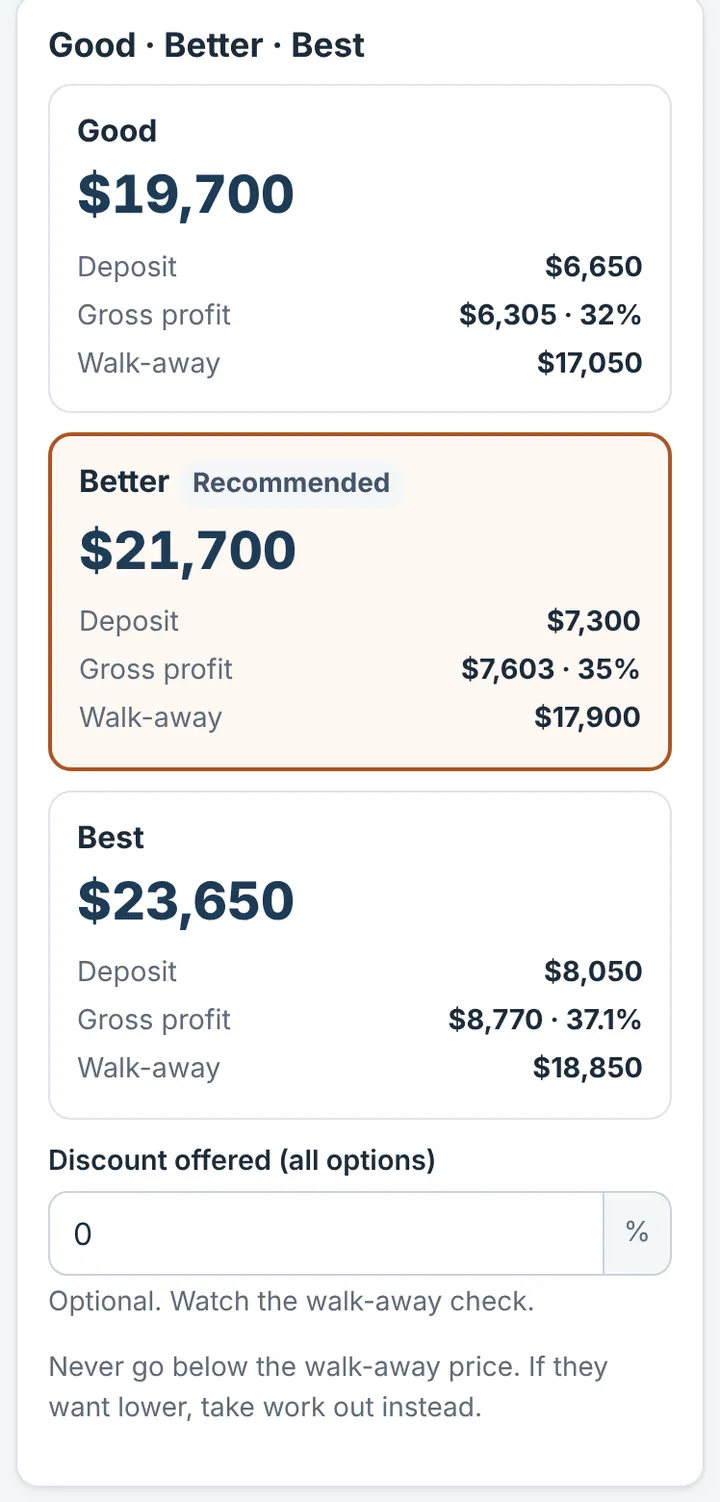
This design was opened from a BidRidge Ceilings job, so the button says Update the job in BidRidge. BidRidge shows what changes, keeps what you typed, and prices the grid, tile, cedar, soffits and bracing at your rates: Good, Better and Best.

Field tip: A sold job gets a change order instead.

What you get

The drawing set, the lists and the files

Real files from this sample, made by the designer. Tap a page to see it full size. Yours carry your company, the client and the address.

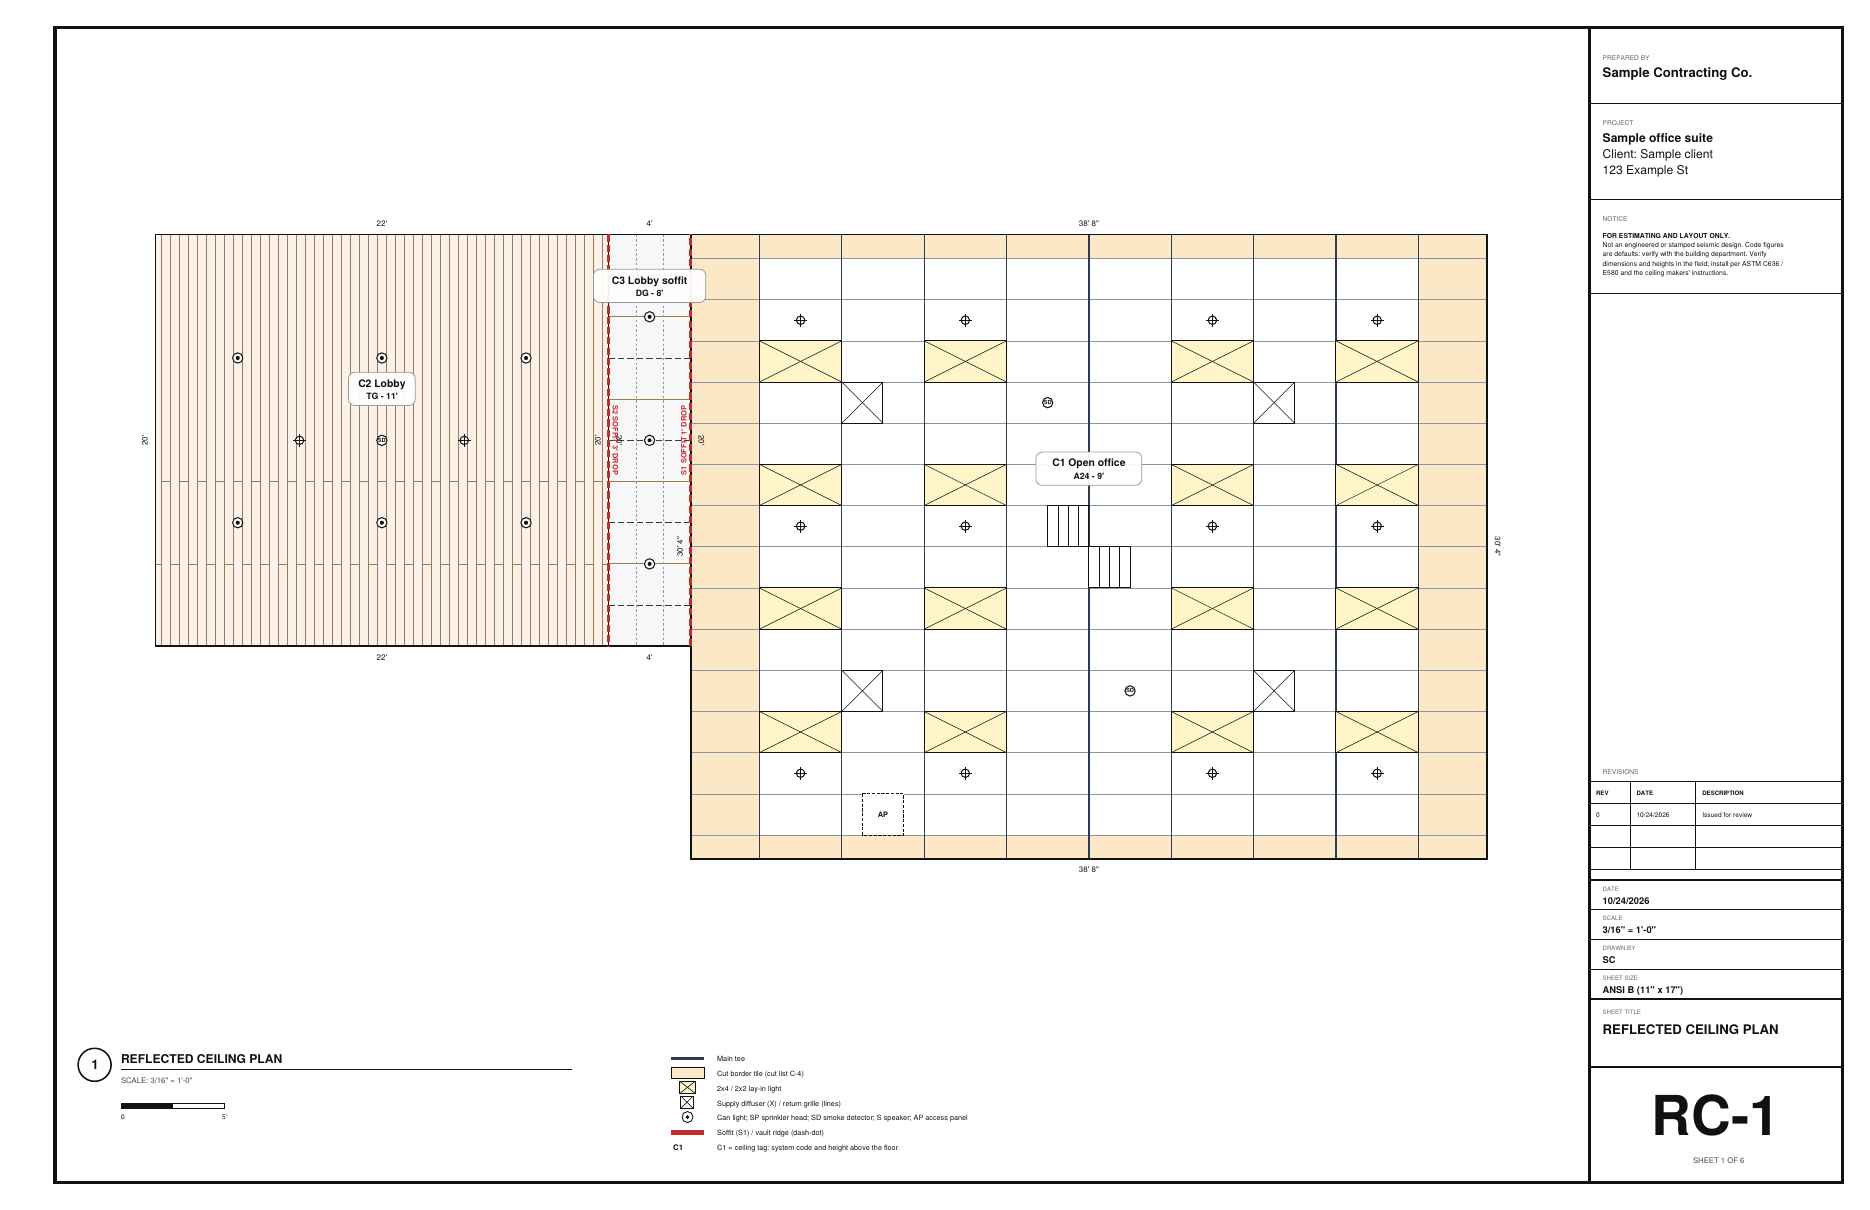
RC-1 reflected ceiling plan: the balanced grid, cut border tiles, lights, diffusers, heads, heights and the soffits
RC-2 suspension and seismic bracing plan: mains, cross tees, hanger wires and the 12 bracing groups
RC-3 suspension details: the wall angle, hanger wires along the mains and a seismic bracing group, typical
RC-4 schedules and buy list: ceilings, soffits and what to buy
RC-5 cut lists: board rows piece by piece and border tiles by size
RC-6 notes sheet: installation notes, ASTM C636 / E580 and the makers' instructions

The BidRidge quote

Same numbers in the quote

The designer sends its quantities to BidRidge, and BidRidge prices the labor and materials at your rates.

  • Good
    $19,700
  • Better
    $21,700
    Recommended
  • Best
    $23,650
The design and the quote, line by line
ItemIn the designerIn the BidRidge quote
ACT tiles 2x4141 tiles (1,128 sf)1,128 sf
Grid mains273 LF273 LF
Cedar T&G1,020 LF1,020 LF
Seismic bracing12 groups12 each
Soffits & bulkheads40 LF40 LF

Office suite sample, opened in the BidRidge app at its starting rates. Your rates give your own numbers.

The sample opened as a quote in the BidRidge app: Good, Better and Best prices
The BidRidge app, at its starting rates.

More in the guide

Try it on your own job

Open the sample, change it to your measurements, and send it to a BidRidge quote. Drawing is free; the drawing set, the lists and the quote come with a BidRidge license or the 14-day trial.

In the designer, tap Open project and pick the sample file. It opens exactly as in the video.

Sample designs: names, sizes and clients are made up. Prices are BidRidge's starting rates; set your own. The designers check against common guidelines (IRC, NKBA and the makers' published numbers) to help you catch mistakes. They don't replace your building department or the manufacturer's installation instructions: verify with them.