BidRidge › Designers › Guide › Chapter 40

Chapter 40 · Low-Slope Roofing DesignerBeta

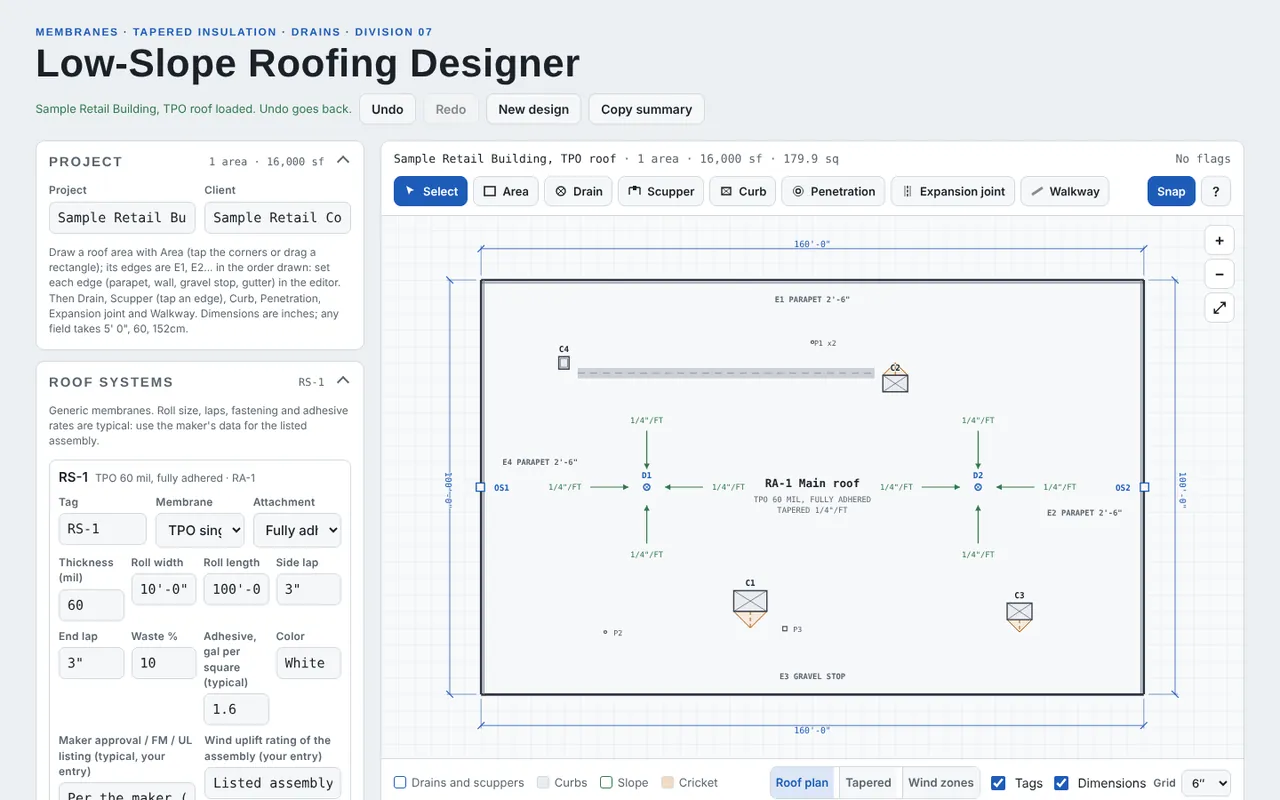
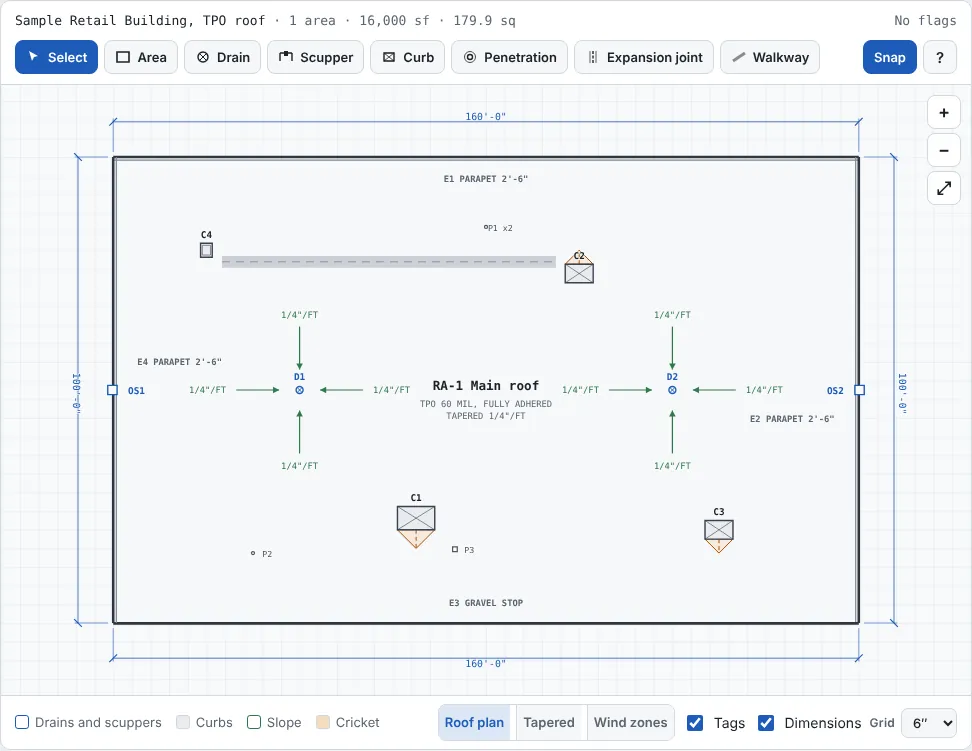
Sample Retail Building, TPO roof: one 160 x 100 ft area, parapets on three sides, a gravel stop at the front, 2 drains, 2 overflow scuppers, 3 RTU curbs and a hatch

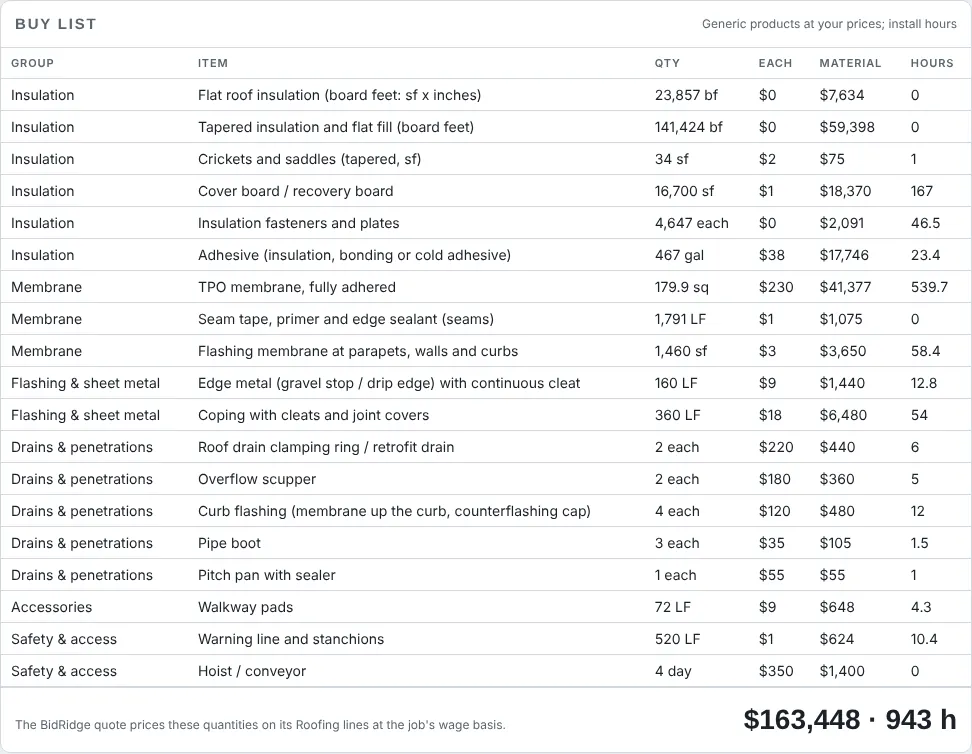
From the designer's commercial sample: a one-story retail roof with parapets on three sides and a gravel stop at the front. Two roof drains and two overflow scuppers drain it; the insulation is tapered 1/4 in. per ft four ways into each drain with saddles between them and crickets behind the rooftop units; a fully adhered TPO membrane goes over a high-density cover board. The checks run as you draw, and the drawing set, the Submittal set and a priced Roofing quote come from the same design. New in 1.63: the price book shows each line's production as squares (or feet, or pieces) a crew does in a day for the crew size you set; type either the hours or the day's production.

Narrated walkthrough, 2:07. Captions on.

The sample in numbers

  • Roof
    16,000 sf
    179.9 squares of TPO with the laps and 10% waste
  • Tapered insulation
    13 marks
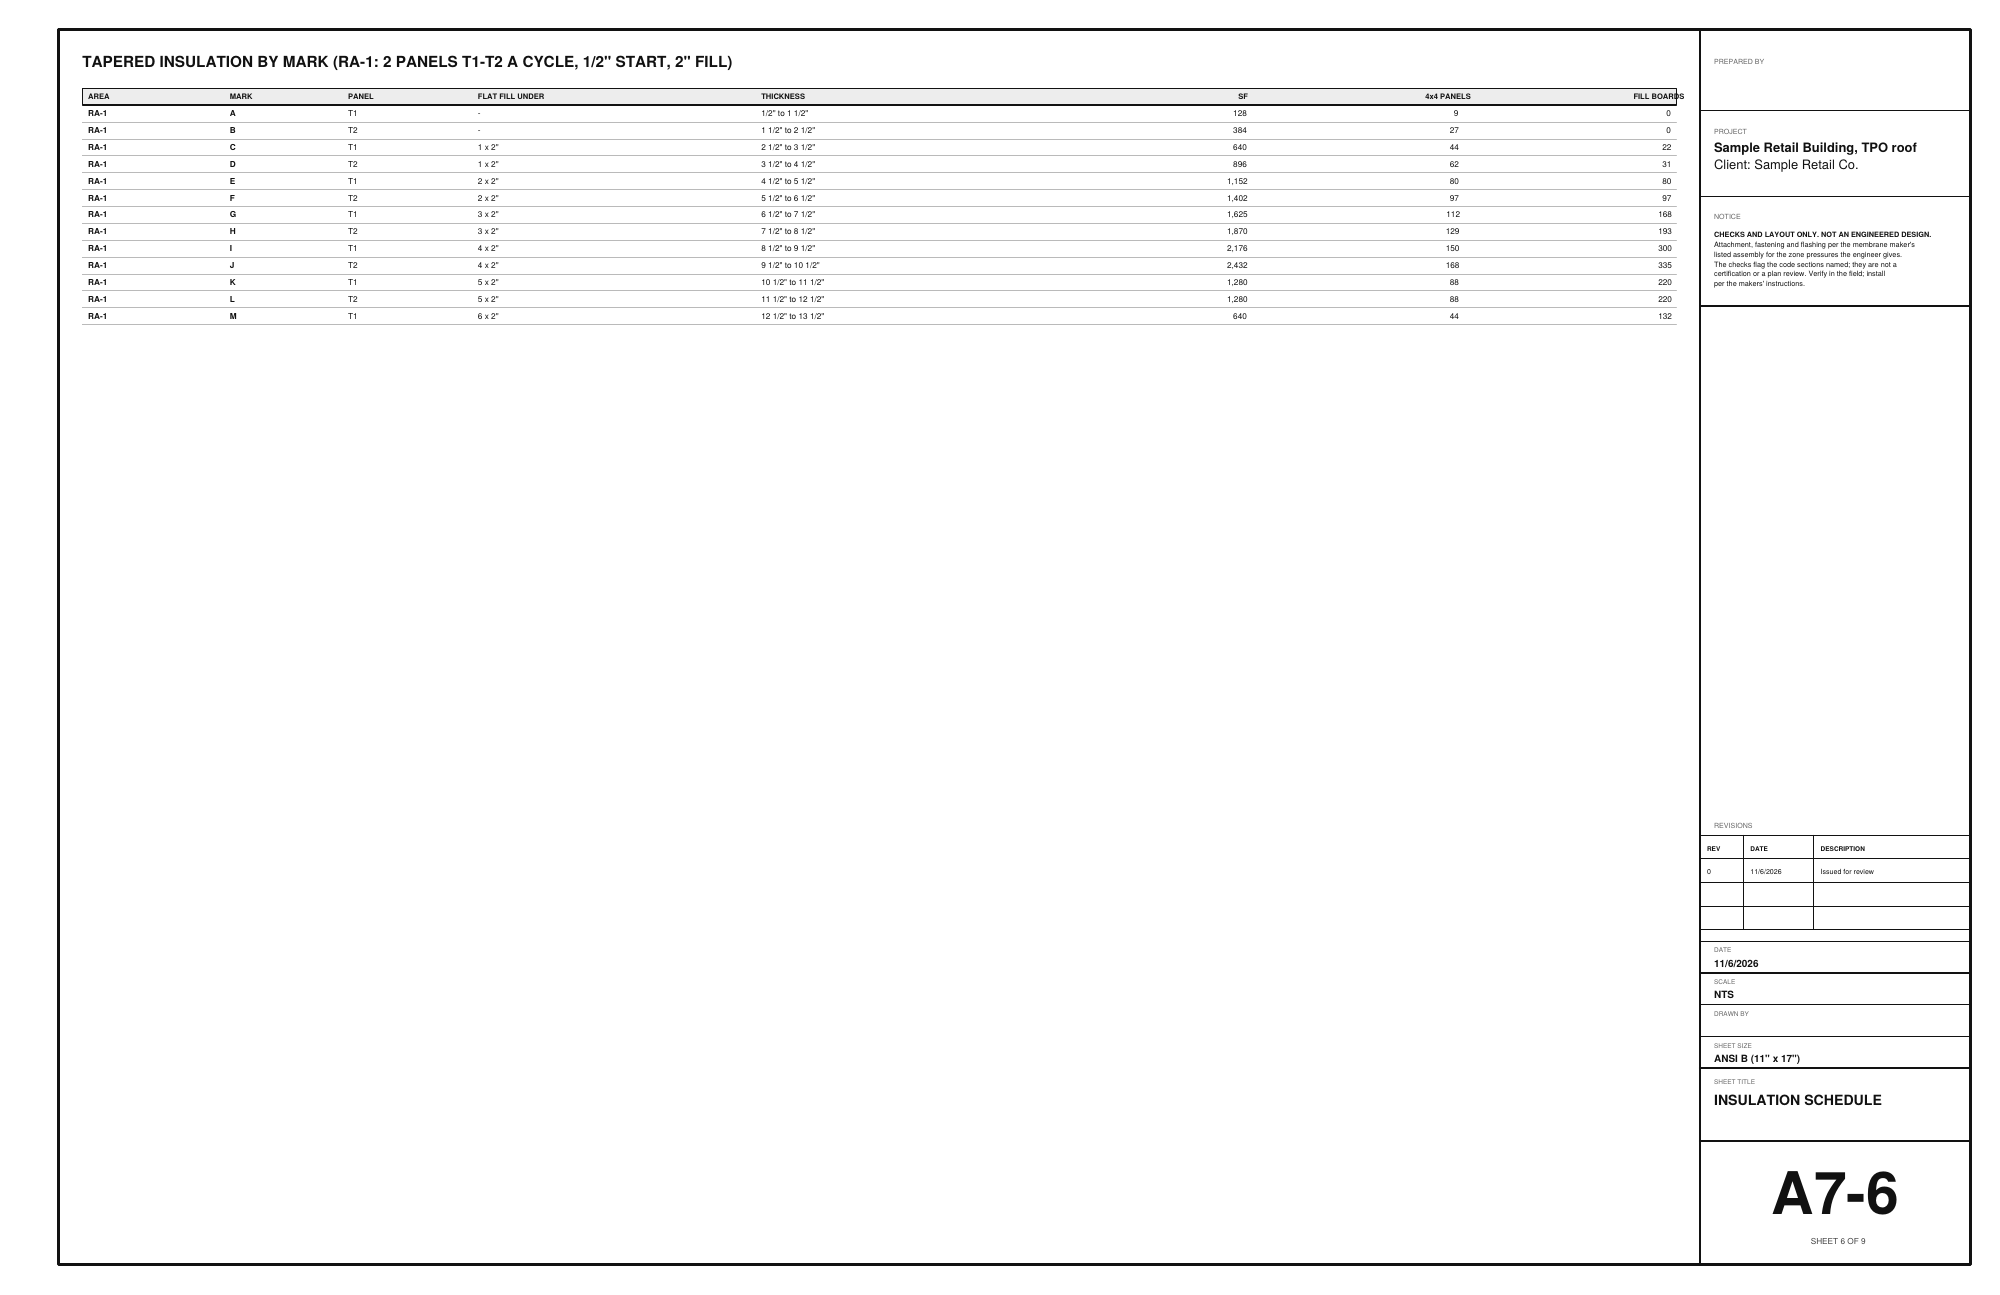
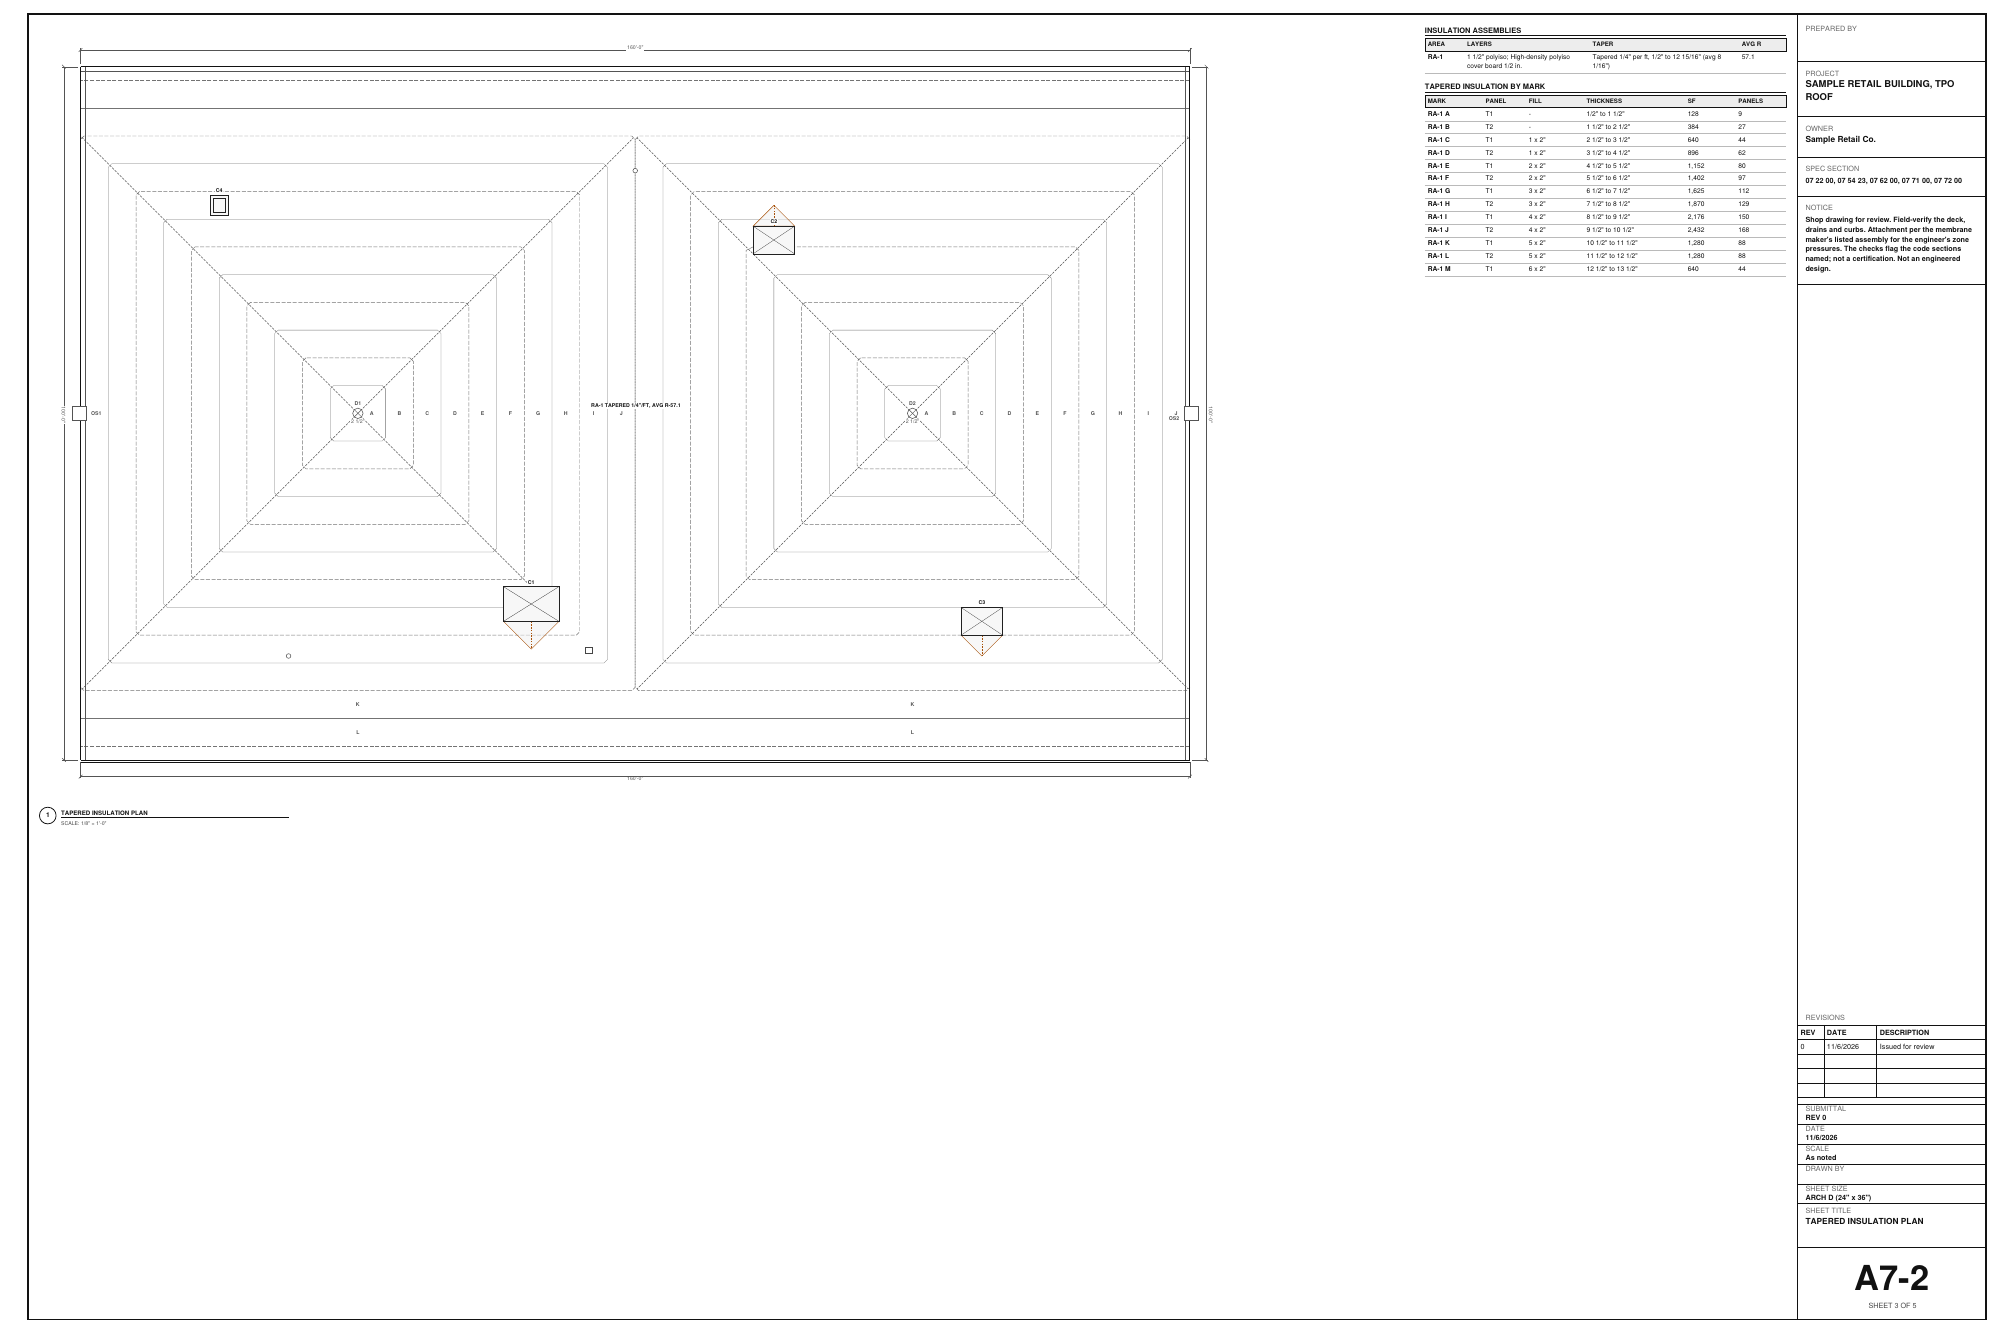
    1/4" per ft, 1/2" to 12.94", average 8.09"; 1,098 panels, 1,798 fill boards
  • Average R
    R-57.1
    2 1/2" at the drains (R-13.9); zone 7 asks R-35ci
  • Checks
    12
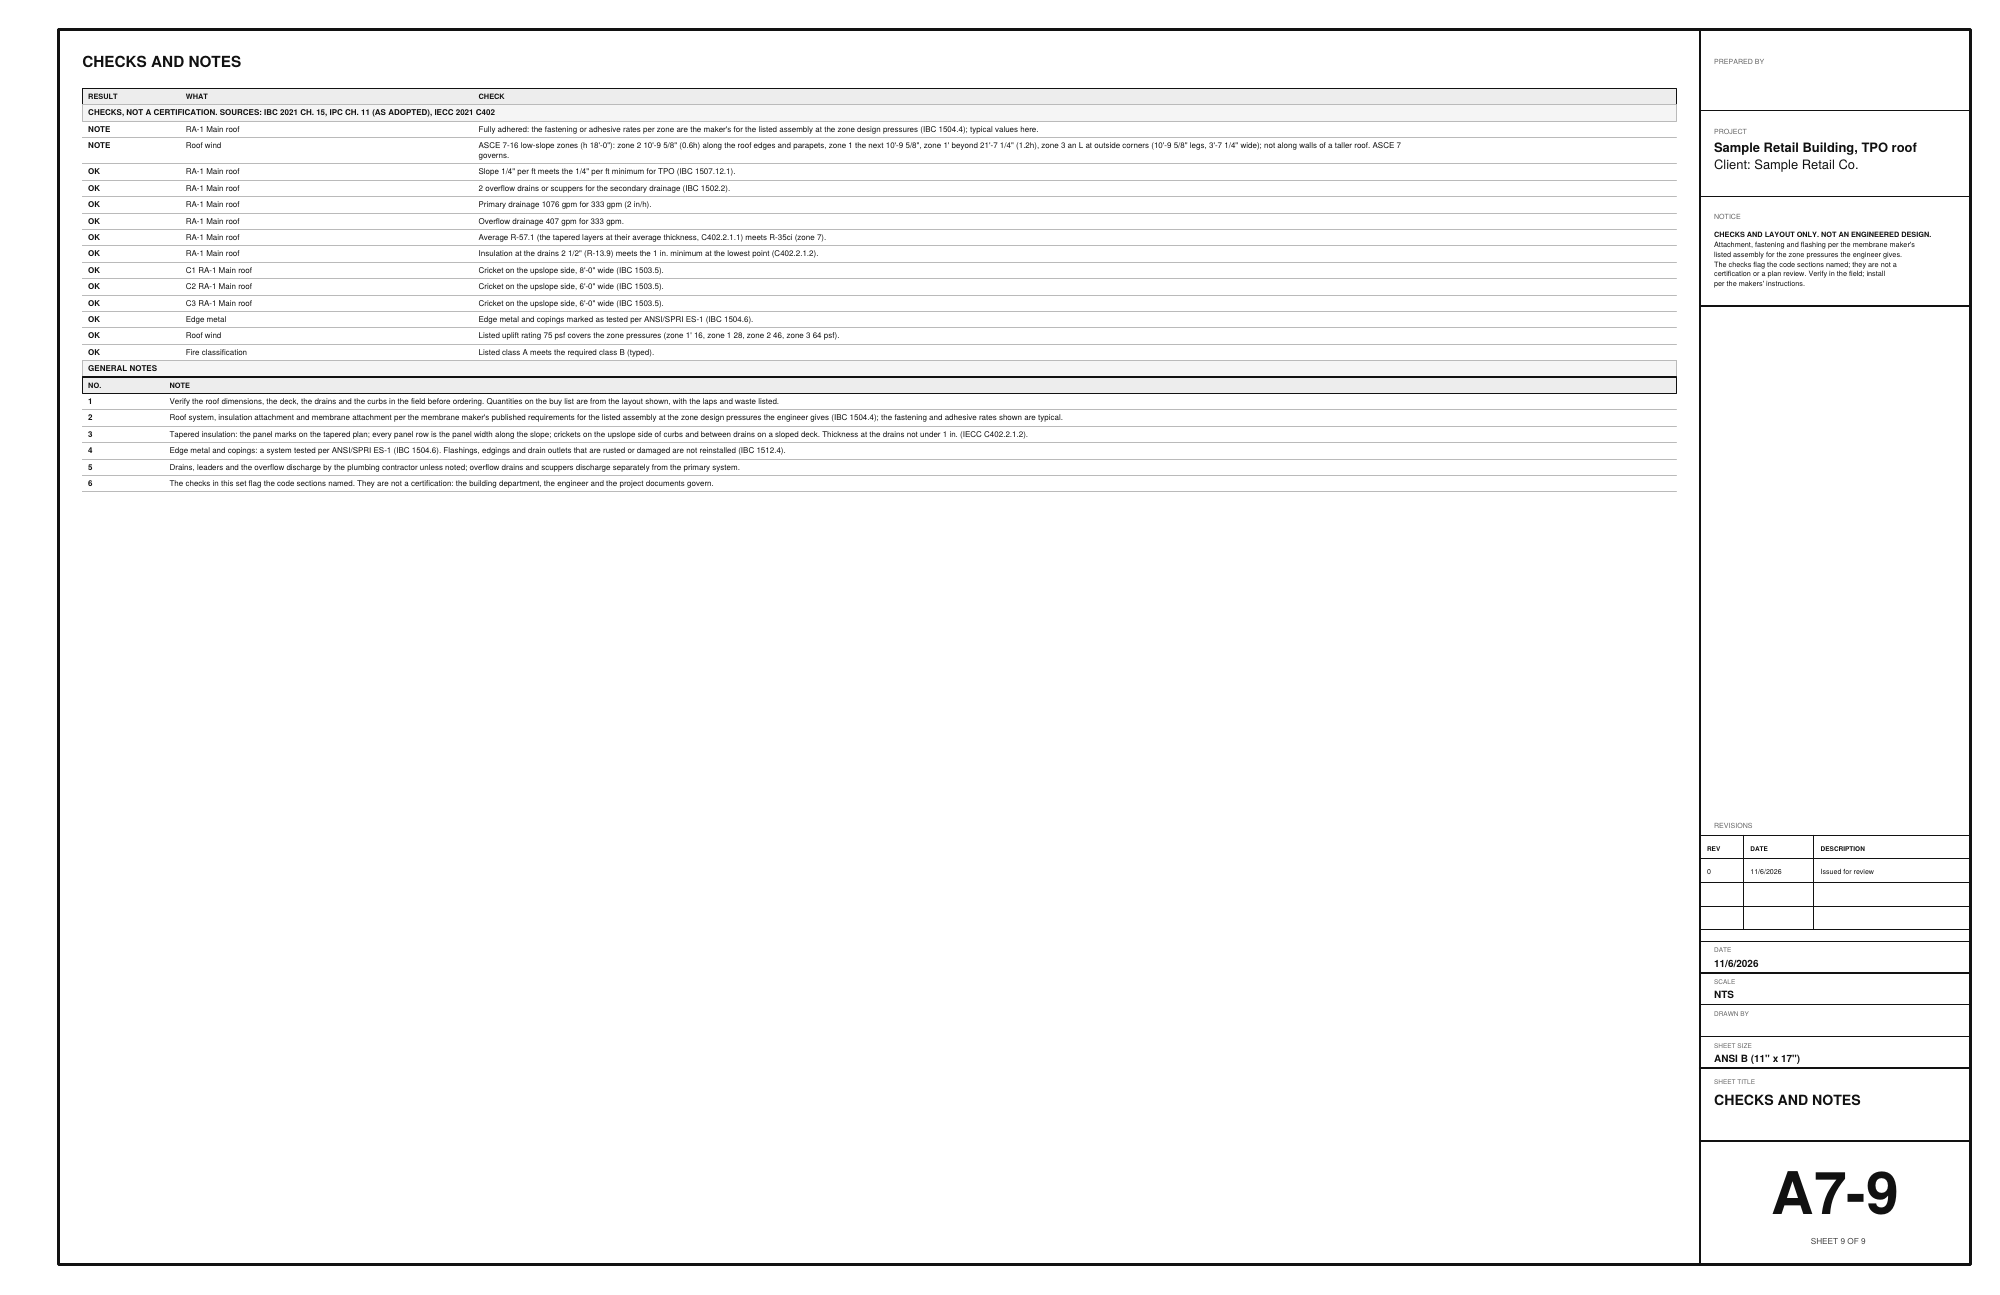
    passing; 0 flagged, 2 notes
  • Buy list
    $163,448
    19 lines, 943 install hours (sample prices: set yours)

Step by step

Step 1: Open the sample in the Low-Slope Roofing Designer

Step 1: Open the sample

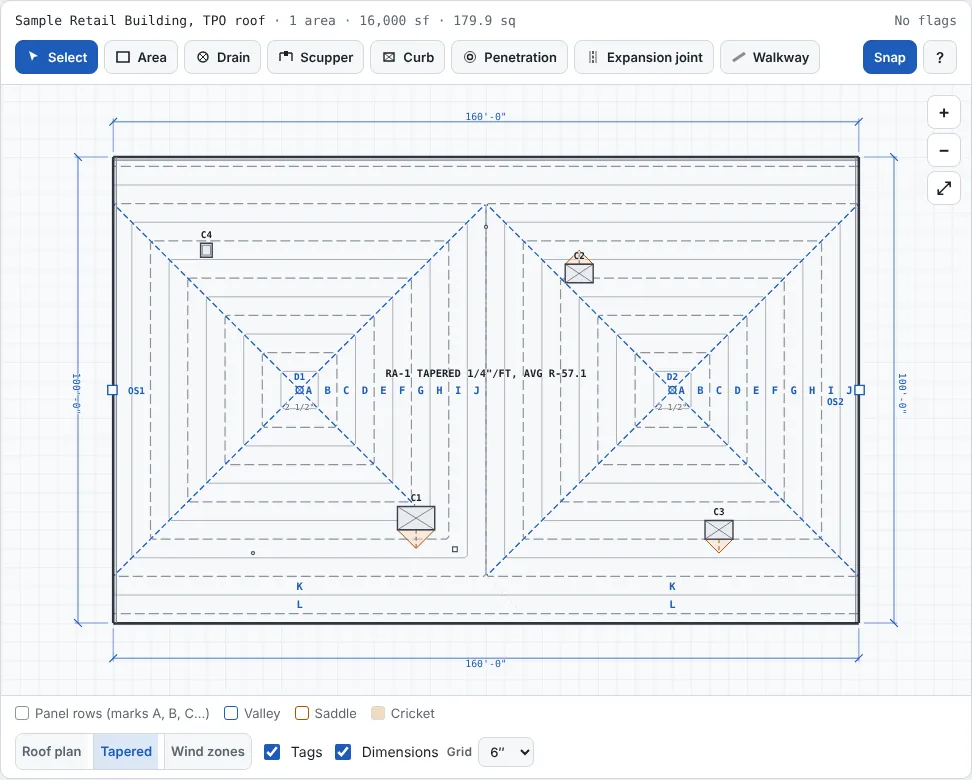
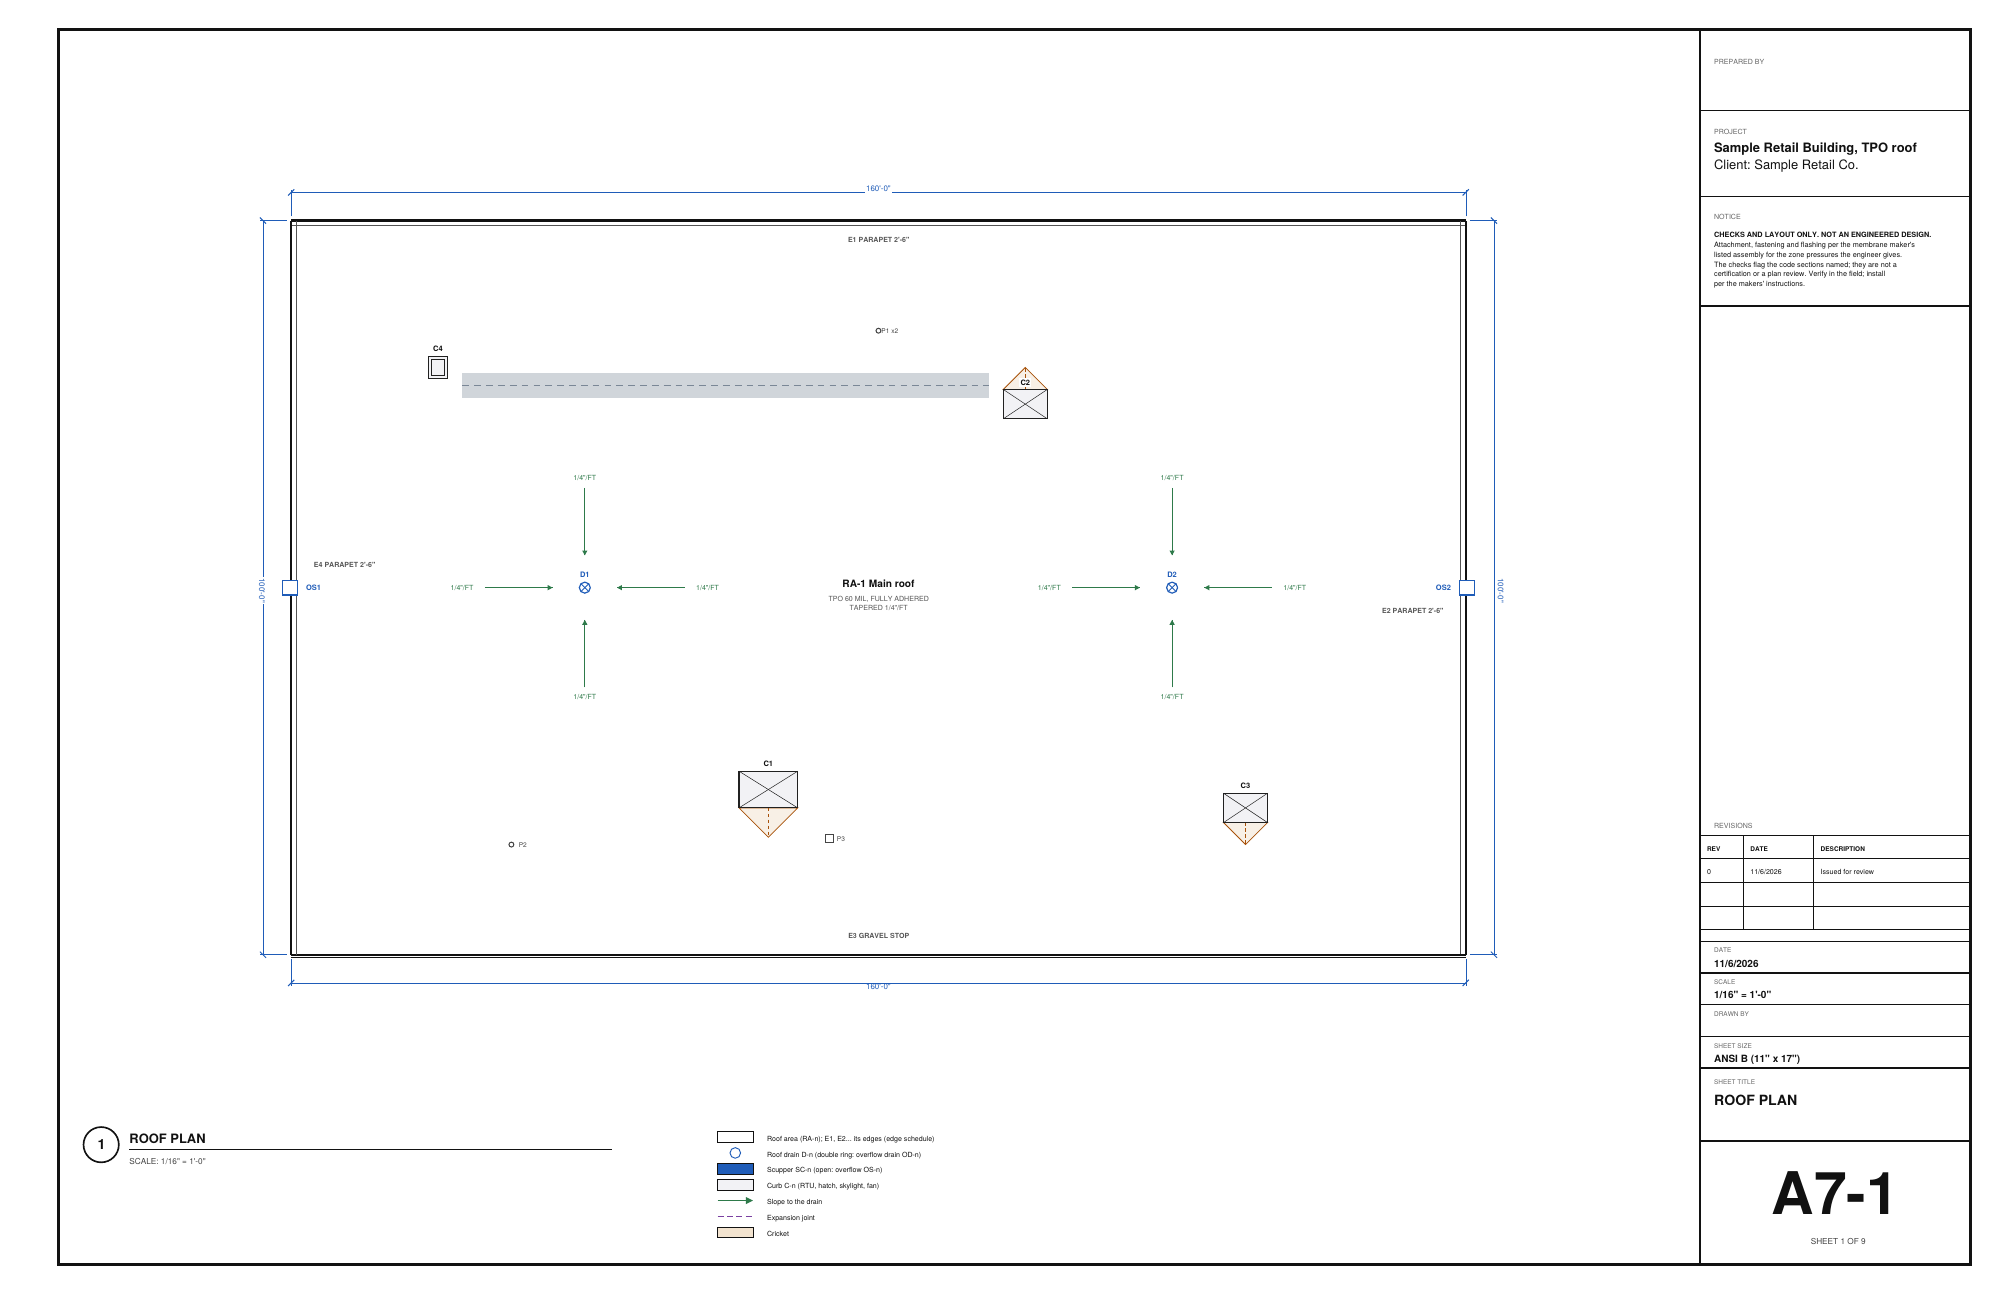
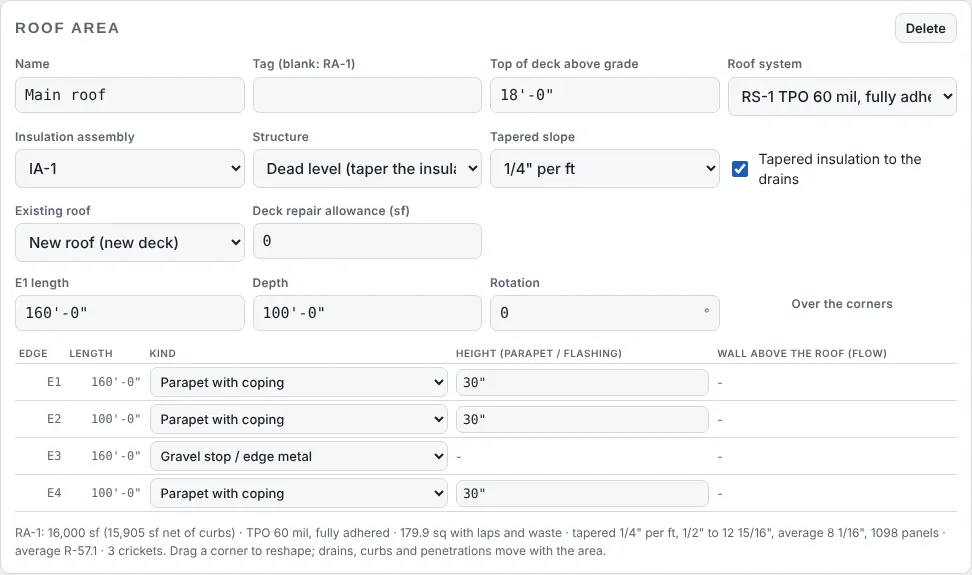
Open the Low-Slope Roofing Designer, tap New design, then Sample Retail Building, TPO roof. The roof plan shows the area RA-1 with its edges E1 to E4 (parapets on three sides, a gravel stop at the front), the two drains with their slope arrows, the overflow scuppers in the side parapets, the curbs with their crickets and the walkway.

Field tip: The sample's names and sizes are made up and every product is generic: set your own systems, insulation and prices before a real bid.
Step 2: Draw the roof areas in the Low-Slope Roofing Designer

Step 2: Draw the roof areas

Area drags a rectangle or taps the corners of any outline. Each area has its deck height above grade, its roof system and insulation assembly. Its edges are E1, E2... in the order drawn: in the editor set each one to a parapet (with its height), a wall of a taller roof (the flashing height, and the wall's height for the drain flow), a gravel stop, a drip edge, a gutter or open where it joins another area. Or import the flat-roofed sections of a Roofing & Siding Designer commercial project.

Field tip: Any field takes 5' 0", 60 or 152cm. Residential flat roofs stay in the Roofing & Siding Designer.

Step 3: Set the structure, the slope and the existing roof in the Low-Slope Roofing Designer

Step 3: Set the structure, the slope and the existing roof

A dead-level structure is tapered to the drains (1/8, 3/16, 1/4, 3/8 or 1/2 in. per ft); a sloped structure drains to its low edge with crickets between the drains. Pick new roof, tear-off to the deck (with the number of existing layers) or recover, and a deck repair allowance.

Field tip: Recover is flagged over two existing roofs or a wet one (IBC 1512.2.1.1); a reroof with positive drainage need not meet the minimum slope (1512.1).

Step 4: Place the drains, scuppers, curbs and penetrations in the Low-Slope Roofing Designer

Step 4: Place the drains, scuppers, curbs and penetrations

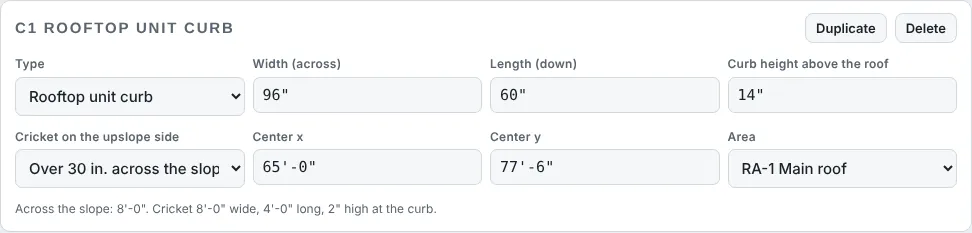
Drain taps a roof drain (its leader size, overflow, new body or retrofit insert); Scupper taps an edge for a scupper through it; Curb taps or drags a curb (RTU, hatch, skylight, fan); Penetration places pipe boots and pitch pans. Expansion joint and Walkway take two taps.

Field tip: A curb over 30 in. across the slope gets a cricket on its upslope side (IBC 1503.5); force it on or off in its editor.

Step 5: Read the tapered layout in the Low-Slope Roofing Designer

Step 5: Read the tapered layout

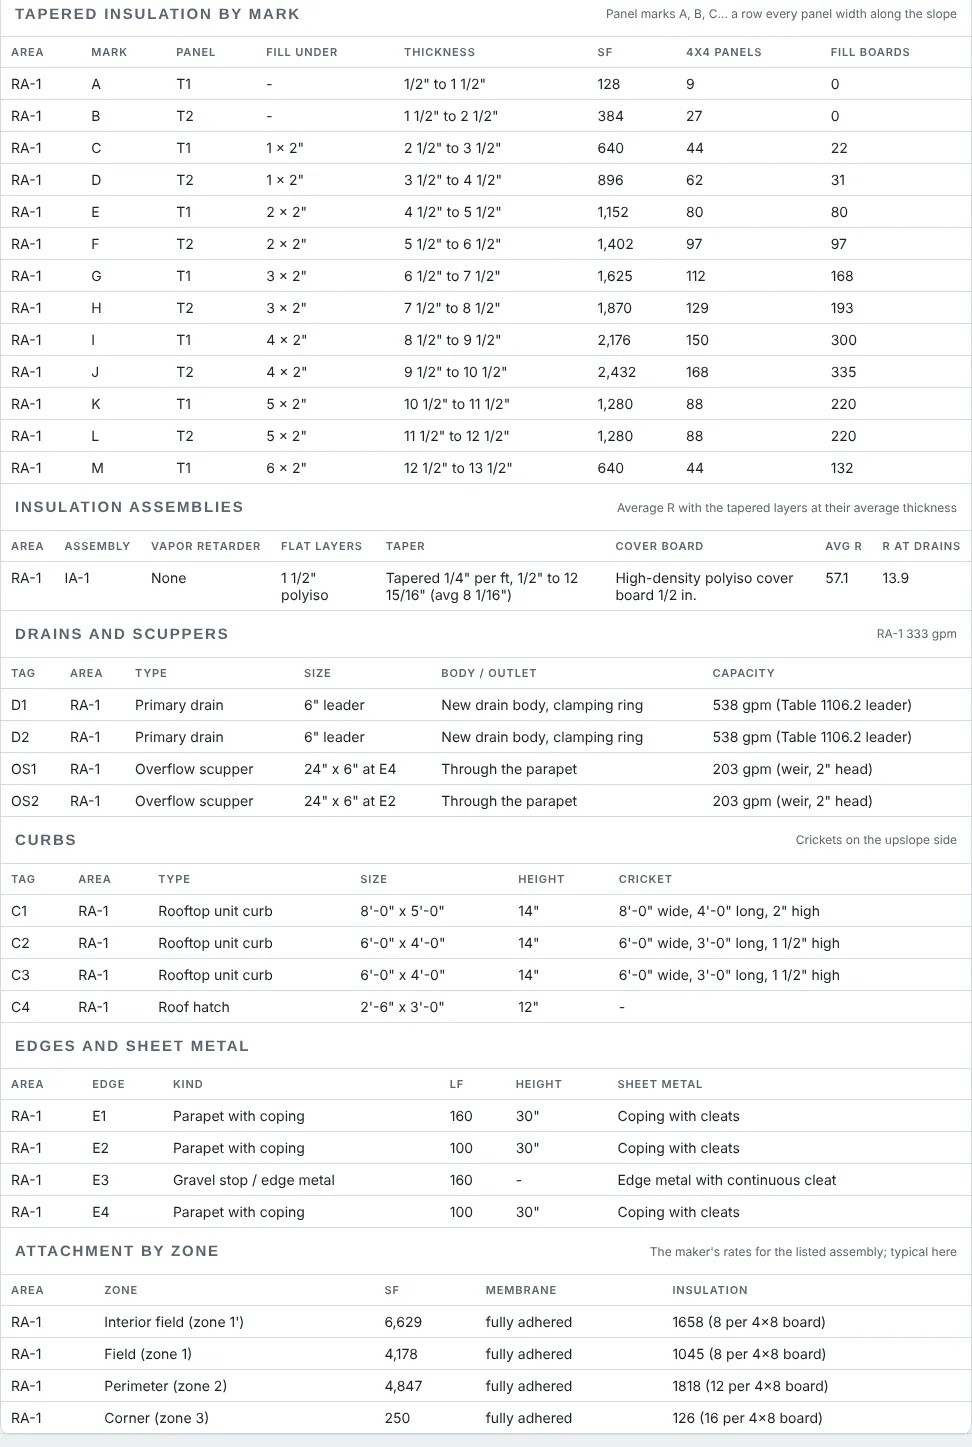
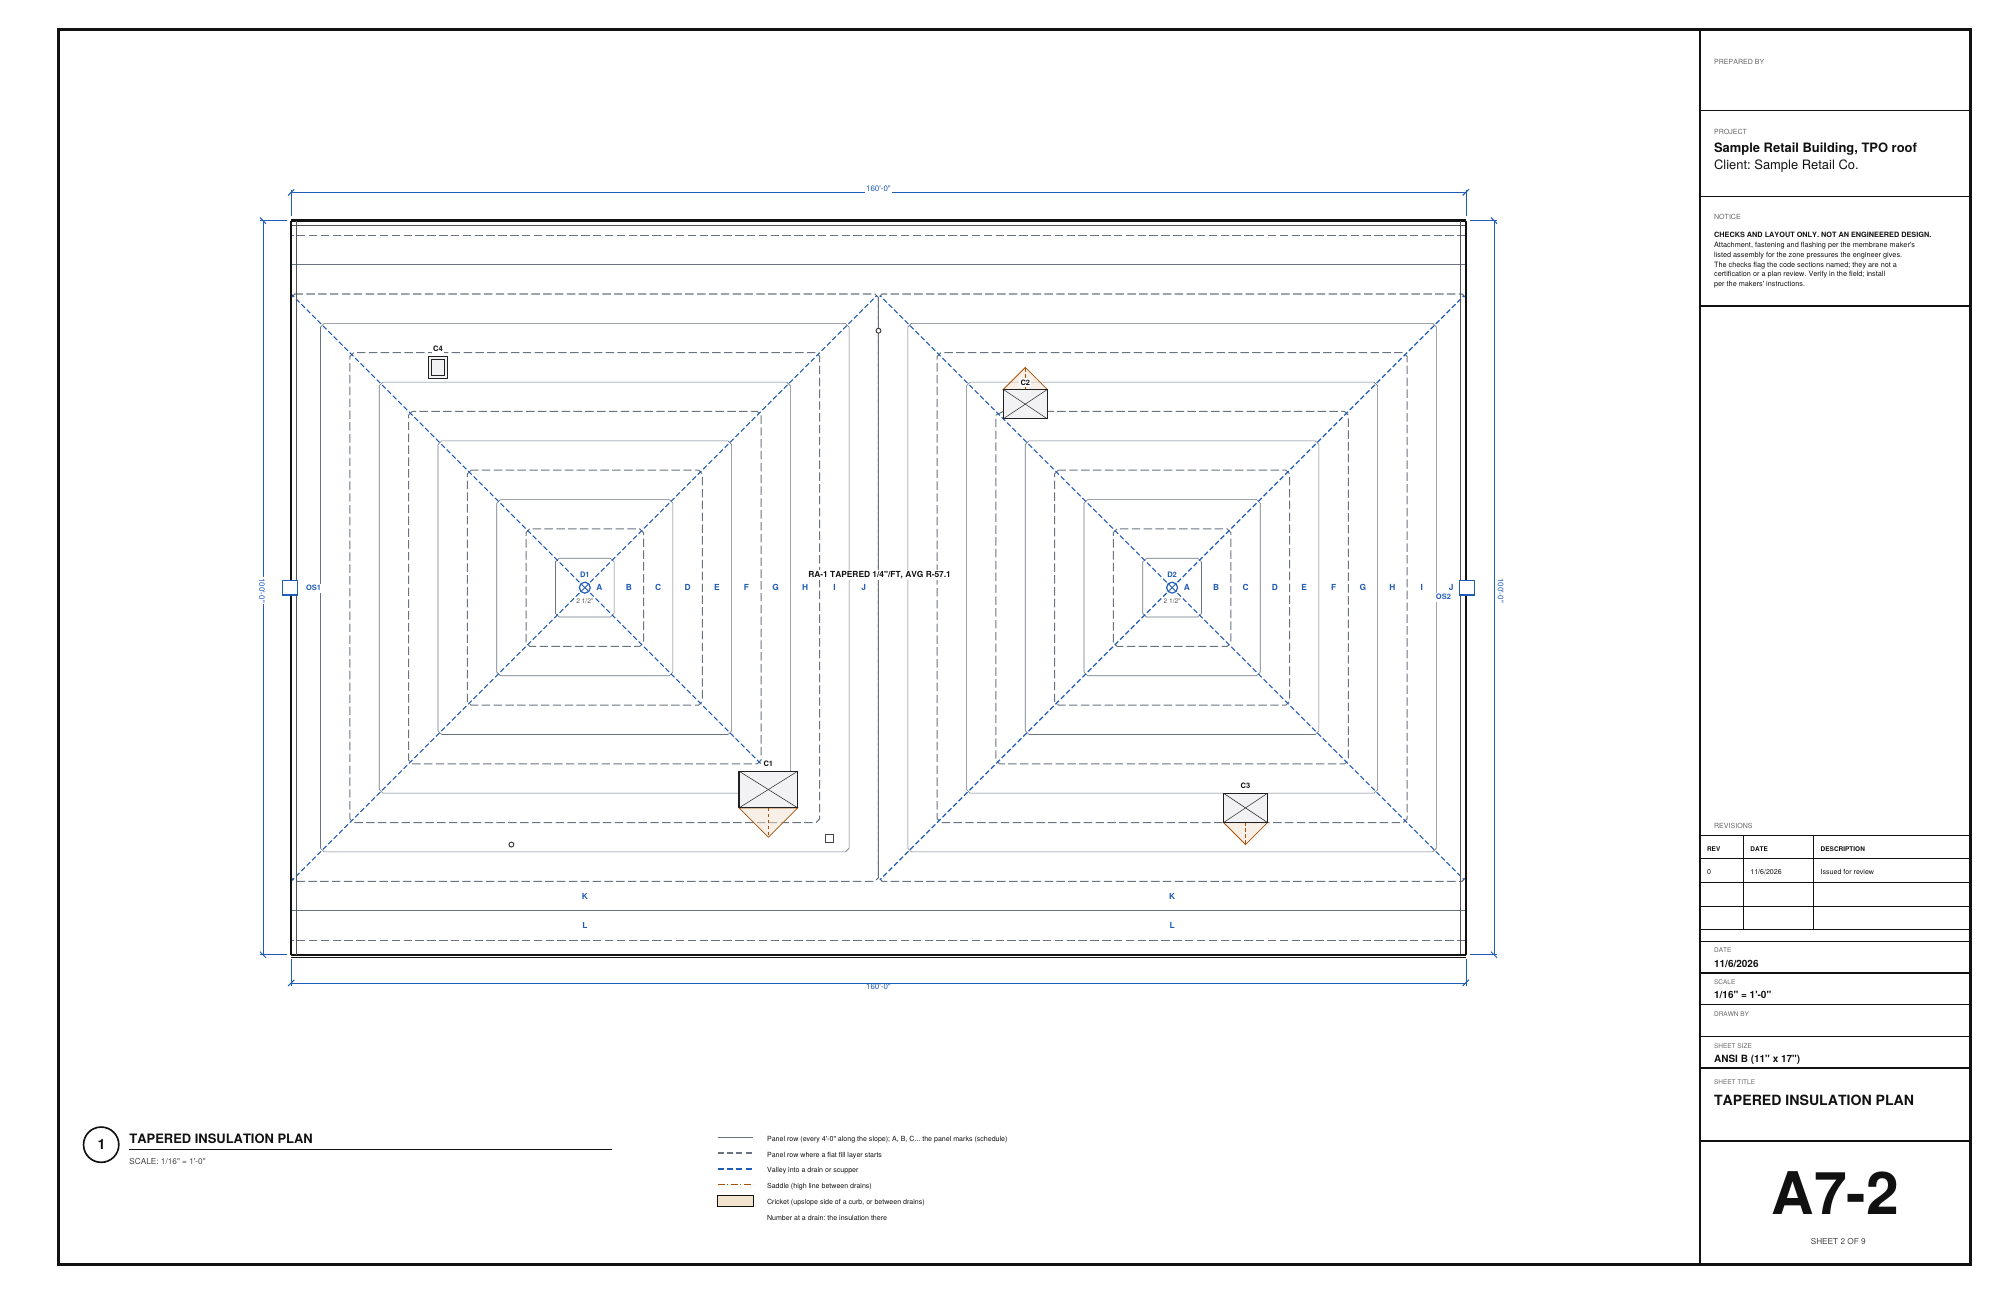
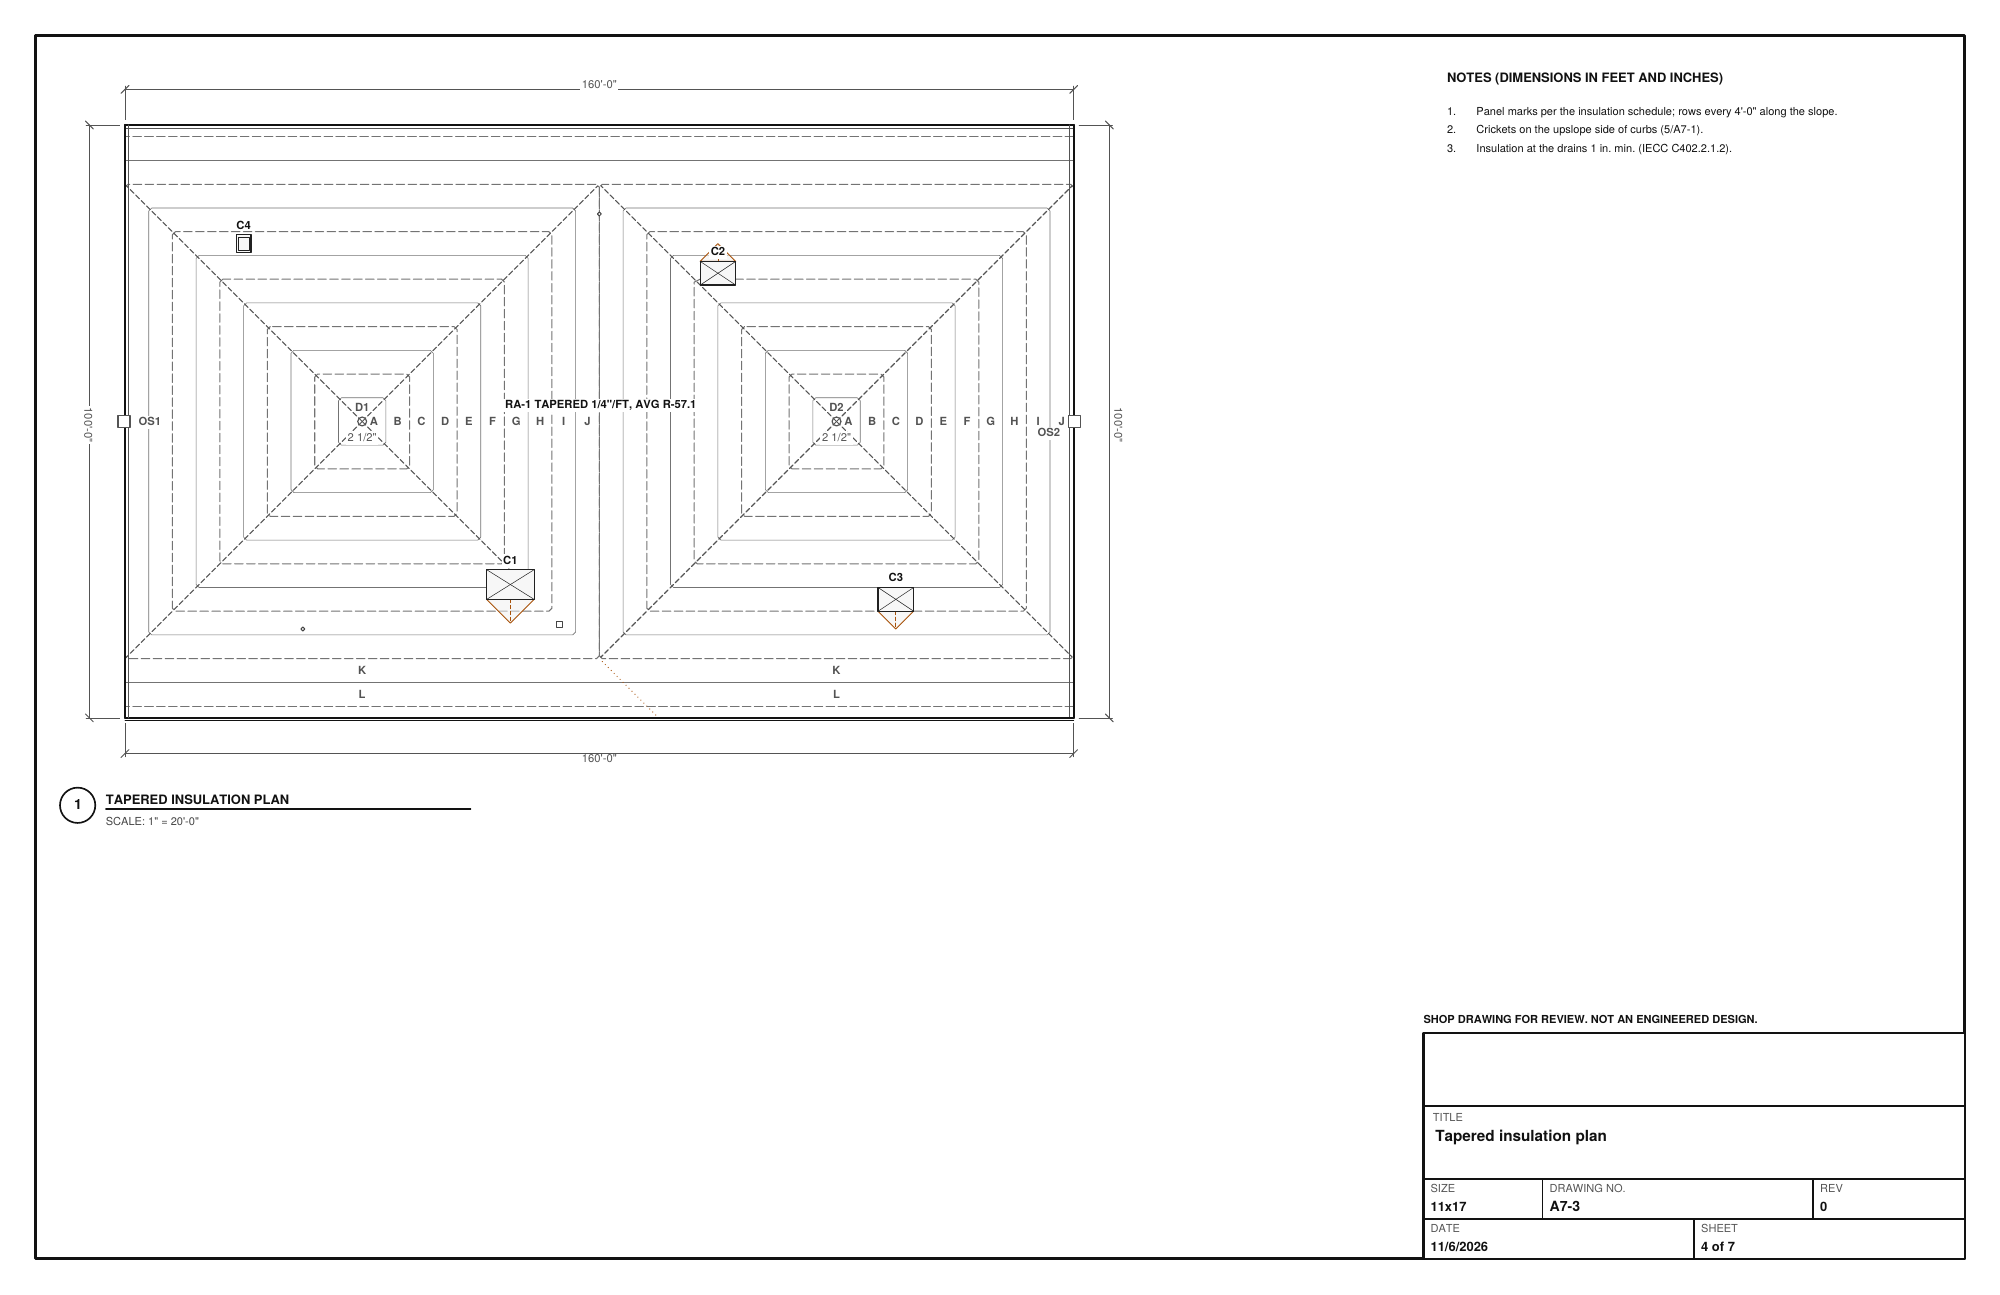
Tapered shows the layout the designer works out: the slopes run four ways into each drain, with valleys on the diagonals and a saddle where two drains' slopes meet. Each panel row (4 ft along the slope) is a mark A, B, C...; each mark is a tapered panel (T1, T2 of the series) over its flat fill. The sample has 13 marks from 1/2" at the drains to 12.94" at the high corners, averaging 8.09".

Field tip: The series (panel width, thinnest edge, fill board) and the cricket slope are typical values: use the tapered supplier's series.

Step 6: Pick the roof system in the Low-Slope Roofing Designer

Step 6: Pick the roof system

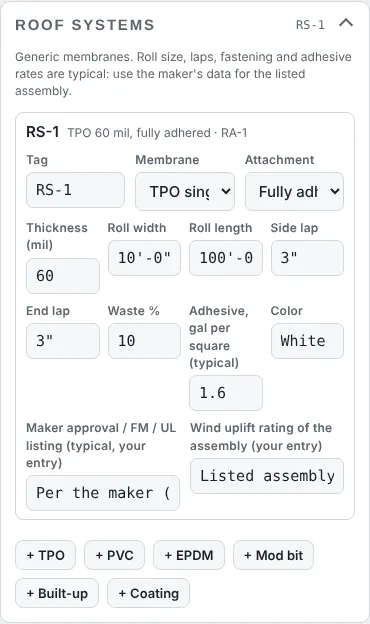
TPO and PVC (adhered or mechanically attached), EPDM (adhered, mechanically attached or ballasted), modified bitumen 2-ply (SBS or APP; torch, cold or self-adhered), built-up 3- or 4-ply with gravel, or a coating over the existing roof. Each system keeps its roll size, side and end laps, waste, adhesive rate, fastening by zone and the maker approval and uplift rating as your entries.

Field tip: Squares come from the net area times the lap factor of the roll times the waste.

Step 7: Build the insulation assembly in the Low-Slope Roofing Designer

Step 7: Build the insulation assembly

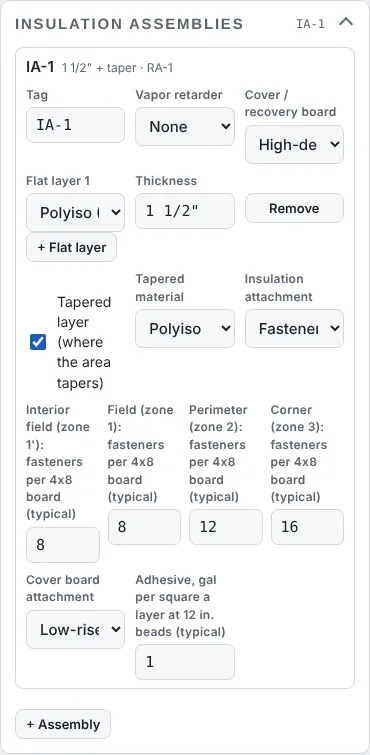
Vapor retarder, flat layers (polyiso, EPS, XPS or mineral wool, each with its typical R per inch), the tapered layer, the cover or recovery board and how each is attached (fasteners per board by zone, or adhesive beads by zone).

Field tip: The average R counts the tapered layers at their average thickness (IECC C402.2.1.1); the drains need 1 in. of insulation (C402.2.1.2).

Step 8: Check the wind zones in the Low-Slope Roofing Designer

Step 8: Check the wind zones

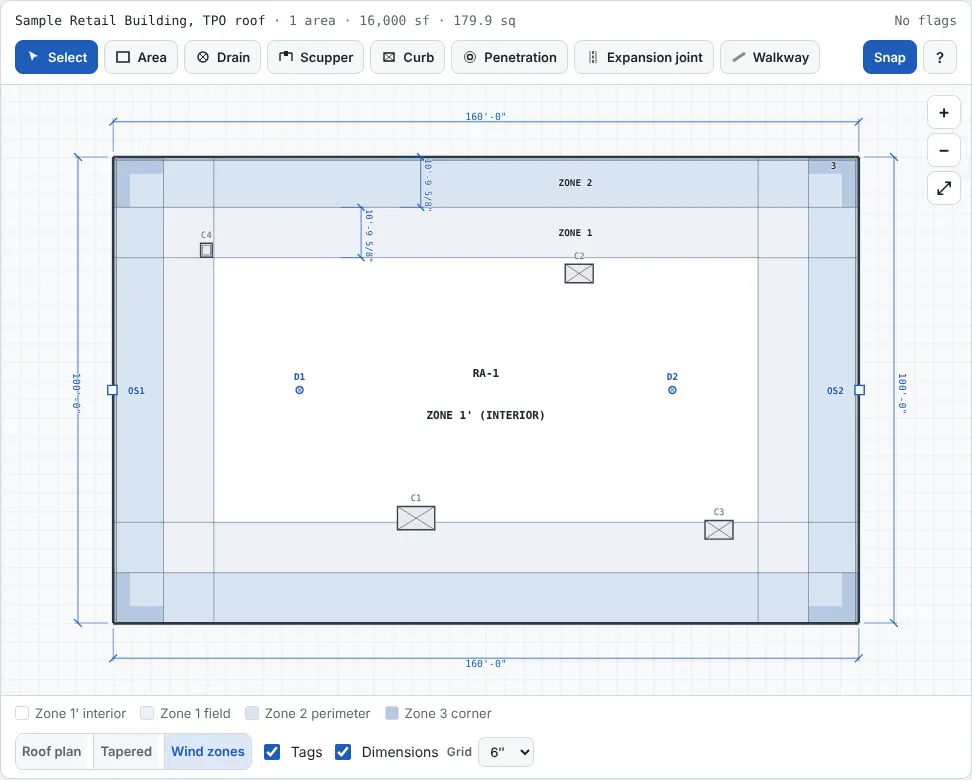
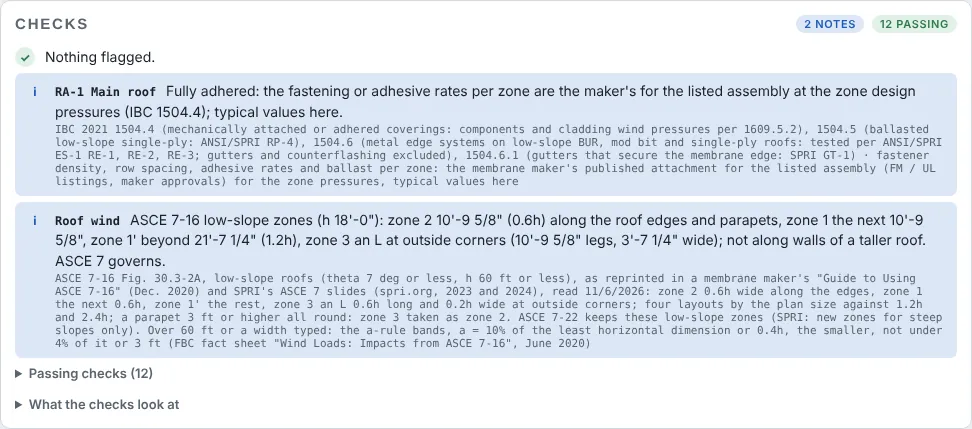
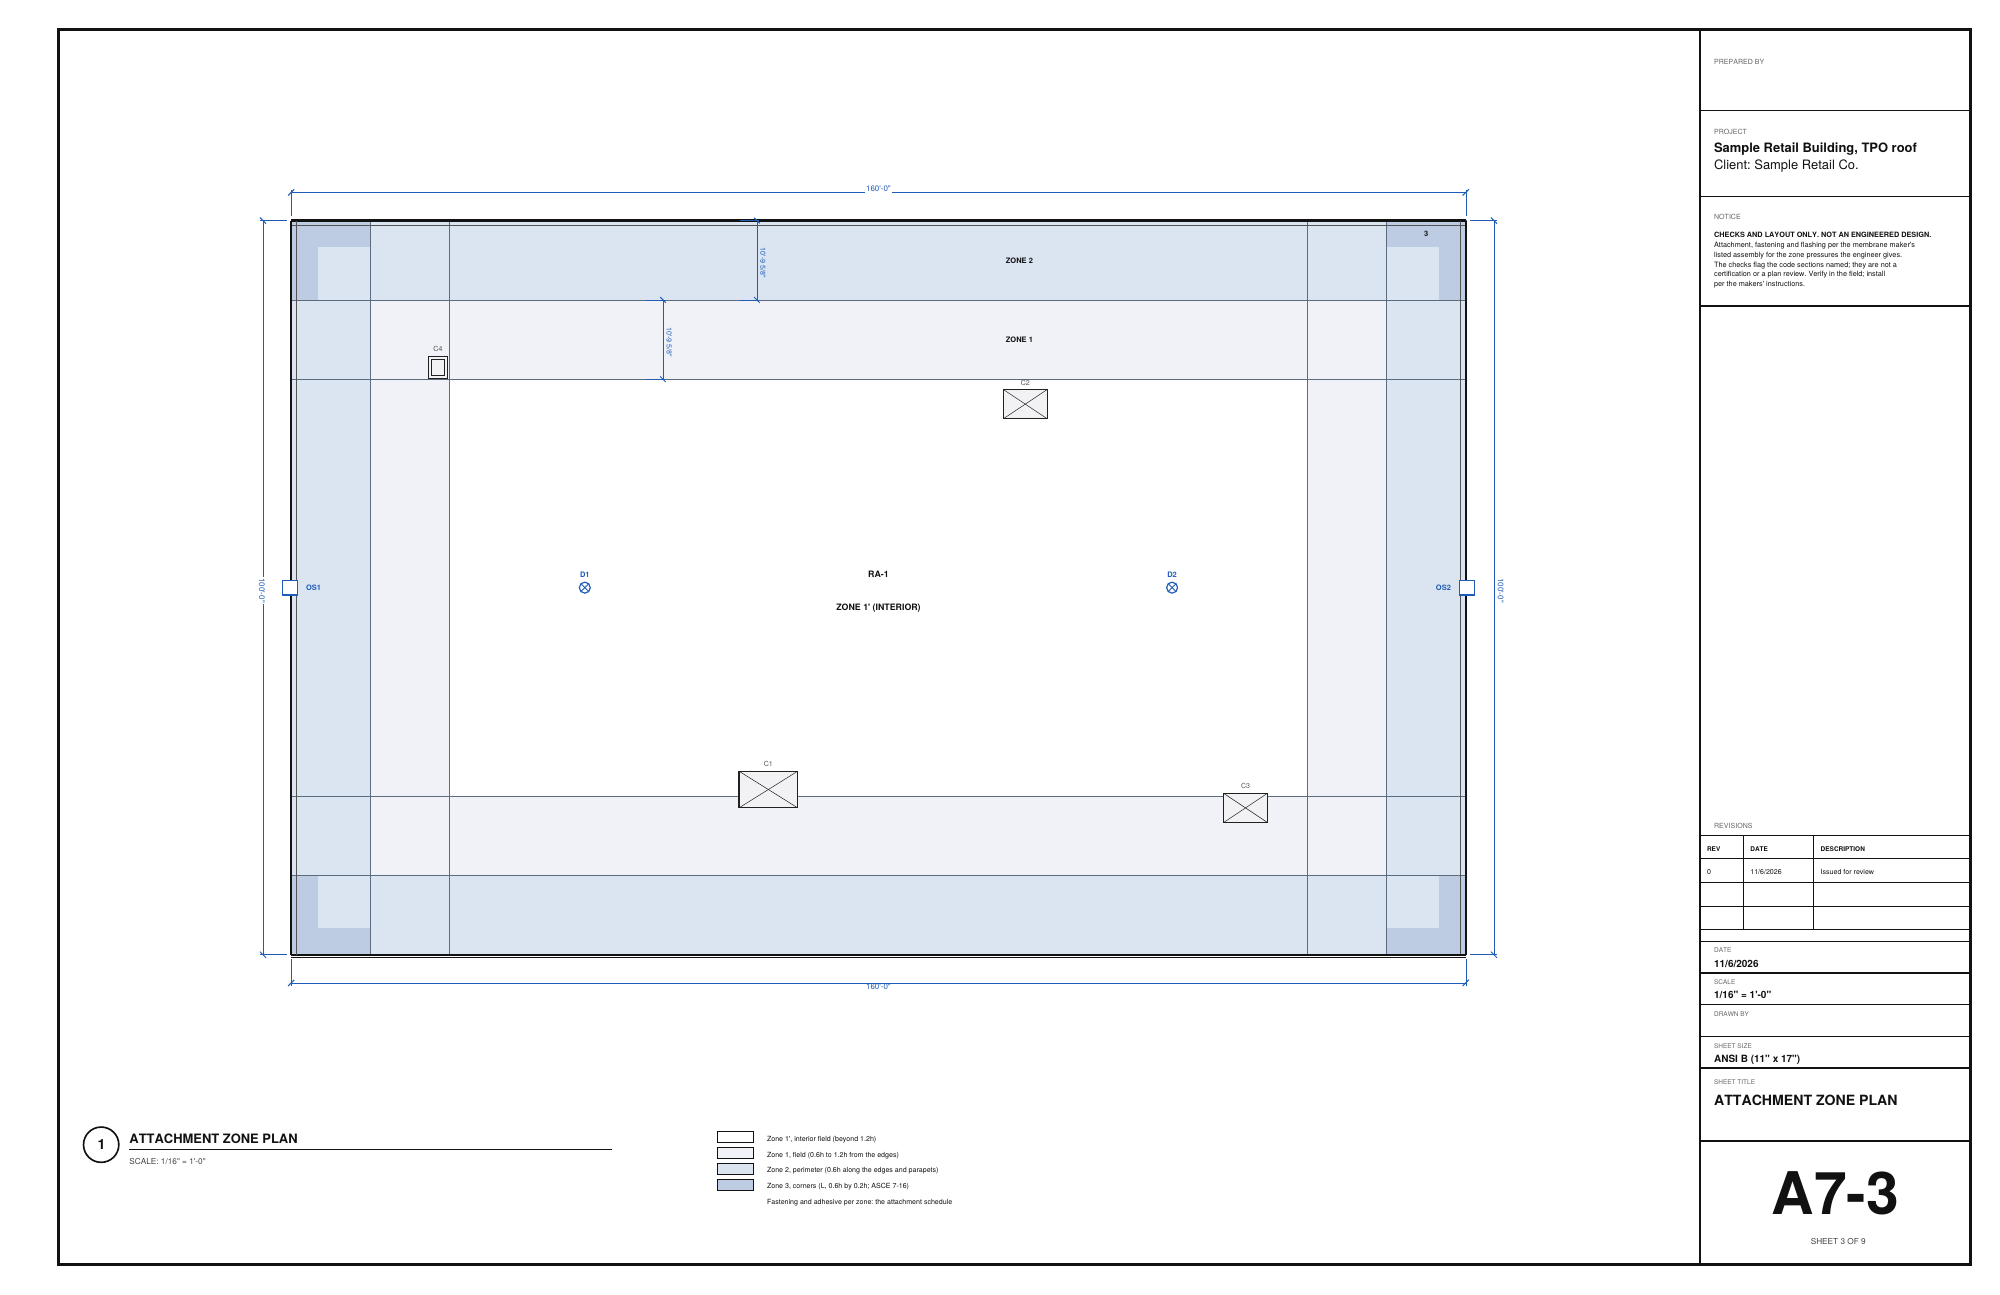
Wind zones shows the ASCE 7-16 low-slope zones for a roof 60 ft or less: zone 2 0.6h wide along the edges and parapets (10'-9.6" here), zone 1 the next 0.6h, zone 1' the interior beyond 1.2h and zone 3 an L (0.6h by 0.2h) at the outside corners; parapets 3 ft or higher all round take zone 3 as zone 2. Type the engineer's pressures for each zone, or the velocity pressure qh to have them worked out from GCp 1' -0.9, 1 -1.7, 2 -2.3, 3 -3.2 (10 sf) and the enclosure, and the assembly's listed rating to have them compared. A width typed (or a roof over 60 ft) uses the a-rule bands.

Field tip: Fastener rows, spacing and per-board counts by zone are typical: use the maker's listed assembly for the zone pressures.

Step 9: Size the drainage in the Low-Slope Roofing Designer

Step 9: Size the drainage

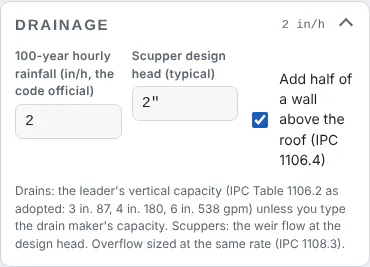
Type the site's 100-year hourly rainfall. Each area's flow (its area plus half of a wall above it) is compared with the drains' leader capacity and the scuppers' weir flow, and the overflow drains and scuppers are sized at the same rate. The sample makes 333 gpm at 2 in/h; the two 6 in. leaders carry 1076 gpm and the overflow scuppers 407 gpm.

Field tip: Parapets or walls on every side need overflow drains or scuppers (IBC 1502.2); scuppers are 4 in. min. (1502.3).

Step 10: Read the checks in the Low-Slope Roofing Designer

Step 10: Read the checks

Minimum slope per membrane, drainage and overflow, the drain sizes, a tested edge system for the edge metal and copings (IBC 1504.6), the R-value and the drains, the crickets, recover limits, the wind pressures against the listed rating and the fire classification (IBC Table 1505.1 by the type of construction).

Field tip: Checks and flags, not an engineered design or a plan review.

Step 11: Schedules and the buy list in the Low-Slope Roofing Designer

Step 11: Schedules and the buy list

The insulation by mark (panels and fill boards), the assemblies with their average R, the drains and scuppers with their capacity, the curbs and crickets, the edges and their sheet metal and the attachment by zone. The buy list carries every quantity: membrane squares, flashing membrane, insulation in board feet, cover board, fasteners, adhesive, edge metal, coping, drains, curbs, boots, walkways, safety, access, warranty and tests.

Field tip: Each buy-list line is a BidRidge Roofing line, so the quote carries the same quantities.

Step 12: Drawing set, Submittal set and the quote in the Low-Slope Roofing Designer

Step 12: Drawing set, Submittal set and the quote

Save PDF makes the roof plan, the tapered insulation plan with the marks, the attachment zone plan, the details (parapet, edge, drain, scupper, curb and cricket, pipe boot, pitch pan, expansion joint), the schedules, the buy list and the checks. Sheets for > Submittal set makes the full ARCH D set or 11x17 shop sheets with the product data log. Send to BidRidge makes a commercial Roofing quote on the trade's Low-slope (commercial) lines.

Field tip: BidRidge prices those lines from its own Roofing rate book: set your low-slope prices there once.

Step 13: Coat or foam the existing roof in the Low-Slope Roofing Designer

Step 13: Coat or foam the existing roof

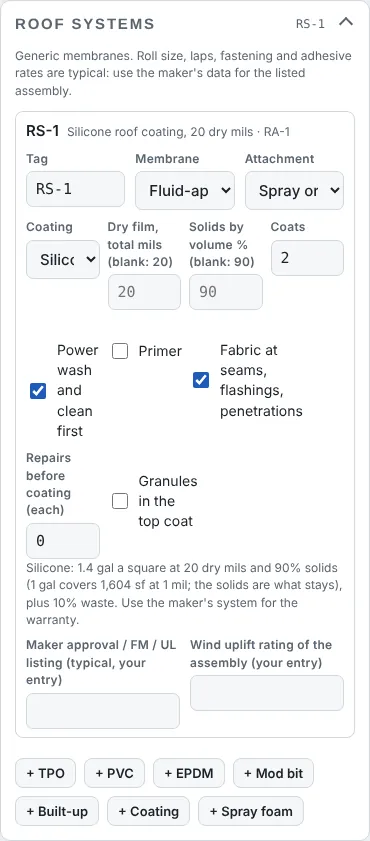
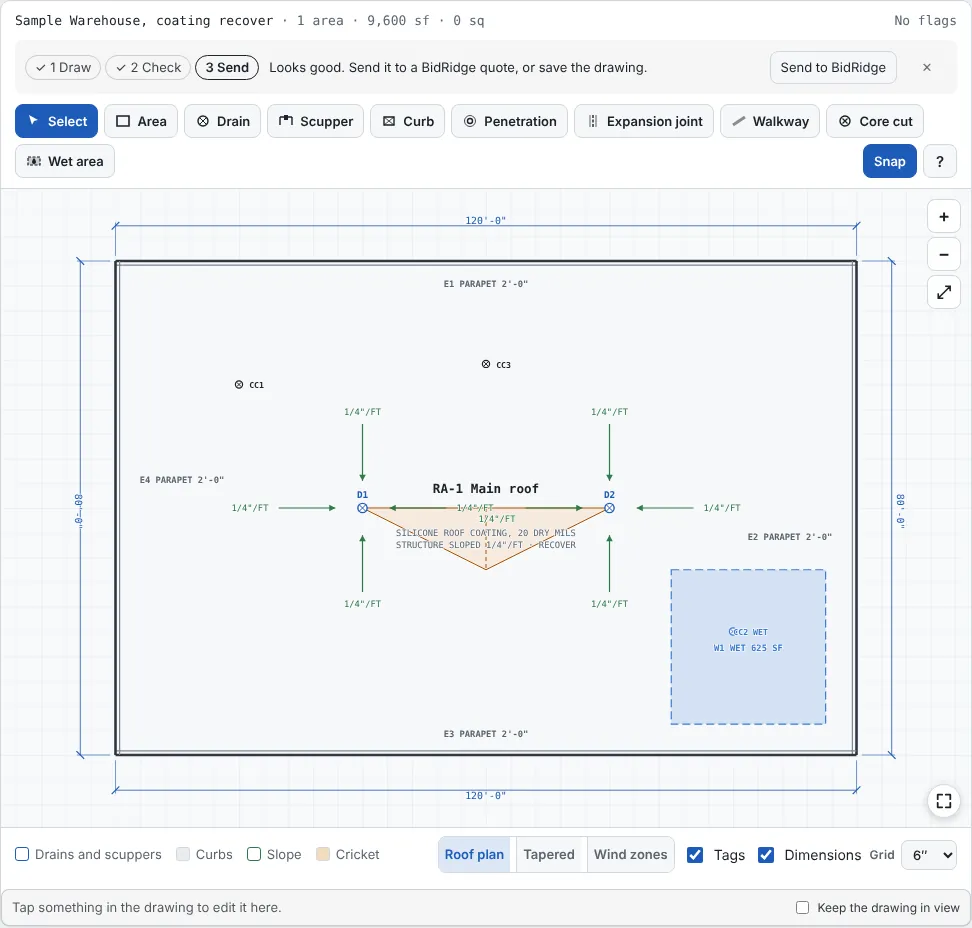
Under Roof systems, + Coating adds a fluid-applied coating over the existing roof (silicone, elastomeric acrylic or urethane), + Spray foam a spray polyurethane foam roof with its protective coating. A coating prices from the dry film and the solids: here 20 dry mils at 90% solids is 1.4 gal a square, two coats, plus the power wash, a primer if you tick it, fabric at the seams, flashings and penetrations, repairs and granules. Spray foam counts board feet from its thickness and its taper, and the foam is the insulation (R from its thickness). Set the area's Existing roof to Recover so the survey below counts. Sample Warehouse, coating and spray foam has both, with its survey: open it from New design.

Field tip: The film thickness and solids are typical starting points: the coating maker's system governs, and the warranty comes from it.

Step 14: Survey the existing roof in the Low-Slope Roofing Designer

Step 14: Survey the existing roof

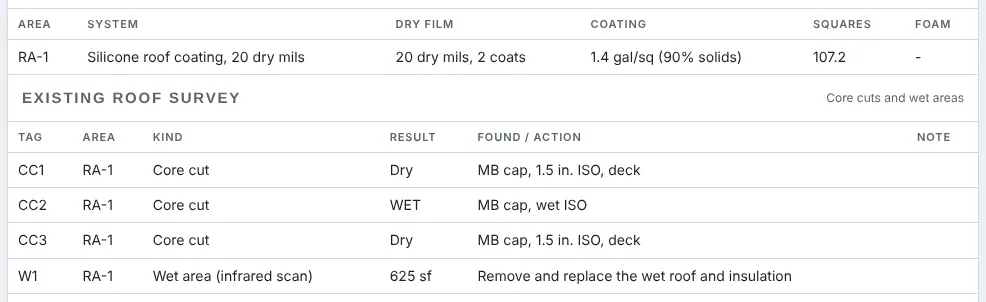
Before you recover, find out what is under the old roof. Core cut drops a core where you cut one (CC1, CC2...): pick Dry or Wet and type what you found. Wet area drags a box (or taps a shape) around the wet roof from an infrared or moisture scan. Each wet area is priced to remove and replace before the new roof goes on; a wet core with no wet area around it gets a flag; and over a quarter of the roof wet is flagged as a tear-off to consider (IBC 1512.2.1.1 does not allow a recover over a water-soaked roof). The recover check passes once a survey is on the drawing.

Step 15: The coating and survey schedules in the Low-Slope Roofing Designer

Step 15: The coating and survey schedules

The schedules list each coated area (system, dry film, gallons a square, squares, foam) and the survey: every core with its result and what was found, every wet area with its size and the action. Both tables go on the drawing set, and the coating, the wet replacement and the cores go to BidRidge as their own lines.

Step 16: Plan background: start from the roof plan

Import the architect's roof plan under Plan background and set the scale. Trace walls reads the parapets: a closed parapet becomes the roof area inside it with parapet edges, and the edges of areas you drew that run along a parapet are set to parapet. Trace room makes a roof area (or a curb) from any outline you click, and drains tapped on the drawing's drains land on their centers, so the tapered layout starts from the architect's drain locations. New in 1.63: on a vector PDF with the scale set, Suggest walls and Suggest rooms find the walls from the double lines and the areas from the names printed on the sheet, for review; tap any you don't want, then Use adds the rest. Scanned sheets are still traced by hand.

What you get

The drawing set, the lists and the files

Real files from this sample, made by the designer. Tap a page to see it full size. Yours carry your company, the client and the address.

A7-1 Roof plan
A7-1 Roof plan
A7-2 Tapered insulation plan
A7-3 Attachment zone plan
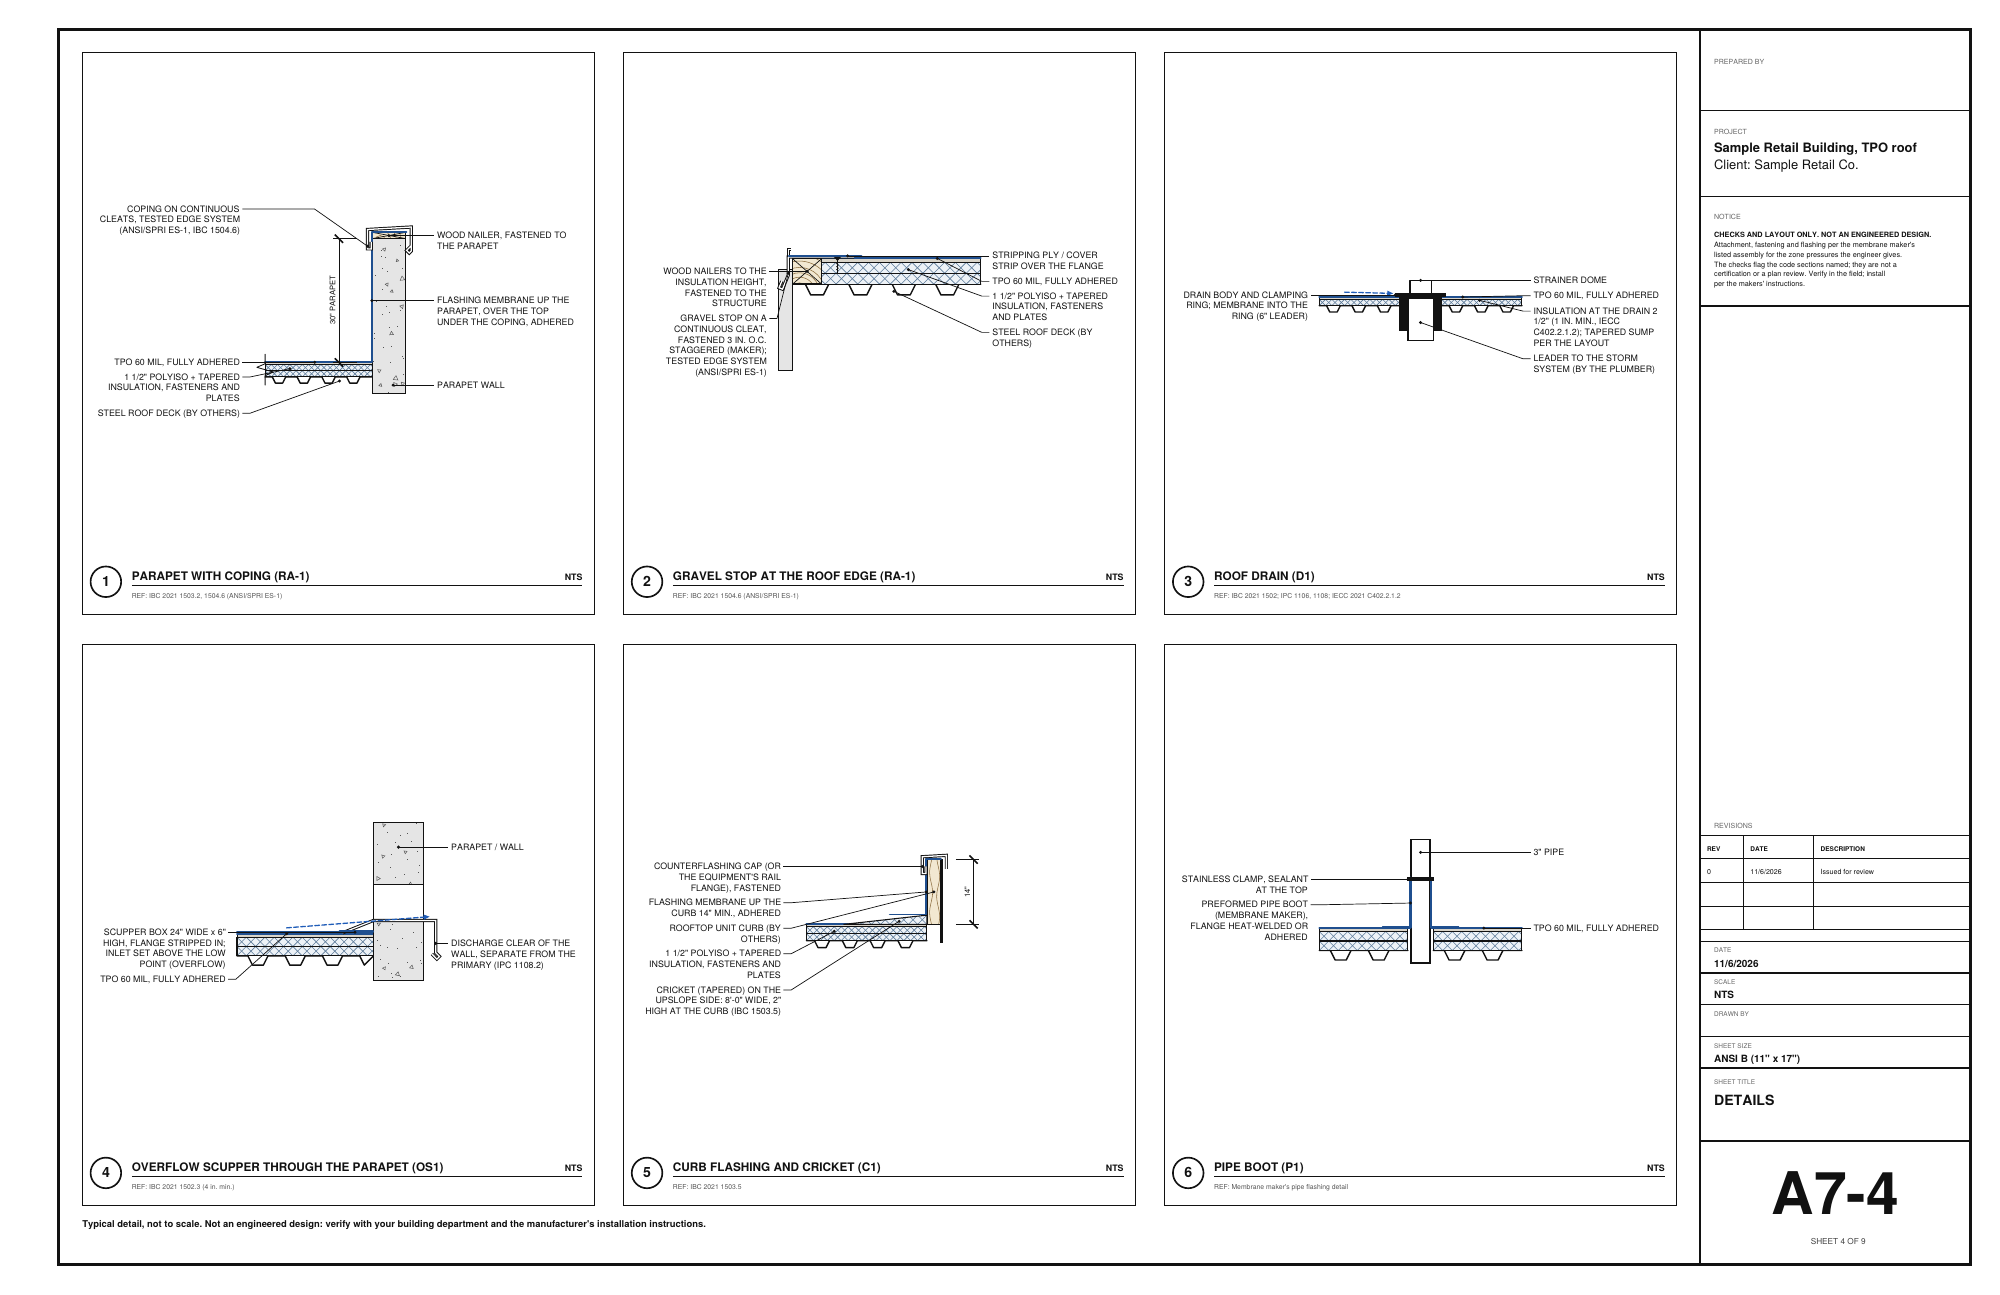
A7-4 Details
A7-4 Details
A7-6 Insulation schedule
A7-9 Checks and notes
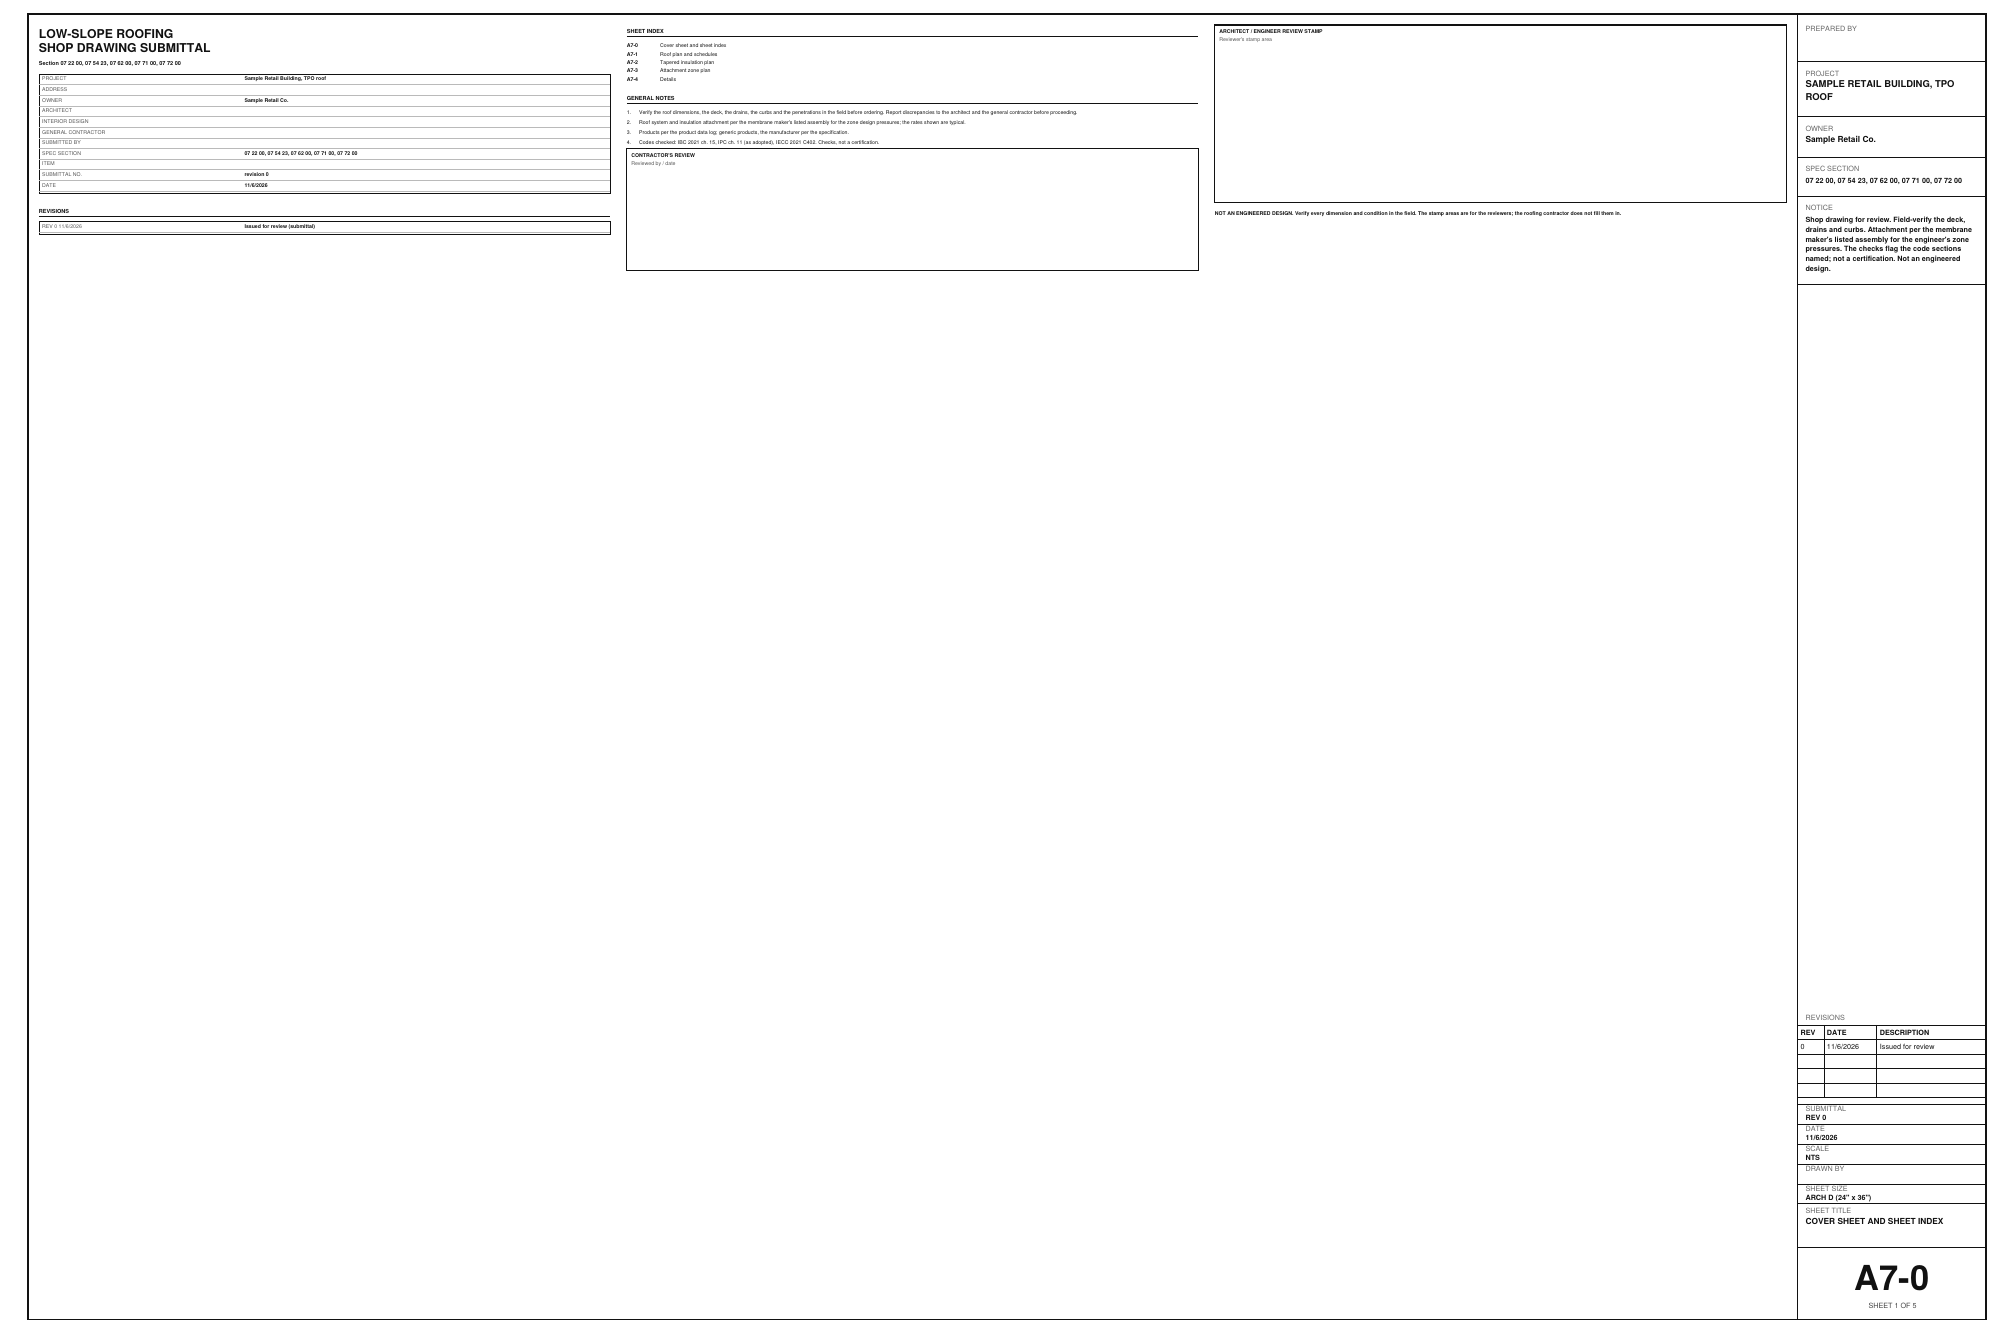
Submittal (ARCH D) A7-0 Cover sheet and sheet index
Submittal (ARCH D) A7-2 Tapered insulation plan
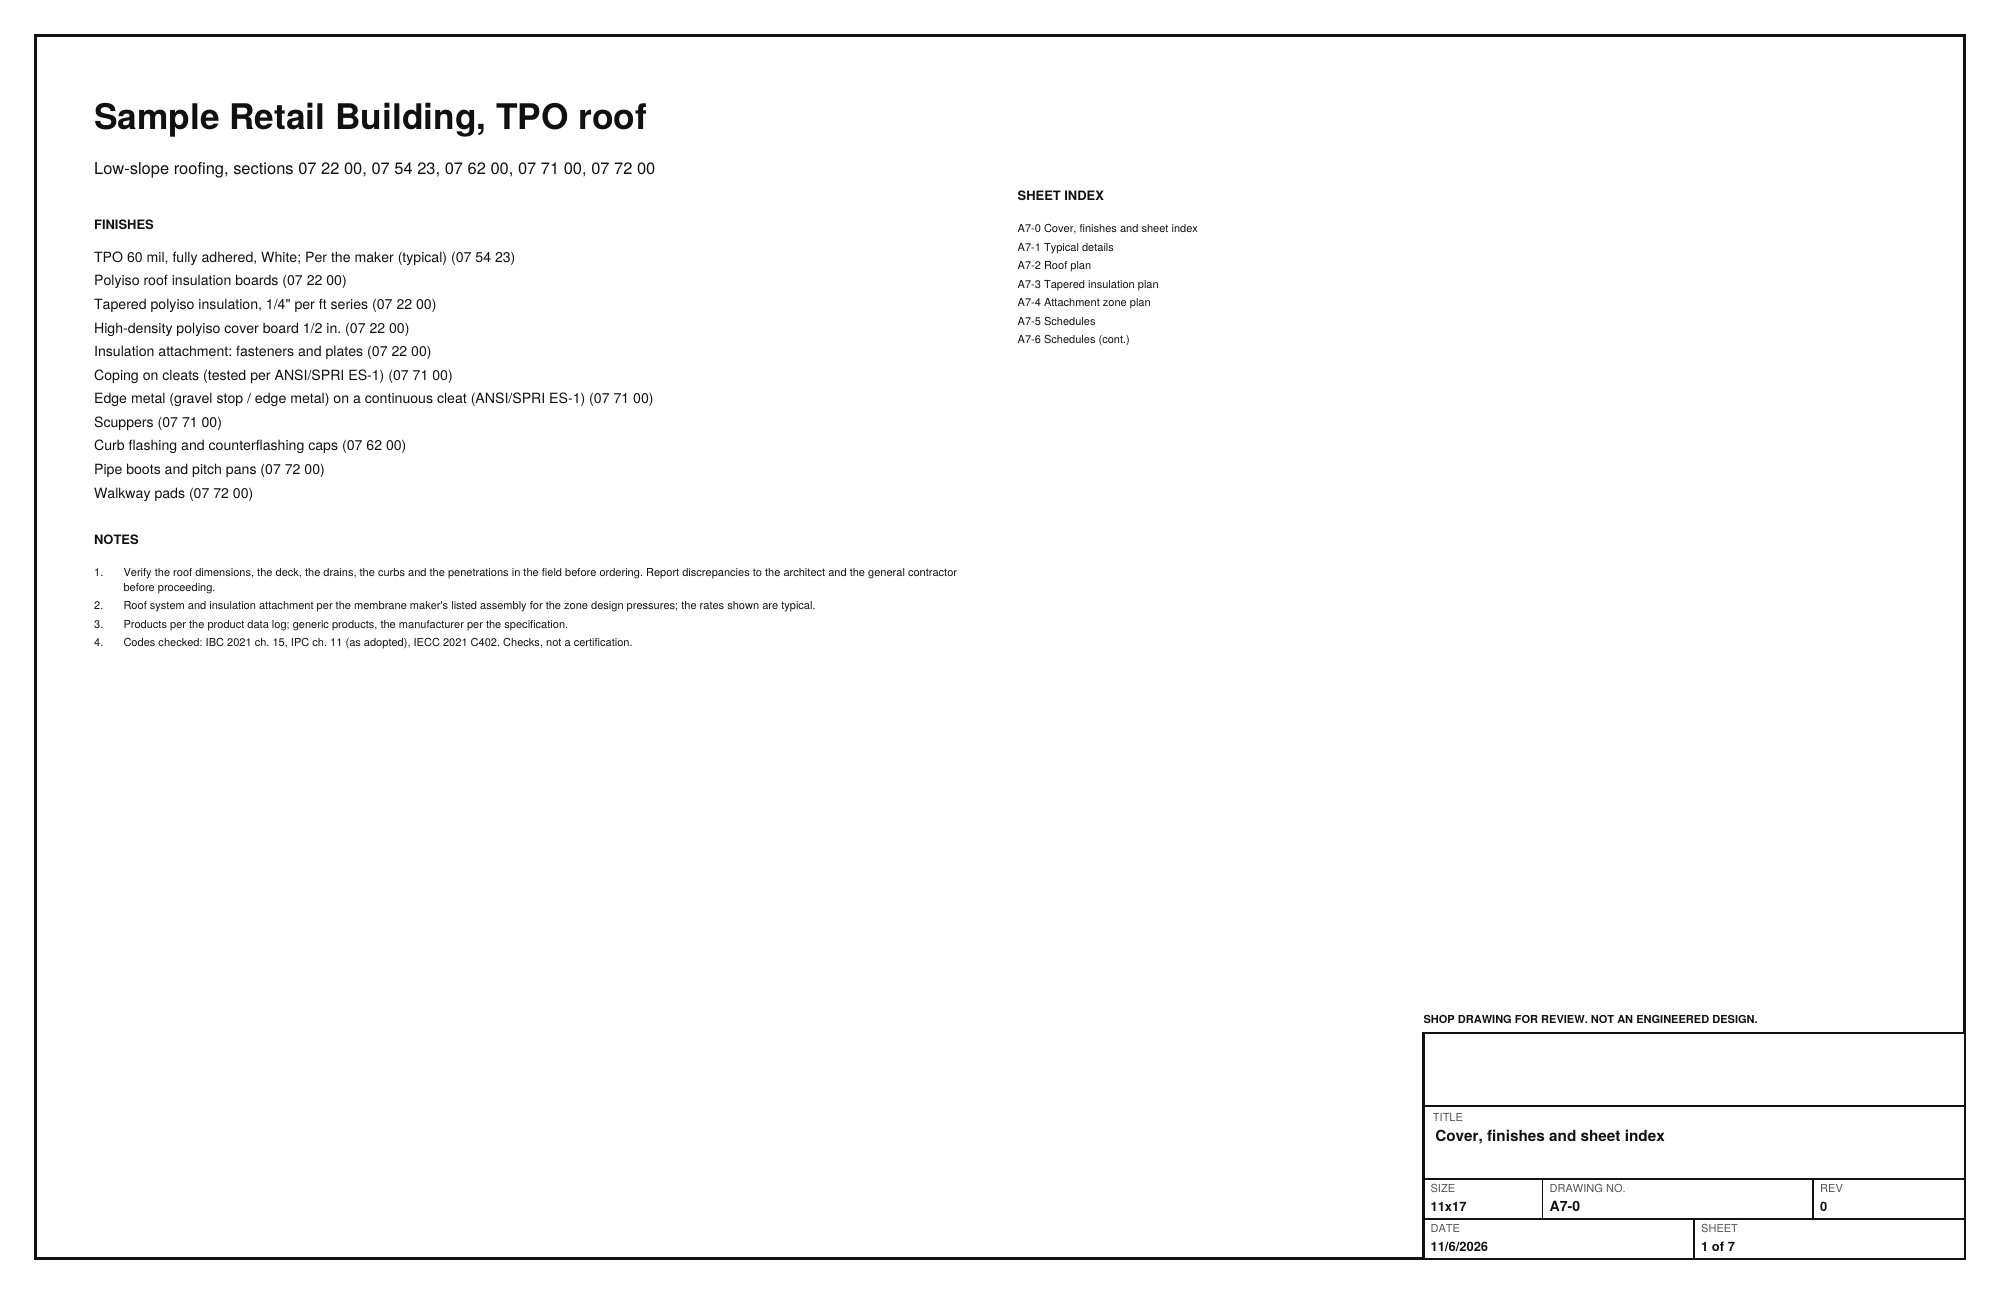
Submittal (11x17 shop) A7-0 Cover, finishes and sheet index
Submittal (11x17 shop) A7-3 Tapered insulation plan

More in the guide

Try it on your own job

Open the sample, change it to your measurements, and send it to a BidRidge quote. Drawing is free; the drawing set, the lists and the quote come with a BidRidge license or the 14-day trial.

Sample designs: names, sizes and clients are made up. Prices are BidRidge's starting rates; set your own. The designers check against common guidelines (IRC, NKBA and the makers' published numbers) to help you catch mistakes. They don't replace your building department or the manufacturer's installation instructions: verify with them.