BidRidge › Designers › Guide › Chapter 48

Chapter 48 · Glazing DesignerBeta

Sample Medical Office, 2 stories: three entrance doors on two hardware sets, and a 16-sheet shop set for seven opening types

Chapter 37 draws the glazing and prices it. This one turns it into the submittal the architect reviews: the entrances with their doors and hardware sets, the door and hardware schedule, then the Submittal set as 11x17 shop sheets (a cover with the finishes and the sheet index, the typical details, one sheet for each opening type and the schedules) or as a full ARCH D set with the elevations, the key plan and the product data log.

Narrated walkthrough, 1:31. Captions on.

The sample in numbers

  • Shop sheets
    16
    11x17, numbered A8-0 to A8-15
  • Opening types
    7
    EN1, CW1, SF1, W1, EN2, FR1, IS1: a sheet each
  • Doors
    3
    a pair and two singles, 4 leaves
  • Hardware sets
    2
    HW-1 exterior, HW-2 interior

Step by step

Step 1: An entrance and its door in the Glazing Designer

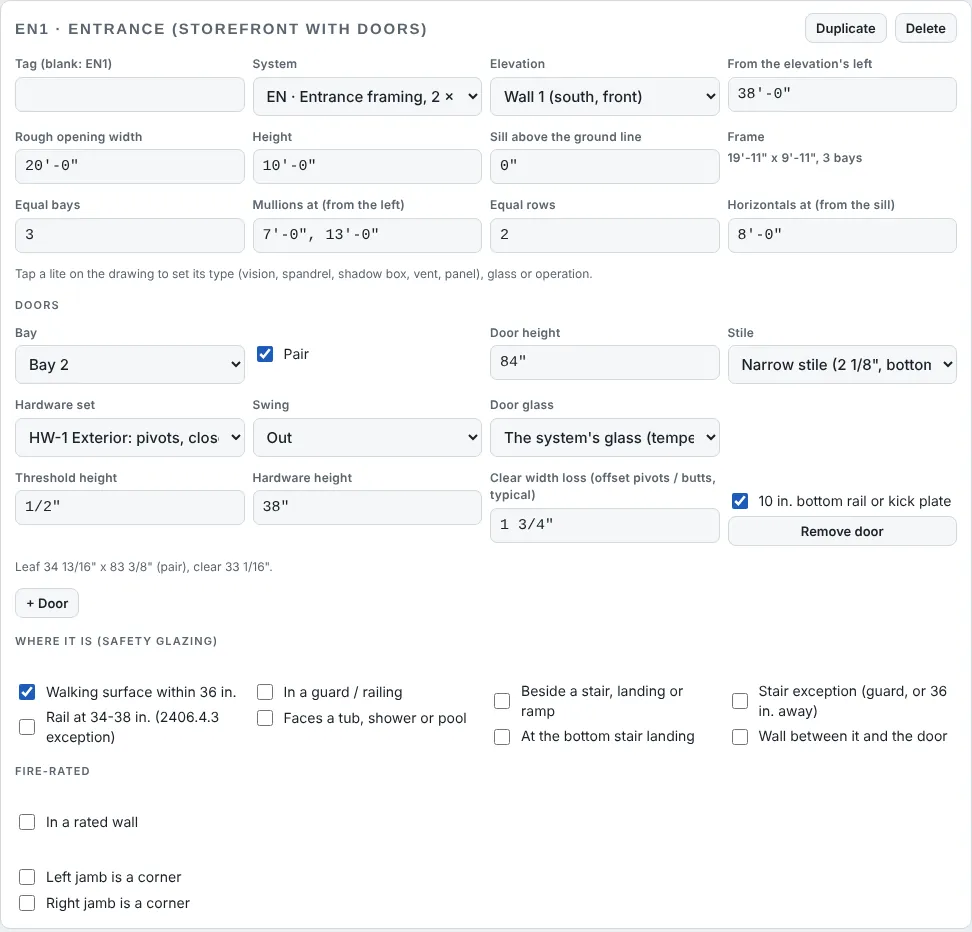
Step 1: An entrance and its door

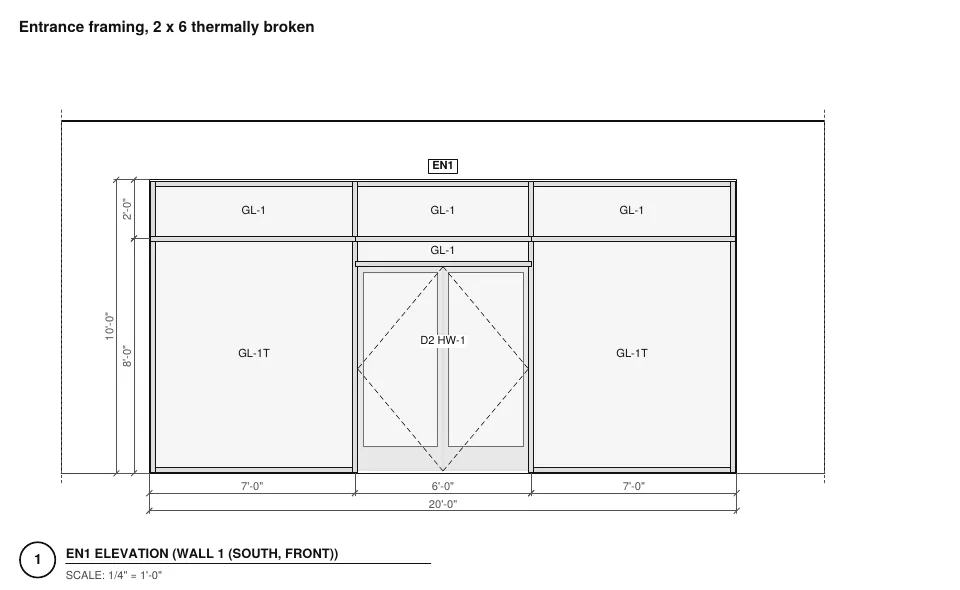
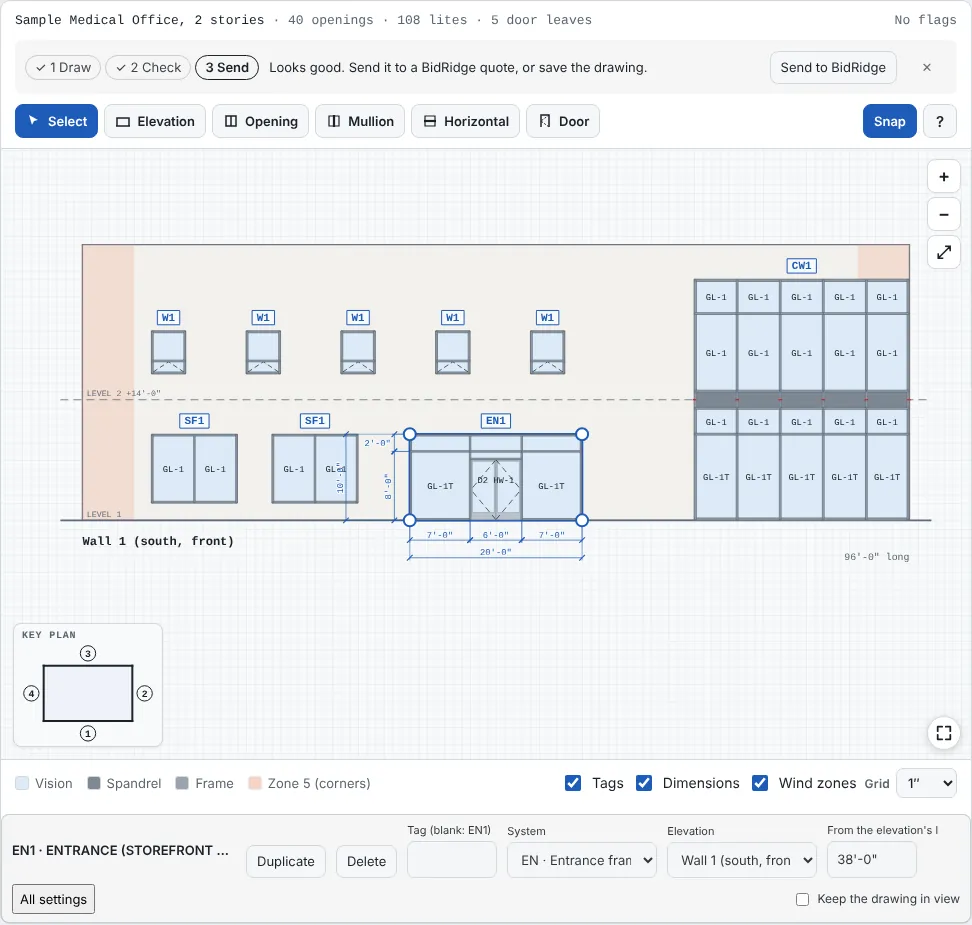
Open the Sample Medical Office (New design, then the sample) and tap EN1, the front entrance on Wall 1. Its editor sets the rough opening (20 ft x 10 ft), the bays and the transom line, and under Doors the door in bay 2: a pair, 84 in. tall, narrow stile, swinging out on hardware set HW-1, a 1/2 in. threshold, the hardware at 38 in. and a 10 in. bottom rail. The leaf size and the clear width are worked out under it: two 34 13/16 in. leaves, 33 1/16 in. clear past the offset pivots.

Field tip: + Door adds a door to another bay of the opening; Remove door takes it out. The door glass is tempered (IBC 2406.4.1).
Step 2: The entrance on its wall in the Glazing Designer

Step 2: The entrance on its wall

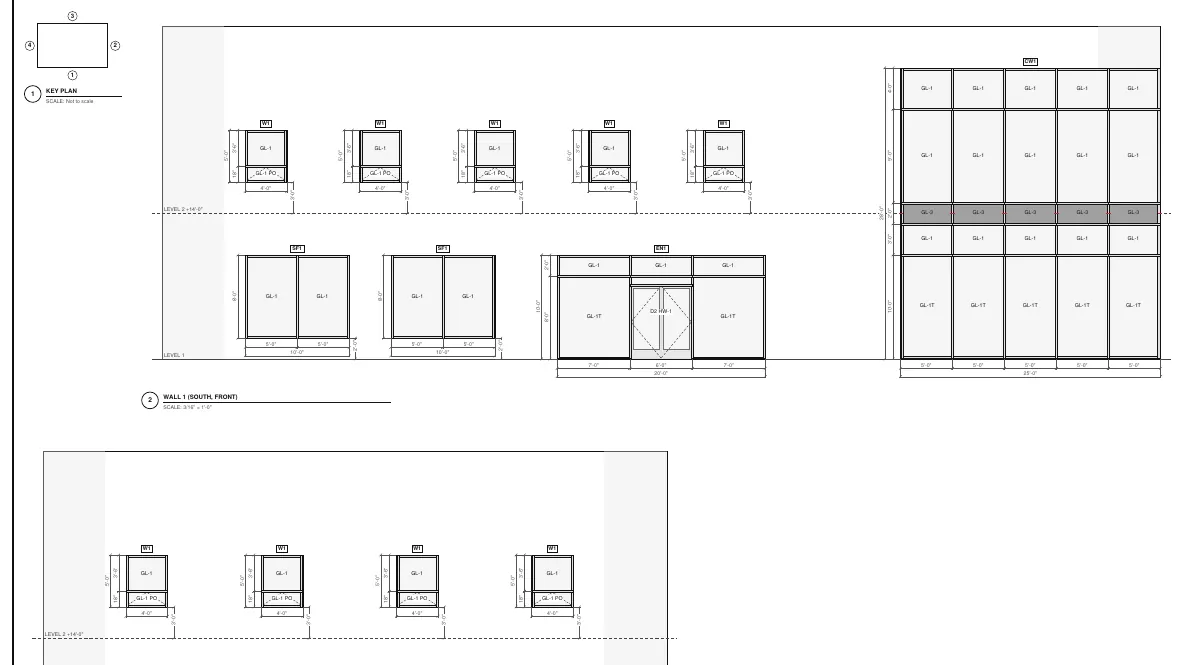
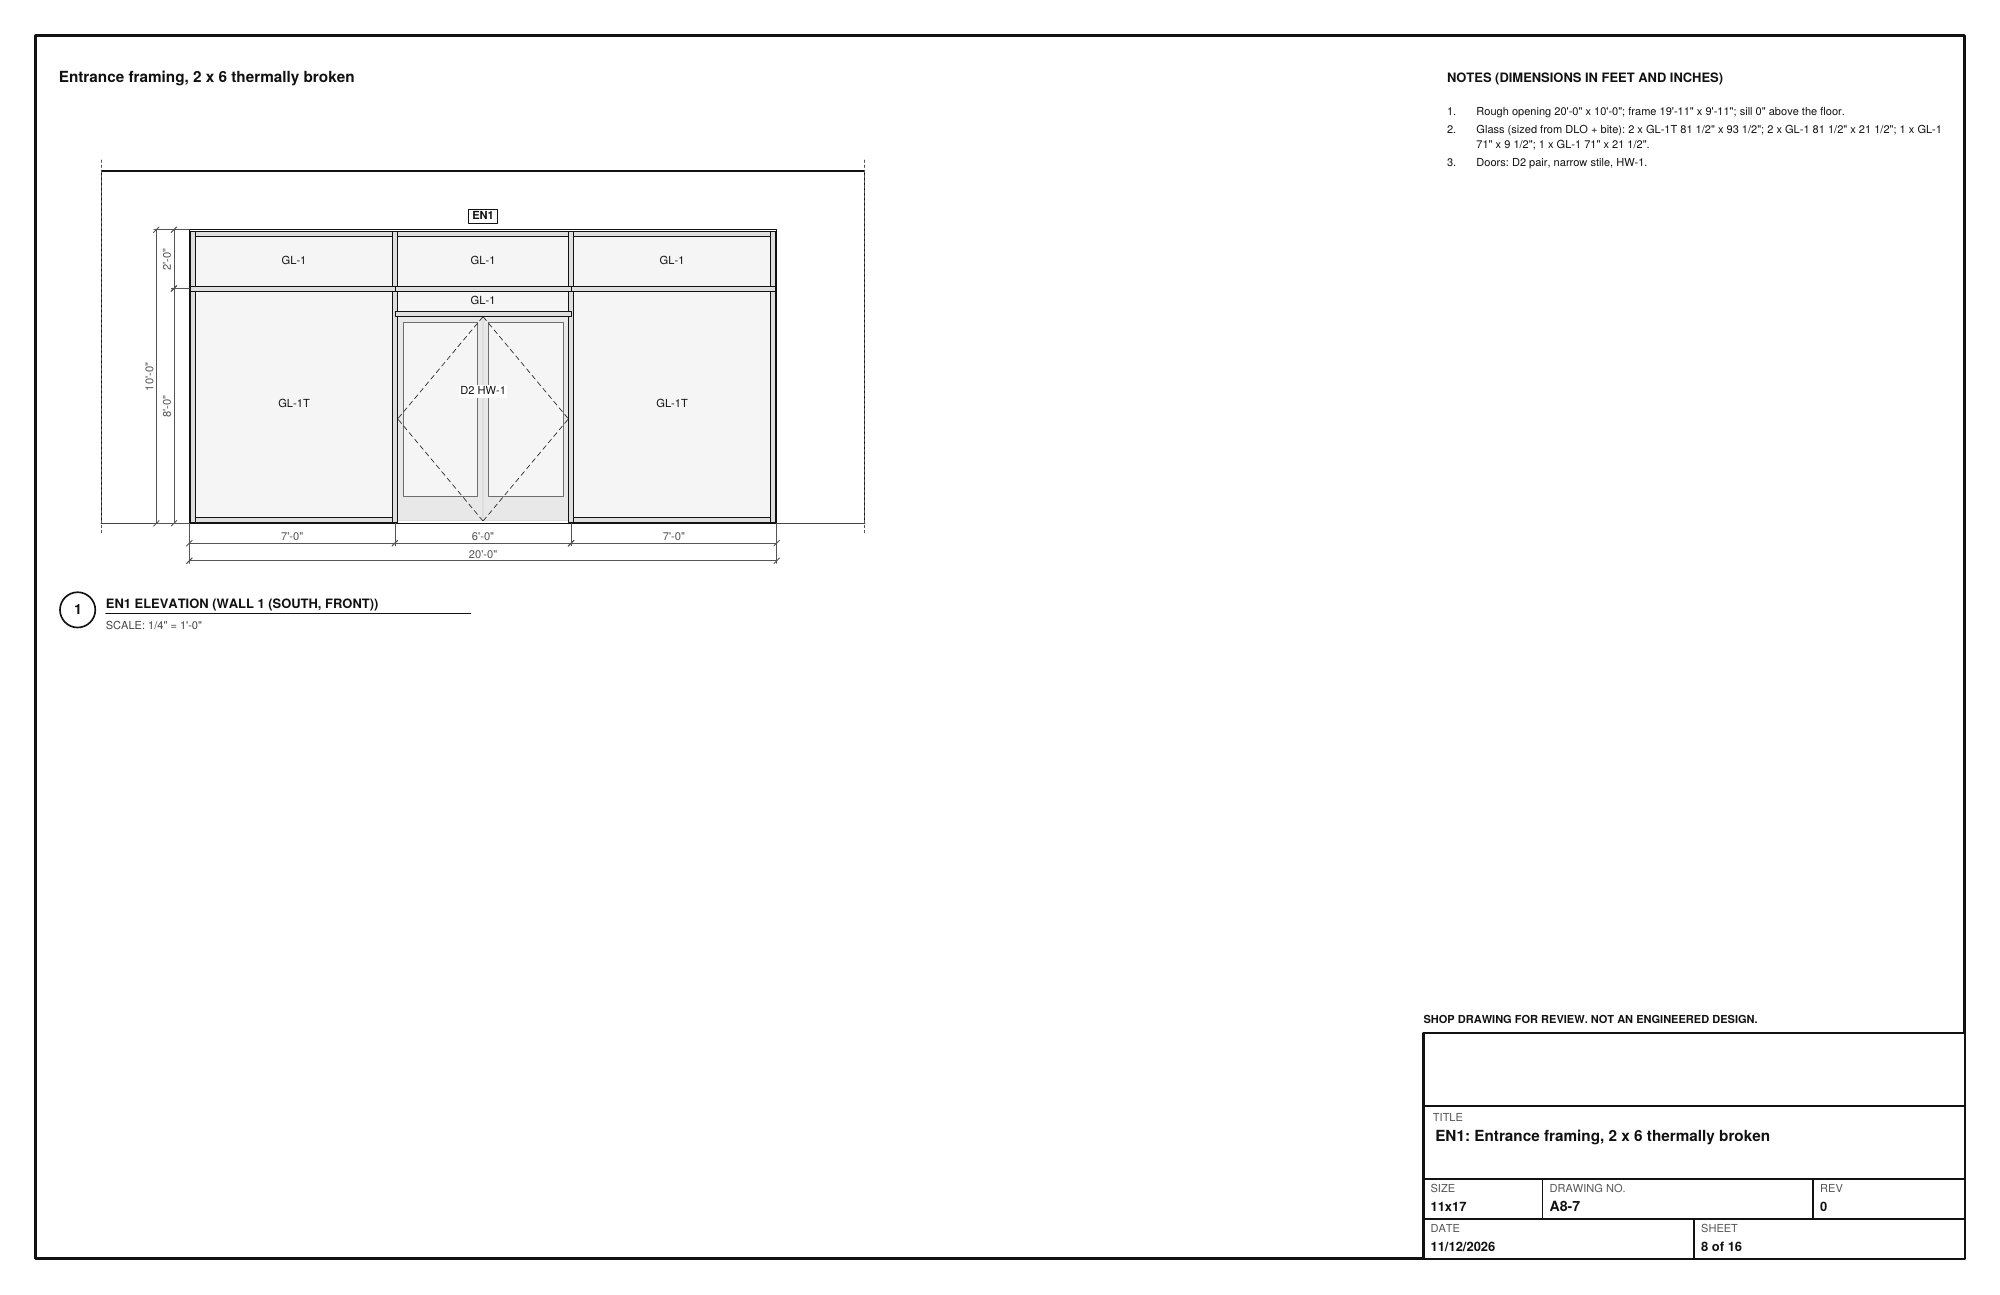
On the drawing the door shows as a pair with its swing and its hardware set (D2 HW-1). The side lites are tagged GL-1T, tempered: each is within 24 in. of a door edge and a large pane low to the floor (IBC 2406.4.2 and 2406.4.3); the transoms stay annealed GL-1. The key plan in the corner shows where each wall is on the building: tap a number to go to that wall.

Step 3: Hardware sets in the Glazing Designer

Step 3: Hardware sets

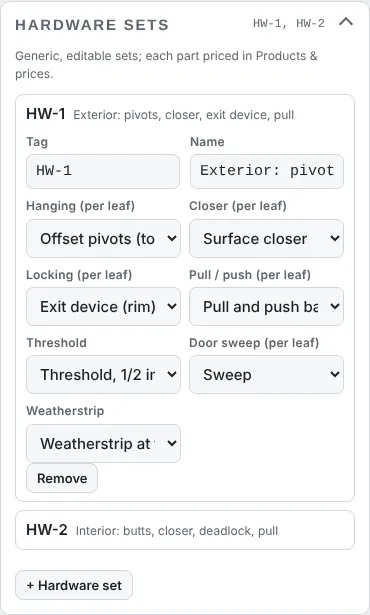
Hardware sets lives in the side panel. Each set is generic and editable: the tag and name, then the hanging (offset pivots or butts), the closer, the locking (exit device, deadlock, passage), the pull or push, the threshold, the sweep and the weatherstrip. HW-1 is the exterior set (pivots, closer, rim exit device, pull and push bar, threshold, sweep, weatherstrip); HW-2 the interior one (butts, closer, deadlock with thumbturn, offset pull). Every part prices from Products & prices, per leaf where it says so.

Field tip: + Hardware set adds HW-3. Removing a set moves its doors to the first set, so no door is left without hardware.

Step 4: The door and hardware schedule in the Glazing Designer

Step 4: The door and hardware schedule

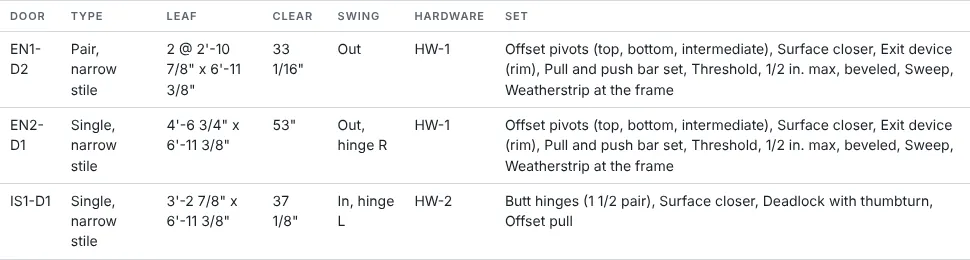
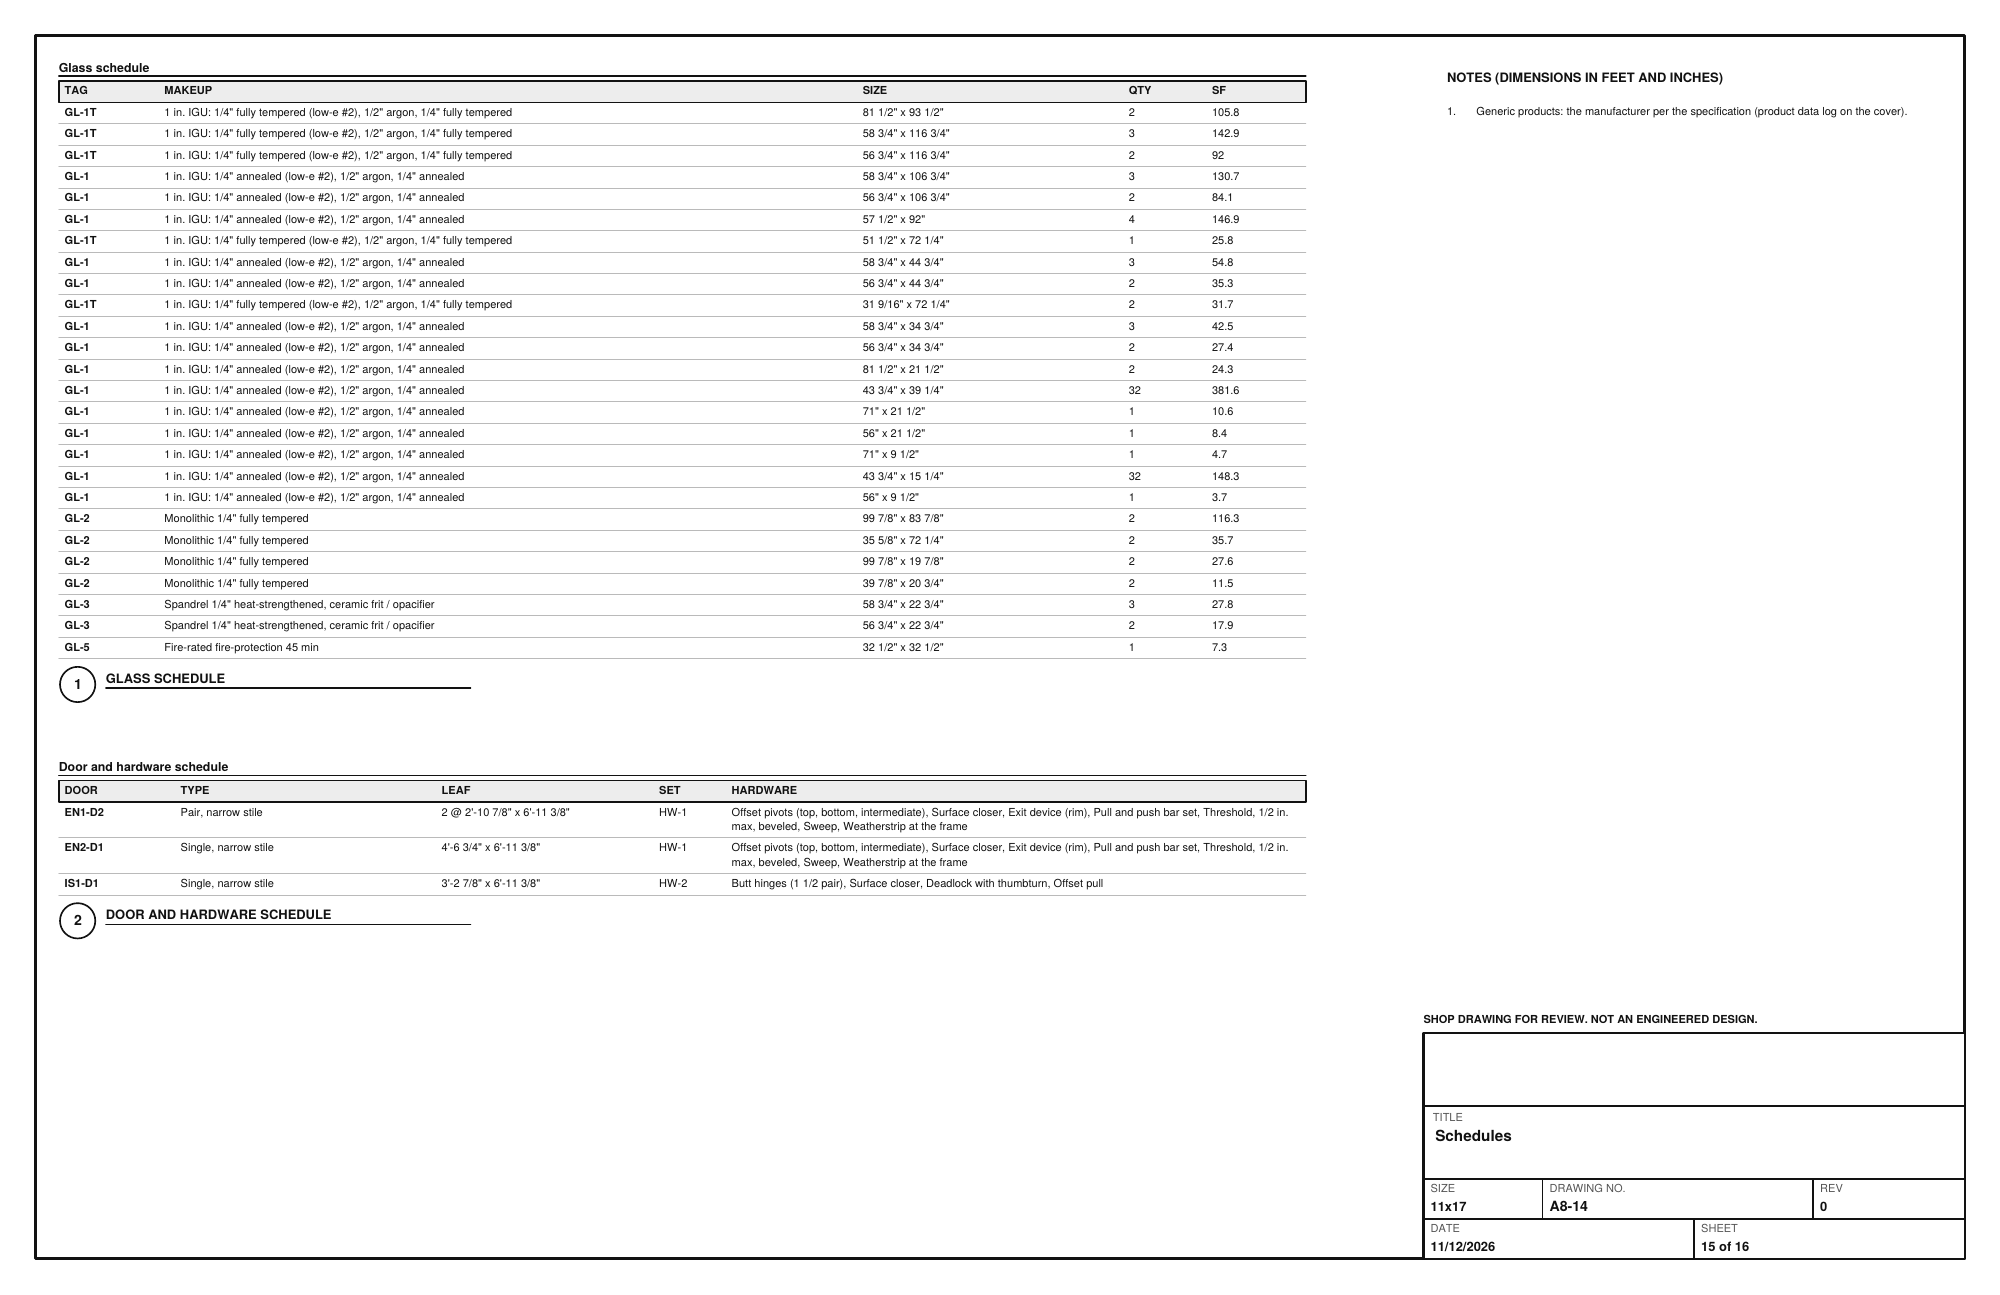
Schedules lists every door: EN1-D2, the pair at the front (2 leaves of 2'-10 7/8" x 6'-11 3/8", 33 1/16 in. clear, swinging out), EN2-D1 at the back (a single 4'-6 3/4" leaf, 53 in. clear) and IS1-D1 at the office front (in, on HW-2), each with its set written out. The same schedule goes on the drawing set and the Submittal set, and the hardware goes on the buy list part by part.

Step 5: Sheets for: Submittal set in the Glazing Designer

Step 5: Sheets for: Submittal set

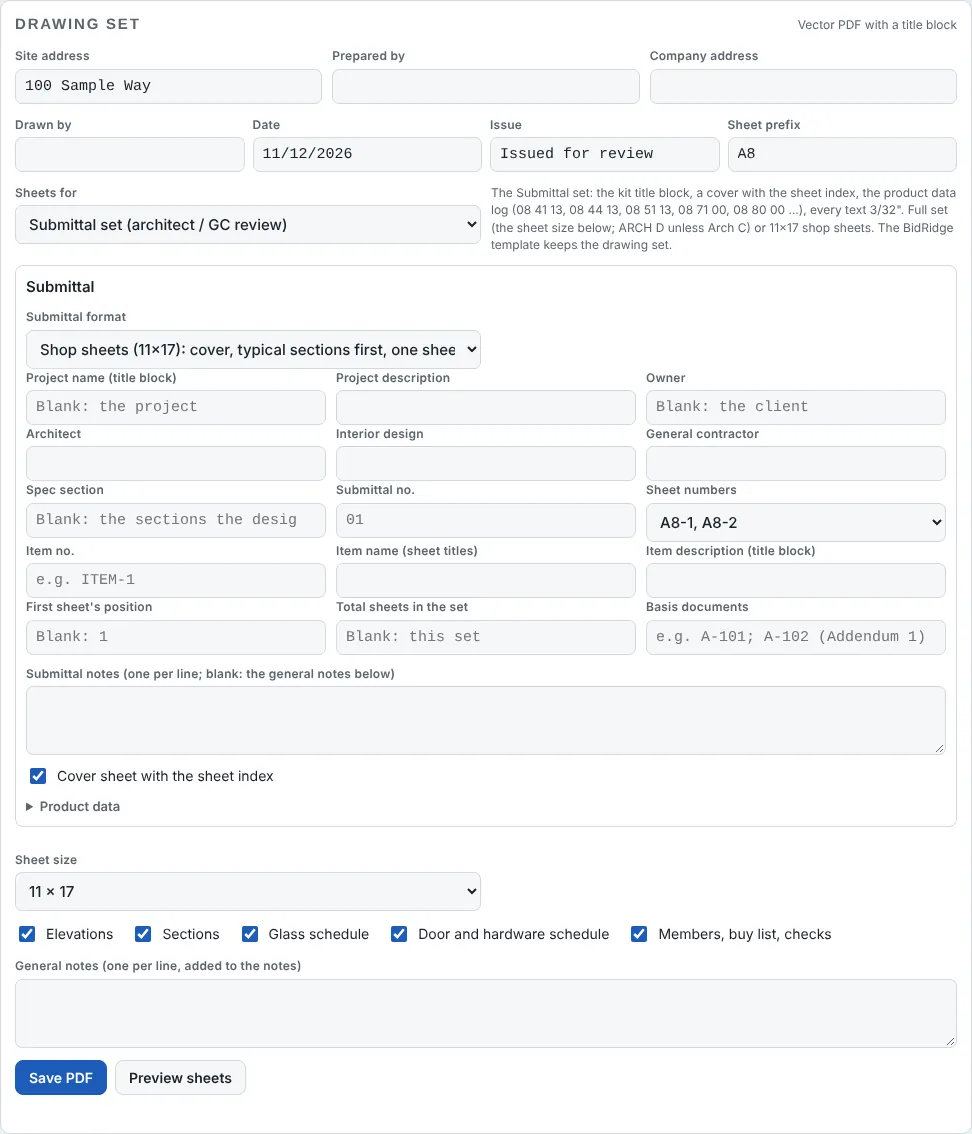
In the Drawing set tab, set Sheets for to Submittal set (architect / GC review) and the Submittal block opens: the format, the project and owner, the architect and general contractor, the spec section (blank: the sections the design uses), the submittal number, the sheet numbers (A8-1, A8-2, or 01, 02 appended to a sheet number like A-101), the item and the basis documents. Submittal format picks Shop sheets (11x17) or the Full set. The BidRidge template keeps the drawing set and the same prices either way.

Field tip: Product data, under the Submittal block, has a row for each product the design uses under its spec section: type the product and maker the specification calls for.

Step 6: The cover in the Glazing Designer

Step 6: The cover

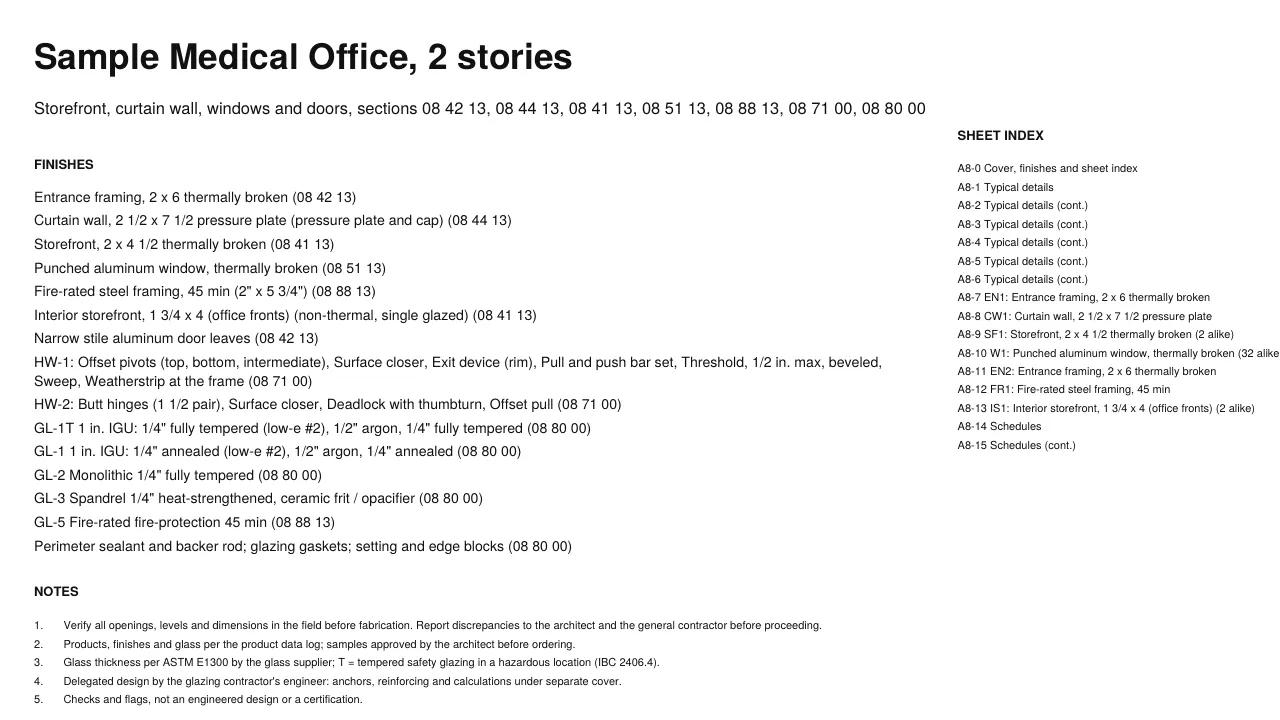
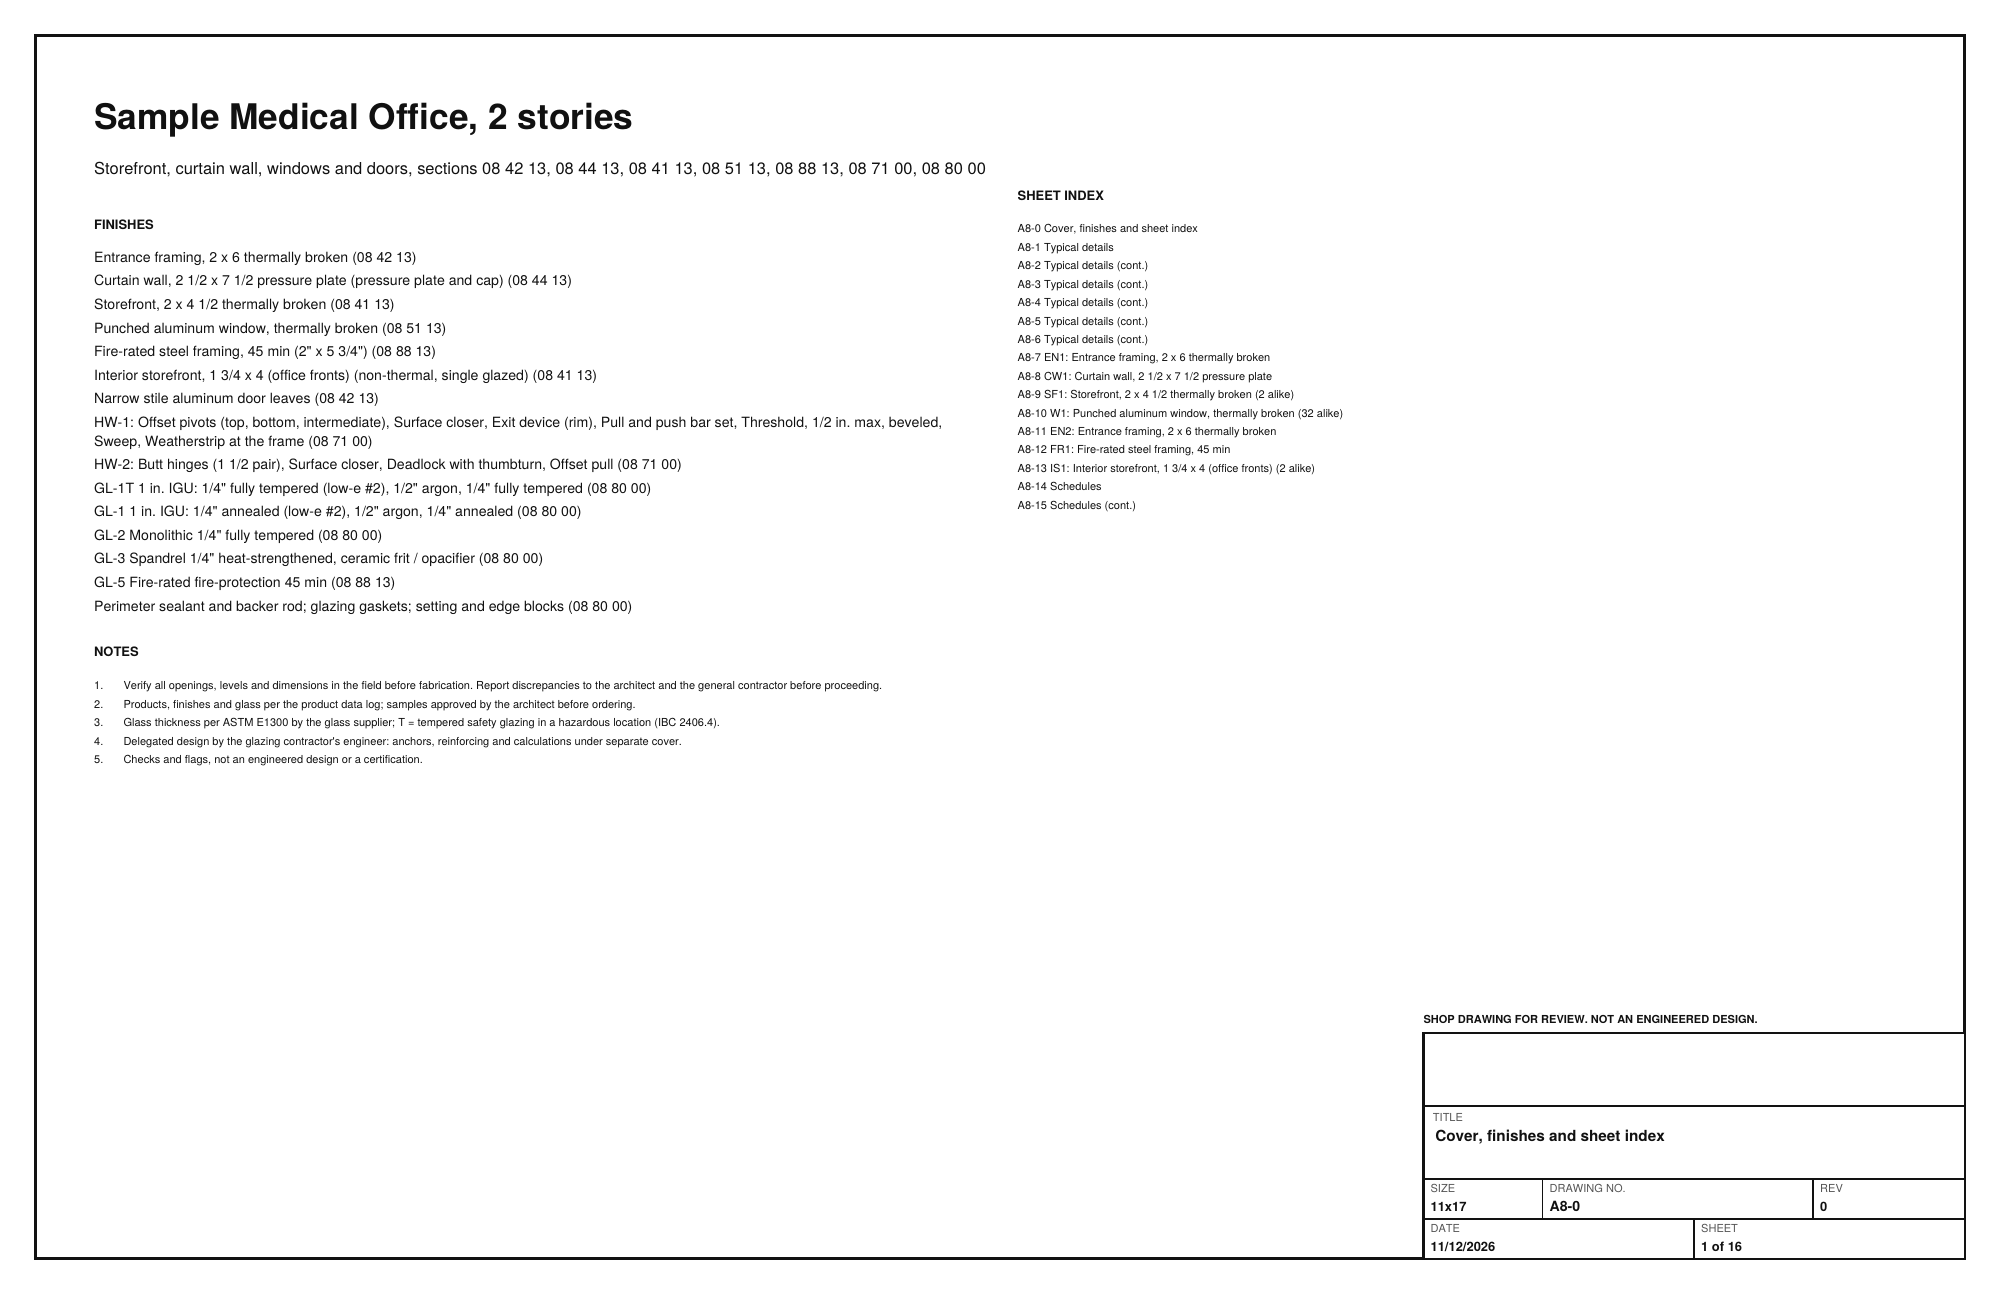
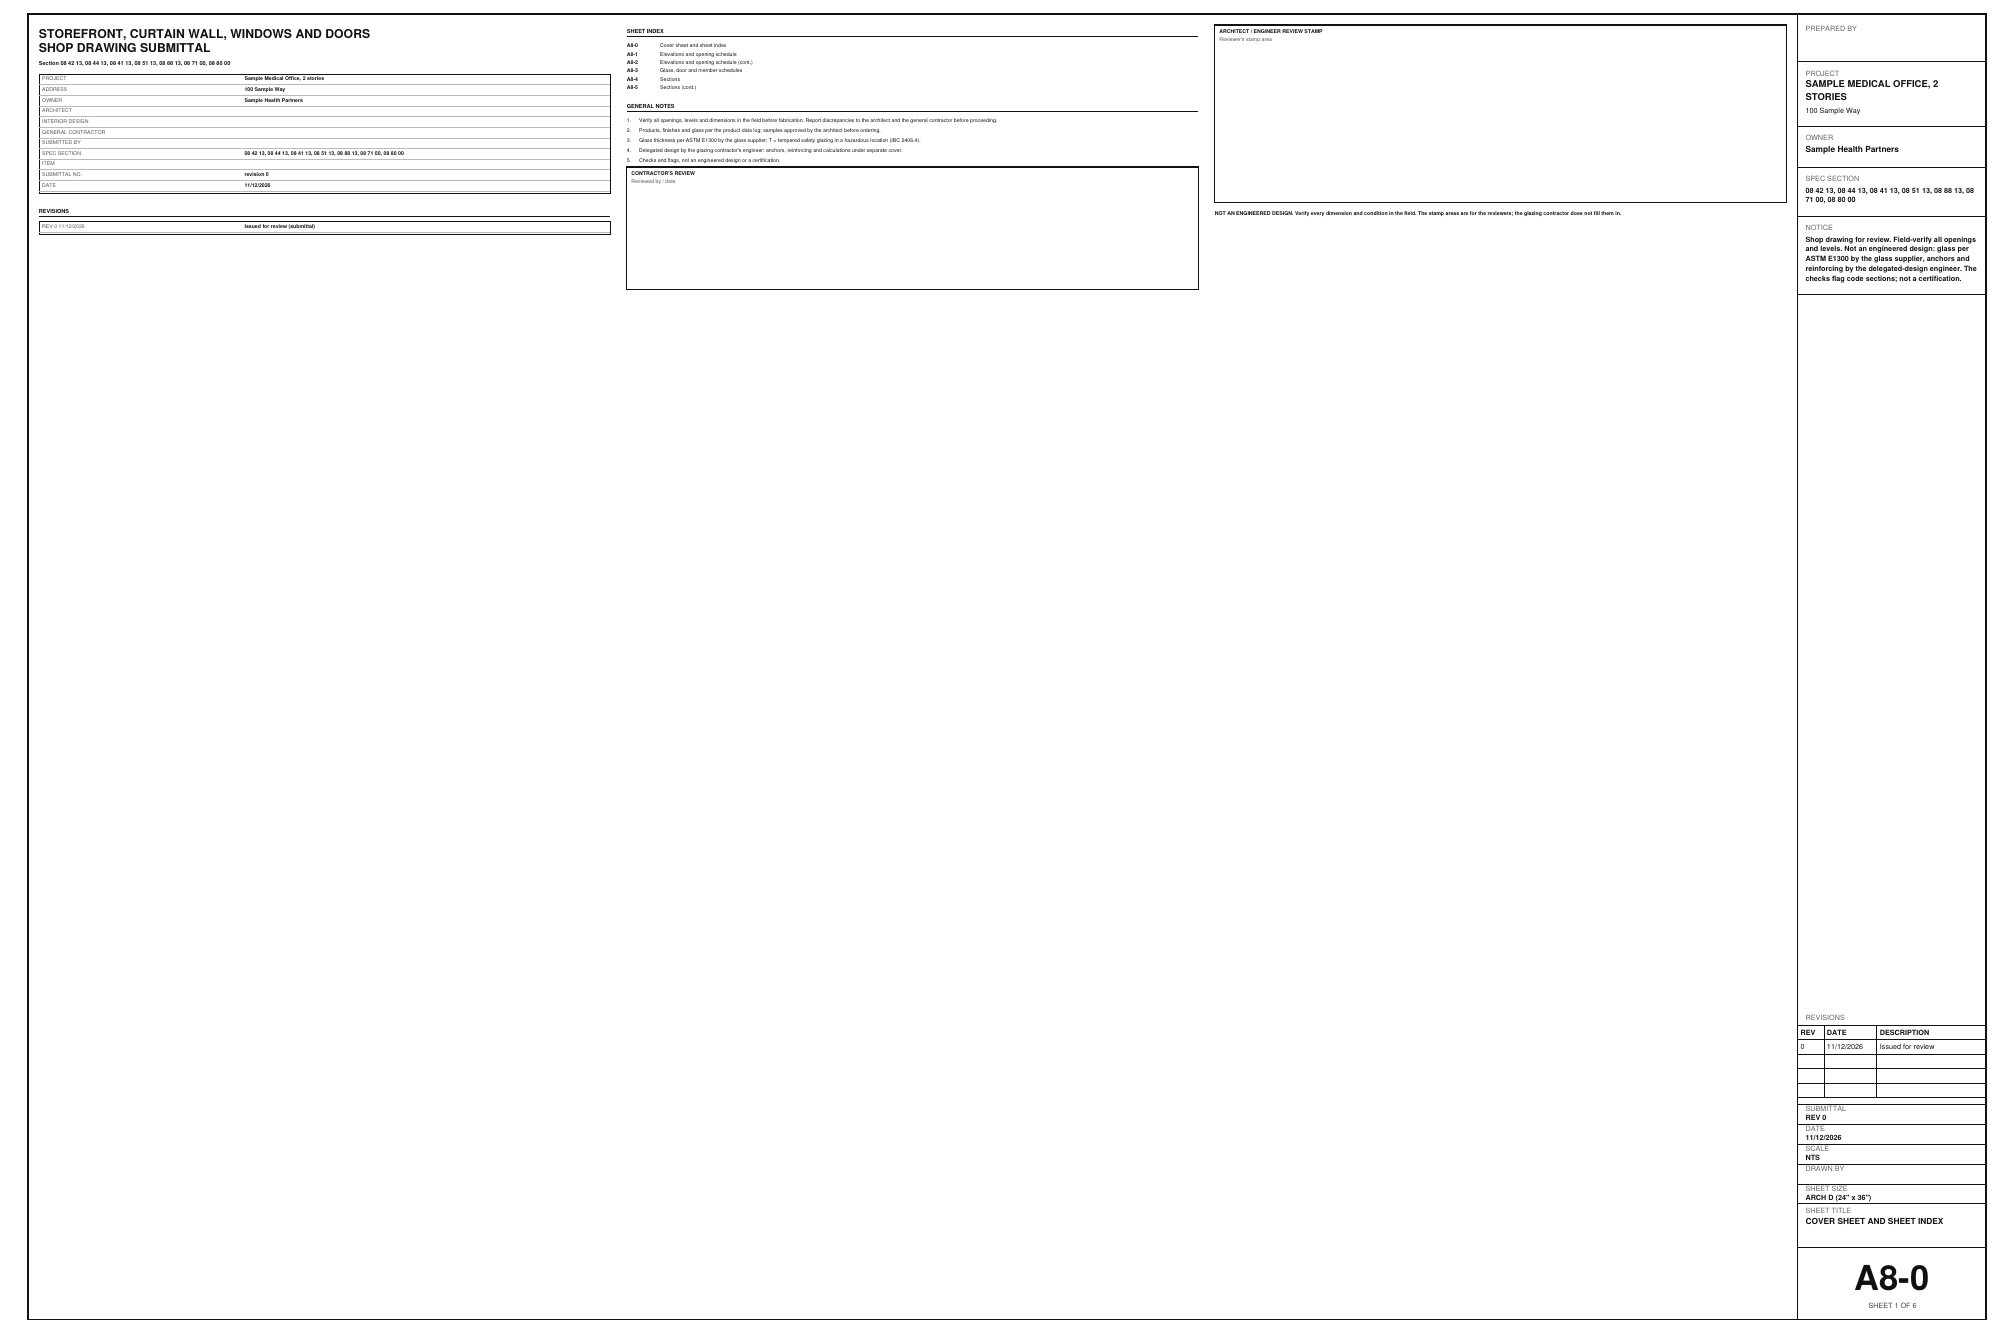
The first shop sheet is the cover: the project, the spec sections, the finishes (each system, the door leaves, both hardware sets, every glass makeup and the sealants, each with its section), the sheet index and the notes (field-verify before fabrication, samples approved before ordering, glass thickness by the glass supplier per ASTM E1300, the delegated design under separate cover). Each sheet carries SHOP DRAWING FOR REVIEW. NOT AN ENGINEERED DESIGN. over the title block.

Step 7: The typical details in the Glazing Designer

Step 7: The typical details

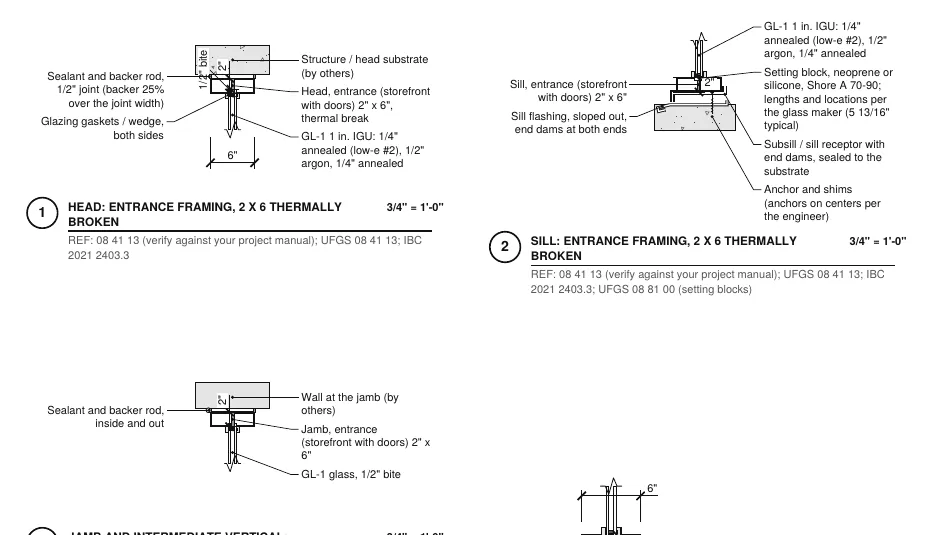
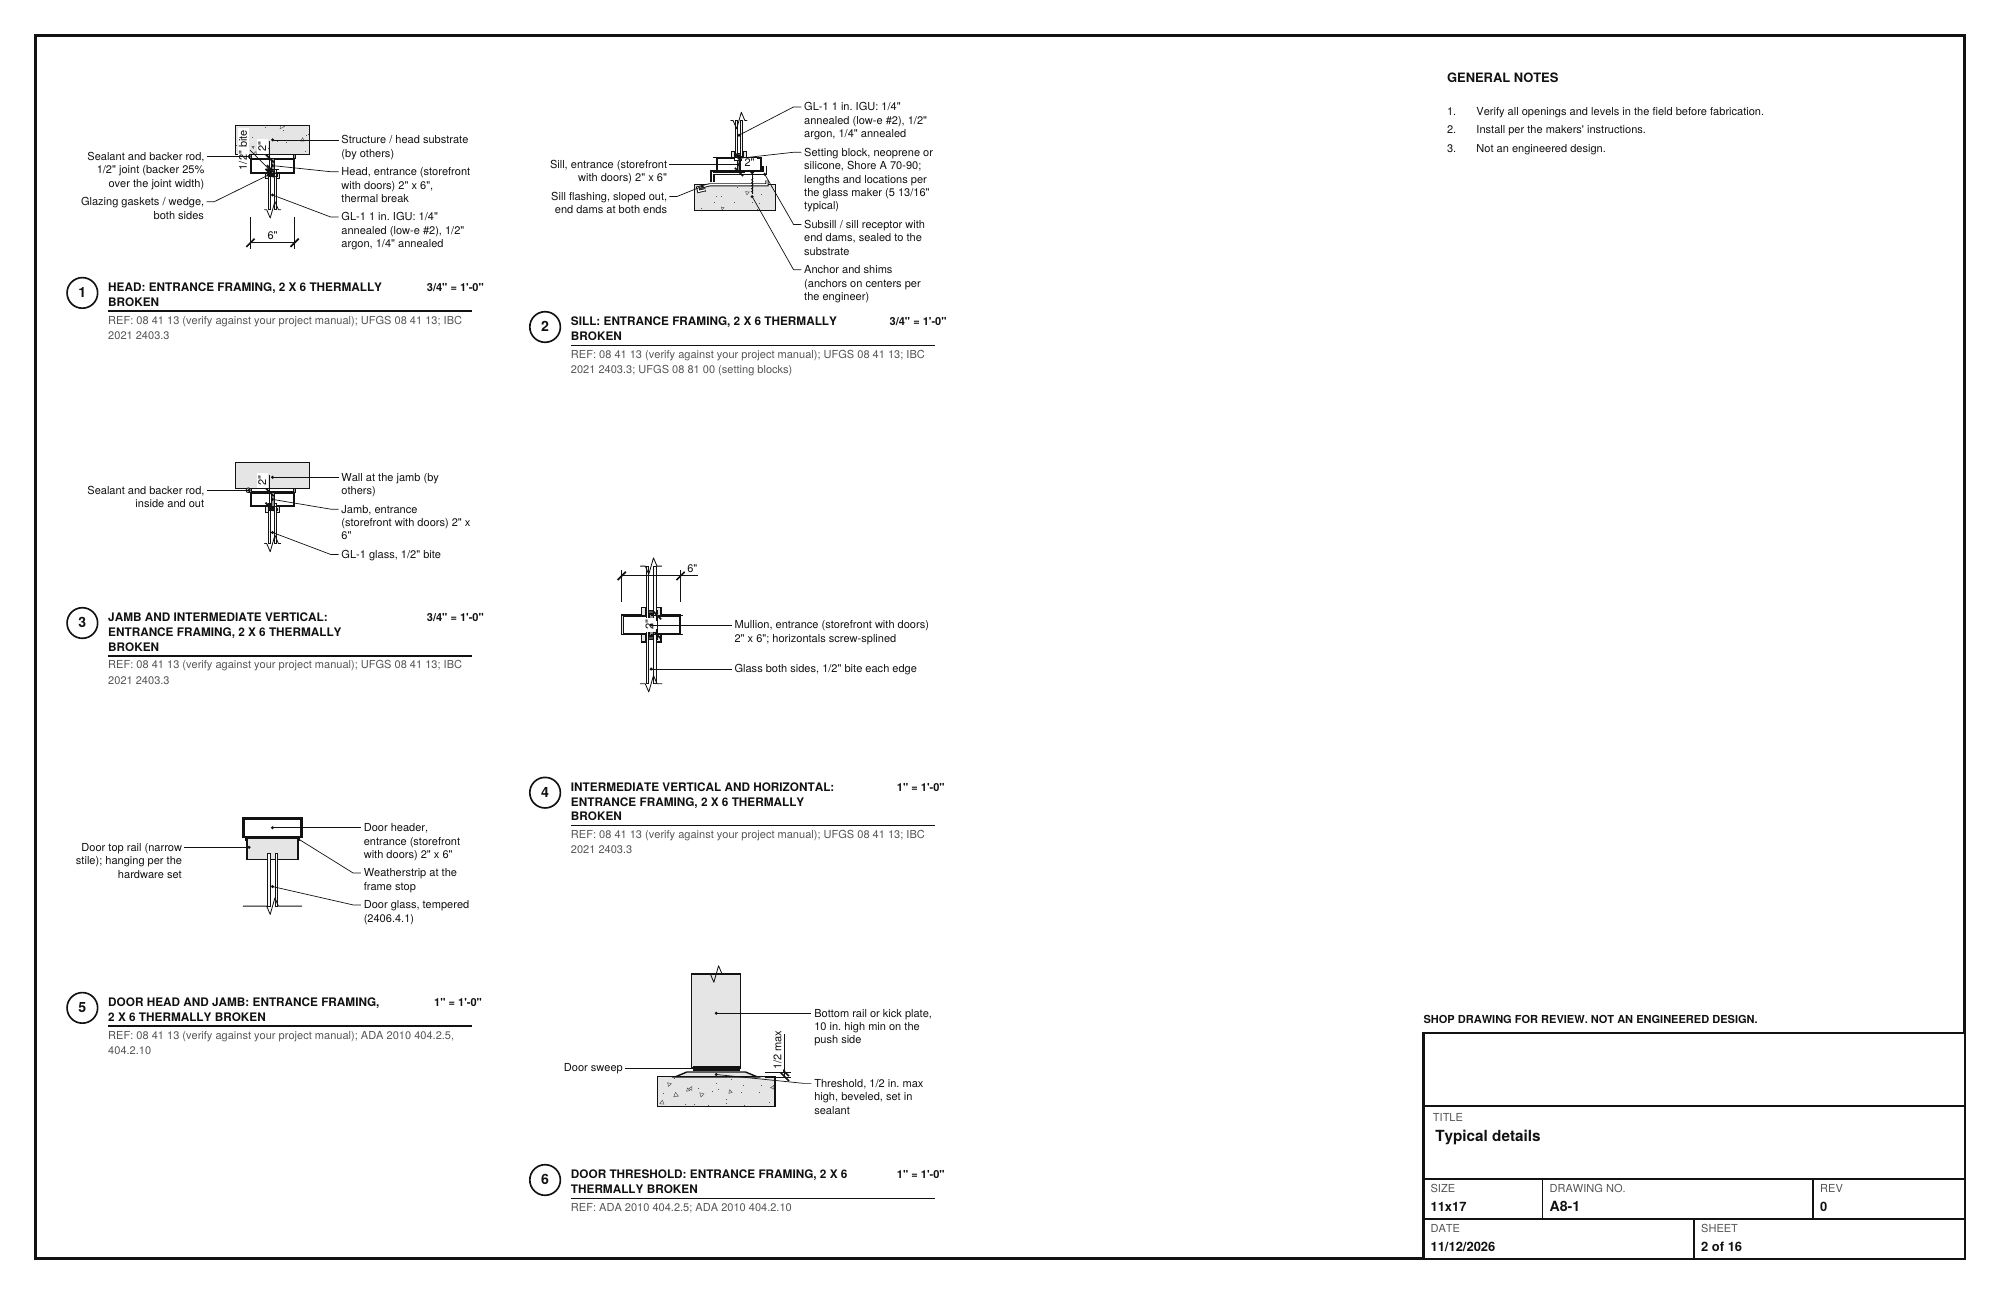
Six sheets of typical details come next, drawn at real scale: for each system the head, the sill (with the setting blocks, the sill flashing and its end dams), the jamb and the intermediate members, and for the entrances the door head and jamb and the threshold (1/2 in. max, beveled). Every label names the part and every detail lists the sections it follows.

Step 8: A sheet for every opening type in the Glazing Designer

Step 8: A sheet for every opening type

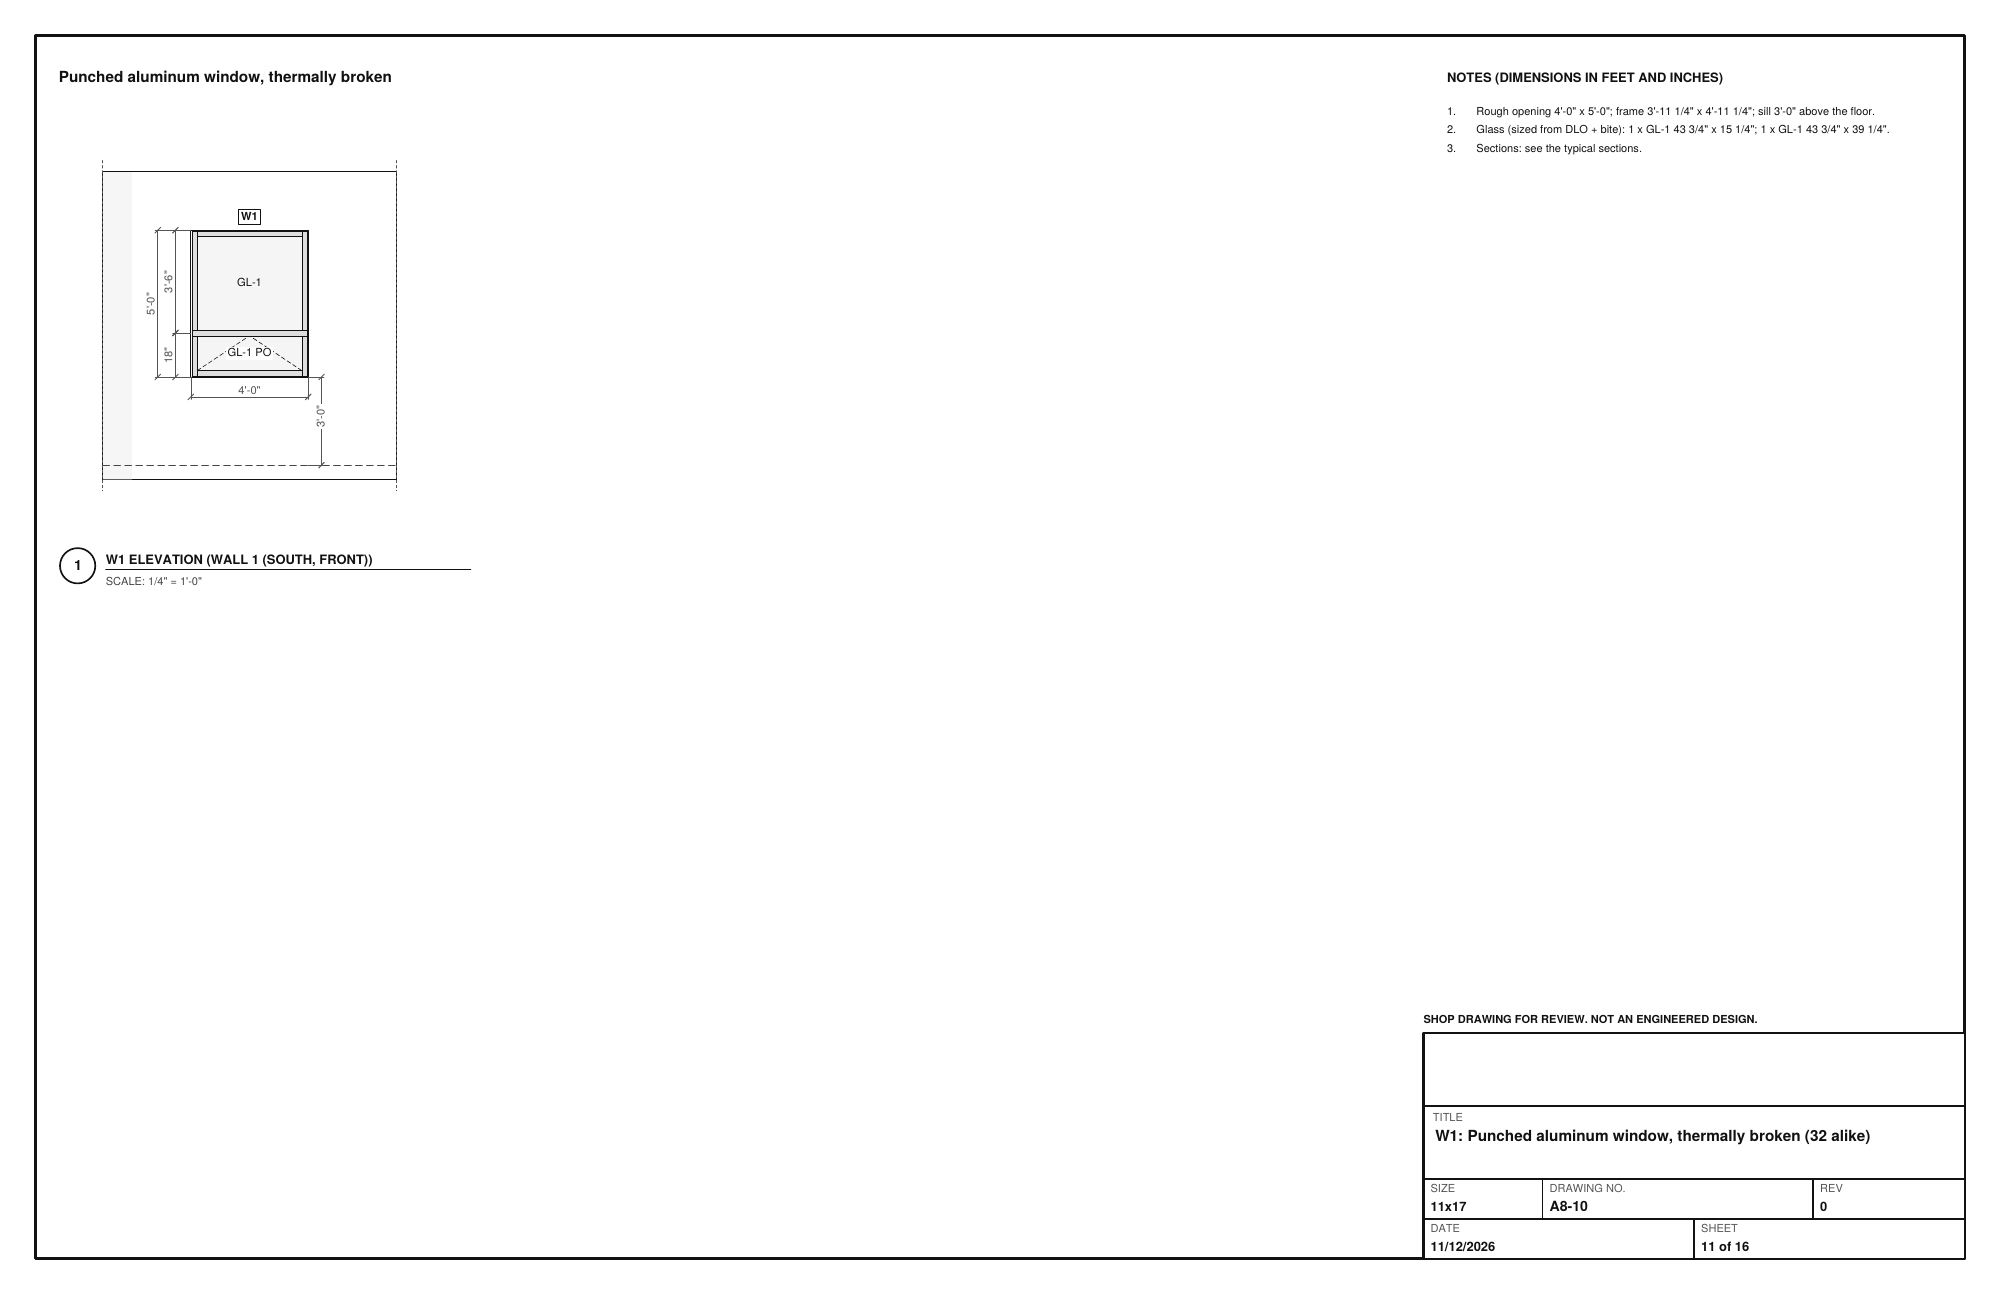
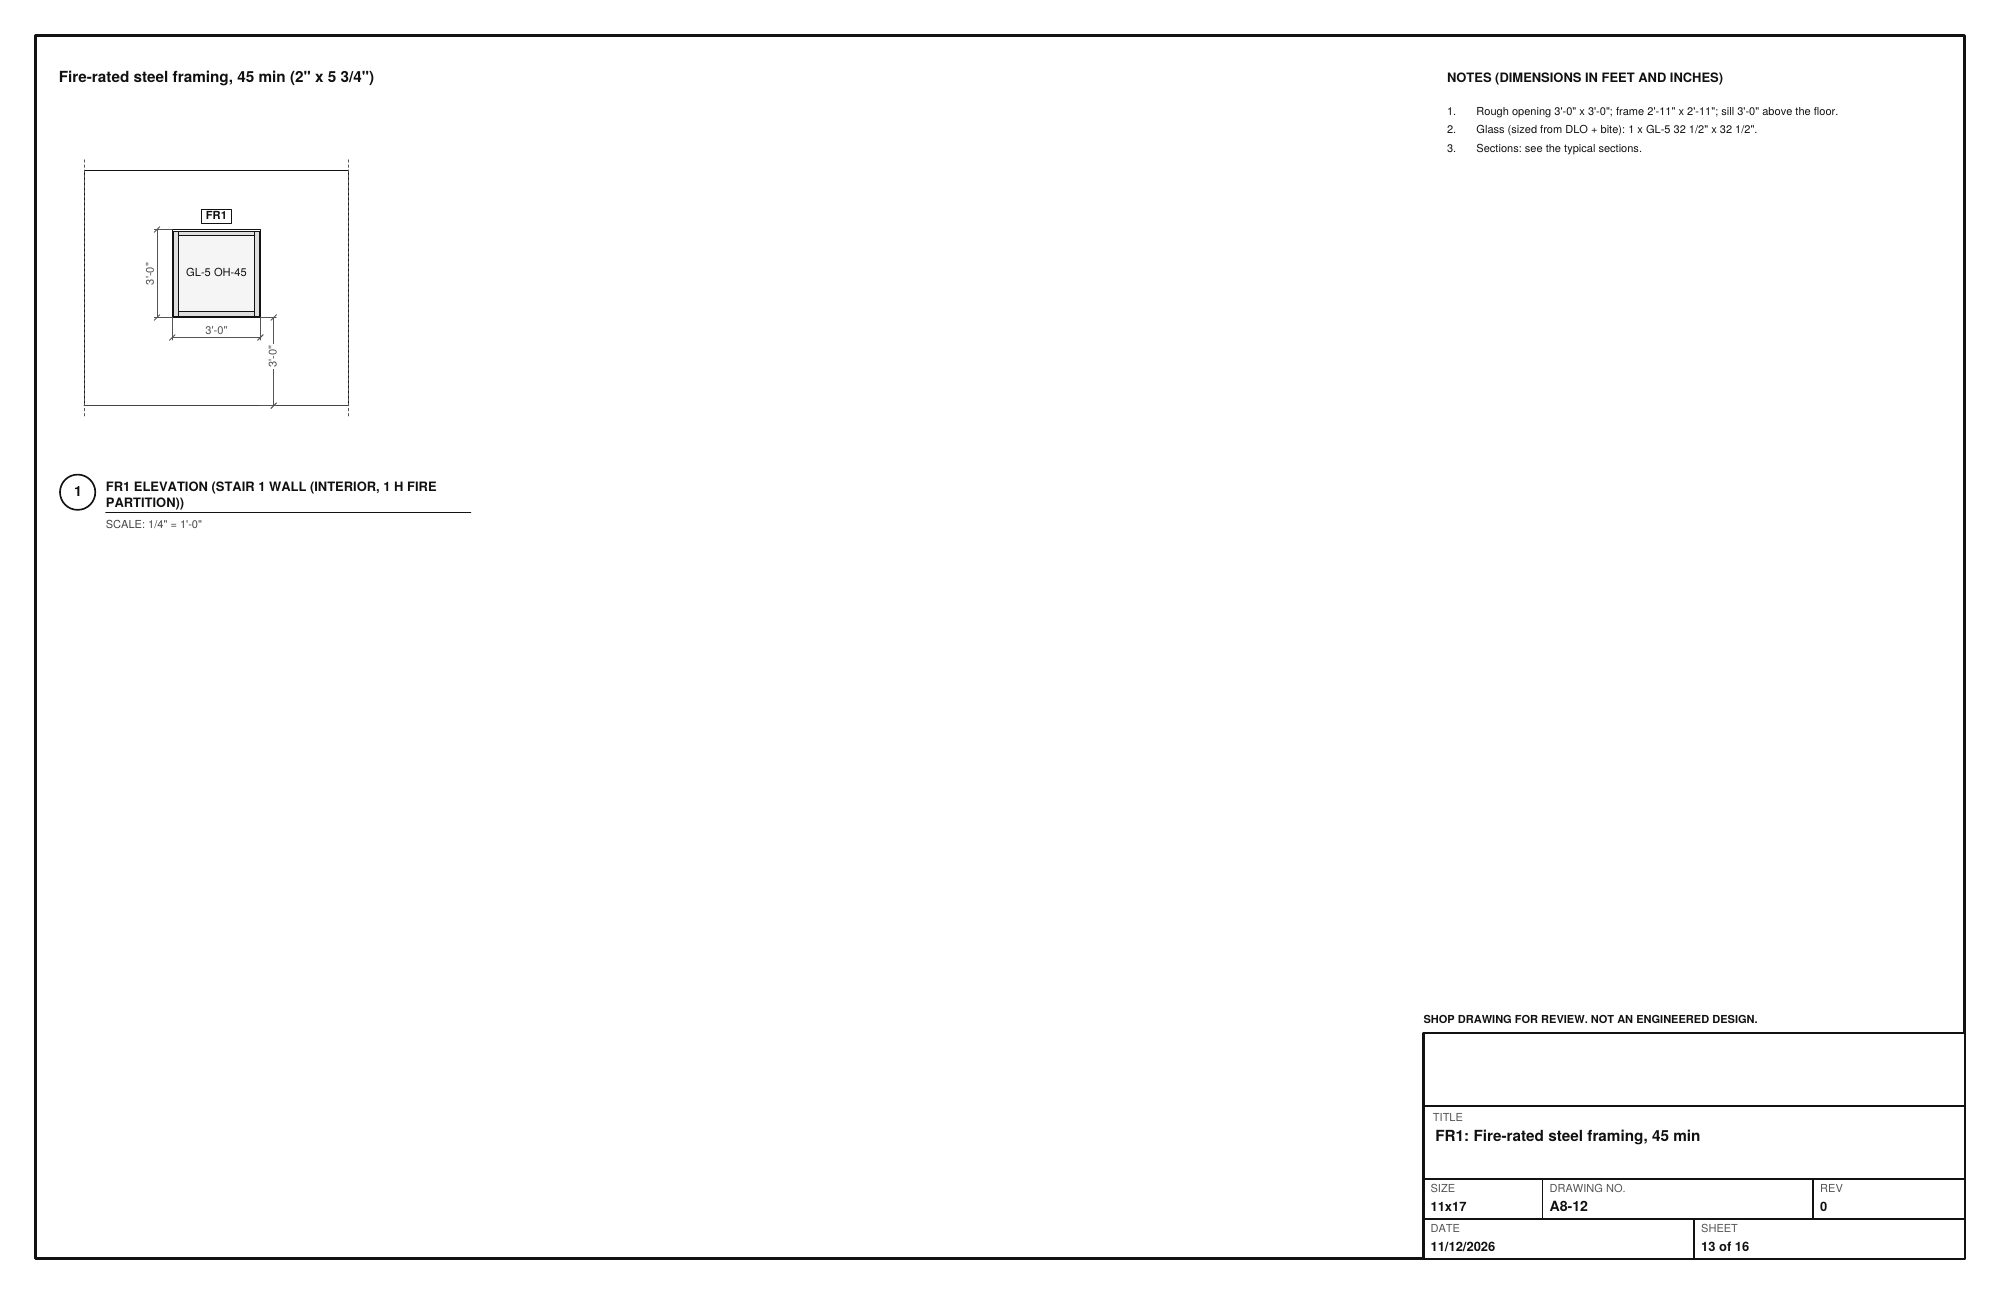
Then one sheet for each type, with the number of alike openings in its title: EN1 drawn at 1/4 in. with its bays, the glass tags and the door pair, and its notes (the rough opening and frame size, the sill height, every glass size from the daylight opening plus the bite, the doors and their set). W1 covers all 32 punched windows on one sheet; FR1, the fire-rated lite at the stair, shows its fire-protection glass and its label mark.

Step 9: The schedules in the Glazing Designer

Step 9: The schedules

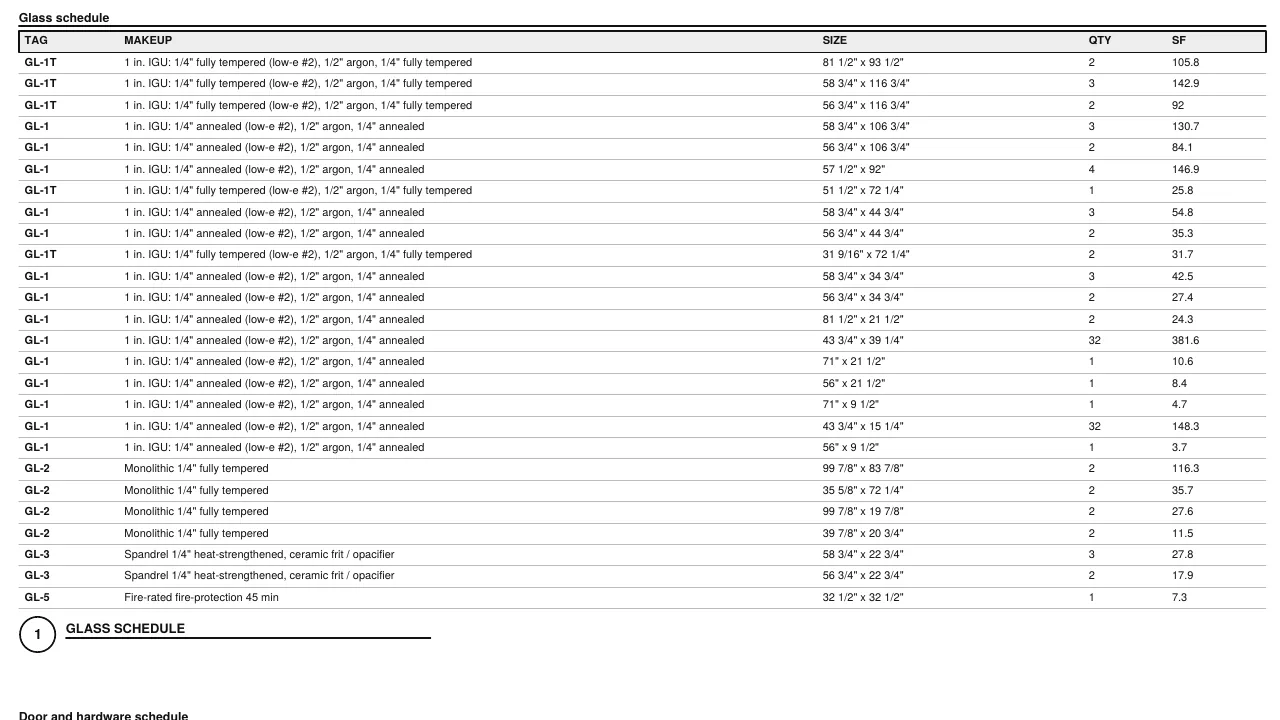
The last sheets are the schedules: the glass schedule (every size, its makeup, how many and the area, tempered sizes marked T), the door and hardware schedule and the members with their lengths, pieces and bars. That is the glass order and the door order the reviewer sees, the same numbers as the buy list.

Step 10: Or the full set, with the key plan in the Glazing Designer

Step 10: Or the full set, with the key plan

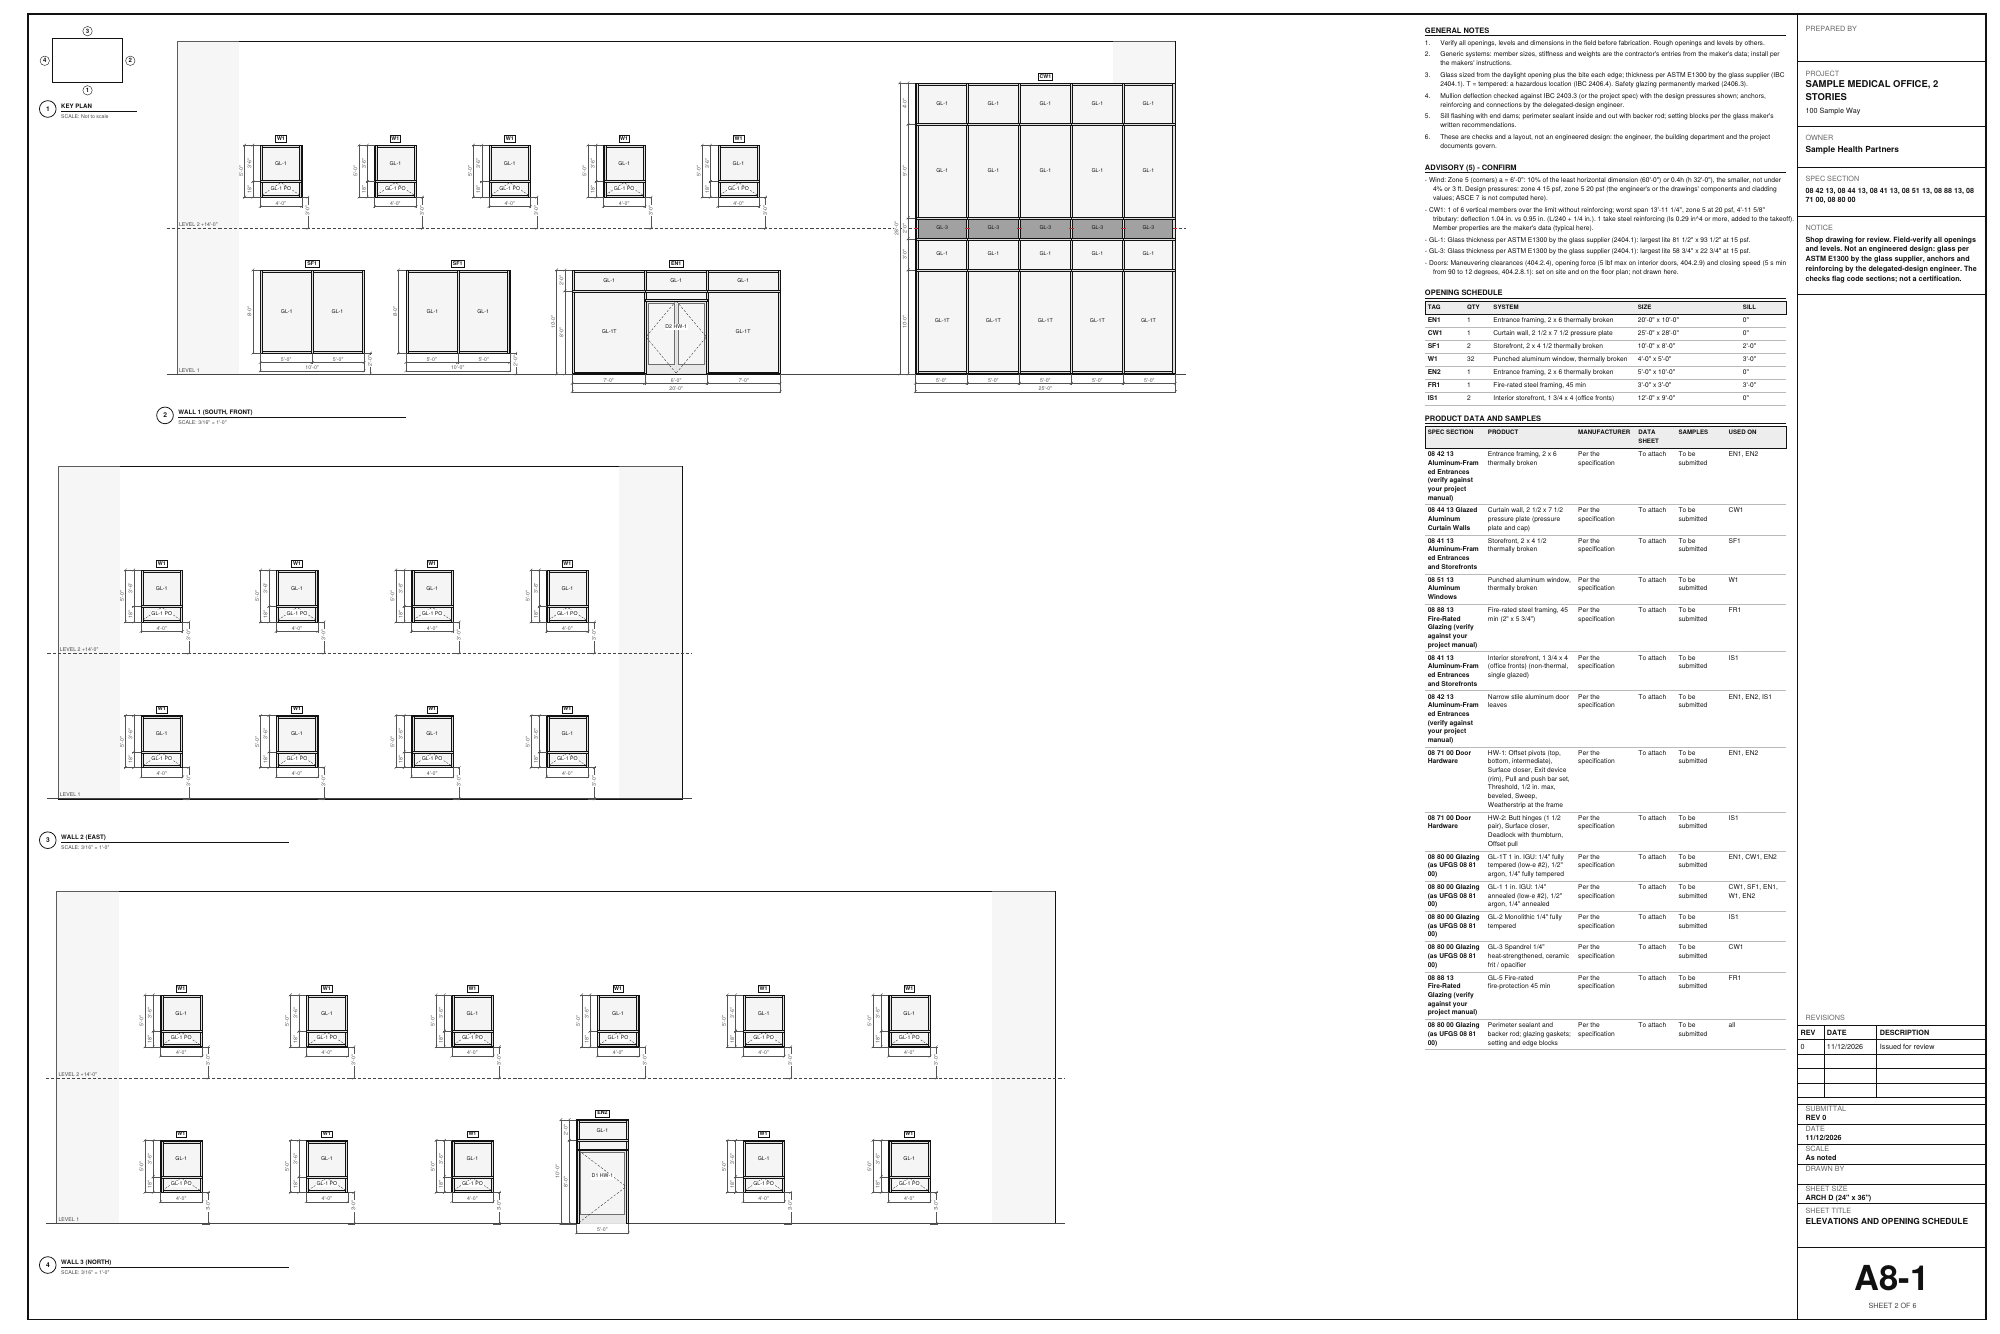
Pick Full set and the same submittal comes as ARCH D sheets (or ARCH C): a cover with the sheet index, the elevations with a key plan (Wall 1 to Wall 4 around the building) and a notes column holding the general notes, the open advisories, the opening schedule and the product data and samples log, then the glass, door and member schedules and the sections. The revisions box on each sheet records the issue.

Field tip: Download the sample's shop set below to see all 16 sheets.

Step 11: What it is and is not

The shop set is a fabricator's layout for review, not an engineered design: the glass thickness is the glass supplier's (ASTM E1300), the anchors and reinforcing are the delegated-design engineer's, and the checks flag code sections without certifying anything. Field-verify every opening before you release it for fabrication. RFIs and numbered revisions are not in the Glazing Designer's submittal yet.

What you get

The drawing set, the lists and the files

Real files from this sample, made by the designer. Tap a page to see it full size. Yours carry your company, the client and the address.

Shop sheet A8-0: the cover, finishes and sheet index
Shop sheet A8-1: typical details for the entrance framing
Shop sheet A8-7: EN1, the front entrance
Shop sheet A8-14: the glass and door schedules
Full set sheet A8-1: elevations with the key plan, the opening schedule and the product data log
Shop sheet A8-10: W1, the punched window (32 alike)
Shop sheet A8-12: FR1, the fire-rated lite at the stair
Full set cover with the sheet index

More in the guide

Try it on your own job

Open the sample, change it to your measurements, and send it to a BidRidge quote. Drawing is free; the drawing set, the lists and the quote come with a BidRidge license or the 14-day trial.

Sample designs: names, sizes and clients are made up. Prices are BidRidge's starting rates; set your own. The designers check against common guidelines (IRC, NKBA and the makers' published numbers) to help you catch mistakes. They don't replace your building department or the manufacturer's installation instructions: verify with them.