BidRidge › Designers › Guide › Chapter 13

Chapter 13 · Finish Carpentry DesignerBeta

Sample house trim

We trim out a living room and hall in a Craftsman package with one board-and-batten wall, a dining room in raised panel wainscot, and a straight stair with its skirt, chair rail, raked panels and crown. Then we read a joint detail, the cut list and the drawing set, and update the Finish carpentry job the design was opened from.

In the designer, tap Open project and pick the sample file. It opens exactly as in the video.

Narrated walkthrough, 2:30. Captions on.

The sample in numbers

  • Trim
    500 LF
    + 118 LF shoe · base 118 · casing 256 · crown 52 · the stair 72
  • Rooms
    3
    Craftsman in the living room and hall · Dining: raised panel wainscot
  • Wall treatments
    174 sf
    22 raised panels · 12 battens on one wall
  • Stair
    15 risers of 7 1/4″
    treads 11 1/4″ · pitch 32.80° · 32.3 LF skirt
  • Joints
    10
    joint details with the miter and bevel
  • Quote
    $24,100
    Better, at the starting rates

Step by step

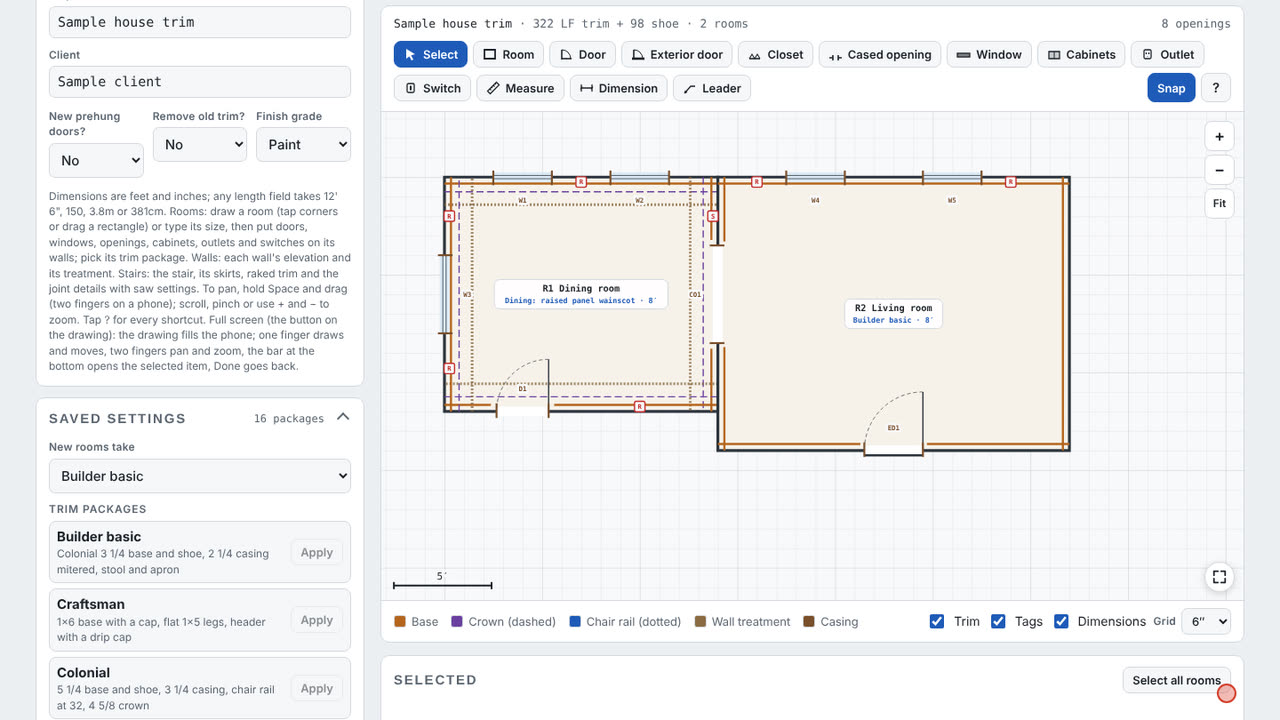
Step 1: Draw the rooms and their openings in the Finish Carpentry Designer
  1. Room: drag a rectangle or tap the corners
  2. Windows, doors and outlets go on the walls
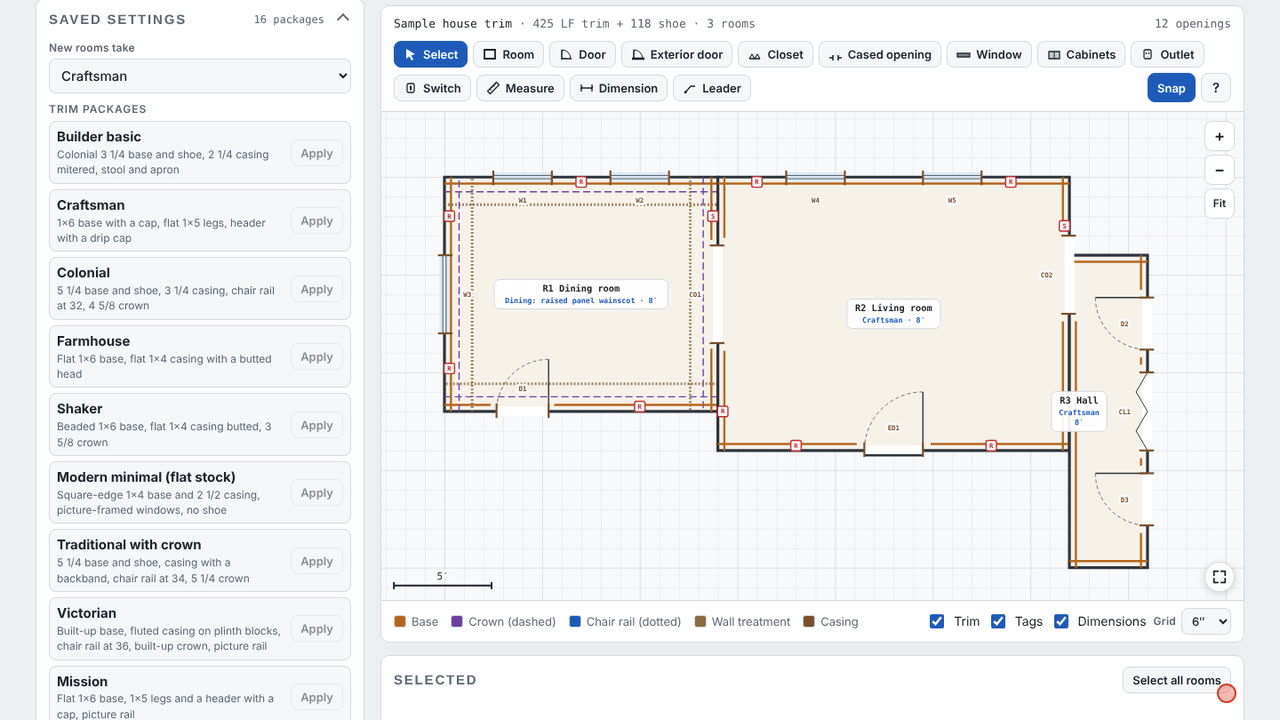
  3. Living room 18′ × 14′

Step 1: Draw the rooms and their openings

In Rooms mode, pick Room and drag a rectangle for each room, or type its size in the editor. Then pick Window, Door, Exterior door or Outlet and tap a wall to put one there. Doors on a wall two rooms share are cased once and cut both rooms' base.

Field tip: Any length field takes 18' 6", 222 (inches) or 5.6m. Put the outlets and switches in: the wall treatments keep off them.
Step 2: Apply a trim package in the Finish Carpentry Designer
  1. Pick both rooms (Shift-click), then Apply to 2
  2. Craftsman: 1x6 base with a cap, header over the casing

Step 2: Apply a trim package

Shift-click the living room and the hall, then Apply to 2 on Craftsman under Saved settings: a 1x6 base with a cap, flat 1x5 legs and a header with a drip cap over every door and window. Sixteen packages are built in, and Save these settings keeps your own.

Field tip: A package replaces the room's trim. A change you make in the room's editor stays with that room and shows as changed.

Step 3: Change one wall in the Finish Carpentry Designer
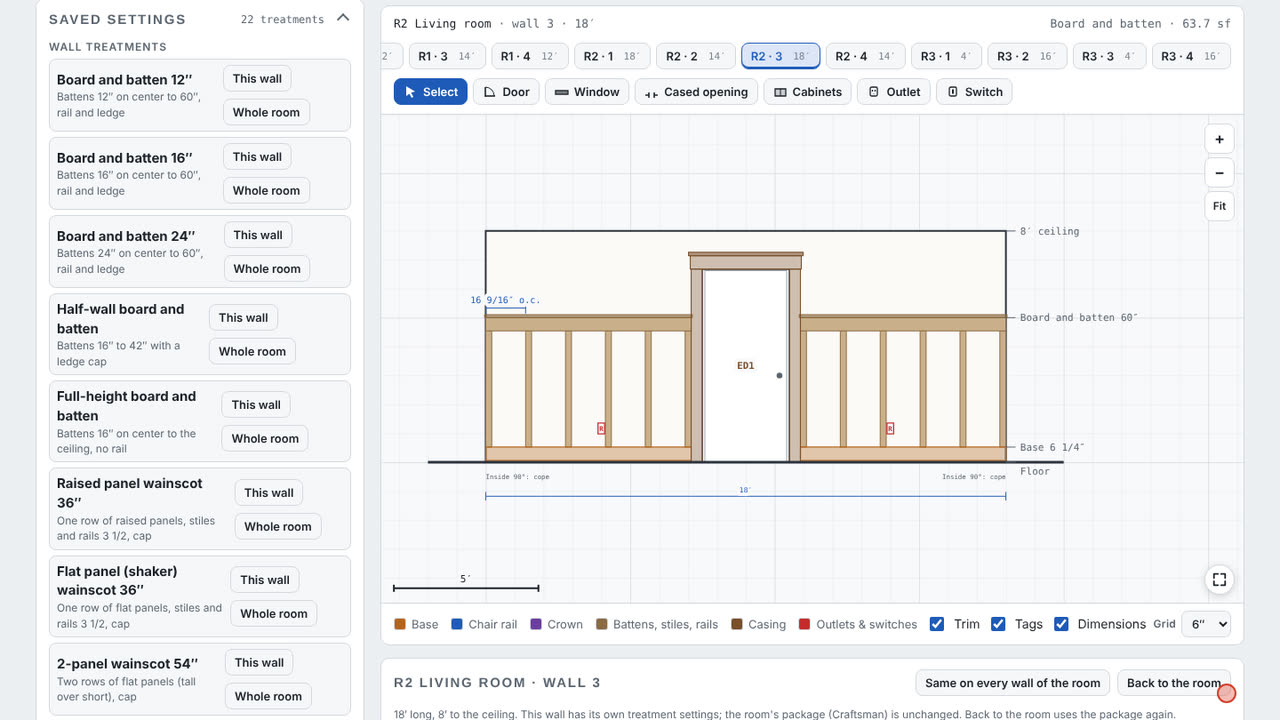
  1. This wall: only R2 wall 3 changes; the package stays
  2. Battens spaced around the door and the outlets

Step 3: Change one wall

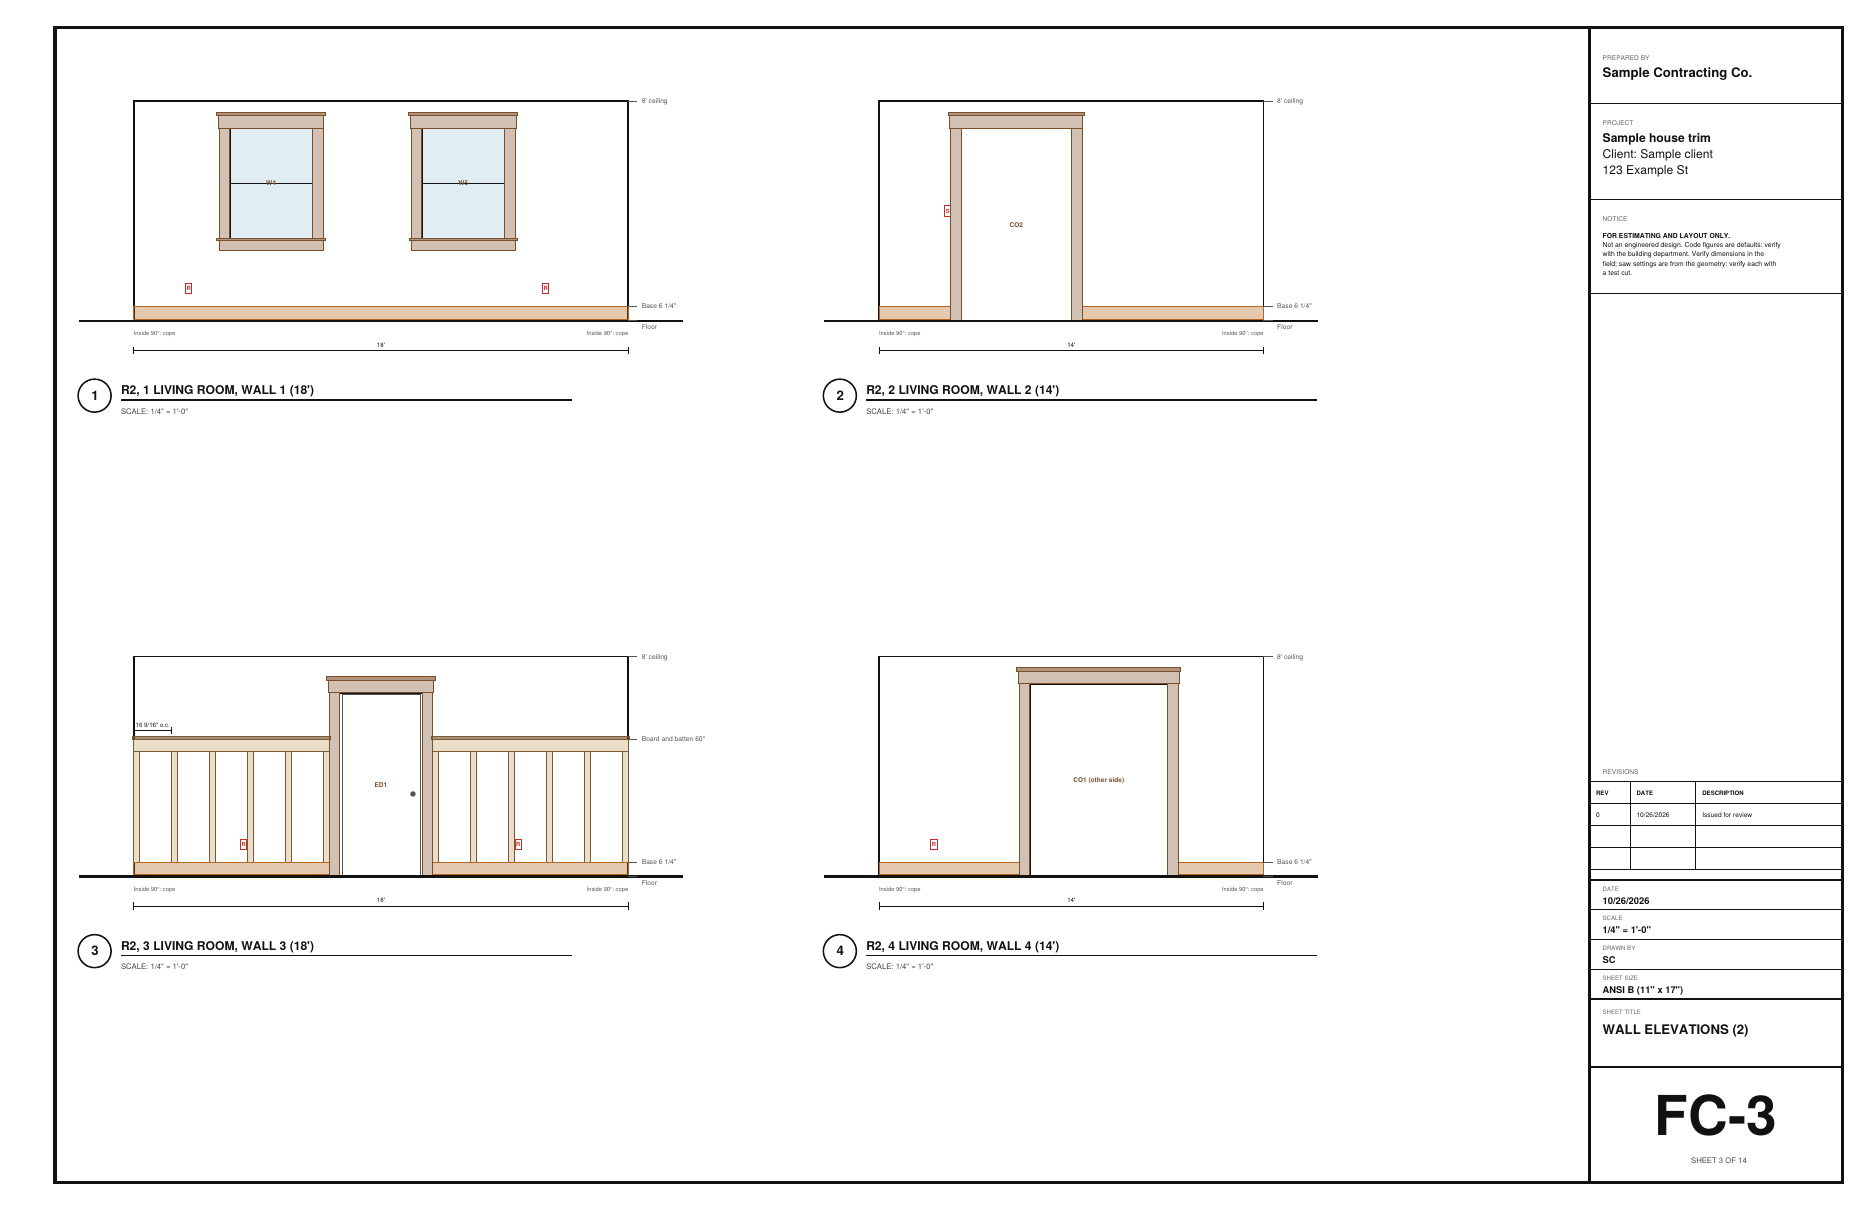
In Walls mode, pick the living room's front wall and tap This wall on Board and batten 16 in. Only that wall changes; the room keeps its Craftsman package. The battens are spaced around the door and kept off the outlets.

Field tip: Back to the room undoes the wall's own settings. Same on every wall of the room copies them around.

Step 4: Lay out the dining room wainscot in the Finish Carpentry Designer
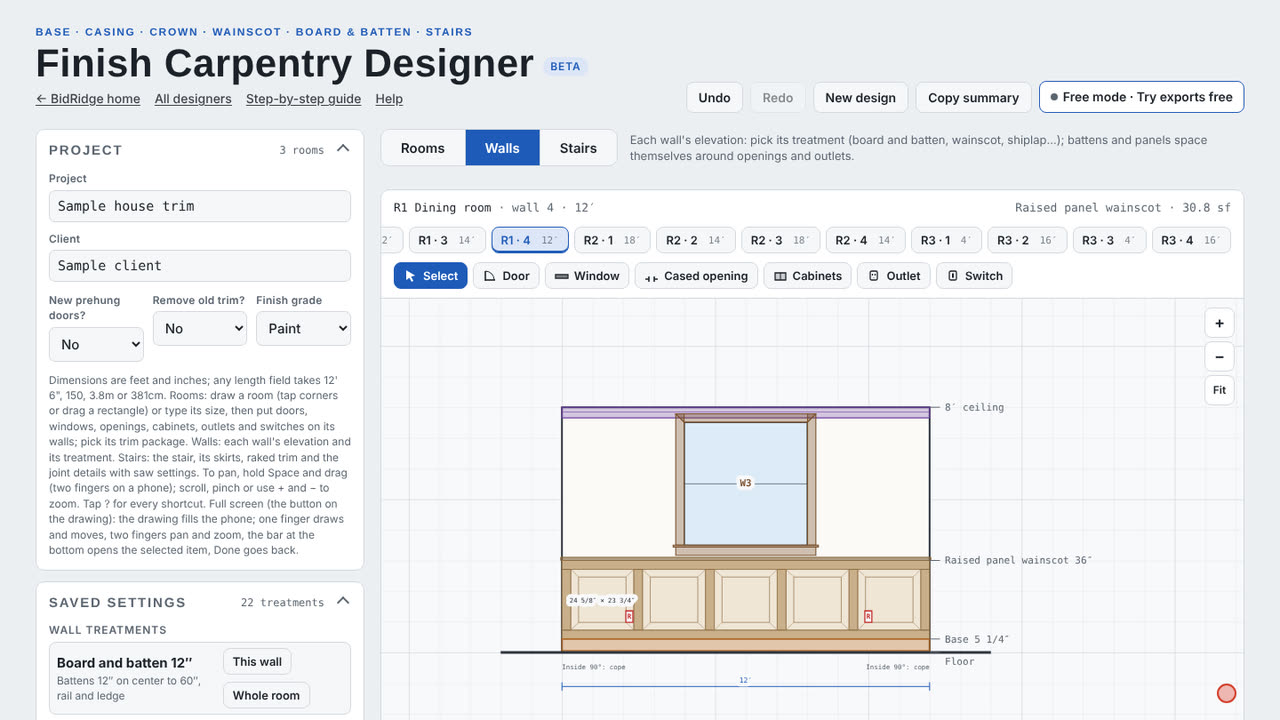
  1. Dining: raised panel wainscot at 36″
  2. Stiles kept off the outlets

Step 4: Lay out the dining room wainscot

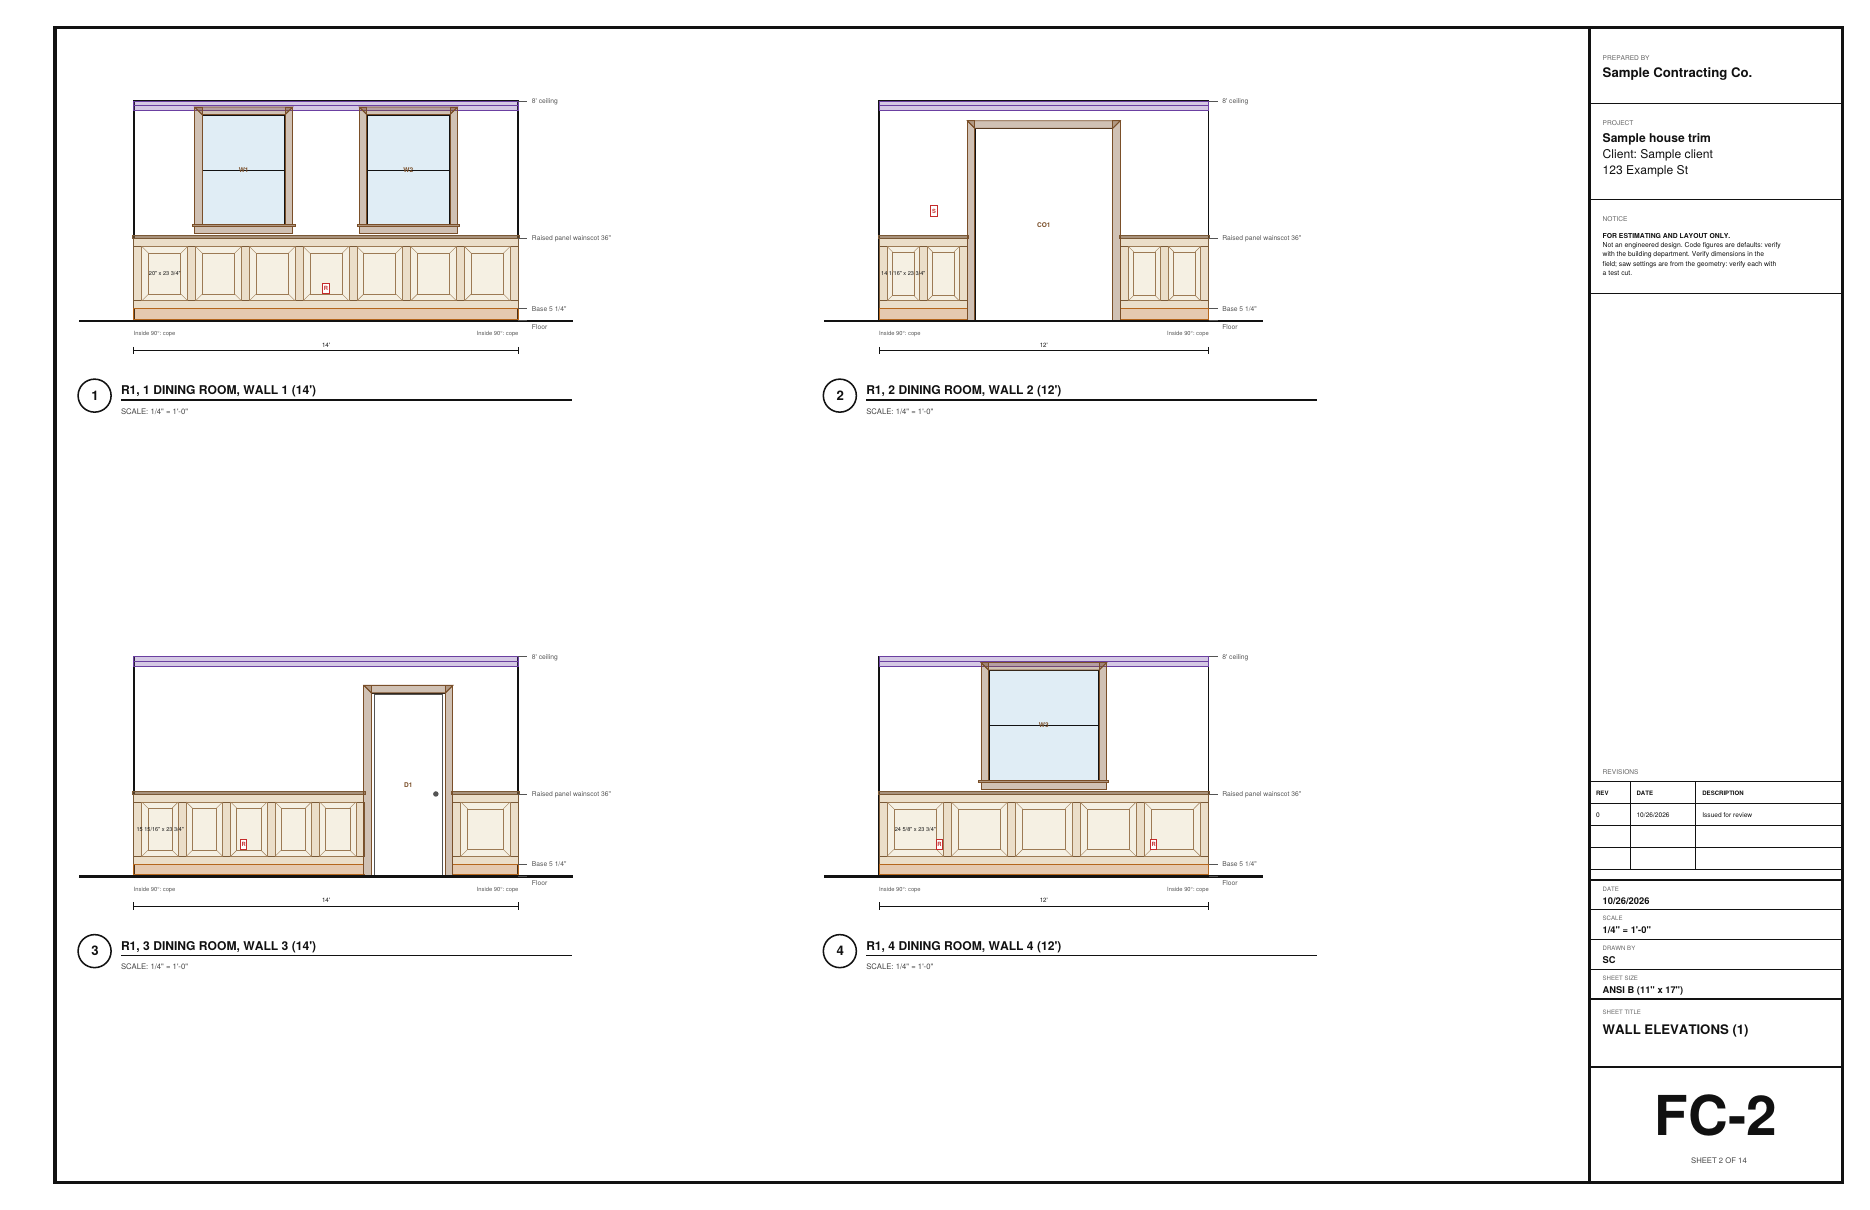
The dining room takes the Dining package: Colonial trim, crown and raised panel wainscot at 36″. Each wall lays out its own panels, equal widths in each span, with the stiles kept off the outlets and switches and short panels under the windows.

Field tip: The Wall treatments schedule lists every wall with its panels, battens and square feet.

Step 5: Add the stair in the Finish Carpentry Designer
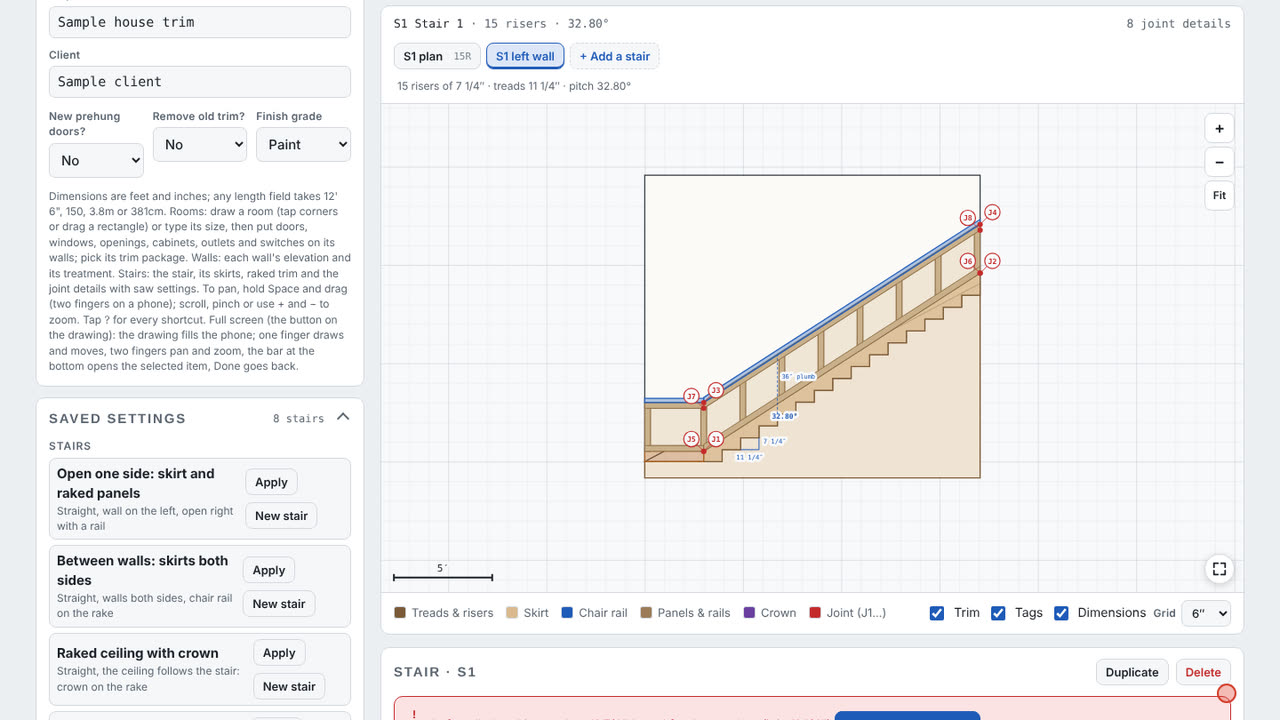
  1. New stair: open one side, skirt and raked panels
  2. The left wall: skirt, chair rail and panels follow the stair

Step 5: Add the stair

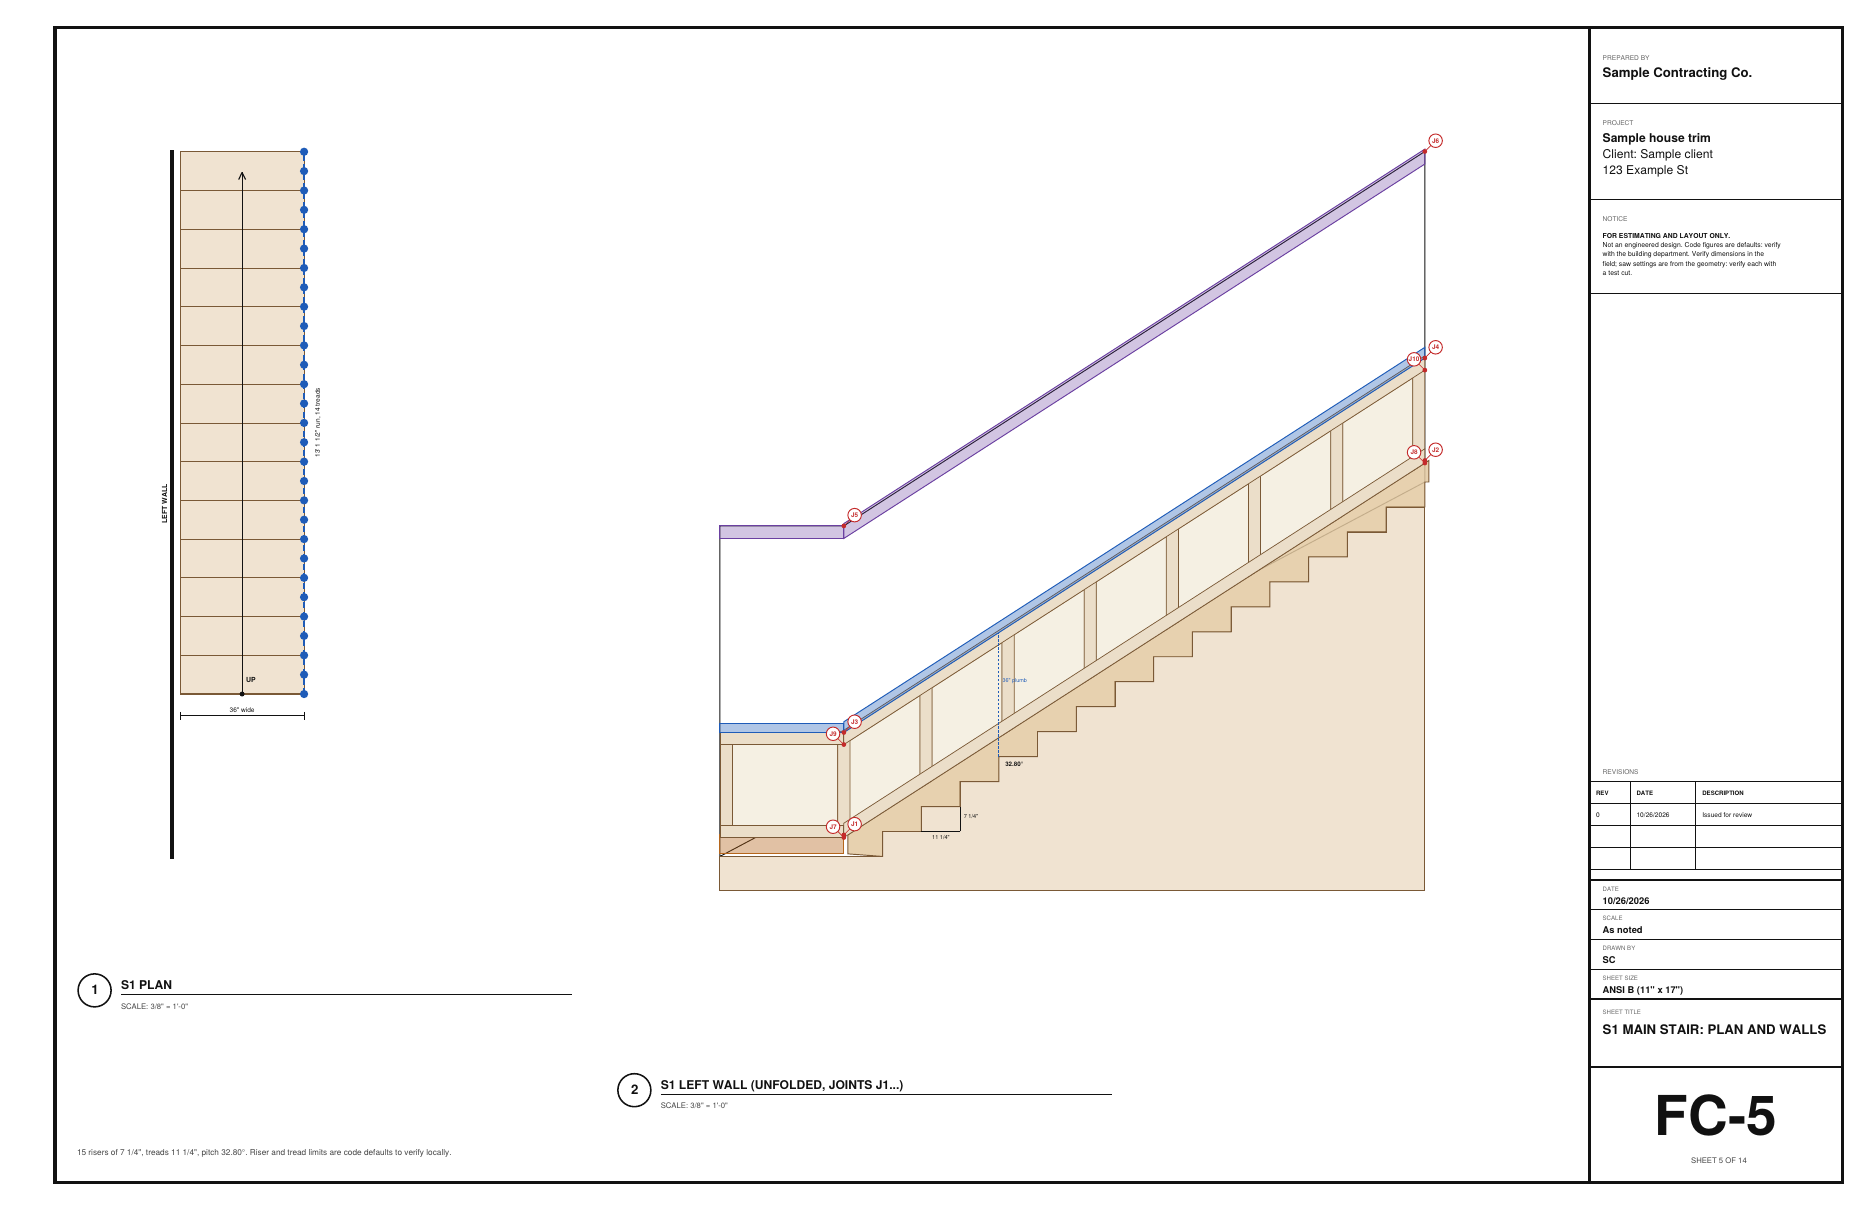
In Stairs mode, tap New stair on Open one side: skirt and raked panels under Saved settings. Ours is a straight run, a wall on the left and open on the right, 9′ 0 3/4″ floor to floor: Auto gives 15 risers of 7 1/4″, on 11 1/4″ treads, with Craftsman profiles. At the bottom the wall runs on level; at the top it turns an inside corner.

Field tip: The checks use a 7 3/4″ riser and a 10″ tread. Those are starting defaults: verify them with your building department.

Step 6: Trim that follows the stair in the Finish Carpentry Designer
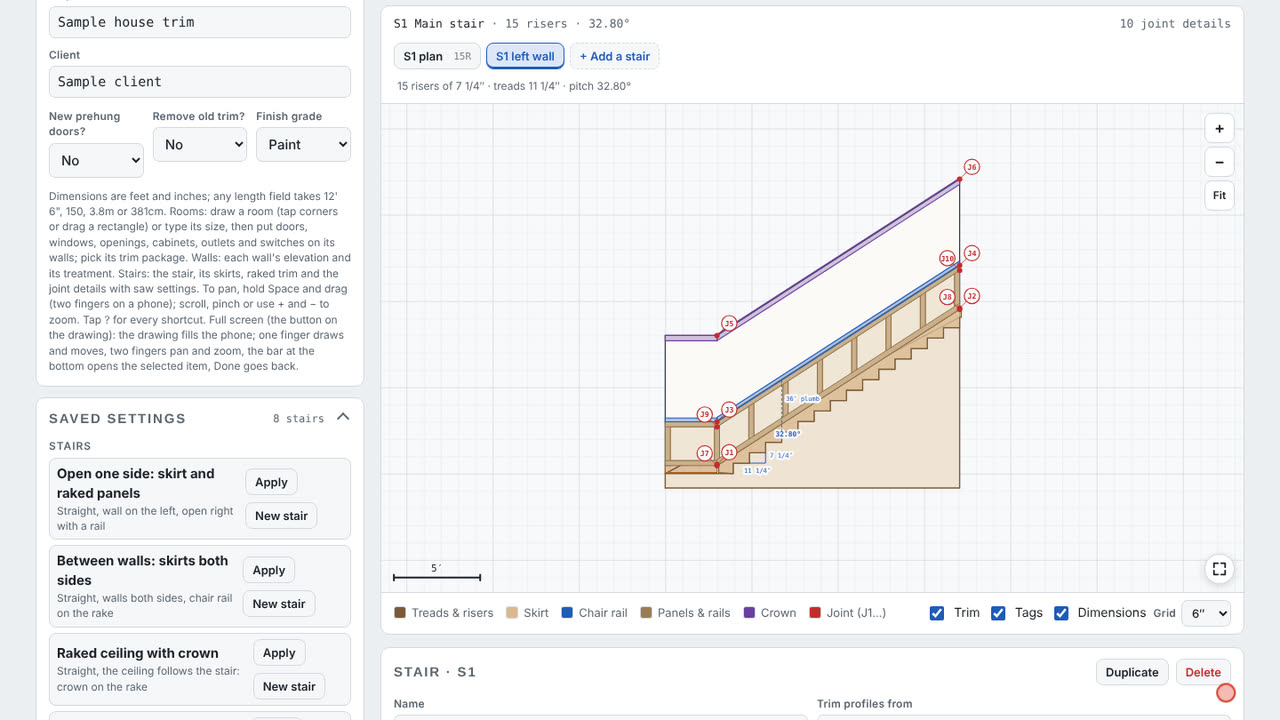
  1. Crown on the rake, level past the bottom
  2. Chair rail and raked panels

Step 6: Trim that follows the stair

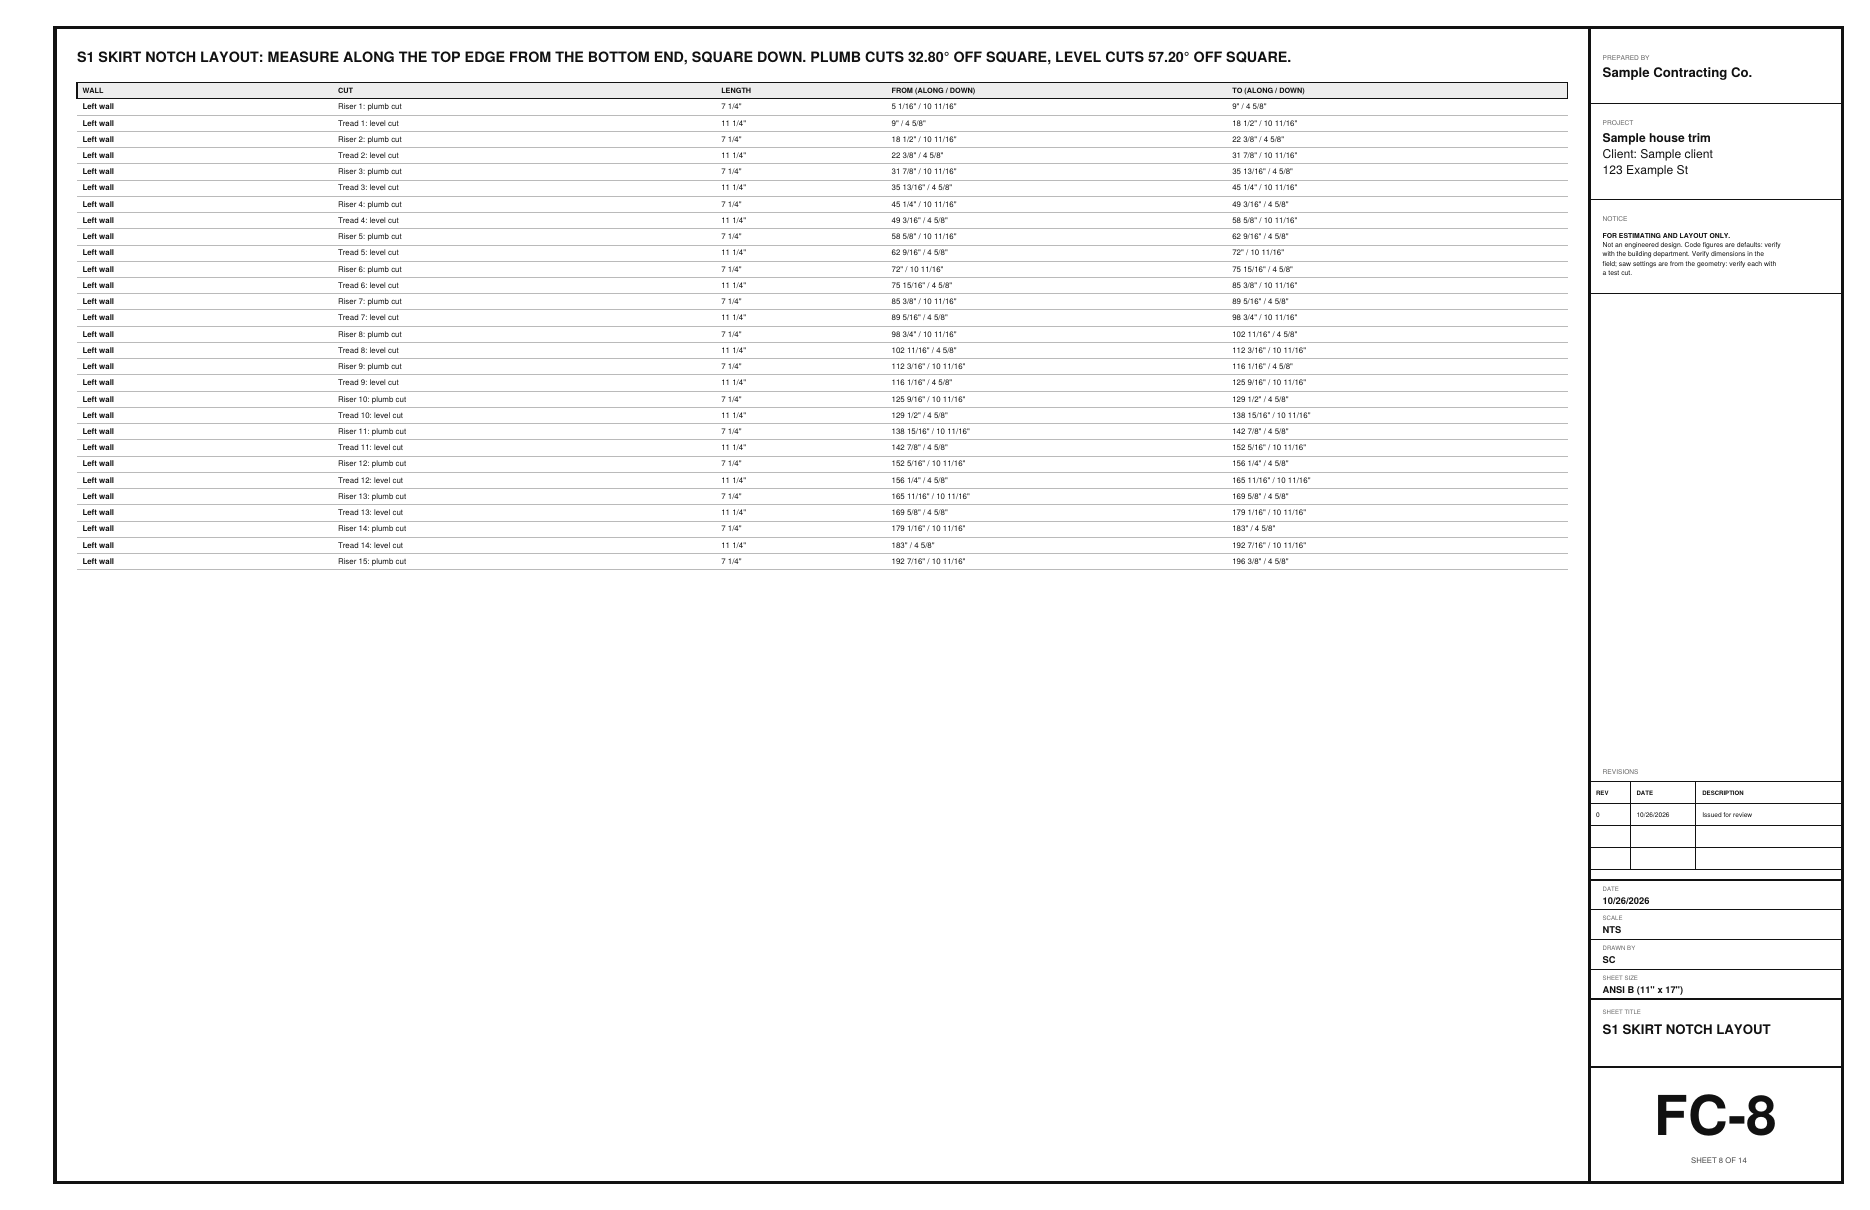
The closed wall gets a notched skirt board, chair rail and raked panels, and crown on the rake. The skirt check flags a board too narrow for the notches; its button lowers the skirt top to 5 1/2″. The skirt notch layout gives every cut, measured along the top edge.

Field tip: Each rake-to-level change and corner becomes a joint, J1 to J10, tagged on the wall.

Step 7: Read a joint detail in the Finish Carpentry Designer
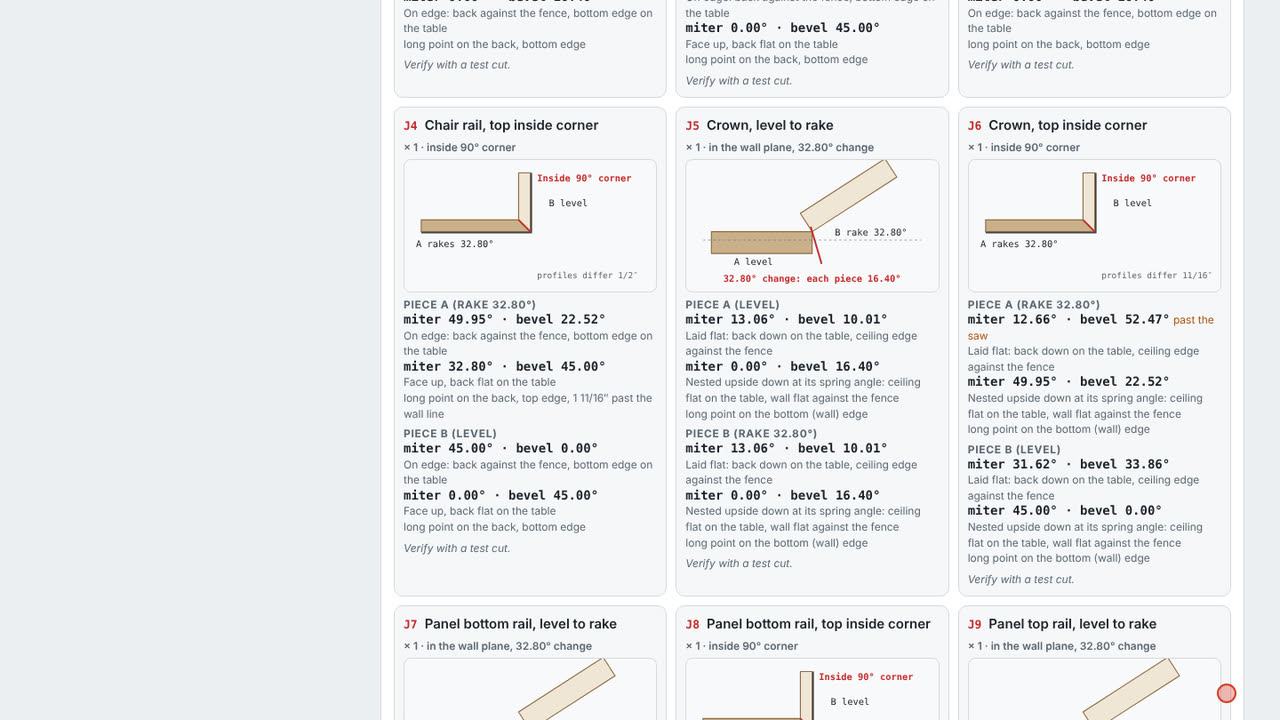
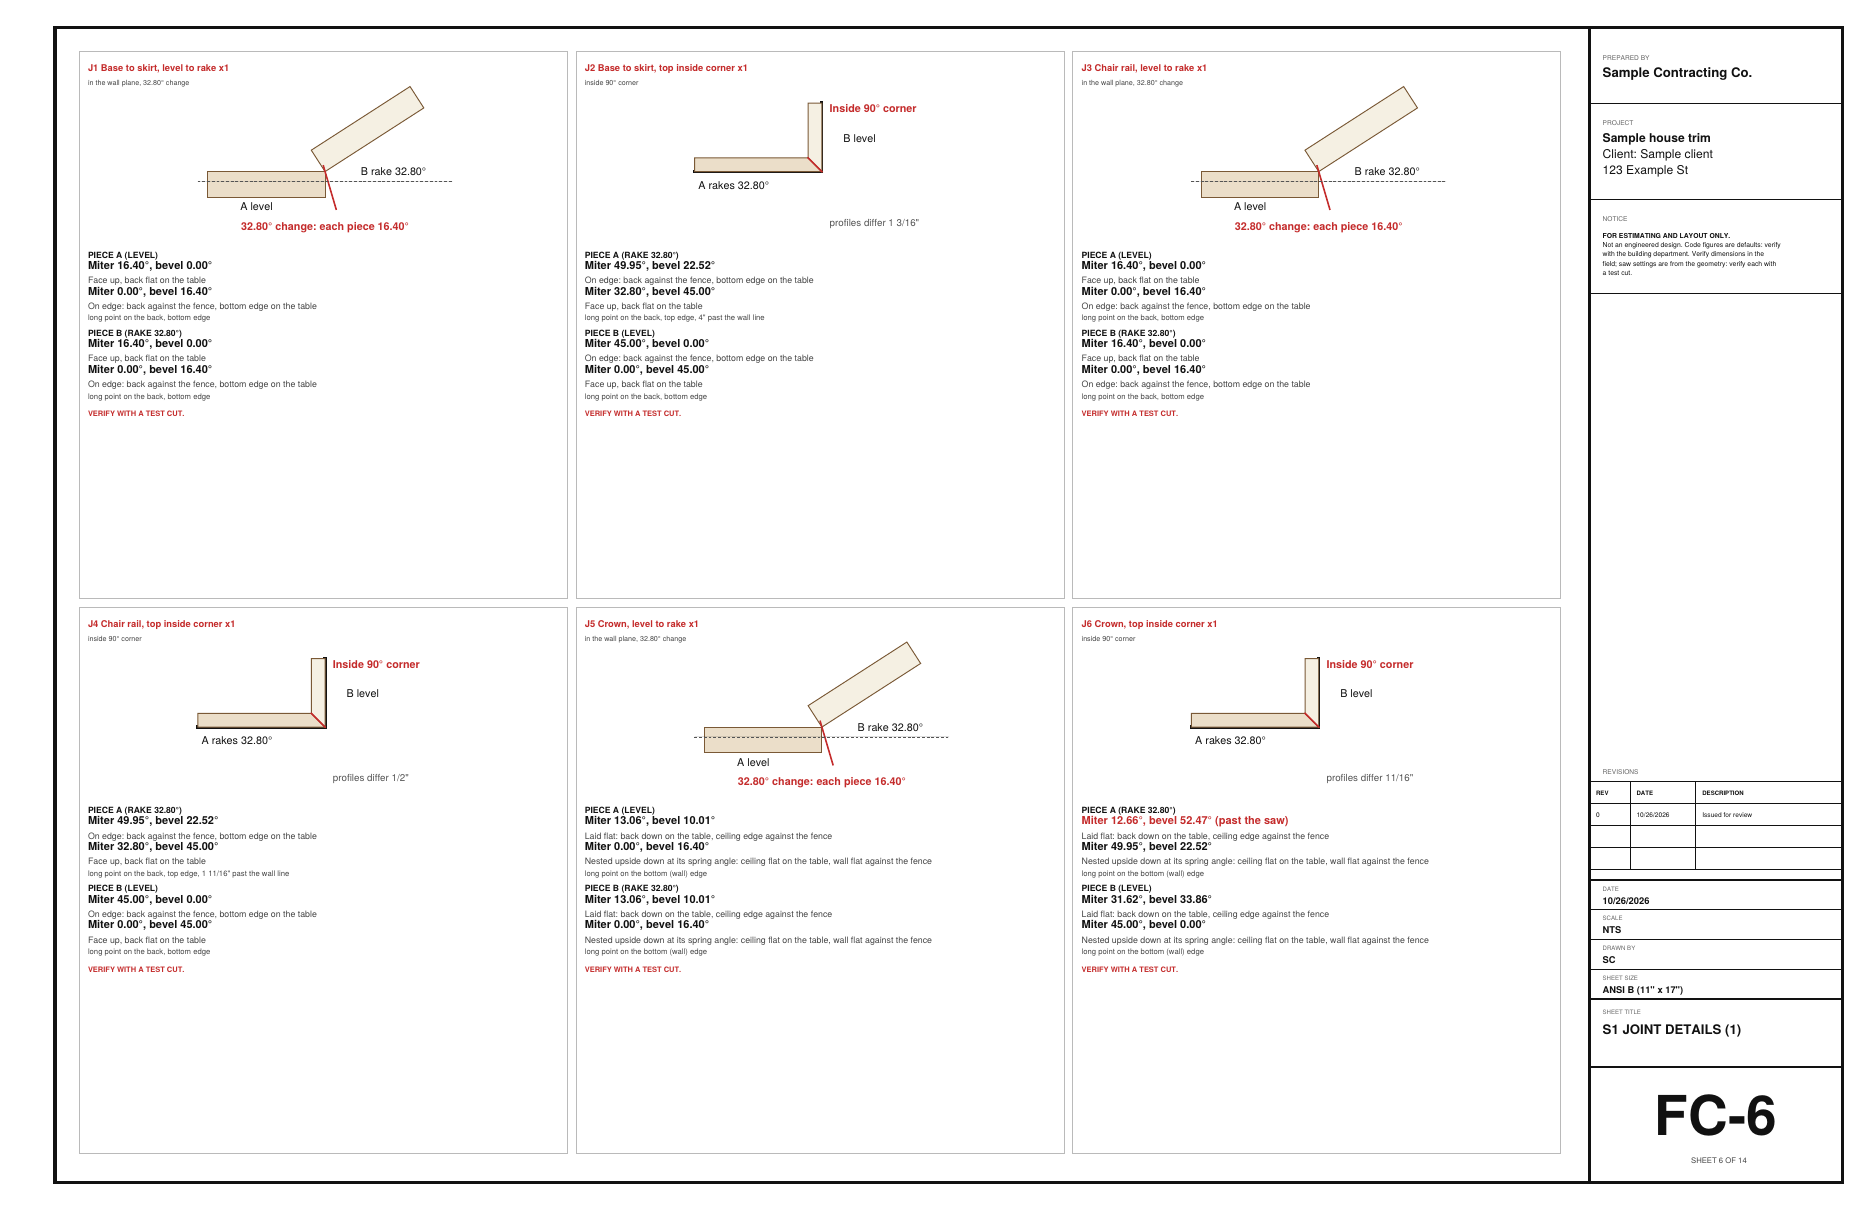
  1. Raked piece on edge: miter 49.95°, bevel 22.52°
  2. Verify with a test cut

Step 7: Read a joint detail

Tap J4, the chair rail at the top inside corner. The raked piece on edge is a miter 49.95°, bevel 22.52°; the level piece is a plain 45°. Each card shows how the piece sits on the saw and where the long point is.

Field tip: Verify with a test cut. Crown that runs past your saw is flagged: cut it nested, by hand to a line, or add a short level piece.

Step 8: The cut list and stock nesting in the Finish Carpentry Designer
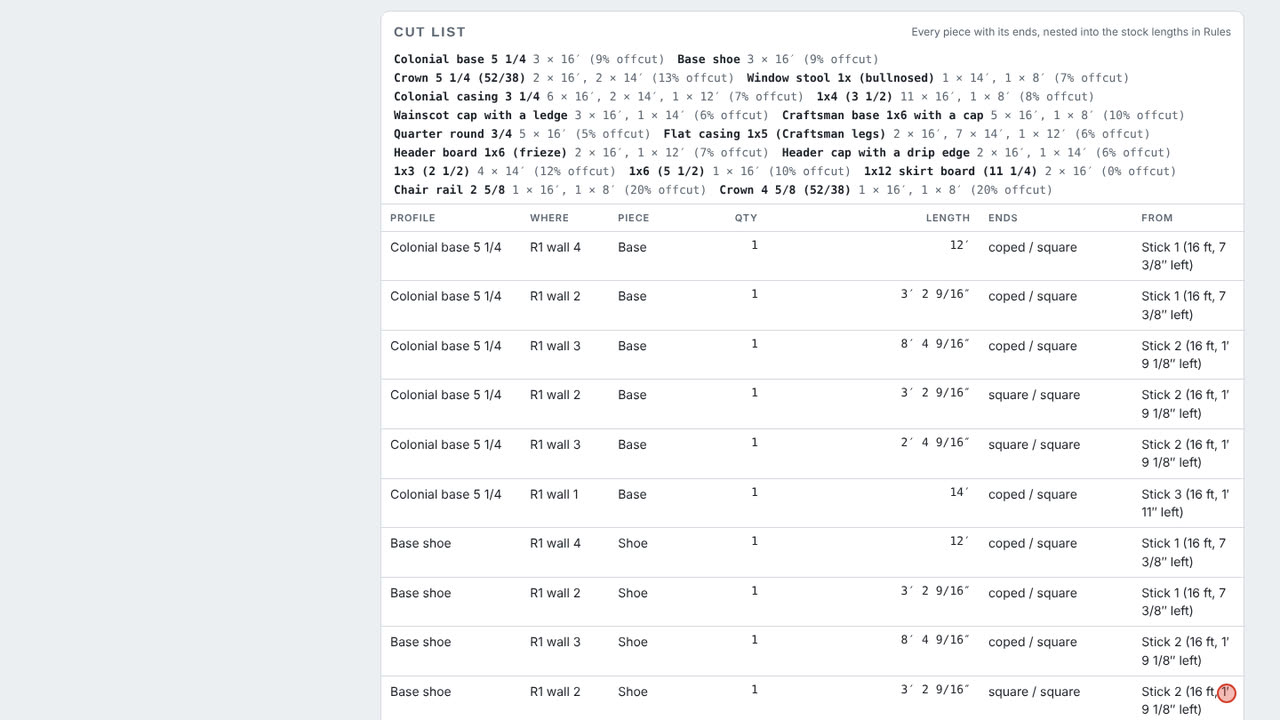
  1. Stock nested into 8 to 16 ft lengths, offcut %
  2. Every piece with its ends: coped, mitered, square

Step 8: The cut list and stock nesting

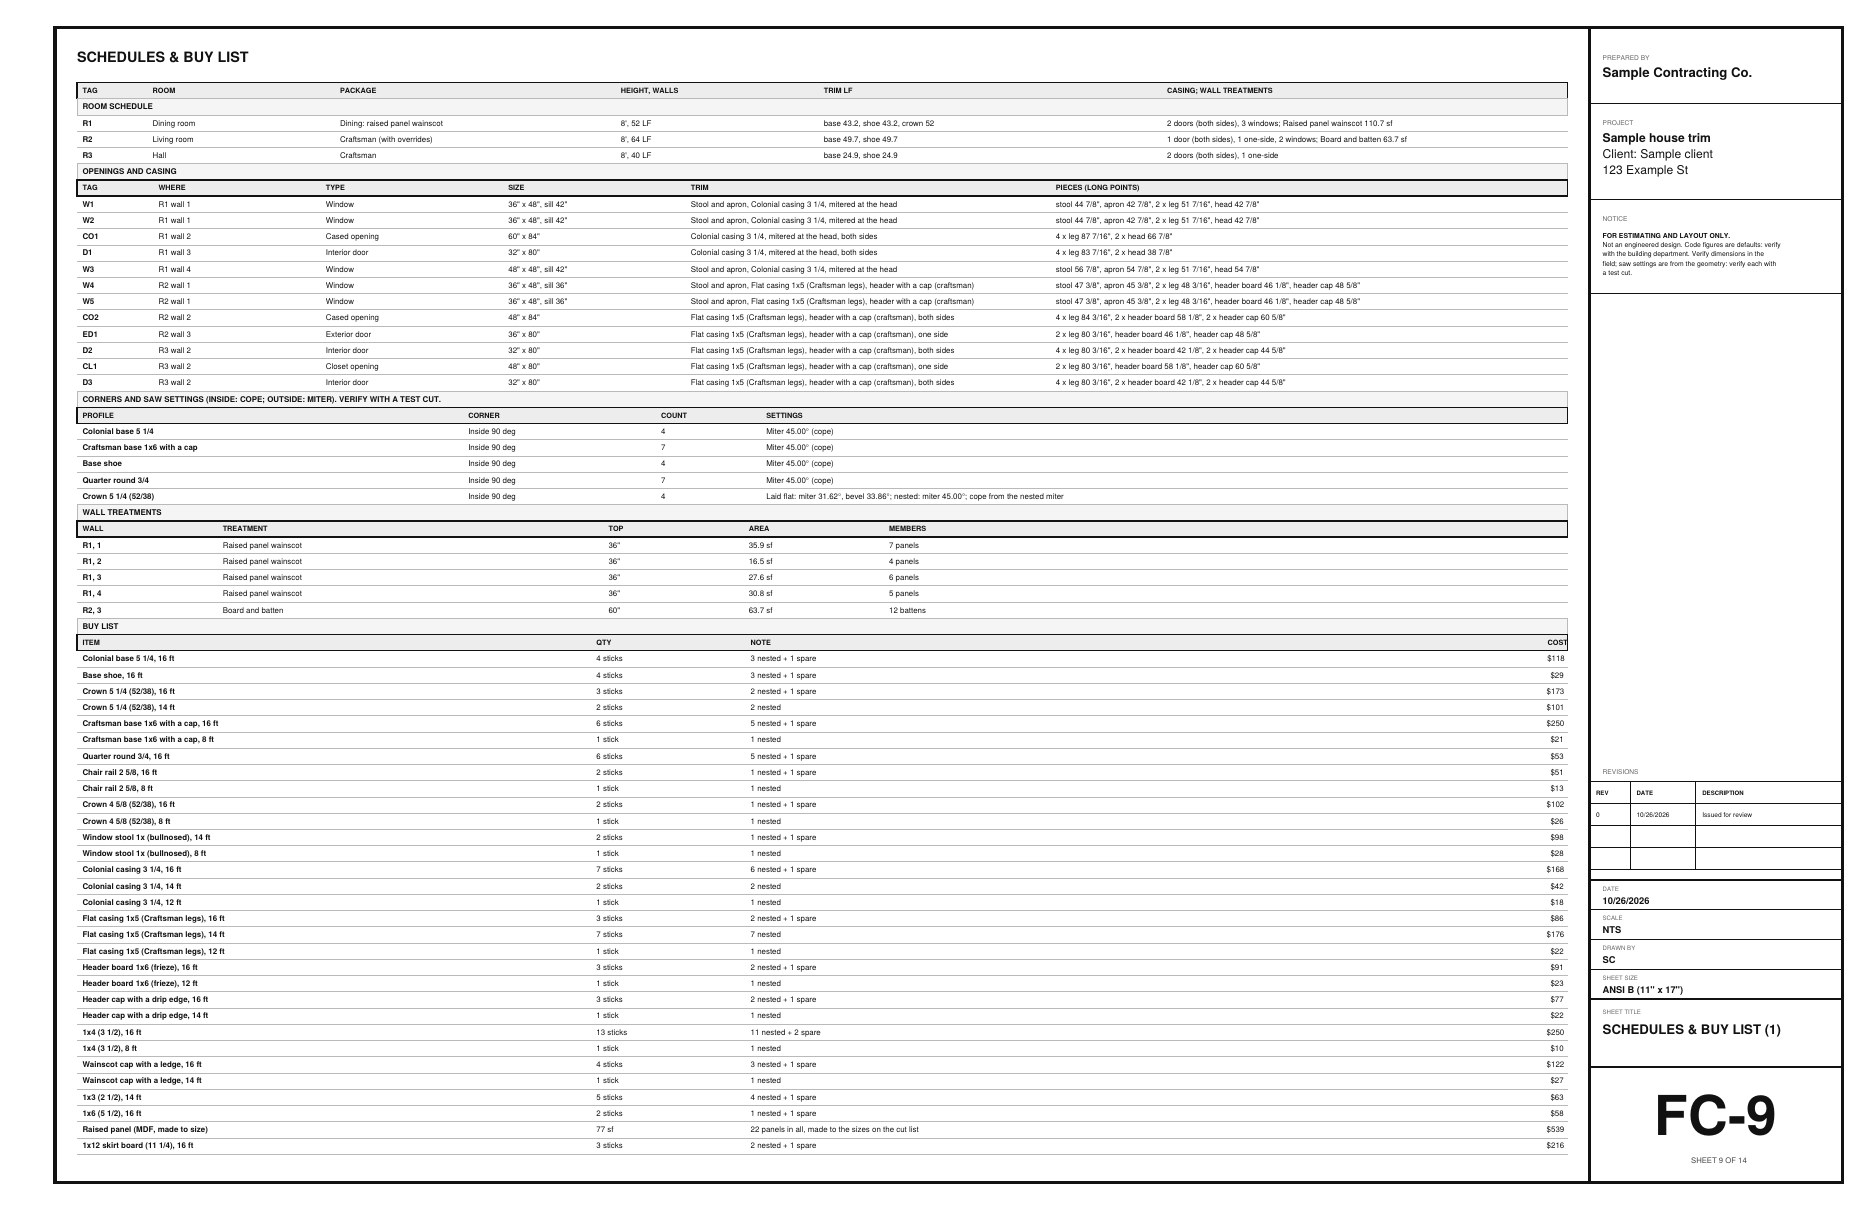
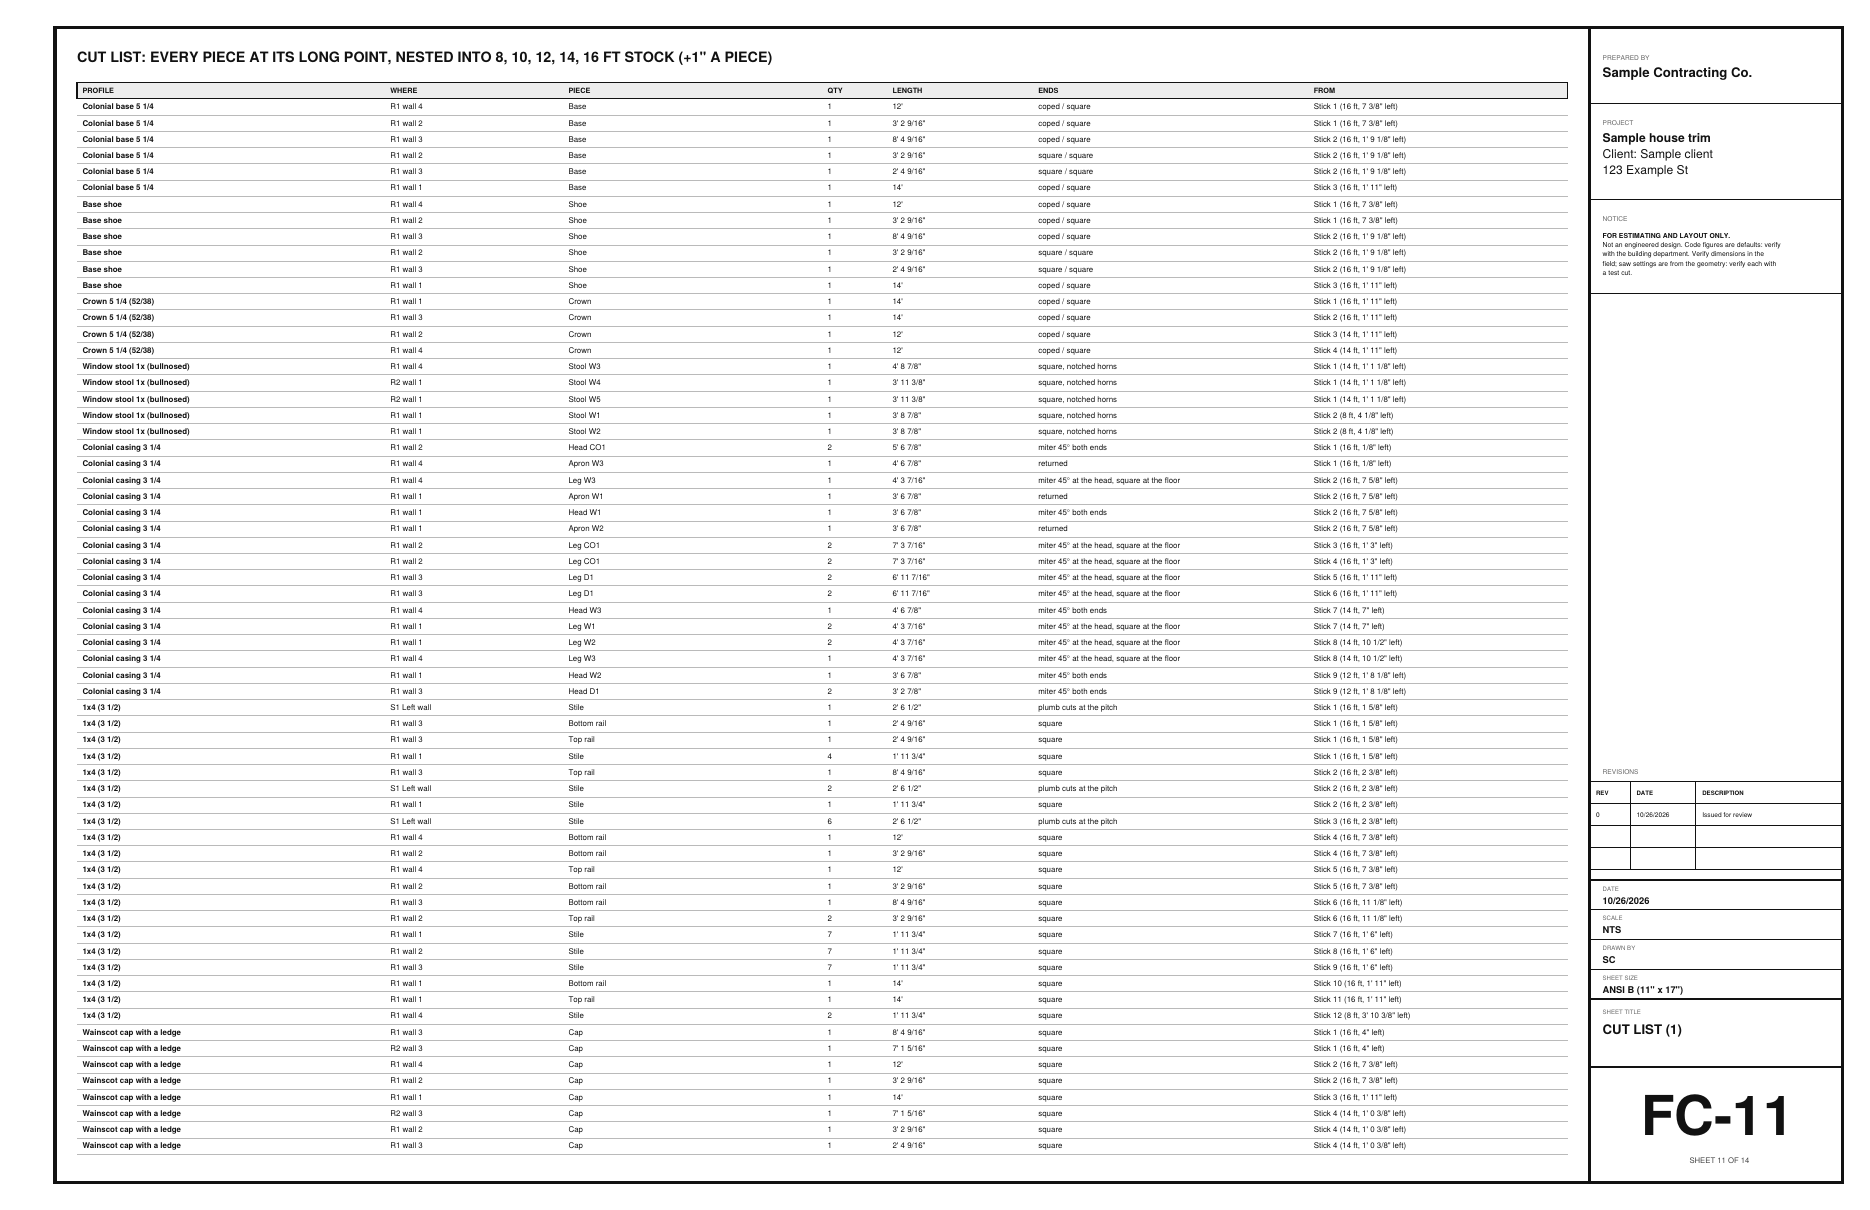
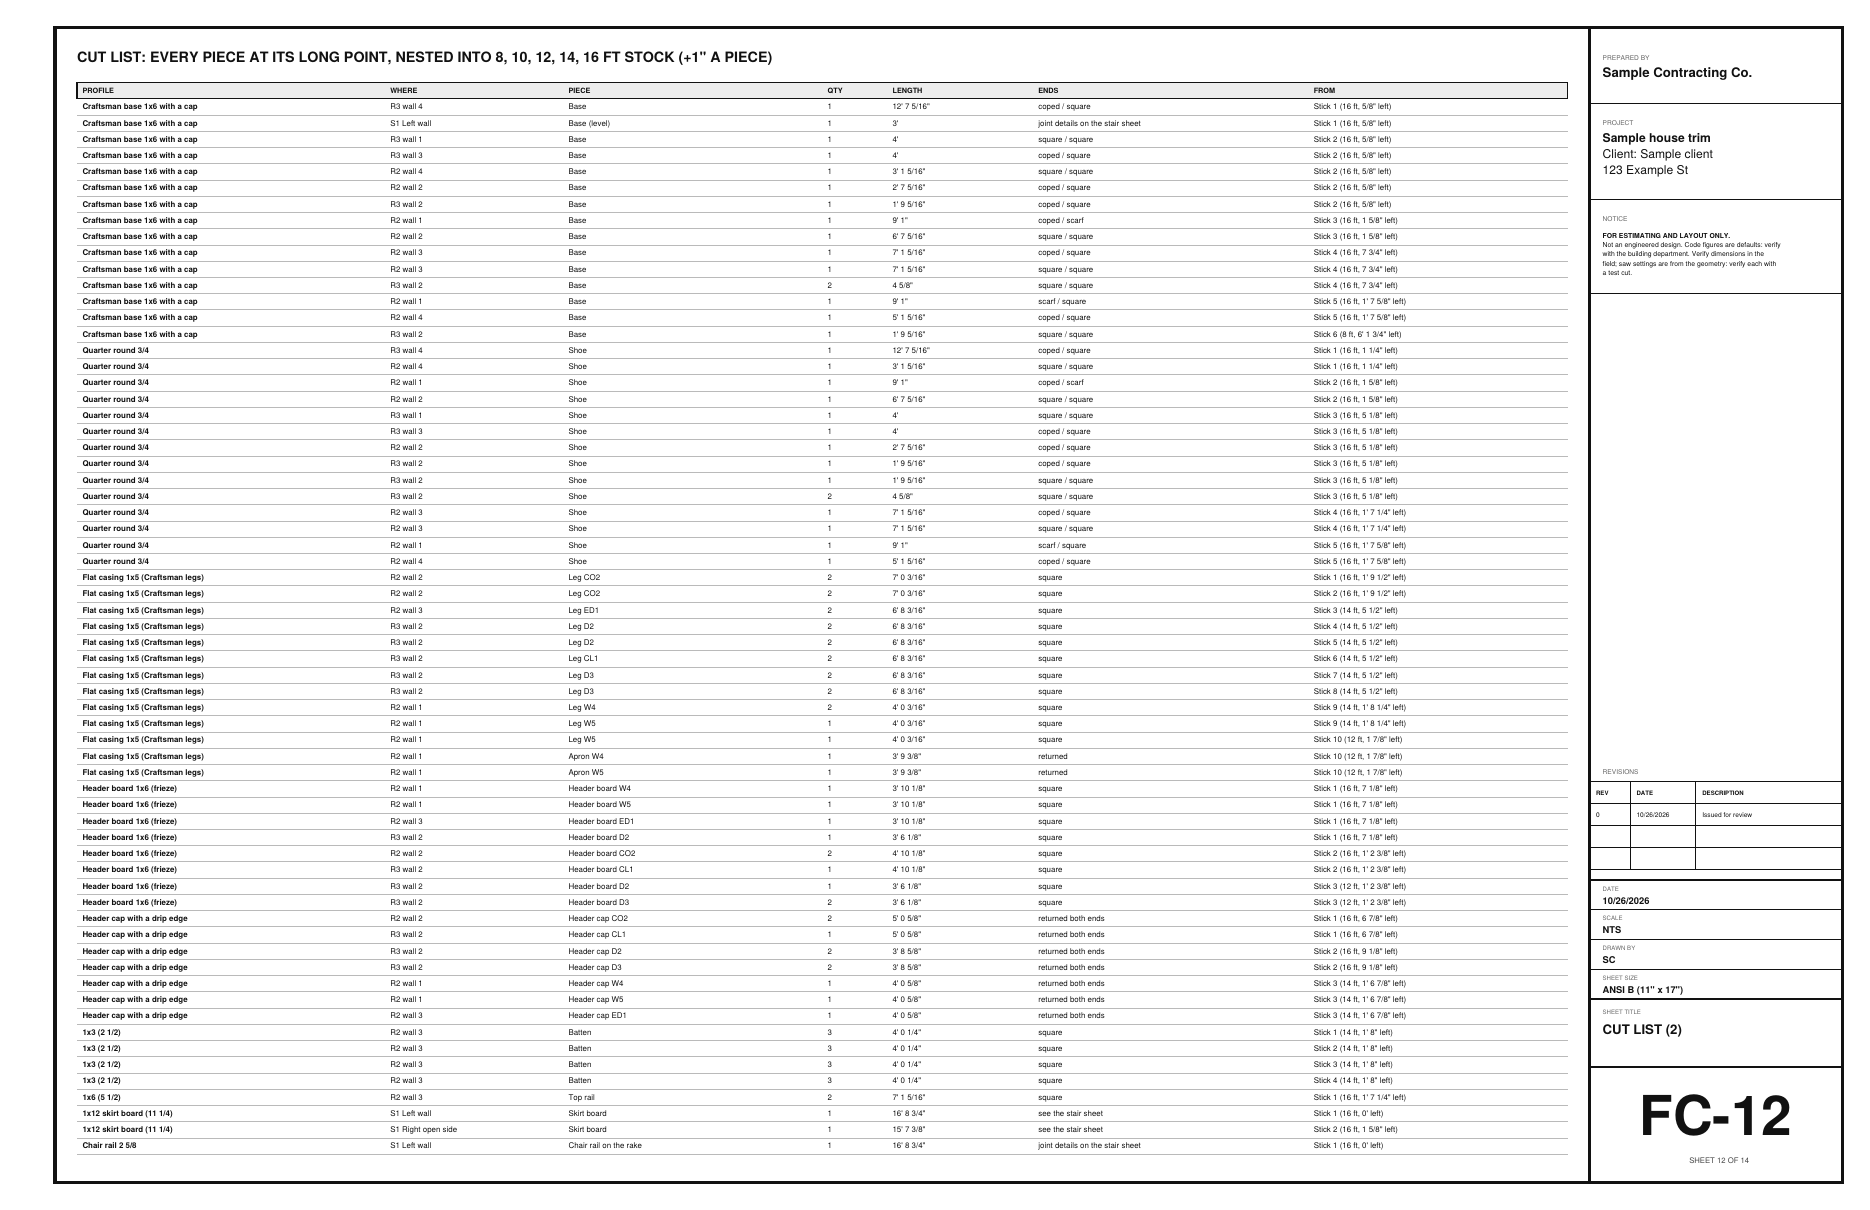
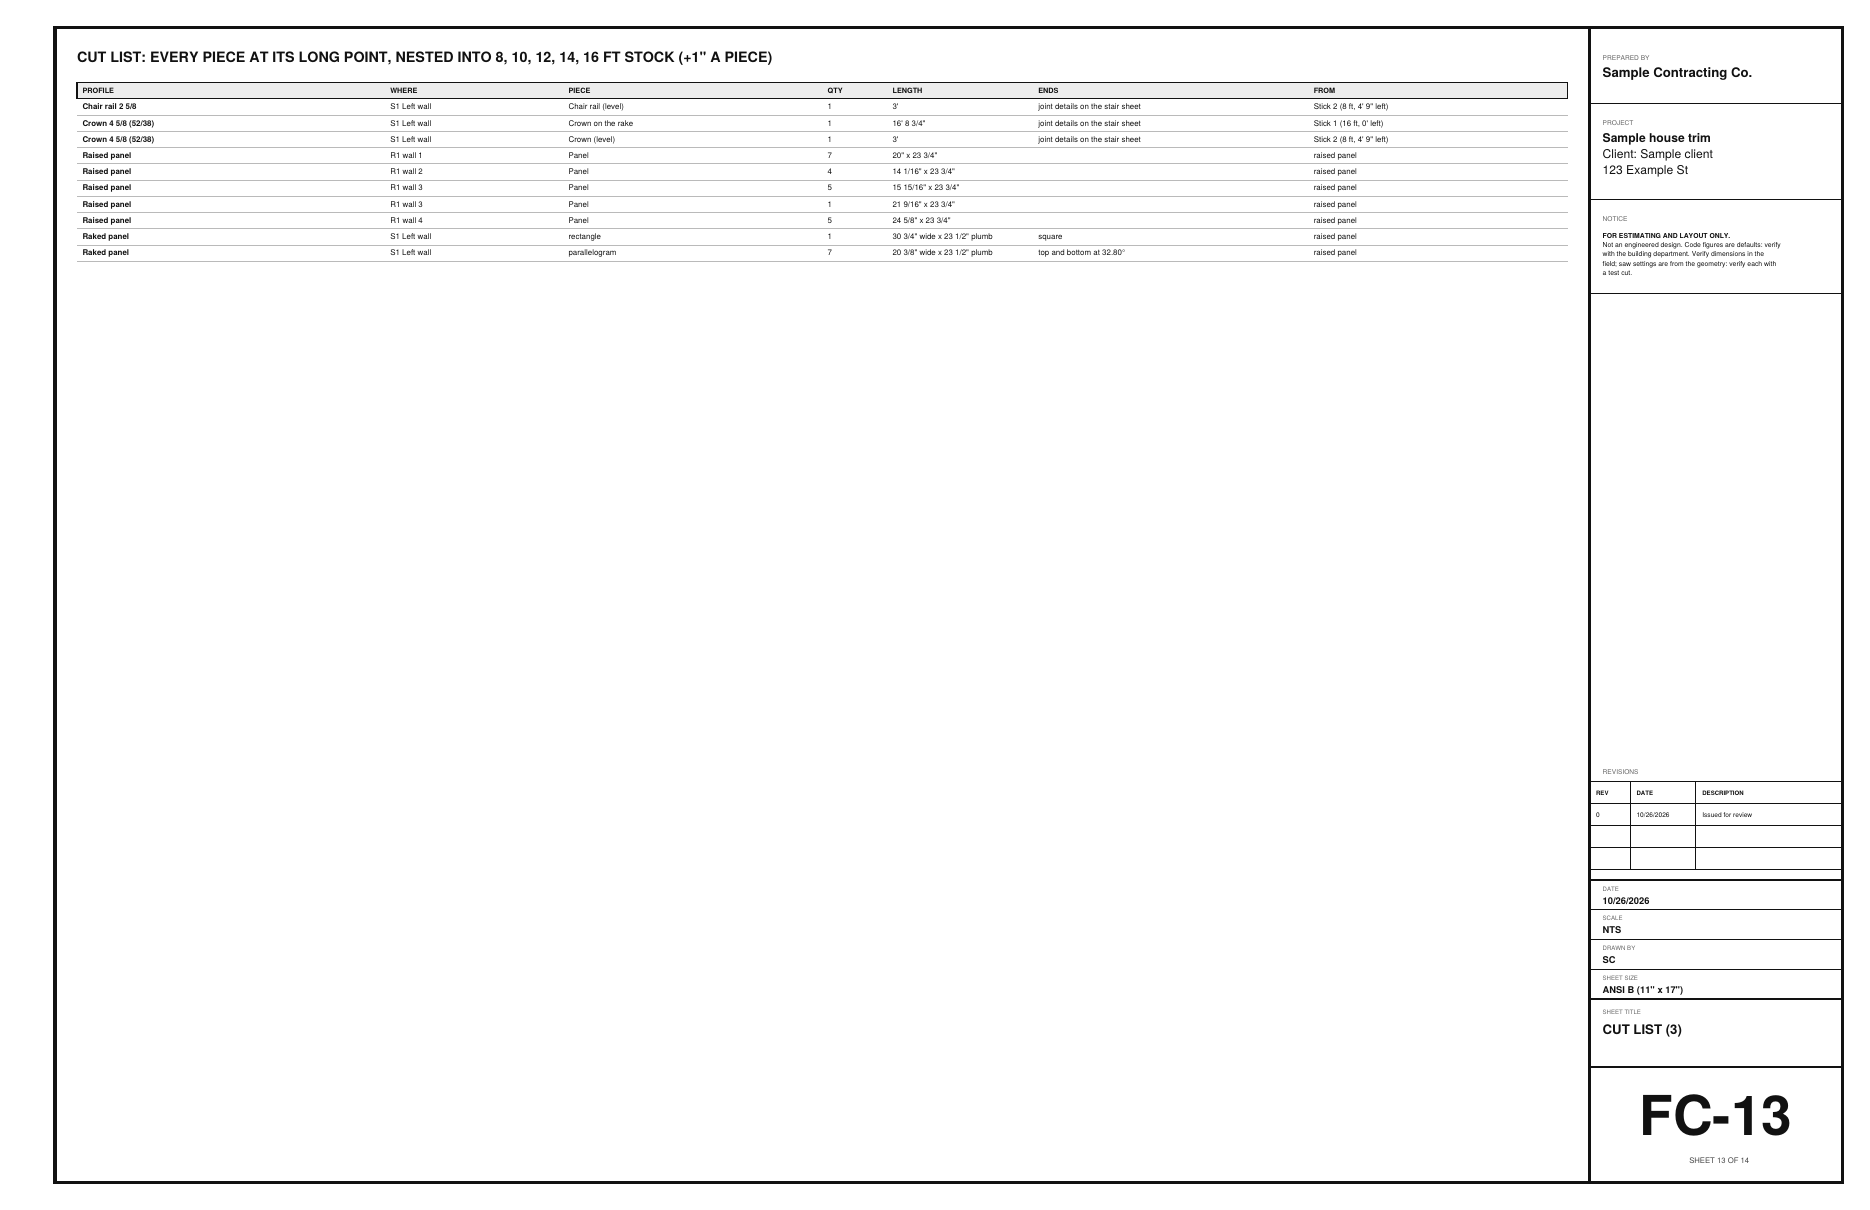
Corners & saw settings shows the inside corners coped and the outside corners mitered, with the saw settings for each profile. The cut list gives every piece with its ends, nested into 8 to 16 ft stock, with the offcut for each profile.

Field tip: Pick your stock lengths, the cut allowance and the spare in Rules.

Step 9: The drawing set and the buy list in the Finish Carpentry Designer
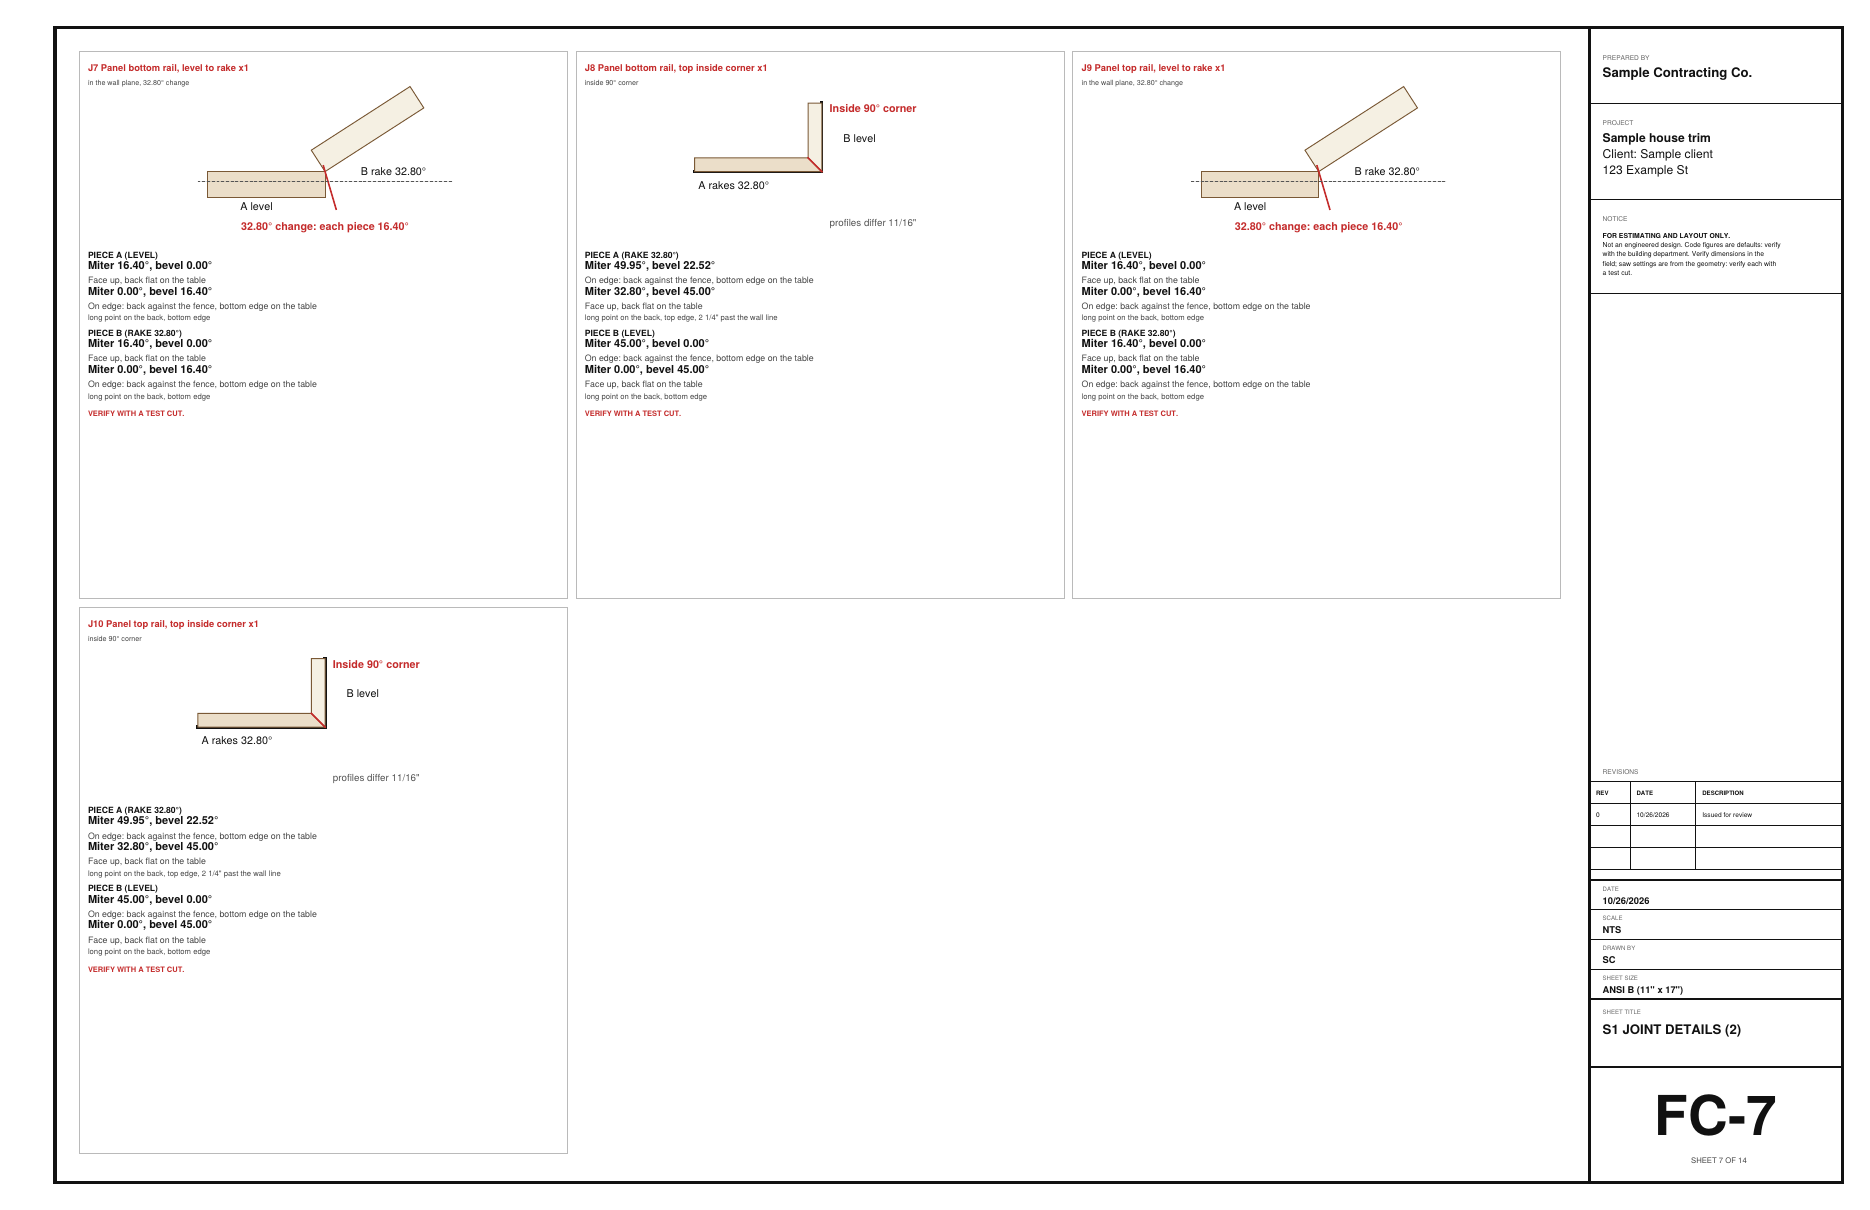
  1. Joint details with the saw settings
  2. FC sheets: the stair, its plan and the stair wall

Step 9: The drawing set and the buy list

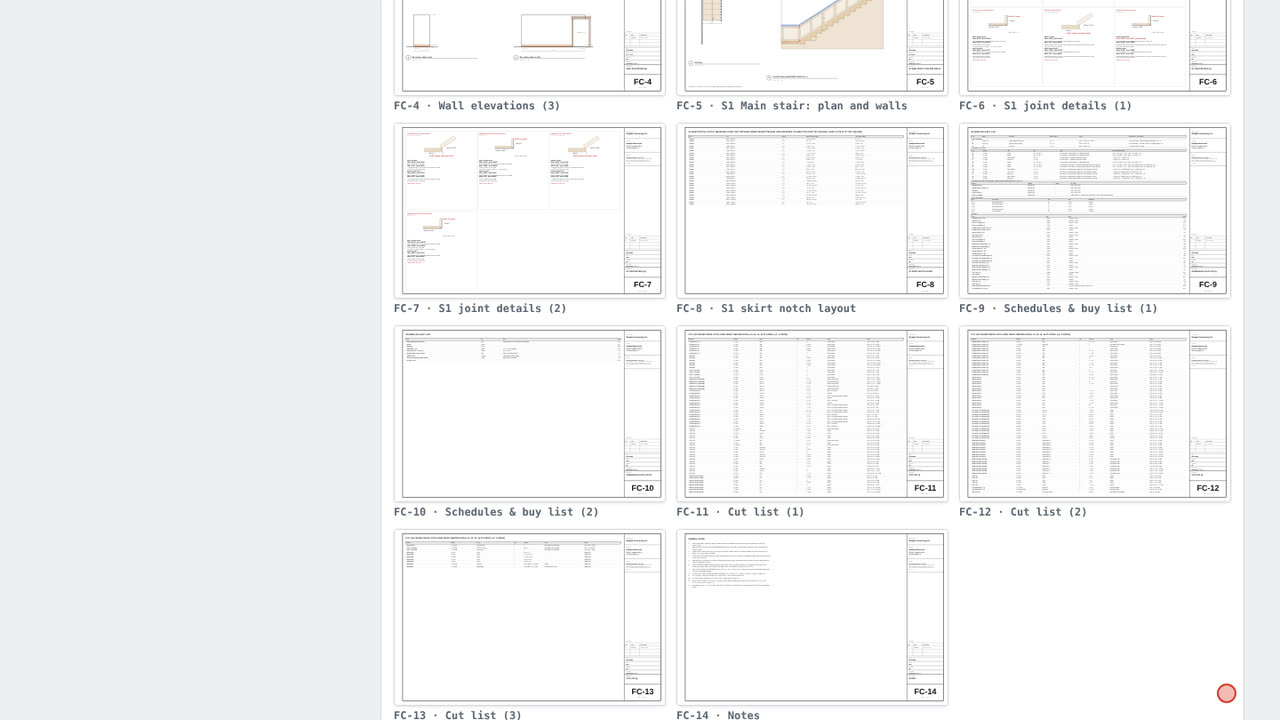
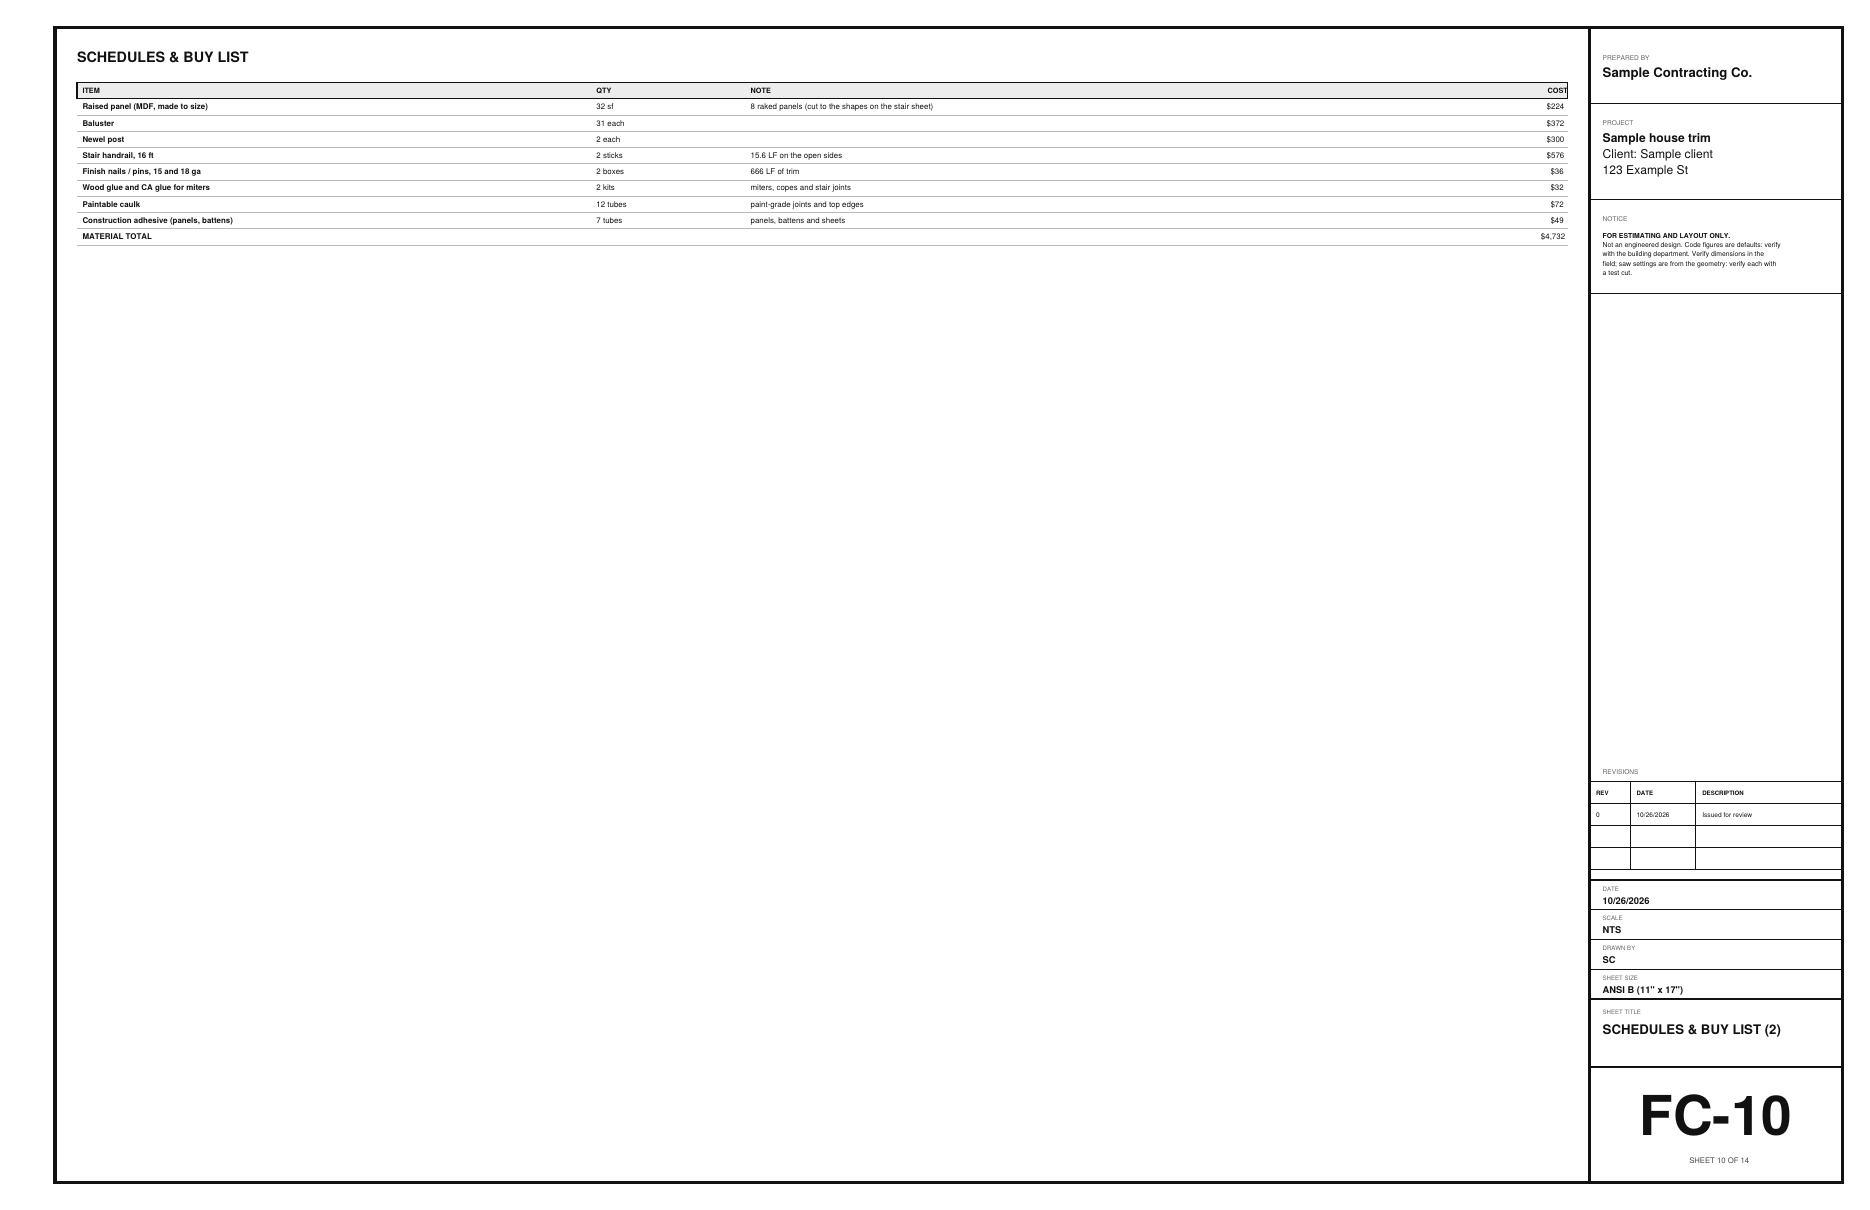
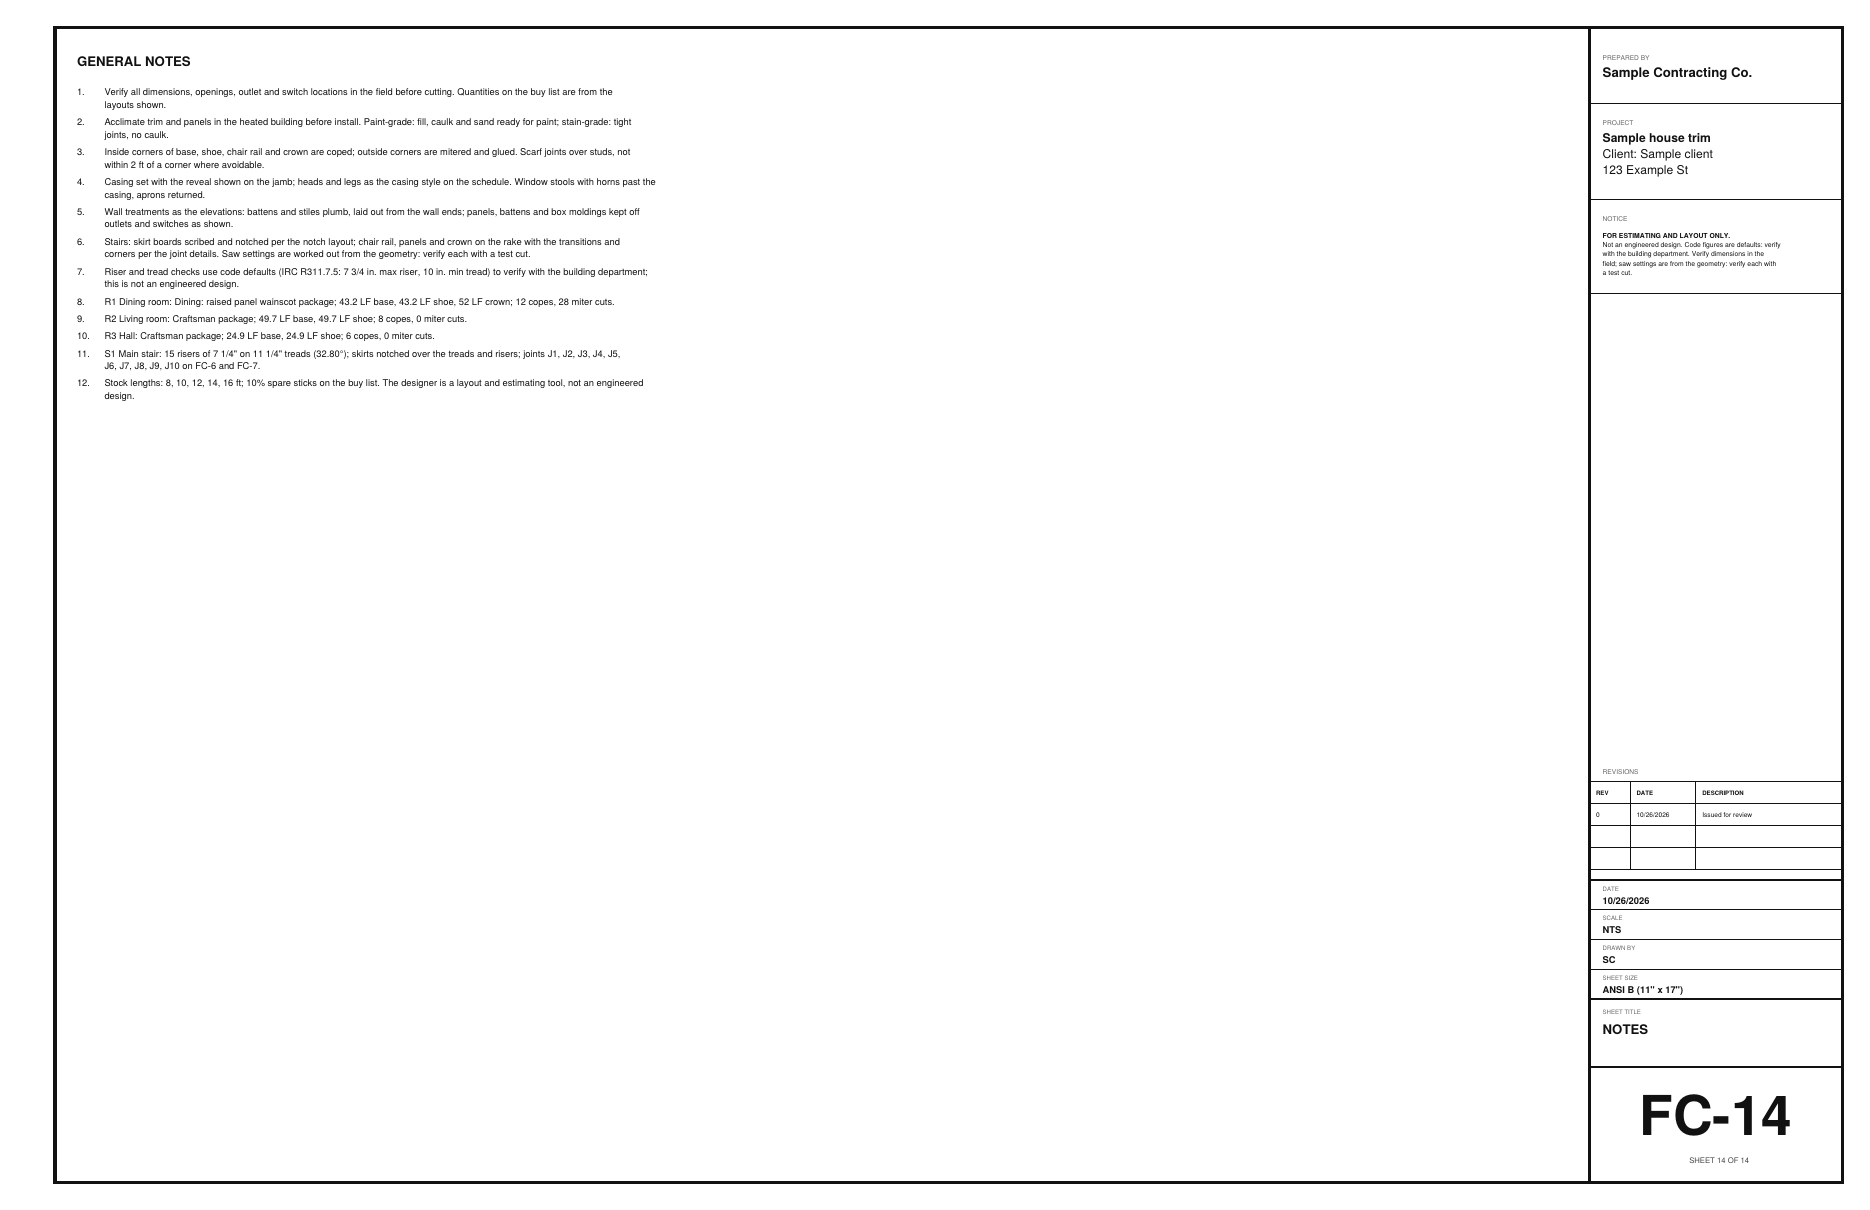
Preview sheets shows the set: the trim plan, wall elevations, the stair and its joint details, the skirt notch layout, schedules and buy list, the cut list and notes, on FC sheets. Save PDF makes it on 11 × 17. The buy list counts sticks by length, panels, nails, glue and caulk.

Step 10: Update the job in the Finish Carpentry Designer
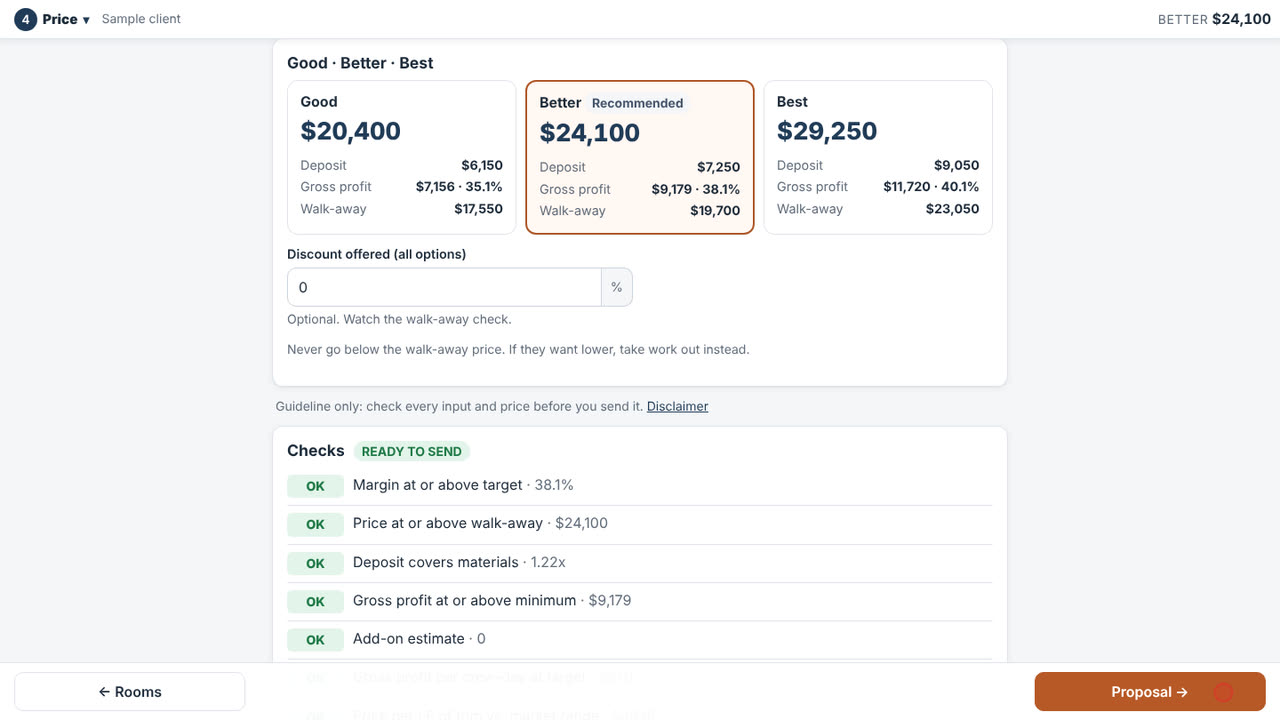
  1. Priced at your rates: Good, Better, Best
  2. Better (recommended)

Step 10: Update the job

We opened this design from a Finish carpentry job, where Design it shows two designers: this one for the trim, the Cabinet Designer for cabinets. Update the job in BidRidge shows what changes, then prices the trim, the wall treatments and the stair at your rates.

Field tip: Each designer updates only its own rows on the job.

Step 11: Plan background: rooms and doors from the floor plan

In Rooms, open Plan background, import the floor plan and set its scale. Trace room makes a room of the outline you click, and its walls carry the base, casing and crown of its package. For the doors, pick a kind under Openings and Pick two jambs: tap both sides of each opening on the plan and a door of that width goes on the wall, centered between them. Walls and Stairs never show the plan; it is saved with the project and never prints. New in 1.63: on a vector PDF with the scale set, Suggest rooms outlines each room from the room names printed on the sheet and shows it for review; tap any you don't want, then Use adds the rest with their names. Scanned sheets are still traced by hand. New in 1.64: Suggest doors finds every door drawn with a swing on a vector plan (set the scale first); tap a leaf to leave it out, then Use, and each door goes on its wall (a pair as one opening).

What you get

The drawing set, the lists and the files

Real files from this sample, made by the designer. Tap a page to see it full size. Yours carry your company, the client and the address.

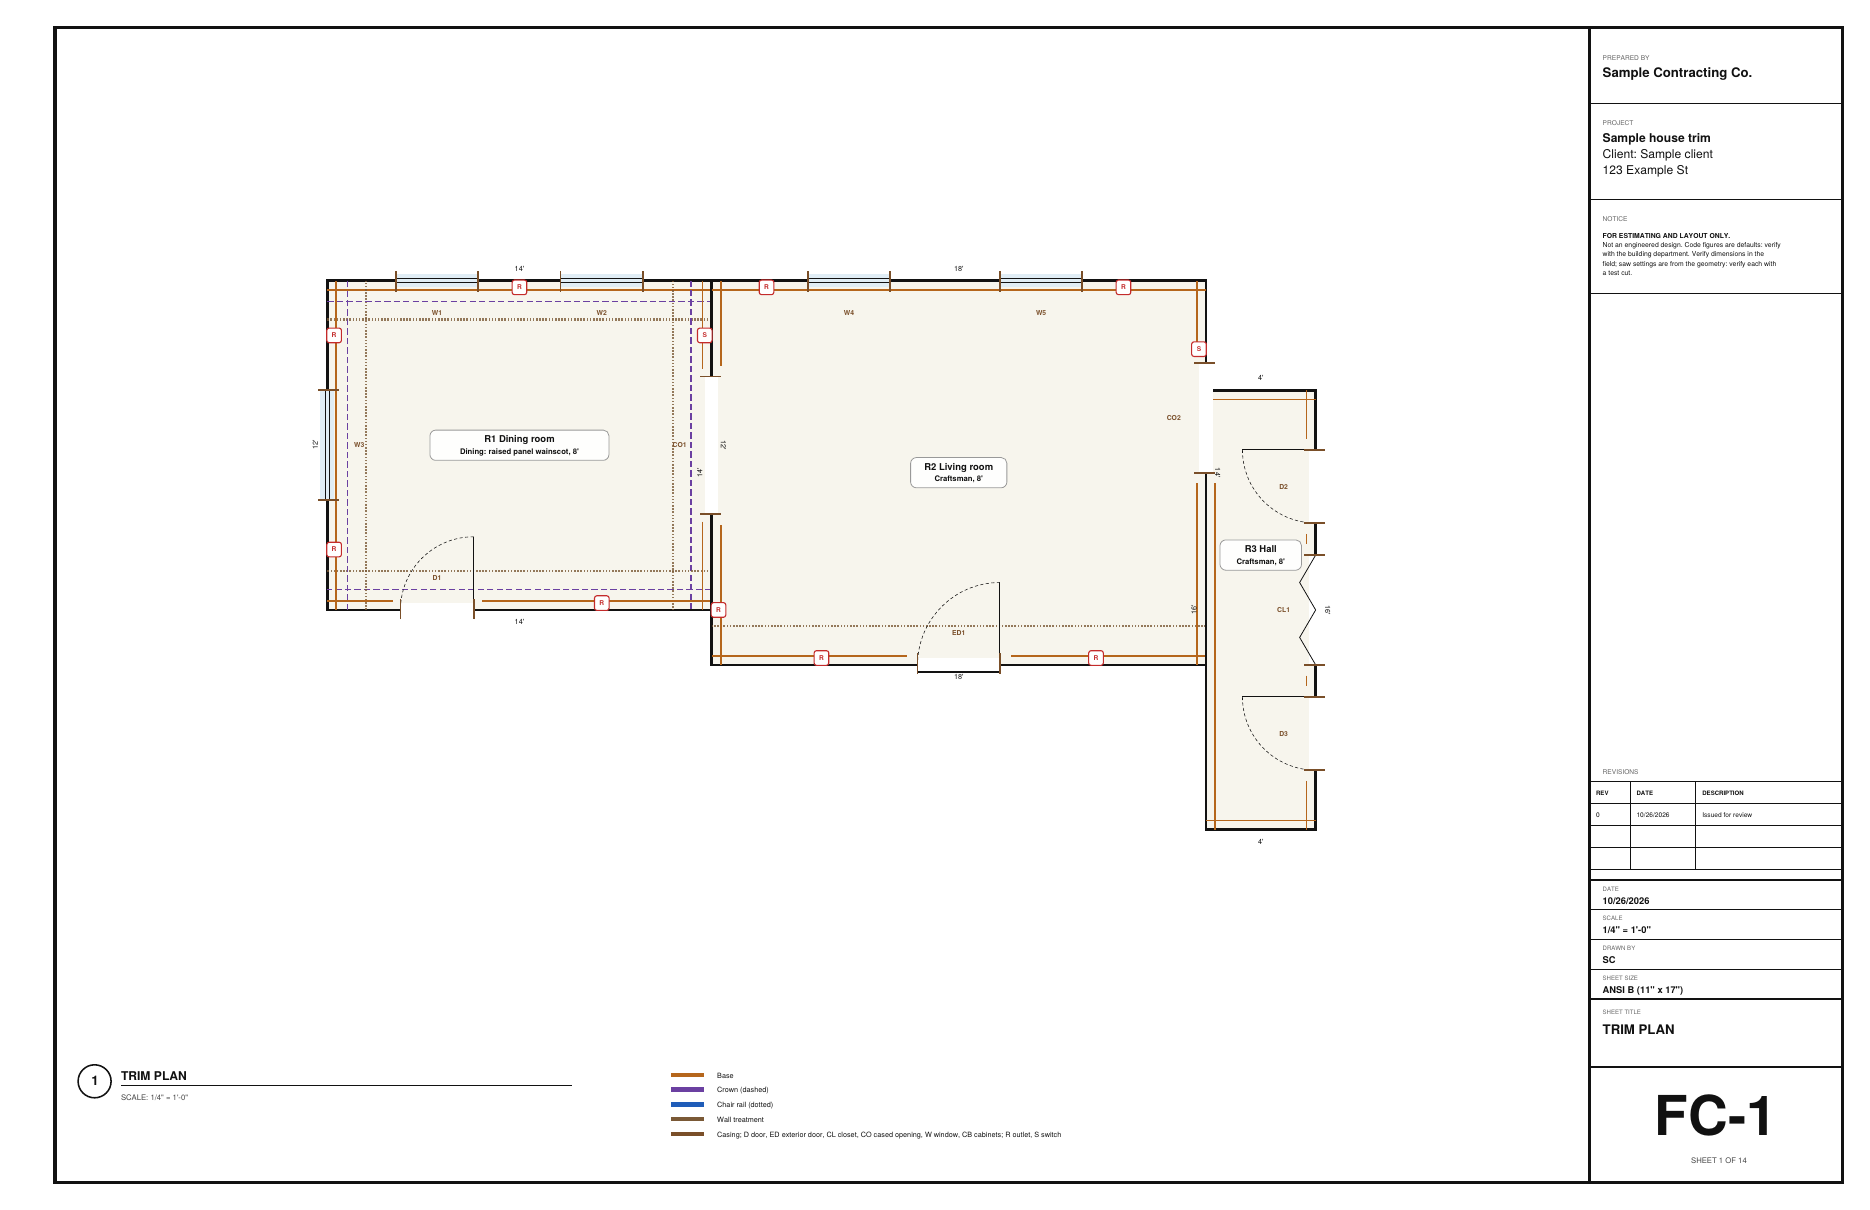
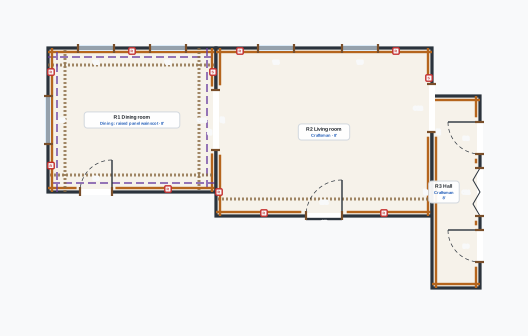
FC-1 · Trim plan
FC-1 · Trim plan
FC-2 · Wall elevations (1)
FC-3 · Wall elevations (2)
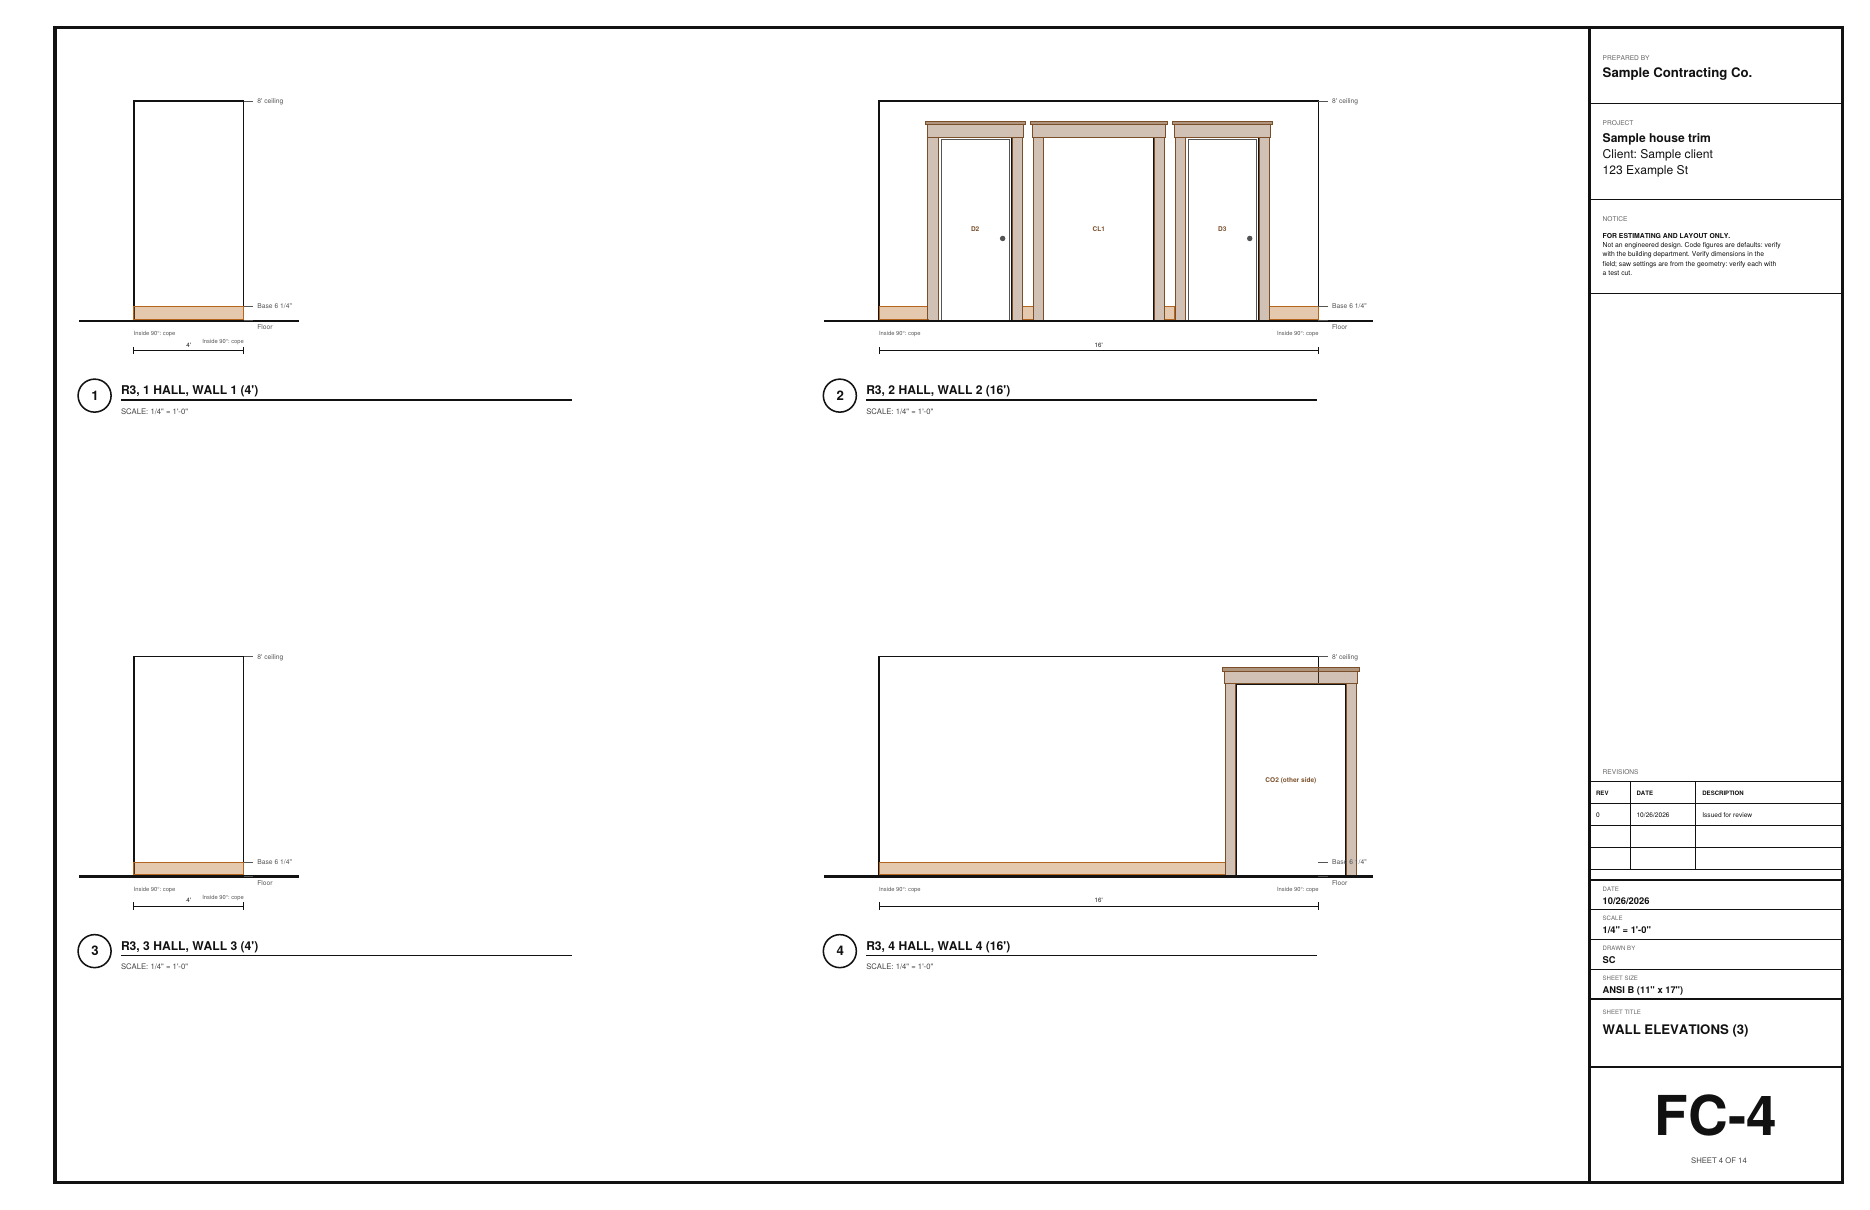
FC-4 · Wall elevations (3)
FC-5 · S1 Main stair: plan and walls
FC-6 · S1 joint details (1)
FC-7 · S1 joint details (2)
FC-8 · S1 skirt notch layout
FC-9 · Schedules & buy list (1)
FC-10 · Schedules & buy list (2)
FC-11 · Cut list (1)
FC-12 · Cut list (2)
FC-13 · Cut list (3)
FC-14 · Notes
FC-14 · Notes

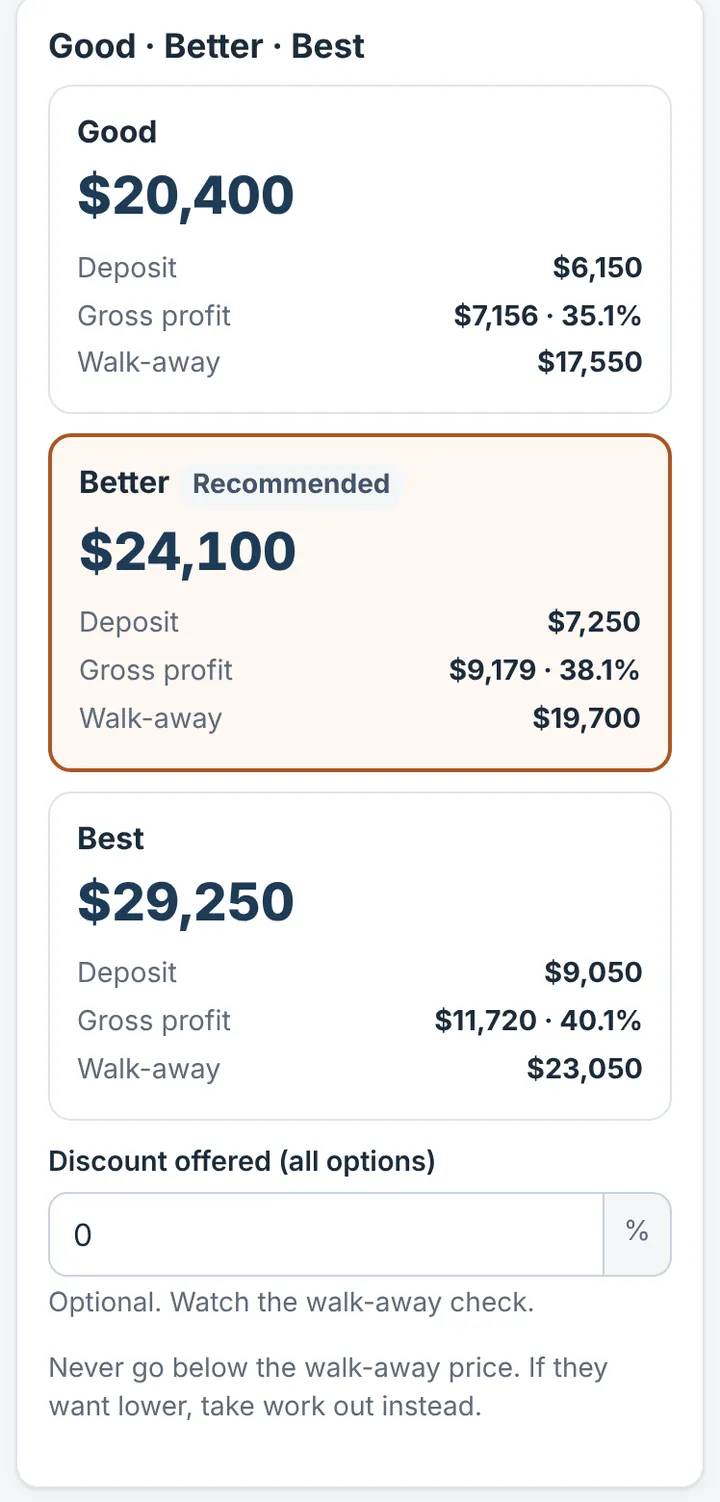
The BidRidge quote

Same numbers in the quote

The designer sends its quantities to BidRidge, and BidRidge prices the labor and materials at your rates.

  • Good
    $20,400
  • Better
    $24,100
    Recommended
  • Best
    $29,250
The design and the quote, line by line
ItemIn the designerIn the BidRidge quote
Baseboard118 LF in the rooms + 3 LF at the stair120.8 LF
Casing5 doors both sides · 2 one side · 5 windows5 · 2 · 5
Panel wainscot22 raised panels in the dining room110.7 sf
Board and battenthe living room front wall, 12 battens63.7 sf
Stair32.3 LF skirt · 33.5 LF raked trim · 10 joints32.3 LF · 33.5 LF · 10

House trim sample, sent to a Finish carpentry job in the BidRidge app at its starting rates. Your rates give your own numbers.

The sample opened as a quote in the BidRidge app: Good, Better and Best prices
The BidRidge app, at its starting rates.

More in the guide

Try it on your own job

Open the sample, change it to your measurements, and send it to a BidRidge quote. Drawing is free; the drawing set, the lists and the quote come with a BidRidge license or the 14-day trial.

In the designer, tap Open project and pick the sample file. It opens exactly as in the video.

Sample designs: names, sizes and clients are made up. Prices are BidRidge's starting rates; set your own. The designers check against common guidelines (IRC, NKBA and the makers' published numbers) to help you catch mistakes. They don't replace your building department or the manufacturer's installation instructions: verify with them.