BidRidge › Designers › Guide › Chapter 14

Chapter 14 · Rough Carpentry DesignerBeta

Garage and addition

We frame a 24x24 two-car garage, first on rafters and then on trusses with the truss maker's drawings attached, and a 12x16 addition tied into an existing house, sized from the code tables we set once in BidRidge. Then we look at the wall elevations, the sheathing, the cut list and the details, and update the Rough carpentry job, which gets an Insulation scope from the same walls and ceilings.

In the designer, tap Open project and pick the sample file. It opens exactly as in the video.

Narrated walkthrough, 2:33. Captions on.

The sample in numbers

  • Buildings
    768 sf
    garage 24′ × 24′ + addition 16′ × 12′
  • Walls
    136 LF
    173 studs · 4 headers
  • Roof
    13 trusses
    + 14 rafters on the addition
  • Sheathing
    89 sheets
    46 wall · 37 roof · 6 subfloor
  • Material
    $8,650
    2,518 BF of lumber, at the starting prices
  • Quote
    $41,900
    Rough carpentry, Better, at the starting rates

Step by step

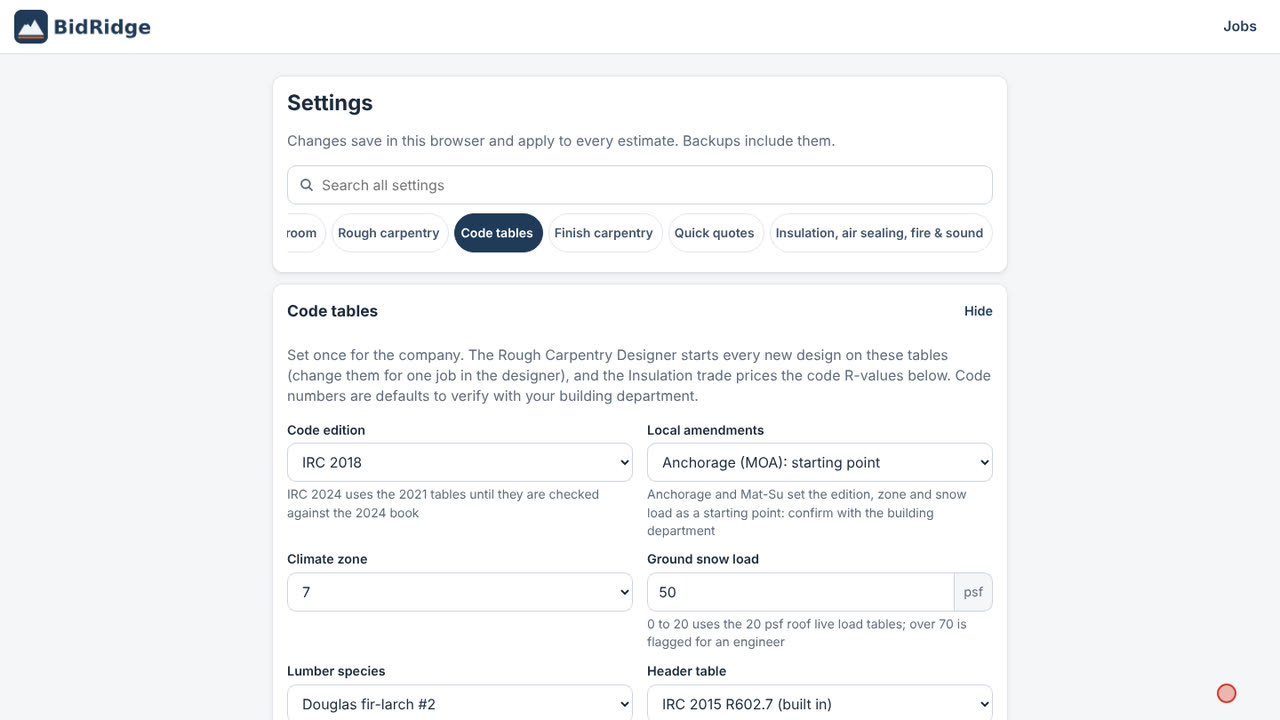
Step 1: Code tables, set once in the Rough Carpentry Designer
  1. Local amendments: Anchorage starting point
  2. IRC 2018, zone 7, 50 psf ground snow
  3. Headers: the 2015 table, built in

Step 1: Code tables, set once

In BidRidge, Settings → Code tables, pick the edition, local amendments, climate zone, ground snow load and lumber. The Anchorage starting point sets IRC 2018, zone 7 and 50 psf. Every new design starts on these tables, and the Insulation trade uses their R-values.

Field tip: Set what your building department has adopted. Code numbers are defaults to verify there.
Step 2: The garage in the Rough Carpentry Designer
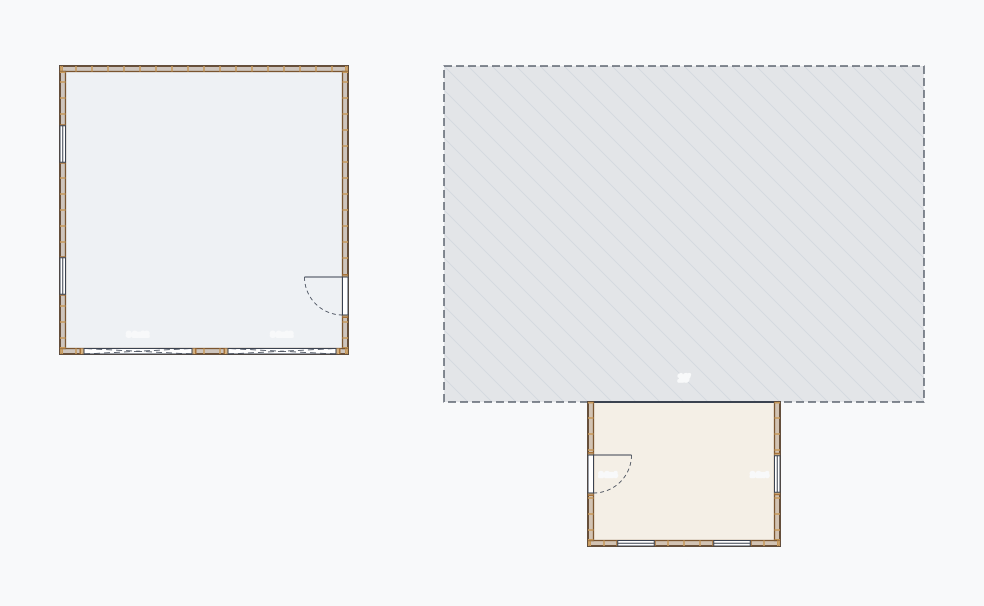
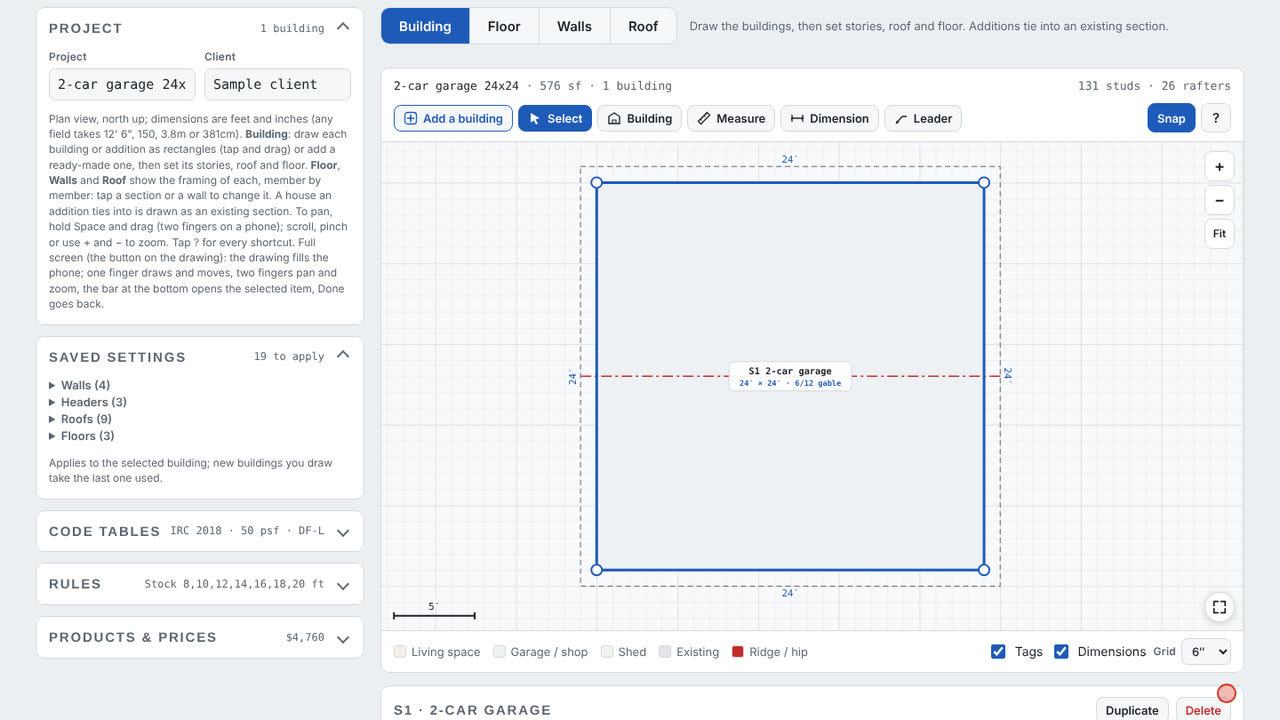
  1. 2-car garage 24′ × 24′, 6/12 gable
  2. Add a building: ready-made sizes

Step 2: The garage

On the Rough carpentry job, Design it opens the Rough Carpentry Designer linked to the job. Pick the 2-car garage 24x24: a slab, 2x6 walls at 16″, 9′ walls and a 6/12 gable. Set its roof framing to Rafters for now.

Field tip: Every size is editable in the building's panel; Undo takes a preset back.

Step 3: The addition, tied to the house in the Rough Carpentry Designer
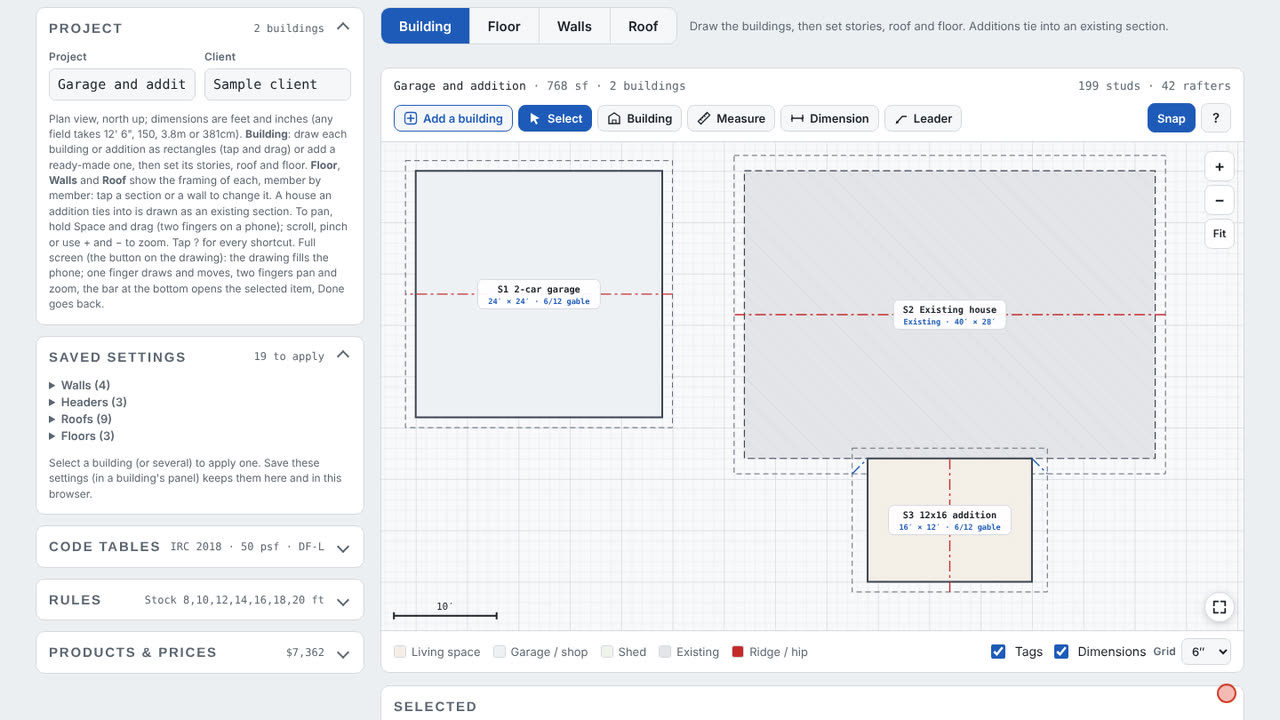
  1. Existing house: not framed
  2. 12x16 addition (S3)
  3. Valleys into the house roof

Step 3: The addition, tied to the house

Add a building, 12x16 room addition. It brings the existing house it ties into. The house isn't framed: the addition's joists hang on a ledger at the house, and its roof valleys into the house roof.

Field tip: Draw your own with Building: drag a rectangle and tick Existing building for the house.

Step 4: Floor: joists, ledger and anchor bolts in the Rough Carpentry Designer
  1. 2x8 at 16″: 12′ of 12′ 9″ (the joist table)
  2. Ledger at the house, 13 hangers
  3. 40 LF PT sill, 10 anchor bolts

Step 4: Floor: joists, ledger and anchor bolts

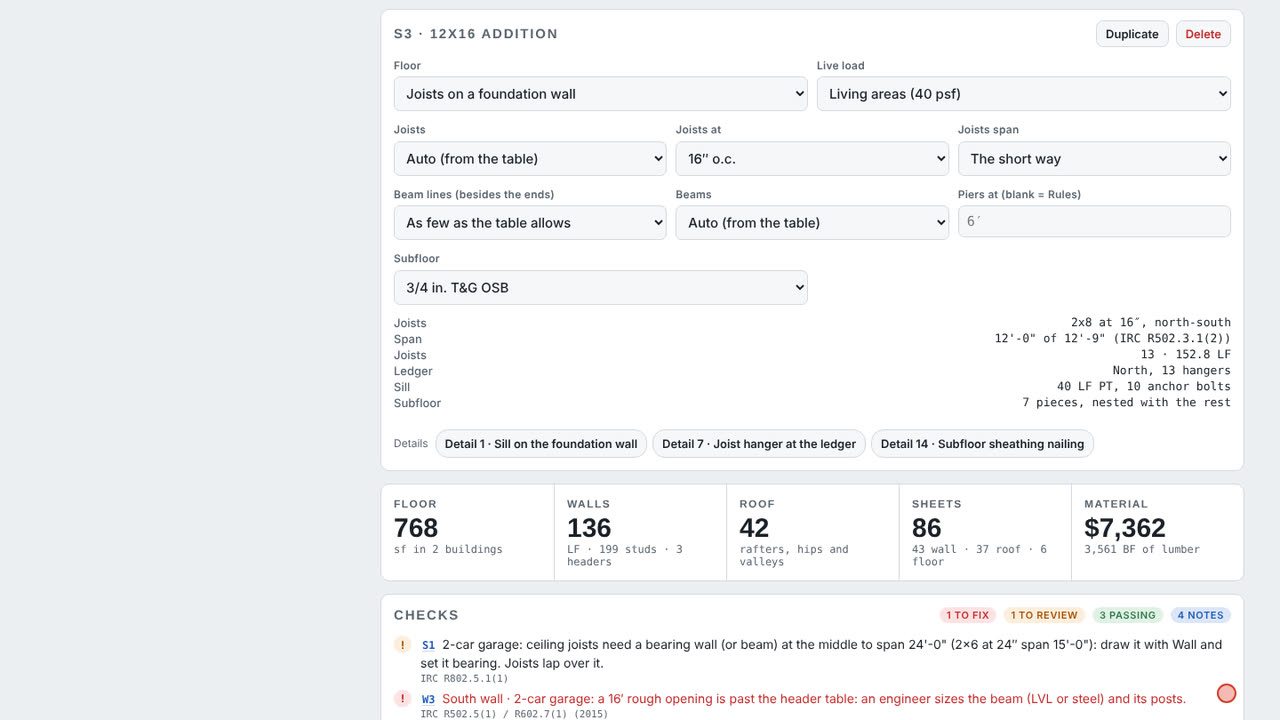
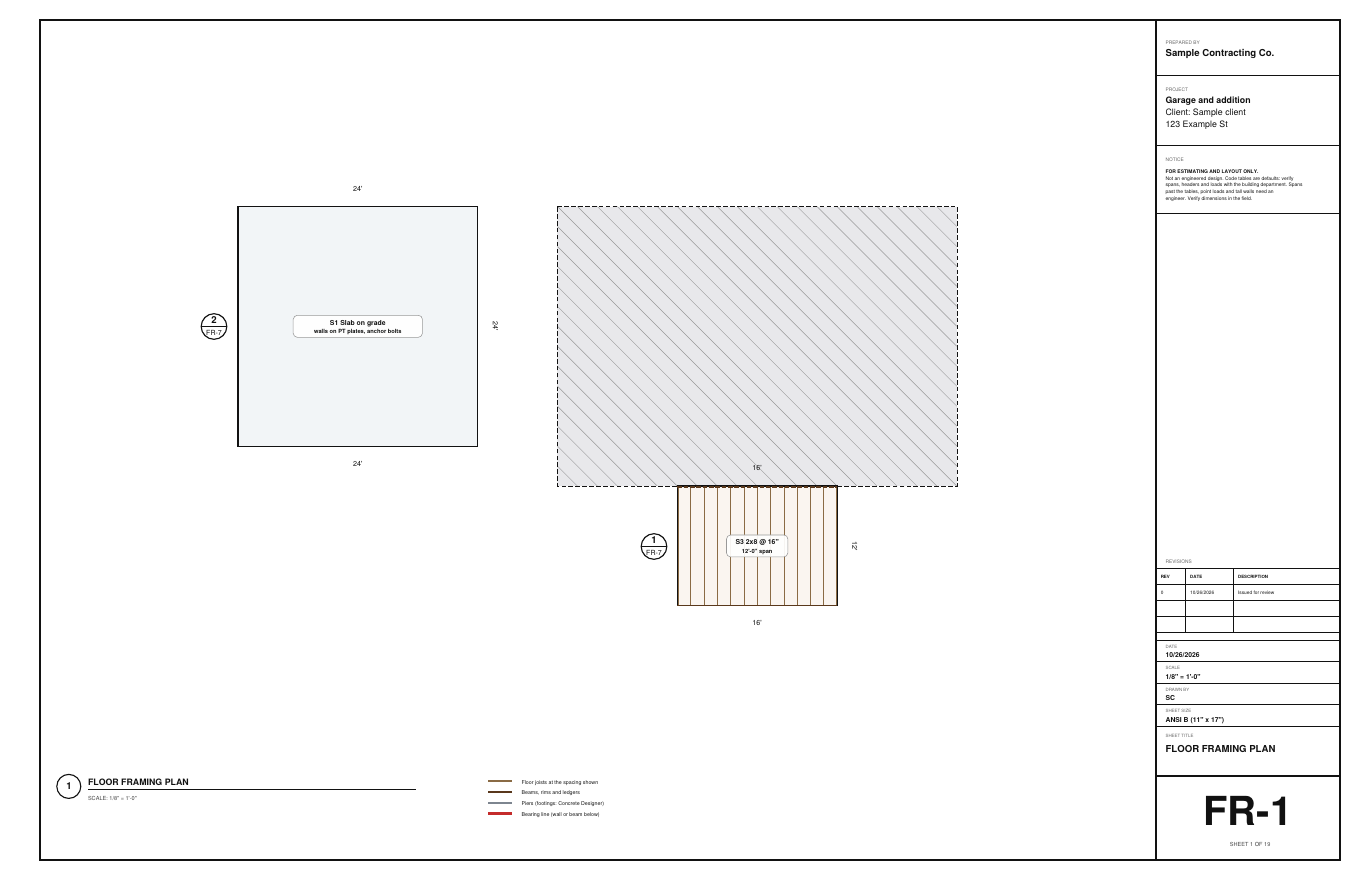
Floor mode. The garage is a slab: pressure-treated plates with anchor bolts at 6′. The addition sits on a foundation wall: 2x8 joists at 16″, 12′ of the table's 12′ 9″, 13 hangers at the ledger and a PT sill with 10 anchor bolts.

Field tip: The slab and footings are the Concrete Designer's.

Step 5: Walls: headers from the table in the Rough Carpentry Designer
  1. Two 9′ × 7′ doors
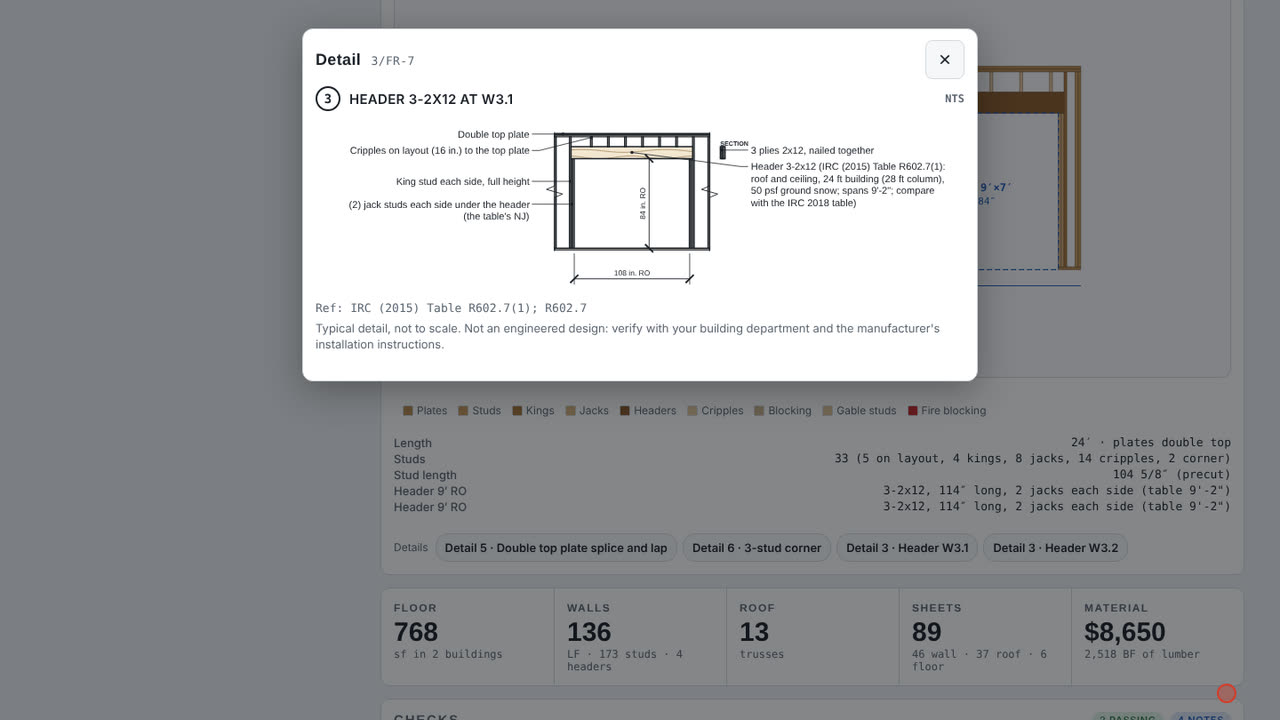
  2. 3-2x12 headers from the table (9′ 2″)
  3. 2 jacks each side

Step 5: Walls: headers from the table

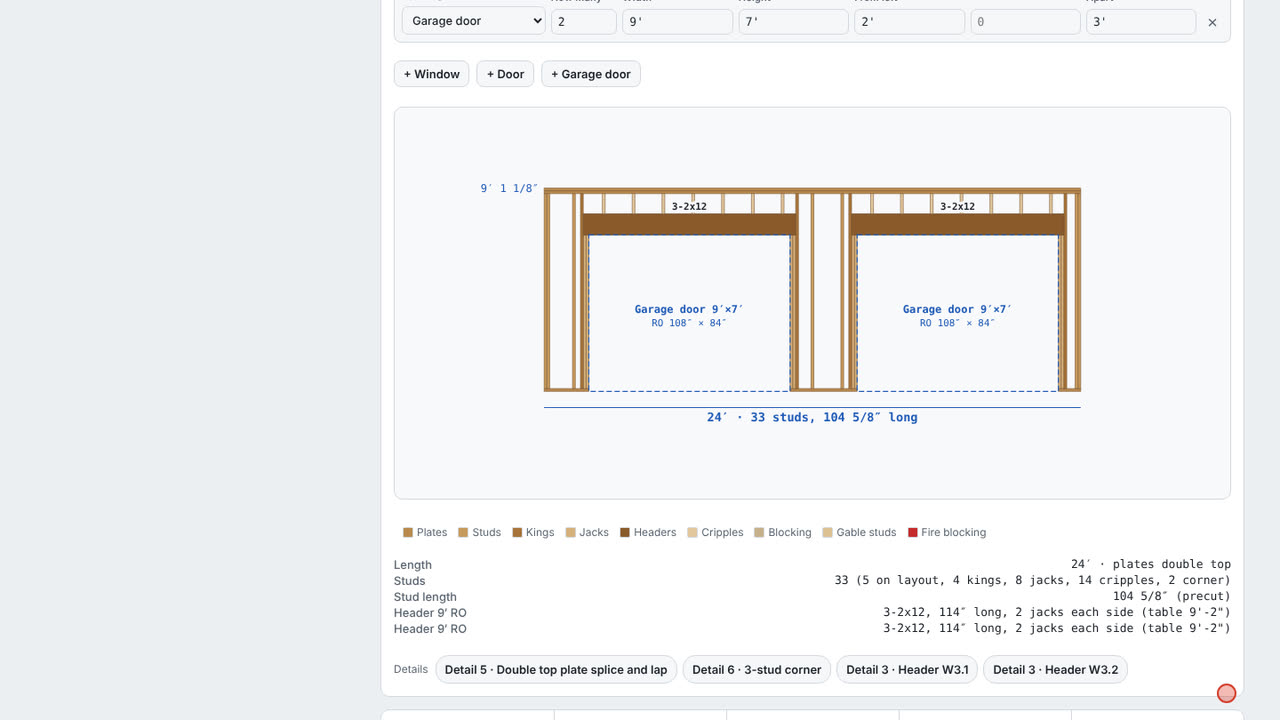
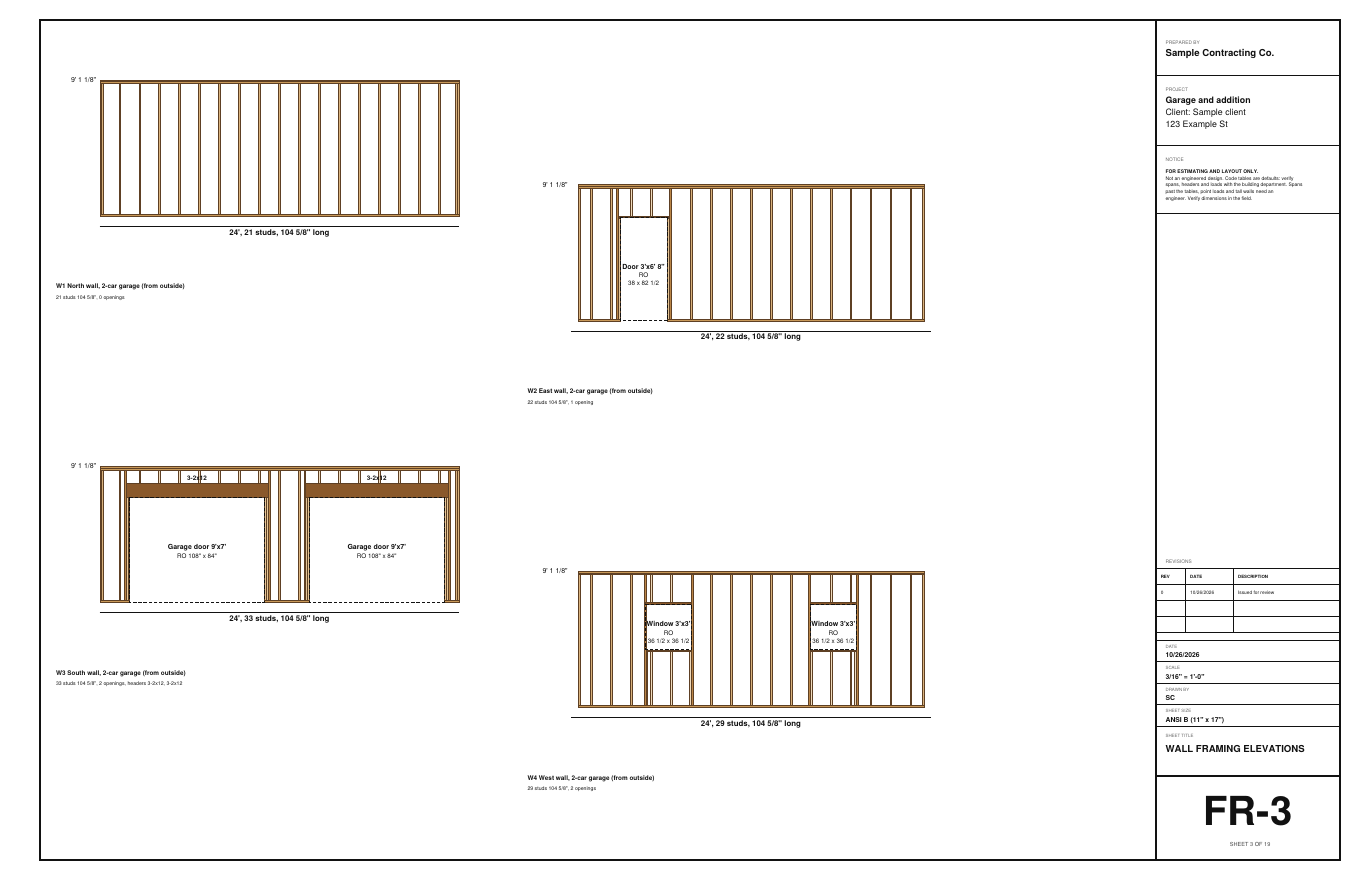
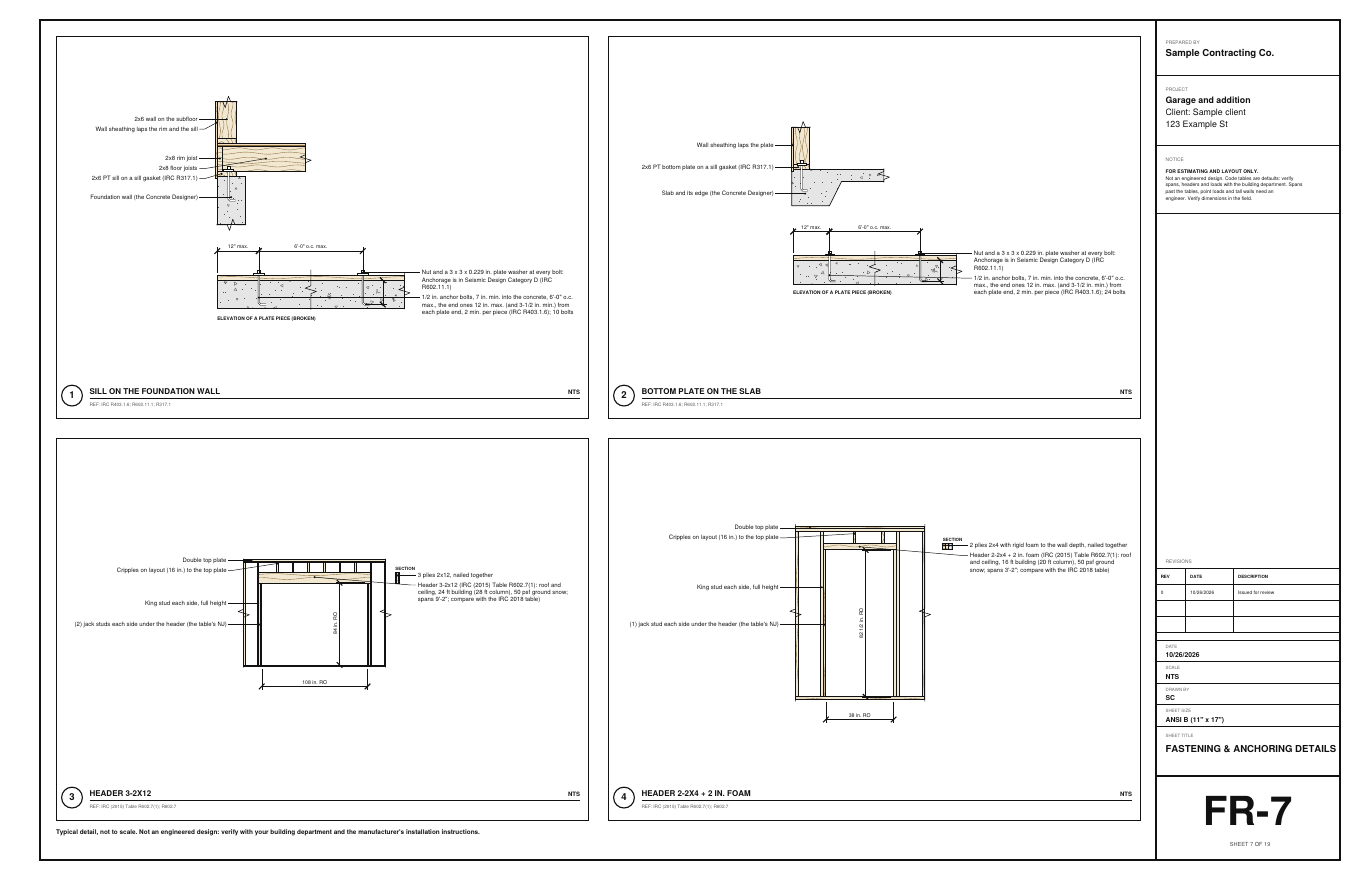
Walls mode: tap the garage's front wall. One 16′ door is past the header table, so it is flagged for an engineer. Two 9′ × 7′ doors fit: 3-2x12 headers with 2 jacks each side, from the header table for the building width and snow load.

Field tip: The headers use the 2015 header table. Check them against the book your department uses, or type its spans under My own.

Step 6: Wall elevations in the Rough Carpentry Designer
  1. Plates, studs, kings, jacks, cripples
  2. Stud count by kind, precut length

Step 6: Wall elevations

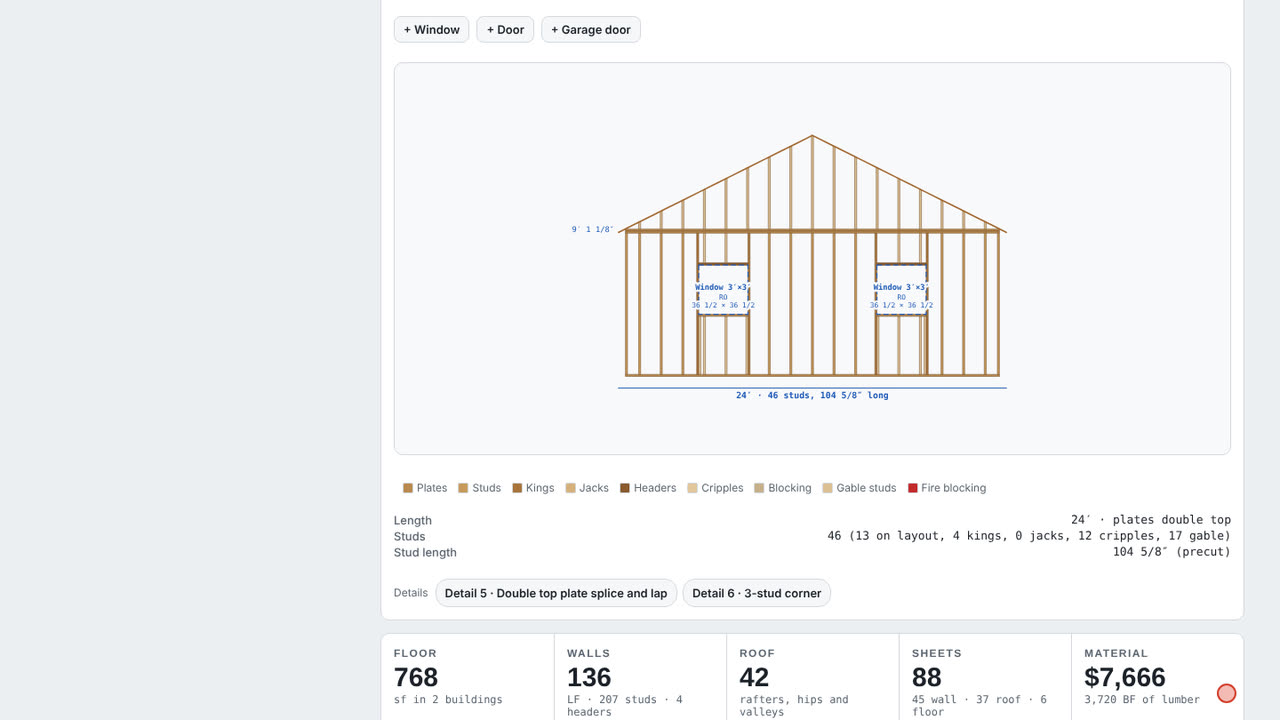
Every wall gets a framing elevation: plates, studs, kings, jacks, cripples and blocking, with the stud count by kind and the precut length. Next › walks around the building.

Step 7: Roof: rafters and their cuts in the Rough Carpentry Designer
  1. Plumb cut, seat, heel and HAP drawn
  2. Line and overall lengths, the cuts

Step 7: Roof: rafters and their cuts

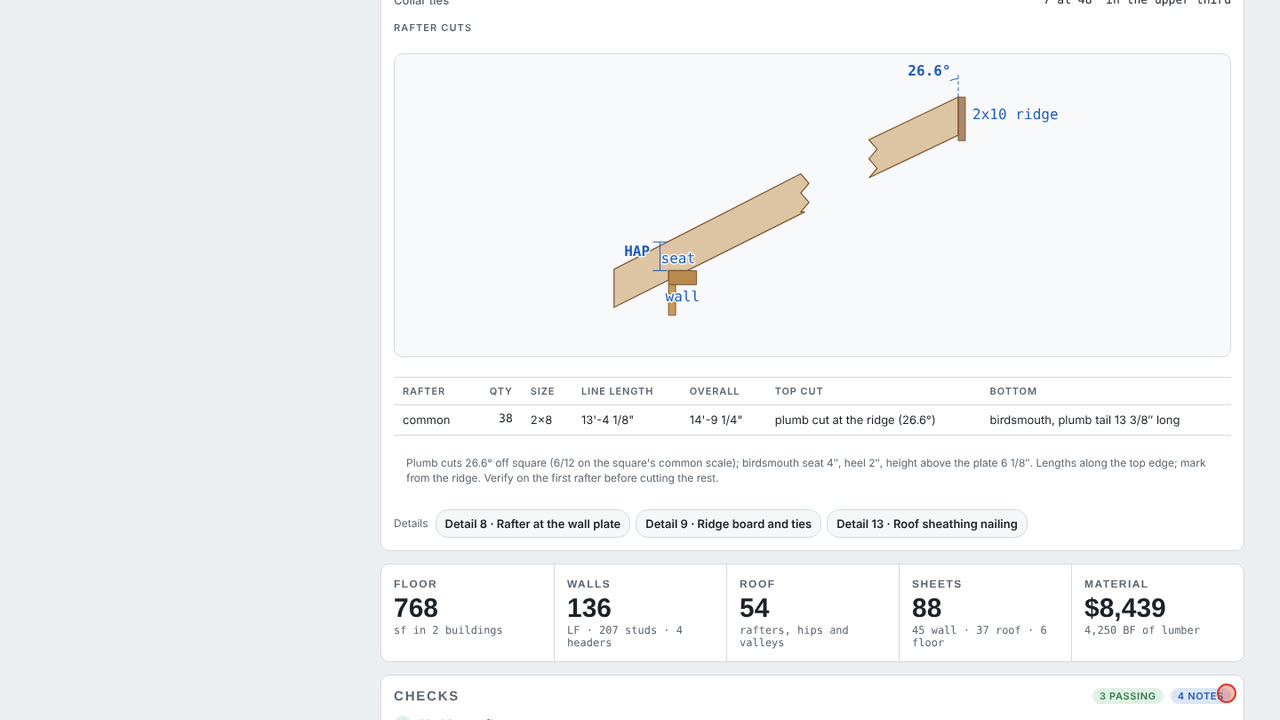
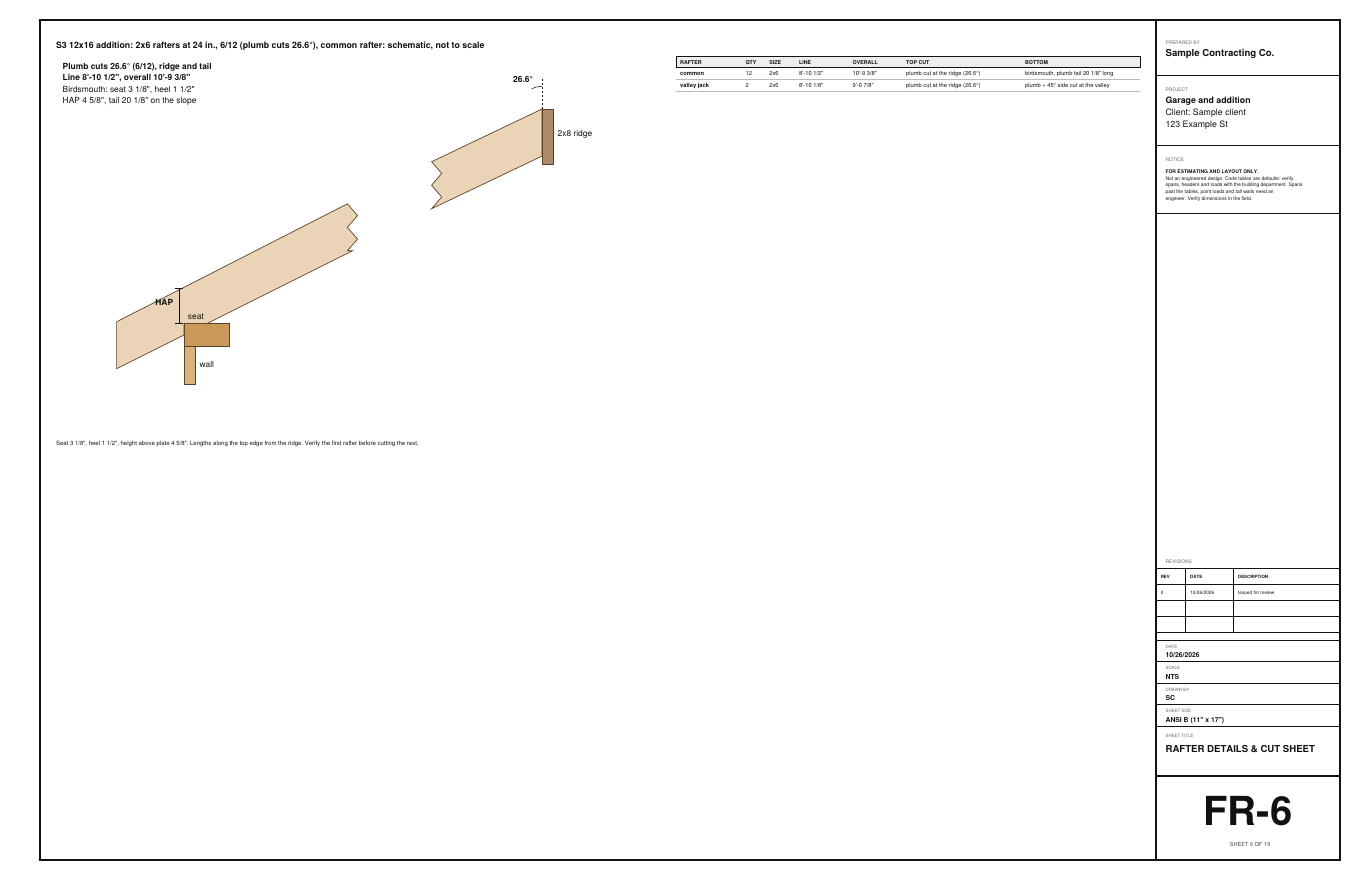
Roof mode. At 24″ the garage's ceiling joists want a bearing wall at the middle, so set the rafters to 16″: 2x8 rafters and 2x10 ceiling joists from the tables. The cut sheet draws the plumb cut, the birdsmouth seat and heel, and the height above the plate.

Field tip: Cut one rafter and check it before cutting the rest.

Step 8: Or trusses, with the truss drawings in the Rough Carpentry Designer
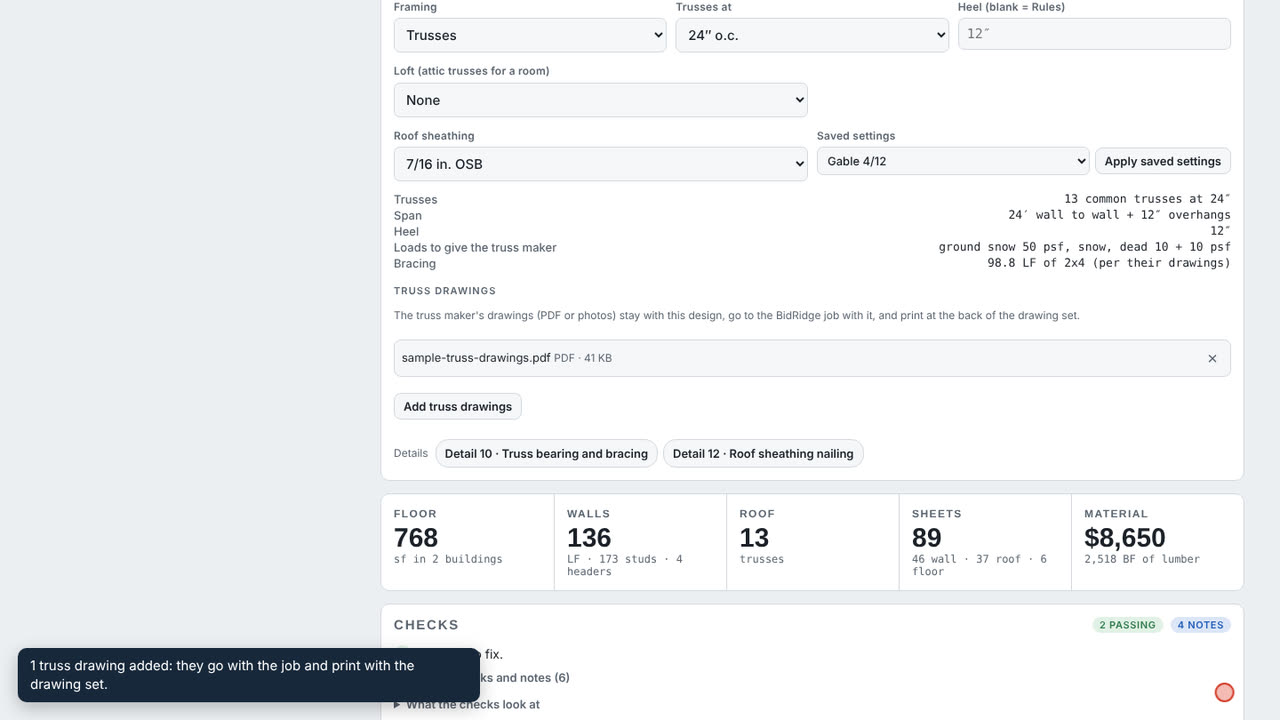
  1. 13 trusses at 24″, 24′ span
  2. The loads to give the truss maker
  3. The truss maker's drawings, with the job

Step 8: Or trusses, with the truss drawings

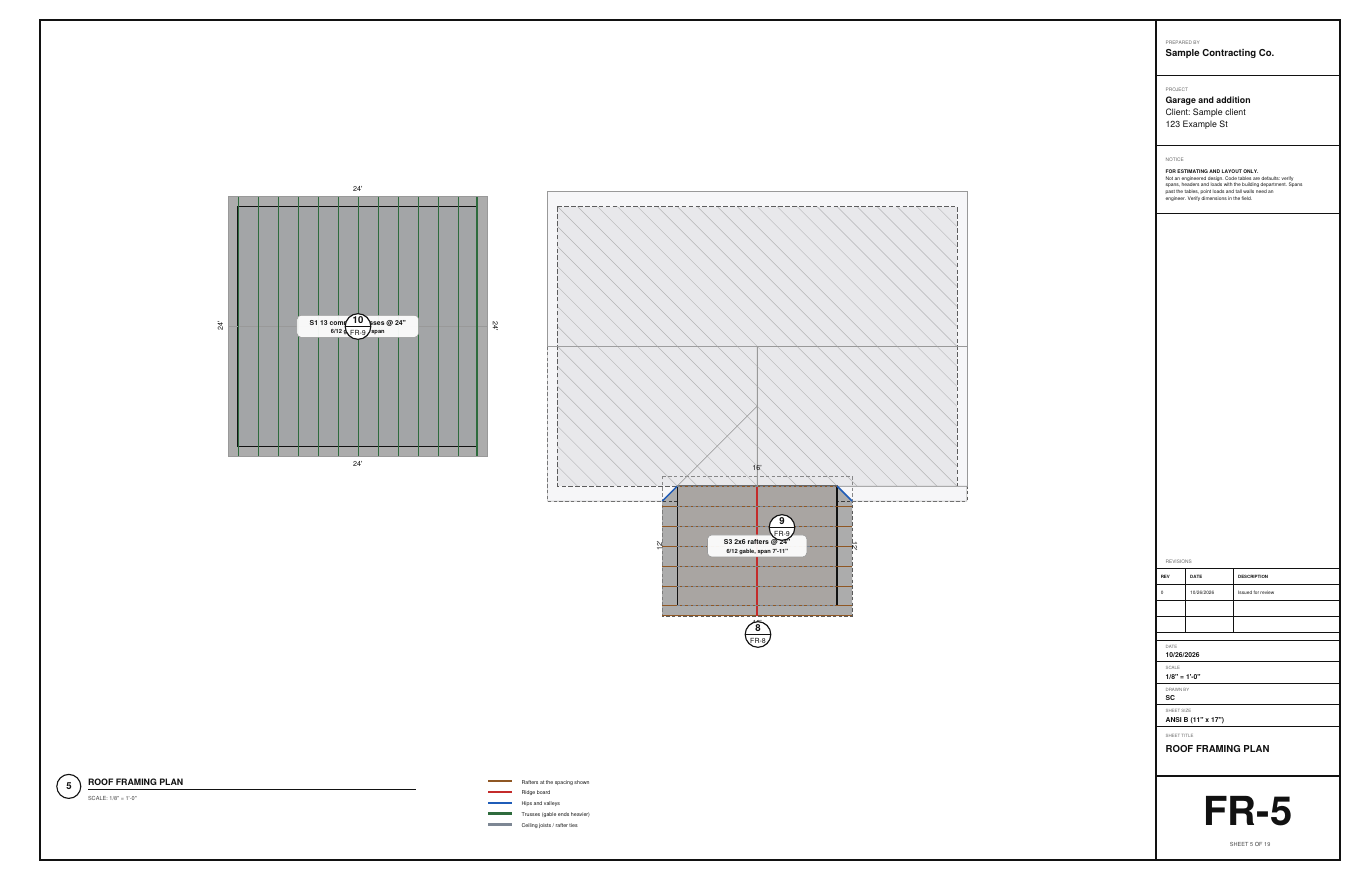
Set Framing to Trusses at 24″: 13 trusses, 24′ span, with the loads to give the truss maker. Add truss drawings takes their PDF or photos; they go to the job and print at the back of the drawing set.

Field tip: The truss maker designs the trusses, the girders and the bracing.

Step 9: Sheathing, cut list and buy list in the Rough Carpentry Designer
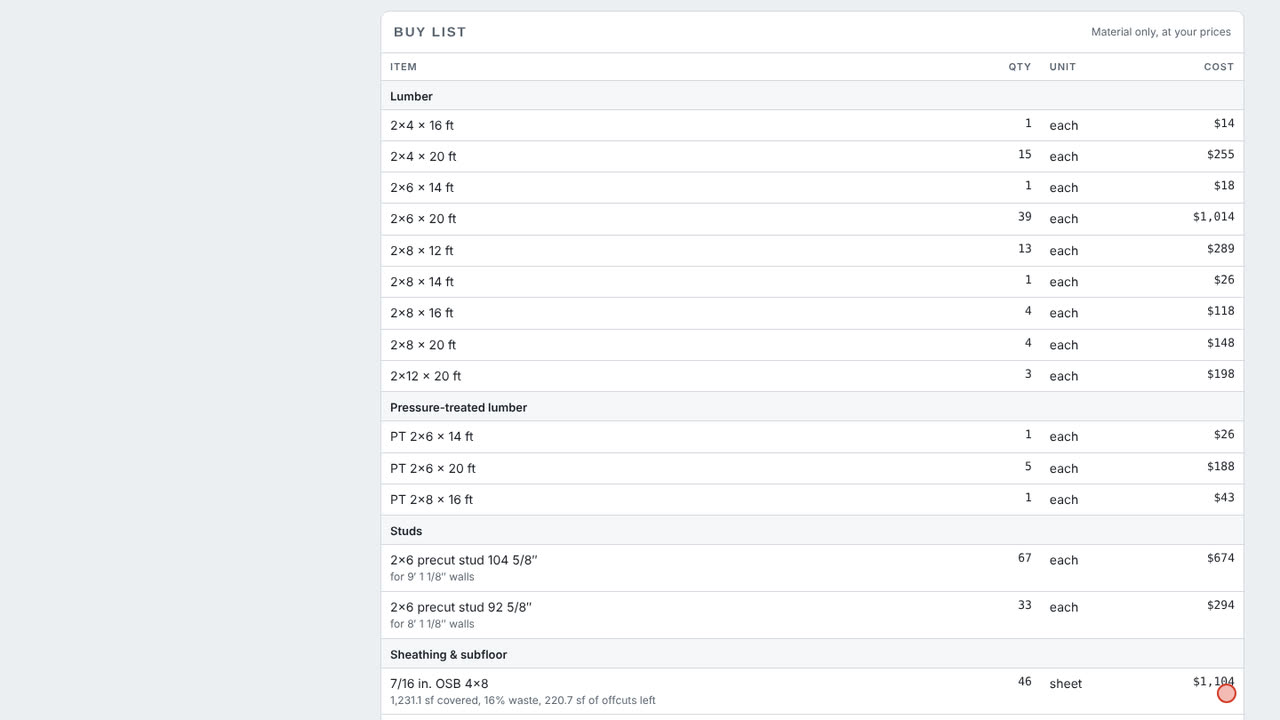
  1. Material at your prices
  2. Lumber by size and length, from the cut list

Step 9: Sheathing, cut list and buy list

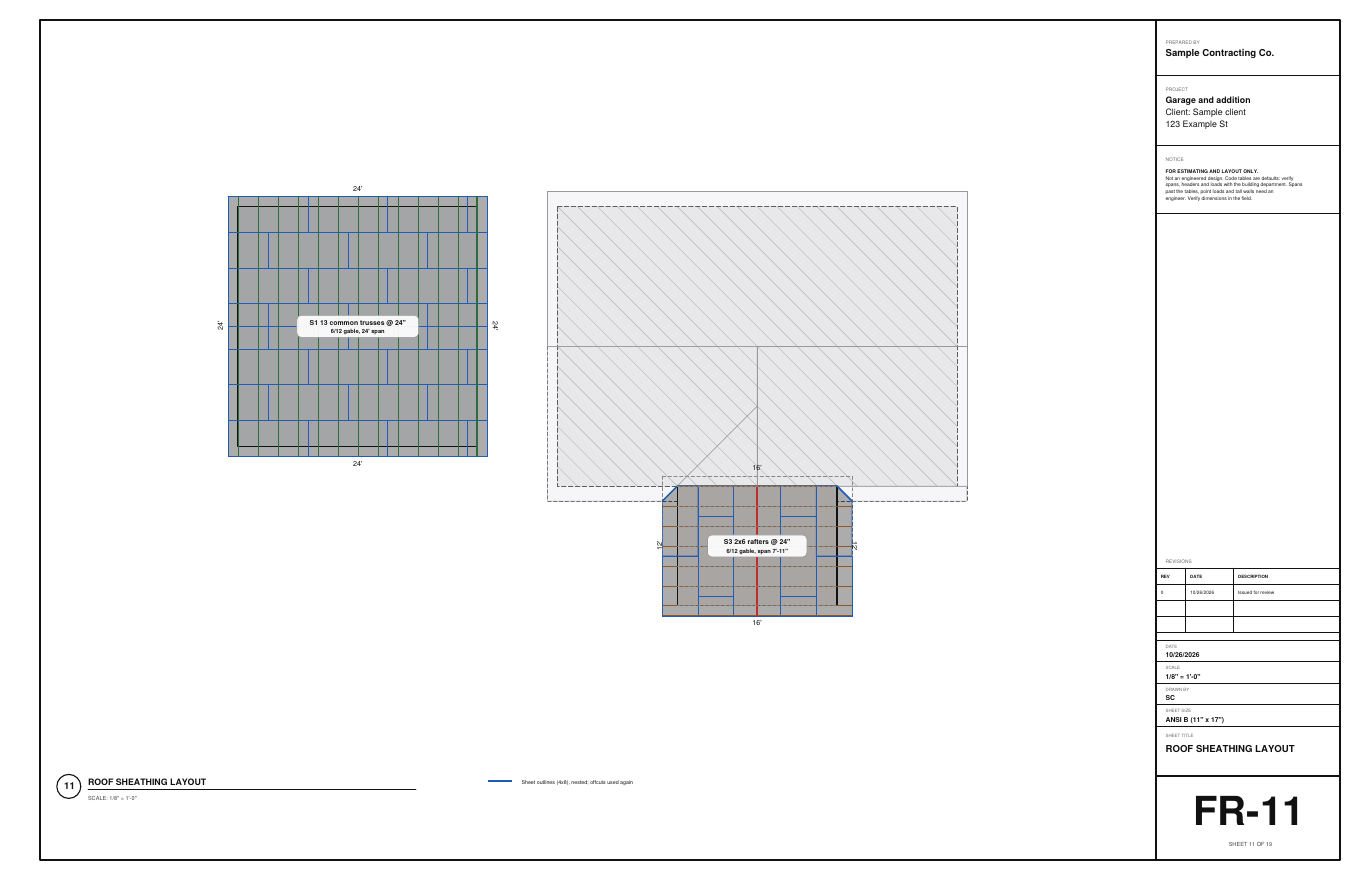
Sheathing is nested on every wall, roof plane and the subfloor, openings cut out and offcuts used again: 89 sheets. The cut list puts every member in stock lengths, and the buy list prices the lumber, sheets, trusses and hardware.

Field tip: Tick Sheets under the drawing to see the layout.

Step 10: Details and the drawing set in the Rough Carpentry Designer
  1. Drawn from the job: this opening's header

Step 10: Details and the drawing set

The details are drawn from the job's numbers: the bottom plate on the slab with its anchor bolts, this opening's header, the rafter at the wall plate. They're typical details, not engineered. Save PDF prints the plans, elevations, details, schedules, cut list and the truss drawings.

Field tip: Verify every detail with your building department.

Step 11: Update the job: framing and insulation in the Rough Carpentry Designer
  1. Rough carpentry at your rates
  2. Better (recommended)

Step 11: Update the job: framing and insulation

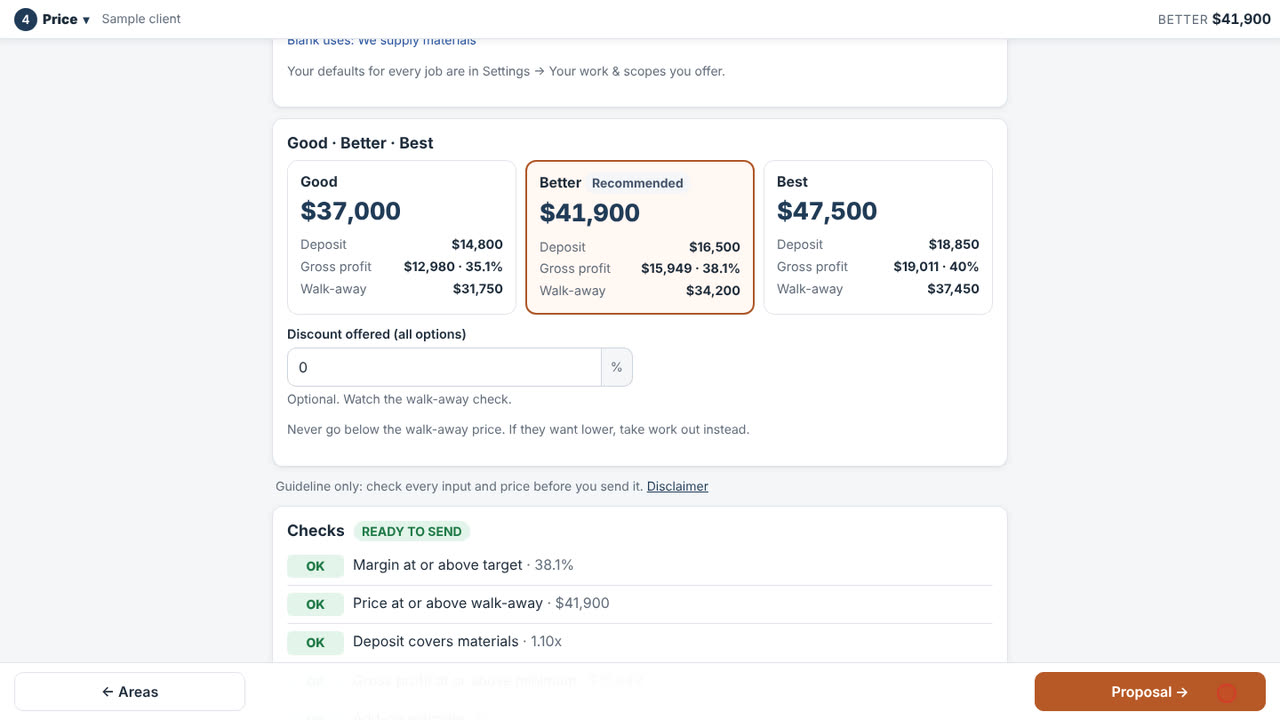
We opened this from a Rough carpentry job, so Update the job in BidRidge. BidRidge shows what changes, adds an Insulation scope from the same walls and ceilings, and prices both at your rates: $41,900 for Better on the framing.

Field tip: From an Insulation job it sends the insulation only.

Step 12: Plan background: draw over the floor plan

Open the Plan background section and import the floor plan (a PDF page or a photo of it). Tap Set scale, click both ends of a long dimension and type it; Check it on a second one. Your drawing tools now snap to the plan's corners and lines. In Building, Trace room inside a building on the plan makes a building from it, grown by the stud depth so the framing's outside lines up with the drawing (an L-shaped outline becomes two rectangles joined along a wall). In Walls, Trace walls finds the walls in view and shows them; Use adds the interior ones (2x6 where the drawn wall is over 5 1/4 in. thick, else 2x4) and leaves out the ones on the exterior walls. On a Commercial project, Steel partitions: Trace walls adds partitions in the type whose thickness matches the drawing, and Trace room puts partitions around a room. The plan is saved with the design (with Save project, its picture too) and never prints. New in 1.63: on a vector PDF with the scale set, Suggest walls finds the walls from the drawing's double lines and shows them for review; tap any you don't want, then Use adds the rest. Scanned sheets are still traced by hand.

What you get

The drawing set, the lists and the files

Real files from this sample, made by the designer. Tap a page to see it full size. Yours carry your company, the client and the address.

FR-1 floor framing plan: the garage slab, the addition's joists, ledger and sill, detail tags
FR-3 wall framing elevations: every stud, king, jack, header and cripple
FR-5 roof framing plan: the garage trusses and the addition's rafters, ridge and valleys
FR-6 rafter details and cut sheet
FR-7 fastening and anchoring details: sill, bottom plate on the slab, headers
FR-11 roof sheathing layout

The BidRidge quote

Same numbers in the quote

The designer sends its quantities to BidRidge, and BidRidge prices the labor and materials at your rates.

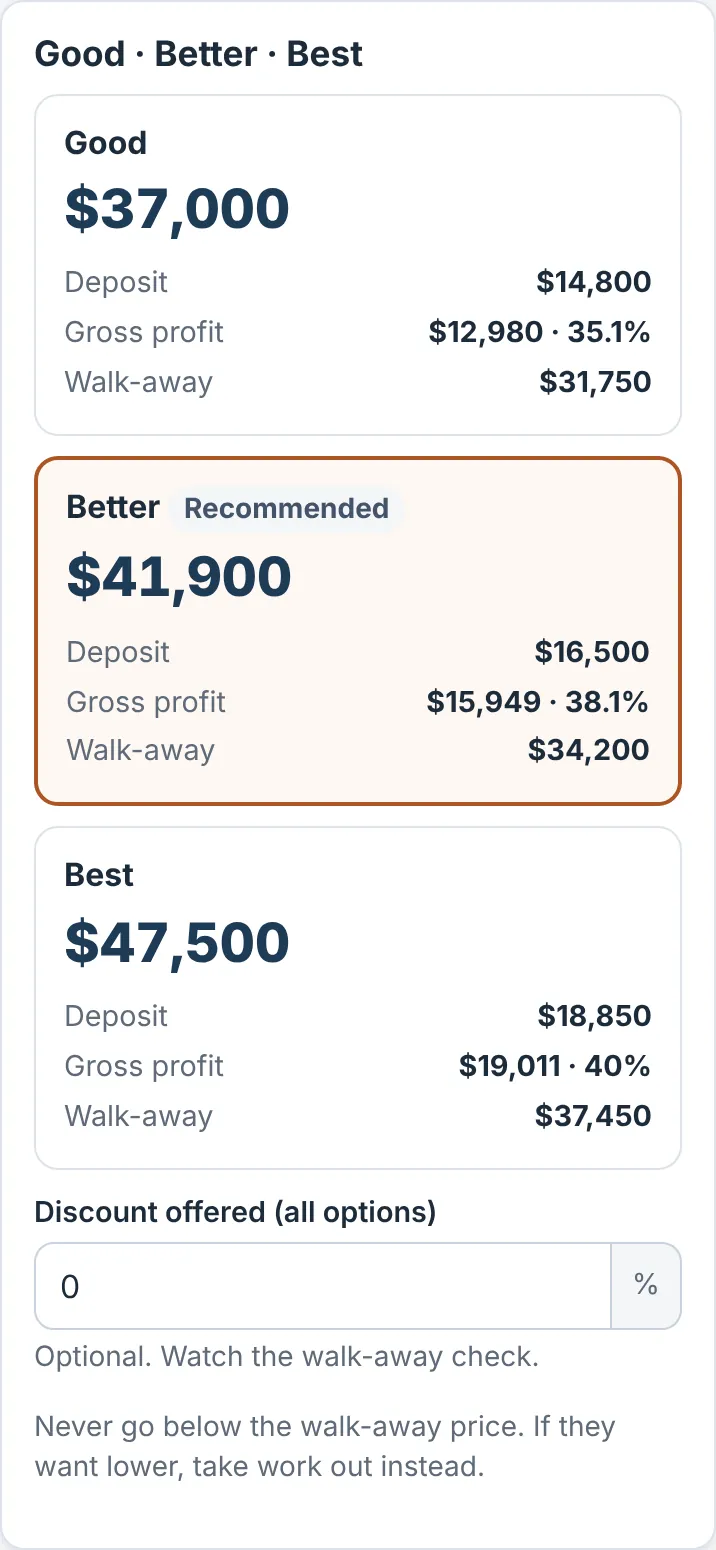
  • Good
    $37,000
  • Better
    $41,900
    Recommended
  • Best
    $47,500
The design and the quote, line by line
ItemIn the designerIn the BidRidge quote
Walls136 LF, 173 studs, 2x6 at 16″178.3 LF of 2x6 wall (at 8 ft)
Headers4: two 3-2x12, two 2-2x4 + foam25.7 LF built-up
Floor192 sf, 2x8 at 16″ on a foundation wall192 sf floor, 192 sf subfloor
Roof13 trusses + 14 rafters13 trusses, 273.6 sf of rafters
Sheathing46 wall + 37 roof sheets1,231 sf wall, 1,029 sf roof
Anchors and hardwareanchor bolts, hangers, ties34 anchors, 51 connectors
Insulation303 sf R-21, 192 sf R-49, 192 sf R-38, 34 sf R-21495 sf batts, 192 sf blown, air sealing

Garage and addition sample, sent to a Rough carpentry job in the BidRidge app at its starting rates: one project, two scopes. Rough carpentry $37,000 / $41,900 / $47,500 and Insulation, air sealing, fire & sound $2,750 / $3,000 / $3,250 (Good / Better / Best). Your rates give your own numbers.

The sample opened as a quote in the BidRidge app: Good, Better and Best prices
The BidRidge app, at its starting rates.

Try it on your own job

Open the sample, change it to your measurements, and send it to a BidRidge quote. Drawing is free; the drawing set, the lists and the quote come with a BidRidge license or the 14-day trial.

In the designer, tap Open project and pick the sample file. It opens exactly as in the video.

Sample designs: names, sizes and clients are made up. Prices are BidRidge's starting rates; set your own. The designers check against common guidelines (IRC, NKBA and the makers' published numbers) to help you catch mistakes. They don't replace your building department or the manufacturer's installation instructions: verify with them.