BidRidge › Designers › Guide › Chapter 12

Chapter 12 · Roofing & Siding DesignerBeta

Two-story house: shingles, EIFS and stone

Every place two assemblies meet gets a flashing: its profile and legs, the metal and gauge, checked against the code minimum. We walk the schedule on a two-story house with a garage, dormers and a chimney, EIFS over a stone wainscot, make a check fire and fix it, then find the schedule on the drawings and the flashing on the buy list.

In the designer, tap Open project and pick the sample file. It opens exactly as in the video.

Narrated walkthrough, 2:22. Captions on.

The sample in numbers

  • Flashing rows
    13
    all OK with the default metals
  • Step flashing
    137 pcs
    5 × 7″ · 56.8 LF of sidewall
  • Drip edge
    268 LF
    30 pieces · 26 ga prefinished steel
  • Roof
    21.2 sq
    2,119 sf · 2 dormers · a chimney with a cricket
  • Walls
    2,713 sf
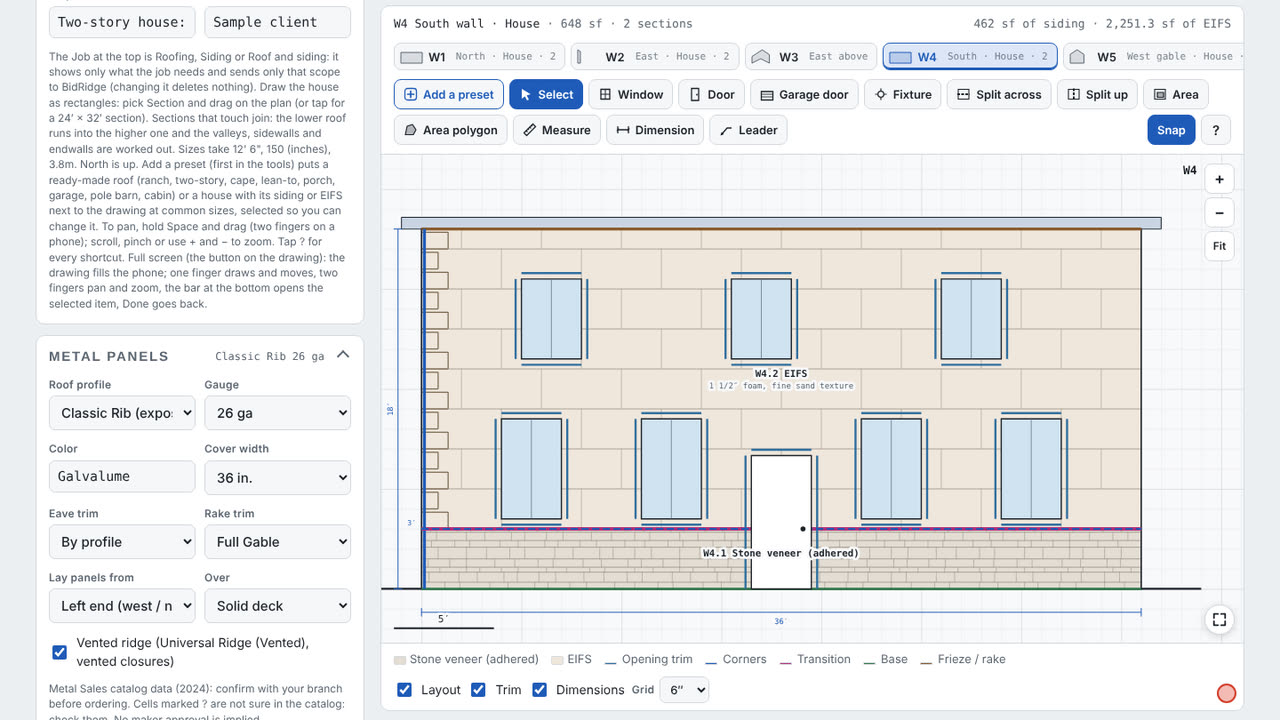
    2,251 sf EIFS over 462 sf of stone
  • Quote
    $103,850
    Better: roof $20,850 + siding $42,200 + EIFS $40,800

Step by step

Step 1: The house in the Roofing & Siding Designer
  1. Roof | Siding (the walls)
  2. EIFS
  3. 36″ stone wainscot

Step 1: The house

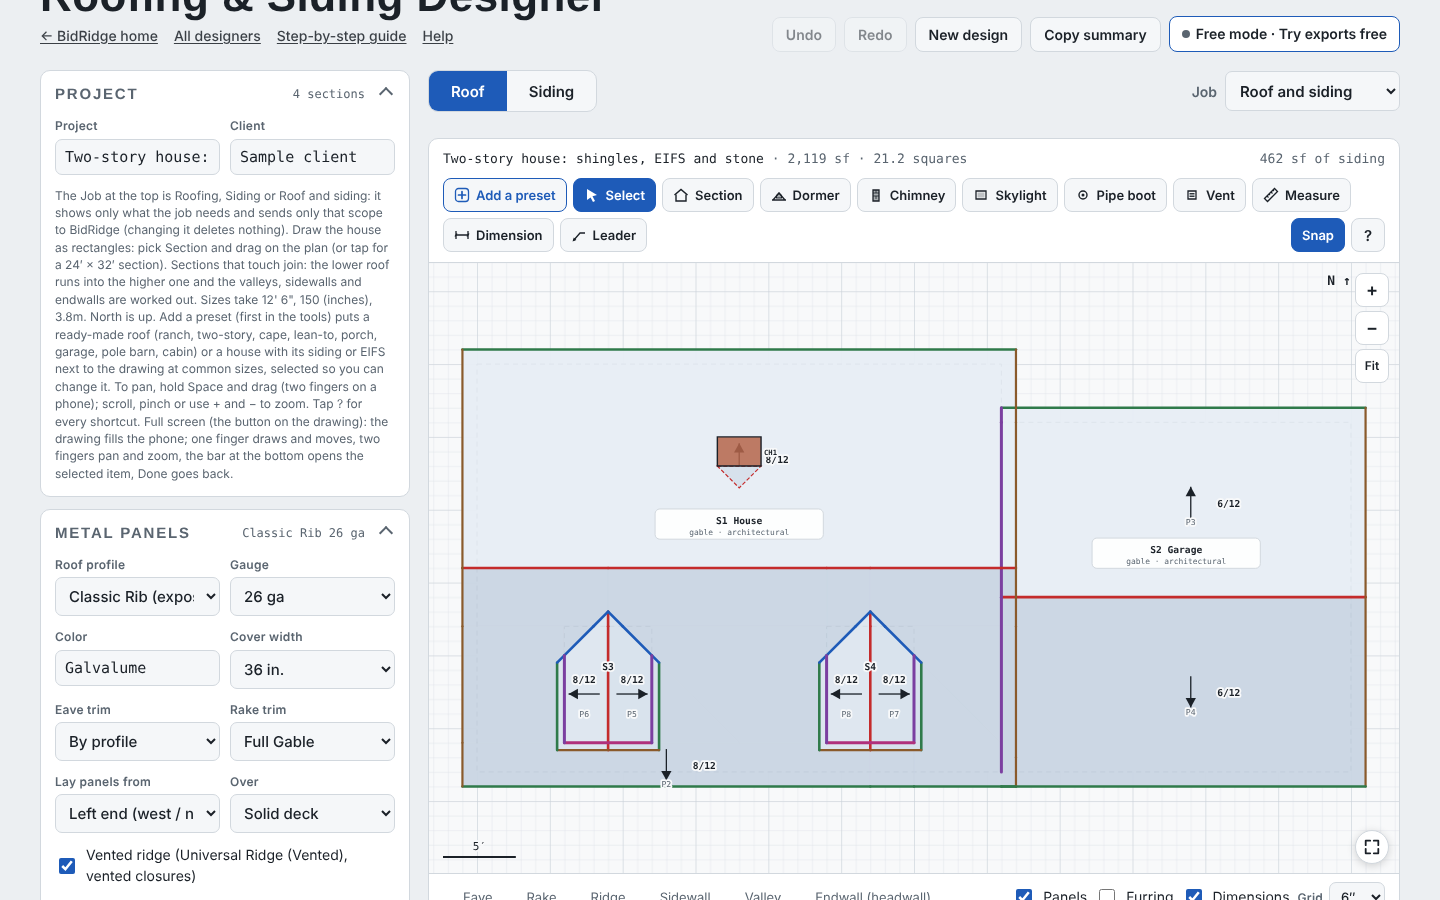
Our sample is a two-story house with a garage against its east wall, two dormers and a chimney, all in architectural shingles. The walls are EIFS over a 36″ stone wainscot. The flashing schedule works out from what is drawn: nothing extra to enter.

Step 2: The flashing schedule card in the Roofing & Siding Designer
  1. Where two assemblies meet
  2. Status: OK, On site, Review, Fix

Step 2: The flashing schedule card

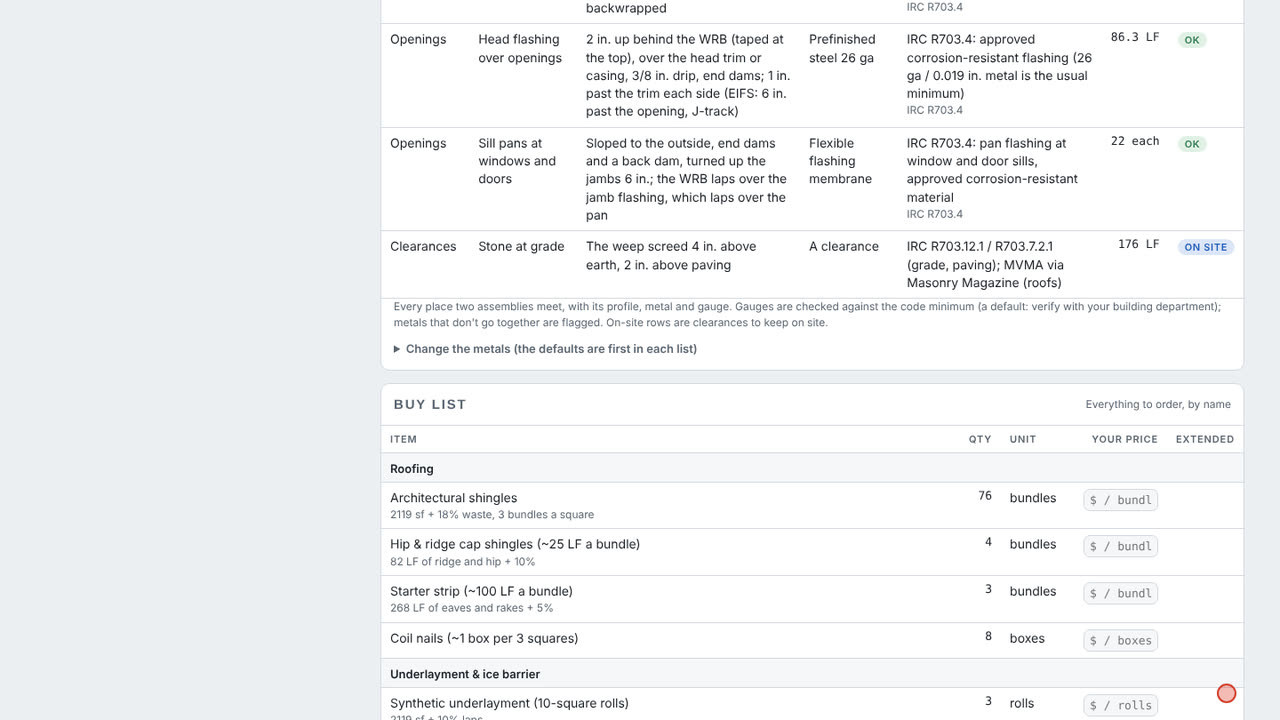
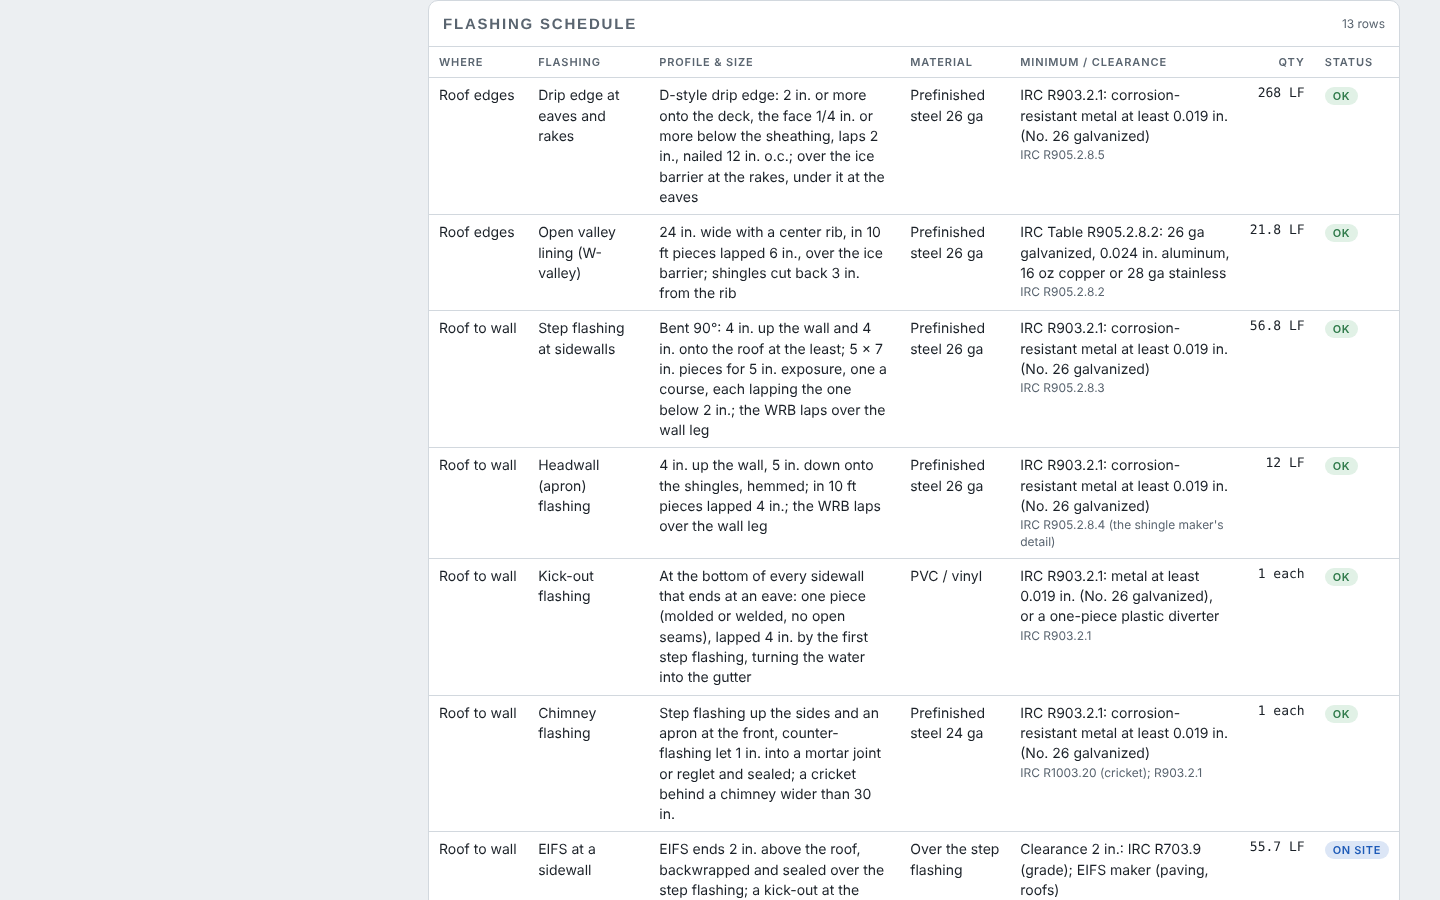
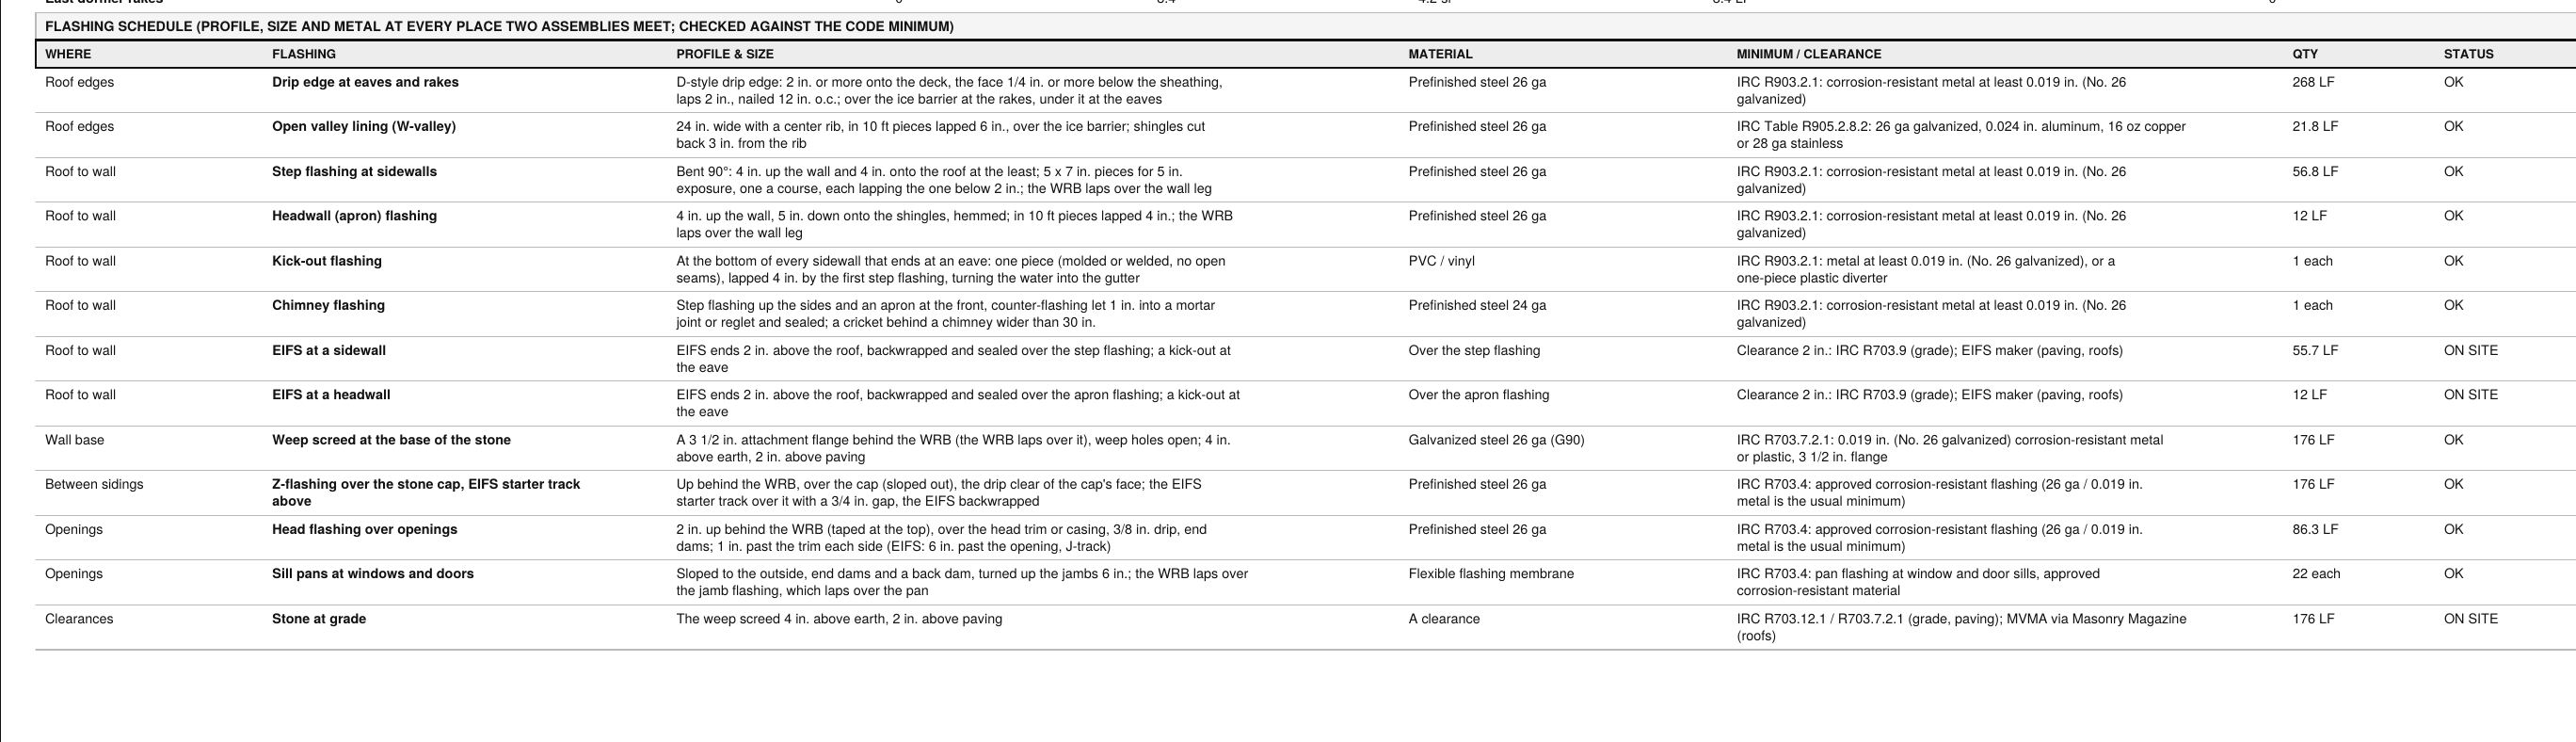
The Flashing schedule card opens with the table: a row at every place two assemblies meet, from the roof edges and roof to wall, to the base of each siding, the lines between sidings and the openings. This house has 13.

Step 3: Defaults first in the Roofing & Siding Designer
  1. Change the metals: the defaults first
  2. Drip edge: 26 ga prefinished (default)
  3. Kick-out: one-piece plastic
  4. Chimney: 24 ga

Step 3: Defaults first

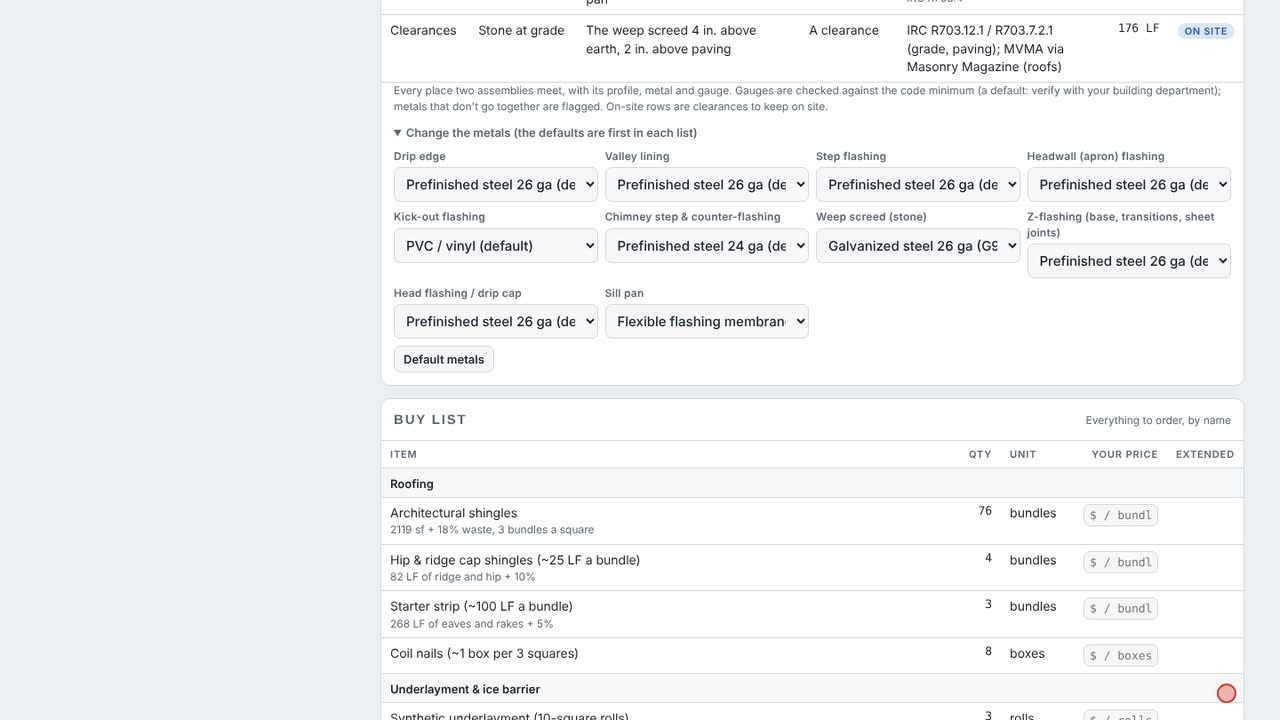
Under Change the metals, each flashing has a pick list, and the first one is the default: 26 ga prefinished steel for the drip edge, valleys, step and apron, 24 ga at the chimney, a one-piece plastic kick-out, a galvanized weep screed and a membrane sill pan.

Field tip: Default metals, in the same fold, puts every pick back in one tap.

Step 4: Roof to wall in the Roofing & Siding Designer
  1. Step: 4″ up, 4″ on the roof, 137 pieces
  2. Chimney: counter-flashing and a cricket
  3. On site: EIFS ends 2″ above the roof

Step 4: Roof to wall

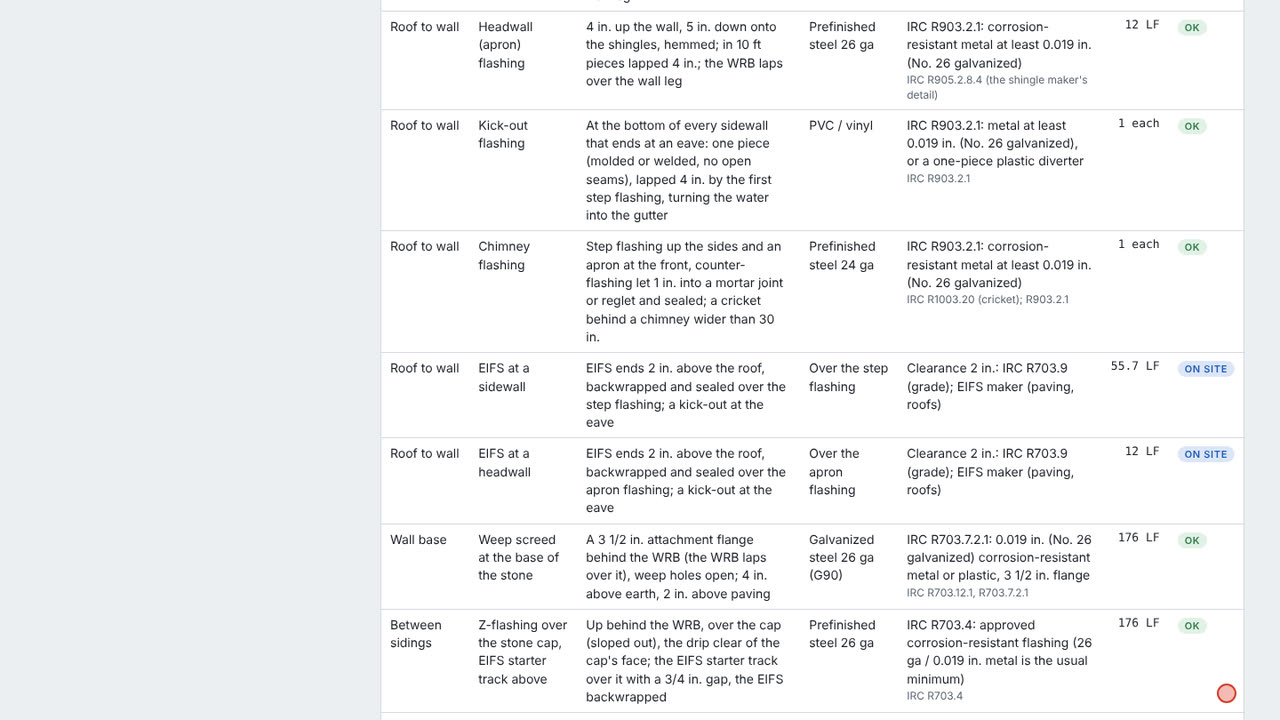
Each row gives the profile and its legs. Step flashing is 4″ up the wall and 4″ onto the roof, 137 pieces of 5 × 7. The chimney gets step and counter-flashing and a cricket. On site rows are clearances to keep on site, like the EIFS ending 2″ above the roof.

Step 5: The walls and openings in the Roofing & Siding Designer
  1. Weep screed under the stone
  2. Z over the stone cap, EIFS starter above
  3. 22 sill pans

Step 5: The walls and openings

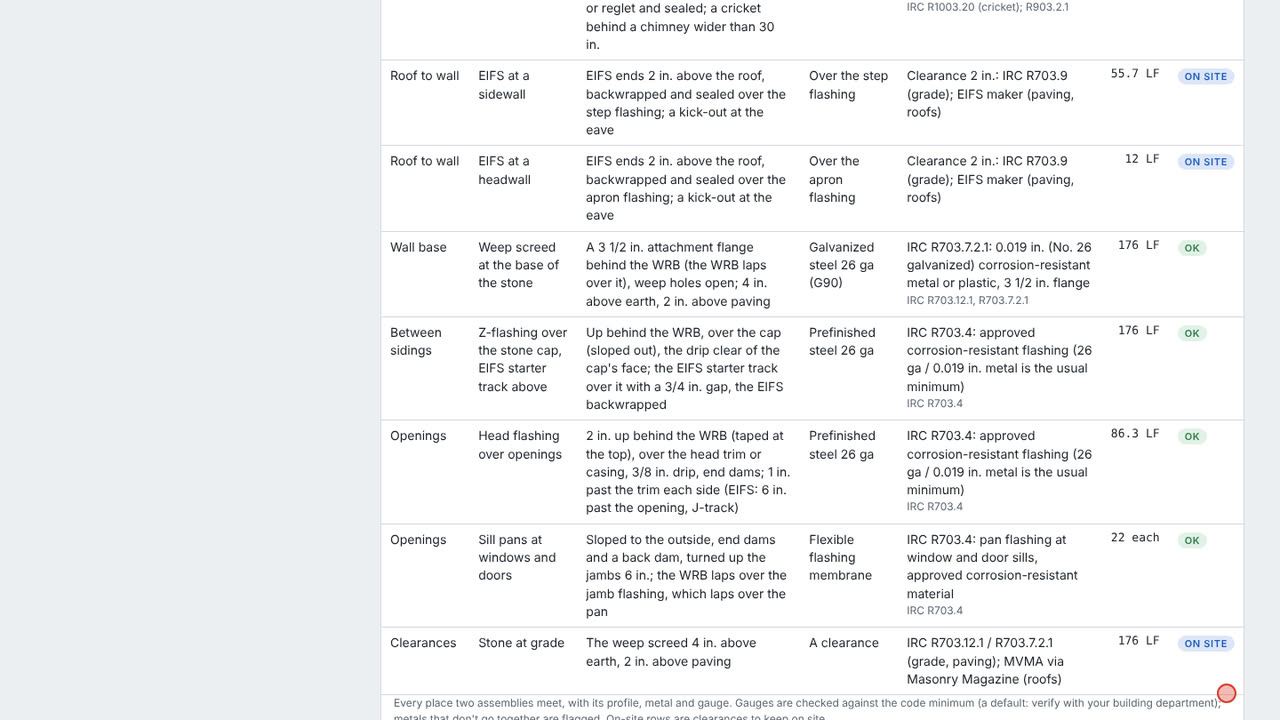
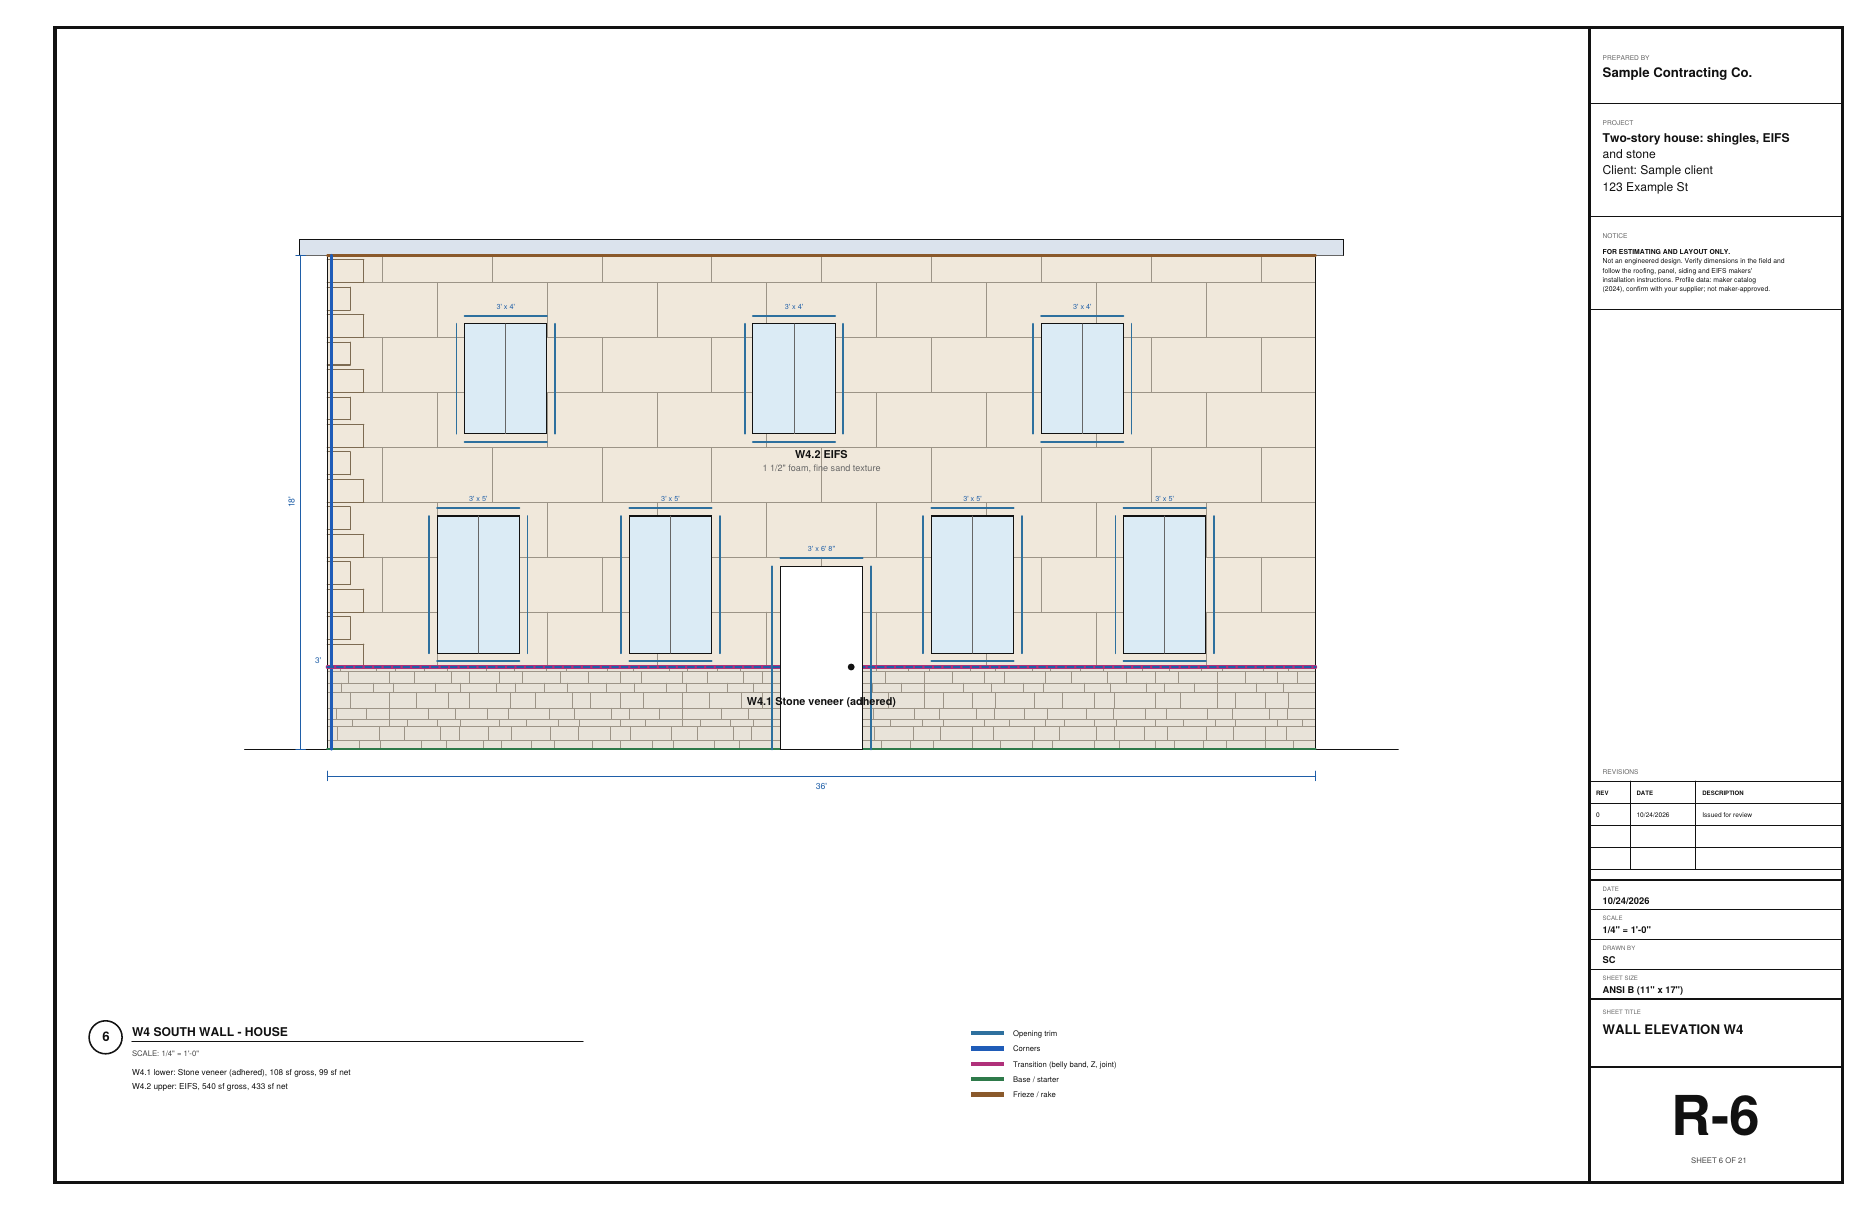
At the base, a weep screed under the stone. Over the stone cap, Z-flashing with the EIFS starter track above it. A head flashing over every opening and a sill pan under each of the 22.

Field tip: Bare aluminum against stone, stucco or EIFS base coat gets flagged: those are alkaline.

Step 6: A check fires in the Roofing & Siding Designer
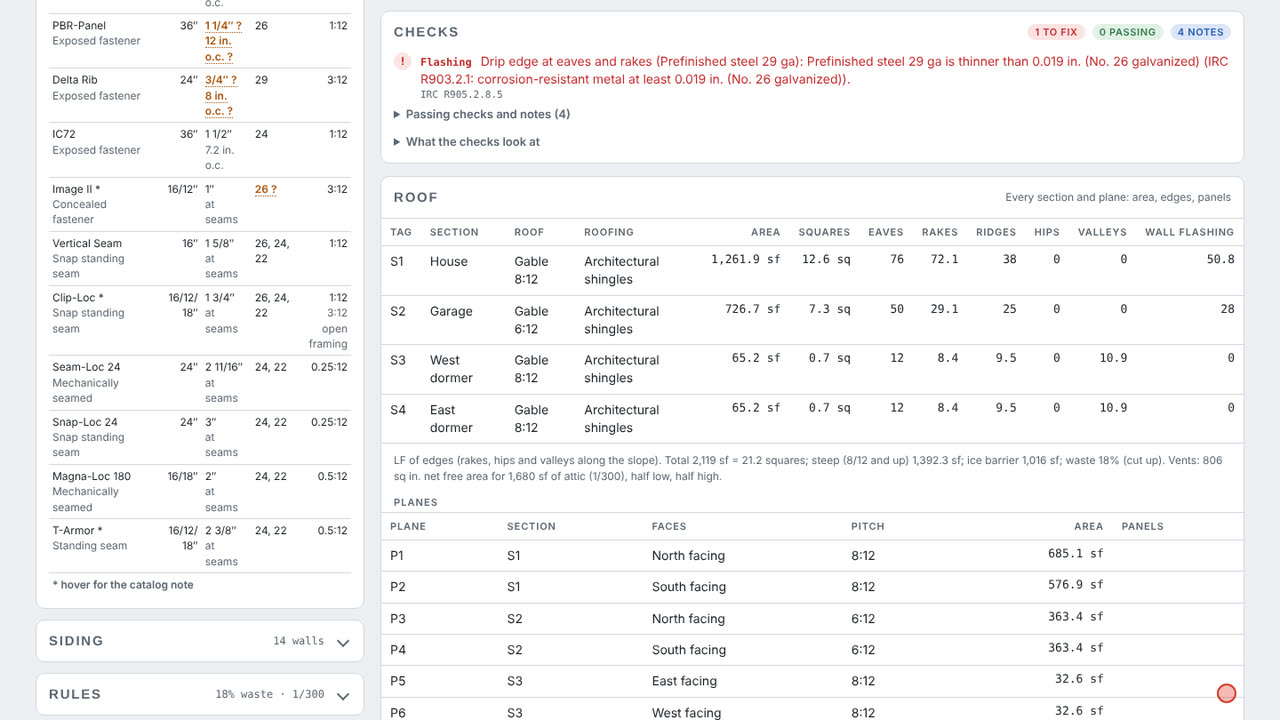
  1. Checks: 29 ga is under 0.019″ (IRC R903.2.1)

Step 6: A check fires

Say we pick 29 ga for the drip edge. The row turns to Fix: it is thinner than 0.019″, the IRC minimum for roof flashing. The same line shows up under Checks.

Field tip: The minimums are defaults to verify with your building department.

Step 7: Fix it in the Roofing & Siding Designer
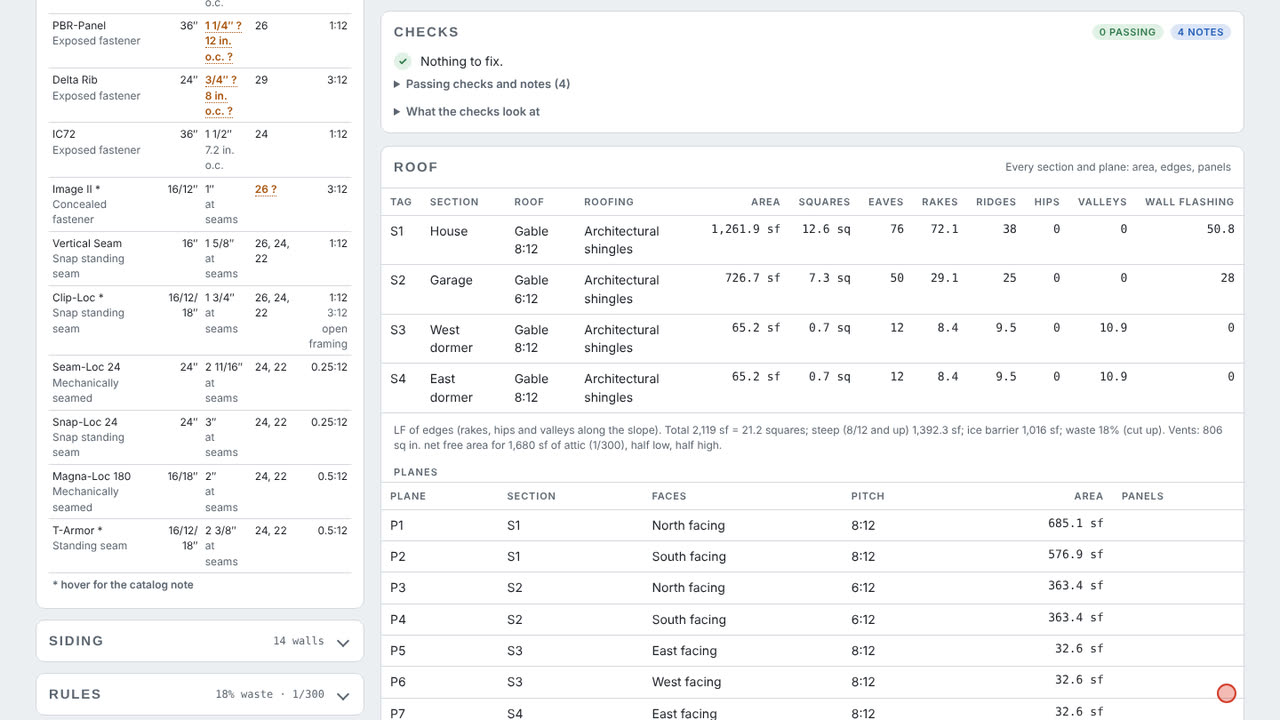
  1. Nothing to fix

Step 7: Fix it

We tap Default metals, or pick 26 ga again. The row is OK and the check clears.

Step 8: The schedule on the drawings in the Roofing & Siding Designer
  1. The flashing schedule, on the Trims & schedules sheet

Step 8: The schedule on the drawings

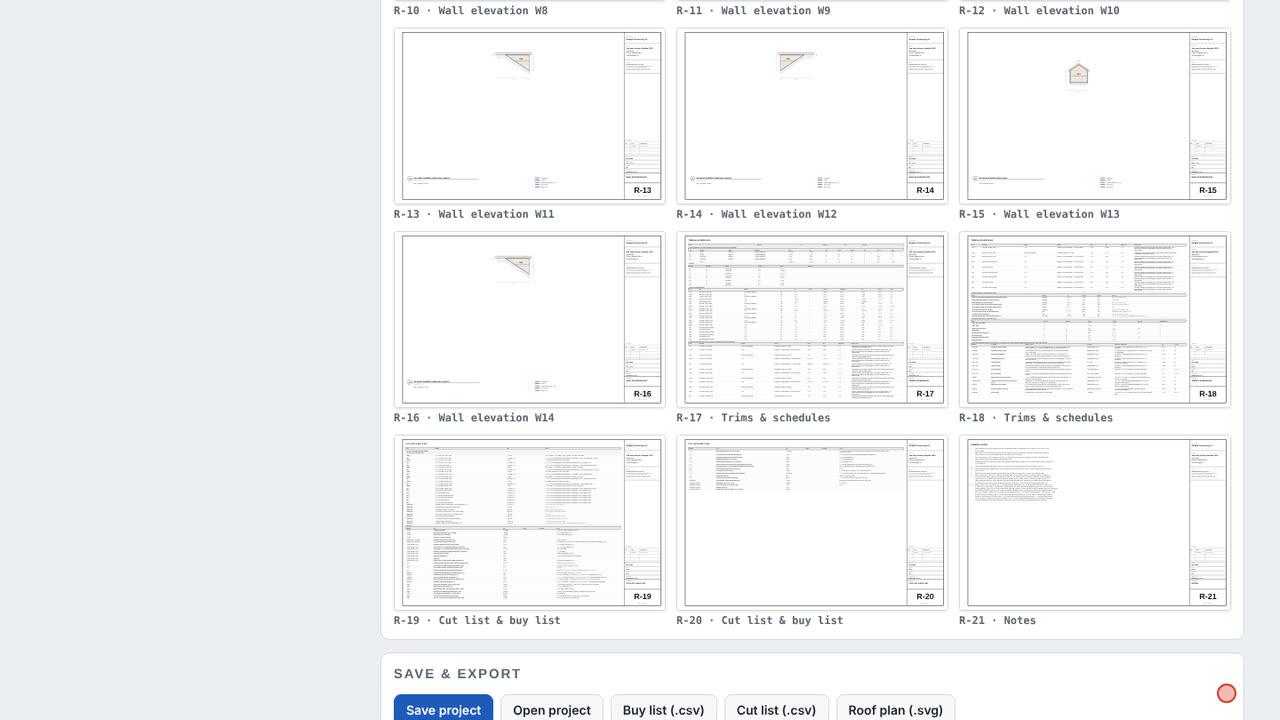
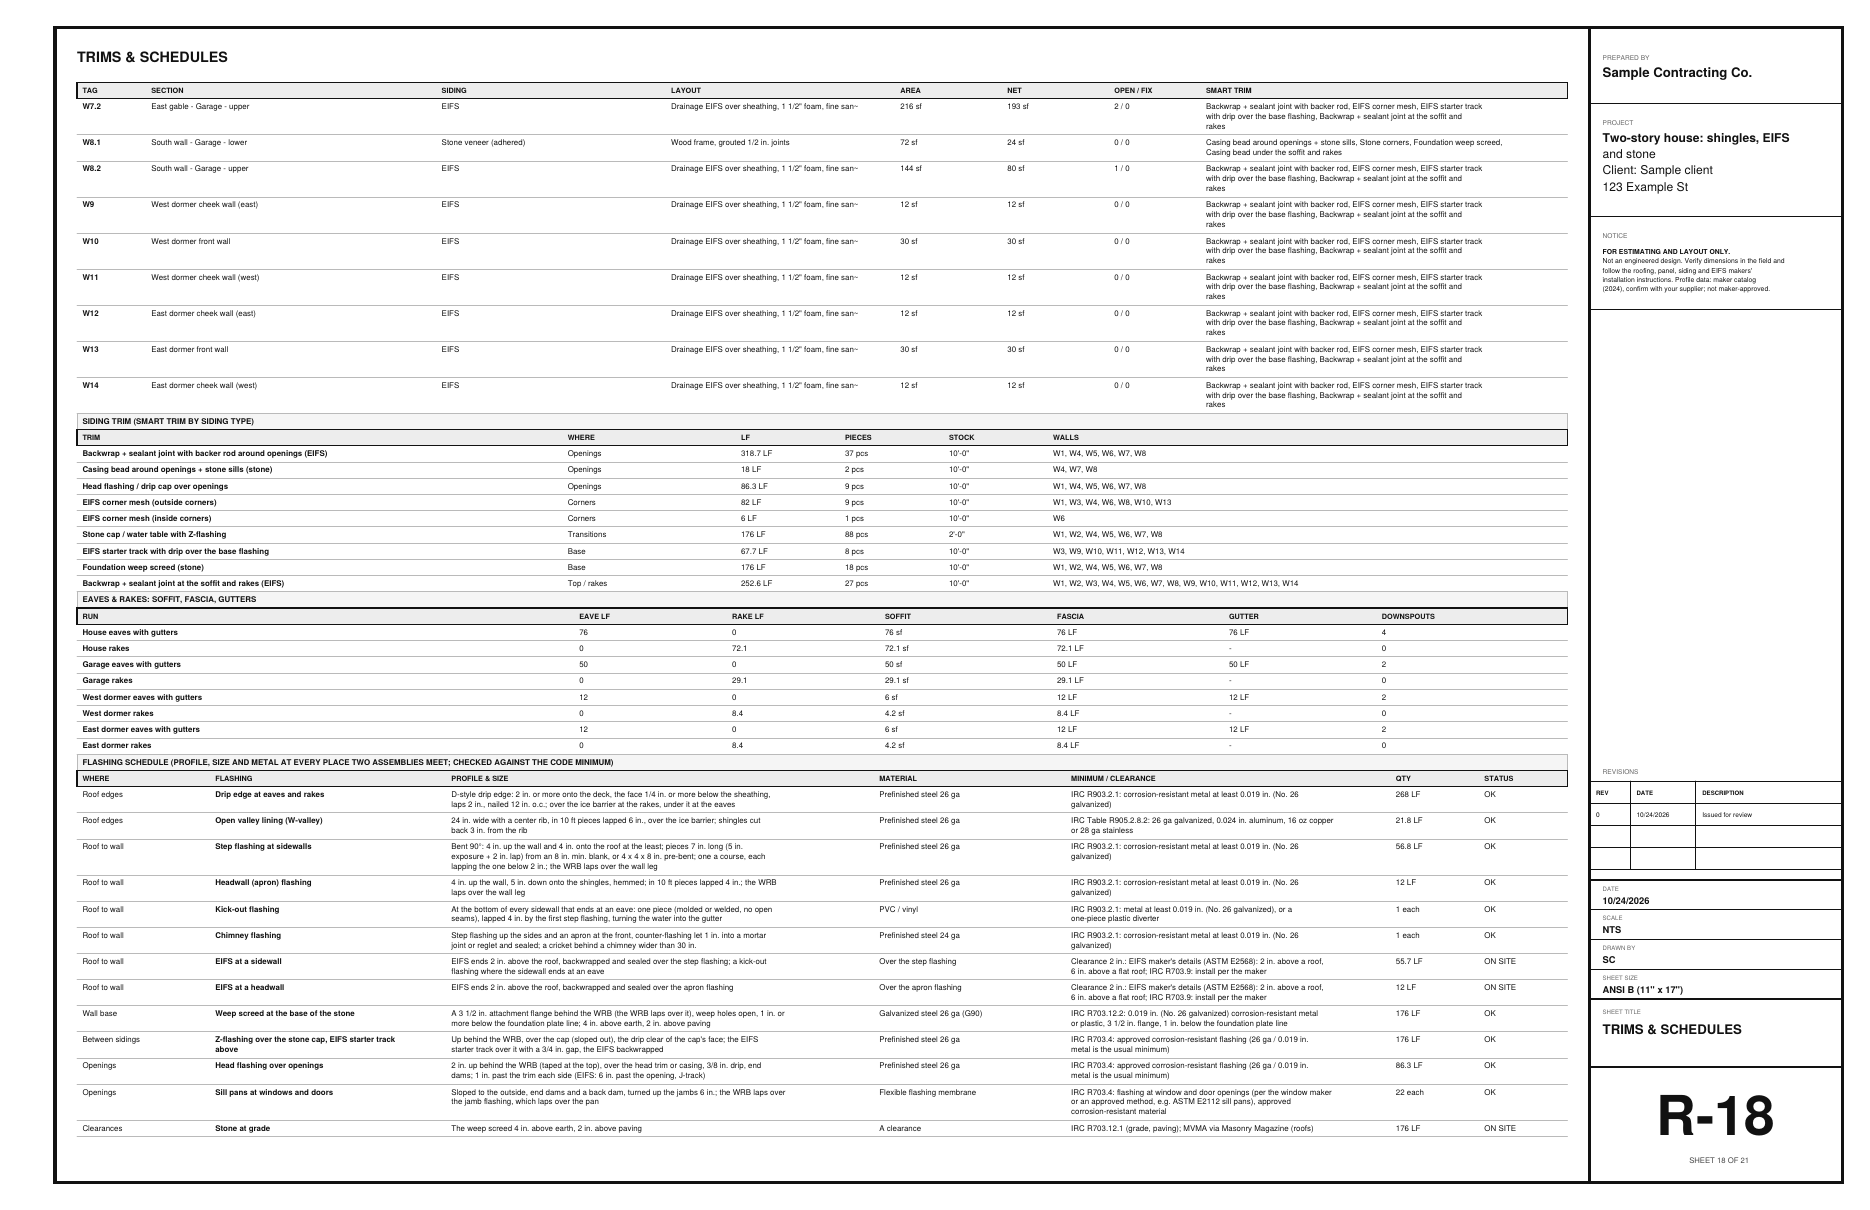
The drawing set prints the same table on the Trims & schedules sheet (Trims, flashing & schedules in the drawing set options): where, the flashing, profile and size, material, the minimum, the quantity and the status.

Step 9: Flashing on the buy list in the Roofing & Siding Designer
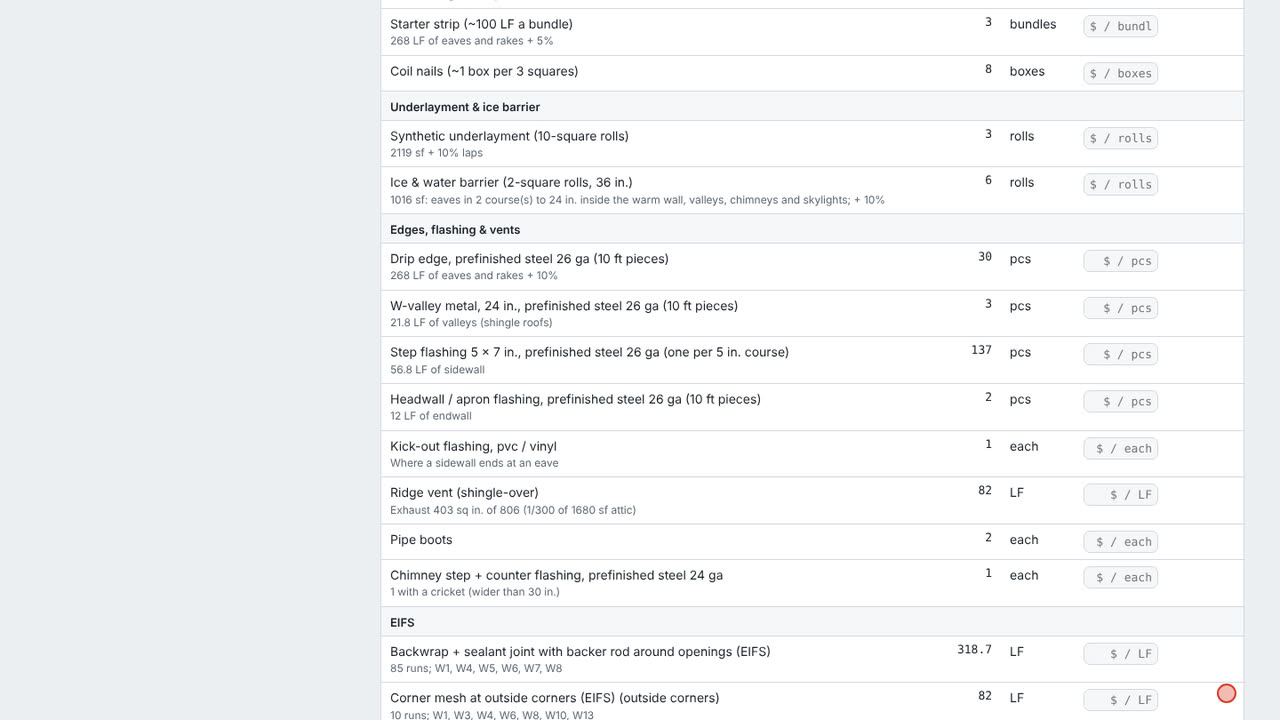
  1. Drip edge: the metal named
  2. 137 step flashings, 5 × 7″
  3. Kick-out and chimney flashing

Step 9: Flashing on the buy list

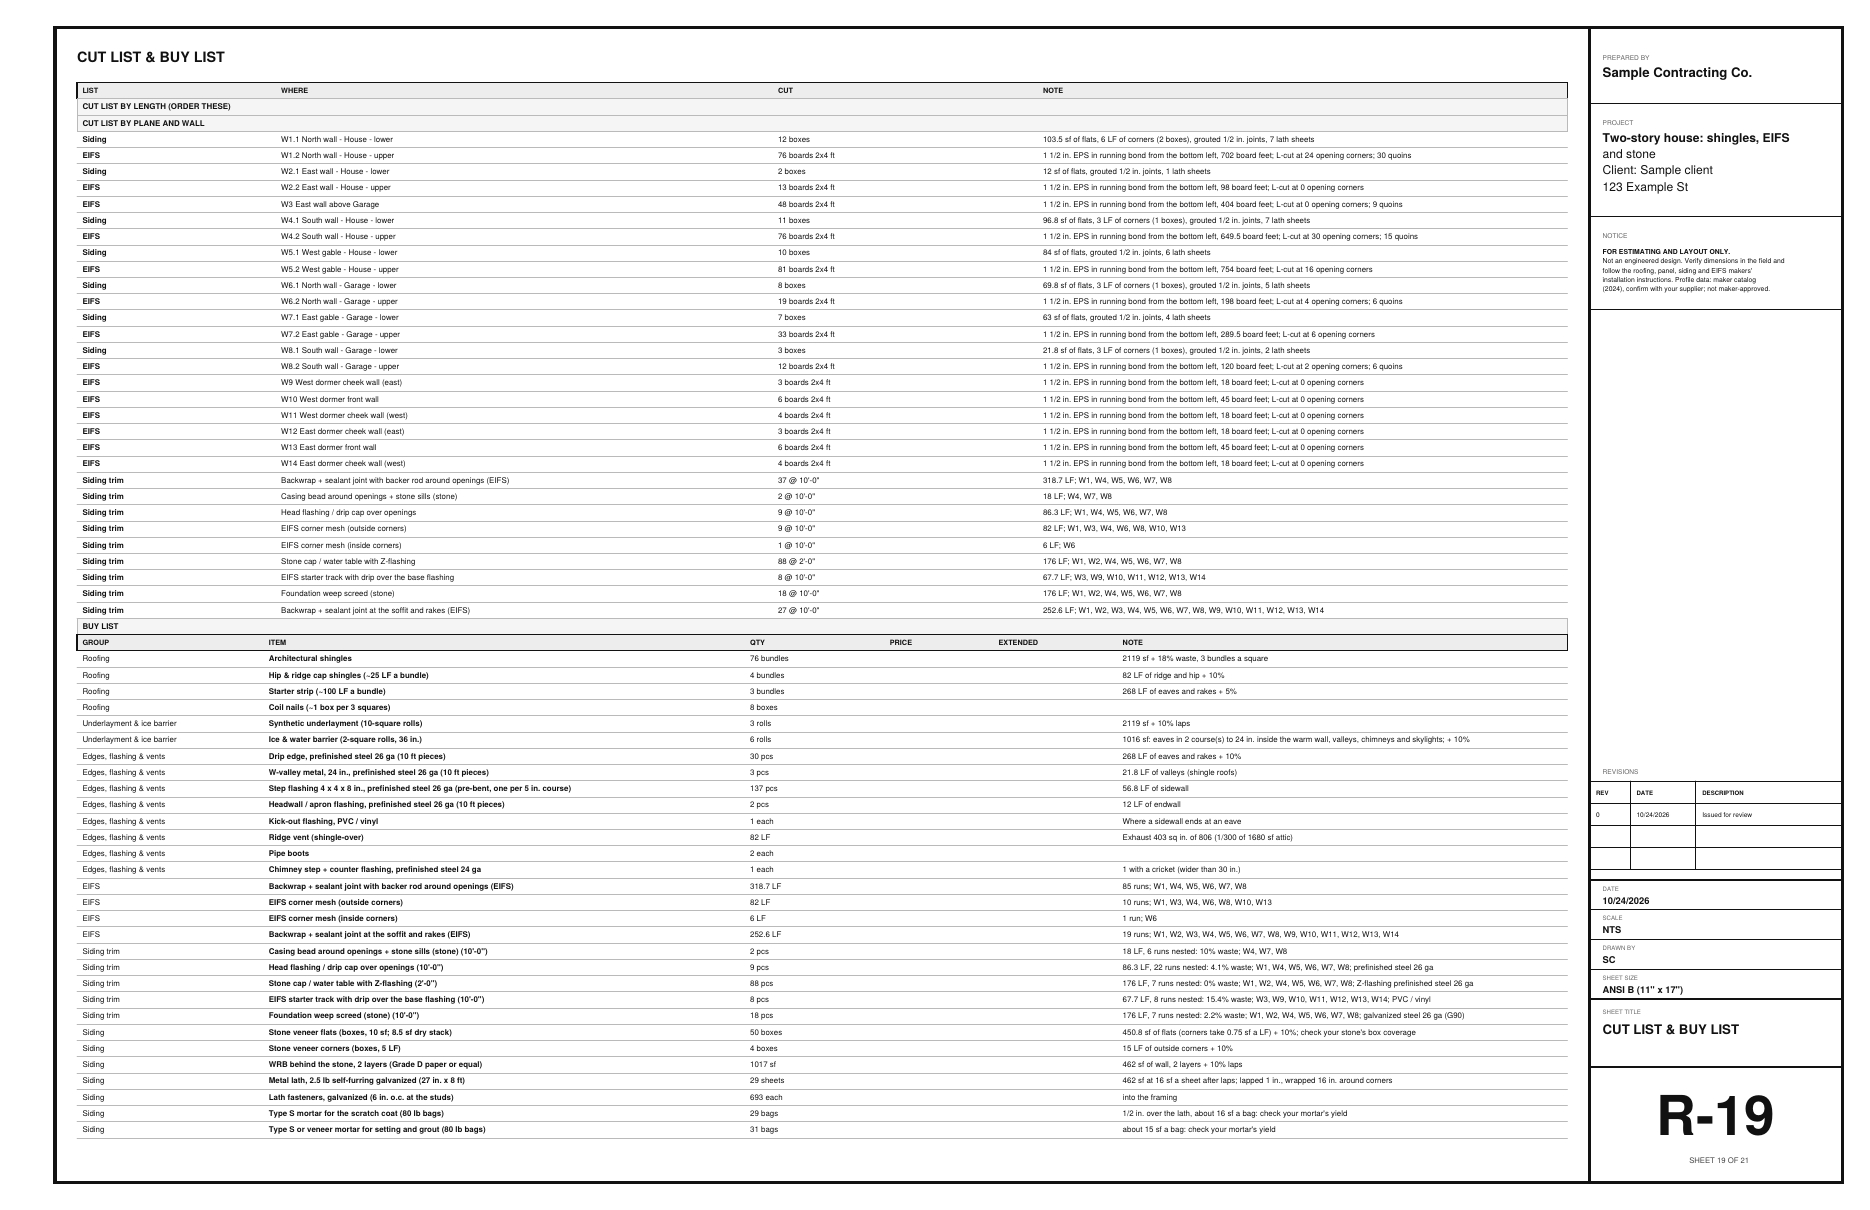
The buy list names the metal on each piece: drip edge, W-valley, 137 step flashings, the apron, the kick-out and the chimney flashing, then the head flashing, the Z-flashing, the weep screed, the starter track and 22 sill pans.

What you get

The drawing set, the lists and the files

Real files from this sample, made by the designer. Tap a page to see it full size. Yours carry your company, the client and the address.

The Flashing schedule card: 13 rows, the table first, the metals under Change the metals
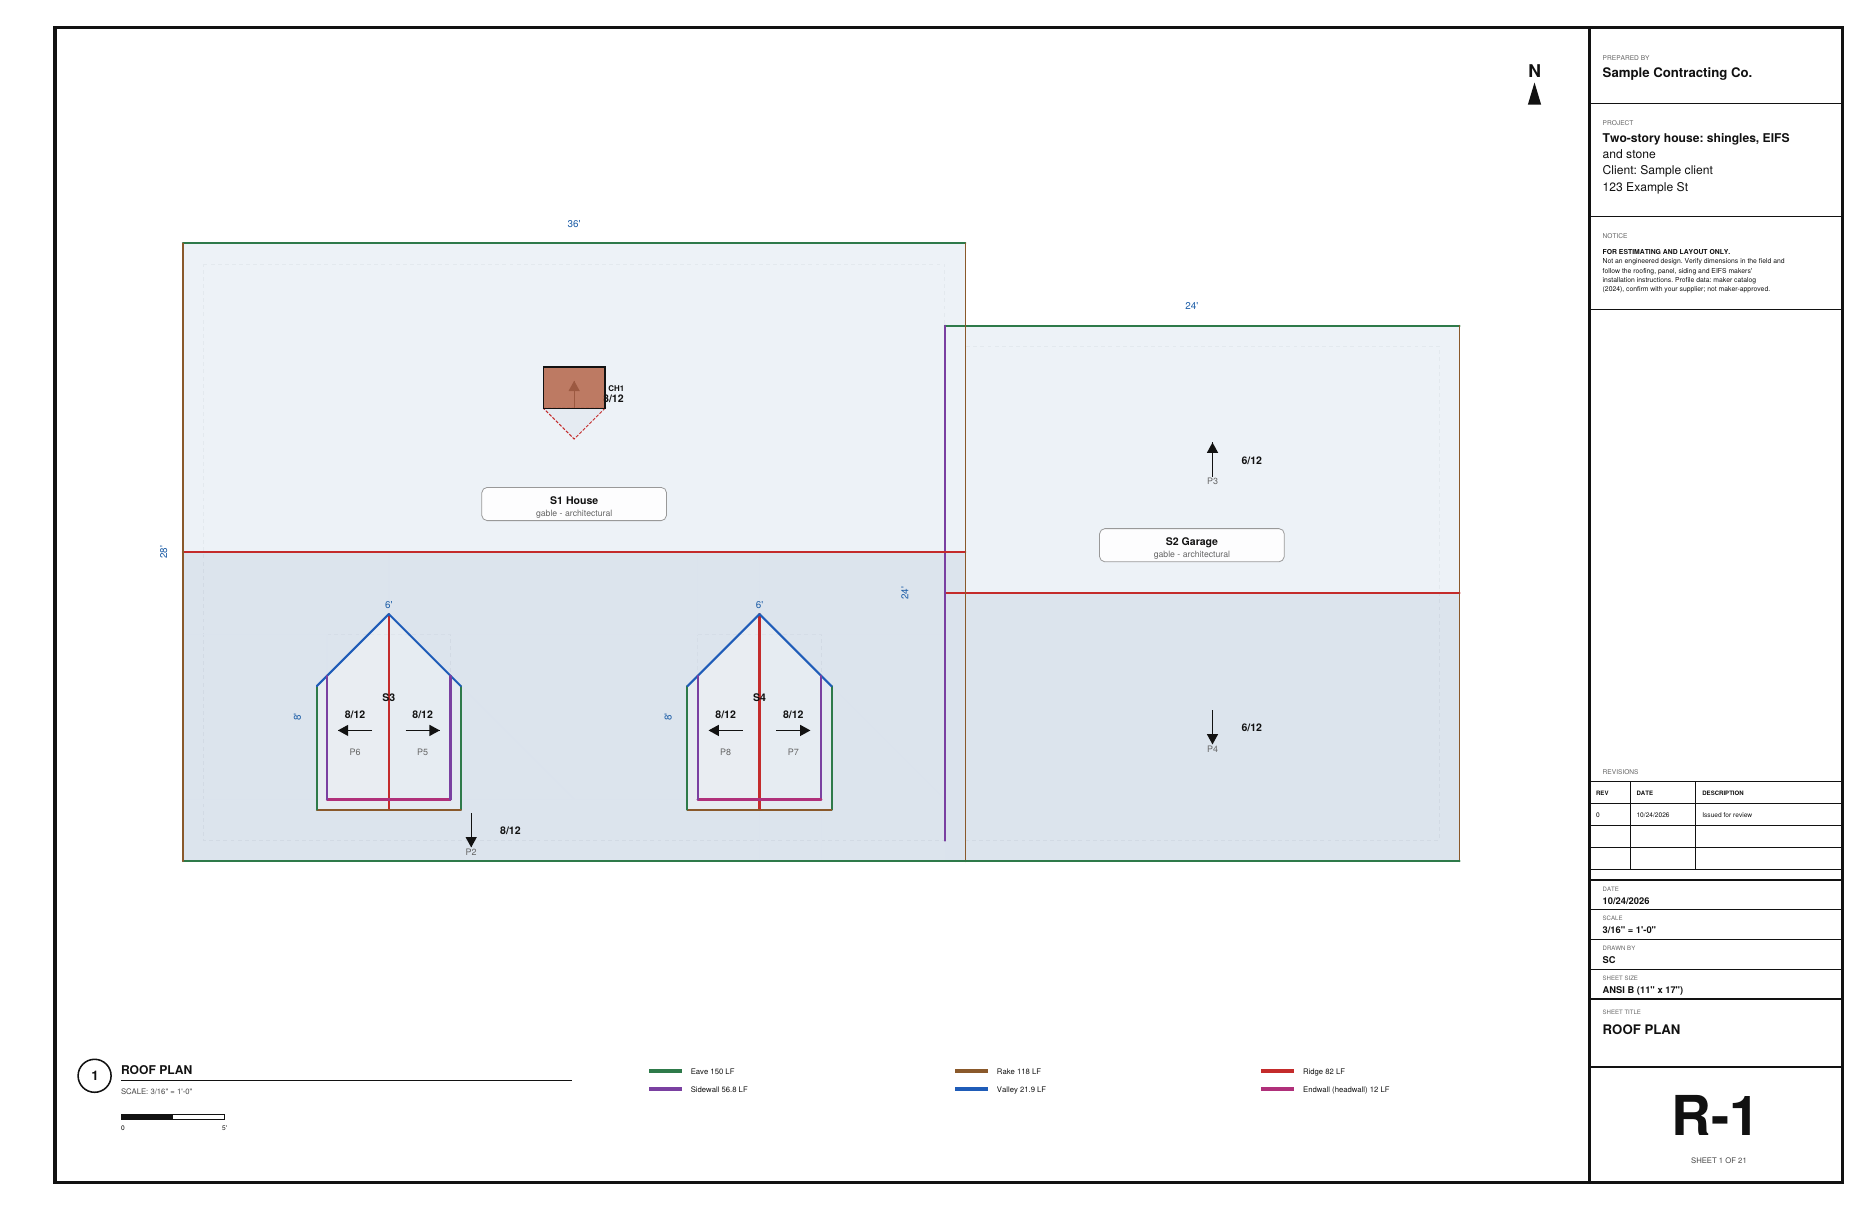
The roof plan: house, garage against its wall, two dormers, the chimney with its cricket
R-1 roof plan: edges by kind (eave, rake, valley, sidewall, endwall)
R-6 wall elevation W4: EIFS over the stone wainscot, the openings
The flashing schedule table from the drawing set: profile and size, material, the minimum, quantity and status
R-18 trims & schedules: the flashing schedule, profile, metal, minimum and status
R-19 cut list and buy list: the flashing with its metal named

The BidRidge quote

Same numbers in the quote

The designer sends its quantities to BidRidge, and BidRidge prices the labor and materials at your rates.

  • Good
    $92,350
  • Better
    $103,850
    Recommended
  • Best
    $116,050
The design and the quote, line by line
ItemIn the designerIn the BidRidge quote
Roof2,119 sf, 4 roof rows21.2 squares, 2,119 sf
Step & wall flashing78.8 LF (56.8 step, 12 apron, 10 around the chimney)78.8 LF on the roof rows
Kick-out · chimney1 kick-out, 1 chimney with a cricket1 kick-out flashing, 1 chimney to flash
Stone462 sf net, a weep screed and cap462 sf net (Siding scope)
EIFS2,251 sf net, 14 sections2,251 sf of EIFS, 571 LF of sealant

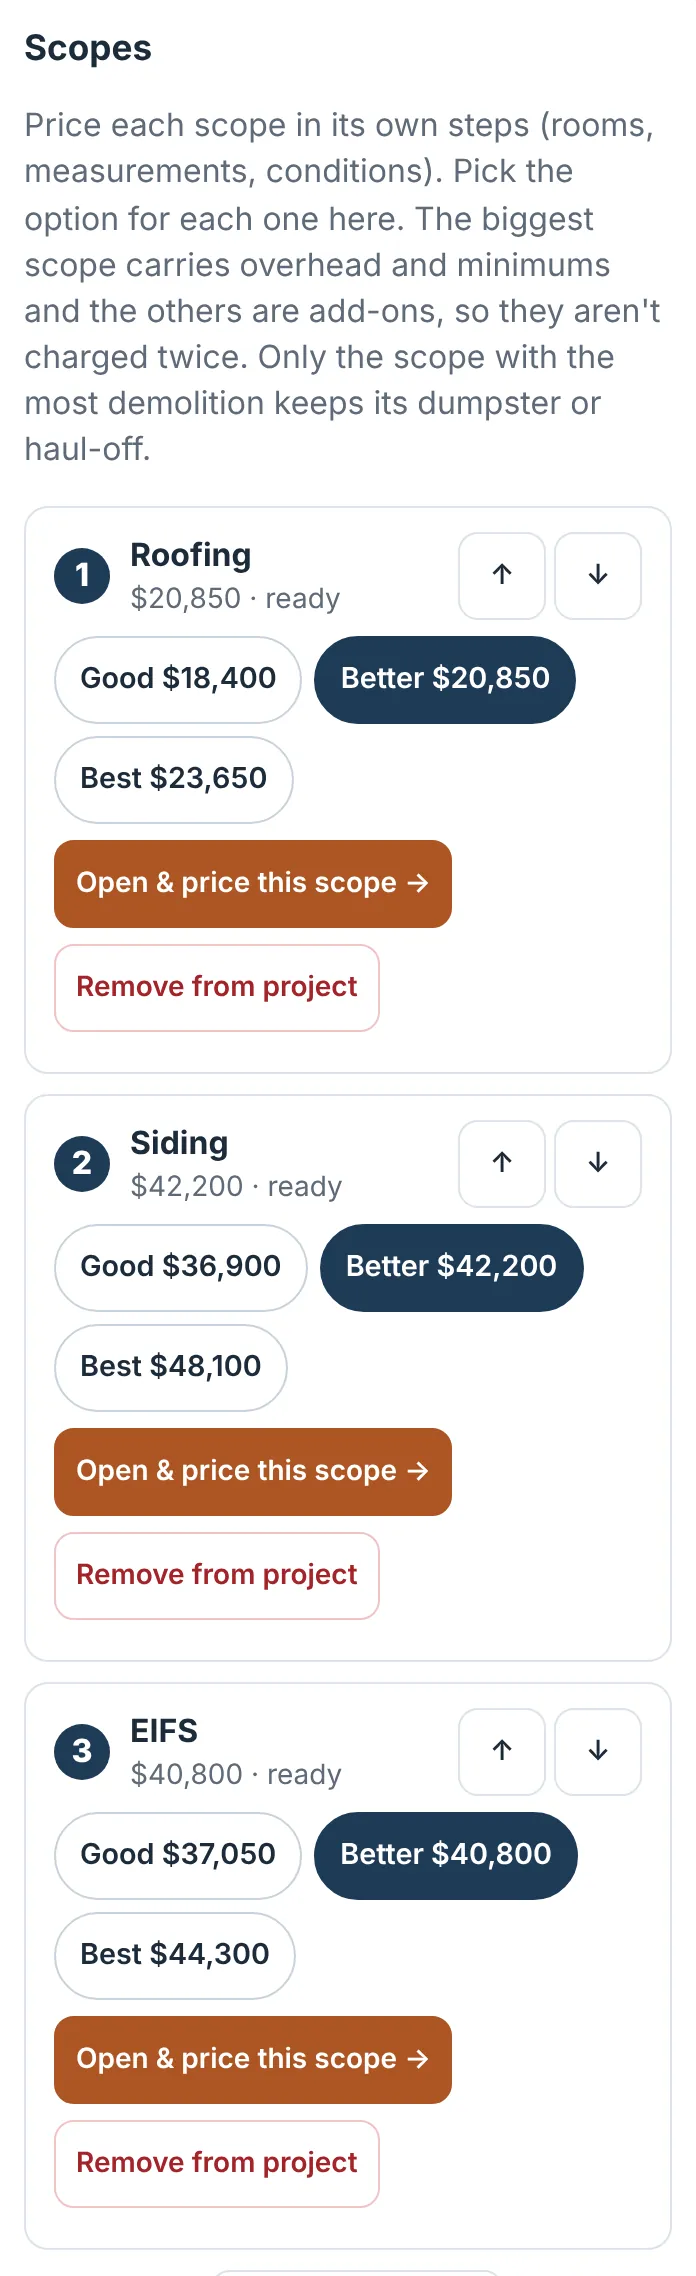
Flashing sample, opened in the BidRidge app at its starting rates: one project, three scopes. Roofing $18,400 / $20,850 / $23,650, siding (stone, soffit, fascia, gutters) $36,900 / $42,200 / $48,100 and EIFS $37,050 / $40,800 / $44,300 (Good / Better / Best), added together here. Your rates give your own numbers.

The sample opened as a quote in the BidRidge app: Good, Better and Best prices
The BidRidge app, at its starting rates.

Try it on your own job

Open the sample, change it to your measurements, and send it to a BidRidge quote. Drawing is free; the drawing set, the lists and the quote come with a BidRidge license or the 14-day trial.

In the designer, tap Open project and pick the sample file. It opens exactly as in the video.

Sample designs: names, sizes and clients are made up. Prices are BidRidge's starting rates; set your own. The designers check against common guidelines (IRC, NKBA and the makers' published numbers) to help you catch mistakes. They don't replace your building department or the manufacturer's installation instructions: verify with them.