BidRidge › Designers › Guide › Chapter 30

Chapter 30 · Division 10 DesignerBeta

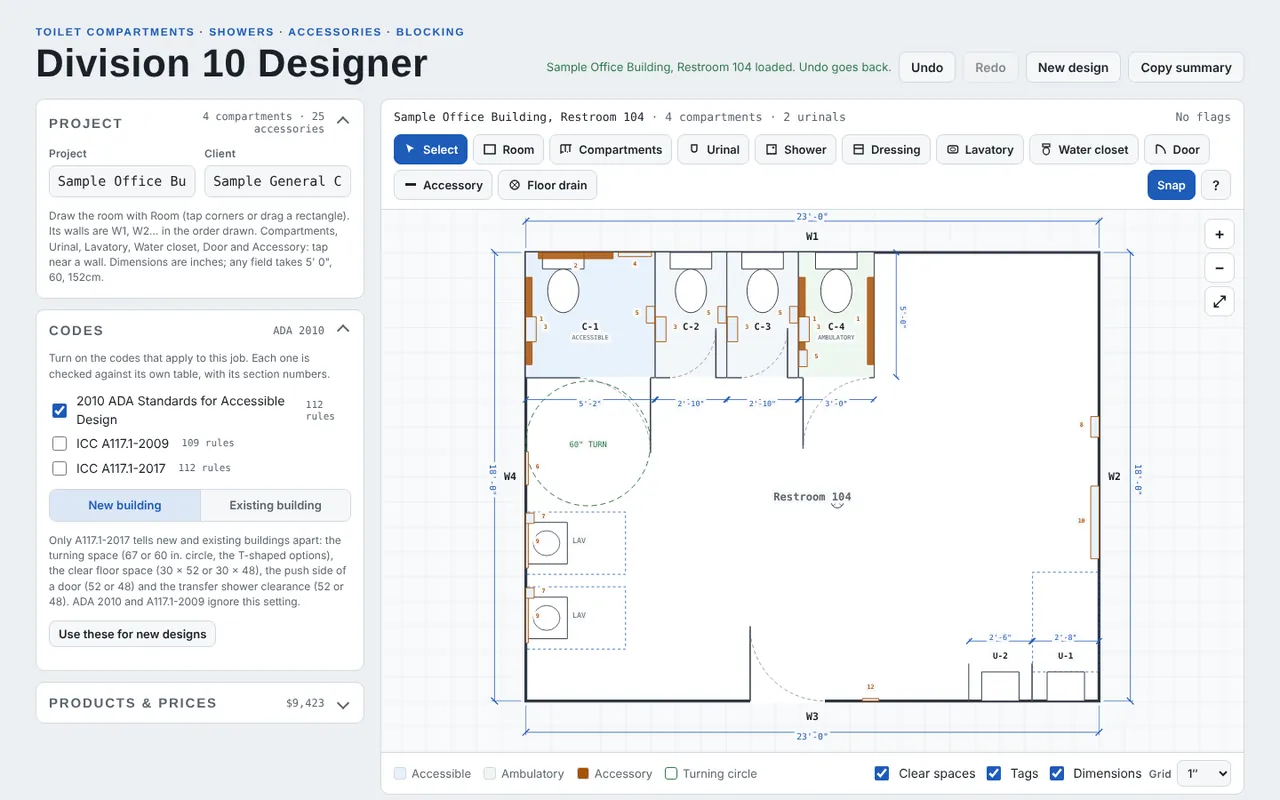
Sample Office Building, Restroom 104: four compartments, two urinals, two lavatories

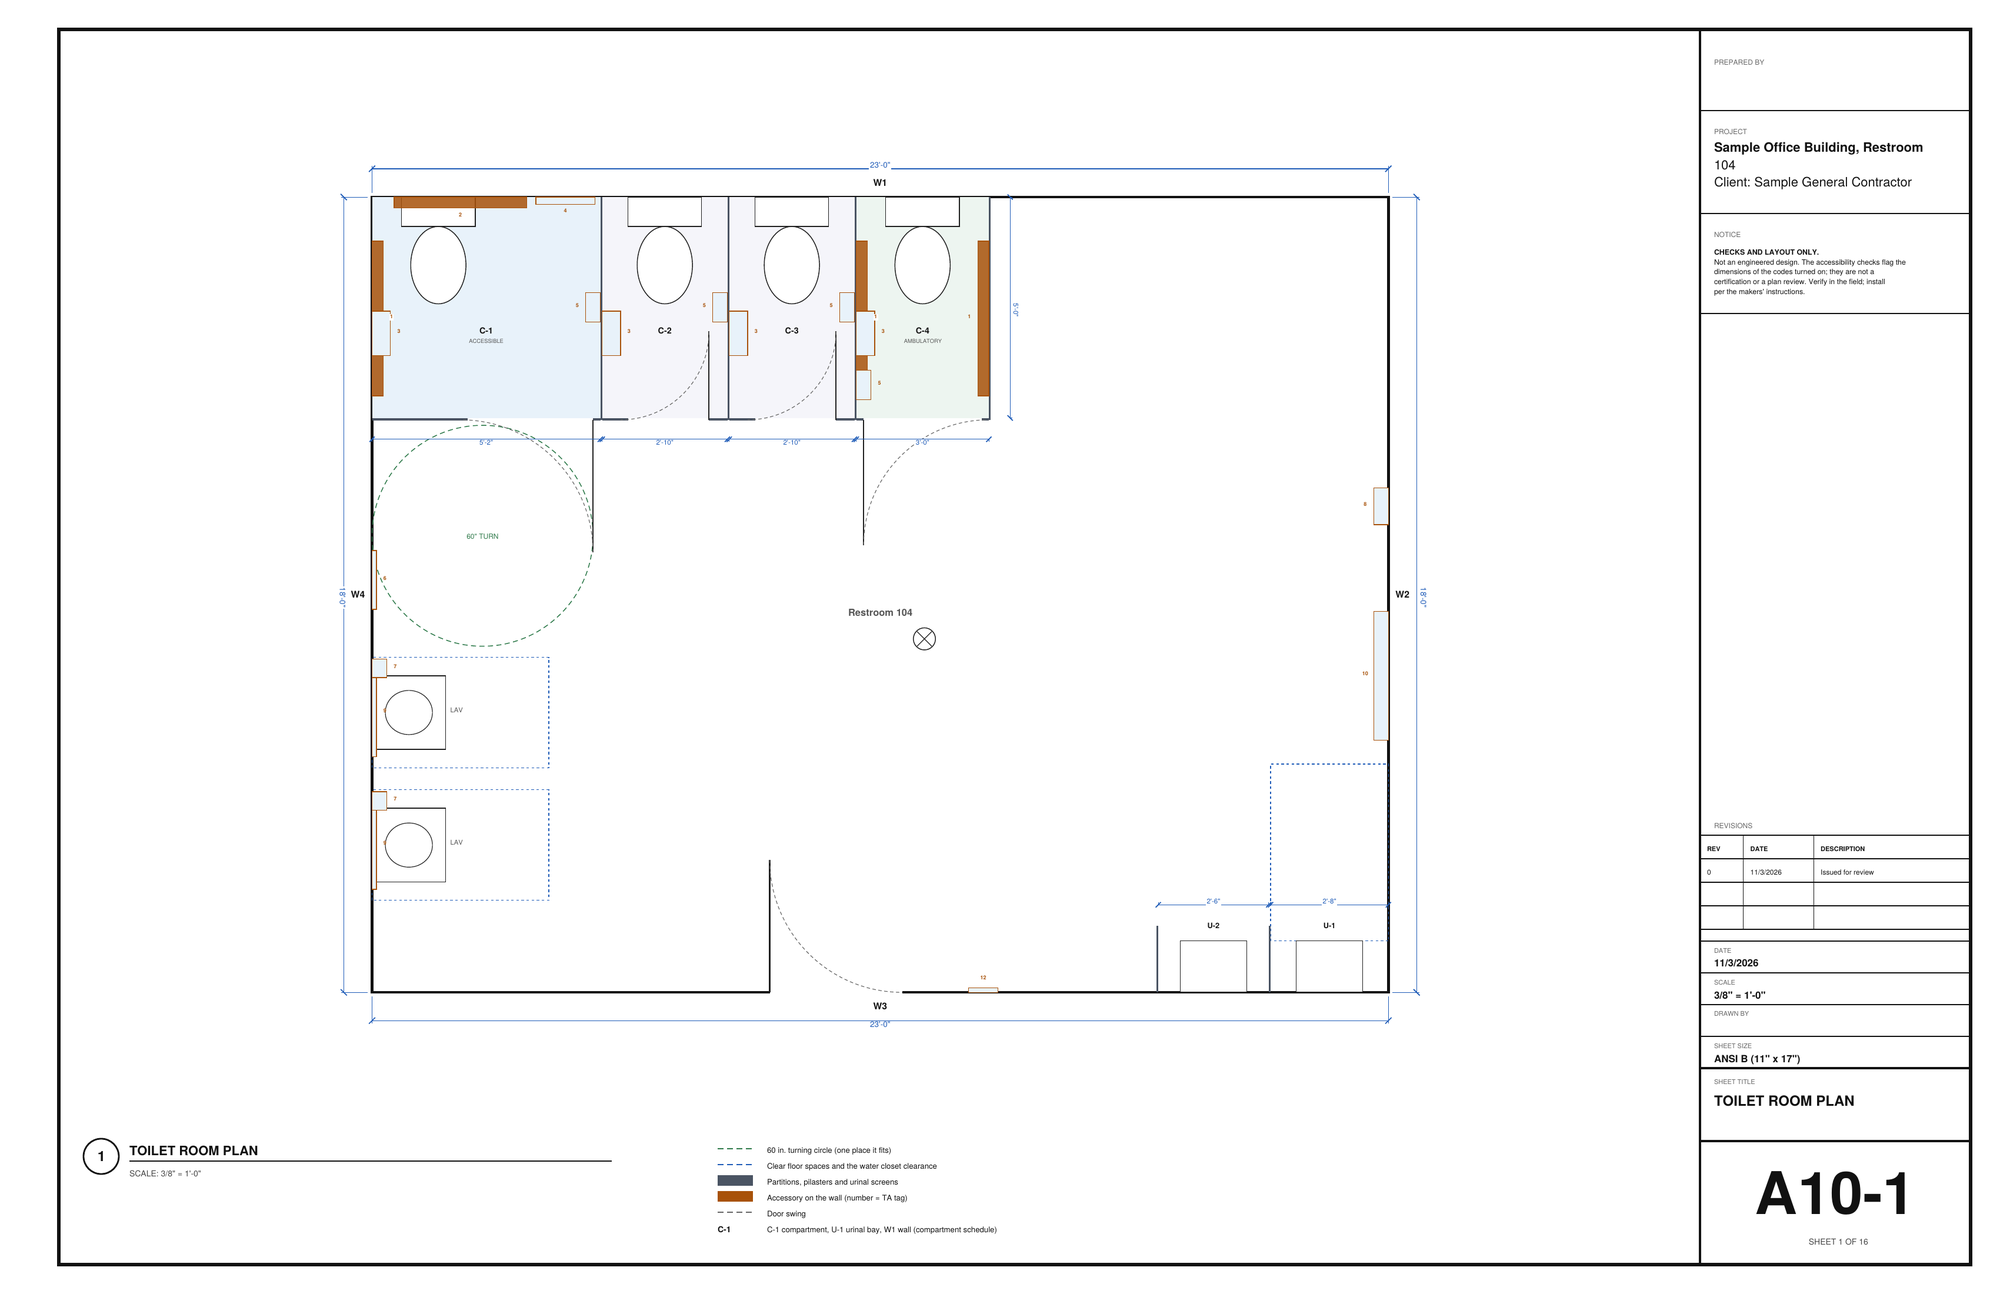
From the designer's multi-stall sample: a wheelchair accessible compartment in the corner, two standard and an ambulatory one along W1, two urinals with a screen on the entry wall, lavatories, mirrors and the towel and waste unit on W4. The codes you turn on are checked with their section numbers; the drawing set has the dimensioned plan, partition and mounting elevations, the blocking plan for the GC, details and schedules, and the buy list goes to the BidRidge quote. The Locker room sample adds transfer and roll-in showers and a dressing compartment, and Sheets for: Submittal set makes the architect's review set. Commercial tier.

In the designer, tap Open project and pick the sample file. It opens exactly as in the video.

Narrated walkthrough, 2:00. Captions on.

The sample in numbers

  • Compartments
    4
    accessible, 2 standard, ambulatory
  • Accessories
    25
    12 tags, TA-1 to TA-12
  • Checks
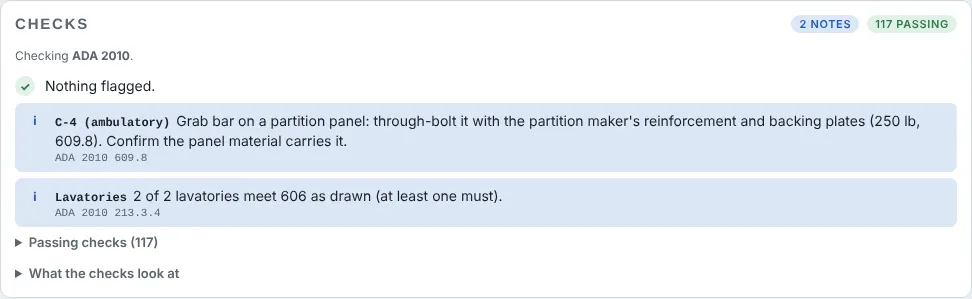
    117
    passing under ADA 2010; 0 flagged
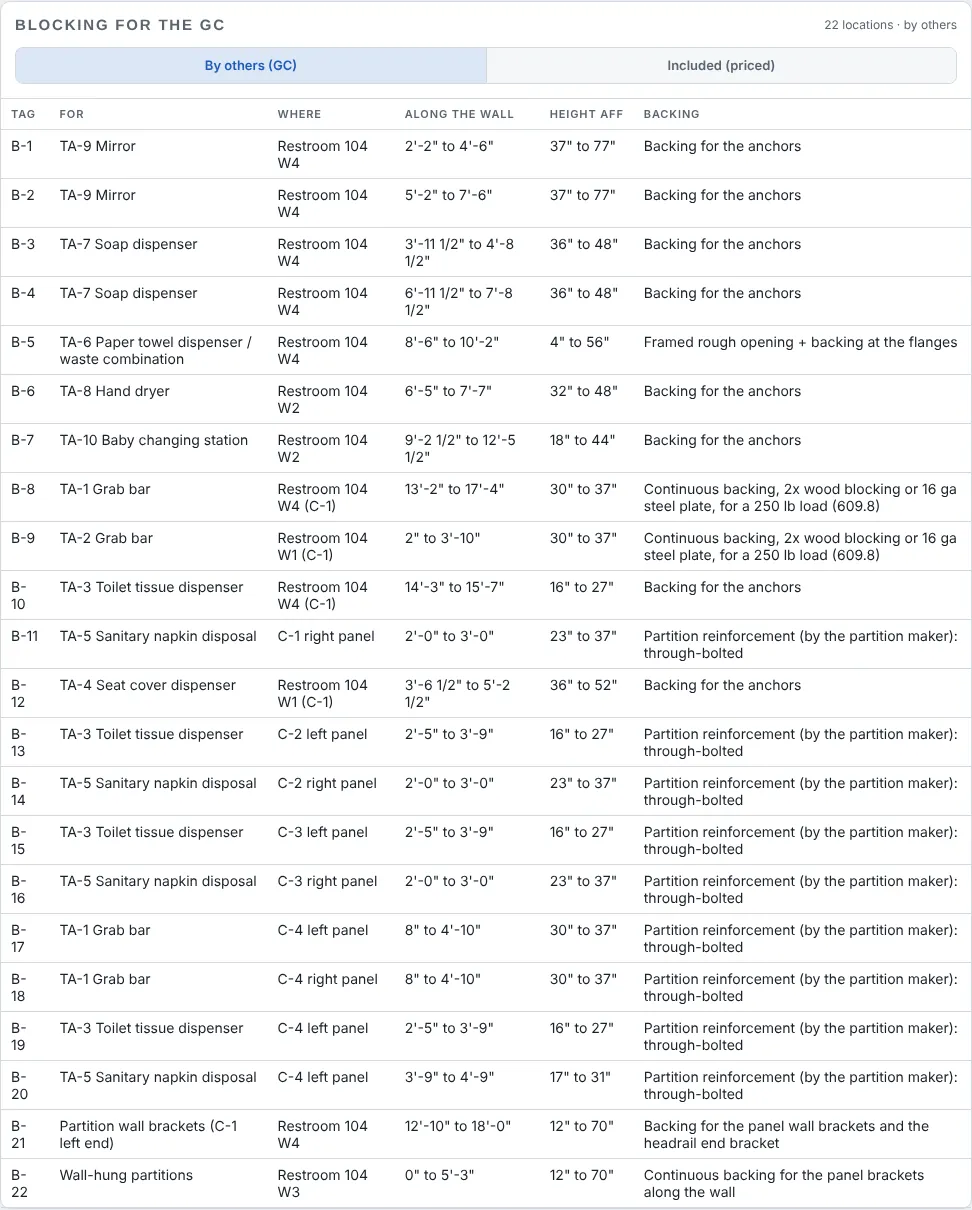
  • Blocking
    22
    locations for the GC
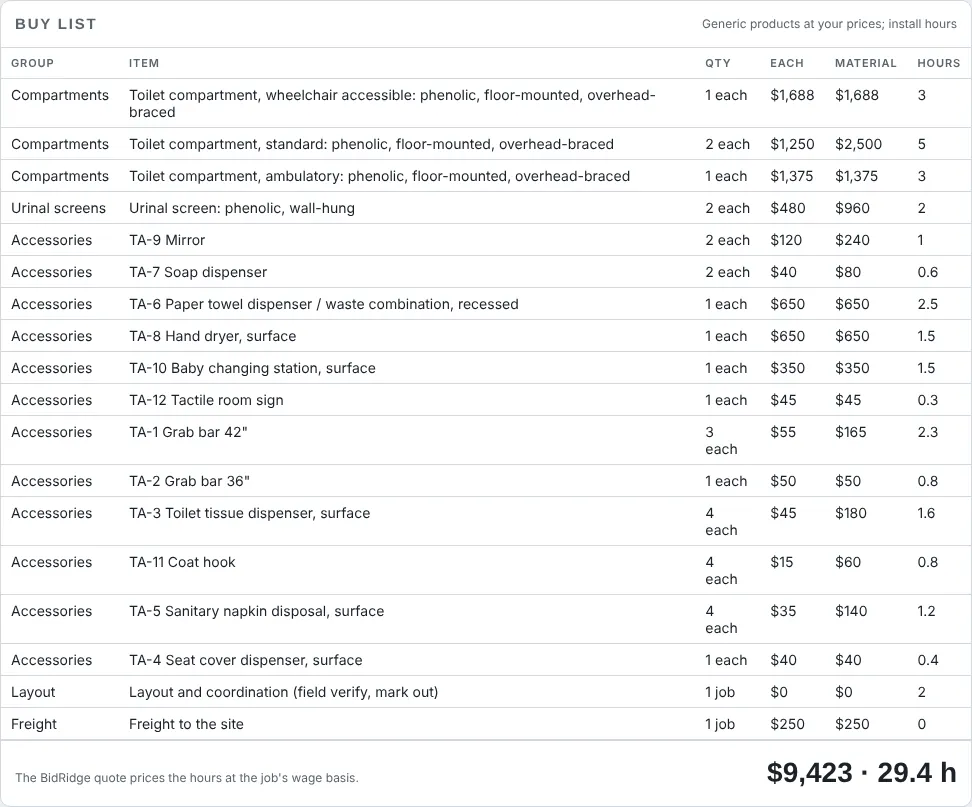
  • Buy list
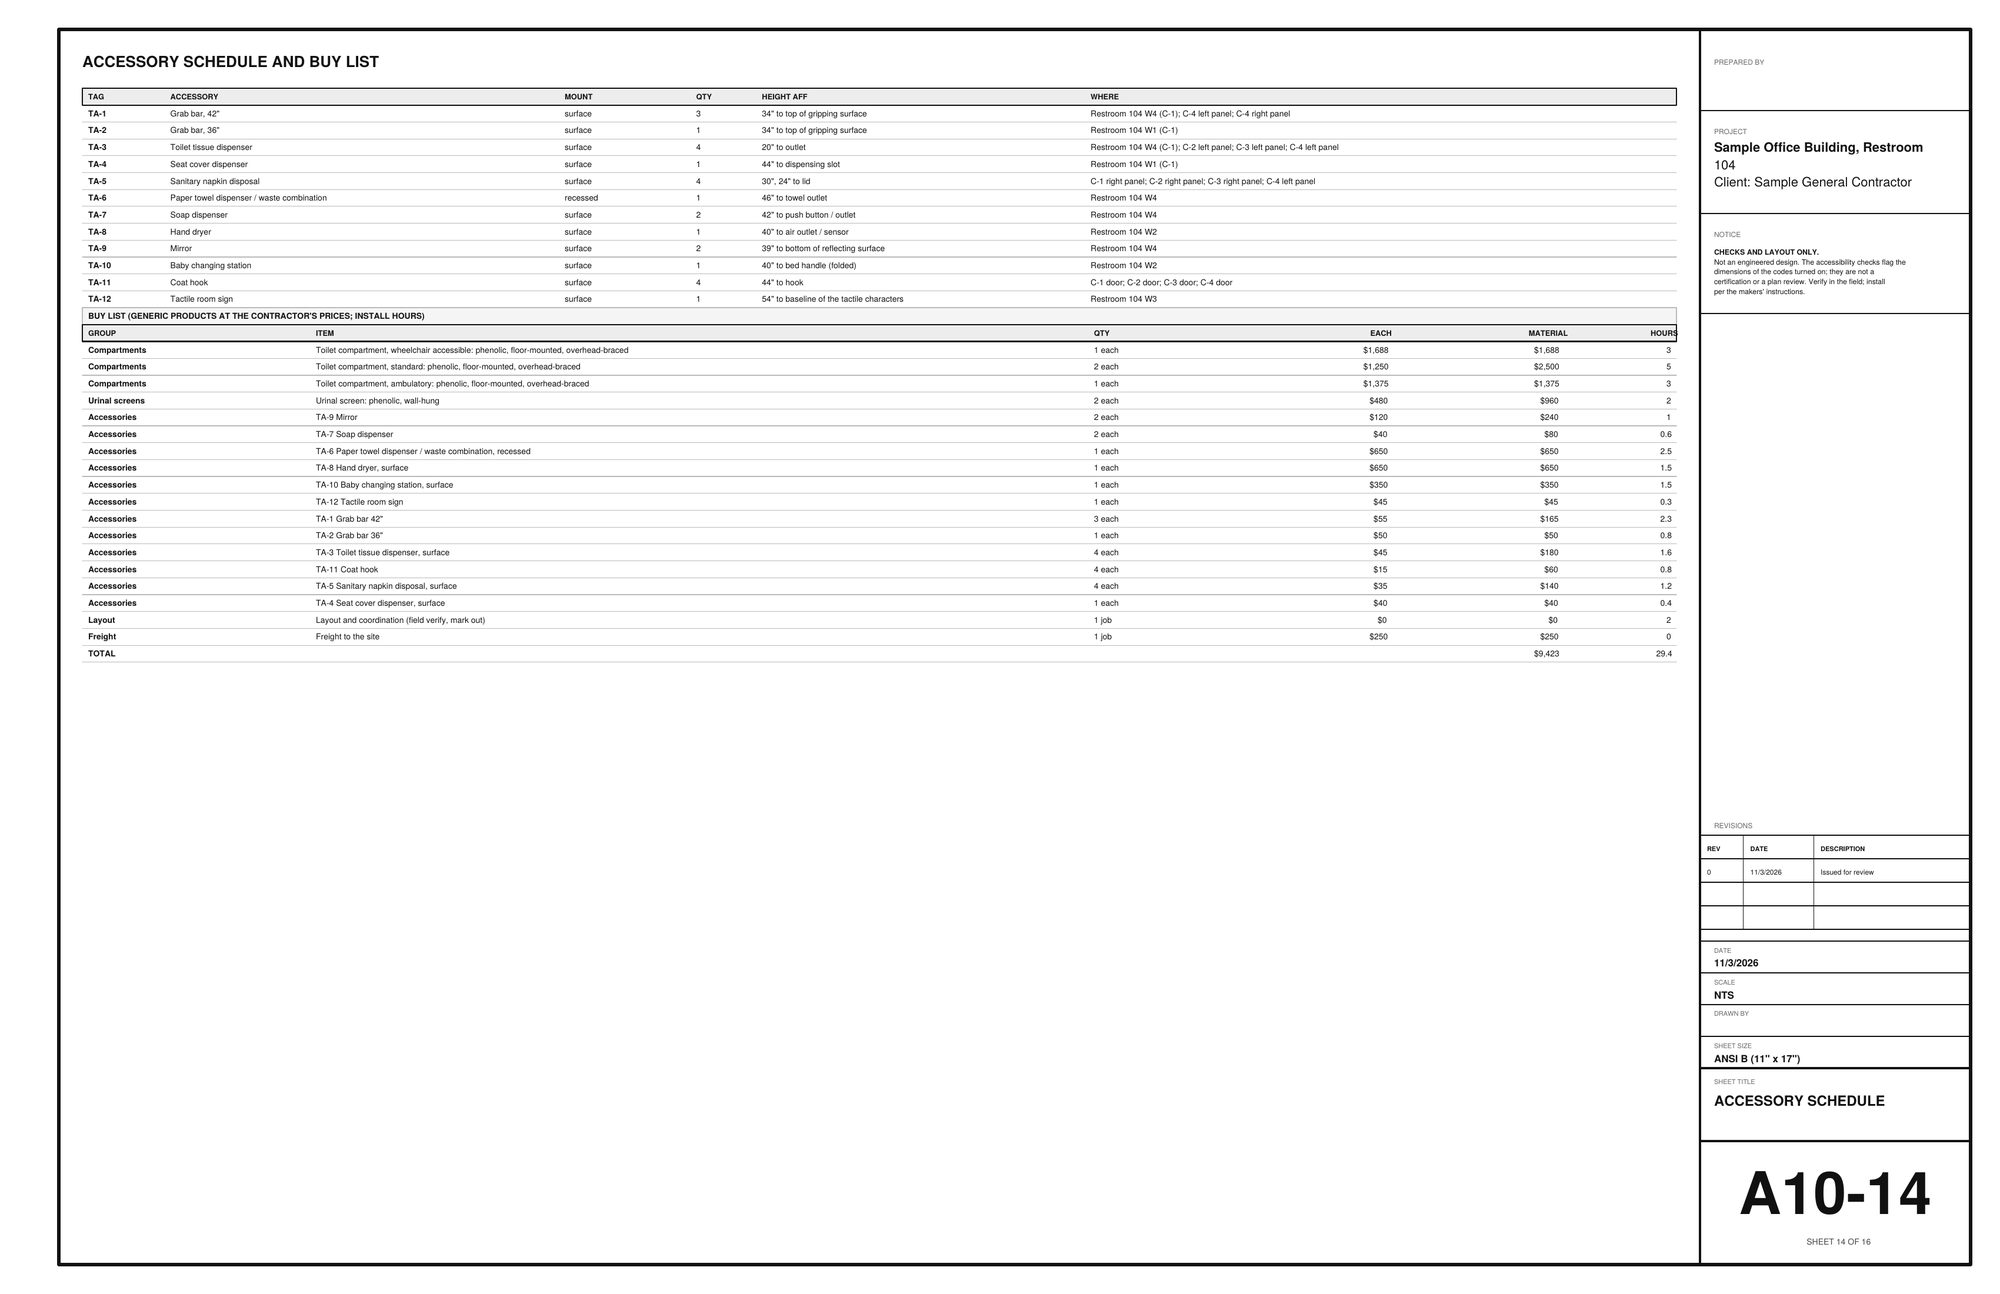
    $9,423
    29.4 install hours, your prices

Step by step

Step 1: Start from the multi-stall sample in the Division 10 Designer

Step 1: Start from the multi-stall sample

Open the Division 10 Designer and tap New design, then Multi-stall restroom. The room is drawn with Room (corners, or drag a rectangle) and its walls are W1, W2, W3 and W4 in the order drawn. Compartments, urinals, lavatories, water closets, the door and every accessory sit on a wall, so they move with it.

Field tip: The sample's names and sizes are made up. Everything stays editable.
Step 2: Lay out the compartments in the Division 10 Designer

Step 2: Lay out the compartments

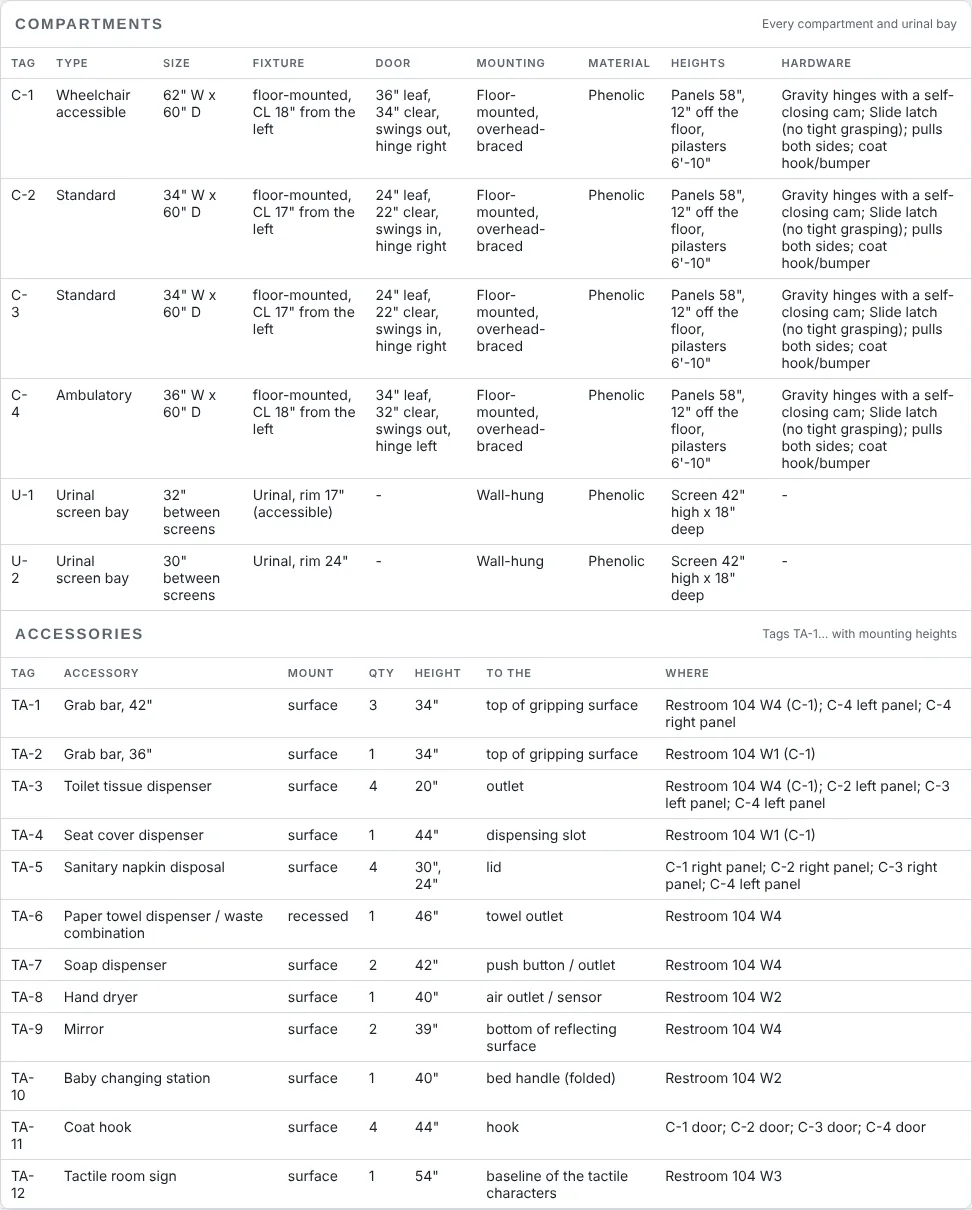
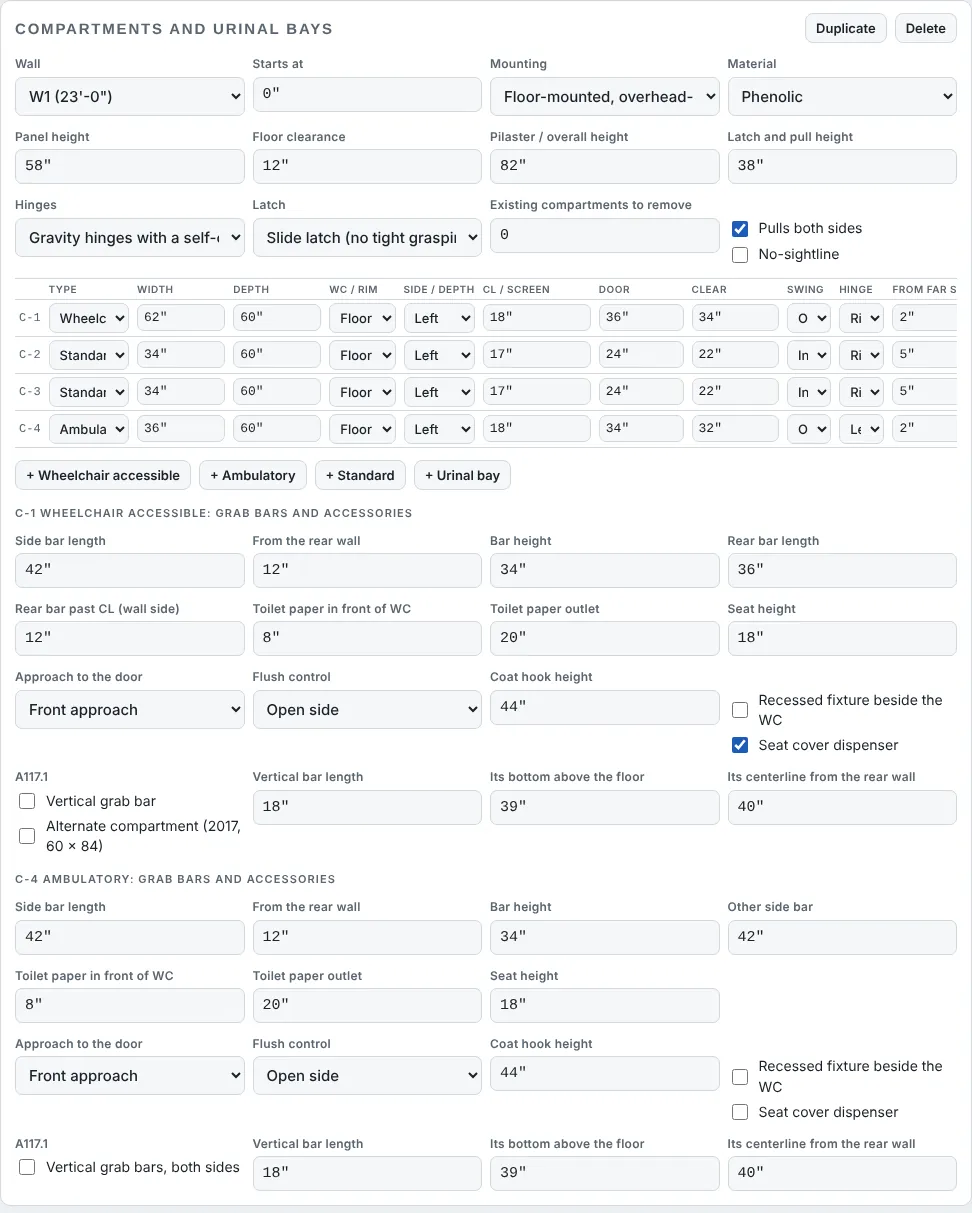
Tap the row of compartments. Each one has its type (standard, wheelchair accessible, ambulatory or a urinal bay), its clear width and depth, the water closet (floor-mounted or wall-hung), its side and centerline, and the door: leaf, clear opening, swing in or out, hinge side and how far the opening is from the far side. The row has the mounting, the material, the panel height, the floor clearance, the pilasters, hinges, latch and pulls.

Field tip: Solid plastic (HDPE) shows a note: many specs call for a fire-rated grade.

Step 3: Turn on the codes that apply in the Division 10 Designer

Step 3: Turn on the codes that apply

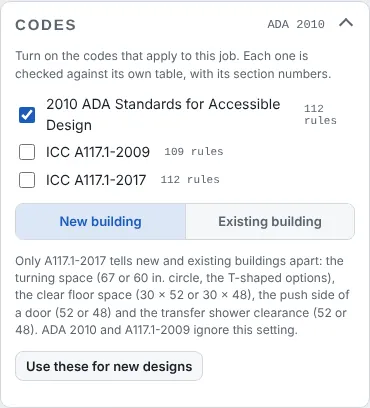
Codes, in the settings: turn on the codes the job is built to. Each code is its own table of dimensions with the section numbers of its official text; with several on, each failure names the code that fails it. Use these for new designs keeps your choice for the next design.

Field tip: ICC A117.1-2009 and A117.1-2017 have their own tables too. A117.1-2017 sets some sizes differently for new and existing buildings, so pick New building or Existing building under the codes.

Step 4: A flag names its section in the Division 10 Designer

Step 4: A flag names its section

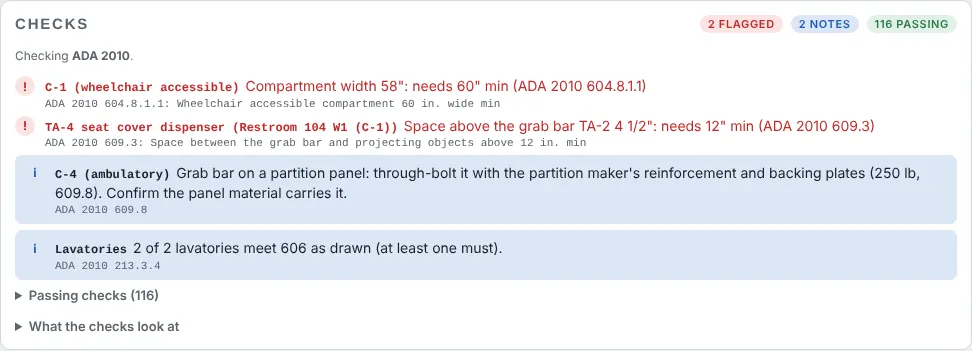
Narrow the accessible compartment to 58 in. and the Checks panel flags it: needs 60 in. min, ADA 2010 604.8.1.1. The seat cover dispenser now sits over the rear grab bar and is flagged too (609.3: 12 in. above a grab bar). Put it back to 62 in. and both clear.

Field tip: Checks and flags, not a certification: the building department and the project documents govern.

Step 5: What is checked in the Division 10 Designer

Step 5: What is checked

Compartment size by water closet type, the centerline, door clear width, location, self-closing hinges and pulls, swing into the minimum area, the floor outside the door, toe clearance with its size exceptions, grab bars and toilet paper; the turning circle, lavatory and urinal clear floor spaces, door swings, reach ranges, mirrors, protruding objects and the tactile sign.

Step 6: Schedules with mounting heights in the Division 10 Designer

Step 6: Schedules with mounting heights

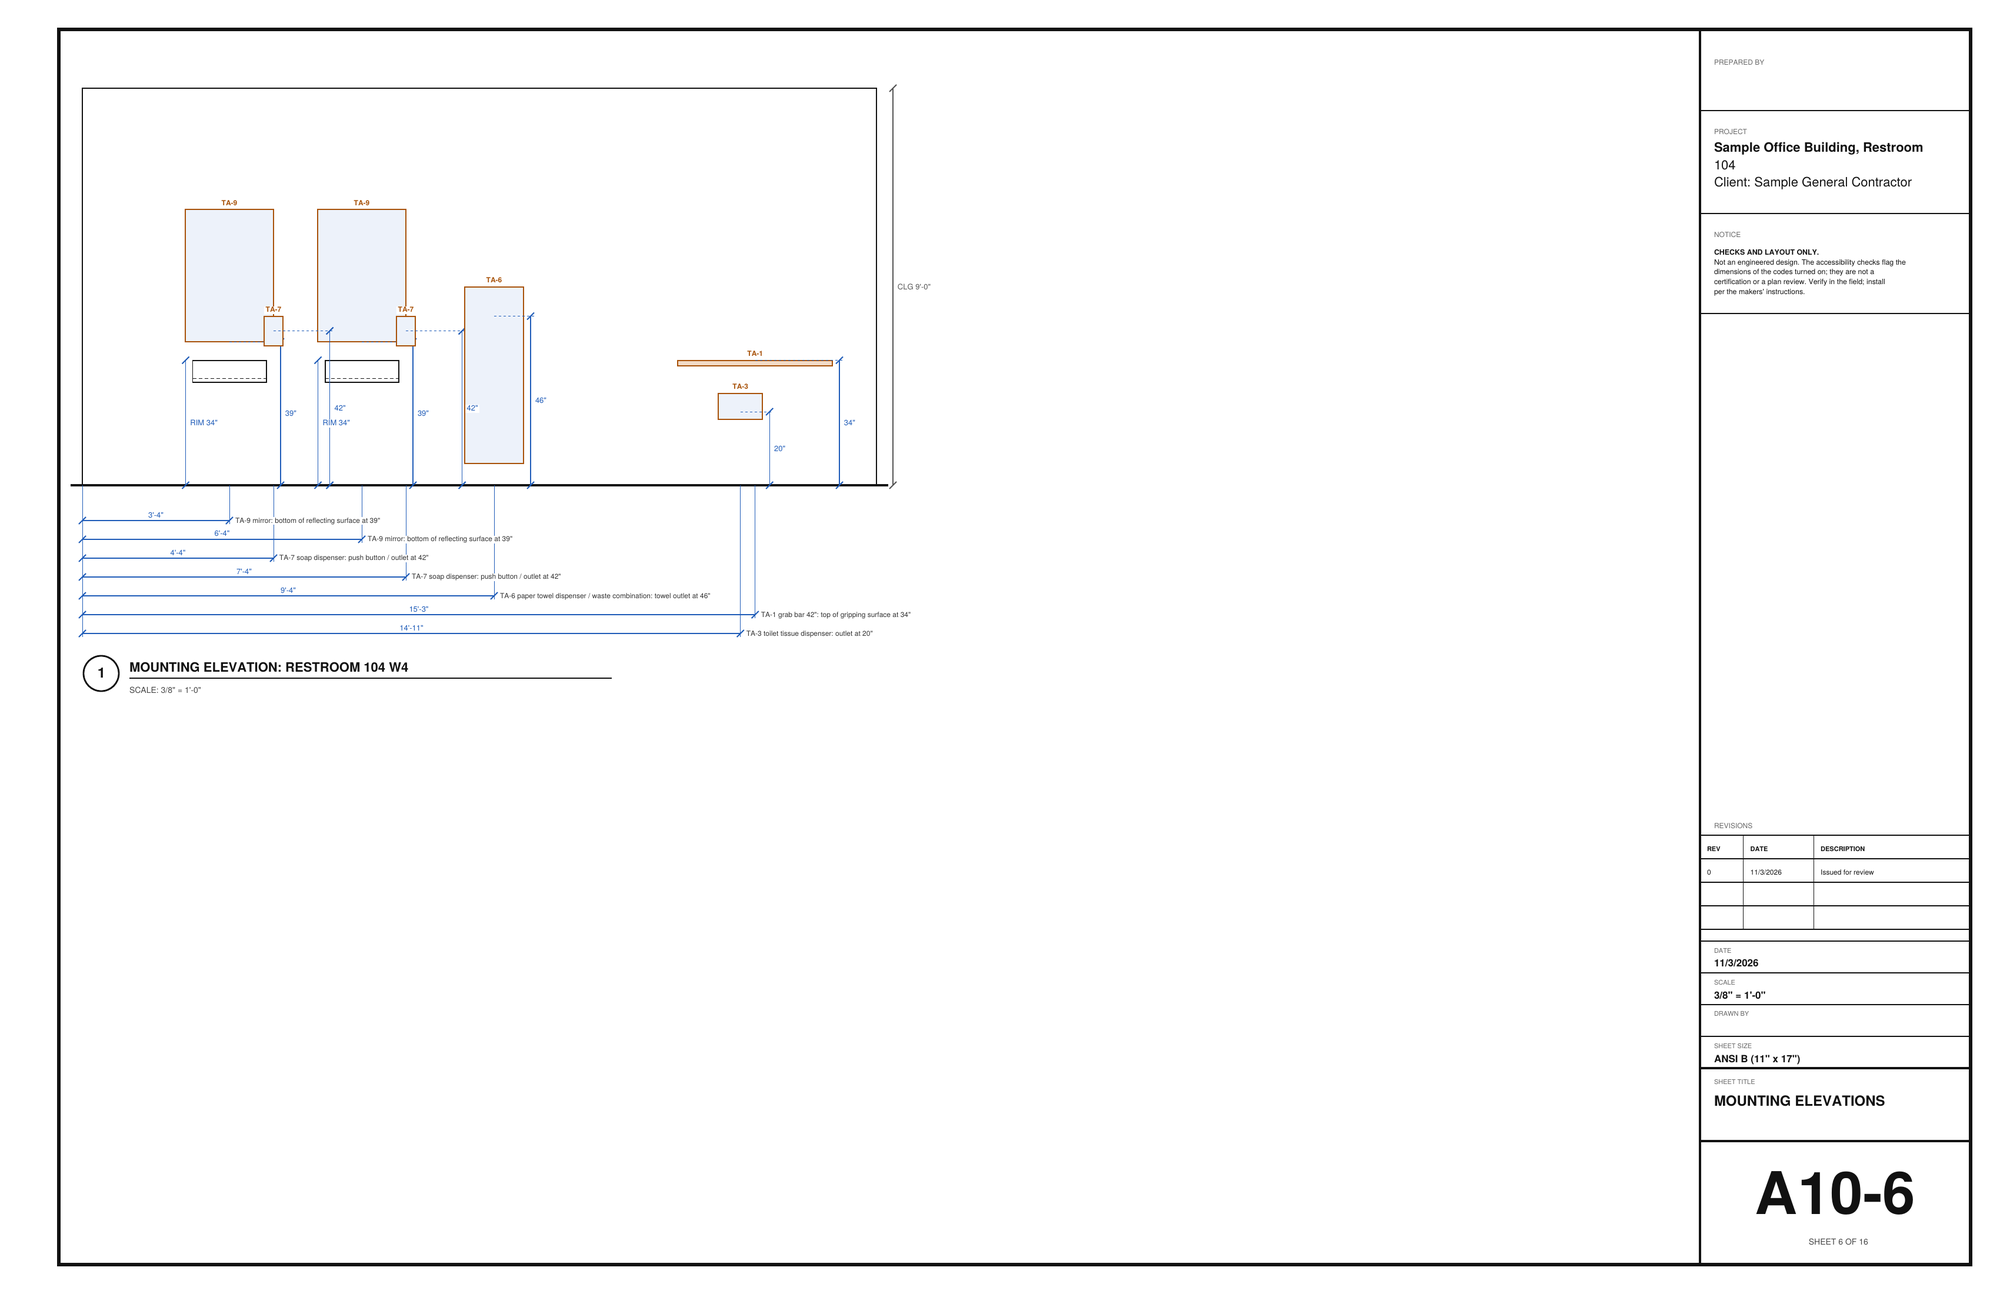
The compartment schedule lists every compartment and urinal bay; the accessory schedule tags each product TA-1, TA-2... with its mounting height and what the height is measured to (the top of the gripping surface, the outlet, the bottom of the mirror).

Step 7: The blocking plan for the GC in the Division 10 Designer

Step 7: The blocking plan for the GC

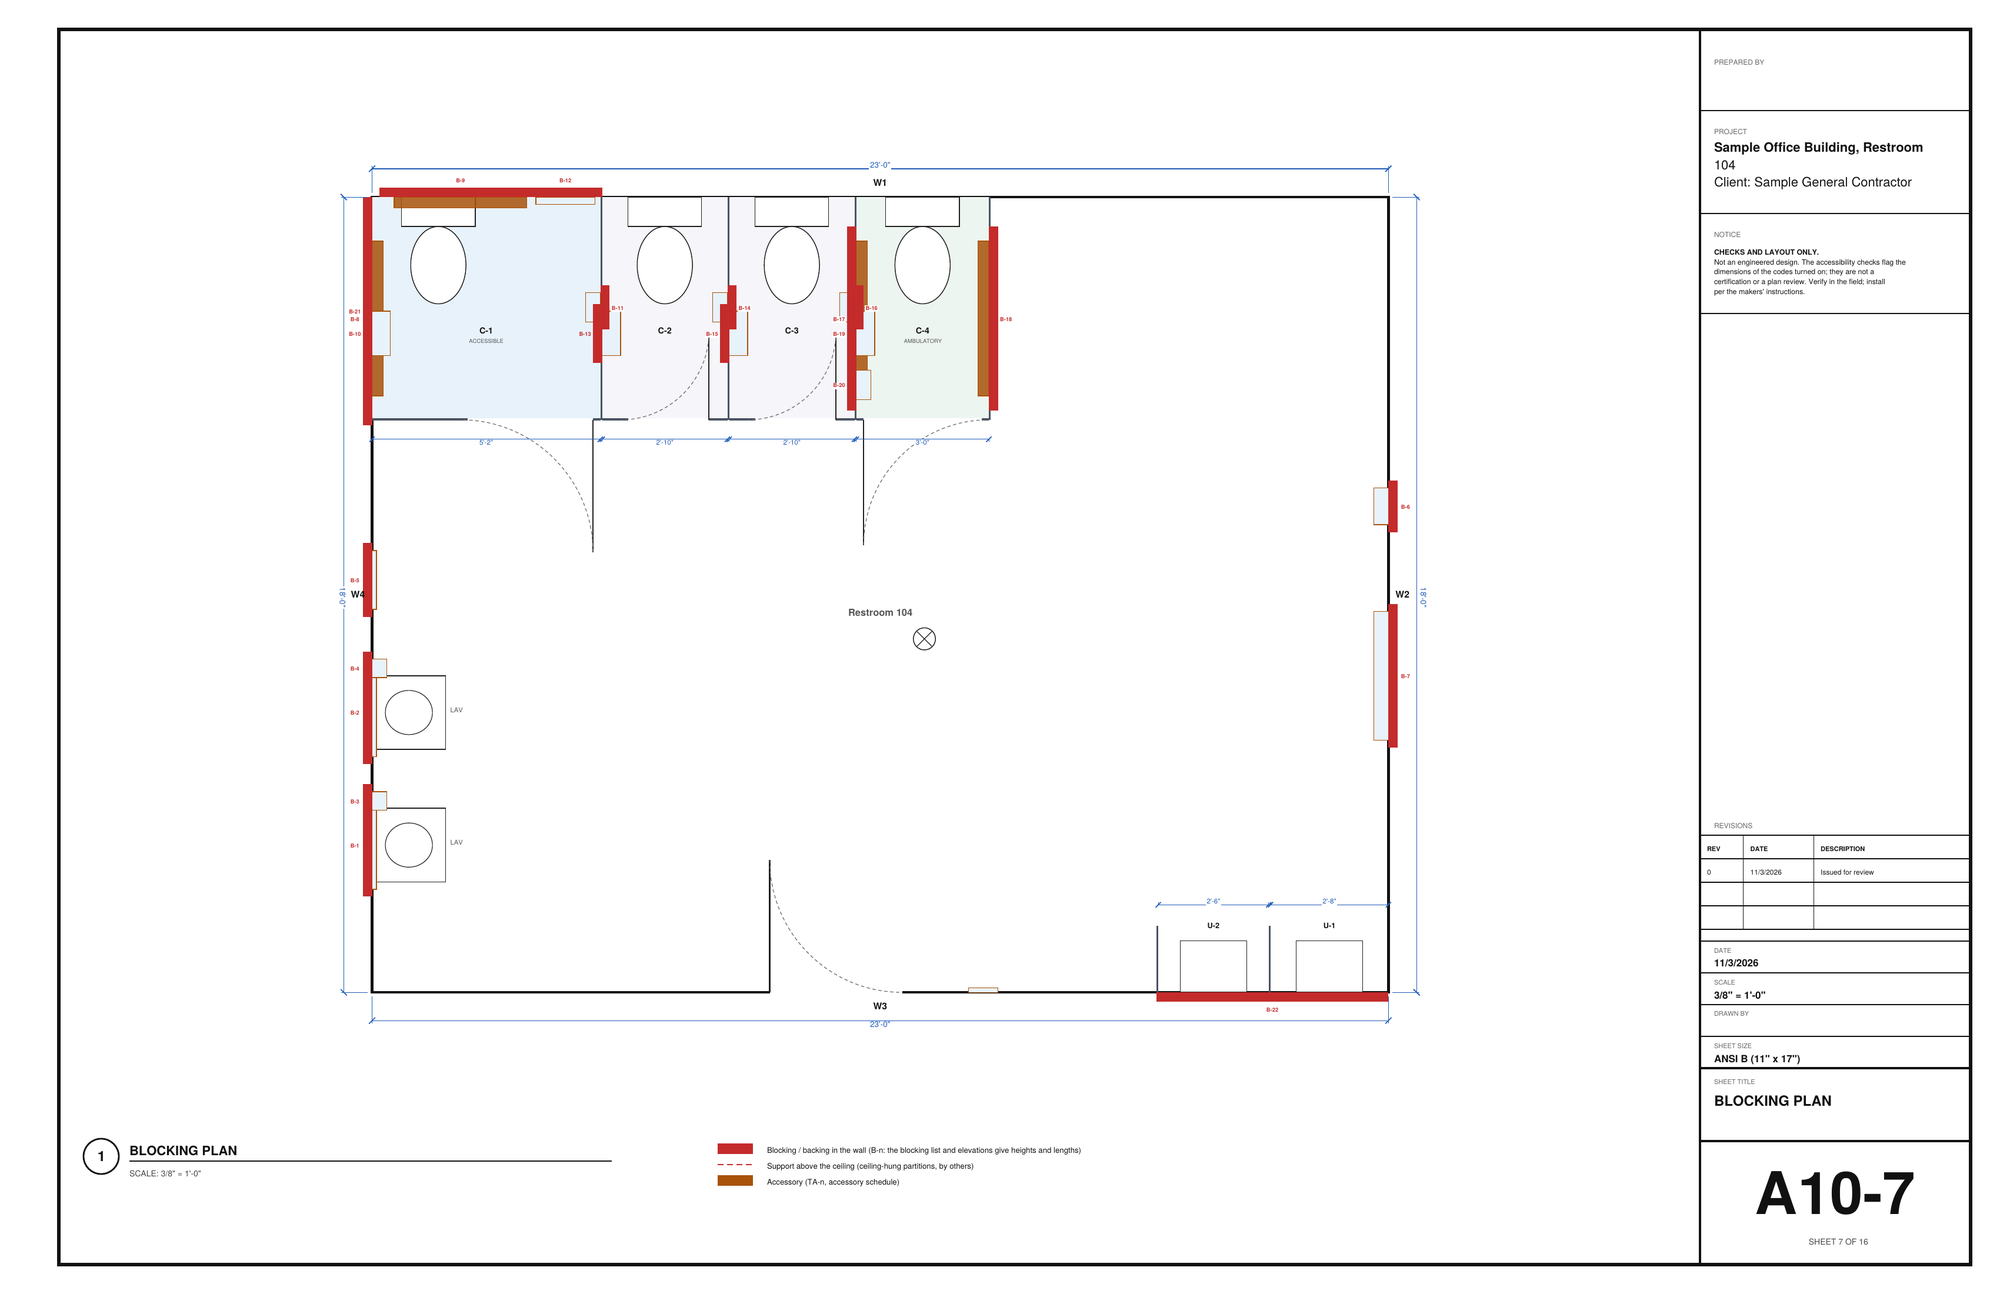
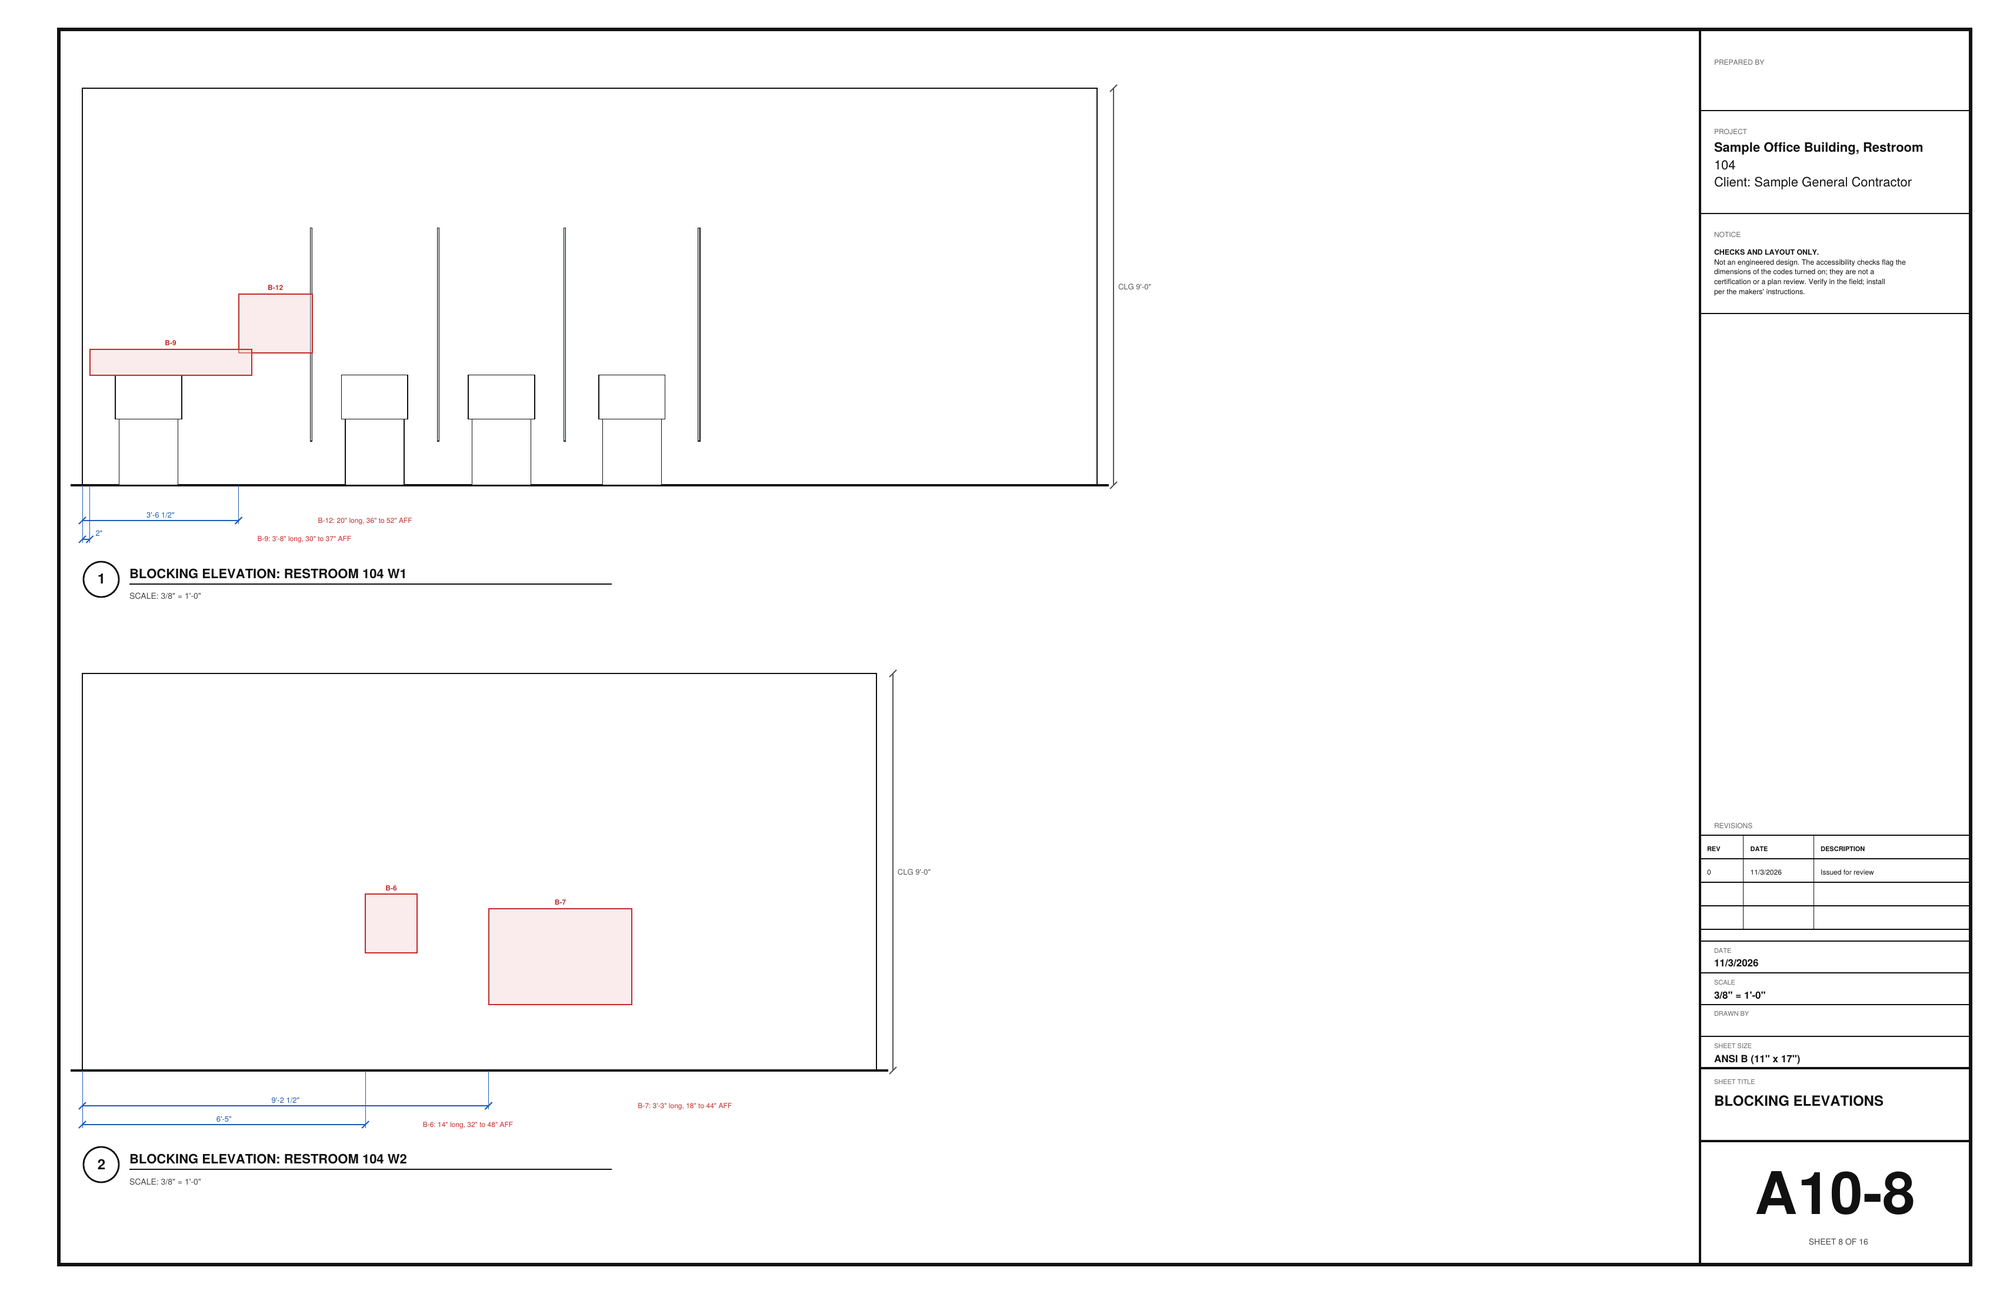
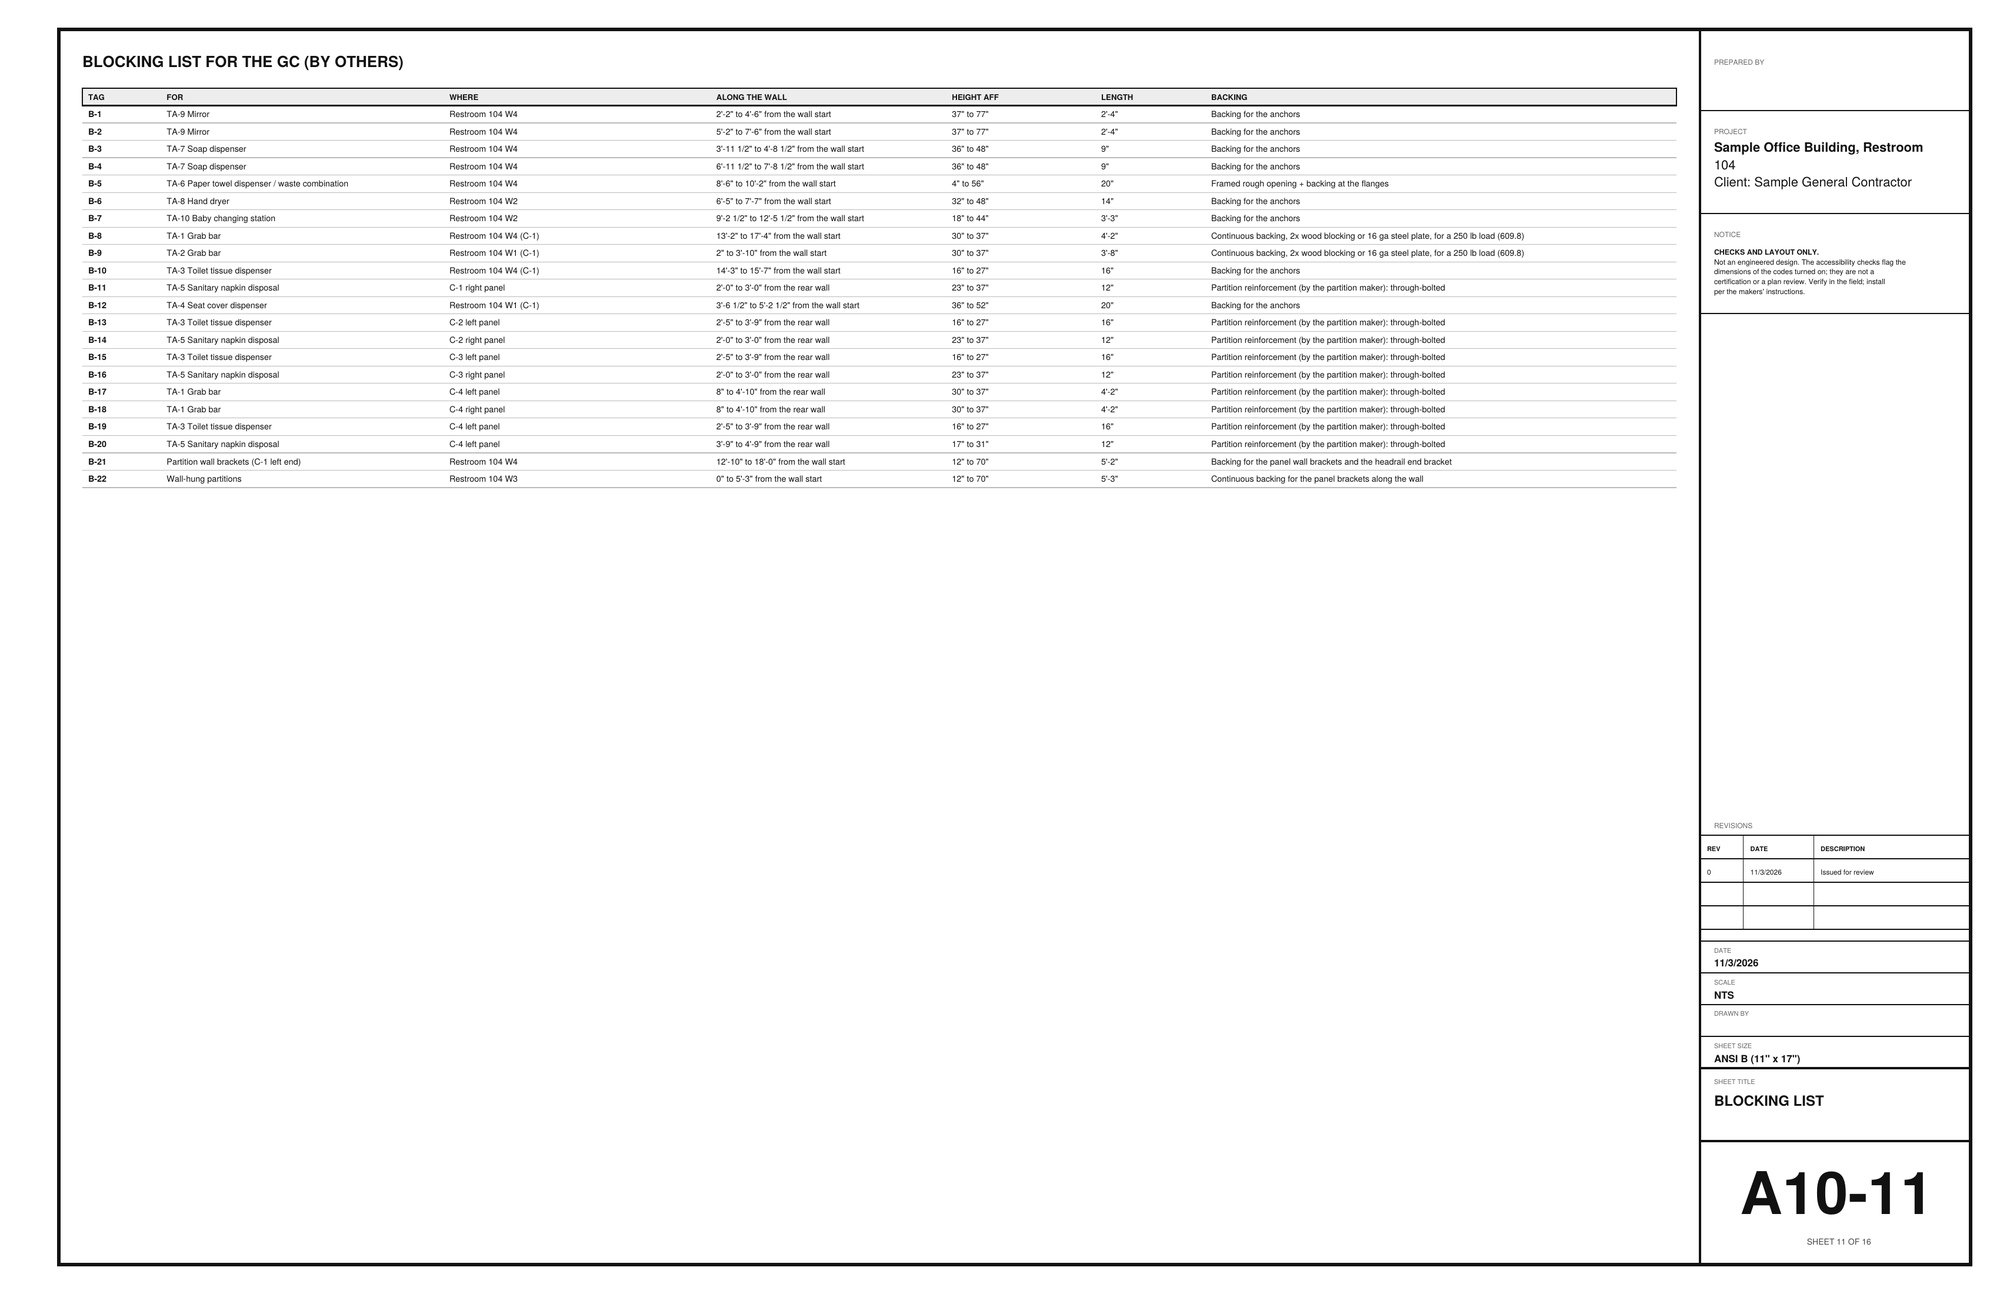
Every grab bar and wall-mounted accessory gets its backing: height above the floor, length and location along the wall, and what to put in. By others (the default) sends it to the GC on the blocking plan; Included prices it.

Step 8: Buy list and the quote in the Division 10 Designer

Step 8: Buy list and the quote

Generic products at your prices with install hours. Save BidRidge template (or Open in BidRidge) sends every line to the Division 10 / Specialties trade: the quote's material is the buy list to the dollar, and the hours price at the job's wage basis.

Step 9: A single-user restroom in the Division 10 Designer

Step 9: A single-user restroom

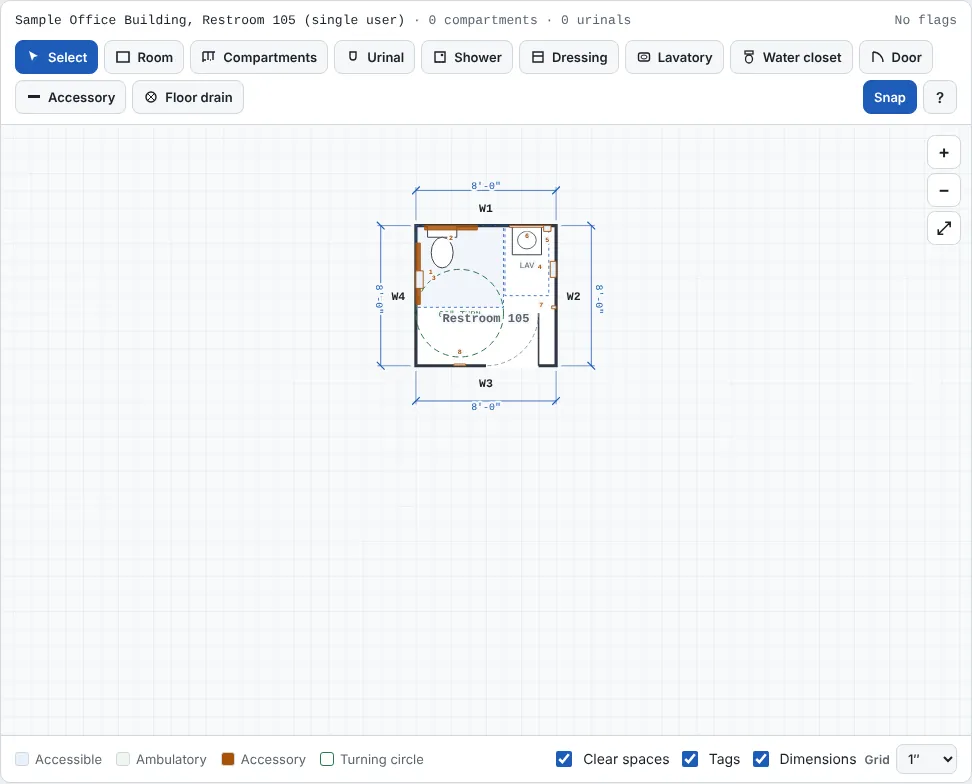
The Single-user restroom sample: the water closet 18 in. from the side wall with its 60 x 56 in. clearance, the side and rear grab bars, the lavatory outside the clearance, the door swing and the turning circle.

Step 10: Shower and dressing compartments in the Division 10 Designer

Step 10: Shower and dressing compartments

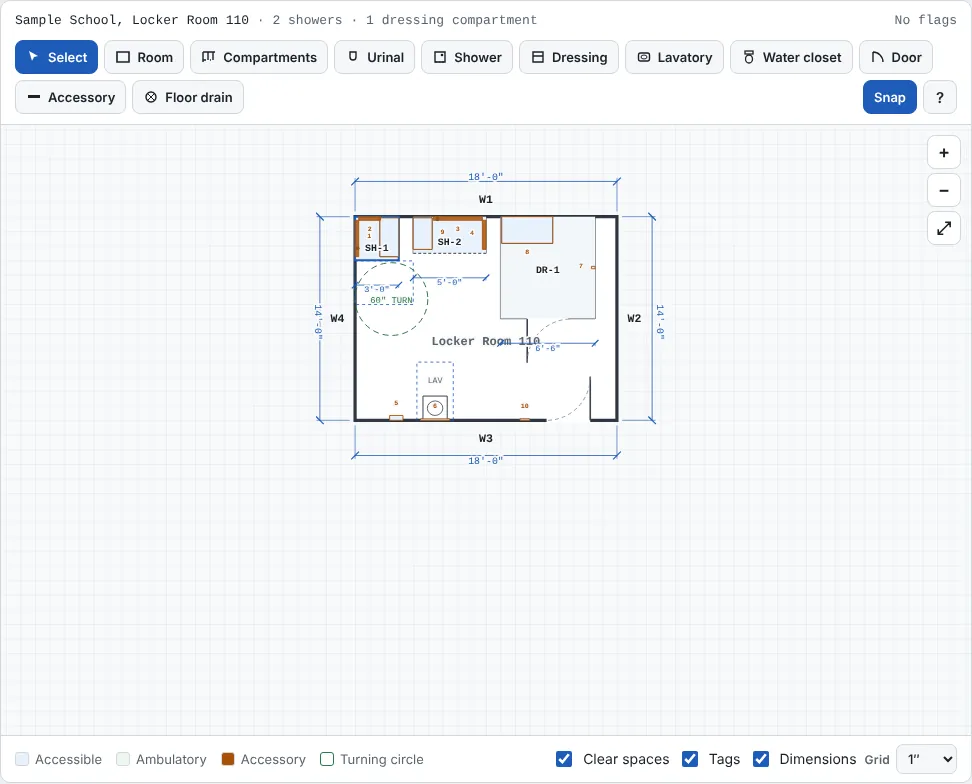
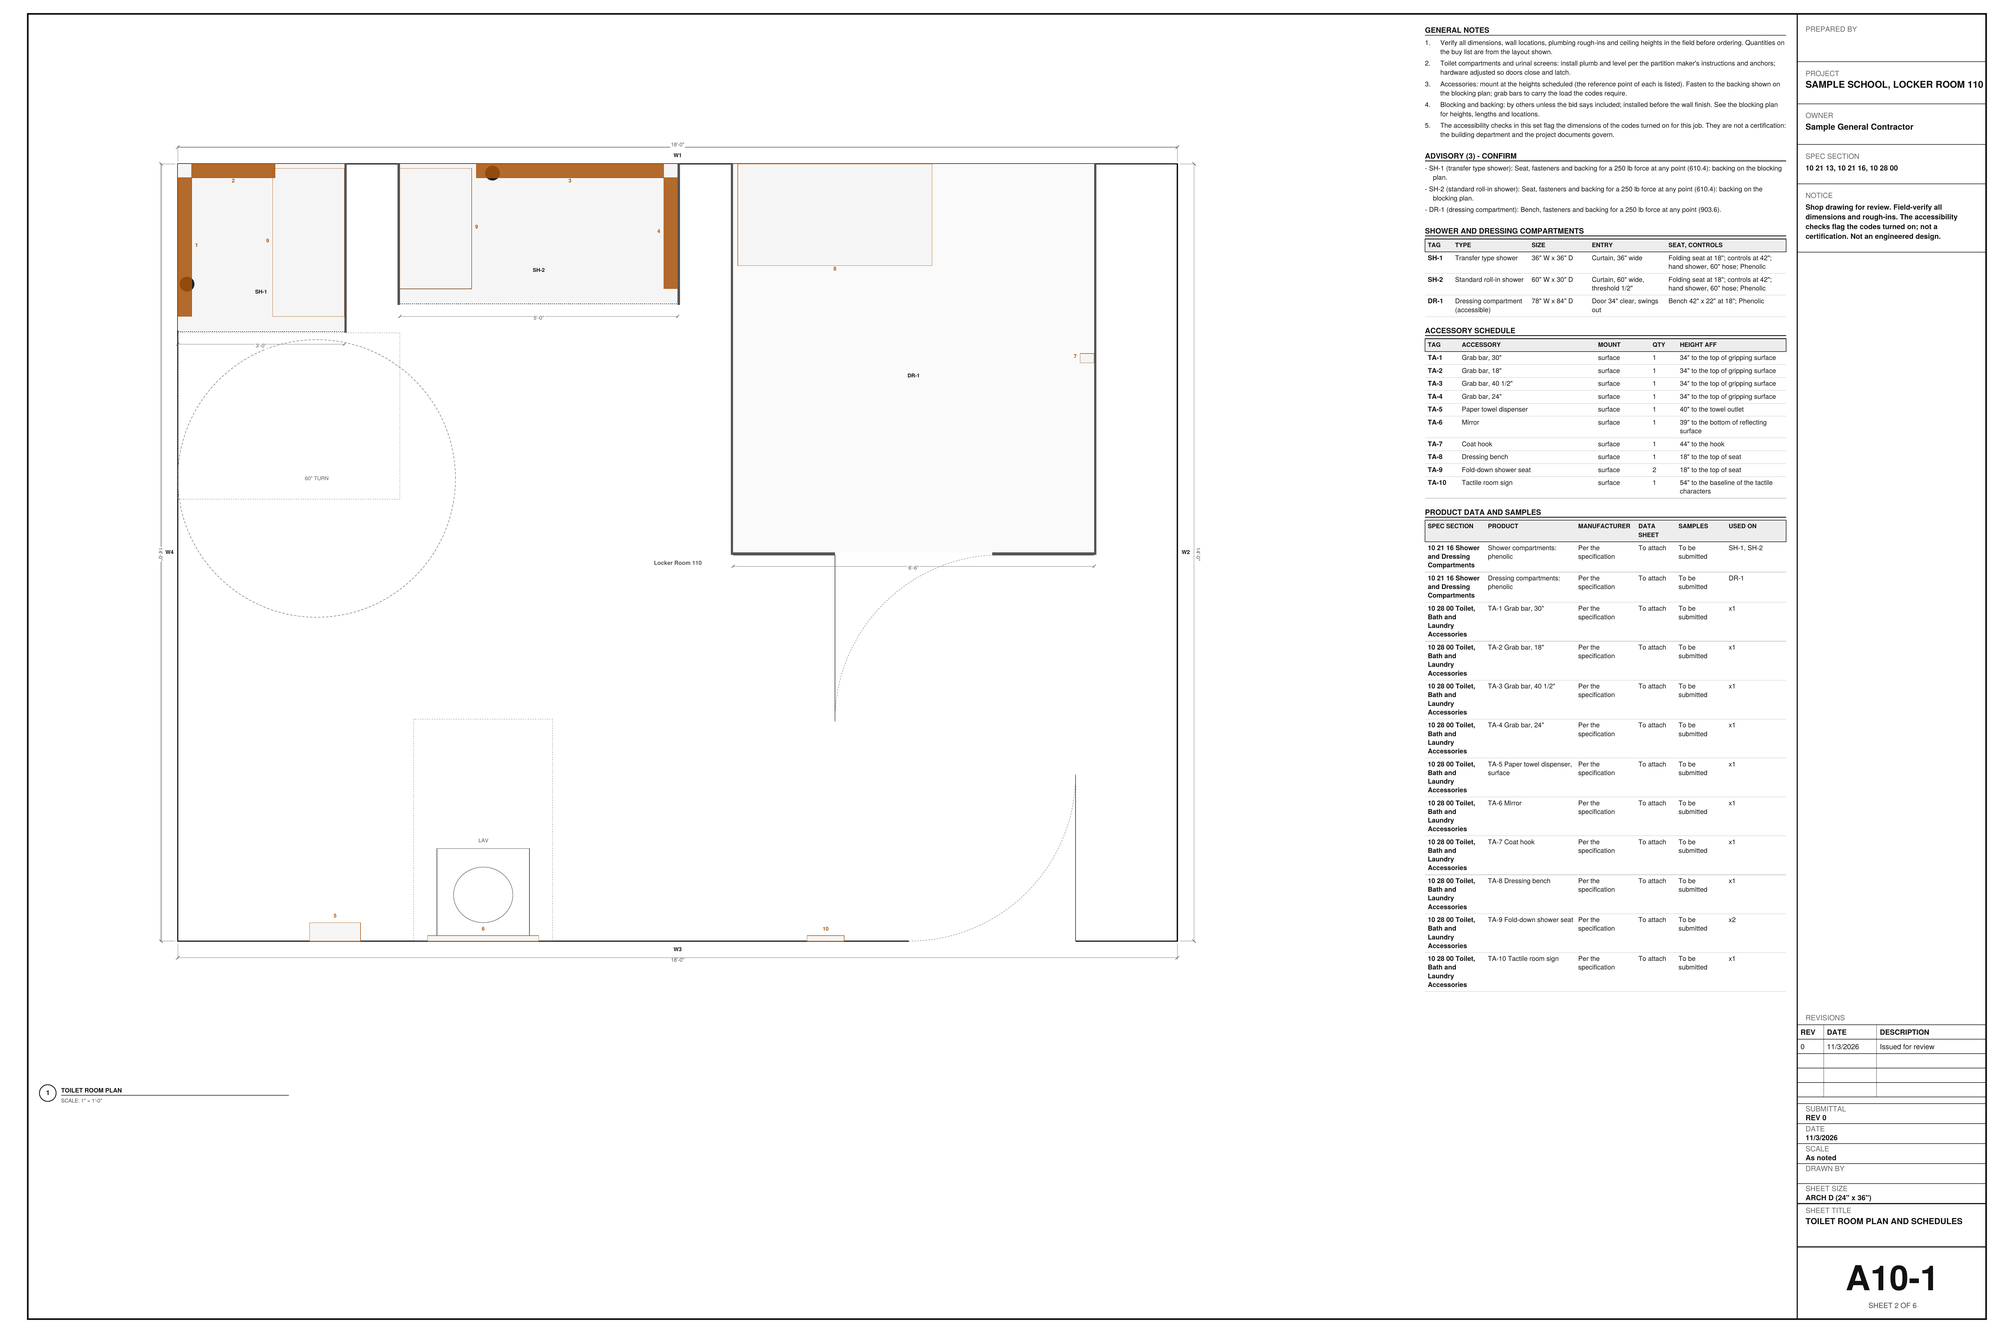
New design, then Locker room: a transfer type shower (36 x 36 in., its folding seat, the controls and a hand shower), a standard roll-in shower (60 x 30 in.) and a dressing compartment with its 42 in. bench. Shower and Dressing on the toolbar add more. They are checked against ADA 2010 608 (size, clearance, grab bars, controls, hand shower, thresholds), 610 (the seats), 803 (dressing rooms) and 903 (benches), each flag with its section, and they get their own schedule, interior elevations, backing and prices (the Showers group on the quote).

Field tip: The seat, its fasteners and the backing carry 250 lb (610.4): the backing goes on the blocking plan.

Step 11: The Submittal set in the Division 10 Designer

Step 11: The Submittal set

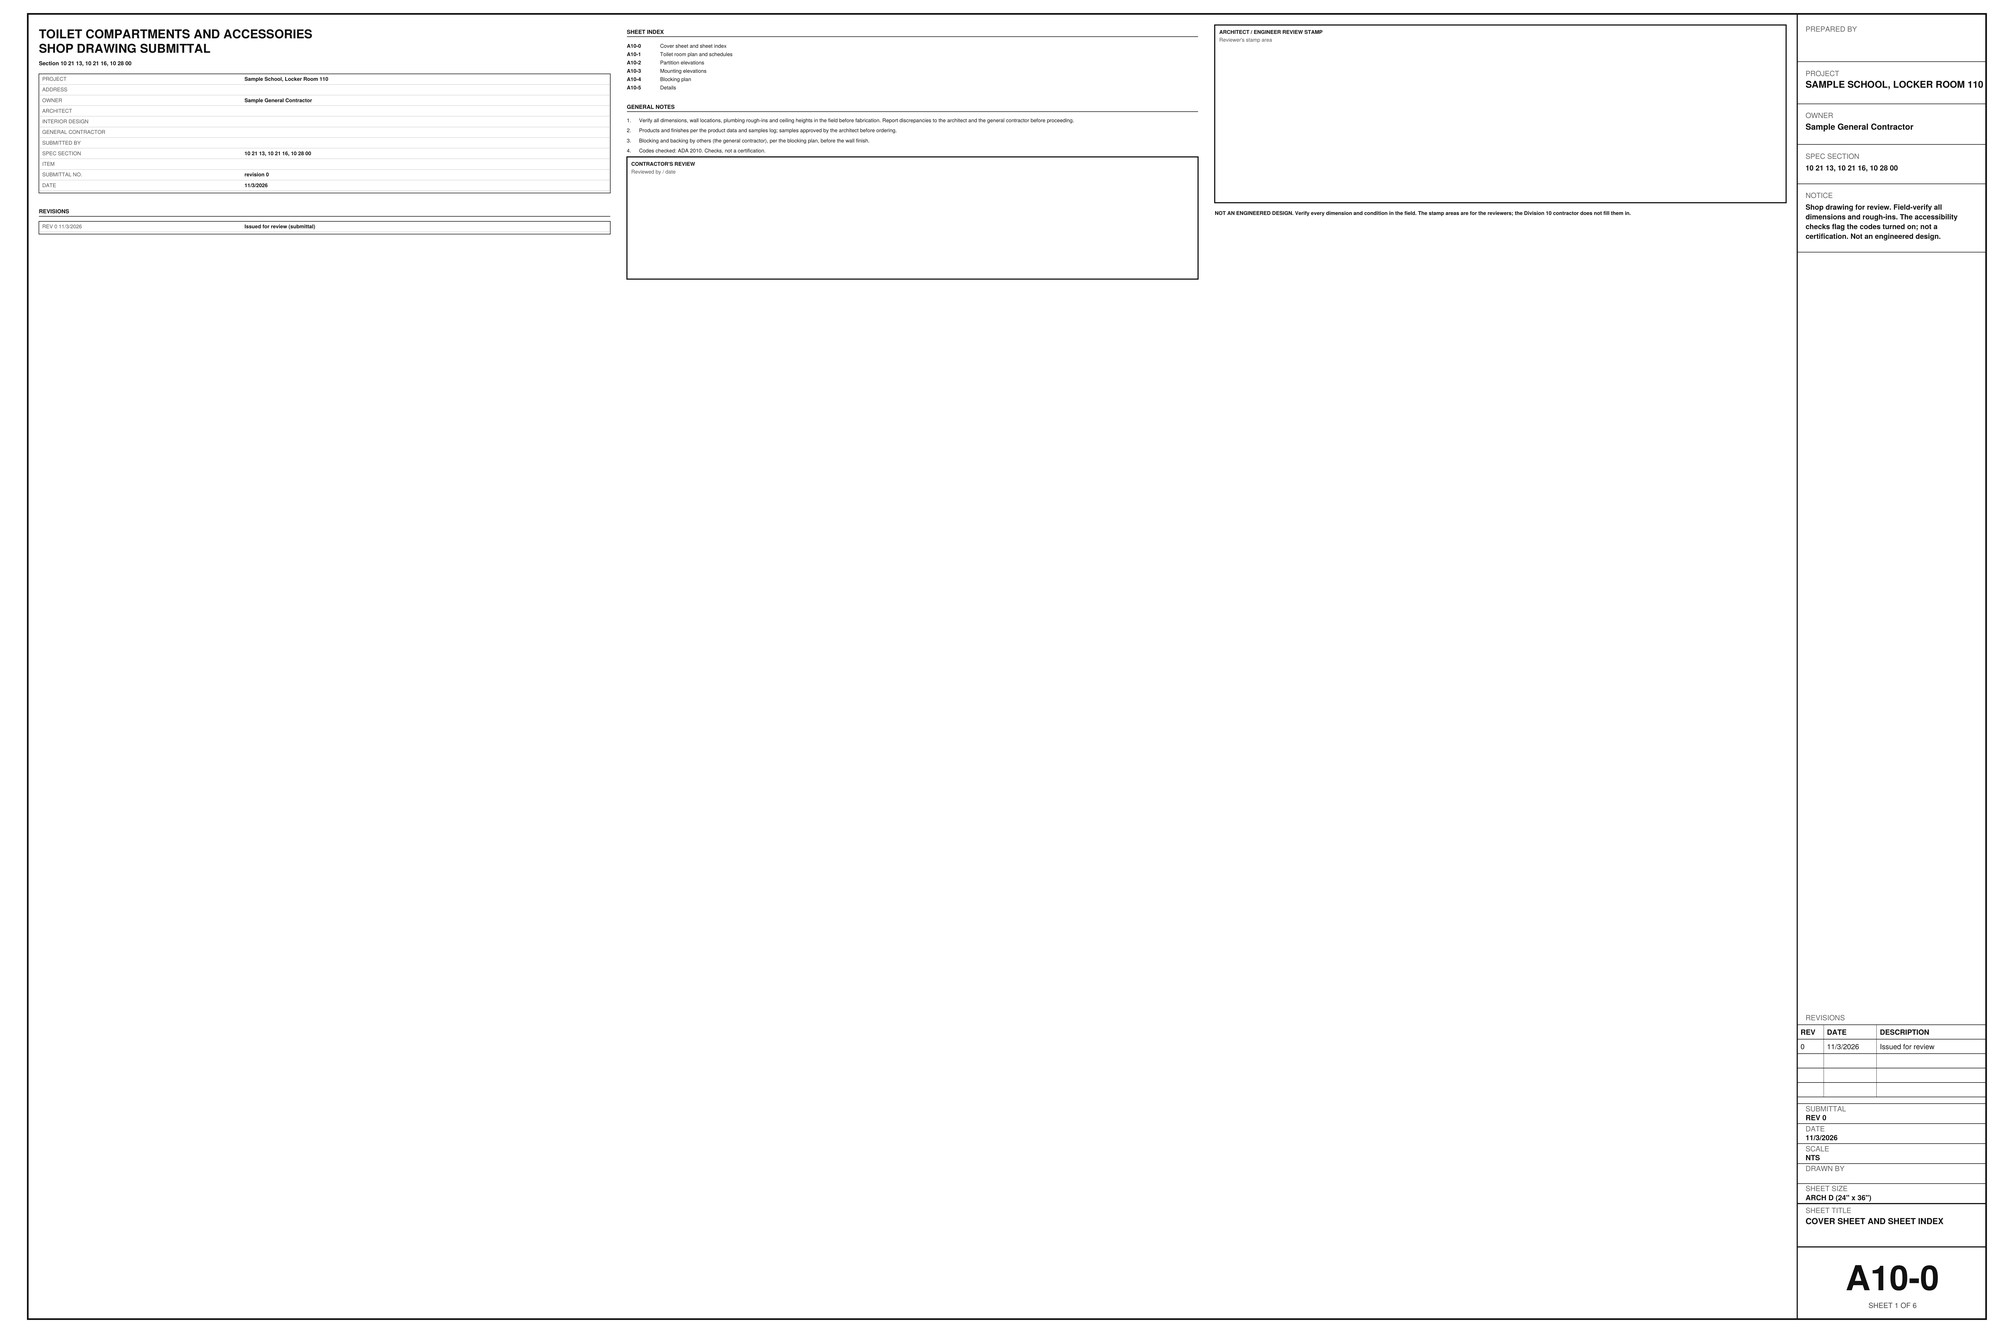
In the Drawing set, Sheets for: Submittal set (architect / GC review). Full set on the sheet size (ARCH D unless Arch C): a cover with the sheet index, the plan with notes and schedules, the product data and samples log by spec section (10 21 13, 10 21 16, 10 28 00), partition and mounting elevations, the blocking plan and details. Or 11x17 shop sheets: a cover, typical details, one sheet an item. Every text is 3/32 in. and the prices are the same as the drawing set's; the BidRidge template keeps the drawing set.

Field tip: Preview sheets shows the set before you save the PDF.

Step 12: Plan background: accessories where the architect drew them

Under Plan background, import the enlarged restroom plan and set its scale. Trace room makes the restroom from its outline. Then pick Accessory (or a compartment, lavatory or door) and tap the architect's mark: the tap snaps to the drawing, so the accessory lands at that spot along the wall and its mounting checks run as usual. While the plan shows, the room is drawn see-through so the marks stay visible; it is saved with the project and never prints. New in 1.63: on a vector PDF with the scale set, Suggest rooms outlines each room from the room names printed on the sheet and shows it for review; tap any you don't want, then Use adds the rest with their names. Scanned sheets are still traced by hand.

What you get

The drawing set, the lists and the files

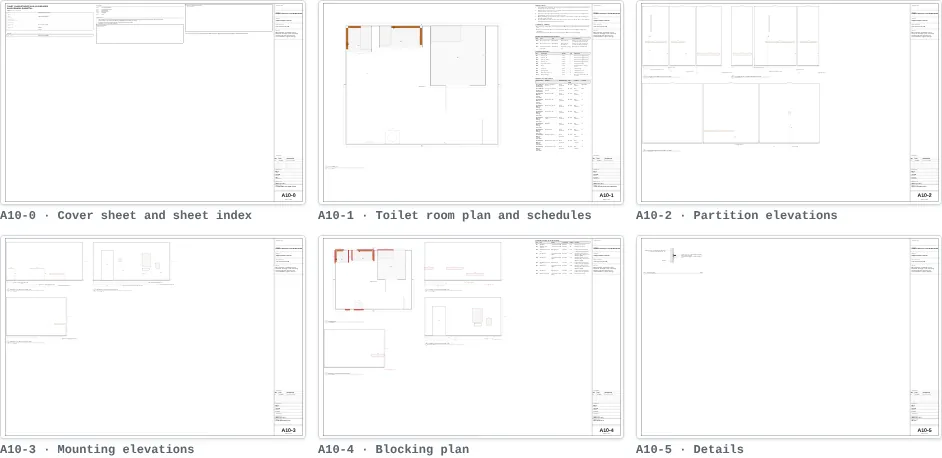
Real files from this sample, made by the designer. Tap a page to see it full size. Yours carry your company, the client and the address.

A10-1 Toilet room plan: compartments, swings, the turning circle and clear spaces
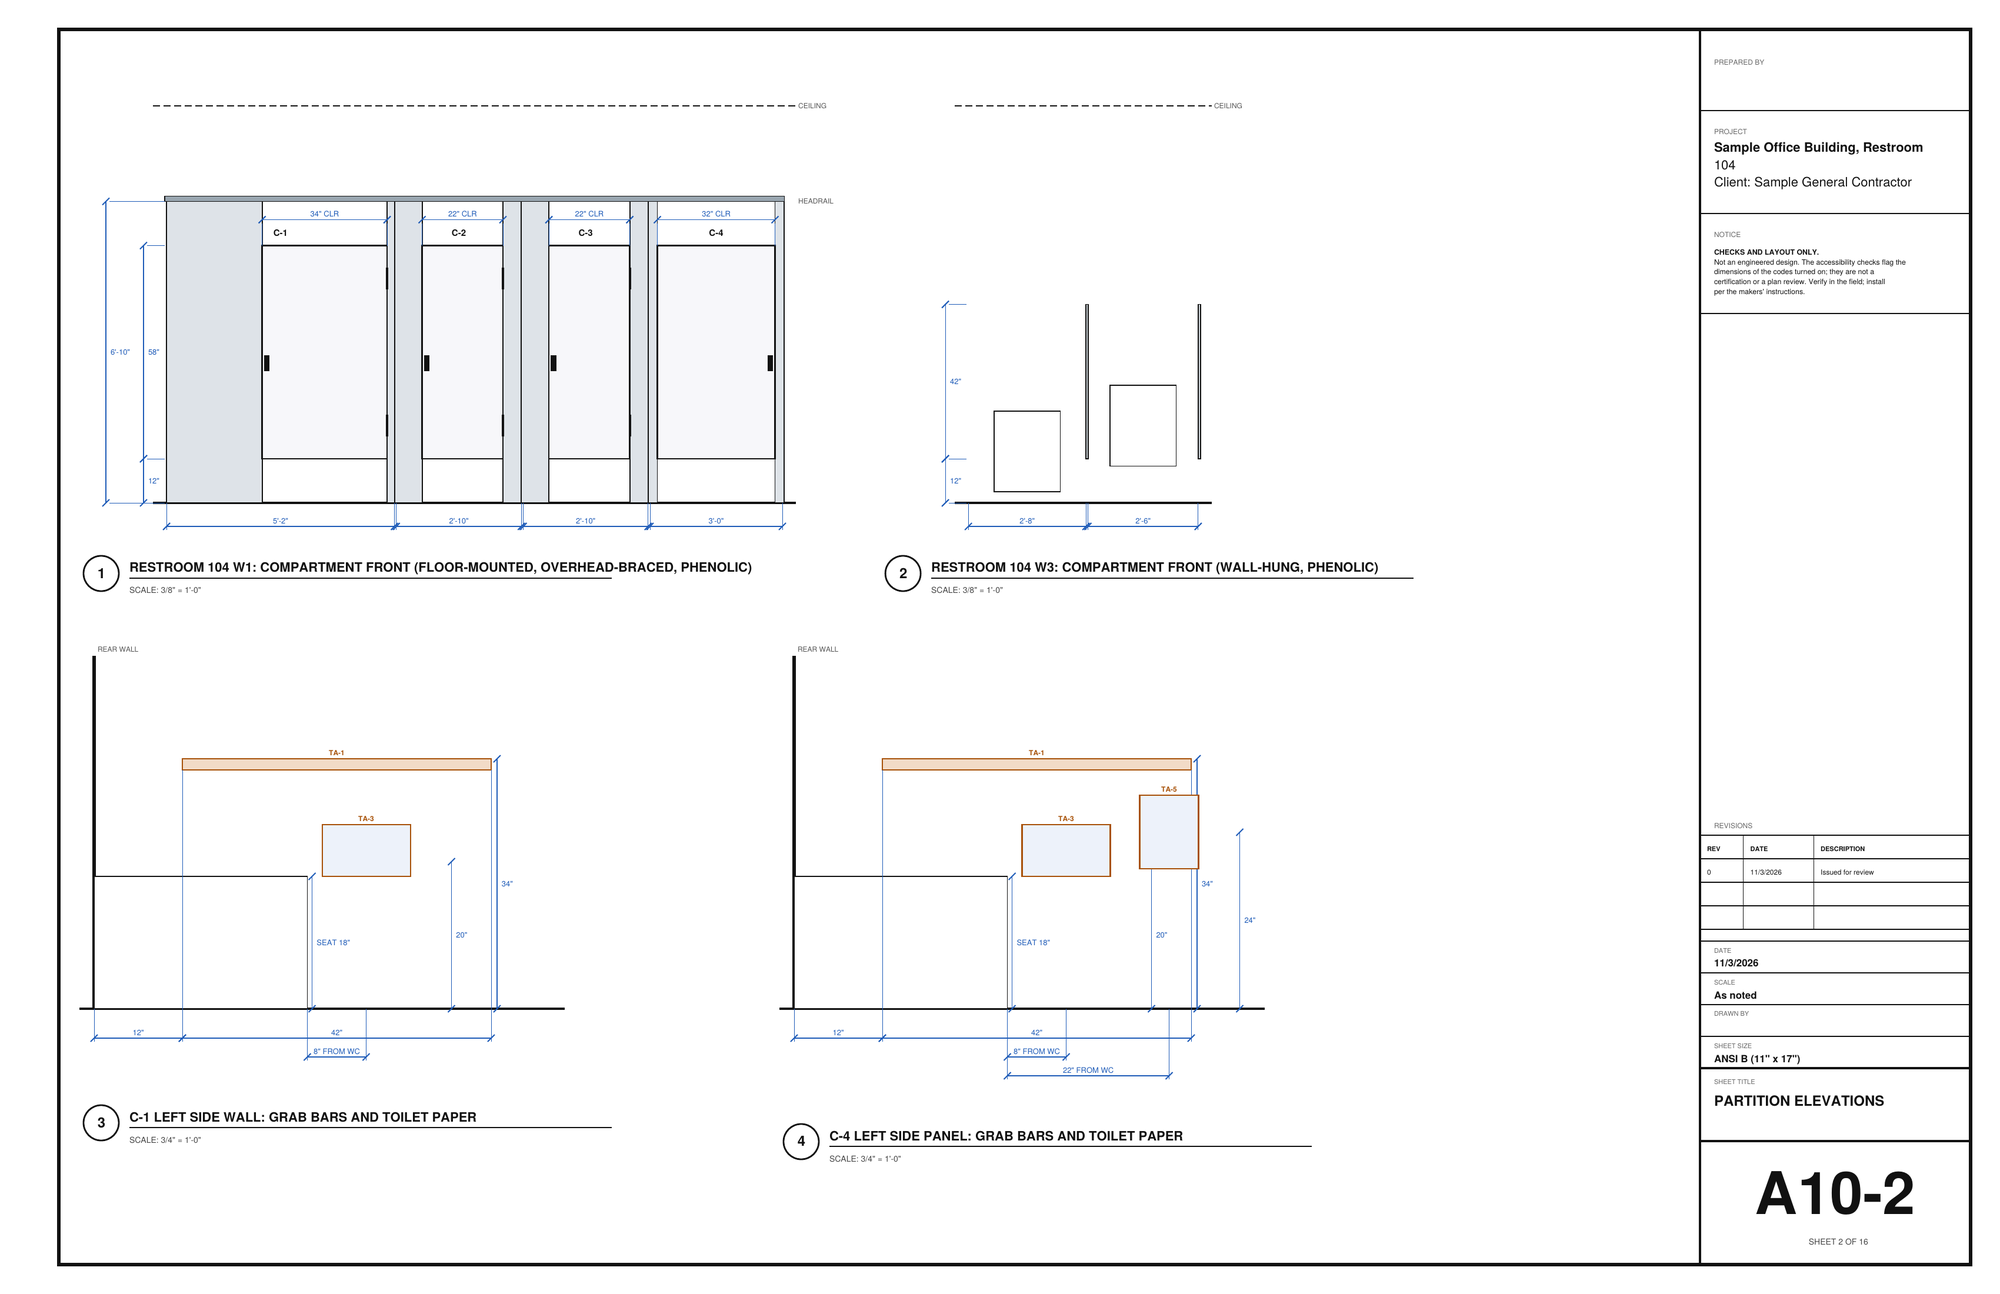
A10-2 Partition elevations and the grab-bar sides
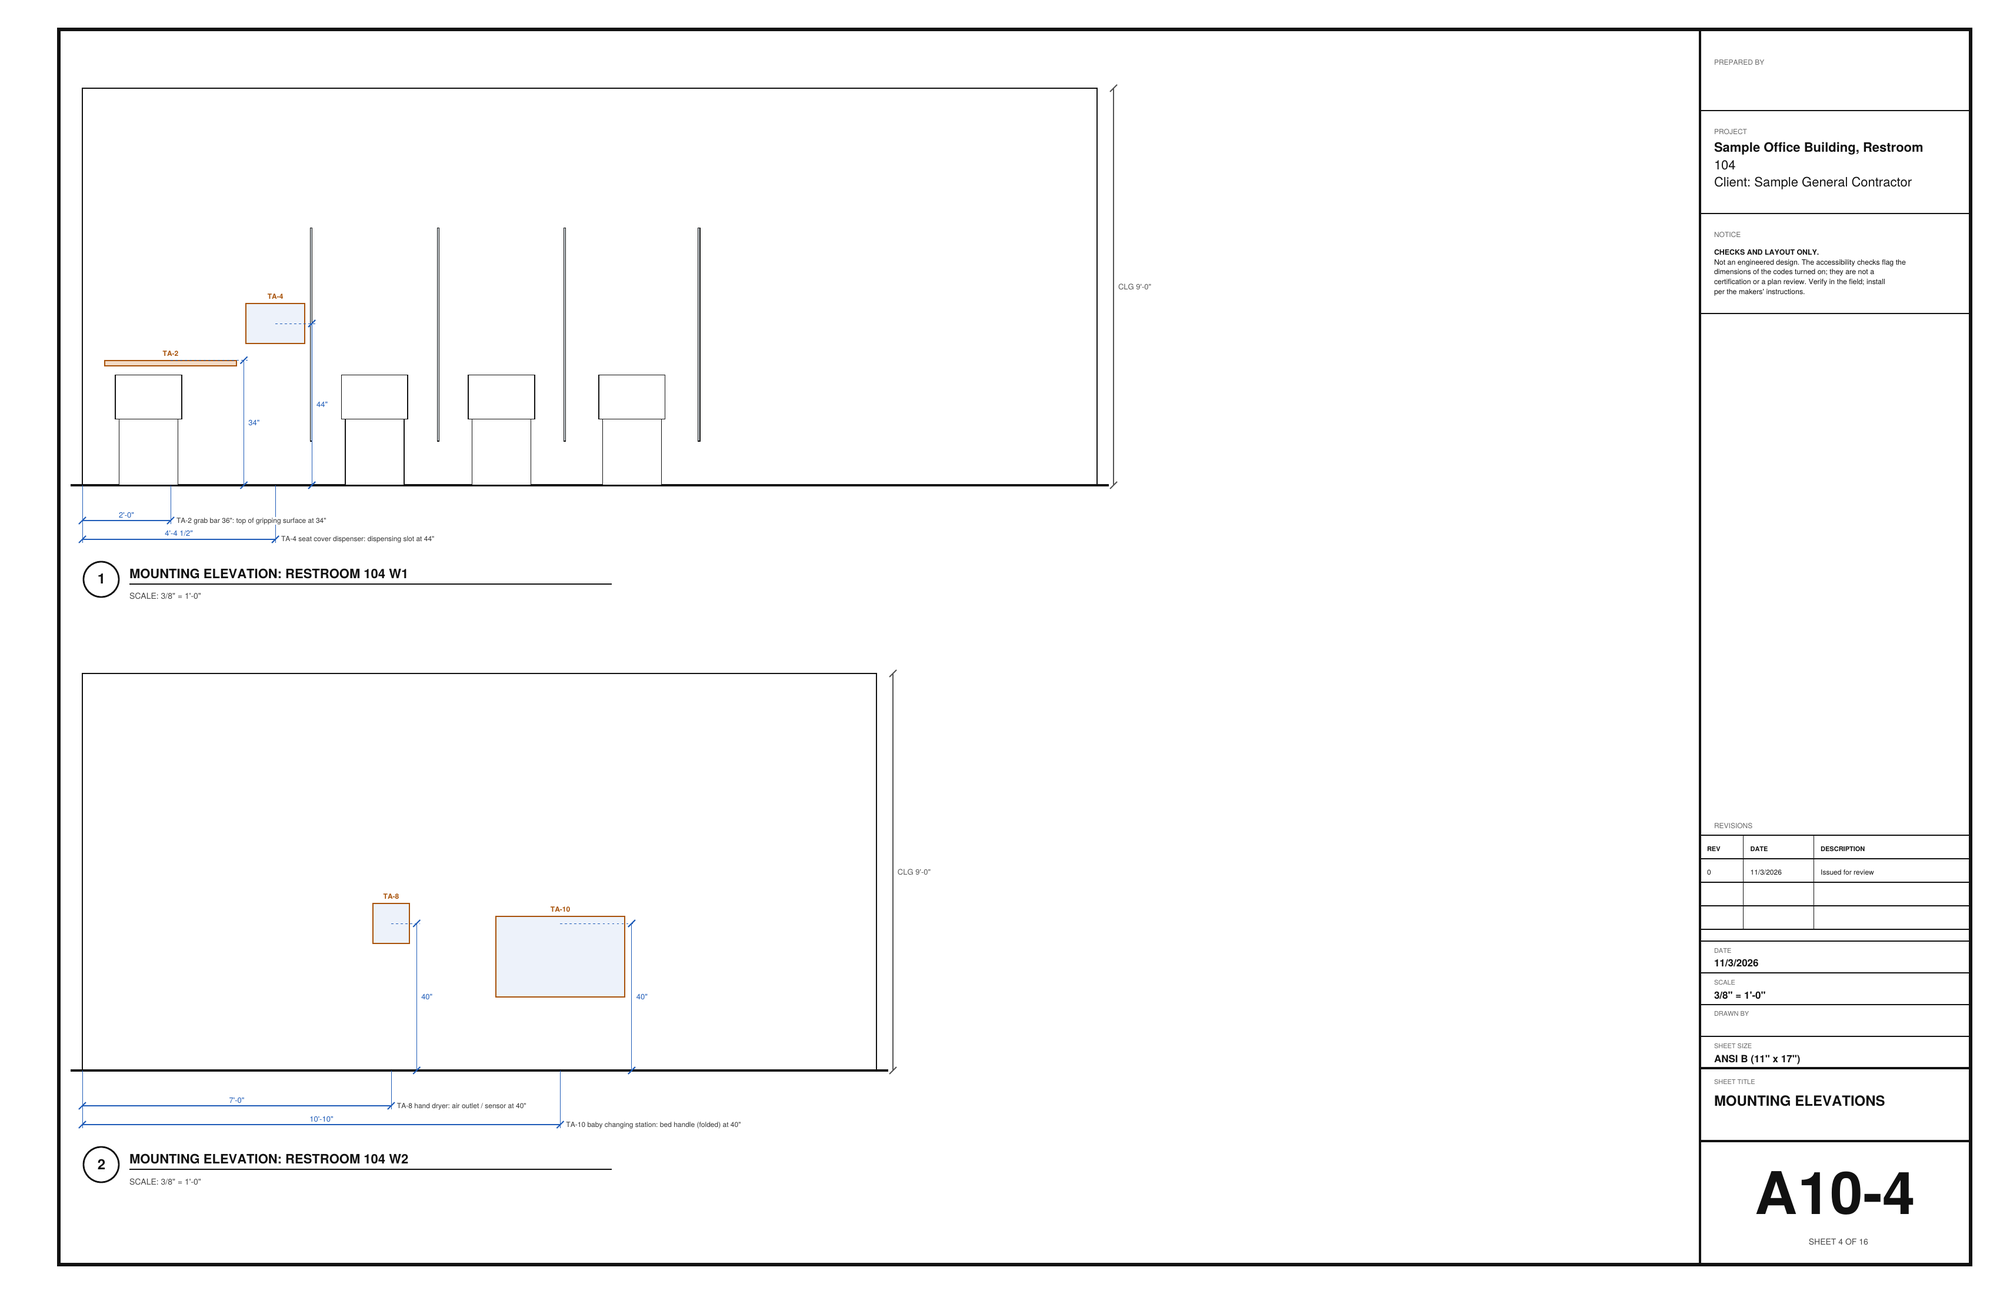
A10-4 Mounting elevations W1 and W2
A10-6 Mounting elevation W4
A10-7 Blocking plan
A10-7 Blocking plan
A10-8 Blocking elevation
A10-11 Blocking list for the GC
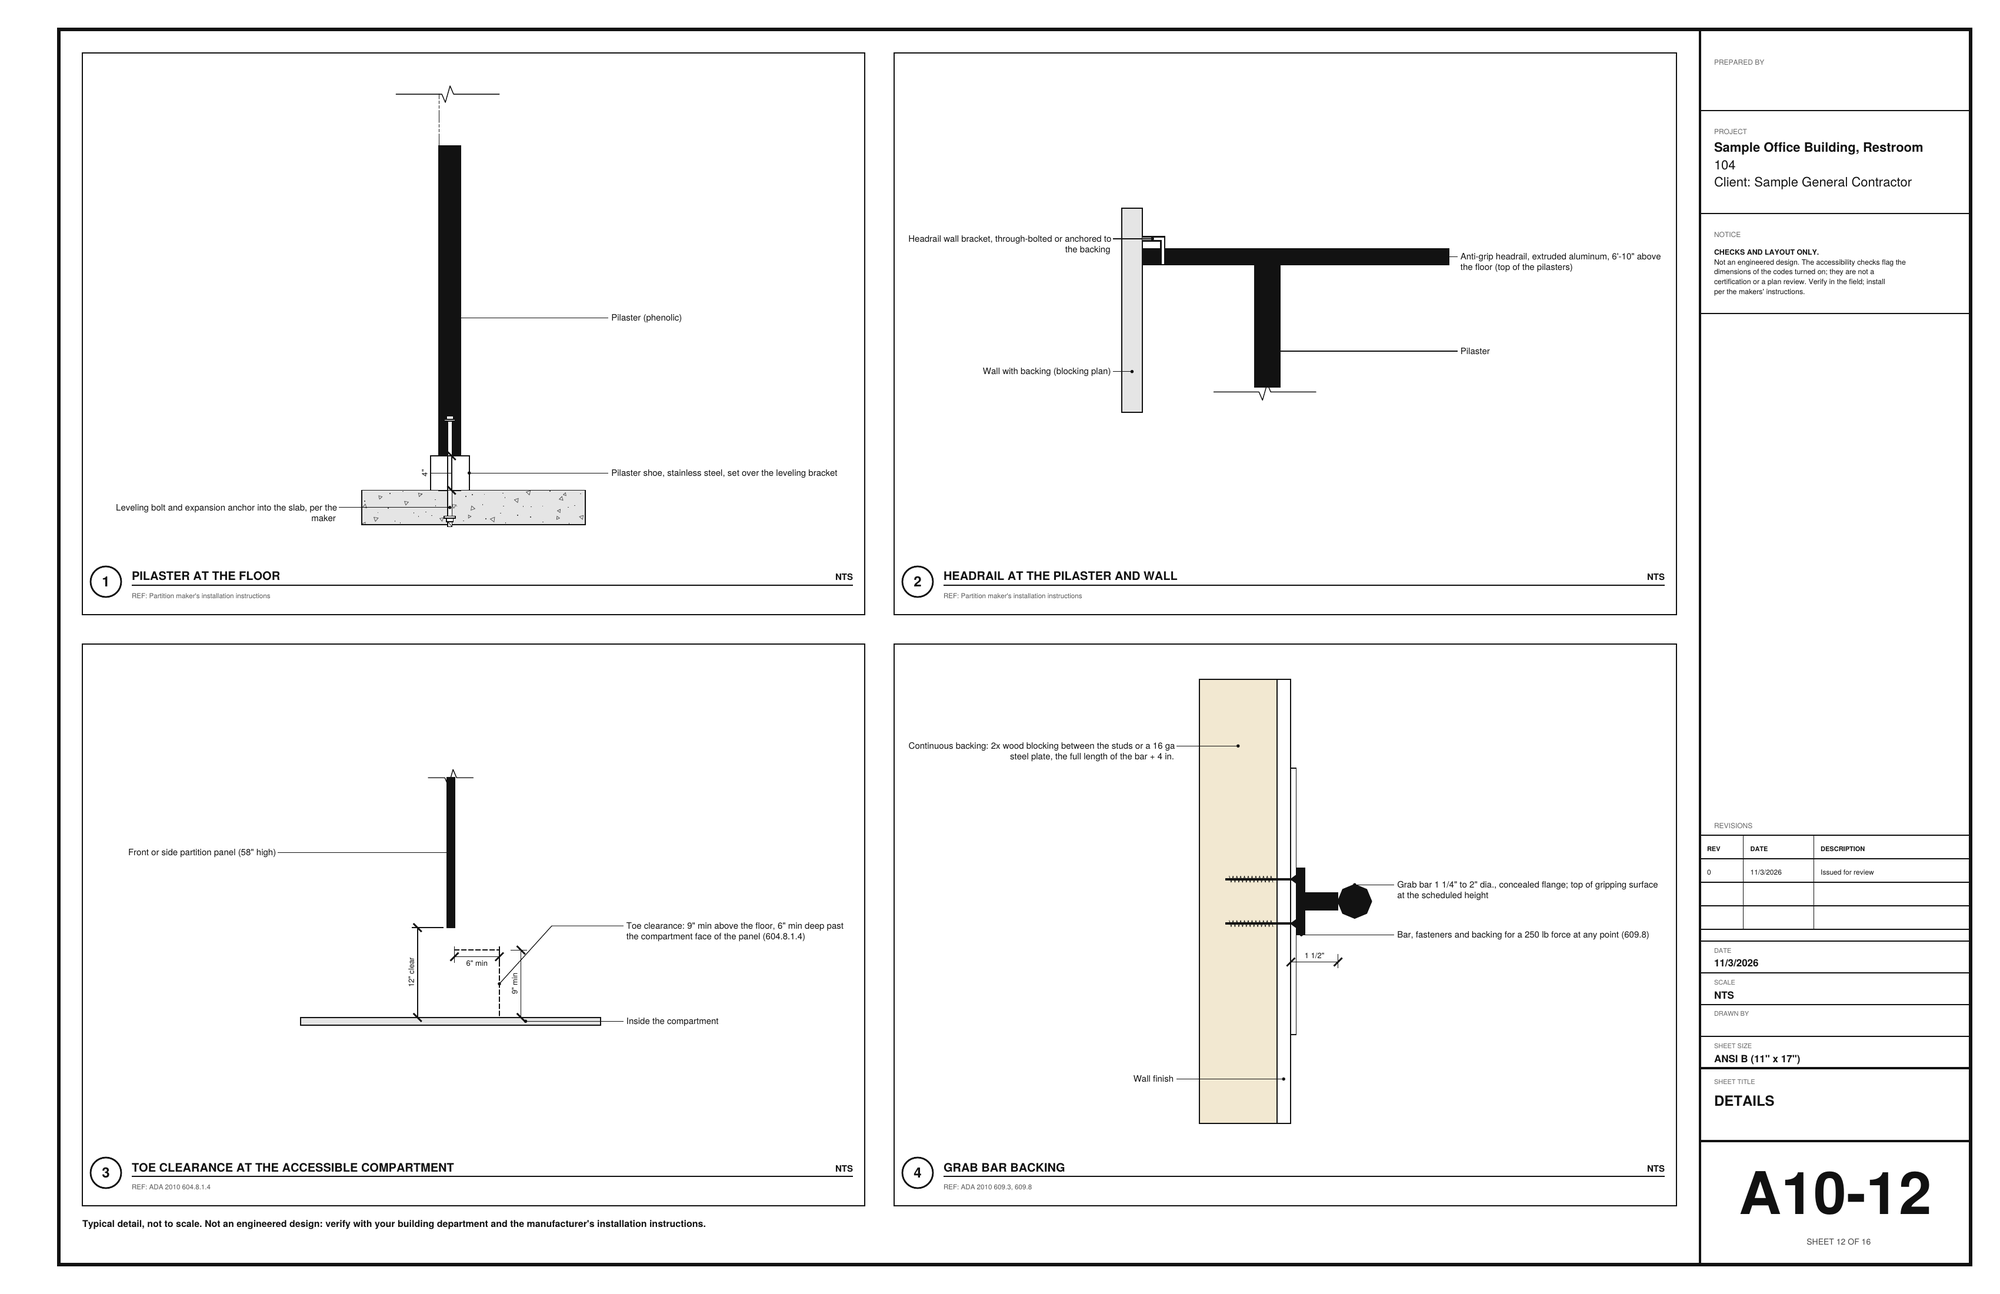
A10-12 Details
A10-12 Details
A10-14 Accessory schedule and buy list
Submittal set A10-0: cover and sheet index (Locker Room 110)
Submittal set A10-1: plan, the shower and dressing compartment schedule, product data

Try it on your own job

Open the sample, change it to your measurements, and send it to a BidRidge quote. Drawing is free; the drawing set, the lists and the quote come with a BidRidge license or the 14-day trial.

In the designer, tap Open project and pick the sample file. It opens exactly as in the video.

Sample designs: names, sizes and clients are made up. Prices are BidRidge's starting rates; set your own. The designers check against common guidelines (IRC, NKBA and the makers' published numbers) to help you catch mistakes. They don't replace your building department or the manufacturer's installation instructions: verify with them.