BidRidge › Designers › Guide › Chapter 17

Chapter 17 · Cabinet DesignerBeta

Suite 200 break room

We put together the casework submittal for an office break room: the cover sheet with its index and blank review stamps, the plan and elevations with section marks, wall sections, typical sections, details and the hardware schedule. Then a revision with a cloud, Save PDF to send it to the architect and GC, and Update the job for the quote.

In the designer, tap Open project and pick the sample file. It opens exactly as in the video.

Narrated walkthrough, 2:35. Captions on.

The sample in numbers

  • Cabinets
    11
    5 base · 5 wall · 1 tall pantry
  • Sheets
    5 sheets
    CW-0 cover and index to CW-4 sections and details, 11 × 17
  • Wall sections
    3
    pantry · base and light rail · peninsula seating
  • Details
    7
    typical, not engineered
  • Grade
    AWI Custom
    ANSI/AWI 0641-2019
  • Quote
    $27,700
    Better, the whole project at the starting rates

Step by step

Step 1: The break room in the Cabinet Designer
  1. Elevation · Plan
  2. The peninsula, with 15″ seating

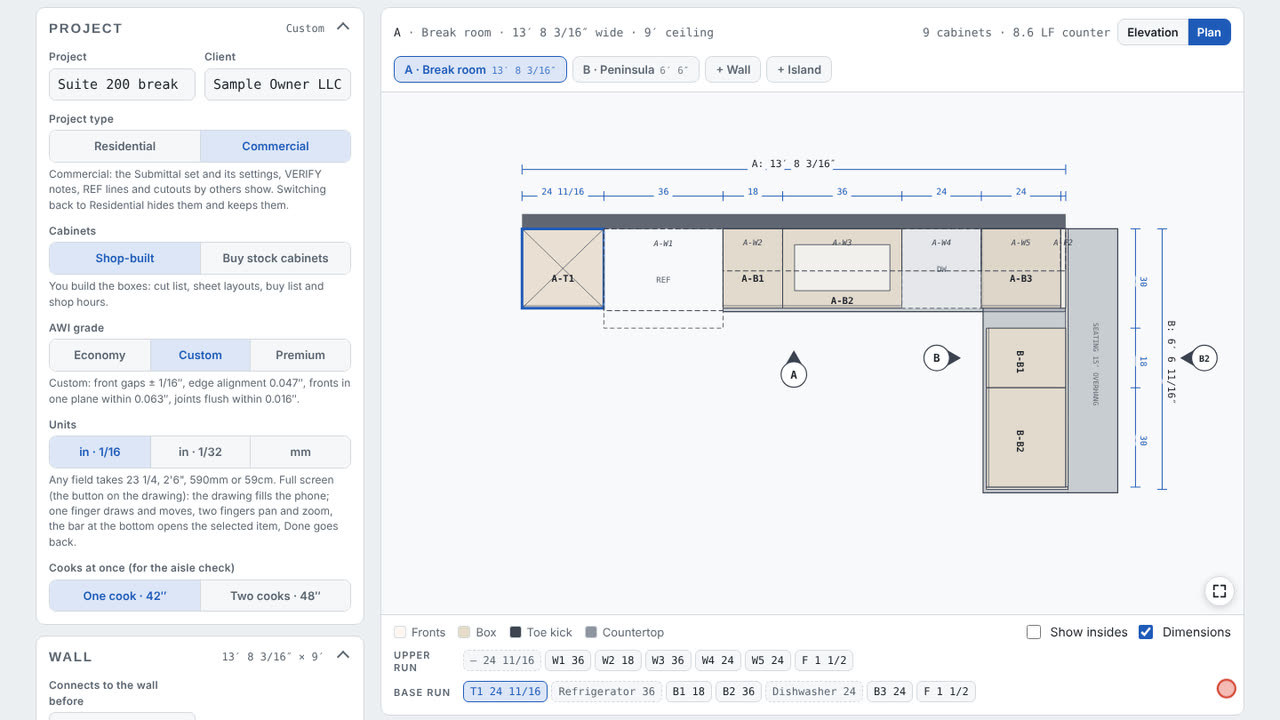
Step 1: The break room

We start from the Commercial break room project and add a peninsula with seating. It's rift oak veneer casework, AWI Custom grade, with laminate tops: a sink base and dishwasher, uppers on a light rail, a tall pantry and the seated peninsula.

Field tip: The Elevation and Plan buttons switch the drawing; the tabs pick the wall or the peninsula.
Step 2: The Submittal fields in the Cabinet Designer
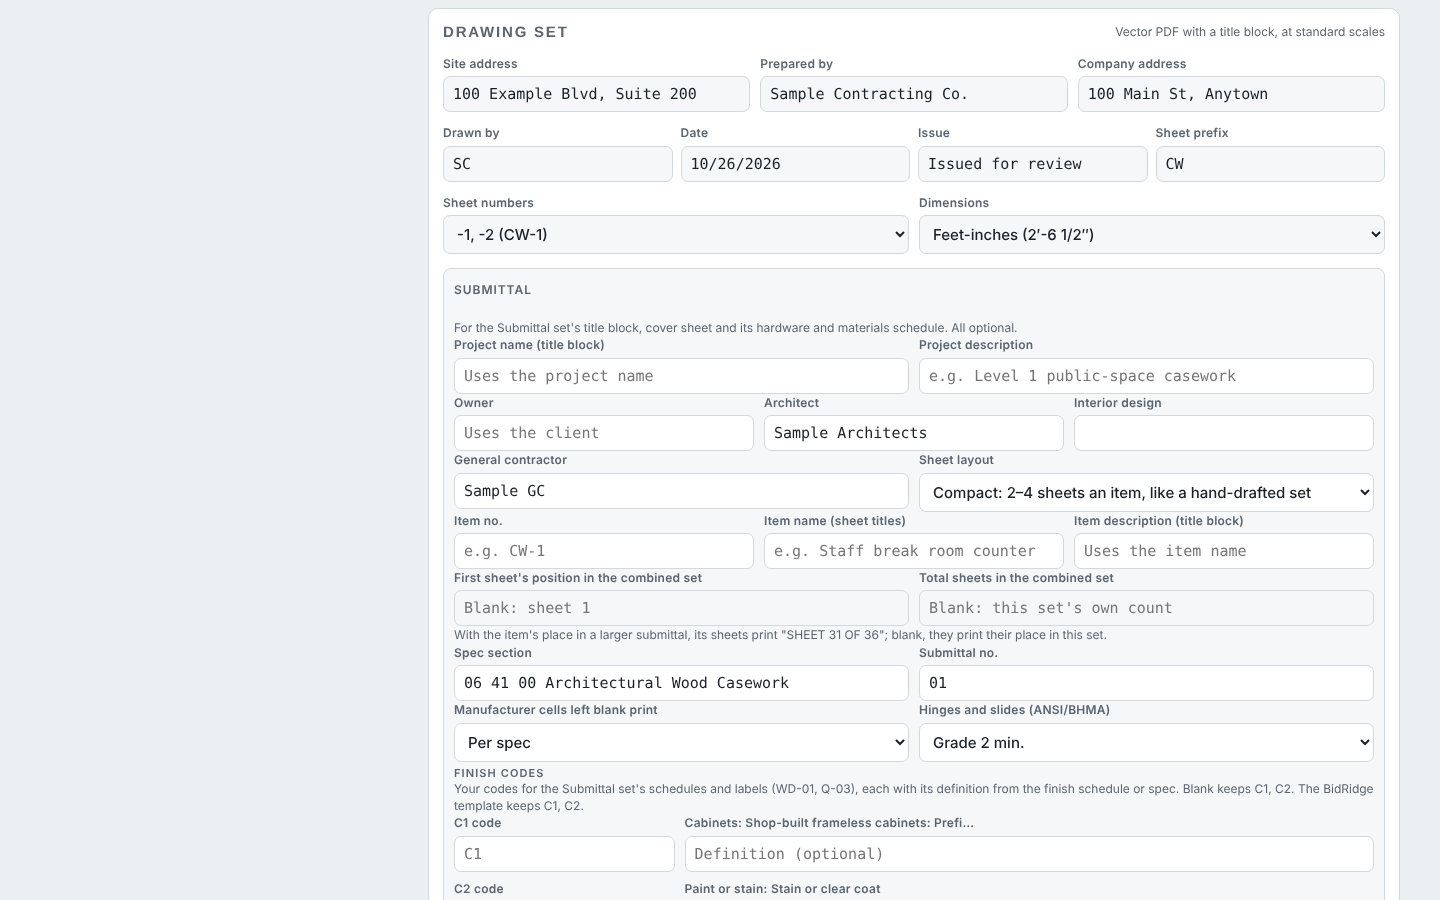
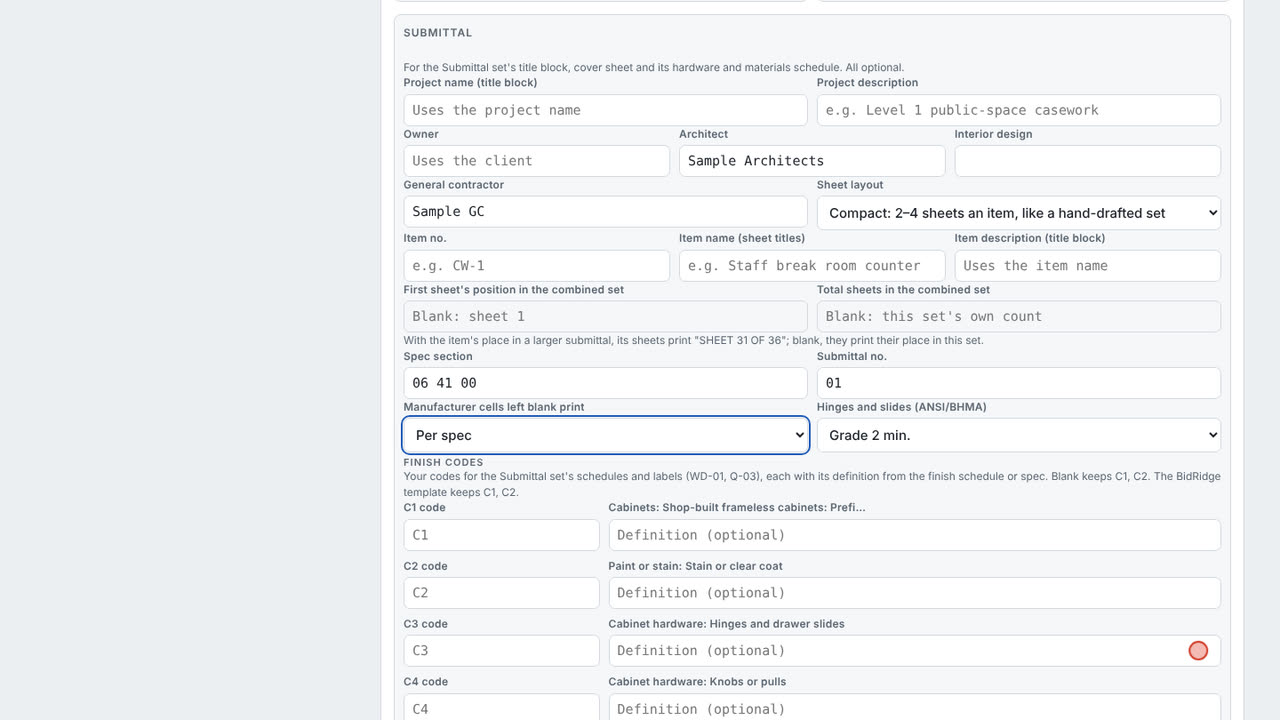
  1. Submittal: all optional, blank to start
  2. Architect and GC: made-up names
  3. Spec section 06 41 00, submittal 01

Step 2: The Submittal fields

In the Drawing set card, open Submittal and type the architect, the general contractor, the spec section and the submittal number. Every field is optional and blank to start; a blank spec section prints 06 41 00 Architectural Wood Casework.

Field tip: Owner left blank uses the client.

Step 3: The Submittal set: the cover sheet in the Cabinet Designer
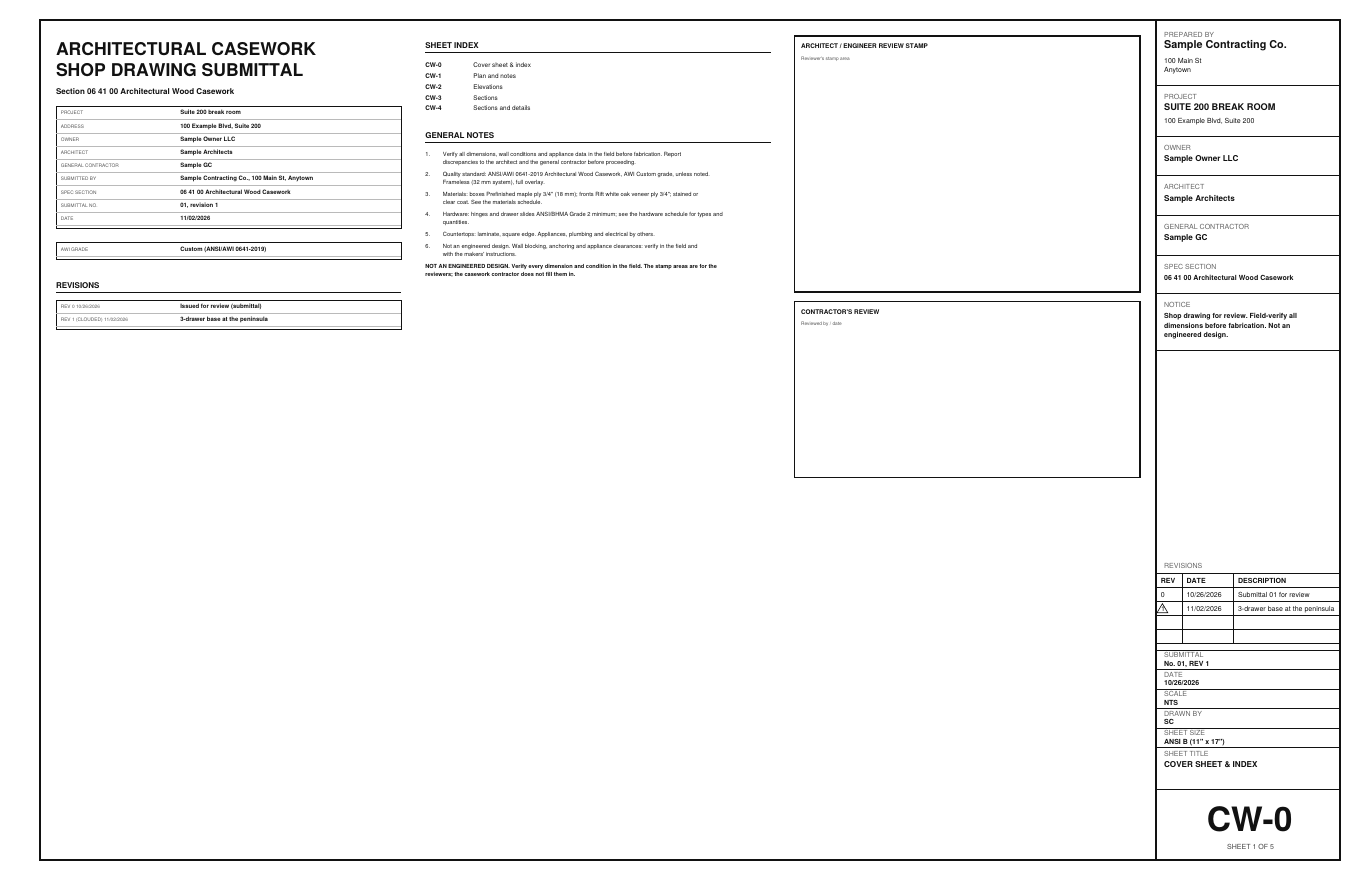
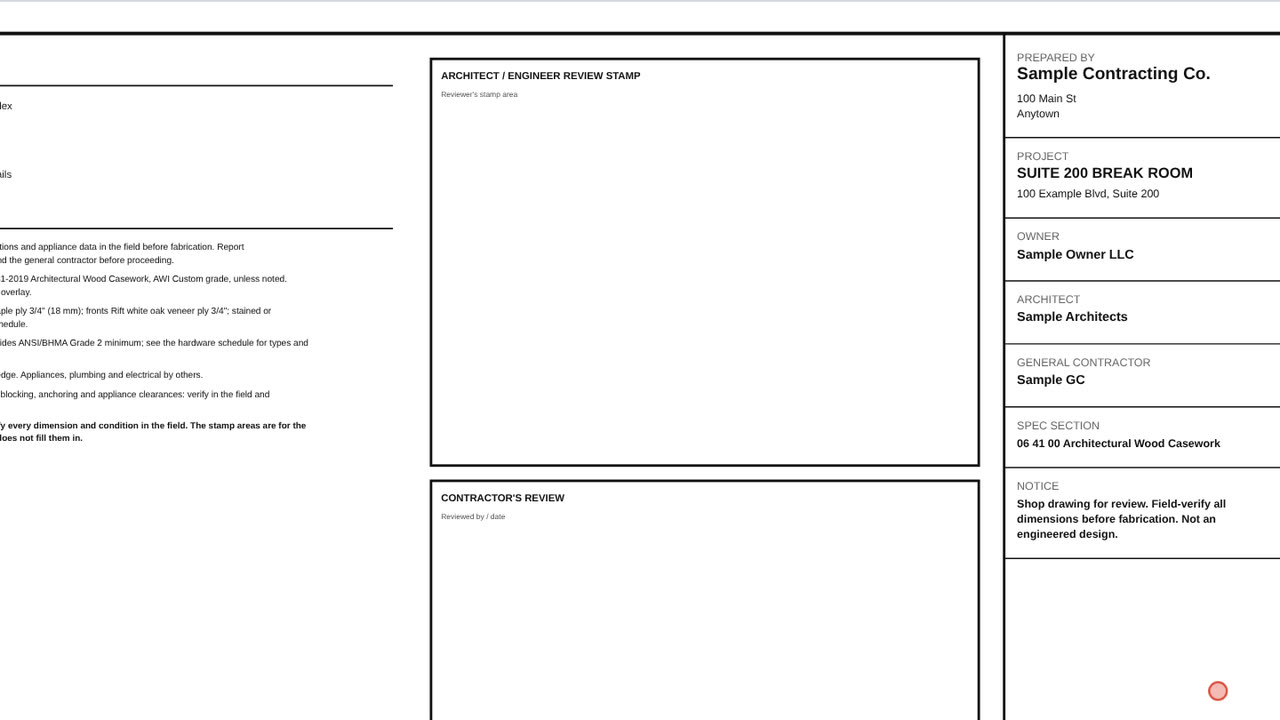
  1. Architect / engineer review stamp: left blank
  2. Contractor's review: left blank

Step 3: The Submittal set: the cover sheet

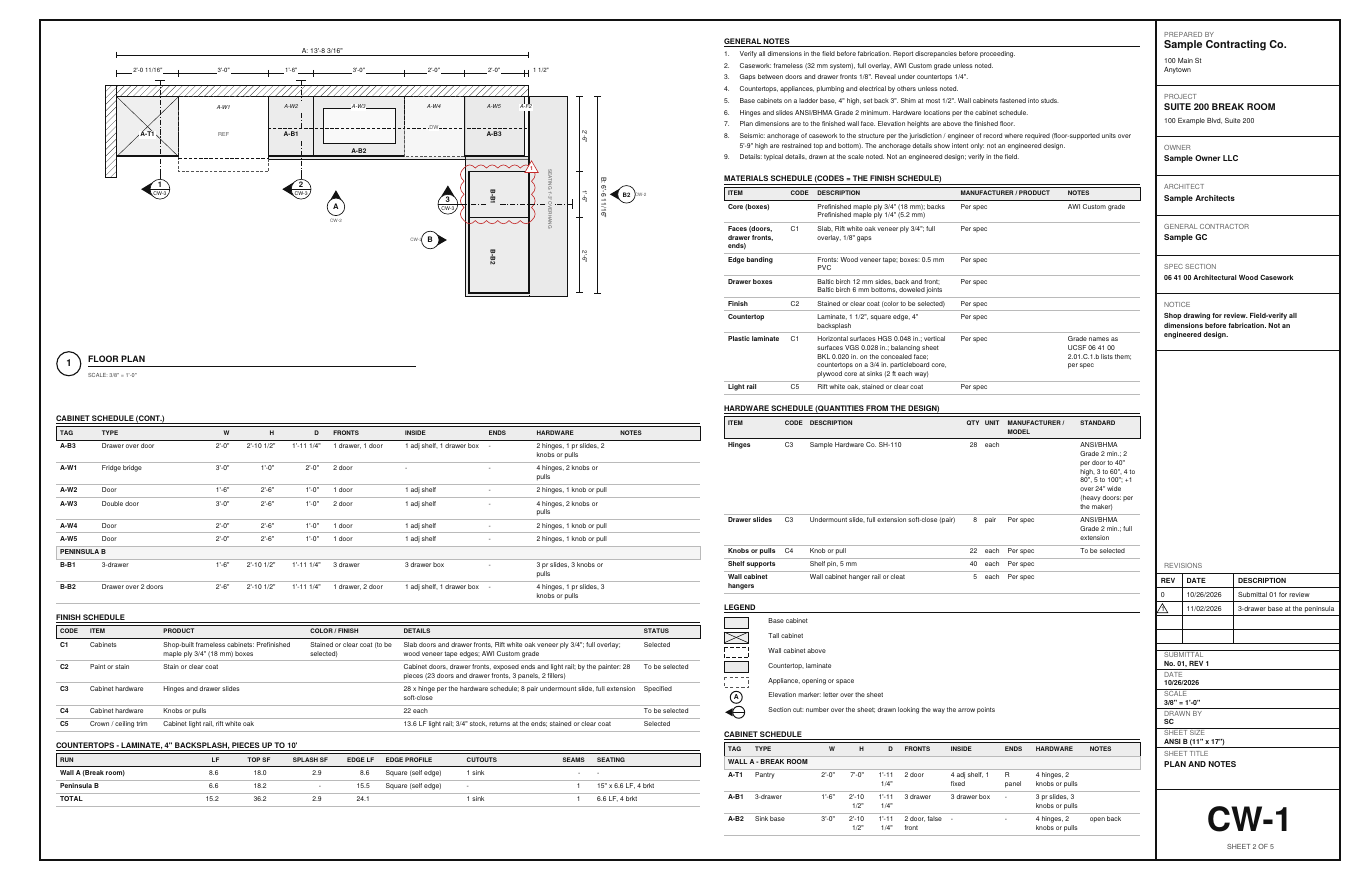
Under Sheets for, pick Submittal set (a Commercial option; the break room is a Commercial project) and tap Preview sheets. The cover has the project, the team, the spec section, the AWI grade, an index of every sheet and the general notes, plus two empty boxes: the architect / engineer review stamp and the contractor's review. The designer never fills them in.

Field tip: The set never shows prices, the cut list or sheet layouts.

Step 4: Section marks on the plan and elevations in the Cabinet Designer
  1. Section bubble: number over the sheet
  2. Detail tag

Step 4: Section marks on the plan and elevations

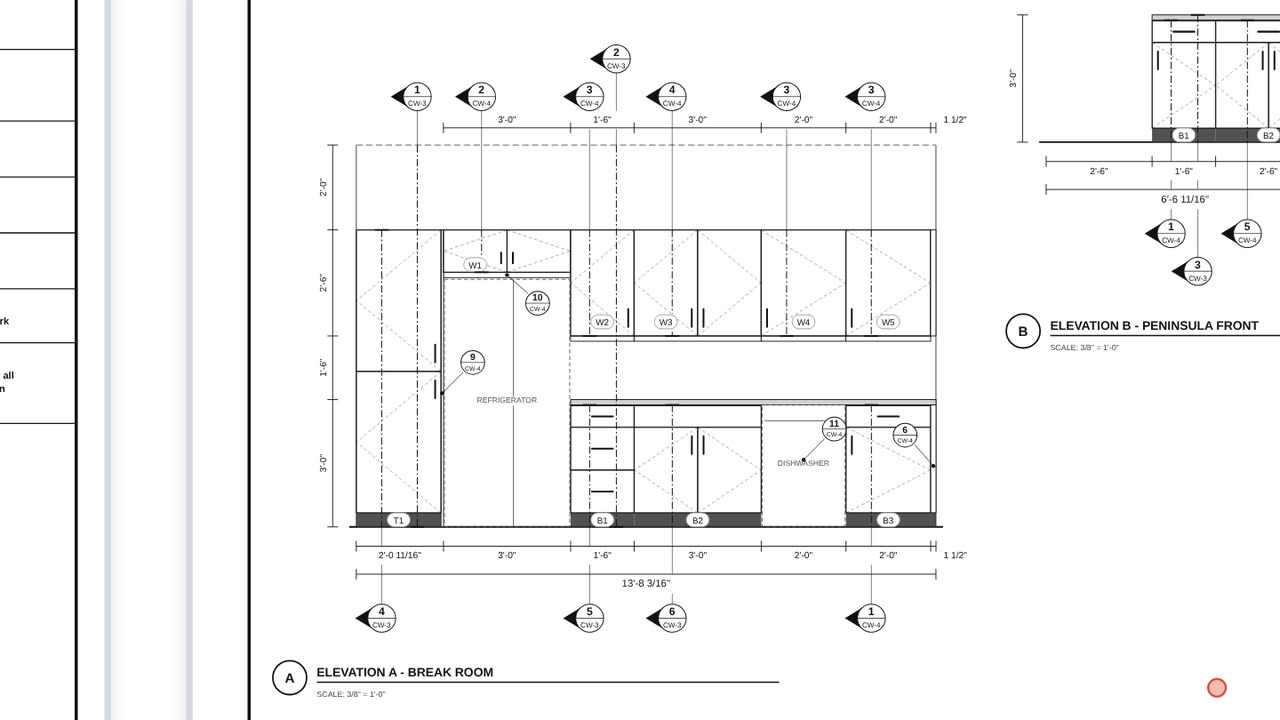
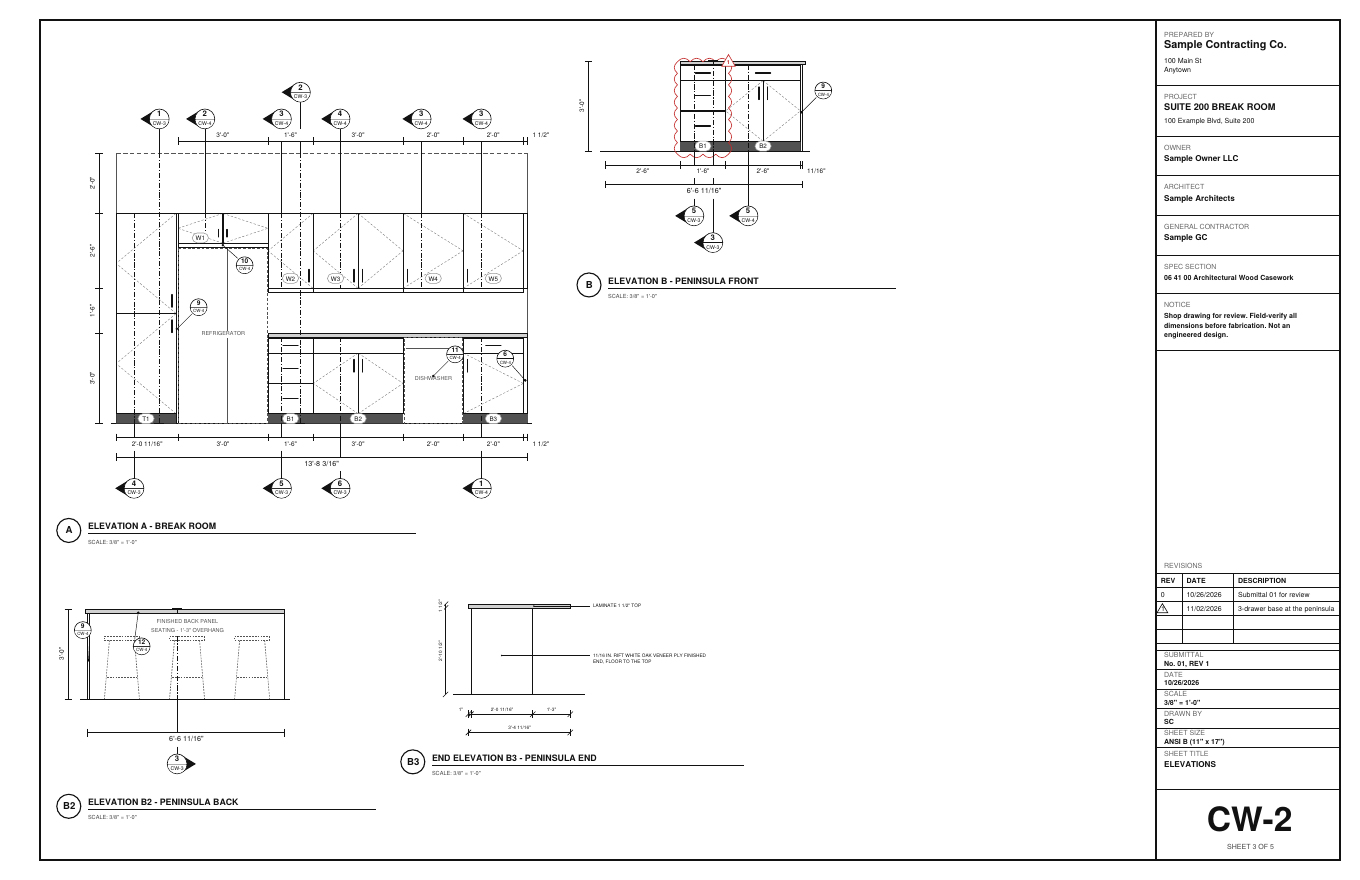
The plan marks the wall-section cuts. Every elevation has a section bubble at each cabinet, the number over the sheet it's drawn on, and detail tags where a detail applies. Each mark matches a drawing in the set.

Step 5: Full-height wall sections in the Cabinet Designer
  1. Laminate top, splash, scribe at the wall
  2. Toe kick, set back 3″
  3. Heights from the design, floor up

Step 5: Full-height wall sections

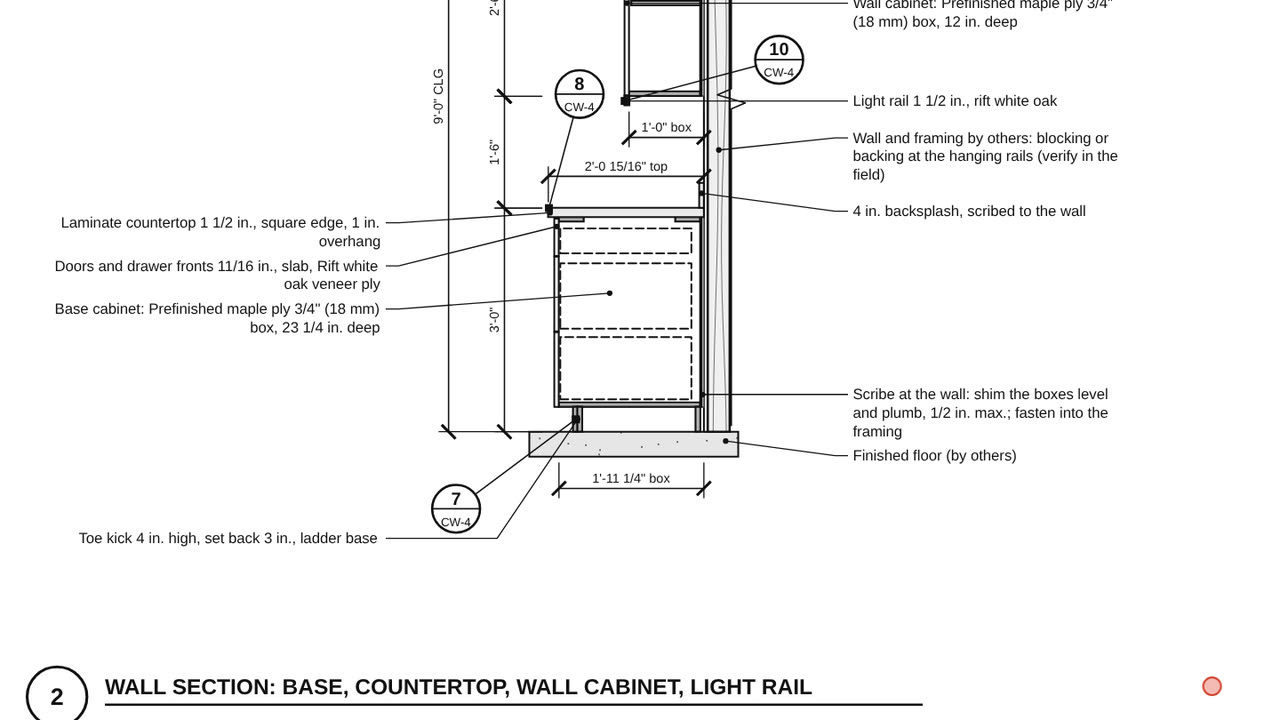
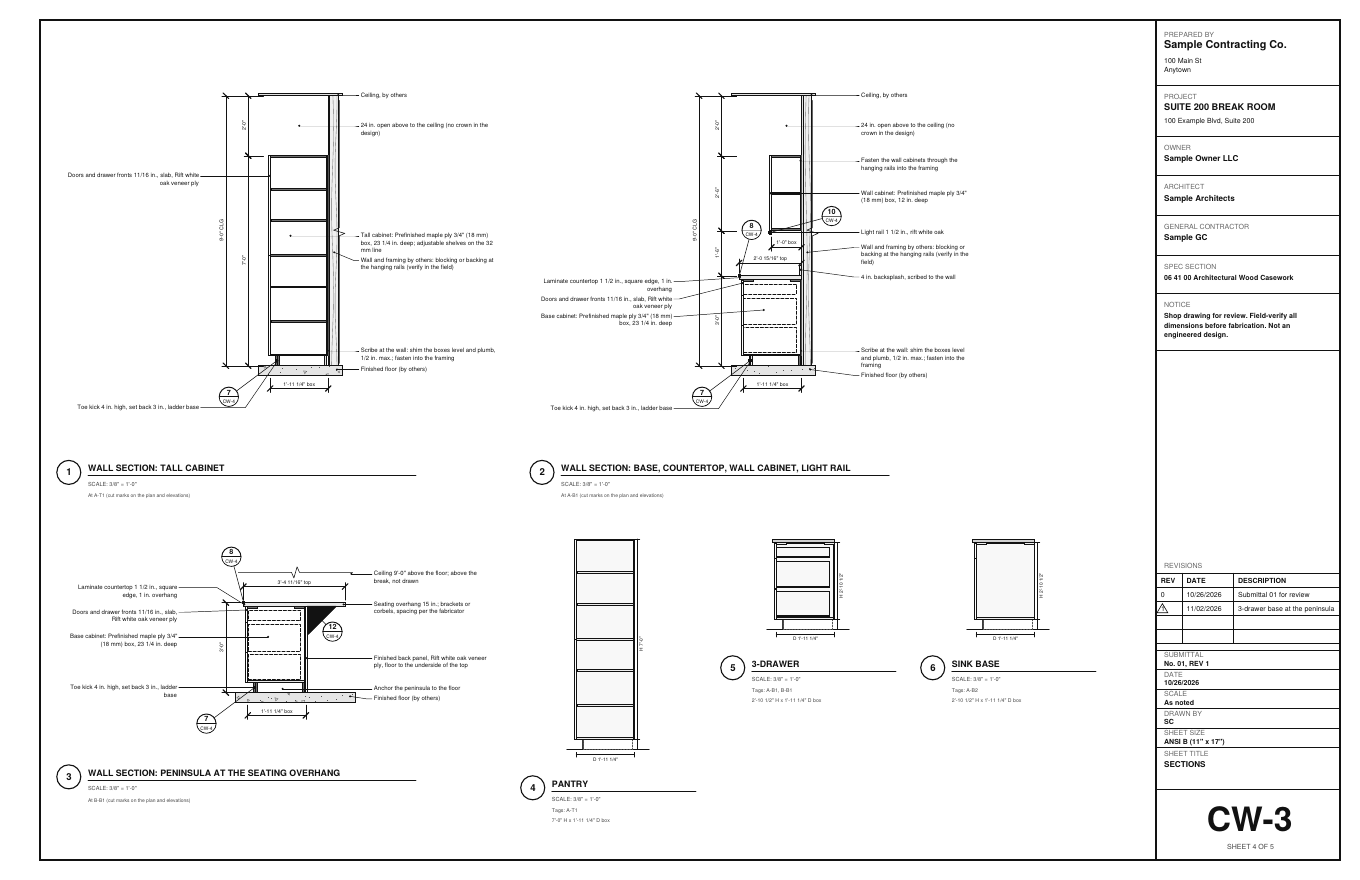
One wall section for each run condition: here the tall pantry, the base with the counter, splash, wall cabinet and light rail, and the peninsula at the seating overhang. Each is drawn floor to the 9′ ceiling with the toe kick, the box, the top, the scribe at the wall and the heights from the design.

Field tip: Verify blocking, ceiling heights and wall conditions in the field.

Step 6: Typical cabinet sections in the Cabinet Designer
  1. Pantry
  2. Sink base, its tags

Step 6: Typical cabinet sections

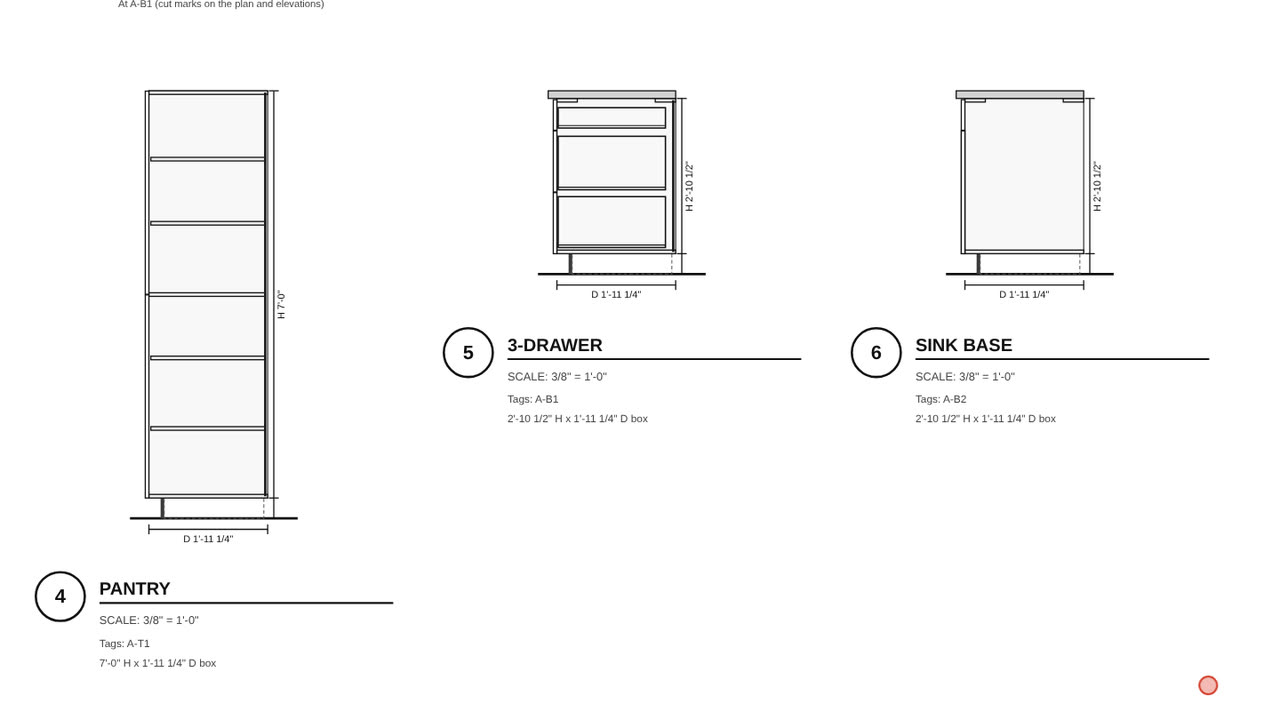
Then a typical section for each cabinet type, numbered S1 and up, with the tags of every cabinet that uses it.

Step 7: The details and the Detail chips in the Cabinet Designer
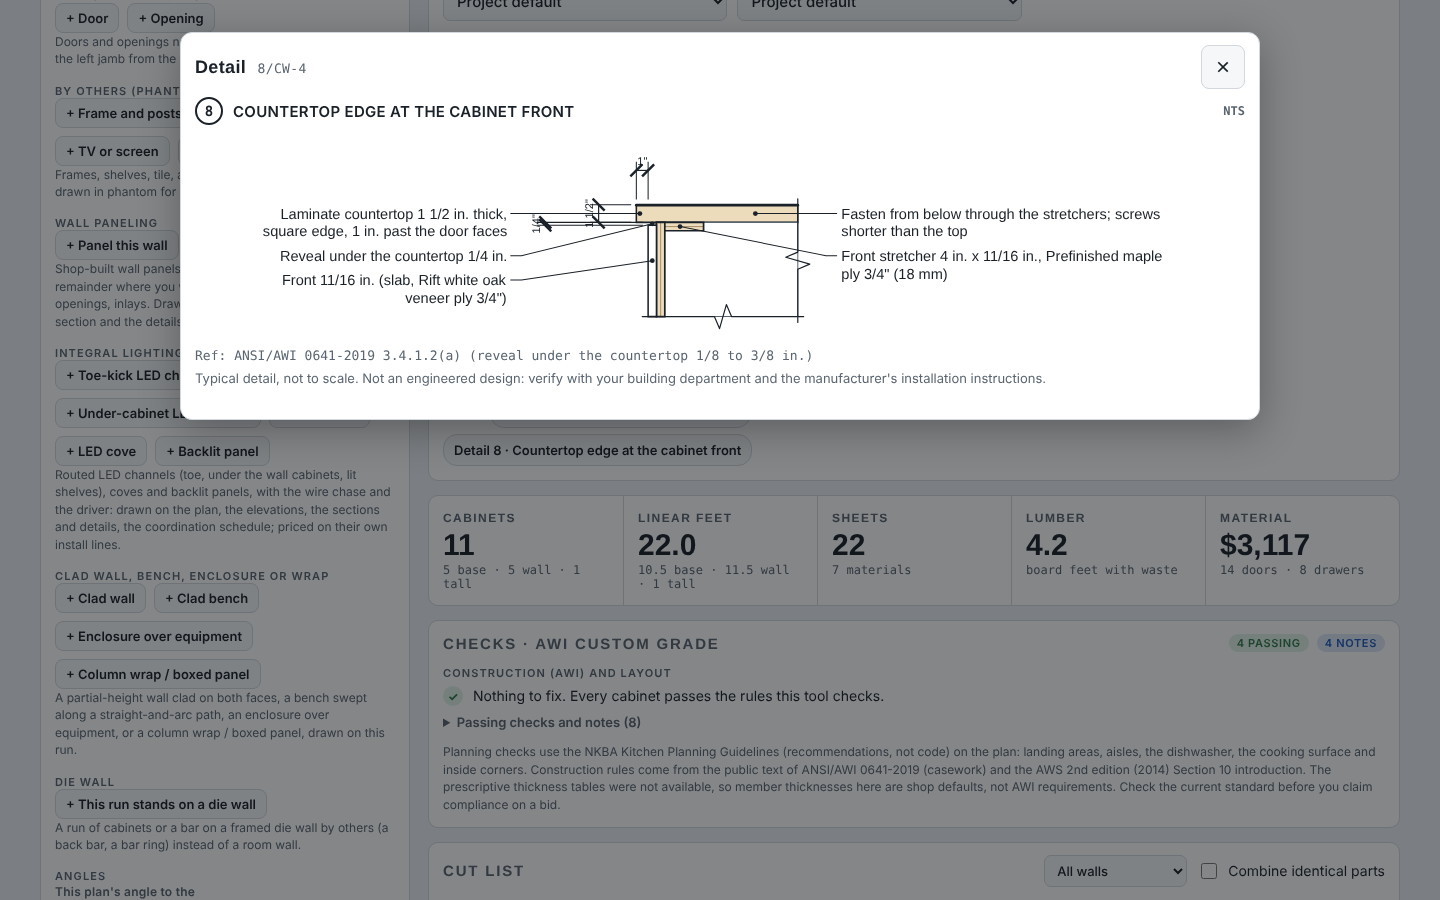
  1. Detail 3 · Countertop edge, from the design

Step 7: The details and the Detail chips

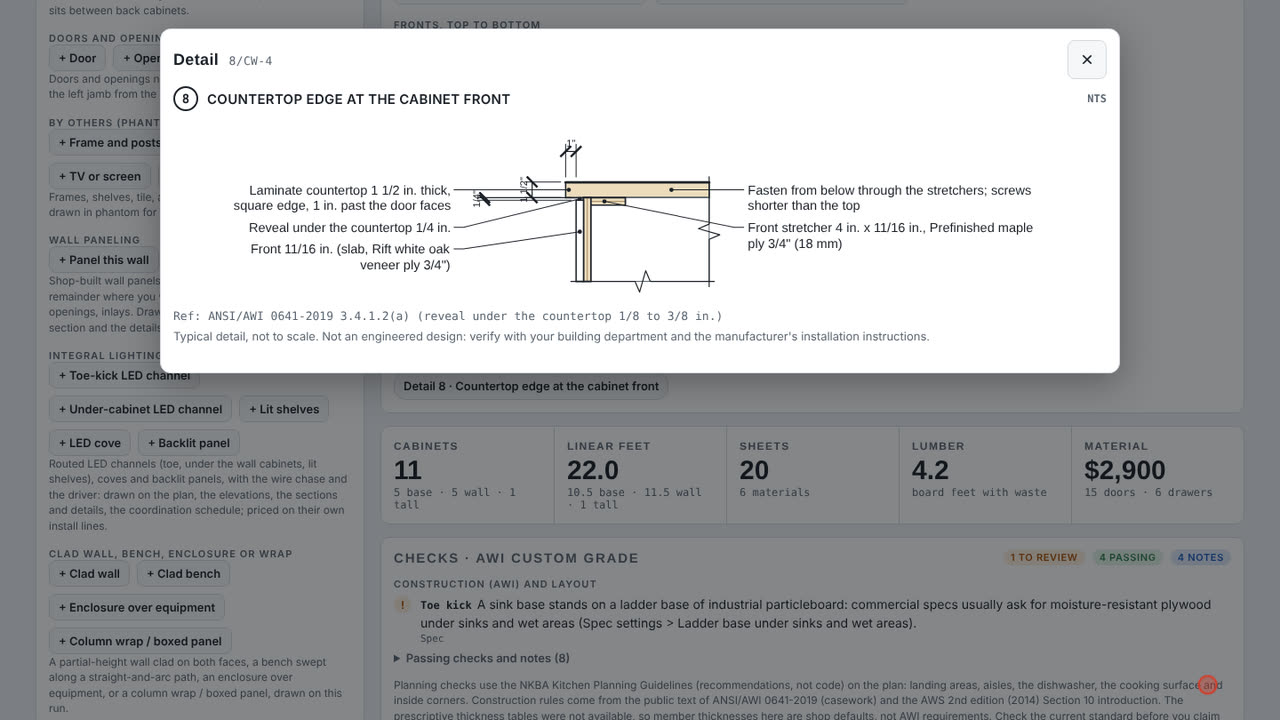
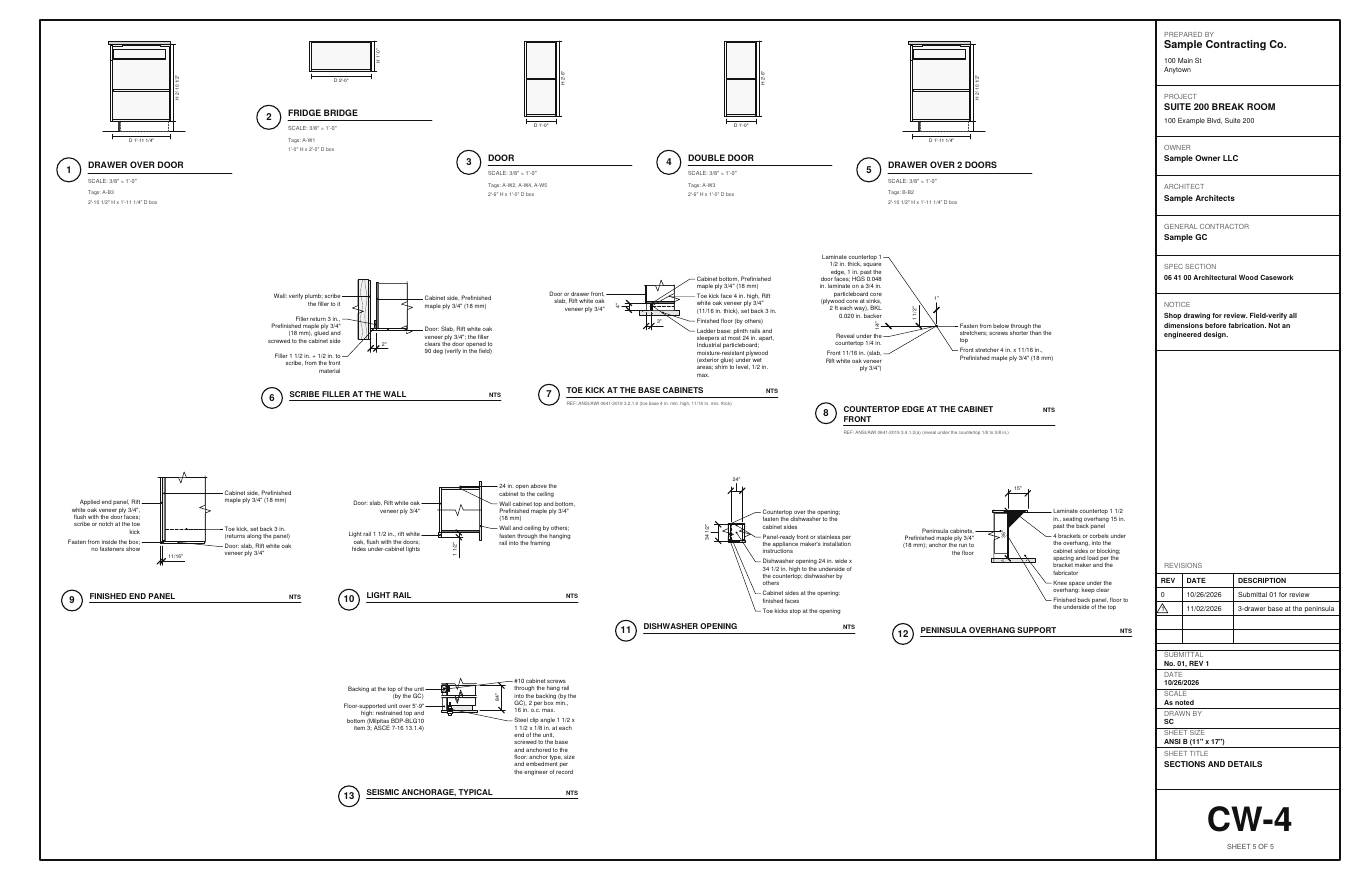
The details on CW-4, with the typical sections, draw the scribe filler, the toe kick, the countertop edge, the finished end, the light rail, the dishwasher opening and the peninsula overhang support, each from the design's numbers. On screen, the same details show as chips on the cabinet: tap Detail 3 and it opens.

Field tip: Typical details, not engineered: verify in the field and with the makers' instructions.

Step 8: The hardware schedule in the Cabinet Designer
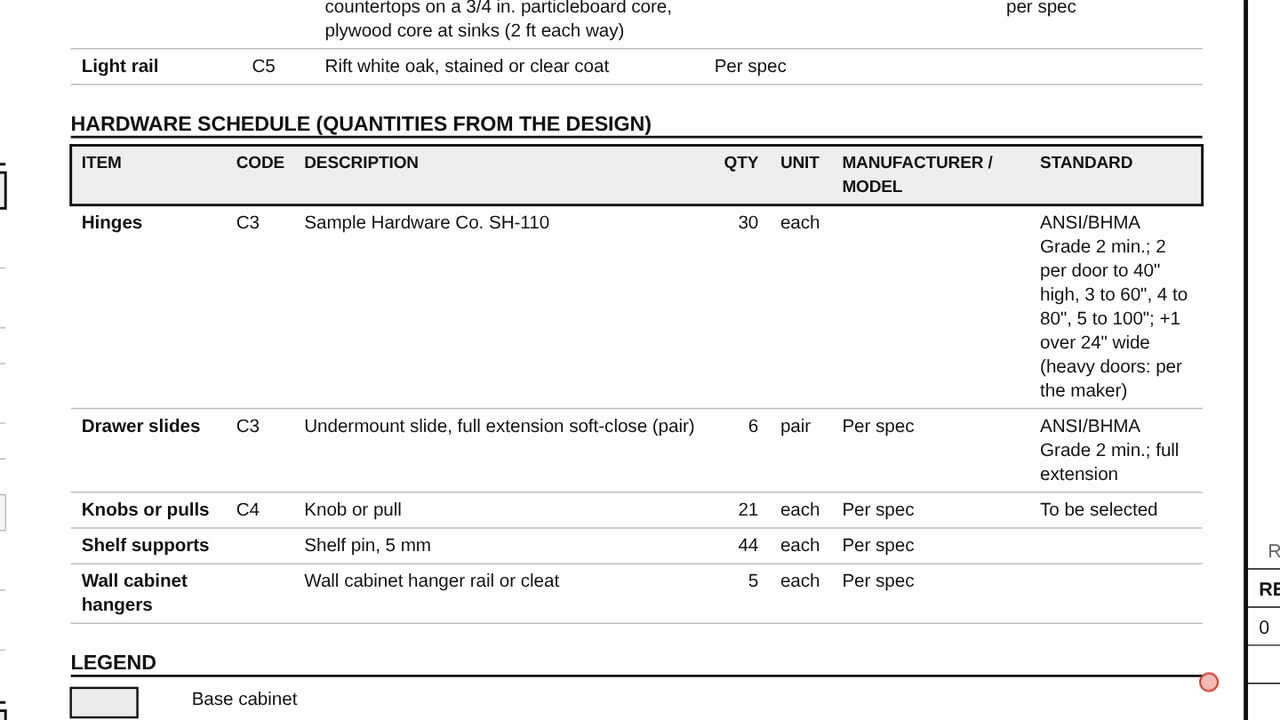
  1. Qty from the design
  2. Manufacturer / model column

Step 8: The hardware schedule

The hardware schedule on CW-1, next to the plan and the cabinet and finish schedules, lists each type with the quantity from the design and a manufacturer / model column. Type a maker under Submittal, or leave it blank to print Per spec or By owner's selection.

Field tip: Attach the hardware makers' cut sheets to the submittal.

Step 9: Revision 1 with a cloud, then Save PDF in the Cabinet Designer
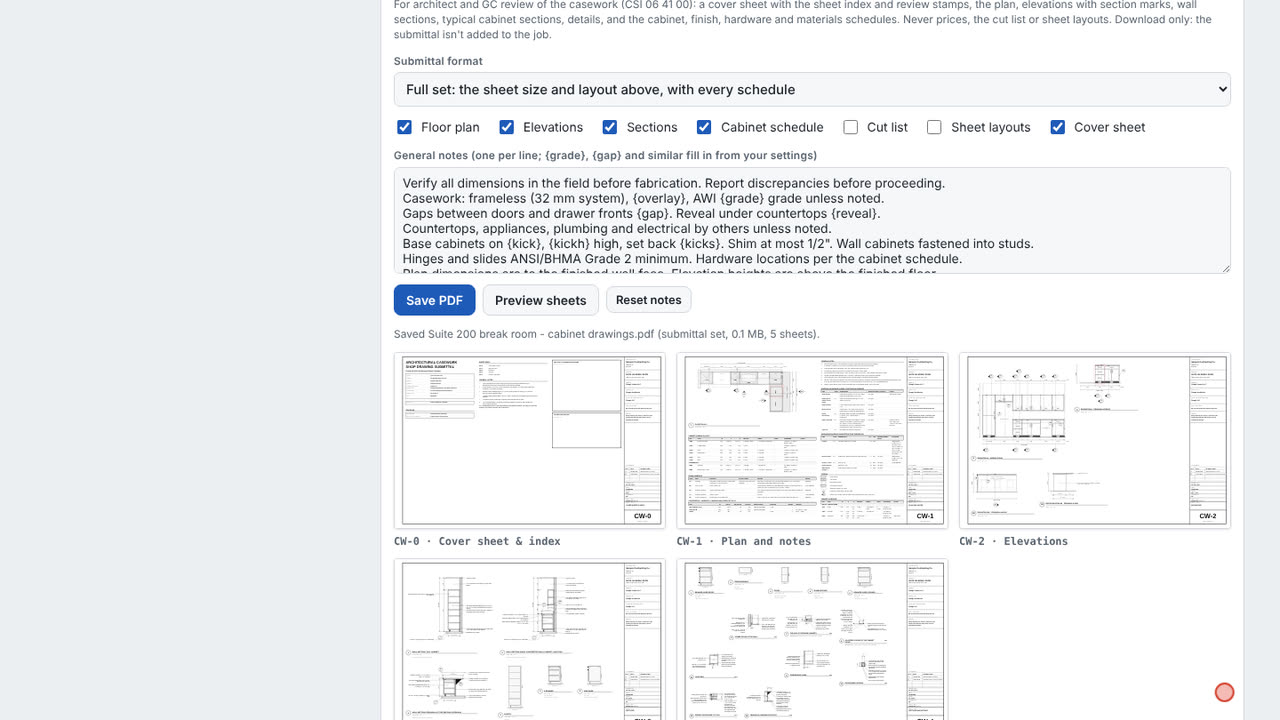
  1. Save PDF: download it, send it yourself

Step 9: Revision 1 with a cloud, then Save PDF

When the architect asks for a change, add revision 1, describe it and tick Cloud on sheets, then make the change. The changed cabinet gets a cloud and the revision's triangle on the plan and elevations, and the title block and the cover list it. Save PDF downloads the set to send to the architect and the GC.

Field tip: The submittal is download only: it isn't added to the BidRidge job.

Step 10: Update the job in BidRidge in the Cabinet Designer
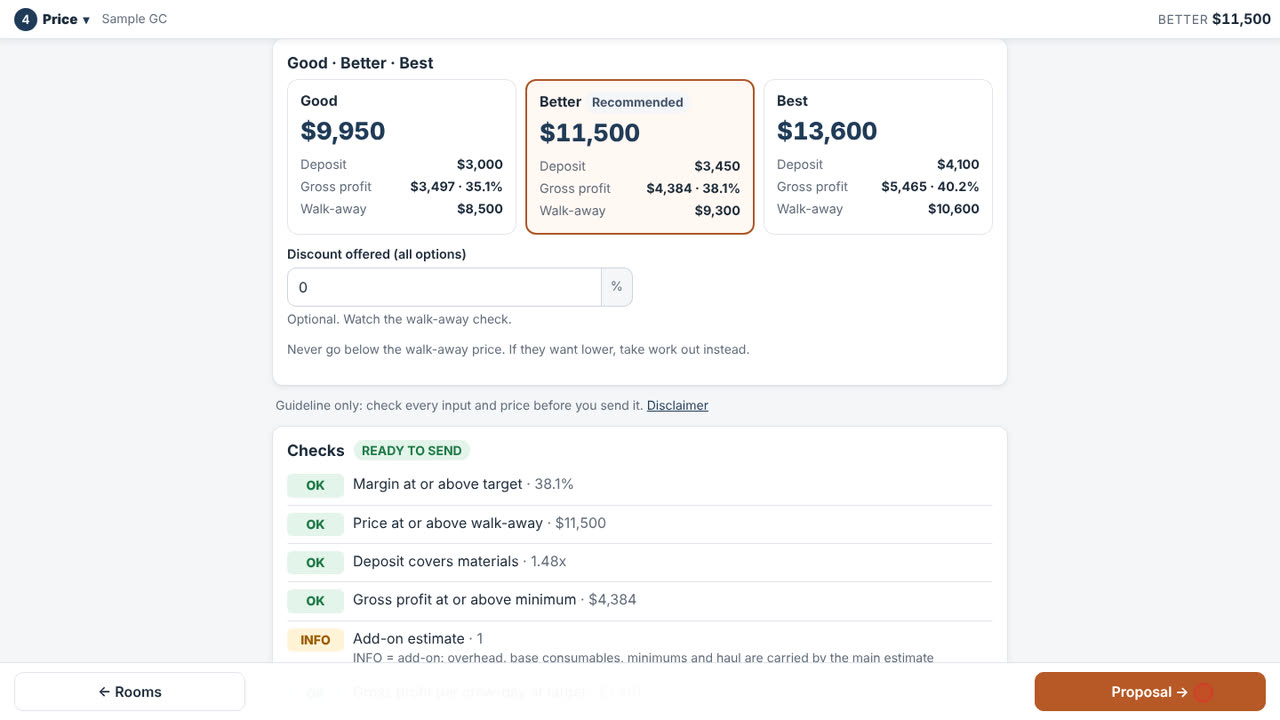
  1. The cabinet quote at your rates
  2. Better (recommended)

Step 10: Update the job in BidRidge

Opened from a BidRidge job, Update the job in BidRidge sends the cabinet quantities, not the submittal. BidRidge shows what changes, then prices it at your rates. At the starting rates the project comes to $27,700 for Better.

Field tip: Every change shows in the review before the job updates.

What you get

The drawing set, the lists and the files

Real files from this sample, made by the designer. Tap a page to see it full size. Yours carry your company, the client and the address.

CW-0 Cover sheet & index, with the review stamps left blank
CW-1 Floor plan and notes, with the cabinet, finish and hardware schedules
CW-2 Elevations A and B, the peninsula front
CW-3 Wall sections: the tall pantry, the base with the light rail, the peninsula at the seating
CW-4 Typical cabinet sections and the casework details
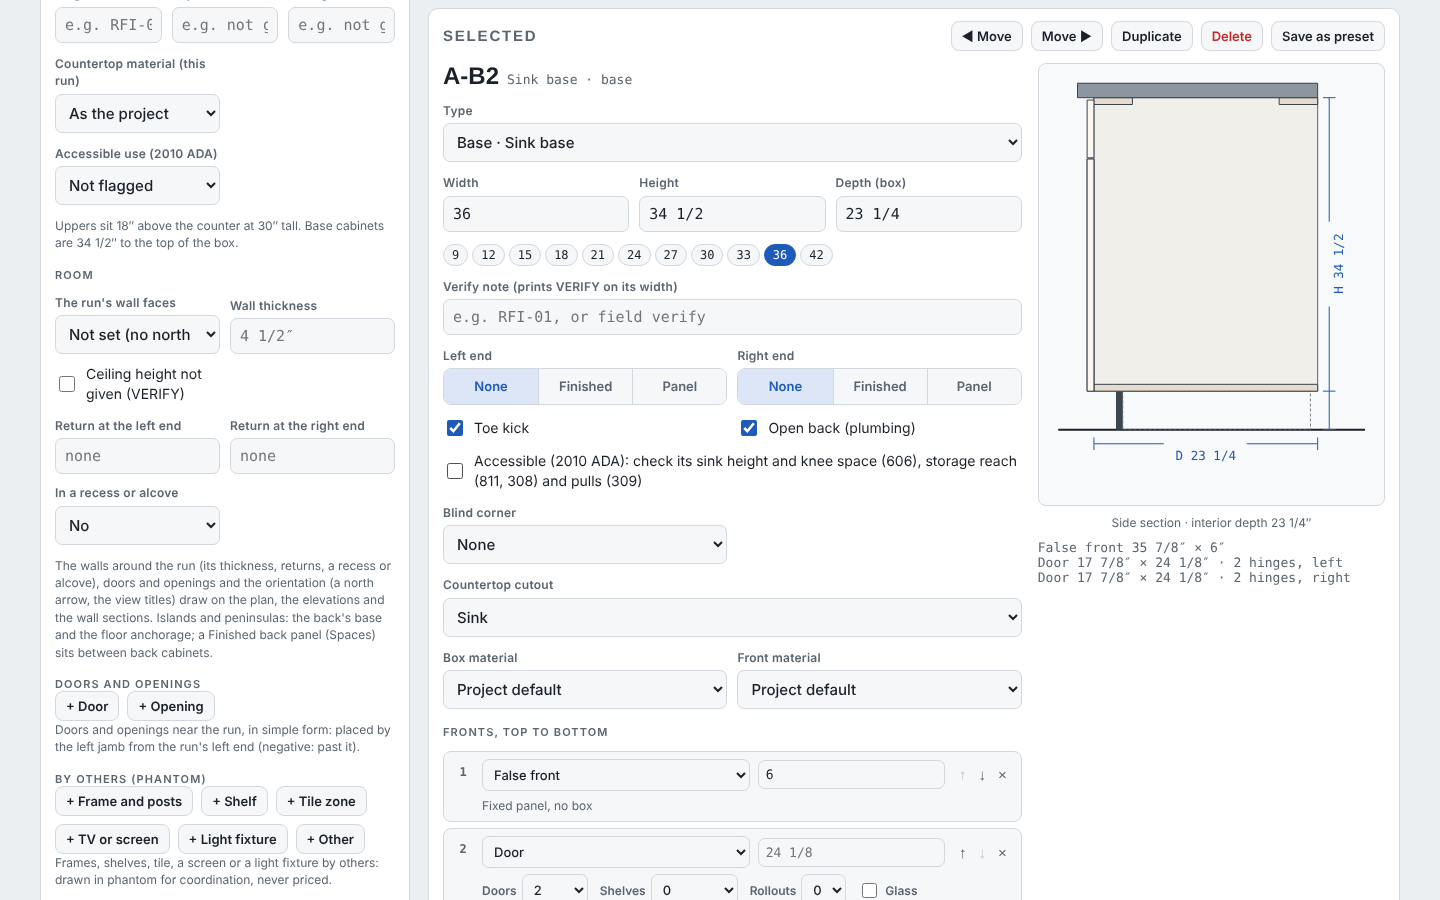
The sink base with its Detail chips
Detail 3 · Countertop edge at the cabinet front, opened from its chip
The Drawing set card: Submittal fields, manufacturer / model, Revisions

The BidRidge quote

Same numbers in the quote

The designer sends its quantities to BidRidge, and BidRidge prices the labor and materials at your rates.

  • Good
    $25,800
  • Better
    $27,700
    Recommended
  • Best
    $30,200
From the designSent to the quote
Cabinets11 · 5 base · 5 wall · 1 tall pantry
Sheets5 sheets · CW-0 cover and index to CW-4 sections and details, 11 × 17
Wall sections3 · pantry · base and light rail · peninsula seating
Details7 · typical, not engineered
GradeAWI Custom · ANSI/AWI 0641-2019
Quote$27,700 · Better, the whole project at the starting rates

The break room sent to a Finish carpentry job in the BidRidge app at its starting rates: the whole project (shop lines, Finish carpentry install, painting). The submittal is not part of it. Your rates give your own numbers.

Try it on your own job

Open the sample, change it to your measurements, and send it to a BidRidge quote. Drawing is free; the drawing set, the lists and the quote come with a BidRidge license or the 14-day trial.

In the designer, tap Open project and pick the sample file. It opens exactly as in the video.

Sample designs: names, sizes and clients are made up. Prices are BidRidge's starting rates; set your own. The designers check against common guidelines (IRC, NKBA and the makers' published numbers) to help you catch mistakes. They don't replace your building department or the manufacturer's installation instructions: verify with them.